目录
1.什么是Spring MVC?
1.1.MVC定义
1.1.1.Model(模型)
1.1.2.View(视图)
1.1.3.Controller(控制器)
1.2.MVC和Spring MVC的关系
2.为什么要学Spring MVC?
3.怎么学Spring MVC?
3.1.Spring MVC创建和连接
3.1.1.创建Spring MVC项目
3.1.2.实现用户和程序的连接
①使用@RequestMapping("/xxx")注解(2种用法)
②@GetMapping("/xxx")注解
③@PostMapping("/xxx")注解
PS:Idea社区版Spring Boot热部署
3.2.获取参数
3.2.1.获取单个参数
3.2.2.获取多个参数
3.2.3.获取对象
3.2.4.获取表单参数/获取多个参数(非对象)
->扩展:后端参数重命名(后端参数映射)
3.2.5.@RequestBody获取JSON对象
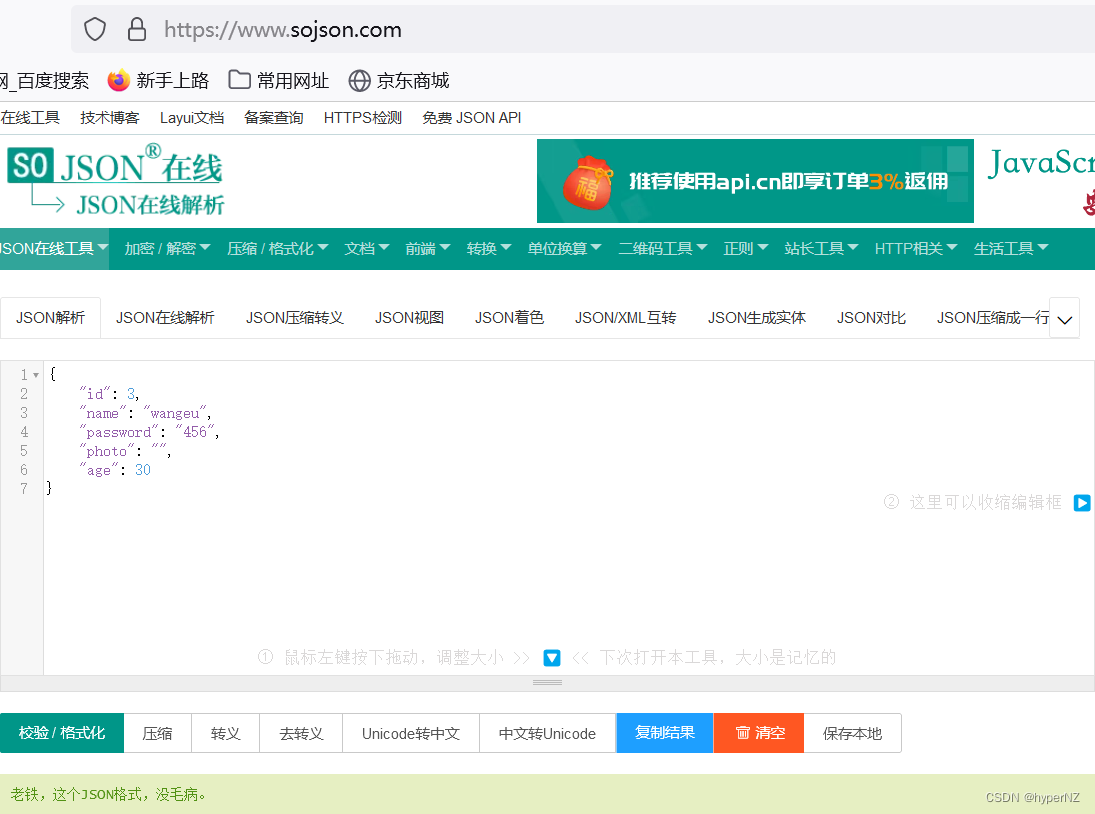
PS:验证是否是标准的JSON字符串->浏览器搜索jsonview(json视图的转换工具)或json格式化
3.2.6.@PathVariable通过URL地址获取参数
3.2.7.@RequestPart获取前端传递的文件
3.2.8.获取前端比较特殊的一类参数Cookie/Session/header
3.3.返回数据
3.3.1.返回静态页面
3.3.2.使用@ResponseBody注解返回非静态页面的数据text/html
3.3.3.返回JSON对象
3.3.4.请求转发或请求重定向
PS:forward(请求转发)和 redirect(请求重定向)的区别:
1.什么是Spring MVC?
Spring MVC是基于MVC设计模式并在Servlet API基础上实现的一个Web框架。
Web框架是基于http协议(里面会封装好Request,Response对象)。
web项目是指服务端部署在服务器上,客户端使用浏览器通过网络传输进行访问获取数据的项目。
Spring MVC也是用来去写后端接口的,实现前后端分离时接口的一个数据提供。它从一开始就包含在Spring框架中(Spring是一个很大的体系,Spring MVC只是属于Spring体系中的一个Web模块,比Spring Boot早很多,但Spring Boot比Spring MVC名气大~介绍项目时多说为Spring Boot)。它的正式名称Spring Web MVC来自其源模块的名称(spring-webmvc)。有2种创建方式:①基于Spring创建(不用了);②基于Spring Boot创建。
1.1.MVC定义
MVC是Model View Controller的缩写,它是软件工程中的一种软件架构模式,它把软件系统分为模型,视图和控制器三个基本部分。

1.1.1.Model(模型)
是应用程序中用于处理应用程序数据逻辑的部分。通常模型对象负责在数据库中存取数据。
1.1.2.View(视图)
是应用程序中处理数据显示的部分,通常视图是依据模型数据创建的。
1.1.3.Controller(控制器)
是应用程序中处理⽤户交互的部分。通常控制器负责从视图读取数据,控制⽤户输⼊,并向模型发送数据。
1.2.MVC和Spring MVC的关系
MVC是一种思想,而Spring MVC是对MVC思想的具体实现。
二者之间的关系,就像是IoC(控制反转-思想)和DI(依赖注入-具体实现)之间的关系。
2.为什么要学Spring MVC?
目前几乎企业里所有的Java项目都是基于Spring/Spring Boot的,而Spring Boot是Spring的脚手架,Spring MVC是Spring的核心模块,Spring MVC是Spring/Spring Boot项目的基础。因此现在市面上绝大部分的Java项目约等于Spring MVC项目,这就是为什么要学的原因。
3.怎么学Spring MVC?
目标:需要掌握3个功能:
①连接功能:当用户通过浏览器输入一个url地址,将用户(浏览器)和Java程序连接起来,也就是访问一个url地址能够调用匹配到Spring程序中的某个方法。
②获取参数功能:用户访问的时候会带一些参数(用户名,密码等),在程序中要想办法获取到前端的请求参数。
③返回数据功能:执行了业务逻辑数据处理之后,要把服务器端程序执行的结果返回给前端(用户)。
这样就实现了用户与服务器的一次交互。
3.1.Spring MVC创建和连接
3.1.1.创建Spring MVC项目
当Spring MVC使用Spring Boot的方式创建时,二者的创建项目步骤相同。
在创建Spring Boot项目时勾选上Spring Web模块就相当于基于Spring Boot创建了Spring MVC项目。
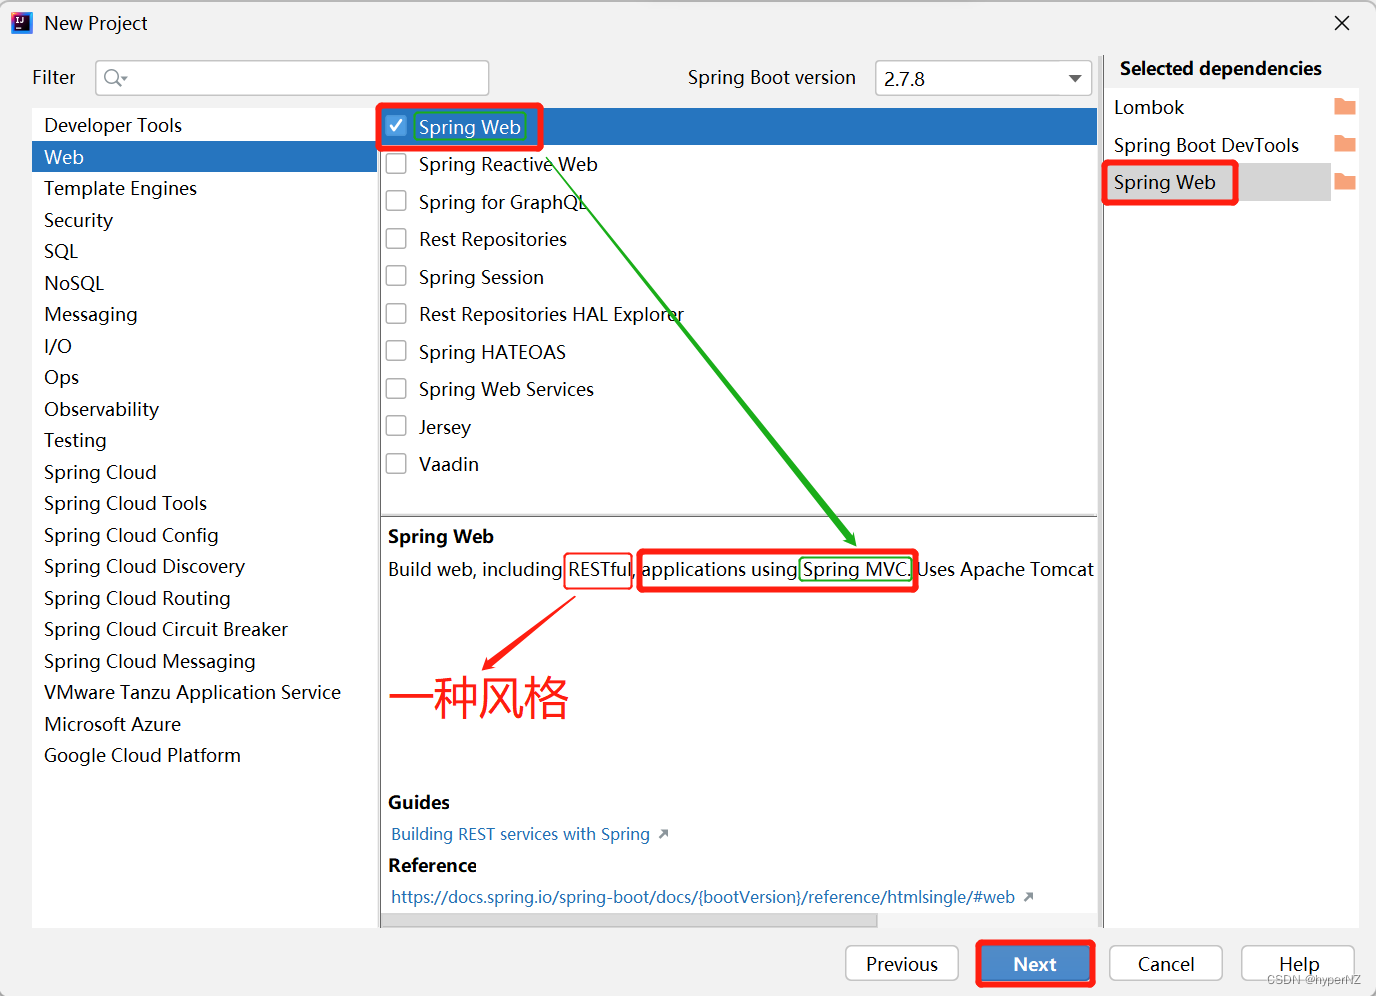
大多数场景下:Spring Boot >= Spring Web == Spring MVC。
介绍时若说SSM项目->即Spring Boot + Spring MVC + Mybatis。
若说SM项目->即Spring Boot + Mybatis。
3.1.2.实现用户和程序的连接
①使用@RequestMapping("/xxx")注解(2种用法)
@RequestMapping("/xxx")用来注册接口的路由映射(路由映射:当用户访问一个url("/xxx"前面一定要加"/",url在Windows上不区分大小写,在Linux上区分大小写。那么写时一律小写,若有多个单词之间用"-"分割)时,将用户的请求对应到程序中某个类的某个方法的过程)。
@RequestMapping既可修饰类,也可修饰方法,不可单独修饰类,可直接修饰方法。当修饰类和方法时,访问的地址是类+方法。
import org.springframework.stereotype.Controller;
import org.springframework.web.bind.annotation.RequestMapping;
import org.springframework.web.bind.annotation.ResponseBody;

@Controller
@RequestMapping("/user")
public class UserController {

    @RequestMapping("/sayhi") //路由映射(用户和程序的连接)
    @ResponseBody //当前方法返回的是一个非静态页面的数据,可以放在方法上也可以放在类上
    public String sayHi() {
        return "Hello, Spring MVC";
    }

}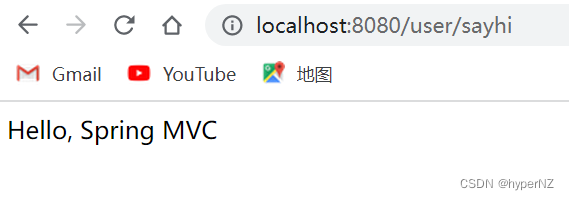
localhost表示本地回环地址,它能访问当前电脑,访问不了云服务器(在公网/外网)。
import org.springframework.stereotype.Controller;
import org.springframework.web.bind.annotation.RequestMapping;
import org.springframework.web.bind.annotation.ResponseBody;

@Controller
@ResponseBody //当前类返回的是一个非静态页面的数据,可以放在方法上也可以放在类上
public class UserController {

    @RequestMapping("/sayhi") //路由映射(用户和程序的连接)
    public String sayHi() {
        return "Hello, Spring MVC";
    }

}
默认情况下(不设置method),@RequestMapping既支持GET方式请求(默认的),又支持POST方式请求......。
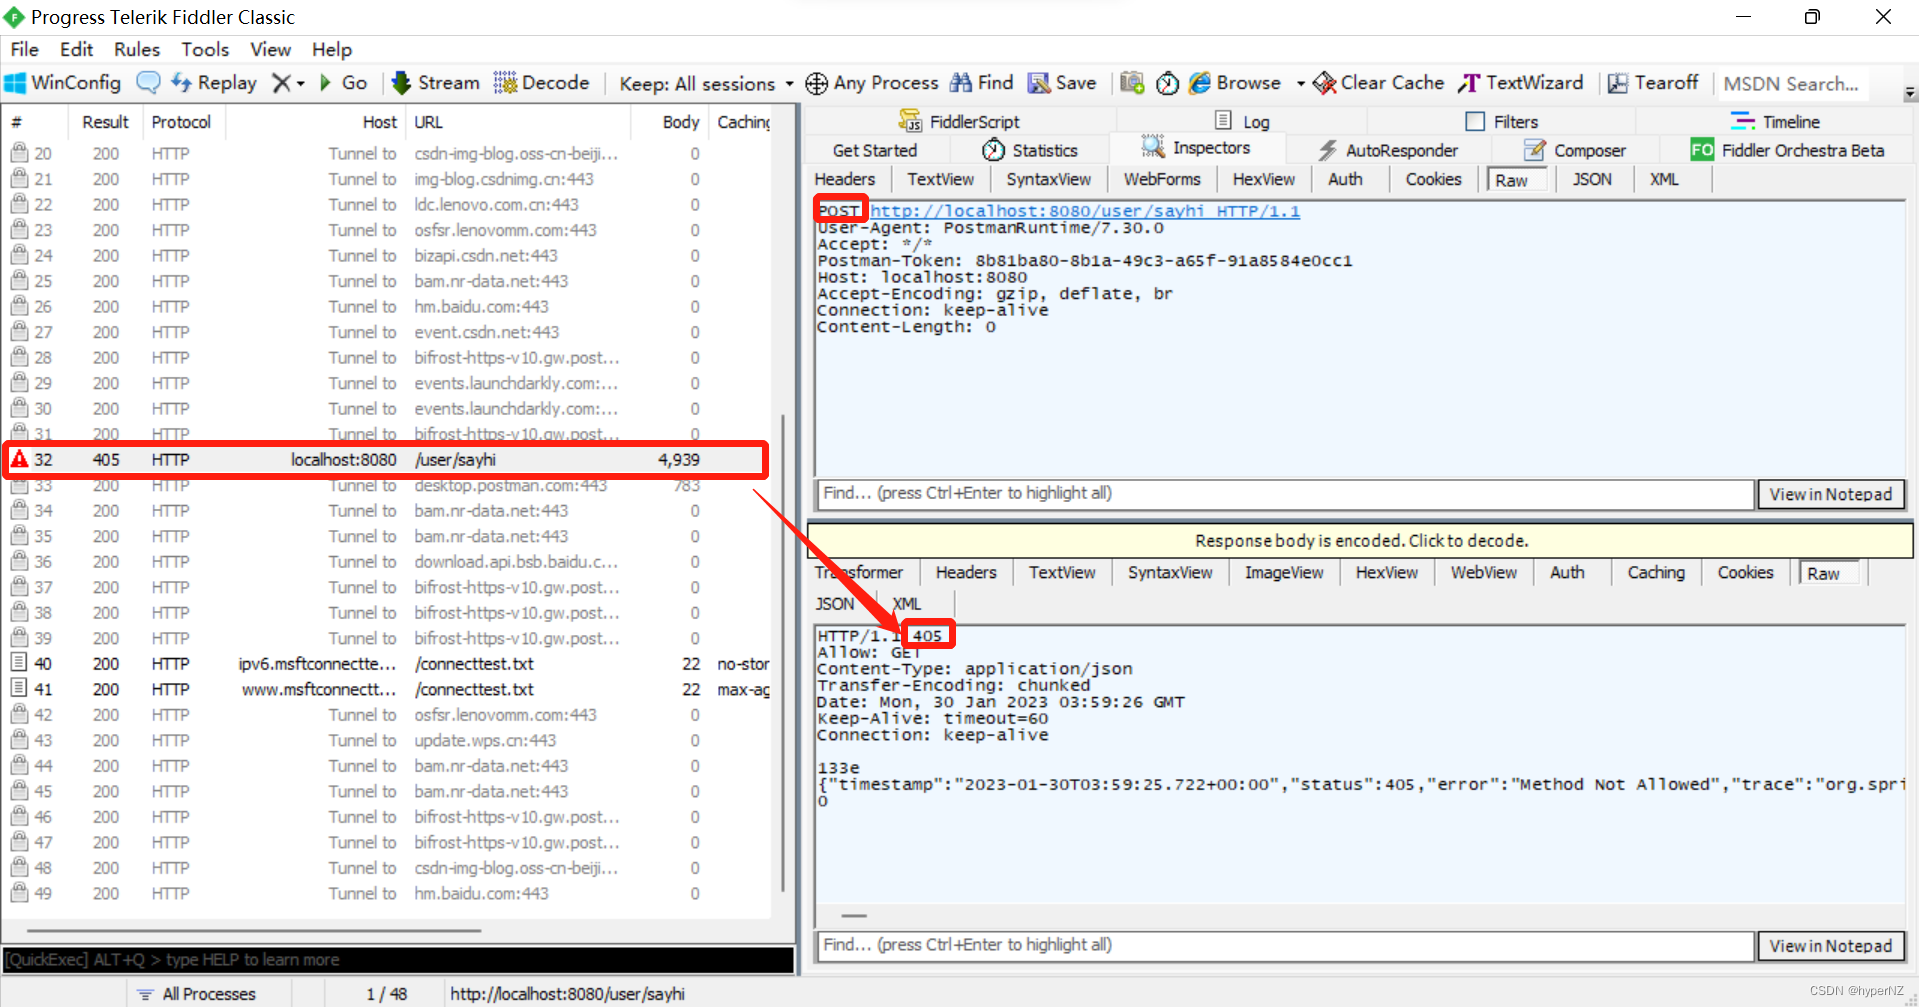
用Fiddler抓包来看一下请求和返回的格式:

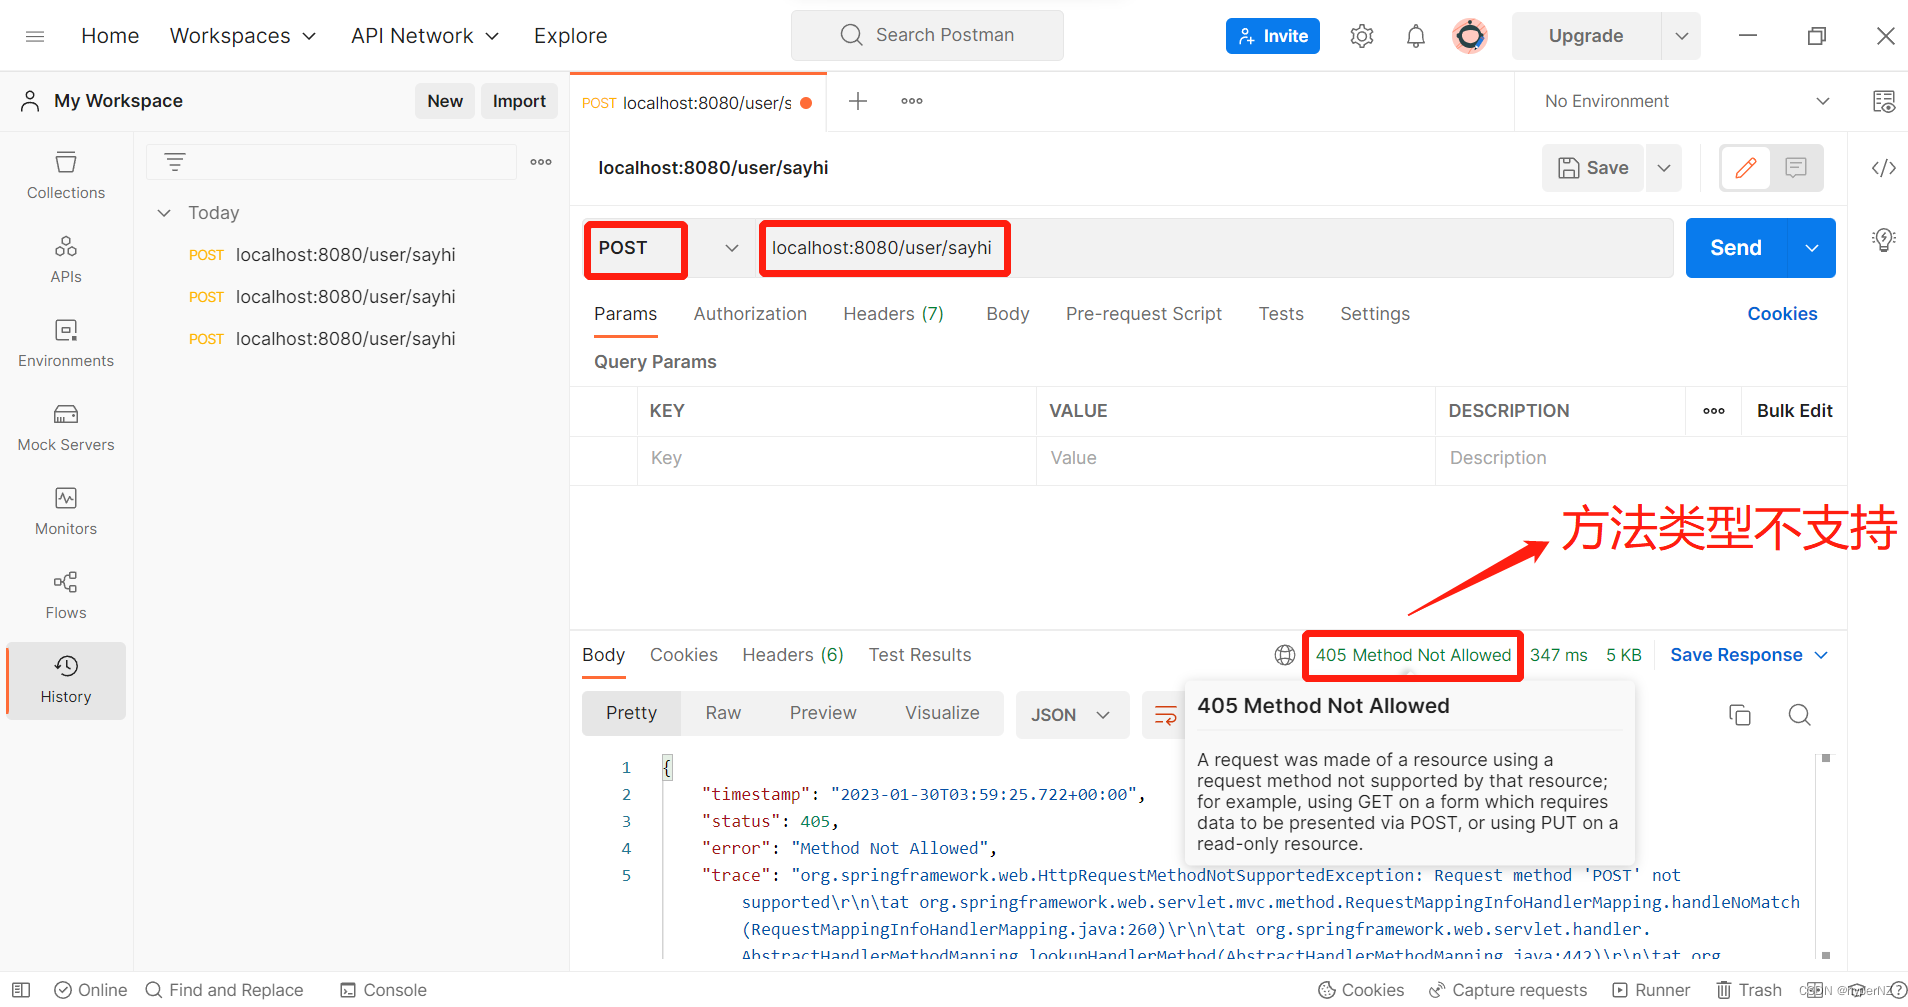
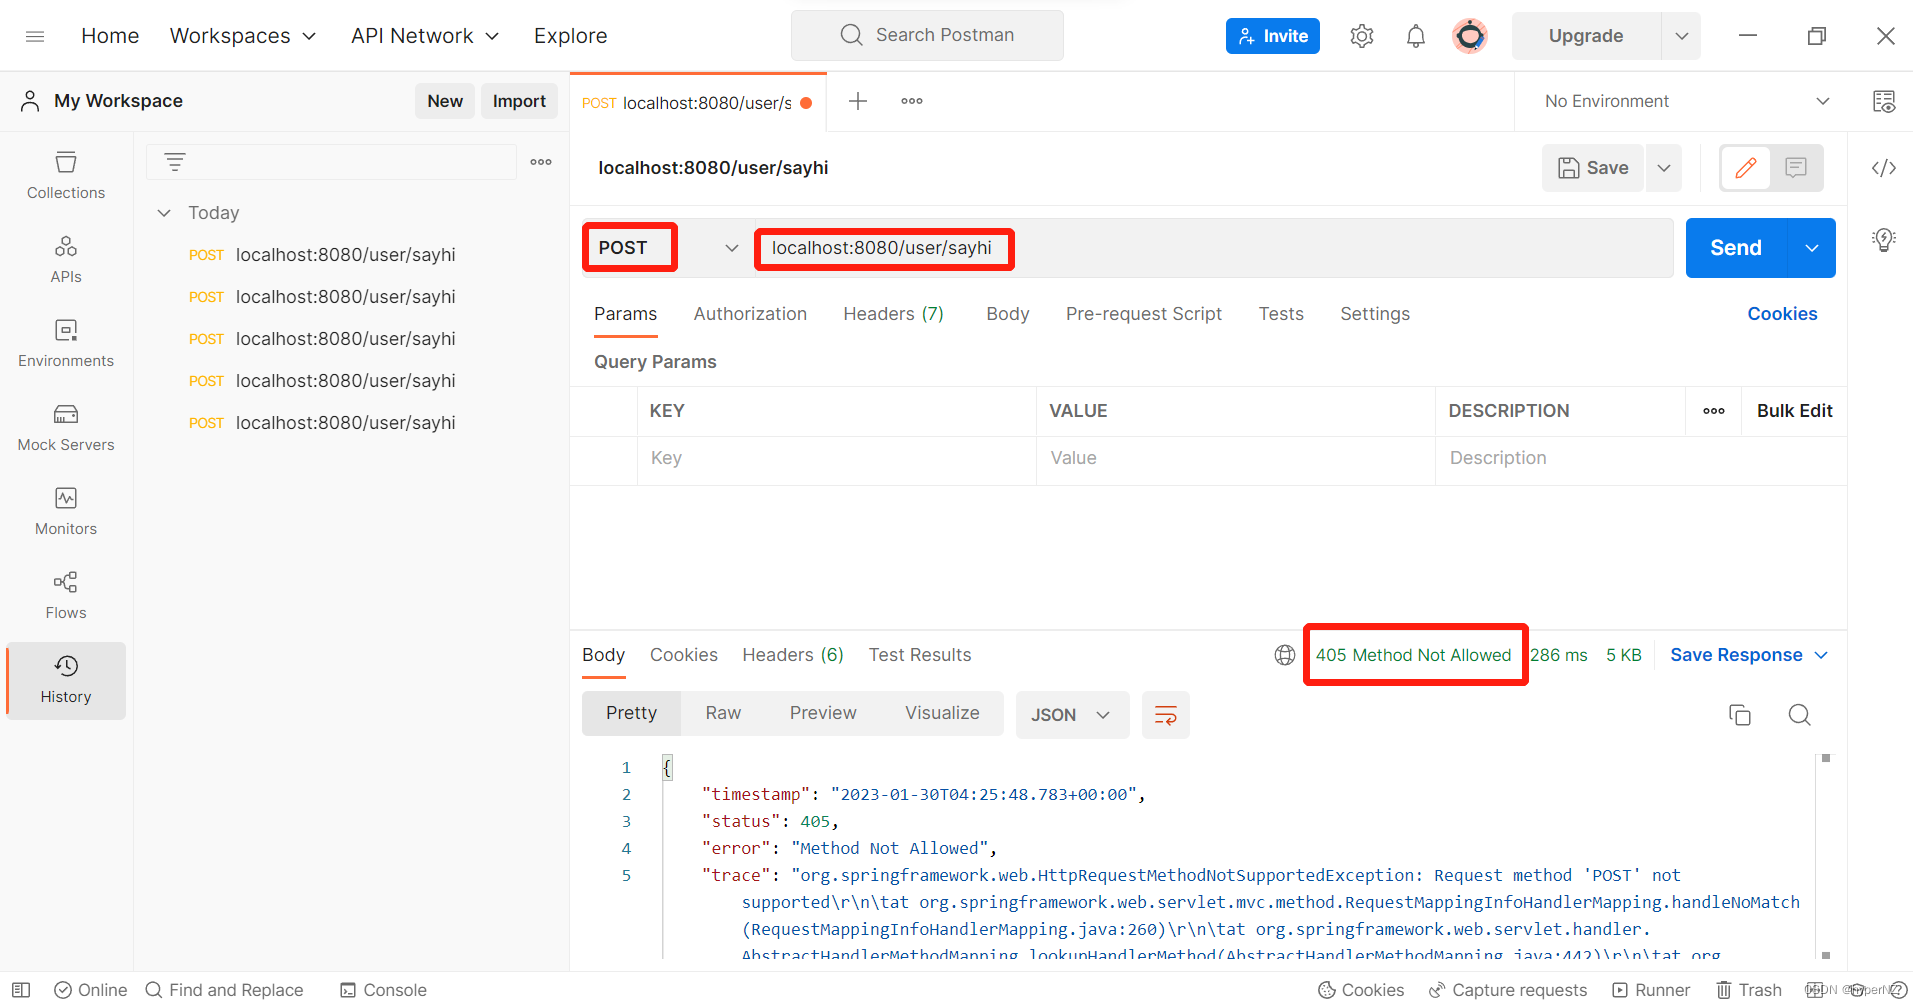
通过POST方式是否也可以呢?利用Postman来模拟尝试一下:
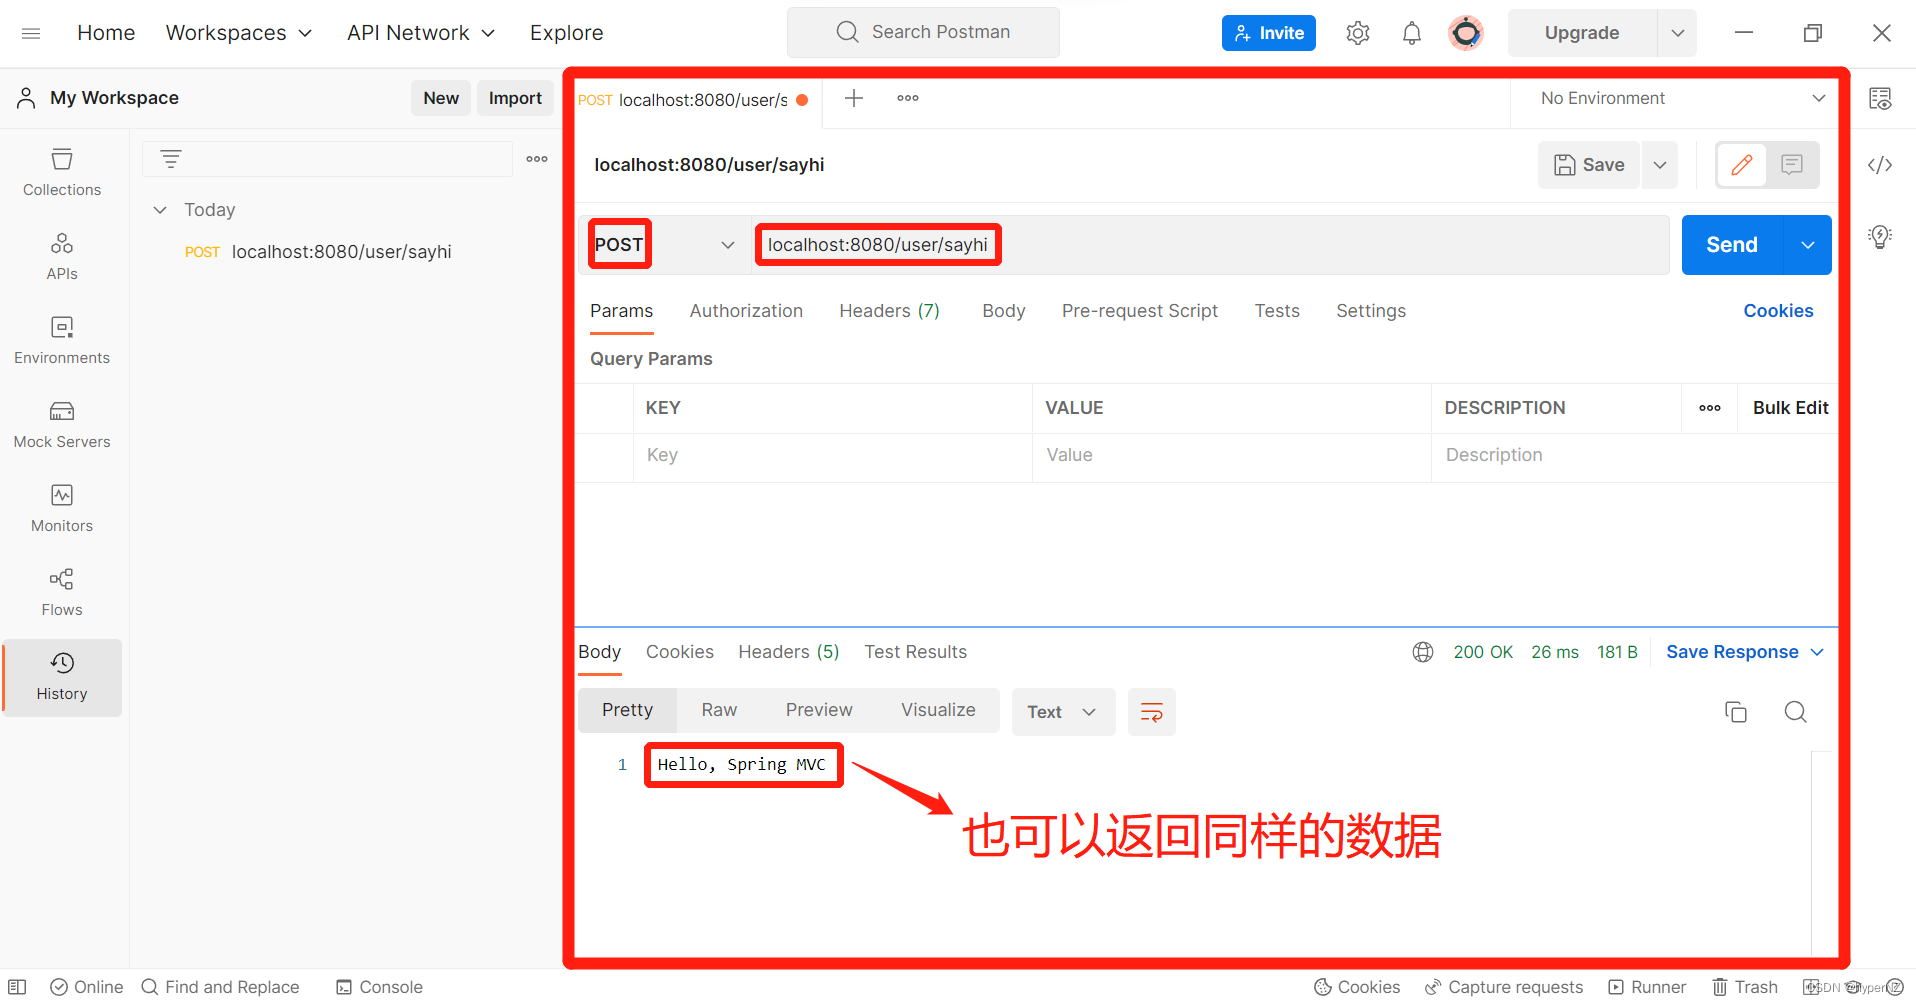

需求:让/user/sayhi方法只能支持GET方式请求,不能支持POST方式请求。
@RequestMapping中包含很多参数:
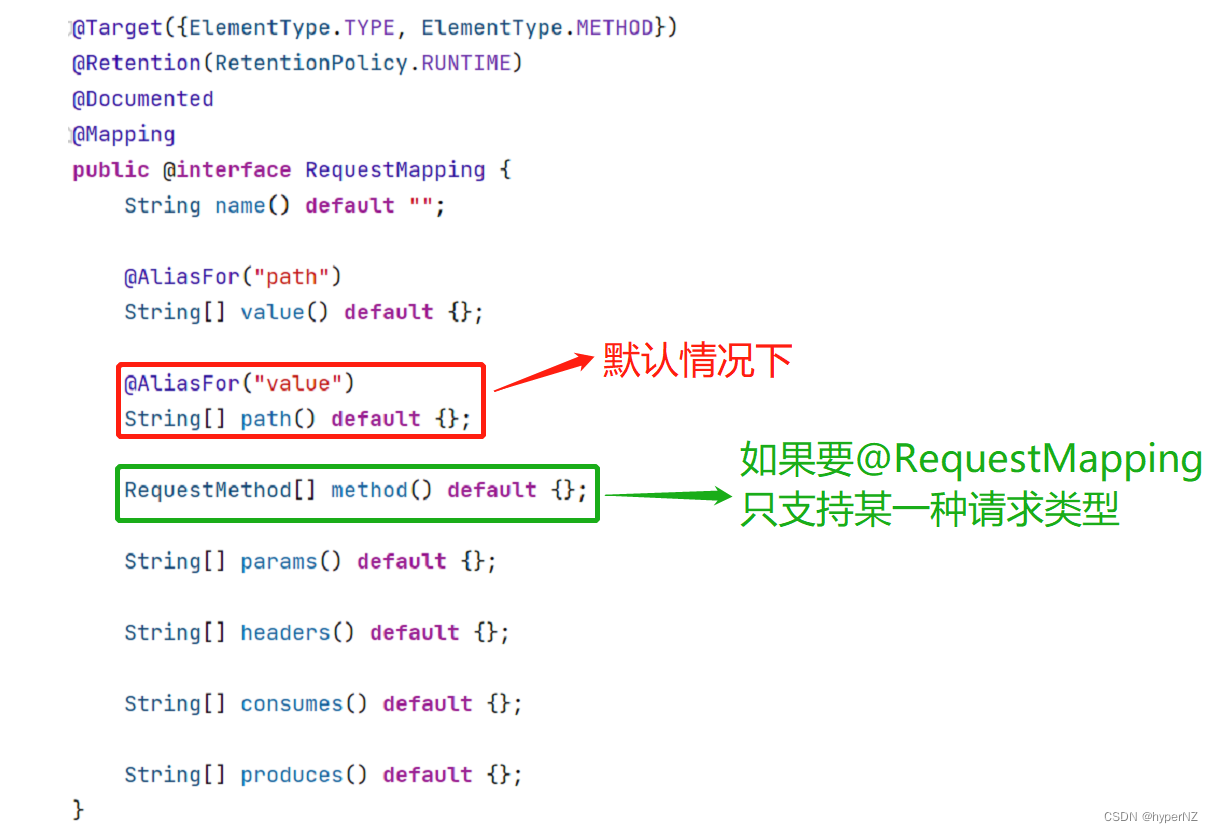
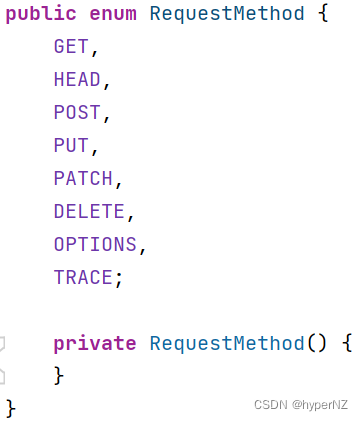 枚举
枚举
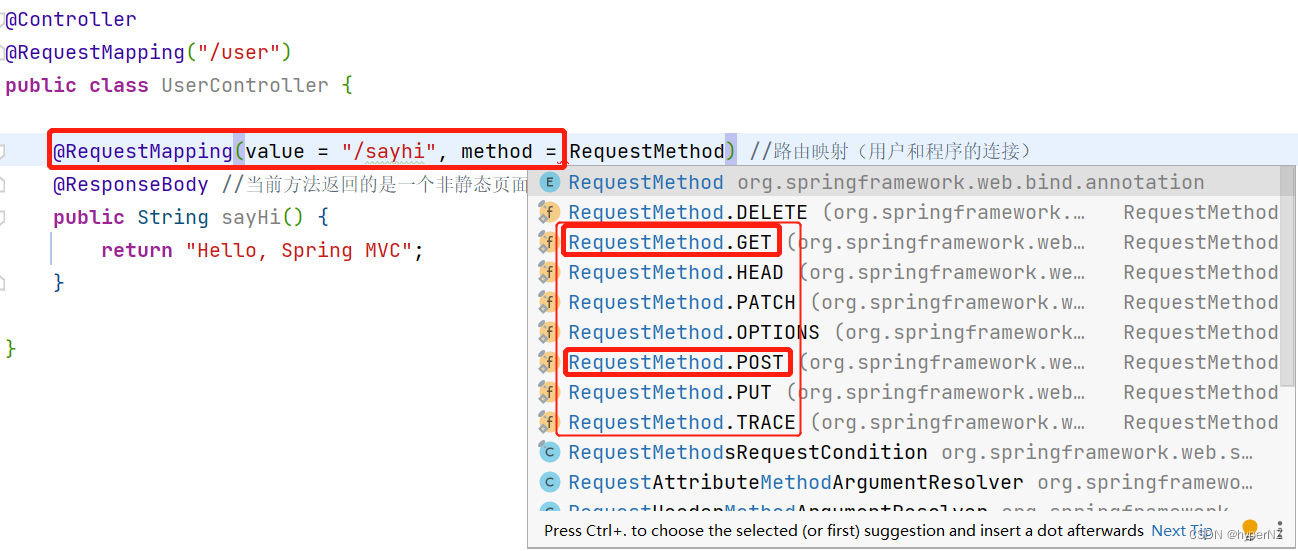
import org.springframework.stereotype.Controller;
import org.springframework.web.bind.annotation.RequestMapping;
import org.springframework.web.bind.annotation.RequestMethod;
import org.springframework.web.bind.annotation.ResponseBody;

@Controller
@RequestMapping("/user")
public class UserController {
    //表示此方法只支持GET类型的请求
    @RequestMapping(value = "/sayhi", method = RequestMethod.GET)
    @ResponseBody
    public String sayHi() {
        return "Hello, Spring MVC";
    }
}
使用Postman模拟POST请求:
②@GetMapping("/xxx")注解
表示此方法只支持GET类型的请求。
import org.springframework.stereotype.Controller;
import org.springframework.web.bind.annotation.GetMapping;
import org.springframework.web.bind.annotation.RequestMapping;
import org.springframework.web.bind.annotation.ResponseBody;

@Controller
@RequestMapping("/user")
public class UserController {
    //表示此方法只支持GET类型的请求
    @GetMapping("/sayhi")
    @ResponseBody
    public String sayHi2() {
        return "Hello, Spring MVC2";
    }
}
浏览器默认是GET请求。
③@PostMapping("/xxx")注解
表示此方法只支持POST类型的请求。
import org.springframework.stereotype.Controller;
import org.springframework.web.bind.annotation.PostMapping;
import org.springframework.web.bind.annotation.RequestMapping;
import org.springframework.web.bind.annotation.ResponseBody;

@Controller
@RequestMapping("/user")
public class UserController {
    //表示此方法只支持POST类型的请求
    @PostMapping("/sayhi")
    @ResponseBody
    public String sayHi3() {
        return "Hello, Spring MVC3";
    }
}
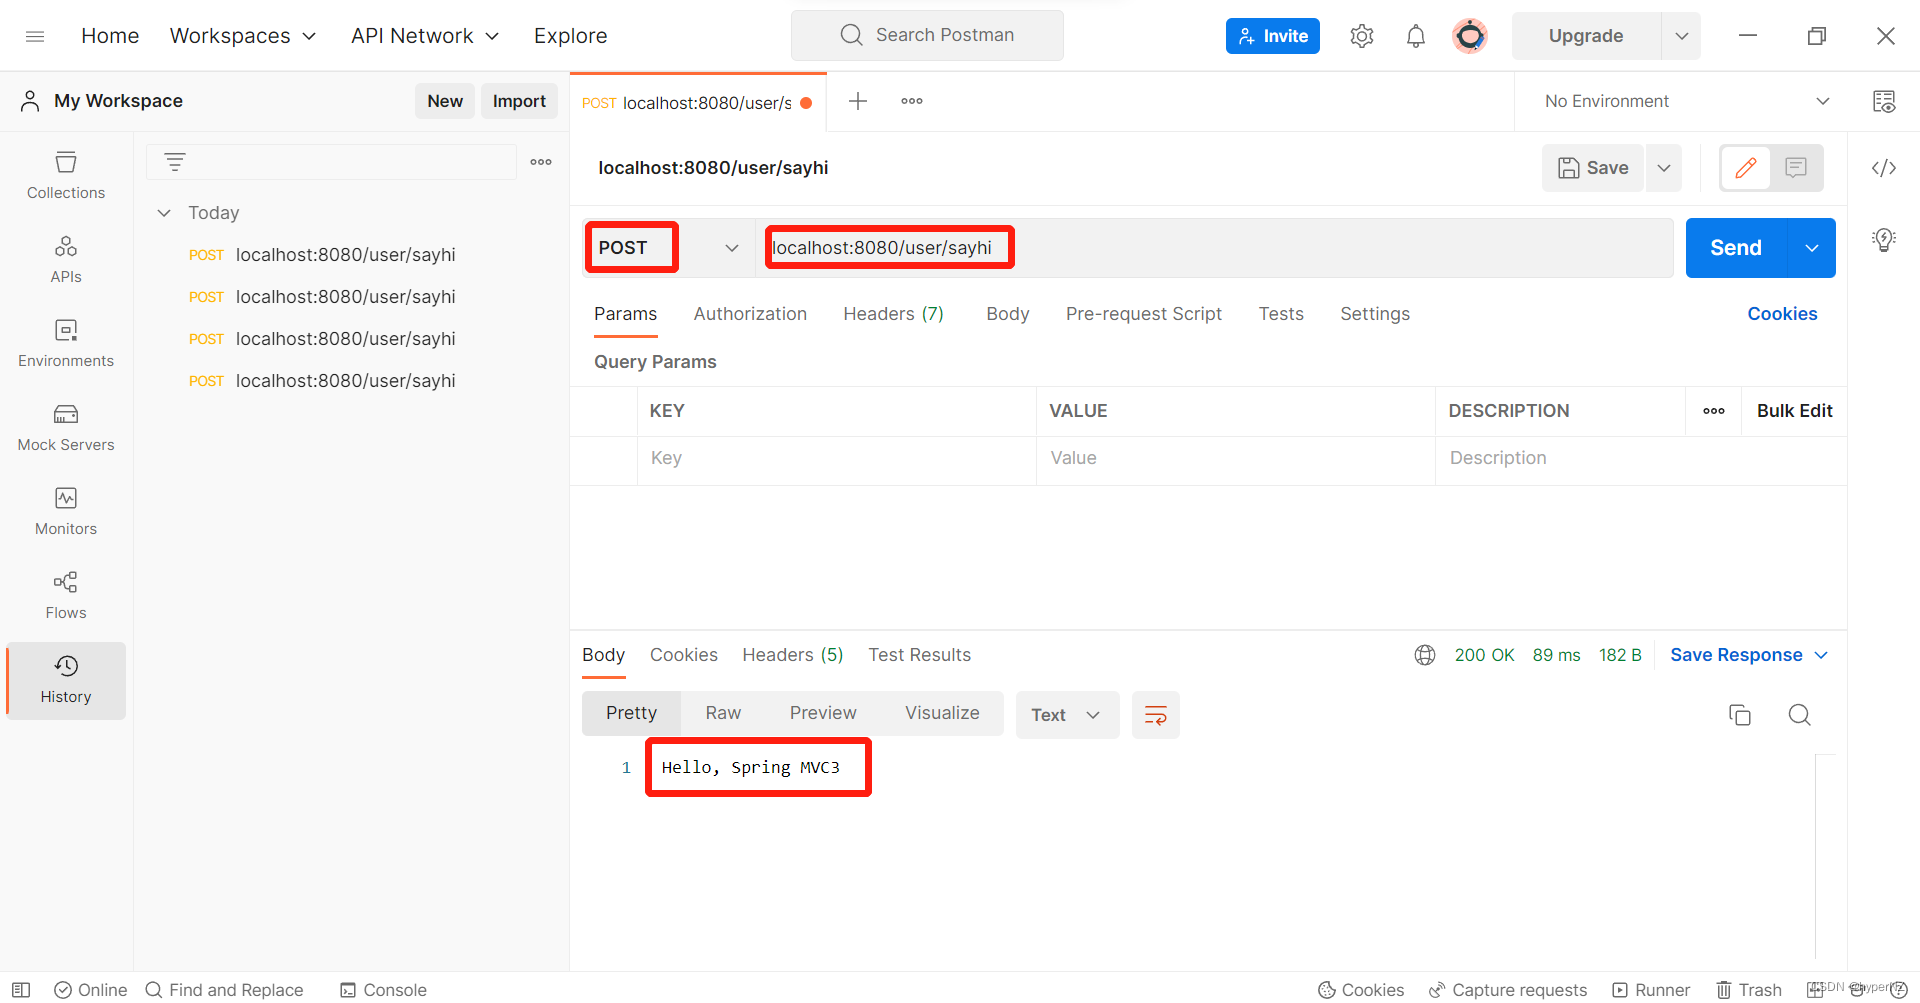
小结:
GET请求的3种写法:
@RequestMapping("/sayhi")
@RequestMapping(value = "/sayhi", method = RequestMethod.GET)
@GetMapping("/sayhi")
@RequestMapping("/sayhi")
@RequestMapping(value = "/sayhi", method = RequestMethod.GET)
@GetMapping("/sayhi")
POST请求的2种写法:
@RequestMapping(value = "/sayhi", method = RequestMethod.POST)
@PostMapping("/sayhi")
PS:Idea社区版Spring Boot热部署
当项目中代码发生变动后,Idea会自动监测到(3s左右),进而帮我们重启运行代码以达到自动更新的目的。我们自己不用管。
Step1:添加热部署框架支持spring-boot-devtools
作用域:只在运行阶段起作用。
<dependency>
	<groupId>org.springframework.boot</groupId>
	<artifactId>spring-boot-devtools</artifactId>
	<scope>runtime</scope>
	<optional>true</optional>
</dependency>
①创建项目时就将其加进来;②在原项目中右键Generate->Edit Starters的方式添加。
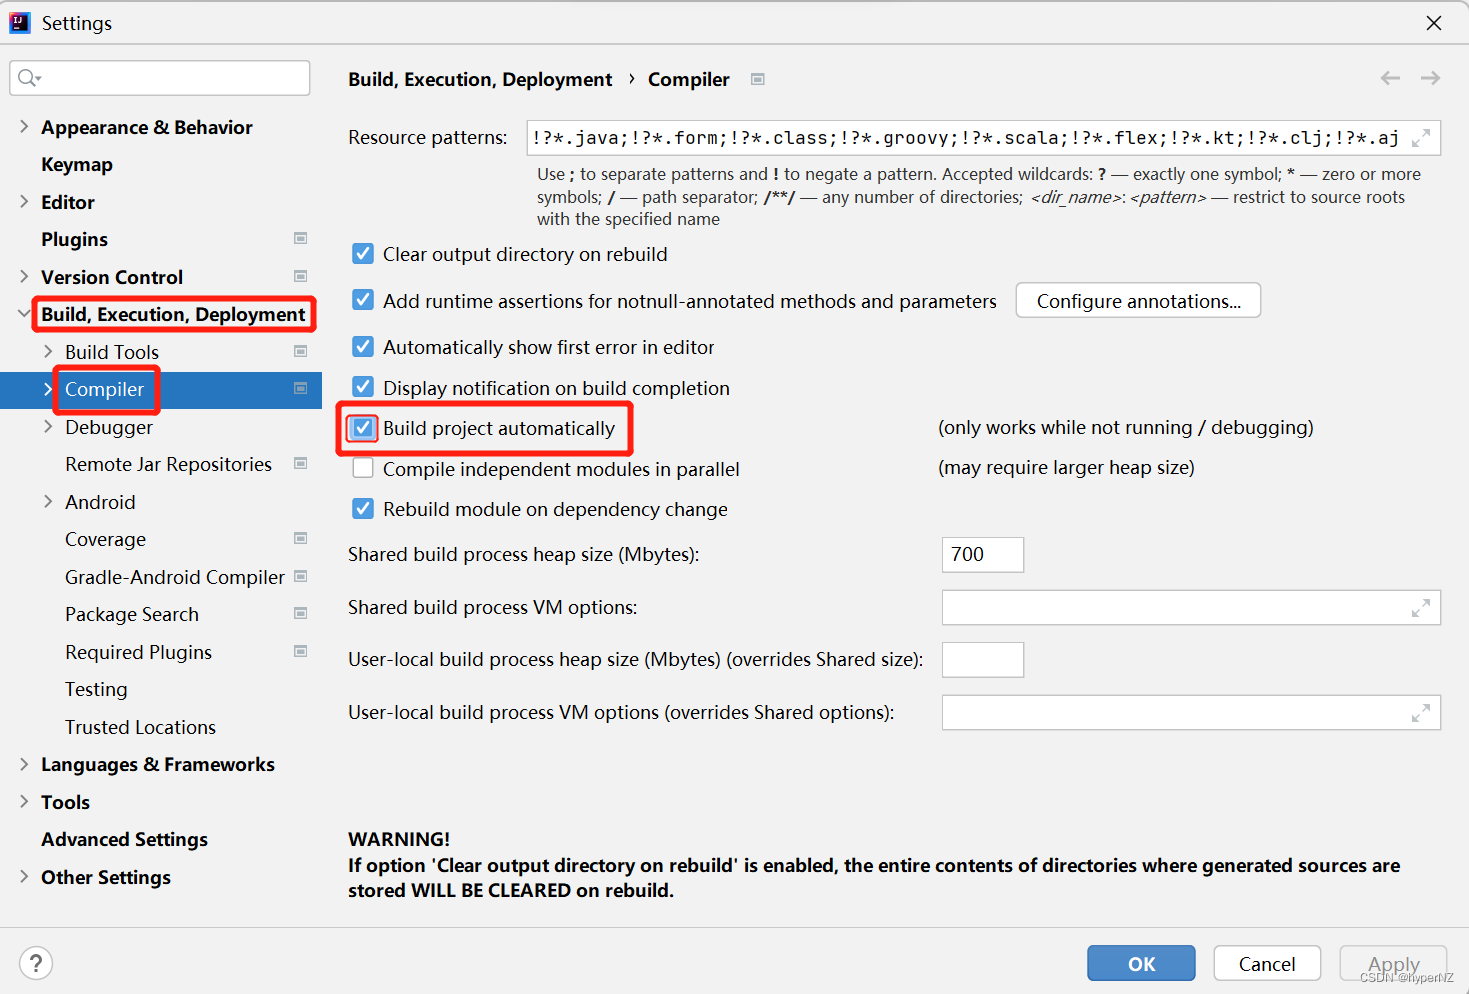
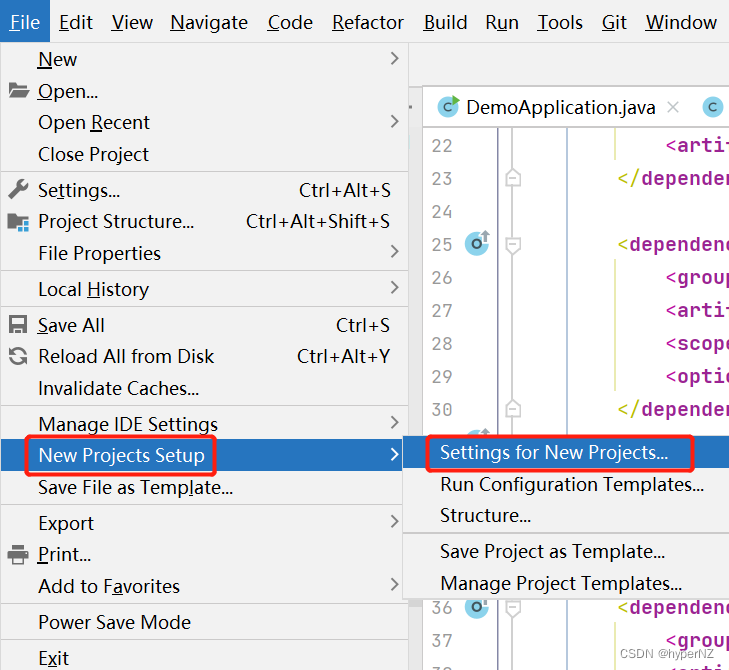
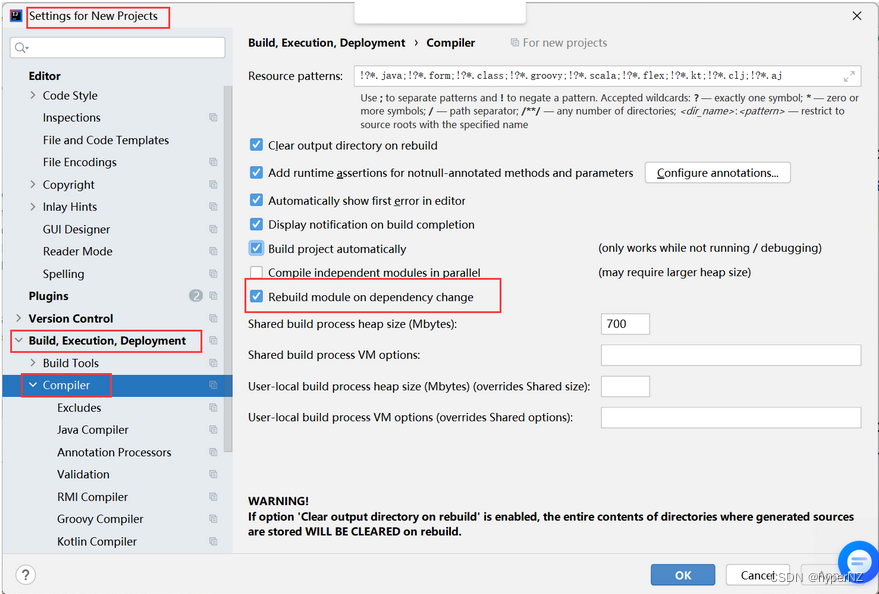
Step2:设置开启项目自动编译
设置当前项目:
设置新项目:
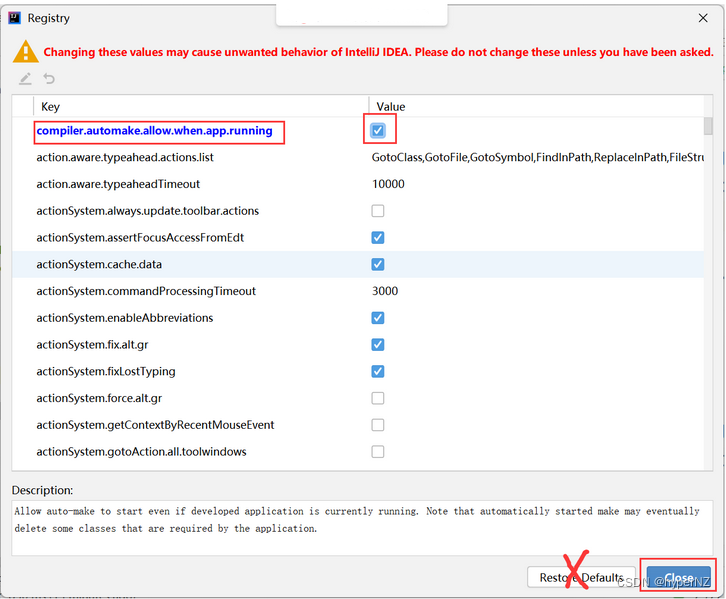
Step3:开启运行中热部署
老版本:
新版本:2021.2之后的idea版本
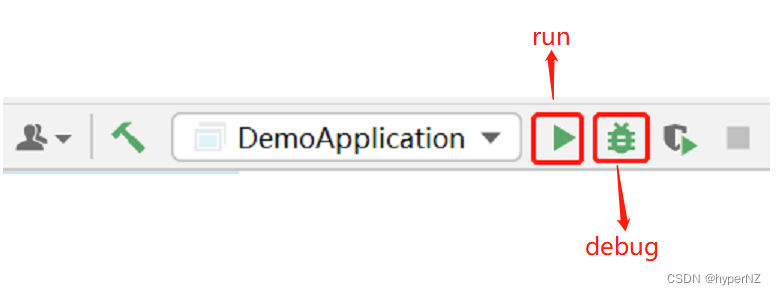
Step4:使用debug运行,不要用run。
3.2.获取参数
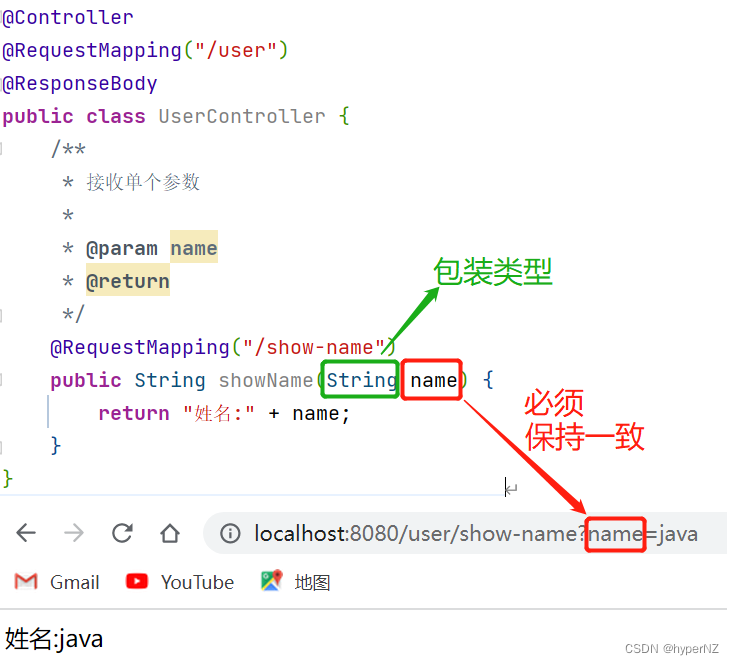
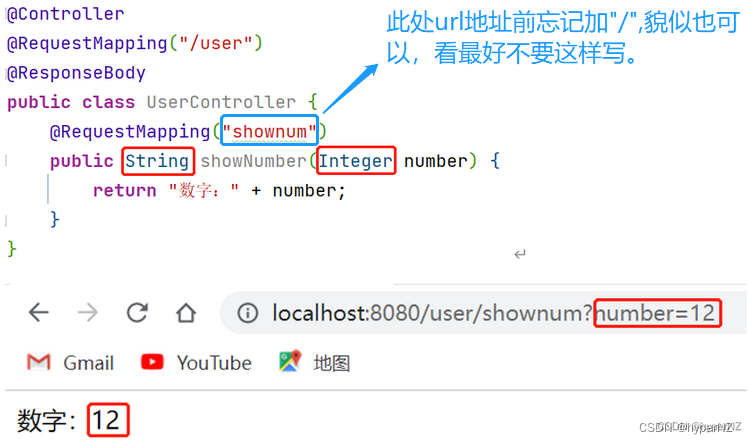
参数获取都是包装类型(可以接收null),不会因为没有传递参数而报错,不会出现500的情况。
不可以是基本类型,会报错。
3.2.1.获取单个参数
import org.springframework.stereotype.Controller;
import org.springframework.web.bind.annotation.RequestMapping;
import org.springframework.web.bind.annotation.ResponseBody;

@Controller
@RequestMapping("/user")
@ResponseBody
public class UserController {
    /**
     * 接收单个参数
     *
     * @param name
     * @return
     */
    @RequestMapping("/show-name")
    public String showName(String name) {
        return "姓名:" + name;
    }
}
不用类型转换。
import org.springframework.stereotype.Controller;
import org.springframework.web.bind.annotation.RequestMapping;
import org.springframework.web.bind.annotation.ResponseBody;

@Controller
@RequestMapping("/user")
@ResponseBody
public class UserController {
    @RequestMapping("/shownum")
    public String showNumber(Integer number) {
        return "数字:" + number;
    }
}
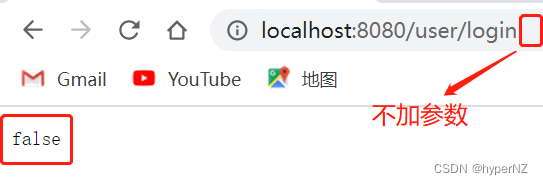
3.2.2.获取多个参数
import org.springframework.stereotype.Controller;
import org.springframework.util.StringUtils;
import org.springframework.web.bind.annotation.RequestMapping;
import org.springframework.web.bind.annotation.ResponseBody;

@Controller
@RequestMapping("/user")
@ResponseBody
public class UserController {
    @RequestMapping("/login")
    public boolean islogin(String name, String password) {
        boolean result = false;
        //非空效验
//        if(name != null && !name.equals("") && password != null && !password.equals("")) {
//
//        }
        if(StringUtils.hasLength(name) && StringUtils.hasLength(password) && name.equals("admin") && password.equals("admin")) {
             return true;
        }
        return result;
    }
}


3.2.3.获取对象
Spring MVC可以自动实现参数对象的赋值,框架会帮助将此对象的所有属性进行填充。
定义实体类:
import lombok.Data;

@Data //一系列方法的组合
public class UserInfo {
    private int id;
    private String name;
    private int age;
    private String password;
    private String photo;
}
import com.example.demo.model.UserInfo;
import org.springframework.stereotype.Controller;
import org.springframework.web.bind.annotation.RequestMapping;
import org.springframework.web.bind.annotation.ResponseBody;
@Controller
@RequestMapping("/user")
@ResponseBody
public class UserController {
@RequestMapping("/reg")
public UserInfo reg(UserInfo userInfo) {
return userInfo;
}
}
POST格式也是一样:


3.2.4.获取表单参数/获取多个参数(非对象)
和3.2.2.获取多个参数一样,注意:当有多个参数,前后端进行参数匹配时,是以参数的名称来进行匹配的,因此参数的位置是不影响后端获取参数的结果的。
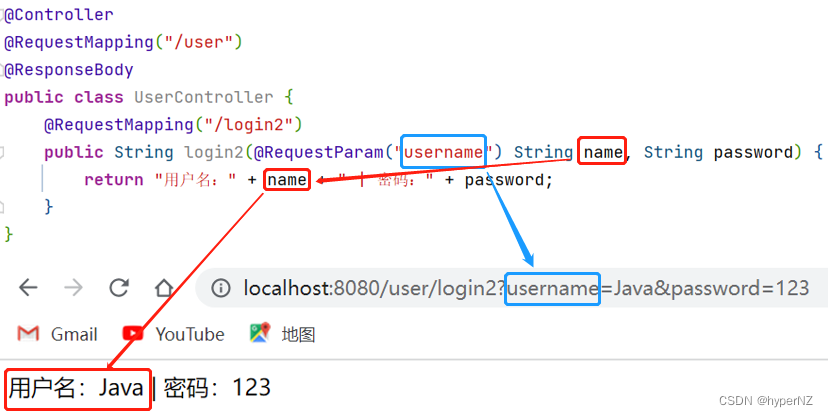
->扩展:后端参数重命名(后端参数映射)
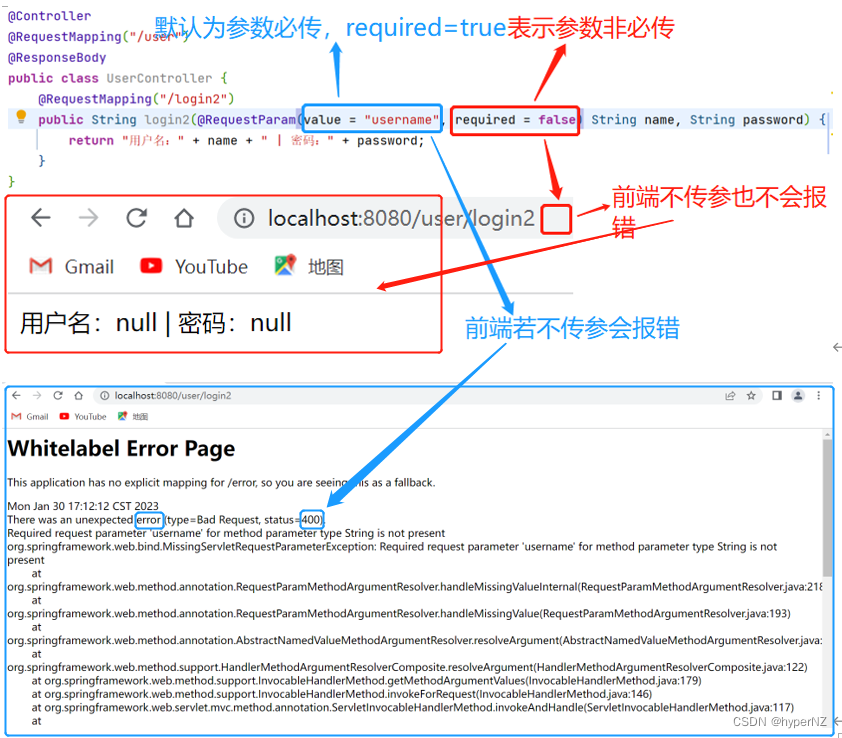
某些特殊的情况下,前端传递的参数 key 和我们后端接收的 key 可以不⼀致,⽐如前端传递了⼀个time 给后端,⽽后端⼜是有 createtime 字段来接收的,这样就会出现参数接收不到的情况,如果出现 这种情况,我们就可以使⽤ @RequestParam 来重命名前后端的参数值。@RequestParam("xxx") 类型 yyy -> 将前端的xxx重命名为后端的yyy。import org.springframework.stereotype.Controller; import org.springframework.web.bind.annotation.RequestMapping; import org.springframework.web.bind.annotation.RequestParam; import org.springframework.web.bind.annotation.ResponseBody; @Controller @RequestMapping("/user") @ResponseBody public class UserController { @RequestMapping("/login2") public String login2(@RequestParam("username") String name, String password) { return "用户名:" + name + " | 密码:" + password; } }
3.2.5.@RequestBody获取JSON对象
之前的Postman在传递JSON对象时:

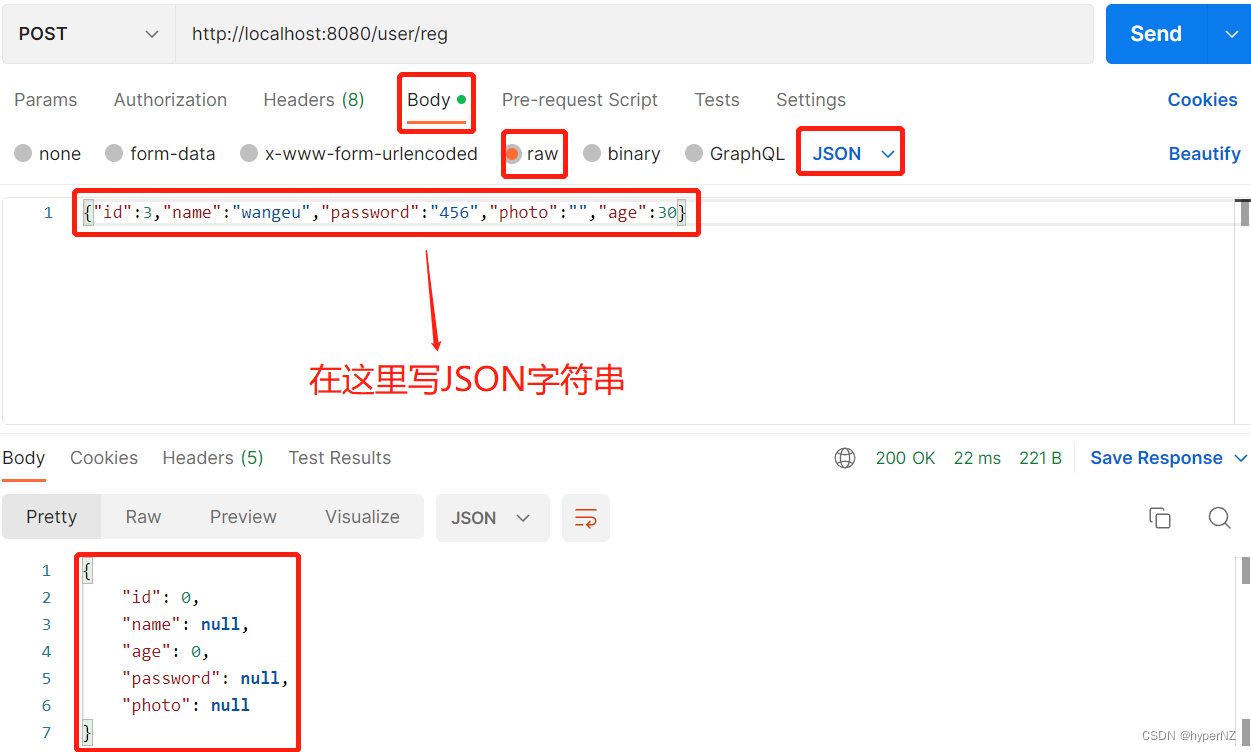
PS:验证是否是标准的JSON字符串->浏览器搜索jsonview(json视图的转换工具)或json格式化
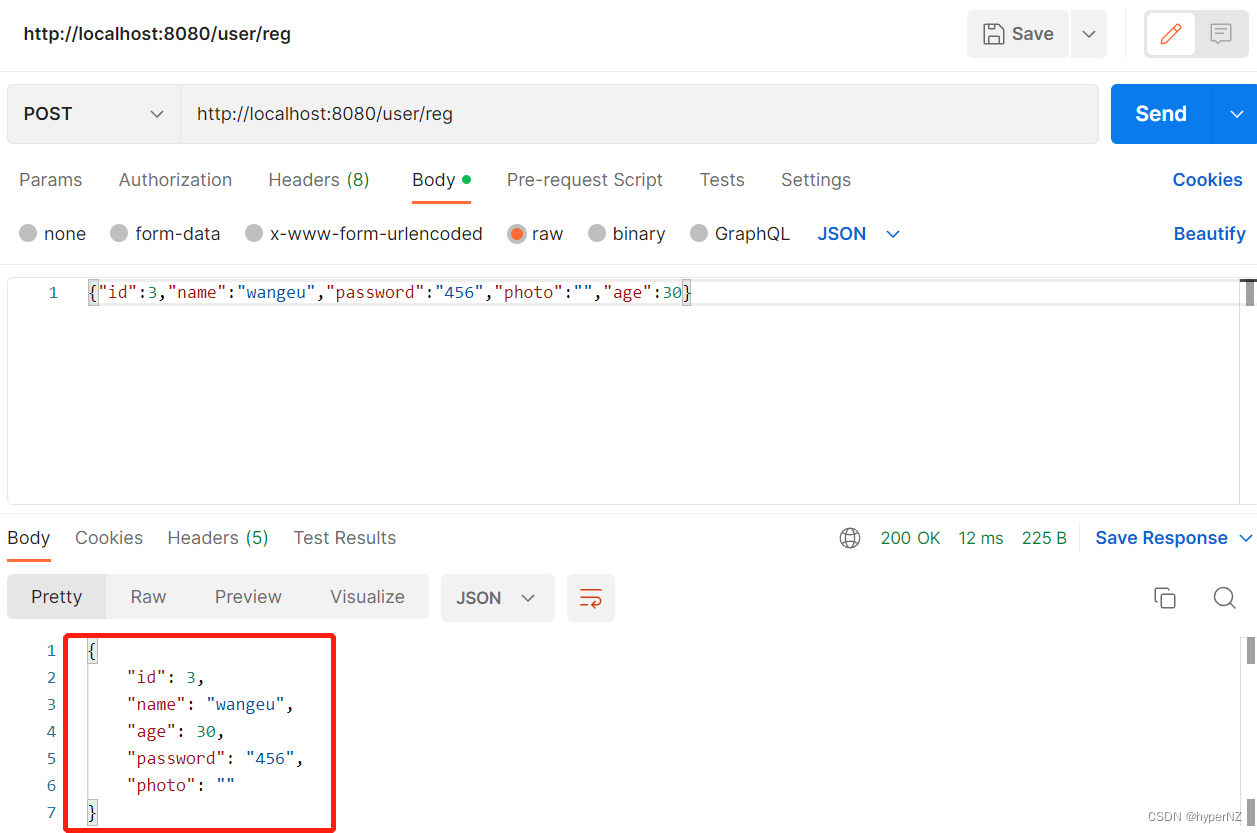
得不到JSON对象。 so~要用@RequestBody获取JSON对象。
import com.example.demo.model.UserInfo;
import org.springframework.stereotype.Controller;
import org.springframework.web.bind.annotation.RequestBody;
import org.springframework.web.bind.annotation.RequestMapping;
import org.springframework.web.bind.annotation.ResponseBody;

@Controller
@RequestMapping("/user")
@ResponseBody
public class UserController {
    @RequestMapping("/reg")
    public UserInfo reg(@RequestBody UserInfo userInfo) {
        return userInfo;
    }
}
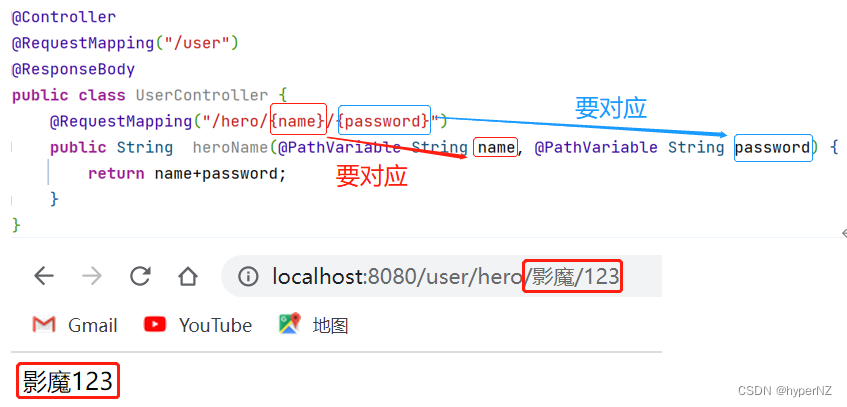
3.2.6.@PathVariable通过URL地址获取参数
出现在传统网站里,为了提高搜索(某个内容比如json)排名权限,在url中存在一次/多次(该内容如json)。这种方式比在url中以"?"之后的传参要有效得多。
import org.springframework.stereotype.Controller;
import org.springframework.web.bind.annotation.PathVariable;
import org.springframework.web.bind.annotation.RequestMapping;
import org.springframework.web.bind.annotation.ResponseBody;

@Controller
@RequestMapping("/user")
@ResponseBody
public class UserController {
    @RequestMapping("/hero/{name}/{password}")
    public String  heroName(@PathVariable String name, @PathVariable String password) {
        return name+password;
    }
}
3.2.7.@RequestPart获取前端传递的文件
文件可以是任意类型,mp3,mp4,img......(图片最多)
关键实现步骤:
1).接收前端传递的文件:
@RequestPart("filename")MultipartFile file
//@RequestPart("filename")从前端获取一个文件名为filename(必须与前端给的名字一致)的对象
//MultipartFile专门用来接收文件格式的对象,并将其赋值到变量file(名字由后端随便起)上
2).将前端传递过来的文件保存到本地(服务器端):
服务器端:就是运行服务的端。比如本地开发,个人的电脑属于服务器端;
客户端:后来将此程序部署到云服务器(Linux服务器)就是客户端。
file.transferTo(new File(filePath));
//用MultipartFile这个对象提供的transferTo方法将文件保存到filePath(文件的完整路径,在配置文件中配置)这个目录下注:如果上传的是文件,不要使用GET类型的请求方式,一定要使用POST类型的请求方式。
虽然在Postman中GET和POST设置表单提交都可以成功,但在真实应用场景当用GET设置表单提交不一定成功。
规范来说:上传用POST,查询用GET。
GET加在URL中有长度限制,文件较大会上传不成功;POST放在BODY中无长度限制。
谷歌浏览器无法上传文件,必须有一个前端的HTML页面才能上传。故使用Postman来验证。
import lombok.extern.slf4j.Slf4j;
import org.springframework.stereotype.Controller;
import org.springframework.web.bind.annotation.RequestMapping;
import org.springframework.web.bind.annotation.RequestPart;
import org.springframework.web.bind.annotation.ResponseBody;
import org.springframework.web.multipart.MultipartFile;
import java.io.File;
import java.io.IOException;

@Controller
@RequestMapping("/user")
@ResponseBody
@Slf4j
public class UserController {
    /**
     * 上传文件
     *
     * @param username
     * @param file
     * @return
     */
    @RequestMapping("/upfile")
    public boolean upFile(String username, @RequestPart("file")MultipartFile file) {
        boolean result = false;
        try {
            file.transferTo(new File("E:\\Users\\Data\\img.png")); //"E:\\Users\\Data\\img.png"是全路径;"img.png"是给起的名字
            result = true;
            log.info(username + ":上传图片成功!");
        } catch (IOException e) {
            System.out.println("图片上传失败!");
        }
        return result;
    }
}
使用Postman模拟请求上传图片:
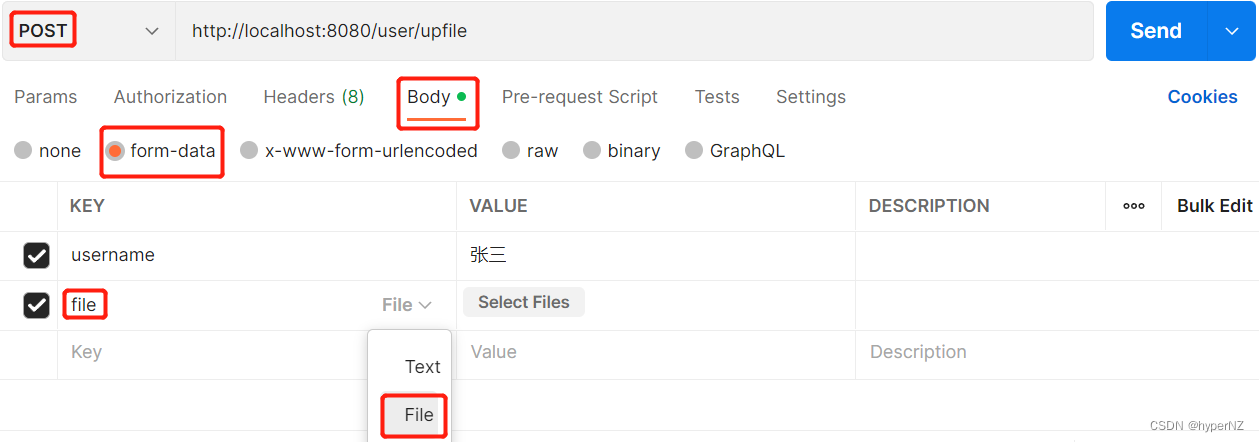


图片上传成功。缺点:因为代码写死的,所以当继续上传另一张图片时,会覆盖掉原来的图片。
完善:①将文件的目录放到配置文件中;②每次生成一个不同的文件名(不能使用时间戳,要使用UUID,UUID每次获取时都不会重复,即使是同一时刻并发访问也不会存在问题,jdk底层已经帮我们实现好了)。
# 图片的保存路径
file:
  path: E:/Users/Data/

# 注意:
# 表示在Data文件夹下
# E:/Users/Data/

# 表示在Users文件夹下,名称为Data
# E:/Users/Data
import lombok.extern.slf4j.Slf4j;
import org.springframework.beans.factory.annotation.Value;
import org.springframework.stereotype.Controller;
import org.springframework.web.bind.annotation.RequestMapping;
import org.springframework.web.bind.annotation.RequestPart;
import org.springframework.web.bind.annotation.ResponseBody;
import org.springframework.web.multipart.MultipartFile;
import java.io.File;
import java.io.IOException;
import java.util.UUID;
@Controller
@RequestMapping("/user")
@ResponseBody
@Slf4j
public class UserController {
@Value("${file.path}")
private String filePath; //从配置文件中获取图片的上传路径
/**
* 上传文件
*
* @param username
* @param file
* @return
*/
@RequestMapping("/upfile")
public boolean upFile(String username, @RequestPart("file") MultipartFile file) {
boolean result = false;
try {
//得到原文件的名称和后缀
String fileType = file.getOriginalFilename(); //获取文件的原生名字
fileType = fileType.substring(fileType.lastIndexOf(".")); //获取文件的后缀/类型
//文件保存的名称
String fileName = UUID.randomUUID().toString() + fileType;
file.transferTo(new File(filePath + fileName));
result = true;
log.info(username + ":上传图片成功!");
} catch (IOException e) {
System.out.println("图片上传失败!");
}
return result;
}
}


当再次上传其他图片时,不会覆盖掉原图片:
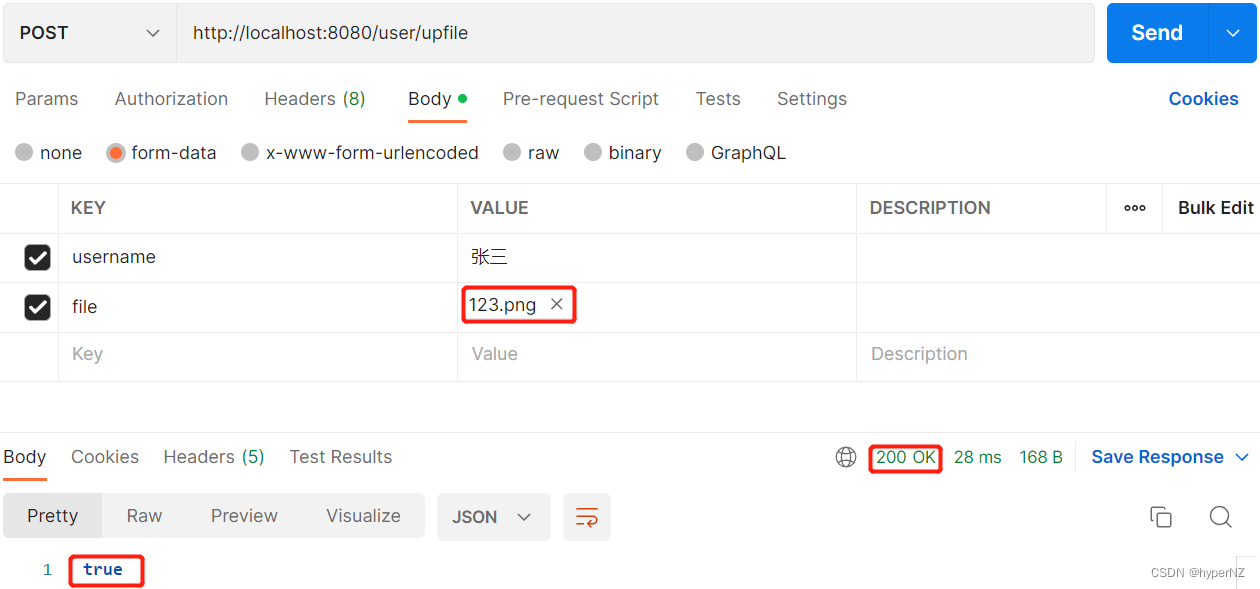

3.2.8.获取前端比较特殊的一类参数Cookie/Session/header
①获取Cookie
方式1:(传统方式)通过HttpServletRequest getCookie获取(Servlet的获取方法)(获取所有的cookie)

import lombok.extern.slf4j.Slf4j;
import org.springframework.beans.factory.annotation.Value;
import org.springframework.stereotype.Controller;
import org.springframework.web.bind.annotation.RequestMapping;
import org.springframework.web.bind.annotation.ResponseBody;
import javax.servlet.http.Cookie;
import javax.servlet.http.HttpServletRequest;
import java.util.Arrays;


@Controller
@RequestMapping("/user")
@ResponseBody
@Slf4j
public class UserController {
    /**
     * 获取cookie方法1
     *
     * @param request
     */
   @RequestMapping("/getck")
    public void getCookie(HttpServletRequest request) {
       Cookie[] cookies = request.getCookies();
       log.info("cookie length:" + cookies.length);
       Arrays.stream(cookies).forEach(cookie -> {
           log.info(cookie.getName() + ":" + cookie.getValue());
       });
   }
}

在浏览器中模拟添加一个Cookie:
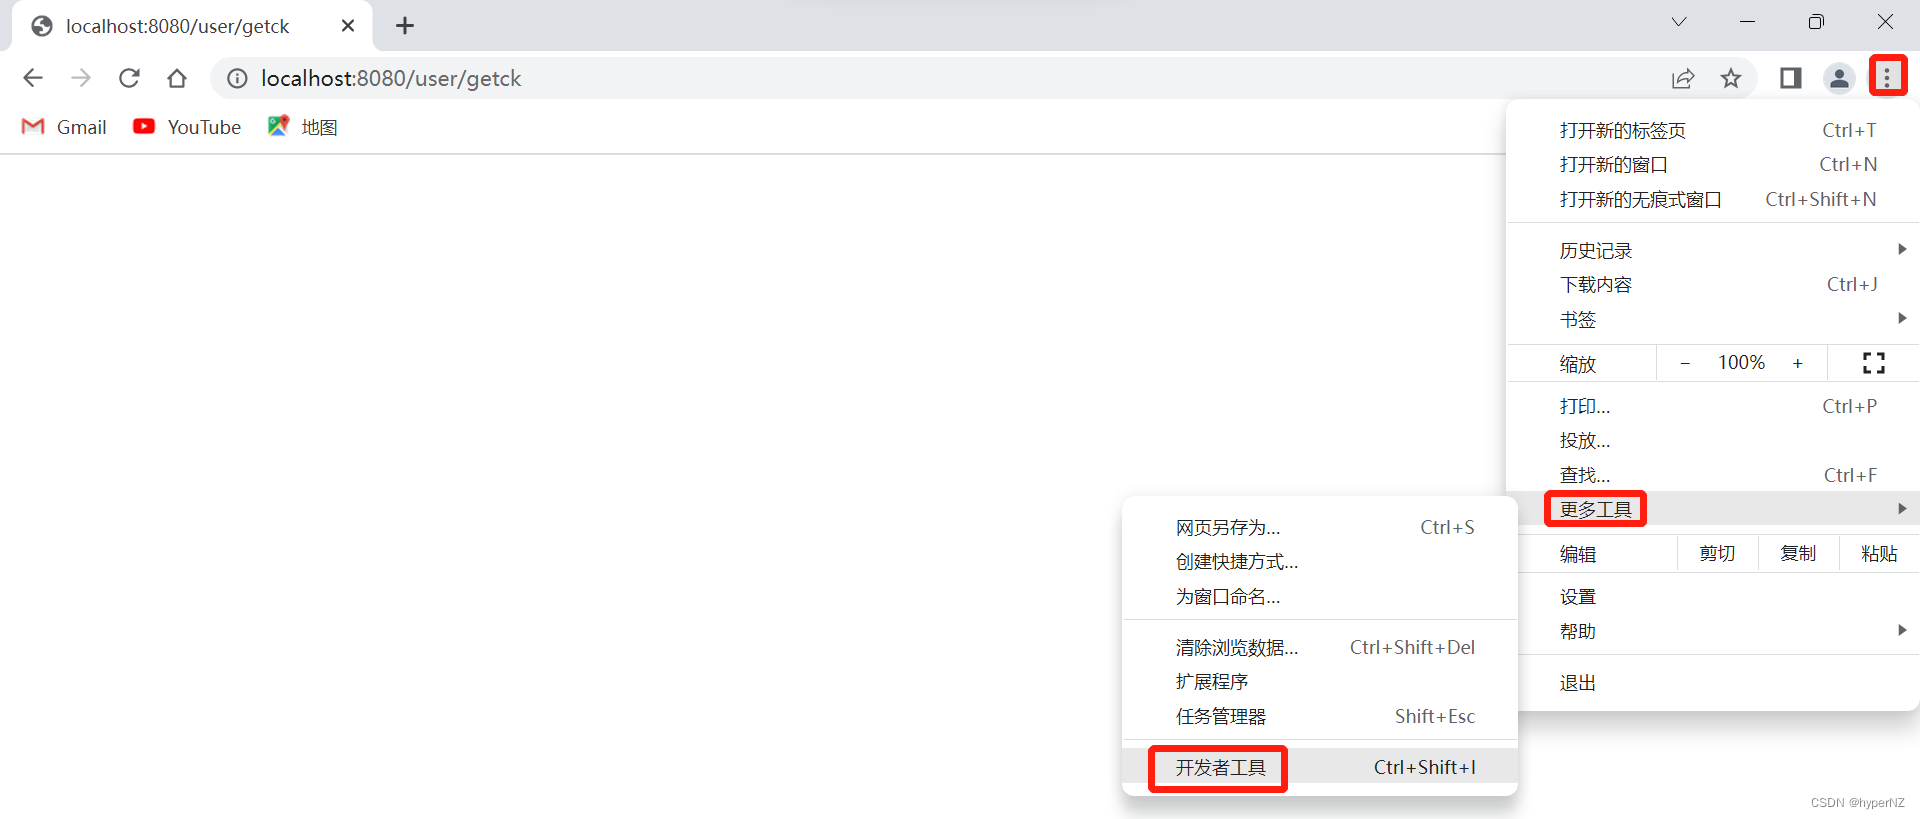
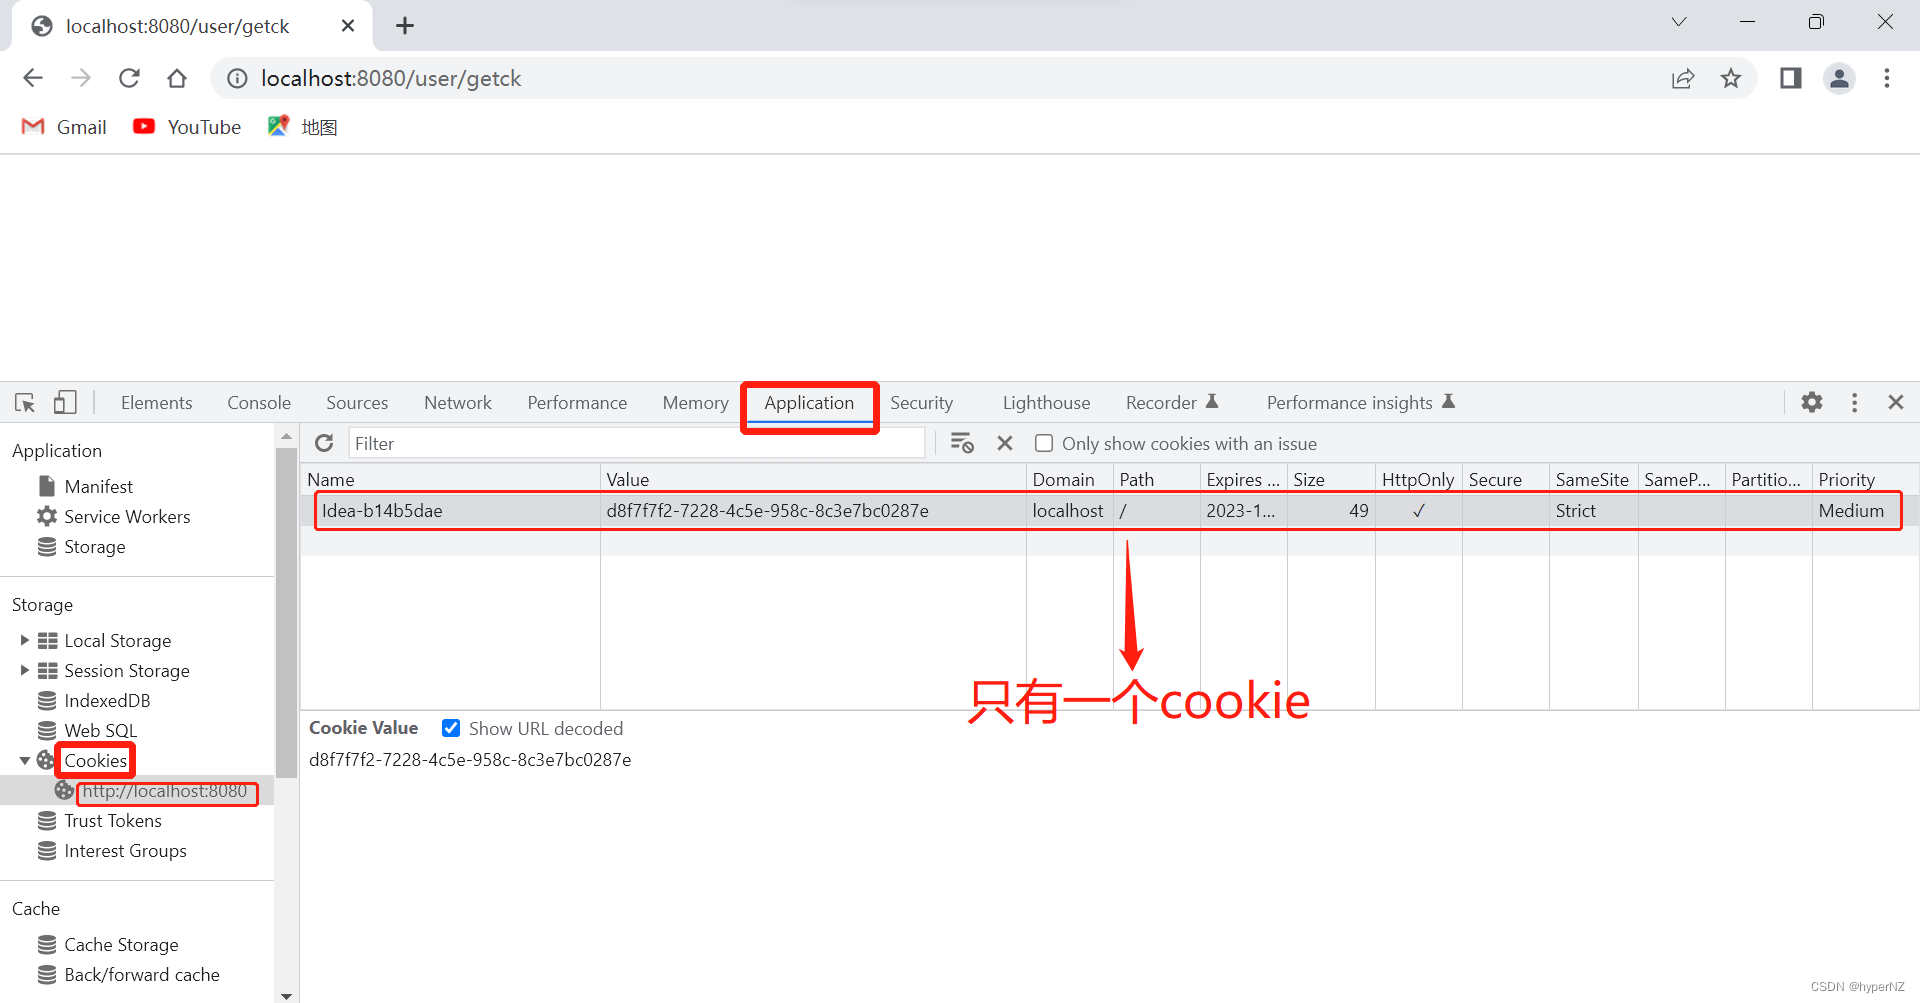


方式2:(简洁方式)通过@CookieValue注解获取(获取一个或少量的cookie值)
@CookieValue("CookieName") String CookieValueimport org.springframework.stereotype.Controller;
import org.springframework.web.bind.annotation.CookieValue;
import org.springframework.web.bind.annotation.RequestMapping;
import org.springframework.web.bind.annotation.ResponseBody;
@Controller
@RequestMapping("/user")
@ResponseBody
public class UserController {
/**
* 获取cookie方法2
*
* @param bite
* @return
*/
@RequestMapping("/getck2")
public String getCookie2(@CookieValue("bite") String bite) { //将名为bite的cookie赋值给变量bite
return bite;
}
} 
②获取header(请求头中的数据)
方式1:(传统方式)通过HttpServletRequest getHeader获取
import org.springframework.stereotype.Controller;
import org.springframework.web.bind.annotation.RequestMapping;
import org.springframework.web.bind.annotation.ResponseBody;

import javax.servlet.http.HttpServletRequest;

@Controller
@RequestMapping("/user")
@ResponseBody
public class UserController {
    /**
     * 获取header方法1
     *
     * @param request
     * @return
     */
    @RequestMapping("/getheader")
    public String getHeader(HttpServletRequest request) {
        String userAgent = request.getHeader("User-Agent");
        return userAgent;
    }
}
方式2:(简洁方式)通过@RequestHeader注解获取
@RequestHeader("headerName") String headerValueimport org.springframework.stereotype.Controller;
import org.springframework.web.bind.annotation.RequestHeader;
import org.springframework.web.bind.annotation.RequestMapping;
import org.springframework.web.bind.annotation.ResponseBody;
@Controller
@RequestMapping("/user")
@ResponseBody
public class UserController {
/**
* 获取header方法2
*
* @param userAgent
* @return
*/
@RequestMapping("/getua")
public String getUA(@RequestHeader("User-Agent") String userAgent) {
return userAgent;
}
} ③存储和获取Session(非常常用)
Session存储和Servlet类似,是使用HttpServletRequest中获取的。
设置Session:
//定义全局的session key
private final String SESSION_KEY = "SESSION_KEY";

/**
* 设置session
*
* @param request
* @return
*/
@RequestMapping("/setsess")
public boolean setSession(HttpServletRequest request) {
    boolean result = false;
    //得到session对象
    try {
       HttpSession session = request.getSession(true);
       session.setAttribute(SESSION_KEY, "Java");
       result = true;
    } catch (Exception e) {
       log.info("出现了异常:" + e.getMessage());
    }
    return result;
}
获取Session方式1:传统Servlet方式
/**
* 获取Session方式1
*
* @param request
* @return
*/
@RequestMapping("/getsess")
public String getSession(HttpServletRequest request) {
    String result = "";
    //得到session,如果存在就查询session中的值,否则返回空
    HttpSession session = request.getSession(false); //false:如果没有session就不用创建session对象
    if(session != null && session.getAttribute(SESSION_KEY) != null) {
        result = (String) session.getAttribute(SESSION_KEY);
    }
    return result;
}
获取Session方式2:(简洁方式)通过@SessionAttribute注解获取
2个都可以:(建议设置name)
@SessionAttribute(required = false, name = "SESSION_KEY") String data@SessionAttribute(required = false, value = "SESSION_KEY") String data)/**
* 获取Session方式2
*
* @param data
* @return
*/
@RequestMapping("/getsess2")
public String getSession2(@SessionAttribute(required = false, name = "SESSION_KEY") String data) { //建议设置为false,如果不设置会默认为true,此时如果没有session也会弄到
return data;
}
import lombok.extern.slf4j.Slf4j;
import org.springframework.stereotype.Controller;
import org.springframework.web.bind.annotation.RequestMapping;
import org.springframework.web.bind.annotation.ResponseBody;
import org.springframework.web.bind.annotation.SessionAttribute;
import javax.servlet.http.HttpServletRequest;
import javax.servlet.http.HttpSession;

@Controller
@RequestMapping("/user")
@ResponseBody
@Slf4j
public class UserController {
    //定义全局的session key
    private final String SESSION_KEY = "SESSION_KEY";

    /**
     * 设置session
     *
     * @param request
     * @return
     */
    @RequestMapping("/setsess")
    public boolean setSession(HttpServletRequest request) {
        boolean result = false;
        //得到session对象
        try {
            HttpSession session = request.getSession(true);
            session.setAttribute(SESSION_KEY, "Java");
            result = true;
        } catch (Exception e) {
            log.info("出现了异常:" + e.getMessage());
        }
        return result;
    }

    /**
     * 获取Session方式2
     *
     * @param data
     * @return
     */
    @RequestMapping("/getsess2")
    public String getSession2(@SessionAttribute(required = false, name = "SESSION_KEY") String data) {
        return data;
    }
}
3.3.返回数据
默认情况下,无论是Spring Boot还是Spring MVC,返回的都是视图(xxx.html),而现在都是前后端分离的,后端只需要返回给前端数据即可,此时就需要使用@ResponseBody注解了。
3.3.1.返回静态页面
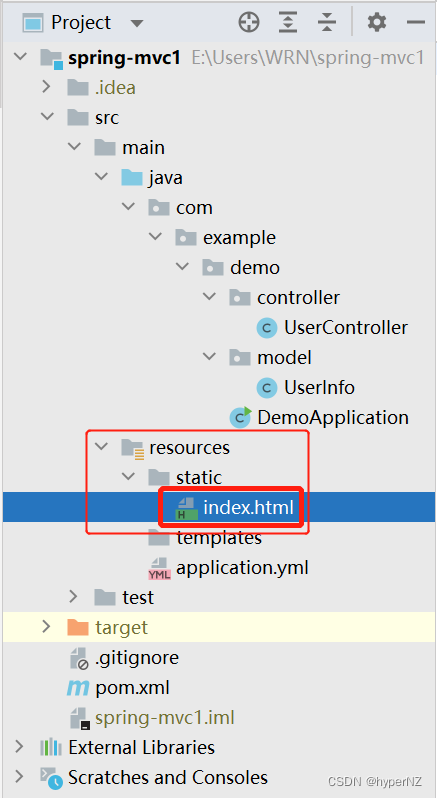


<!doctype html>
<html lang="en">
<head>
    <meta charset="UTF-8">
    <meta name="viewport"
          content="width=device-width, user-scalable=no, initial-scale=1.0, maximum-scale=1.0, minimum-scale=1.0">
    <meta http-equiv="X-UA-Compatible" content="ie=edge">
    <title>Document</title>
</head>
<body>
    <h1 style="color:red;">Hello, index.html.</h1>
</body>
</html>
import org.springframework.stereotype.Controller;
import org.springframework.web.bind.annotation.RequestMapping;
@Controller
public class ResponseController {
@RequestMapping("/index")
public String getIndex() {
return "index.html";
}
}
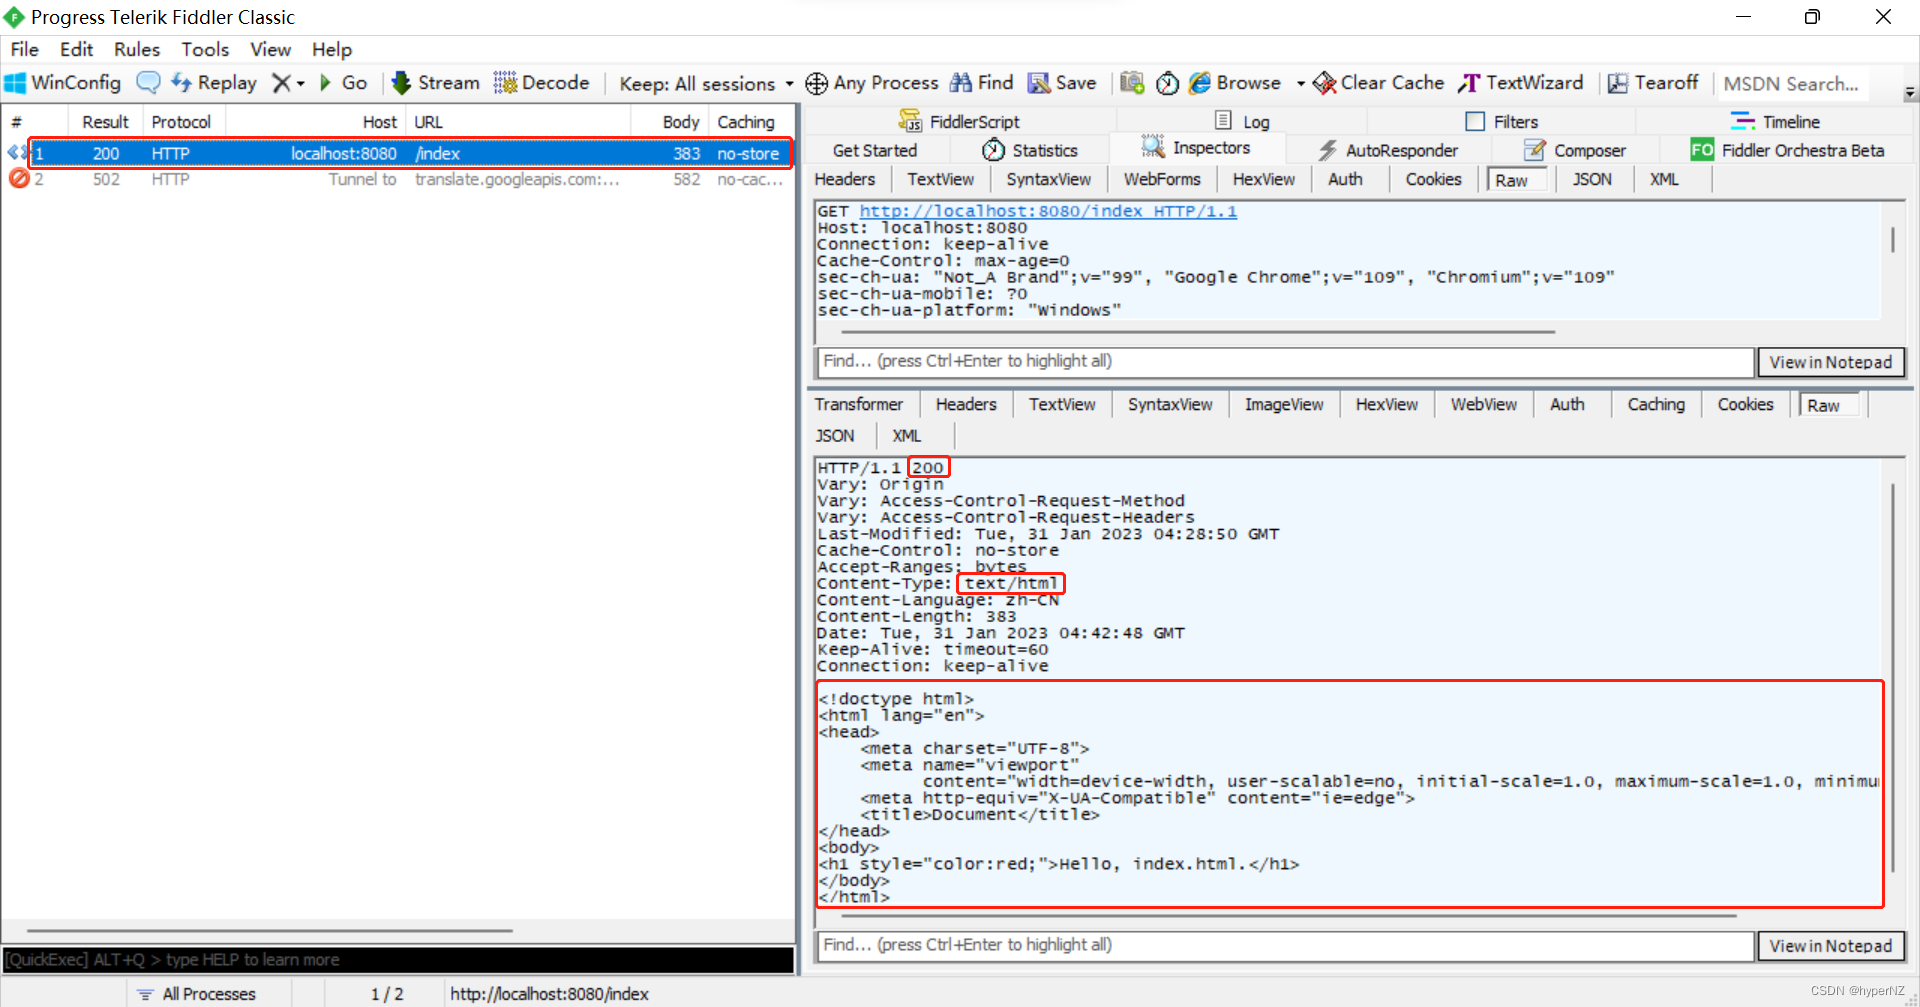
3.3.2.使用@ResponseBody注解返回非静态页面的数据text/html
@ResponseBody:可以放在方法上也可以放在类上,表示当前方法/类中的所有方法返回的是一个非静态页面的数据。
import org.springframework.stereotype.Controller;
import org.springframework.web.bind.annotation.RequestMapping;
import org.springframework.web.bind.annotation.ResponseBody;

@Controller
@ResponseBody // 表示当前类中的所有方法返回的是一个非静态页面的数据。
public class ResponseController {
    @RequestMapping("/index")
//    @ResponseBody  // 表示当前方法返回的是一个非静态页面的数据。
    public String getIndex() {
        return "index.html";
    }
}
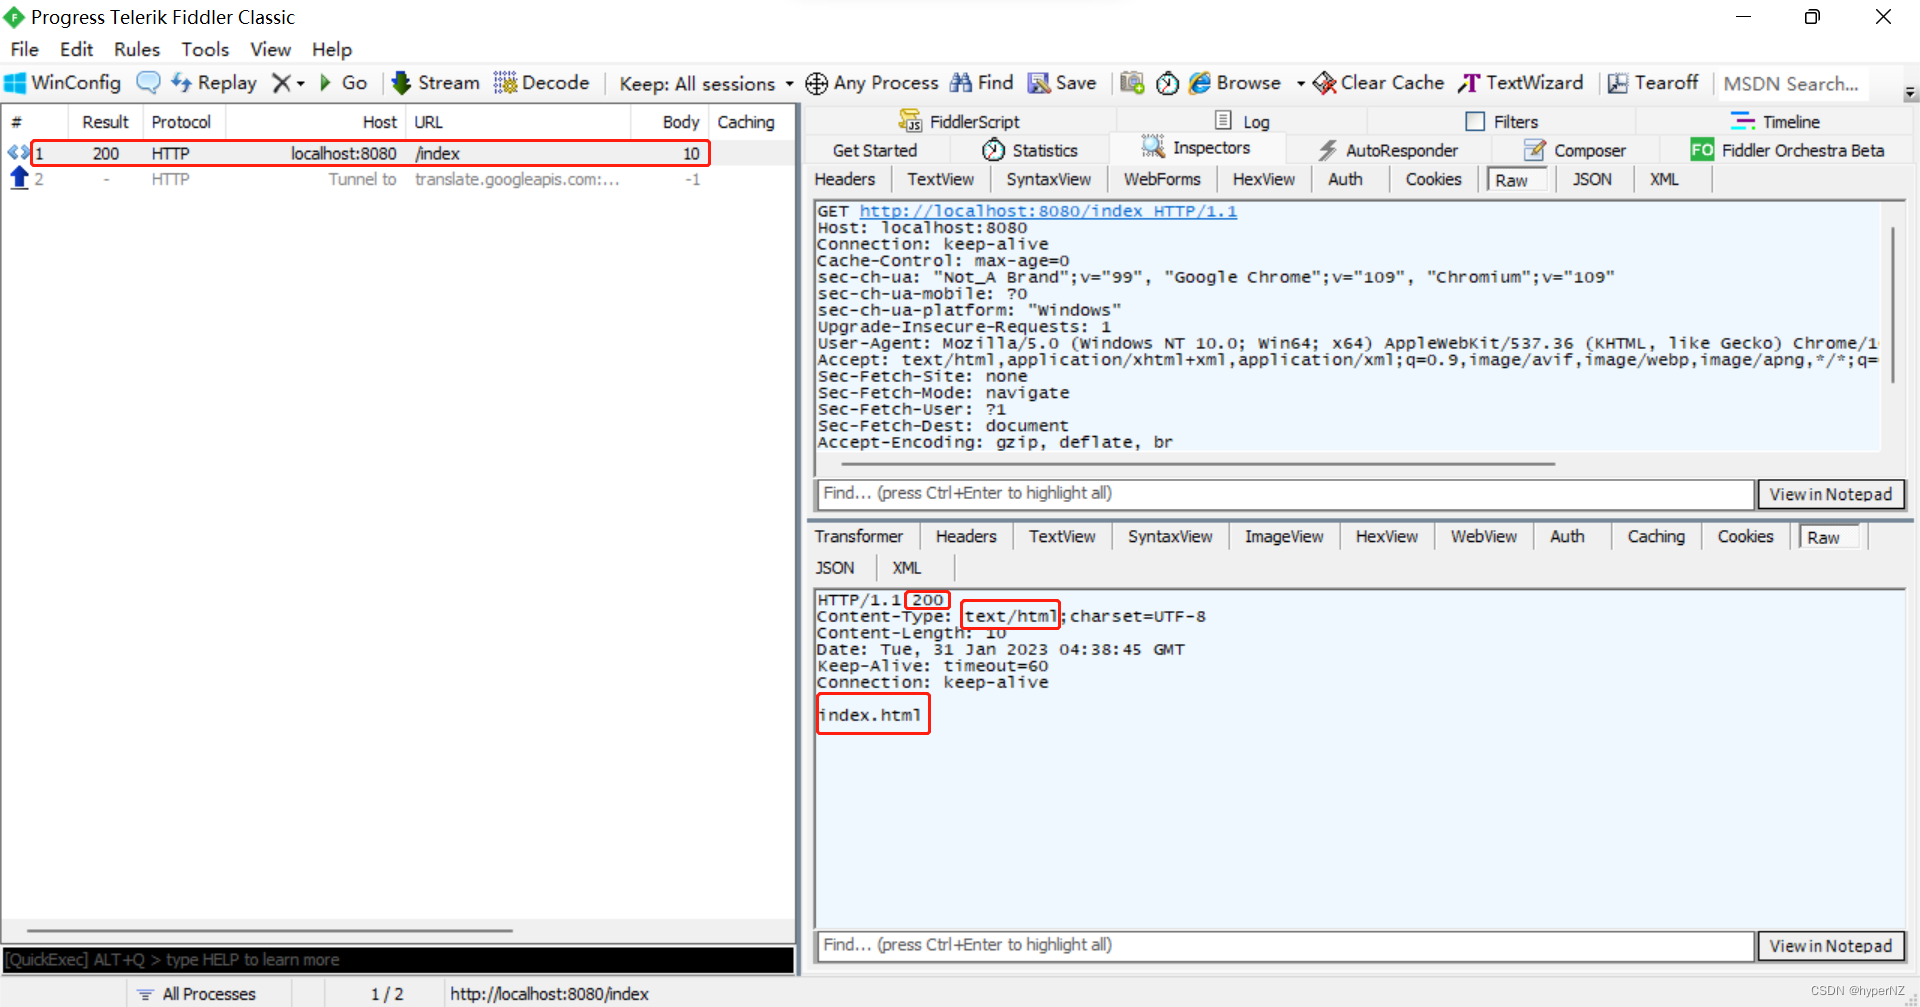
一种更简单的写法:使用@RestController注解代替@Controller注解和@ResponseBody注解。
import org.springframework.web.bind.annotation.RequestMapping;
import org.springframework.web.bind.annotation.RestController;

@RestController
public class ResponseController {
    @RequestMapping("/index")
    public String getIndex() {
        return "index.html";
    }
}
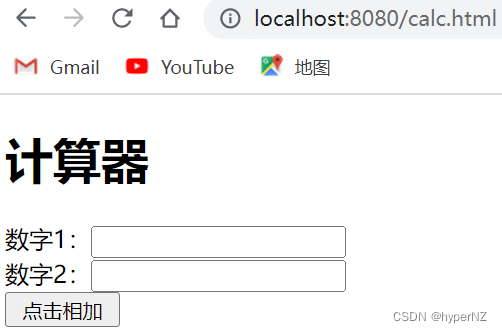
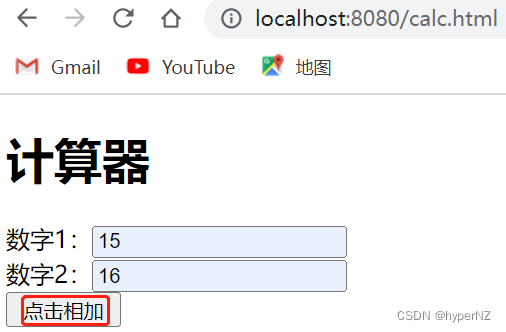
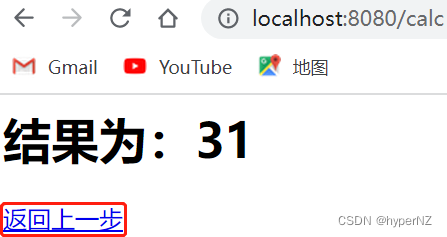
练习:实现计算器功能。
可使⽤ postman 传递参数,或使⽤ form 表单的⽅式提交参数。前端⻚⾯:<!doctype html> <html lang="en"> <head> <meta charset="UTF-8"> <meta name="viewport" content="width=device-width, user-scalable=no, initial-scale=1.0, maximum-scale=1.0, minimum-scale=1.0"> <meta http-equiv="X-UA-Compatible" content="ie=edge"> <title>计算器示例</title> </head> <body> <form action="calc" method="post"> <h1>计算器</h1> 数字1:<input name="num1" type="text"><br> 数字2:<input name="num2" type="text"><br> <input type="submit" value=" 点击相加 "> </form> </body> </html>Controller代码:
import org.springframework.web.bind.annotation.RequestMapping;
import org.springframework.web.bind.annotation.RestController;

@RestController
public class CalcController {
    @RequestMapping("/calc")
    public String calc(Integer num1, Integer num2) {
        return "<h1>结果为:" + (num1 + num2) + "</h1>" + "<p><a href='javascript:history.go(-1);'>返回上一步</a>"; //history.go(-1)表示回退,回到上一步
    }
}
3.3.3.返回JSON对象
import org.springframework.stereotype.Controller;
import org.springframework.web.bind.annotation.RequestMapping;
import org.springframework.web.bind.annotation.ResponseBody;
import java.util.HashMap;

@Controller
@RequestMapping("/json")
@ResponseBody
public class JsonController {
    @RequestMapping("/index")
    public HashMap<String, String> ReturnJson() {
        HashMap<String, String> map = new HashMap<>();
        map.put("Java", "Java Value");
        map.put("MySQL", "MySQL Value");
        map.put("Redis", "Redis Value");
        return map;
    }
}
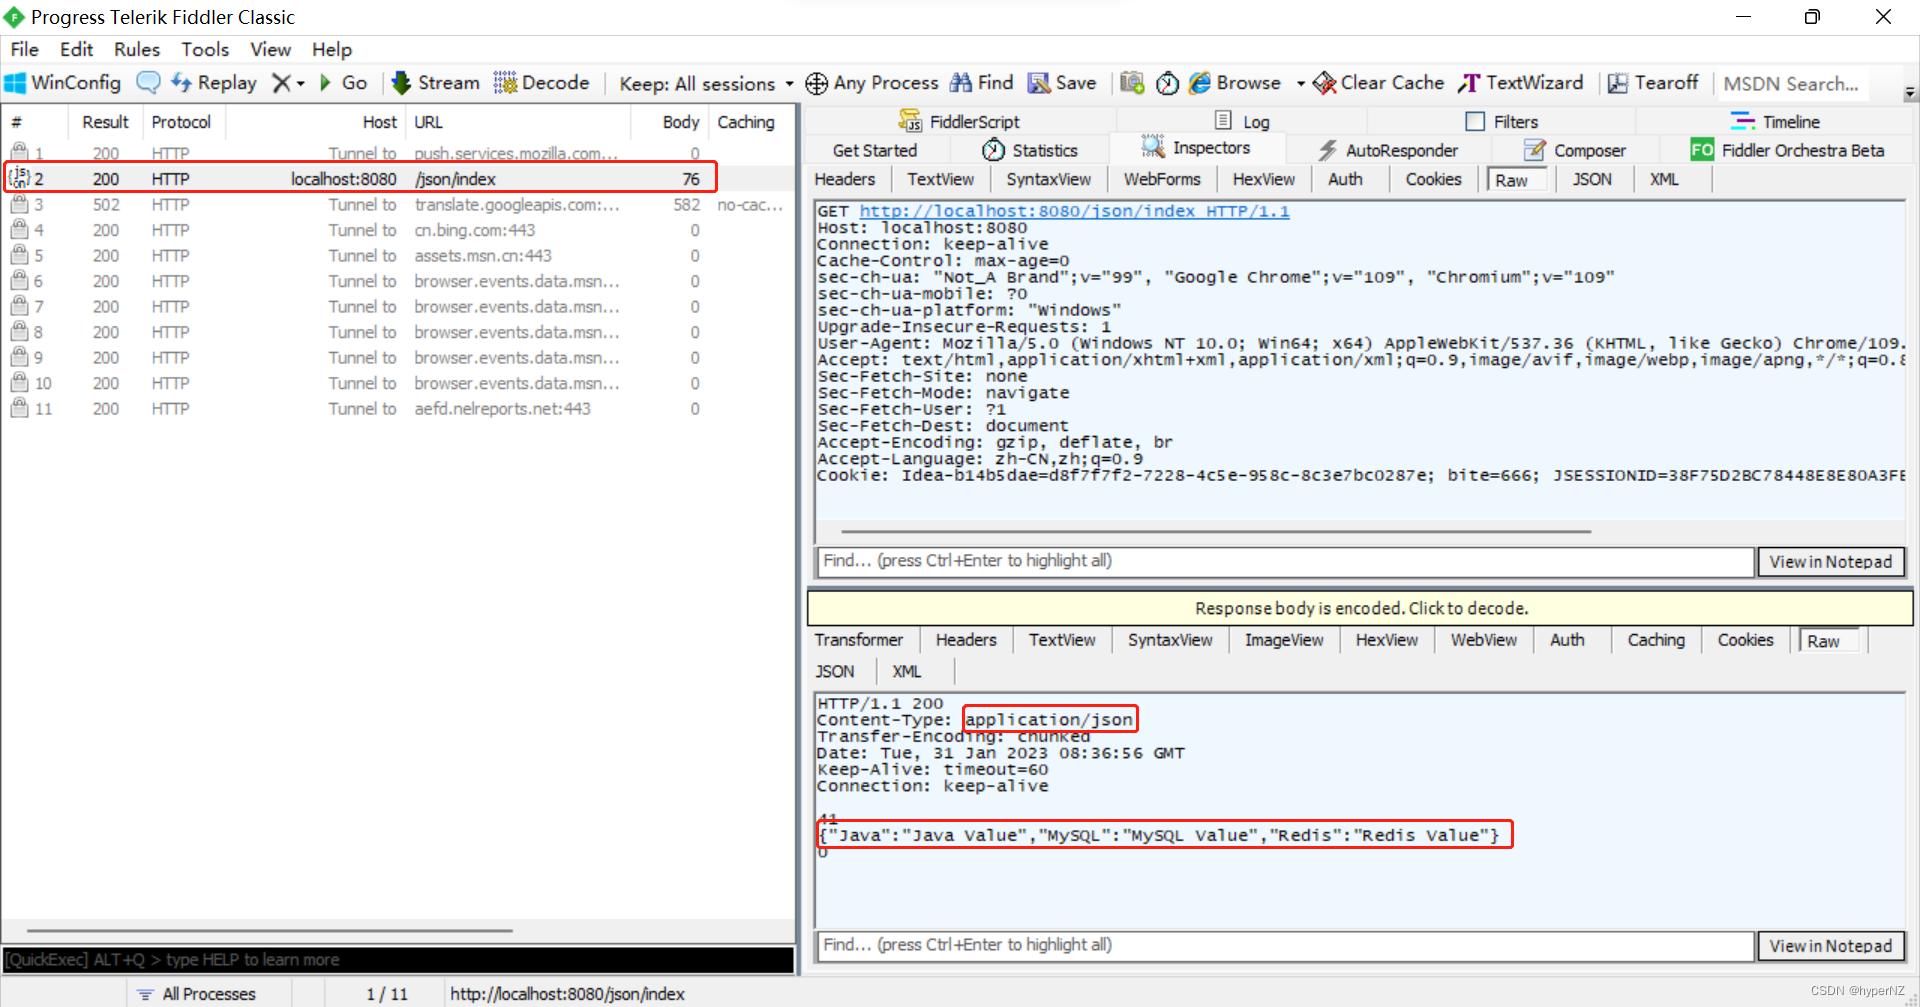
练习:实现登录功能,前端使⽤ ajax,后端返回 json 给前端。
后端代码:
import org.springframework.stereotype.Controller;
import org.springframework.web.bind.annotation.RequestMapping;
import org.springframework.web.bind.annotation.ResponseBody;
import java.util.HashMap;

@Controller
@RequestMapping("/json")
@ResponseBody
public class JsonController {
     @RequestMapping(value = "/login")
     @ResponseBody
     public HashMap<String,Object> login(String username, String password) {
         HashMap<String,Object> res = new HashMap<>();
         int succ = 200;
         if(username!=null && password!=null && username.equals("admin") && password.equals("admin")) {
             res.put("msg","登录成功");
         } else {
             res.put("msg","登录失败");
         }
         res.put("succ",succ);
         return res;
     }
}
前端代码:
<!doctype html>
<html lang="en">
<head>
    <meta charset="UTF-8">
    <meta name="viewport" content="width=device-width, user-scalable=no, initial-scale=1.0, maximum-scale=1.0, minimum-scale=1.0">
    <meta http-equiv="X-UA-Compatible" content="ie=edge">
    <script src="js/jquery-1.9.1.min.js"></script>
    <title>Document</title>
    <script>
        function mysub() {
            var username = jQuery("#username").val();
            var password = jQuery("#password").val();
            jQuery.getJSON("/user/login",
                {
                    "username":username,
                    "password":password
                },
                function (result) {
                if(result.succ==200) {
                    alert("返回结果:"+result.msg);
                } else {
                    alert("操作失败,请重试。");
                }
            });
        }
    </script>
</head>
<body>
<div style="text-align: center;">
    <h1>登录</h1>
    ⽤户:<input id="username">
    <br>
    密码:<input id="password" type="password">
    <br>
    <input type="button" value=" 提交 " onclick="mysub()" style="margin-top: 20px;margin-left: 50px;">
</div>
</body>
</html>
3.3.4.请求转发和请求重定向
return不但可以返回一个视图,还可以实现跳转,Spring MVC有2种跳转方式:
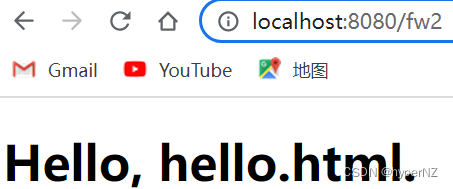
①请求转发:forward(事多)
地址不变。
实现方法1:
<!doctype html>
<html lang="en">
<head>
    <meta charset="UTF-8">
    <meta name="viewport"
          content="width=device-width, user-scalable=no, initial-scale=1.0, maximum-scale=1.0, minimum-scale=1.0">
    <meta http-equiv="X-UA-Compatible" content="ie=edge">
    <title>Document</title>
</head>
<body>
    <h1>Hello, hello.html.</h1>
</body>
</html>
import org.springframework.stereotype.Controller;
import org.springframework.web.bind.annotation.RequestMapping;
@Controller
public class ResponseController {
/**
* 请求转发的实现方法1
*
* @return
*/
@RequestMapping("/fw")
public Object forward() {
return "forward:hello.html";
}
}
实现方法2:
import org.springframework.stereotype.Controller;
import org.springframework.web.bind.annotation.RequestMapping;
import javax.servlet.ServletException;
import javax.servlet.http.HttpServletRequest;
import javax.servlet.http.HttpServletResponse;
import java.io.IOException;

@Controller
public class ResponseController {
    /**
     * 请求转发的实现方法2
     *
     * @return
     */
    @RequestMapping("/fw2")
    public void forward2(HttpServletResponse response, HttpServletRequest request) throws ServletException, IOException {
        request.getRequestDispatcher("hello.html").forward(request, response);
    }
}
②请求重定向:redirect(事少)
地址会变。
实现方法1:
import org.springframework.stereotype.Controller;
import org.springframework.web.bind.annotation.RequestMapping;

@Controller
public class ResponseController {
    /**
     * 请求重定向的实现方法1
     *
     * @return
     */
    @RequestMapping("rt")
    public Object redirect() {
        return "redirect:hello.html";
    }
}
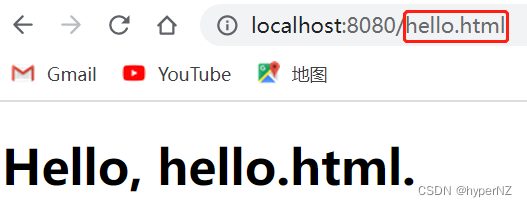
实现方法2:
import org.springframework.stereotype.Controller;
import org.springframework.web.bind.annotation.RequestMapping;
import javax.servlet.http.HttpServletResponse;
import java.io.IOException;

@Controller
public class ResponseController {
    /**
     * 请求重定向的实现方法2
     *
     * @return
     */
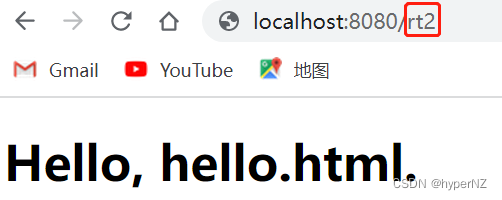
    @RequestMapping("rt2")
    public void redirect2(HttpServletResponse response) throws IOException {
       response.sendRedirect("hello.html");
    }
}

PS:forward(请求转发)和 redirect(请求重定向)的区别:
举例来说,例如:
你告诉你妈妈,你想吃辣条,如果你妈妈,说好,我帮你去买,这就是 forward 请求转发;如果你妈妈让你⾃⼰去买,那么就是请求 redirect 重定向。
forward 和 redirect 具体区别如下:1. 请求重定向( redirect)将请求重新定位到资源;请求转发( forward)服务器端转发。2. 请求重定向地址发⽣变化,请求转发地址不发⽣变化。3. 请求重定向与直接访问新地址效果⼀直,不存在原来的外部资源不能访问;请求转发服务器端转发有可能造成原外部资源不能访问。








![[JavaWeb]JS](https://img-blog.csdnimg.cn/e482cfe78484450d87284fab9a219cdf.png)


