目录
环境配置
导入模块和库
准备数据集
数据集下载和压缩
数据加载和数据预处理
进行模型的构建和优化器的设置
配置和准备模型的训练过程
测量训练操作的执行时间
模型验证
模型推理
自定义推理数据集
环境配置
首先,利用“%%capture captured_output”来捕获后续代码执行所产生的输出。其次,运用“!pip uninstall mindspore -y”这一命令,对已经安装的 mindspore 库予以卸载。随后,从特定的镜像源(即中国科学技术大学的镜像)安装明确版本(2.2.14)的 mindspore 库,之后安装 mindnlp 库,最后使用 pip 命令来显示关于“mindspore”库的详细信息,包括版本、所在位置、依赖项等相关信息。
代码如下:
%%capture captured_output
# 实验环境已经预装了mindspore==2.2.14,如需更换mindspore版本,可更改下面mindspore的版本号
!pip uninstall mindspore -y
!pip install -i https://pypi.mirrors.ustc.edu.cn/simple mindspore==2.2.14
# 该案例在 mindnlp 0.3.1 版本完成适配,如果发现案例跑不通,可以指定mindnlp版本,执行`!pip install mindnlp==0.3.1`
!pip install mindnlp
!pip show mindspore
运行结果:
Name: mindspore
Version: 2.2.14
Summary: MindSpore is a new open source deep learning training/inference framework that could be used for mobile, edge and cloud scenarios.
Home-page: https://www.mindspore.cn
Author: The MindSpore Authors
Author-email: contact@mindspore.cn
License: Apache 2.0
Location: /home/nginx/miniconda/envs/jupyter/lib/python3.9/site-packages
Requires: asttokens, astunparse, numpy, packaging, pillow, protobuf, psutil, scipy
Required-by: mindnlp
导入模块和库
首先导入了一些必要的模块和库,包括操作系统相关的 os 模块,mindspore 库,以及 mindspore 中关于数据集处理的一些模块(如 text、GeneratorDataset、transforms),还有一些其他与模型训练和评估相关的模块(如 nn、context),以及来自 mindnlp 的 Trainer、Evaluator 和一些回调函数(CheckpointCallback、BestModelCallback),还有用于评估的指标 Accuracy 。
代码如下:
import os
import mindspore
from mindspore.dataset import text, GeneratorDataset, transforms
from mindspore import nn, context
from mindnlp._legacy.engine import Trainer, Evaluator
from mindnlp._legacy.engine.callbacks import CheckpointCallback, BestModelCallback
from mindnlp._legacy.metrics import Accuracy
运行结果:
Building prefix dict from the default dictionary ...
Dumping model to file cache /tmp/jieba.cache
Loading model cost 1.034 seconds.
Prefix dict has been built successfully.
准备数据集
定义了一个被称作 SentimentDataset 的类,其主要用途在于对数据集进行准备工作。此类别能够读取处于特定路径之下的数据文件,并将其加以处理,转化为标签和文本数据的形式,与此同时,还支持通过索引来对样本进行访问以及获取数据集的长度信息。
代码如下:
# prepare dataset
class SentimentDataset:
    """Sentiment Dataset"""
    def __init__(self, path):
        # 初始化方法,接收数据集的路径作为参数
        self.path = path
        self._labels, self._text_a = [], []
        self._load()  # 调用内部方法加载数据
    def _load(self):
        # 内部方法,用于从指定路径加载数据集
        with open(self.path, "r", encoding="utf-8") as f:
            dataset = f.read()
        lines = dataset.split("\n")
        for line in lines[1:-1]:
            label, text_a = line.split("\t")
            self._labels.append(int(label))
            self._text_a.append(text_a)
    def __getitem__(self, index):
        # 实现了索引访问功能,通过索引获取数据集中的特定样本
        return self._labels[index], self._text_a[index]
    def __len__(self):
        # 实现了获取数据集长度的功能
        return len(self._labels)
数据集下载和压缩
首先,运用“!wget”命令从特定的网址下载数据集,并将其存储为“emotion_detection.tar.gz”。随后,借助“!tar xvf”命令对已下载的压缩文件“emotion_detection.tar.gz”实施解压操作。
代码如下:
# download dataset
!wget https://baidu-nlp.bj.bcebos.com/emotion_detection-dataset-1.0.0.tar.gz -O emotion_detection.tar.gz
!tar xvf emotion_detection.tar.gz
运行结果:
--2024-07-03 08:14:39--  https://baidu-nlp.bj.bcebos.com/emotion_detection-dataset-1.0.0.tar.gz
Resolving baidu-nlp.bj.bcebos.com (baidu-nlp.bj.bcebos.com)... 119.249.103.5, 113.200.2.111, 2409:8c04:1001:1203:0:ff:b0bb:4f27
Connecting to baidu-nlp.bj.bcebos.com (baidu-nlp.bj.bcebos.com)|119.249.103.5|:443... connected.
HTTP request sent, awaiting response... 200 OK
Length: 1710581 (1.6M) [application/x-gzip]
Saving to: ‘emotion_detection.tar.gz’

emotion_detection.t 100%[===================>]   1.63M  9.58MB/s    in 0.2s

2024-07-03 08:14:40 (9.58 MB/s) - ‘emotion_detection.tar.gz’ saved [1710581/1710581]

data/
data/test.tsv
data/infer.tsv
data/dev.tsv
data/train.tsv
data/vocab.txt
数据加载和数据预处理
第一步:首先导入了 numpy 库。然后定义了一个名为 process_dataset 的函数,用于处理数据集。函数接受数据源、分词器、最大序列长度、批处理大小和是否打乱数据等参数。函数内部根据设备类型进行不同的处理,包括对文本进行分词和填充、对标签进行类型转换、将数据分批处理等操作。
代码如下:
#导入了 numpy 库
import numpy as np
#数据源 source、分词器 tokenizer最大序列长度 max_seq_len(默认为 64)、批处理大小 batch_size(默认为 32)和是否打乱数据 shuffle(默认为 True )
def process_dataset(source, tokenizer, max_seq_len=64, batch_size=32, shuffle=True):
    #判断设备类型是否为 'Ascend'
    is_ascend = mindspore.get_context('device_target') == 'Ascend'
    #定义了列名["label", "text_a"]
    column_names = ["label", "text_a"]
    #创建了一个 GeneratorDataset 对象 dataset ,并设置了列名和是否打乱
    dataset = GeneratorDataset(source, column_names=column_names, shuffle=shuffle)
    # transforms
    type_cast_op = transforms.TypeCast(mindspore.int32)
    #定义了一个内部函数 tokenize_and_pad ,用于根据设备类型对输入的文本进行分词和填充处理。
    def tokenize_and_pad(text):
        if is_ascend:
            tokenized = tokenizer(text, padding='max_length', truncation=True, max_length=max_seq_len)
        else:
            tokenized = tokenizer(text)
        return tokenized['input_ids'], tokenized['attention_mask']
    # map dataset
    #将文本列 text_a 通过 tokenize_and_pad 函数处理得到 input_ids 和 attention_mask 列
    dataset = dataset.map(operations=tokenize_and_pad, input_columns="text_a", output_columns=['input_ids', 'attention_mask'])
    #将标签列通过 type_cast_op 转换为 mindspore.int32 类型,并将其重命名为 labels 。
    dataset = dataset.map(operations=[type_cast_op], input_columns="label", output_columns='labels')
    # batch dataset
    if is_ascend:
        #如果是 Ascend 设备,使用 batch 方法
        dataset = dataset.batch(batch_size)
    else:
        #否则,使用 padded_batch 方法,并指定填充信息。
        dataset = dataset.padded_batch(batch_size, pad_info={'input_ids': (None, tokenizer.pad_token_id),
                                                         'attention_mask': (None, 0)})
    #函数返回处理后的数据集
    return dataset
第二步:从 mindnlp.transformers 中导入 BertTokenizer ,并从预训练的 'bert-base-chinese' 模型获取分词器。
代码如下:
from mindnlp.transformers import BertTokenizer
tokenizer = BertTokenizer.from_pretrained('bert-base-chinese')
tokenizer.pad_token_id
运行中:

运行结果:
0
第三步:然后分别对训练集(data/train.tsv)、验证集(data/dev.tsv)和测试集(data/test.tsv)进行处理,得到对应的数据集 dataset_train 、 dataset_val 和 dataset_test ,最后获取训练集的列名
代码如下:
dataset_train = process_dataset(SentimentDataset("data/train.tsv"), tokenizer)
dataset_val = process_dataset(SentimentDataset("data/dev.tsv"), tokenizer)
dataset_test = process_dataset(SentimentDataset("data/test.tsv"), tokenizer, shuffle=False)
dataset_train.get_col_names()
运行结果:
['input_ids', 'attention_mask', 'labels']
第四步:打印出训练集中的第一个样本。
代码如下:
print(next(dataset_train.create_tuple_iterator())) 运行结果:
[Tensor(shape=[32, 64], dtype=Int64, value=
[[ 101,  872, 1440 ...    0,    0,    0],
 [ 101, 3766, 7231 ...    0,    0,    0],
 [ 101, 6821, 3221 ...    0,    0,    0],
 ...
 [ 101,  872, 5634 ...    0,    0,    0],
 [ 101, 1812, 3152 ...    0,    0,    0],
 [ 101, 2571, 4157 ...    0,    0,    0]]), Tensor(shape=[32, 64], dtype=Int64, value=
[[1, 1, 1 ... 0, 0, 0],
 [1, 1, 1 ... 0, 0, 0],
 [1, 1, 1 ... 0, 0, 0],
 ...
 [1, 1, 1 ... 0, 0, 0],
 [1, 1, 1 ... 0, 0, 0],
 [1, 1, 1 ... 0, 0, 0]]), Tensor(shape=[32], dtype=Int32, value= [1, 1, 1, 0, 1, 1, 1, 2, 1, 1, 2, 0, 1, 2, 1, 1, 1, 1, 1, 1, 1, 0, 1, 1,
 0, 1, 1, 1, 1, 0, 1, 1])]
进行模型的构建和优化器的设置
从 mindnlp.transformers 模块引入了 BertForSequenceClassification(即用于序列分类的 Bert 模型)以及 BertModel 。借助预训练的 'bert-base-chinese' 模型构建了一个用于序列分类的模型,同时明确指定分类的类别数量为 3 。其后,运用 auto_mixed_precision 函数把模型设定为混合精度模式,精度层级为 'O1' 。还创建了一个优化器 nn.Adam ,旨在对模型的可训练参数进行优化,将学习率设定为 2e-5 。
代码如下:
from mindnlp.transformers import BertForSequenceClassification, BertModel
from mindnlp._legacy.amp import auto_mixed_precision
# set bert config and define parameters for training
model = BertForSequenceClassification.from_pretrained('bert-base-chinese', num_labels=3)
model = auto_mixed_precision(model, 'O1')
optimizer = nn.Adam(model.trainable_params(), learning_rate=2e-5)
运行中:

运行结果:
The following parameters in checkpoint files are not loaded:
['cls.predictions.bias', 'cls.predictions.transform.dense.bias', 'cls.predictions.transform.dense.weight', 'cls.seq_relationship.bias', 'cls.seq_relationship.weight', 'cls.predictions.transform.LayerNorm.bias', 'cls.predictions.transform.LayerNorm.weight']
The following parameters in models are missing parameter:
['classifier.weight', 'classifier.bias']
配置和准备模型的训练过程
代码如下:
metric = Accuracy()
# define callbacks to save checkpoints
ckpoint_cb = CheckpointCallback(save_path='checkpoint', ckpt_name='bert_emotect', epochs=1, keep_checkpoint_max=2)
best_model_cb = BestModelCallback(save_path='checkpoint', ckpt_name='bert_emotect_best', auto_load=True)
trainer = Trainer(network=model, train_dataset=dataset_train,
                  eval_dataset=dataset_val, metrics=metric,
                  epochs=5, optimizer=optimizer, callbacks=[ckpoint_cb, best_model_cb])
分析:首先定义了一个名为 metric 的对象,它是 Accuracy 类型,可能用于评估模型的准确性。
然后定义了两个回调函数:
ckpoint_cb 是一个 CheckpointCallback 对象,用于指定保存检查点的路径为 'checkpoint',检查点名称为 'bert_emotect',保存的周期为 1 个 epoch,最多保留 2 个检查点。
best_model_cb 是一个 BestModelCallback 对象,用于指定保存最佳模型的路径和名称,并设置自动加载。
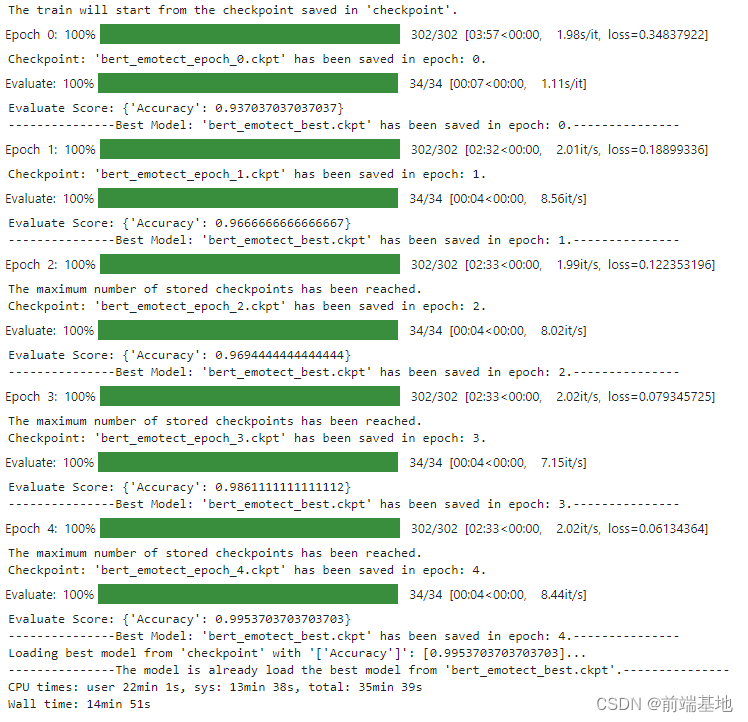
最后创建了一个 Trainer 对象,指定了模型 model 、训练数据集 dataset_train 、评估数据集 dataset_val 、评估指标 metric 、训练轮数为 5 轮、优化器 optimizer ,以及回调函数列表 [ckpoint_cb, best_model_cb] 。
测量训练操作的执行时间
代码如下:
%%time
# start training
trainer.run(tgt_columns="labels")
分析:在 Jupyter Notebook 环境中,“%%time”是一个魔法命令,用于测量下面代码单元格的执行时间。
接下来的代码“trainer.run(tgt_columns="labels")”表示运行名为“trainer”的对象的“run”方法,并指定目标列名为“labels”。综合起来,整段代码的意思是测量“trainer.run(tgt_columns="labels")”这个训练操作的执行时间。
运行结果:
模型验证
首先创建了一个名为 evaluator 的评估器对象。它使用指定的模型 model 、评估数据集 dataset_test 和评估指标 metric 进行初始化。然后,通过 evaluator.run(tgt_columns="labels") 来运行这个评估器,并且指定评估的目标列名为 "labels" 。
代码如下:
evaluator = Evaluator(network=model, eval_dataset=dataset_test, metrics=metric)
evaluator.run(tgt_columns="labels")
运行结果:

模型推理
首先创建了一个名为 dataset_infer 的数据集对象,其数据来自 "data/infer.tsv" 文件。
然后定义了一个名为 predict 的函数,用于对输入的文本进行预测。函数内部定义了一个标签映射 label_map ,将数字标签映射为对应的文本标签(“消极”“中性”“积极”)。对输入的文本进行分词处理后, 通过模型得到预测的逻辑值,进而得到预测的标签。如果有给定的真实标签 label ,会在输出信息中同时显示预测标签和真实标签,否则只显示预测标签。
最后,通过遍历 dataset_infer 数据集中的标签和文本,对每个文本进行预测并打印相关信息。
代码如下:
dataset_infer = SentimentDataset("data/infer.tsv")
def predict(text, label=None):
    label_map = {0: "消极", 1: "中性", 2: "积极"}
    text_tokenized = Tensor([tokenizer(text).input_ids])
    logits = model(text_tokenized)
    predict_label = logits[0].asnumpy().argmax()
    info = f"inputs: '{text}', predict: '{label_map[predict_label]}'"
    if label is not None:
        info += f" , label: '{label_map[label]}'"
    print(info)
from mindspore import Tensor
for label, text in dataset_infer:
    predict(text, label)
运行结果:
inputs: '我 要 客观', predict: '中性' , label: '中性'
inputs: '靠 你 真是 说 废话 吗', predict: '消极' , label: '消极'
inputs: '口嗅 会', predict: '中性' , label: '中性'
inputs: '每次 是 表妹 带 窝 飞 因为 窝路痴', predict: '中性' , label: '中性'
inputs: '别说 废话 我 问 你 个 问题', predict: '消极' , label: '消极'
inputs: '4967 是 新加坡 那 家 银行', predict: '中性' , label: '中性'
inputs: '是 我 喜欢 兔子', predict: '积极' , label: '积极'
inputs: '你 写 过 黄山 奇石 吗', predict: '中性' , label: '中性'
inputs: '一个一个 慢慢来', predict: '中性' , label: '中性'
inputs: '我 玩 过 这个 一点 都 不 好玩', predict: '消极' , label: '消极'
inputs: '网上 开发 女孩 的 QQ', predict: '中性' , label: '中性'
inputs: '背 你 猜 对 了', predict: '中性' , label: '中性'
inputs: '我 讨厌 你 , 哼哼 哼 。 。', predict: '消极' , label: '消极'
自定义推理数据集
自己输入推理数据,展示模型的泛化能力。
代码如下:
predict("家人们咱就是说一整个无语住了 绝绝子叠buff") 运行结果:
inputs: '家人们咱就是说一整个无语住了 绝绝子叠buff', predict: '中性'
最终 运行结果:
