一、引言
最近收到了一块”香橙派AIpro“的开发板,这款开发板是香橙派联合华为精心打造的,他们的宣传sologen是:“为AI而生”。这引起了我的好奇心,想知道其是否可以胜任无人机的实时建图和航迹规划工作。通过实操博主成功实现了在ARM架构上使用香橙派AIpro和D435i深度相机进行SLAM建图以及在仿真环境中的无人机航迹规划。整体来说,这块板子的性价比很高,可以满足多旋翼无人机的航机规划和控制工作。

二、香橙派AIpro介绍
2.1香橙派AIpro简介
2023.12月初,香橙派联合华为发布了基于昇腾的Orange Pi AIpro开发板,提供8/20TOPS澎湃算力,能覆盖生态开发板者的主流应用场景,让用户实践各种创新场景,并为其提供配套的软硬件。而价格更是极为亲民,8TOPS、8GB内存的创客价/预售价仅为799元,8TOPS、16GB内存的创客价/预售价仅为999元。Orange Pi AIpro开发板采用昇腾AI技术路线,无论在外观上、性能上还是技术服务支持上都非常优秀,提供8/20TOPS澎湃算力,能覆盖生态开发板者的主流应用场景,让用户实践各种创新场景,并为其提供配套的软硬件。通信汪这里用的是8+32的配置。
2.2香橙派AIpro硬件介绍
OrangePi AIpro(8-12T)采用昇腾AI技术路线,具体为4核64位处理器+AI处理器,集成图形处理器,支持8-12TOPS AI算力,拥有8GB/16GB LPDDR4X,可以外接32GB/64GB/128GB/256GB eMMC模块,支持双4K高清输出。 Orange Pi AIpro引用了相当丰富的接口,包括两个HDMI输出、GPIO接口、Type-C电源接口、支持SATA/NVMe SSD 2280的M.2插槽、TF插槽、千兆网口、两个USB3.0、一个USB Type-C 3.0、一个Micro USB(串口打印调试功能)、两个MIPI摄像头、一个MIPI屏等,预留电池接口,可广泛适用于AI边缘计算、深度视觉学习及视频流AI分析、视频图像分析、自然语言处理、智能小车、机械臂、人工智能、无人机、云计算、AR/VR、智能安防、智能家居等领域,覆盖 AIoT各个行业。 Orange Pi AIpro支持Ubuntu、openEuler操作系统,满足大多数AI算法原型验证、推理应用开发的需求。


香橙派是常见的HDMI接口,不用再买转接头类的额外线,但树莓派是Micro HDMI,这种线一般很少见,需要额外购买,为以防万一,在插拔HDMI接头或线缆之前,建议先将香橙派断电是最安全的。

三、实际开发体验
3.1SLAM简介
SLAM(Simultaneous Localization and Mapping)技术,即同步定位与地图构建,是机器人领域中的一项重要技术。它通过实现在未知环境中对机器人自身的定位以及构建环境地图,解决了全自主移动机器人的核心问题。
3.3.1SLAM技术的原理
SLAM技术的核心思想是:机器人从未知环境的未知地点出发,在运动过程中通过重复观测到的环境特征定位自身位置和姿态,再根据自身位置构建周围环境的增量式地图,从而达到同时定位和地图构建的目的。通俗地说,SLAM技术就像是一个人的大脑,它帮助机器人在未知环境中感知自身的位置和姿态,同时构建周围环境的地图。
3.3.2SLAM技术的应用
SLAM技术在许多领域都有广泛的应用,如无人驾驶、无人机、服务机器人等。例如,在无人驾驶领域,SLAM技术可以帮助车辆在行驶过程中实时感知自身的位置和姿态,同时构建高精度地图,实现安全、准确的自动驾驶。在服务机器人领域,SLAM技术可以帮助机器人完成导航、定位、避障等功能,提高机器人的智能化水平和服务能力。
3.3.3SLAM技术的发展趋势
随着人工智能技术的不断发展,SLAM技术也在不断进步和完善。目前,SLAM技术正朝着高精度、实时性、智能化方向发展。未来,SLAM技术有望与深度学习、计算机视觉等技术进一步融合,实现更加精准、高效的环境感知和地图构建。
本文将使用香橙派AIpro结合D435i深度相机进行SLAM建图应用。
3.2烧录ubuntu22.04操作系统
香橙派镜像烧录工具下载地址:https://obs-9be7.obs.cn-east-2.myhuaweicloud.com/OrangePi/balenaEtcher/balenaEtcher-Setup-1.18.4.exe
香橙派0318镜像下载地址:https://obs-9be7.obs.cn-east-2.myhuaweicloud.com/OrangePi/20240318/opiaipro_ubuntu22.04_desktop_aarch64_20240318.img.xz


烧录完成后,把SD卡插入香橙派,上电,开机,成功点亮!
查了下AIPro的手册,Ubuntu的初始密码是:Mind@123

如上图成功进入Ubuntu22.04系统。
3.3源码编译安装版本的ros系统
3.3.1ros源码安装
进入系统后开始安装ros系统,由于22.04默认安装ROS2,但很多仓库都是基于ROS1的,ROS1对Ubuntu的支持只到20.04,如果要在22.04上安装ROS1只能从源码编译安装我参考下面链接中的两个博客安装了ROS-noetic:
博客1. https://blog.csdn.net/Drknown/article/details/128701624
博客2. http:// https://zhuanlan.zhihu.com/p/418227536
自己按照博客一进行安装时也遇到了博文中的问题,我这里详细介绍一下解决方法:
3.3.2常见报错解决
问题一:rosconsole,报错如下:
Errors     << rosconsole:make /home/youliang/ros_ws/build/catkin_ws/logs/rosconsole/build.make.002.log
/home/youliang/ros_ws/build/catkin_ws/src/rosconsole/src/rosconsole/impl/rosconsole_log4cxx.cpp: In function ‘void ros::console::impl::initialize()’:
/home/youliang/ros_ws/build/catkin_ws/src/rosconsole/src/rosconsole/impl/rosconsole_log4cxx.cpp:169:23: error: cannot convert ‘ros::console::impl::ROSConsoleStdioAppender*’ to ‘log4cxx::AppenderPtr’ {aka ‘std::shared_ptr<log4cxx::Appender>’}
  169 |   logger->addAppender(new ROSConsoleStdioAppender);
      |                       ^~~~~~~~~~~~~~~~~~~~~~~~~~~
      |                       |
      |                       ros::console::impl::ROSConsoleStdioAppender*
In file included from /usr/include/log4cxx/spi/loggingevent.h:28,
                 from /usr/include/log4cxx/layout.h:29,
                 from /usr/include/log4cxx/appenderskeleton.h:28,
                 from /home/youliang/ros_ws/build/catkin_ws/src/rosconsole/src/rosconsole/impl/rosconsole_log4cxx.cpp:42:
/usr/include/log4cxx/logger.h:144:60: note:   initializing argument 1 of ‘virtual void log4cxx::Logger::addAppender(log4cxx::AppenderPtr)’
  144 |                 virtual void addAppender(const AppenderPtr newAppender);
      |                                          ~~~~~~~~~~~~~~~~~~^~~~~~~~~~~
/home/youliang/ros_ws/build/catkin_ws/src/rosconsole/src/rosconsole/impl/rosconsole_log4cxx.cpp: In function ‘void* ros::console::impl::getHandle(const string&)’:
/home/youliang/ros_ws/build/catkin_ws/src/rosconsole/src/rosconsole/impl/rosconsole_log4cxx.cpp:203:36: error: cannot convert ‘log4cxx::LoggerPtr’ {aka ‘std::shared_ptr<log4cxx::Logger>’} to ‘void*’ in return
  203 |   return log4cxx::Logger::getLogger(name);
      |          ~~~~~~~~~~~~~~~~~~~~~~~~~~^~~~~~
      |                                    |
解决方法:
打开下面链接,首先切换到下图所示的concise_output_roso分支,切换成功后下载rosconsole的源码。
下载成功后,解压,并重命名为rosconsole。

然后再把解压重命名后的文件拷贝并替换到/ros_catkin_ws/src文件夹下重新编译就好了。
问题二:shared_mutex的问题
报错如下:
make[2]: *** [CMakeFiles/tf.dir/build.make:118: CMakeFiles/tf.dir/src/transform_listener.cpp.o] Error 1
In file included from /usr/include/log4cxx/log4cxx.h:45,
from /usr/include/log4cxx/logstring.h:28,
from /usr/include/log4cxx/level.h:22,
from /opt/ros/noetic/include/ros/console.h:46,
from /opt/ros/noetic/include/ros/ros.h:40,
from /tmp/makepkg/ros-noetic-tf/src/geometry-1.13.2/tf/src/transform_broadcaster.cpp:34:
/usr/include/log4cxx/boost-std-configuration.h:10:18: error: ‘shared_mutex’ in namespace ‘std’ does not name a type
10 | typedef std::shared_mutex shared_mutex;
| ^~~~~~~~~~~~
/usr/include/log4cxx/boost-std-configuration.h:10:13: note: ‘std::shared_mutex’ is only available from C++17 onwards
10 | typedef std::shared_mutex shared_mutex;
| ^~~
/usr/include/log4cxx/boost-std-configuration.h:12:30: error: ‘shared_lock’ in namespace ‘std’ does not name a template type
12 | using shared_lock = std::shared_lock<T>;
| ^~~~~~~~~~~
/usr/include/log4cxx/boost-std-configuration.h:12:25: note: ‘std::shared_lock’ is only available from C++14 onwards
12 | using shared_lock = std::shared_lock<T>;
| ^~~
In file included from /opt/ros/noetic/include/ros/console.h:46,
from /opt/ros/noetic/include/ros/ros.h:40,
from /tmp/makepkg/ros-noetic-tf/src/geometry-1.13.2/tf/src/transform_broadcaster.cpp:34:
/usr/include/log4cxx/level.h:283:29: error: ‘mutex’ in namespace ‘std’ does not name a type
283 | static std::mutex initMutex;
| ^~~~~
/usr/include/log4cxx/level.h:25:1: note: ‘std::mutex’ is defined in header ‘<mutex>’; did you forget to ‘#include <mutex>’?
24 | #include <log4cxx/helpers/object.h>
+++ |+#include <mutex>
25 |
解决方法:
首先在/usr/include/log4cxx/文件夹下右键打开终端,并使用su root命令切换到主用户,然后用VI编辑器对boost-std-configuration.h进行修改,将
#define STD_SHARED_MUTEX_FOUND 1
#define Boost_SHARED_MUTEX_FOUND 0
修改为:
#define STD_SHARED_MUTEX_FOUND 0
#define Boost_SHARED_MUTEX_FOUND 1
效果如下图所示,修改后重新编译即可

从编译源码来进行ROS1的安装过程比较麻烦,如果你在安装过程中遇到问题可在评论区留言。
编译过程时间为2.5h左右,编译完成后现象见下图:

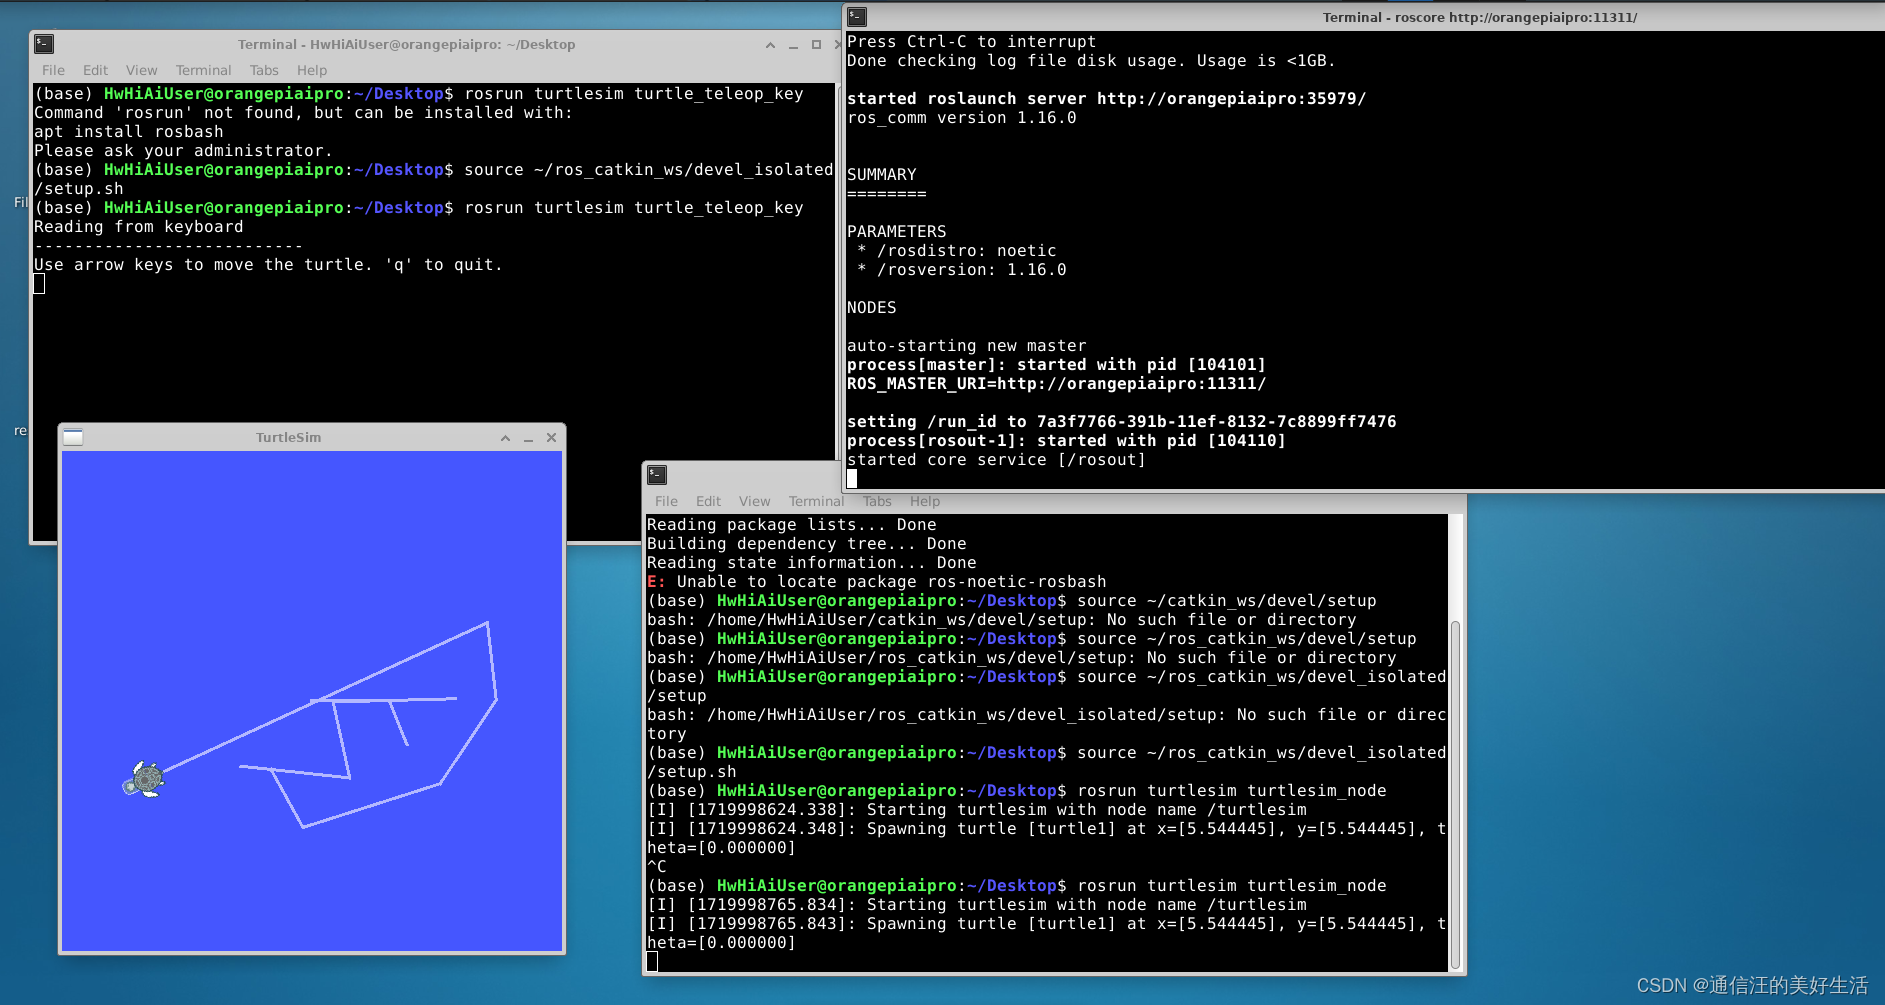
3.3.3ros安装完成测试
- 打开三个终端,分别输入
roscorerosrun turtlesim turtlesim_noderosrun turtlesim turtle_teleop_key
3.4安装D435i深度相机相关依赖
3.4.1realsense驱动安装了解
香橙派AIpro其实可以理解为一个可以装系统的单片机,其是基于arm架构的,不同于我们电脑使用的x86或amd架构,在安装过程中会有一些区别。下面是具体安装过程。
开源网址:https://github.com/IntelRealSense
这里面有两个有用的项目:
librealsense:realsense的依赖库
realsense-ros:提供ros的扩展支持,比如launch文件就在这里
命令运行情况如下:

值得注意的是,你会发现官方只建议了在x86/amd架构下进行SDK安装,实际在香橙派AIpro上SDK安装librealsense确实存在一些问题,所以这里统一使用源码编译。
3.4.2查看版本
安装之前好好看一下自己下载的是哪个版本,一定要保证realsense-ros是支持你安装的版本的,一定要注意!
①首先进入https://github.com/IntelRealSense/realsense-ros/releases/tag/2.3.1
②在Tags里选择版本,ROS1对应的是2.x的版本,ROS2对应的是3.x的版本。
③向下拉,首先看到Supported RealSense SDK这一项,下面写了对应的librealsense的版本,记住这个版本。
④再向下,Recommended Firmware中的表格里写了D400系列相机的固件版本,同样记住这个版本,这个非常重要!!!
3.4.3编译librealsense
打开刚才记下的librealsense版本,开始源码编译,再次提醒注意版本:
# 下载源码
git clone -b v2.25.0 https://github.com/IntelRealSense/librealsense.git
# 进入源码目录
cd librealsense
# 安装依赖
sudo apt-get update && sudo apt-get upgrade && sudo apt-get dist-upgrade
sudo apt-get install libglfw3-dev libgl1-mesa-dev libglu1-mesa-dev at
# 从libalsense根目录运行Intel Realsense权限脚本
./scripts/setup_udev_rules.sh
# 编译安装
mkdir build && cd build
cmake ../ -DBUILD_EXAMPLES=true -DFORCE_RSUSB_BACKEND=true -DCMAKE_BUILD_TYPE=release -DBUILD_GRAPHICAL_EXAMPLES=FALSE
# 内存大运行这个
sudo make uninstall && make clean && make -j8 && sudo make install
# 内存小运行这个
sudo make uninstall && make clean && make && sudo make instal
验证安装是否成功:
cd ~/librealsense/build/examples/C/depth/
./rs-depth
3.4.4编译realsense-ros
首先创建工作空间
mkdir -p  ~/catkin_realsense/src
cd ~/catkin_realsense/src
下载源码
git clone https://github.com/IntelRealSense/realsense-ros.git
cd realsense-ros/
git checkout `git tag | sort -V | grep -P "^2.\d+\.\d+" | tail -1`  #查验
cd ..

编译工作空间
catkin_init_workspace
cd ..
catkin_make clean
catkin_make -DCATKIN_ENABLE_TESTING=False -DCMAKE_BUILD_TYPE=Release
catkin_make install
git clone https://github.com/pal-robotics/ddynamic_reconfigure.git最后添加source文件
echo "source ~/catkin_ws/devel/setup.bash" >> ~/.bashrc
source ~/.bashrc
3.4.5查看是否安装成功
把相机连接到香橙派上,然后终端输入
realsense-viewer3.5安装VScode编程环境及相关插件
因为这个部分较简单,就不放运行效果图了,只放一下具体安装命令。
VScode:
sudo dpkg -i ***.debTerminator:
sudo apt install terminatorPlotjuggler:
    sudo apt install ros-noetic-plotjuggler
    sudo apt install ros-noetic-plotjuggler-ros
    rosrun plotjuggler plotjuggler
3.6部署slam算法
安装mavros
sudo apt-get install ros-noetic-mavros
cd /opt/ros/noetic/lib/mavros
sudo ./install_geographiclib_datasets.sh
安装ceres与glog与ddyanmic-reconfigure
- 解压
3rd_party.zip压缩包 - 进入glog文件夹打开终端
./autogen.sh && ./configure && make && sudo make install
sudo apt-get install liblapack-dev libsuitesparse-dev libcxsparse3.1.2 libgflags-dev libgoogle-glog-dev libgtest-dev
进入ceres文件夹打开终端
    mkdir build
    cd build
    cmake ..
    sudo make -j4
    sudo make install
    sudo apt-get install ros-noetic-ddynamic-reconfigure
下载ego-planner源码并编译
git clone https://github.com/ZJU-FAST-Lab/Fast-Drone-250
cd Fast-Drone-250
catkin_make
source devel/setup.bash
roslaunch ego_planner single_run_in_sim.launch
在Rviz内按下键盘G键,再单击鼠标左键以点选无人机目标点
3.7建图效果显示
3.7.1检查realsense驱动正常
roslaunch realsense2_camera rs_camera.launchrqt_image_view看/camera/infra1/image_rect_raw,/camera/infra2/image_rect_raw,/camera/depth/image_rect_raw话题正常
3.7.2VINS外参精确自标定
sh shfiles/rspx4.sh
rostopic echo /vins_fusion/imu_propagate
3.7.3建图模块验证
sh shfiles/rspx4.sh
roslaunch ego_planner single_run_in_exp.launch
roslaunch ego_planner rviz.launch
3.7.4效果
香橙派AIpro真实场景建图效果:


香橙派AIpro航迹规划仿真效果:

四、测评总结
简单做个总结,自己使用香橙派AIpro烧录了ubuntu22.04操作系统,然后下载ros1 Noetic Ninjemys 版本的源码,编译并安装在了香橙派AIpro上面。因为香橙派AIpro是ARM架构,又从源码编译安装了Realsense,验证了D435i深度相机在香橙派AIpro上的实际建图效果,效果是很出色的。之后又部署了ego-planner源码,验证了香橙派AIpro是可以用于无人机实时在线航迹规划的。经过测评香橙派AI|pro真的惊艳到了我,我自己之前是用的intel nuc 猛虎峡谷i5这样一个机载电脑来进行无人机航迹规划算法的验证,这个电脑售价3千左右,而香橙派AIpro8+32G的版本仅仅8百元作用。使用香橙派AIpro作为我验证无人机建图与航迹规划算法的计算平台真的很合适。
作为一名航迹规划领域的工程人员,非常高兴看到香橙派AIpro这样高性价比的产品,通过实际部署航迹规划领域较先进的“ego-planner算法,验证了香橙派AIpro的计算能力是可以胜任“实时建图与航迹规划”这样复杂的任务的,因为时间原因没有做实际的飞行测试,等后续会把香橙派AIpro实际部署到自己的无人机上面看下实际飞行时的建图和规划效果。


