前言:
一个良好的运行环境对于任何一个部署工作来说都是必须的,俗话说 万事开头难,其实很多部署工作失败的原因在于初始环境没有正确的配置,因此,按照官网的部署文档并结合自己的实际情况,配置一个合理的OpenStack运行环境是十分有必要的。
OpenStack的运行环境配置文档:Environment — Installation Guide documentation
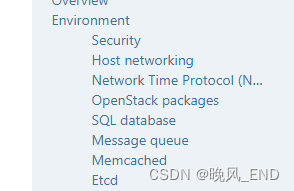
可以看到内容是比较多得,其中需要注意的是,SQL数据库也就是MySQL或者mariadb,或者postgresql。以及消息队列服务rabbitmq,消息中间件memcached和etcd都是划归为运行环境的,etcd计划使用集群而不是官方文档内的单实例etcd。
下面的环境配置根据自己的实际情况做得,并没有完全遵照官方文档。
一,
security 安全方面
三个服务器都关闭防火墙和selinux
systemctl disable firewalld && systemctl stop firewalld
vim /etc/selinux/config
编辑文件,关闭selinux
修改SELINUX=disabled
当然,OpenStack有一个工具名称为openstack-selinux,但为了部署更顺畅,还是将防火墙和selinux彻底关闭比较好。
二,
设置主机名称和域名解析hosts
192.168.123.130
[root@openstack1 ~]# cat /etc/hostname
openstack1
192.168.123.131
[root@openstack2 ~]# cat /etc/hostname
openstack2
192.168.123.131
[root@openstack3 ~]# cat /etc/hostname
openstack3
三个服务器都一样的hosts:
[root@openstack1 ~]# cat /etc/hosts
127.0.0.1   localhost localhost.localdomain localhost4 localhost4.localdomain4
::1         localhost localhost.localdomain localhost6 localhost6.localdomain6
192.168.123.130 openstack1 manager.node
192.168.123.131 openstack2 work.node1
192.168.123.132 openstack3 work.node2
[root@openstack1 ~]# scp /etc/hosts openstack1:/etc/
hosts                                                                                                               100%  274   283.5KB/s   00:00
[root@openstack1 ~]# scp /etc/hosts openstack2:/etc/
hosts                                                                                                               100%  274    65.9KB/s   00:00
[root@openstack1 ~]# scp /etc/hosts openstack3:/etc/
hosts
三,
服务器之间的免密
以192.168.123.130为例:
ssh-keygen -t rsa一路回车到底,生成私钥
拷贝私钥,按提示输入yes和对应主机的密码
ssh-copy-id 192.168.123.130
ssh-copy-id 192.168.123.131
ssh-copy-id 192.168.123.132
四,
ntp时间服务器的搭建
以130服务器作为时间服务器,其它两个节点同步130服务器的时间
192.168.123.130服务器:
yum install ntp -y编辑配置文件 /etc/ntp.conf,增加这么两行:
server 127.127.1.0
fudge  127.127.1.0 stratum 10
重启服务:
systemctl restart ntpd192.168.123.131服务器和132服务器:
yum install ntp -y编辑配置文件 /etc/ntp.conf,增加这一行:
server 192.168.123.130 prefer重启服务:
systemctl restart ntpd在131和132上,查看ntp状态是这样的表示时间服务器搭建完毕(需要等待10来分钟,才会这个状态):
[root@openstack2 ~]# ntpstat
synchronised to NTP server (192.168.123.130) at stratum 12
   time correct to within 45 ms
   polling server every 64 s
五,
yum仓库的配置
基础仓库1:
cat >/etc/yum.repos.d/centos7.repo <<EOF
[aliyun]
name=aliyun
baseurl=https://mirrors.aliyun.com/centos-vault/7.4.1708/os/x86_64/
enable=1
gpgcheck=0
[update]
name=aliyun-update
baseurl=https://mirrors.aliyun.com/centos-vault/7.4.1708/updates/x86_64/
enable=1
gpgcheck=0
EOF
基础仓库2:
wget -O /etc/yum.repos.d/CentOS-Base.repo http://mirrors.aliyun.com/repo/Centos-7.repoEPEL仓库:
cat >/etc/yum.repos.d/epel.repo <<EOF
[epel]
name=epel
baseurl=https://mirrors.aliyun.com/epel-archive/7.8/x86_64/
enable=1
gpgcheck=0
EOF
OpenStack仓库:
cat  >/etc/yum.repos.d/openstack.repo <<EOF
[openstack]
name=openstack
baseurl=https://mirrors.aliyun.com/centos-vault/7.6.1810/cloud/x86_64/openstack-rocky/
enable=1
gpgcheck=0
EOF
yum upgrade -y
yum install centos-release-openstack-rocky -y
yum install python-openstackclient -y
yum install openstack-selinux  -y
六,
SQL database
官方文档:SQL database for RHEL and CentOS — Installation Guide documentation
根据文档,选用mariadb,安装步骤如下:
1,
在192.168.123.130控制节点安装
yum install mariadb mariadb-server python2-PyMySQL -y2,
启动数据库服务
systemctl enable mariadb && systemctl start mariadb3,
新建mariadb的配置文件:
因为是安装在controller节点192.168.123.130,因此,绑定IP为130
cat >/etc/my.cnf.d/openstack.cnf <<EOF
[mysqld]
bind-address = 192.168.123.130

default-storage-engine = innodb
innodb_file_per_table = on
max_connections = 4096
collation-server = utf8_general_ci
character-set-server = utf8
EOF
4,
初始化数据库
mysql_secure_installation

输出如下:

NOTE: RUNNING ALL PARTS OF THIS SCRIPT IS RECOMMENDED FOR ALL MariaDB
      SERVERS IN PRODUCTION USE!  PLEASE READ EACH STEP CAREFULLY!

In order to log into MariaDB to secure it, we'll need the current
password for the root user.  If you've just installed MariaDB, and
you haven't set the root password yet, the password will be blank,
so you should just press enter here.

Enter current password for root (enter for none):
OK, successfully used password, moving on...

Setting the root password ensures that nobody can log into the MariaDB
root user without the proper authorisation.

Set root password? [Y/n] y
New password:
Re-enter new password:
Password updated successfully!
Reloading privilege tables..
 ... Success!


By default, a MariaDB installation has an anonymous user, allowing anyone
to log into MariaDB without having to have a user account created for
them.  This is intended only for testing, and to make the installation
go a bit smoother.  You should remove them before moving into a
5,
数据库远程连接配置
登陆数据库,给root用户远程登陆权限
[root@openstack1 ~]# mysql -uroot -p
Enter password:
Welcome to the MariaDB monitor.  Commands end with ; or \g.
Your MariaDB connection id is 4
Server version: 10.1.20-MariaDB MariaDB Server

Copyright (c) 2000, 2016, Oracle, MariaDB Corporation Ab and others.

Type 'help;' or '\h' for help. Type '\c' to clear the current input statement.

MariaDB [(none)]> use mysql;
Reading table information for completion of table and column names
You can turn off this feature to get a quicker startup with -A

Database changed
MariaDB [mysql]> grant all privileges on *.* to 'root'@'%' identified by '123456';
Query OK, 0 rows affected (0.00 sec)

MariaDB [mysql]> grant all privileges on *.* to 'root'@'localhost' identified by '123456';
Query OK, 0 rows affected (0.00 sec)

MariaDB [mysql]> flush privileges;
Query OK, 0 rows affected (0.00 sec)
6,
使用Navicat测试
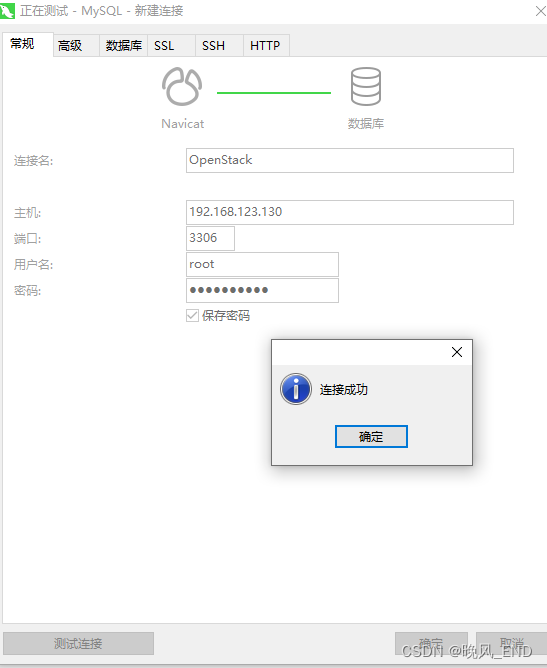
七,
Message queue for RHEL and CentOS
消息队列服务器--rabbitmq
官方文档:
Message queue for RHEL and CentOS — Installation Guide documentation
使用的rabbitmq,依然是安装在130服务器上,安装步骤:
1,Install the package:
yum install rabbitmq-server -y2,Start the message queue service and configure it to start when the system boots:
启动服务并加入自启动
systemctl enable rabbitmq-server.service && systemctl start rabbitmq-server.service3,Add the openstack user
增加用户并设置密码,密码为RABBIT_PASS,此密码可以自定义
rabbitmqctl add_user openstack RABBIT_PASS
4,
用户赋权
rabbitmqctl set_permissions openstack ".*" ".*" ".*"
输出如下:
[root@openstack1 ~]# rabbitmqctl set_permissions openstack ".*" ".*" ".*"
Setting permissions for user "openstack" in vhost "/"
八,
缓存数据库
官方文档:Memcached for RHEL and CentOS — Installation Guide documentation
缓存数据库的作用是保存用户令牌,此数据库仍然是安装在130服务器上
部署步骤
1,
安装缓存数据库
yum install memcached python-memcached -y2,
Edit the /etc/sysconfig/memcached file and complete the following actions:
编辑缓存数据库的配置文件;
Change the existing line OPTIONS="-l 127.0.0.1,::1" 修改为OPTIONS="-l 127.0.0.1,::1,openstack1"
这里说明一下,openstack1是130的主机名
3,
设置开启启动并启动缓存服务:
systemctl enable memcached&&systemctl start memcached
systemctl status memcached
最后的输出如下:
[root@openstack1 ~]# systemctl status memcached
● memcached.service - memcached daemon
   Loaded: loaded (/usr/lib/systemd/system/memcached.service; enabled; vendor preset: disabled)
   Active: active (running) since Mon 2023-01-30 19:13:20 CST; 1s ago
 Main PID: 3345 (memcached)
   CGroup: /system.slice/memcached.service
           └─3345 /usr/bin/memcached -p 11211 -u memcached -m 64 -c 1024 -l 127.0.0.1,::1,openstack1

Jan 30 19:13:20 openstack1 systemd[1]: Started memcached daemon.
Jan 30 19:13:20 openstack1 systemd[1]: Starting memcached daemon...
九,
etcd集群的安装
集群安装使用ansible自动部署,具体步骤见原来的博客:centos7操作系统 ---ansible剧本离线快速部署etcd集群_centos离线安装etcd_晚风_END的博客-CSDN博客
最终测试结果如下即可:
[root@openstack1 ~]# etcd_search  endpoint status -w table
+------------------------------+------------------+---------+---------+-----------+------------+-----------+------------+--------------------+--------+
|           ENDPOINT           |        ID        | VERSION | DB SIZE | IS LEADER | IS LEARNER | RAFT TERM | RAFT INDEX | RAFT APPLIED INDEX | ERRORS |
+------------------------------+------------------+---------+---------+-----------+------------+-----------+------------+--------------------+--------+
| https://192.168.123.130:2379 | 8fef69ba298e9bc3 |   3.4.9 |   20 kB |      true |      false |        55 |          9 |                  9 |        |
| https://192.168.123.131:2379 | 548b7cecabe21cd7 |   3.4.9 |   20 kB |     false |      false |        55 |          9 |                  9 |        |
| https://192.168.123.132:2379 | 28b34b044580be86 |   3.4.9 |   20 kB |     false |      false |        55 |          9 |                  9 |        |
+------------------------------+------------------+---------+---------+-----------+------------+-----------+------------+--------------------+--------
以上就是openstack的基本运行环境了,部署完毕后,可以将三个虚拟机打上快照啦。


