任务描述
接下来我们需要将根据业务需求将某人按照不同维度查询出来的结果,展示到Web页面上。
任务指导
数据展示模块流程图:
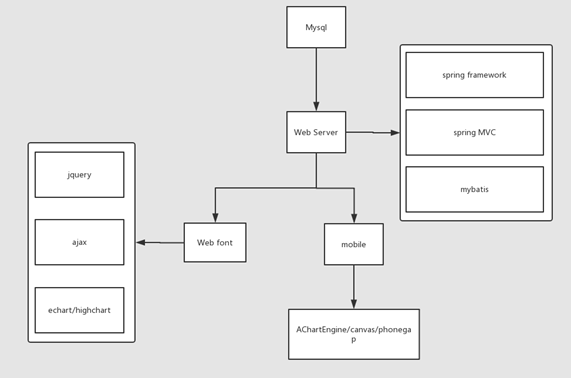
数据展示使用Java的SSM框架,需要实现的代码包括:
1. 实体类
2. 数据库操作
3. 业务逻辑操作
4. 控制器
5. 使用Echart展示数据
任务实现
注:此处使用的IntelliJ IDEA Ultimate版本,只有30天免费使用期;需要自行申请教育ID(免费使用)。
1、后端开发
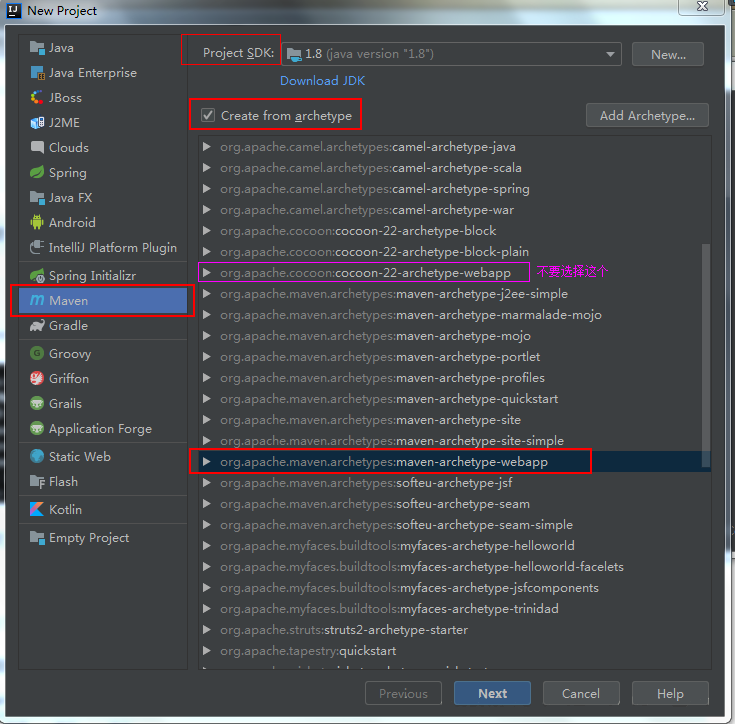
1) 新建module:ct_web
- 创建Maven项目,并选择maven-archetype-webapp插件
- 编辑项目的pom.xml,至少包含以下包:
| jar包 | 版本 | |
| spring基础包(10) | spring-context spring-core spring-beans spring-context-support spring-aop spring-aspects spring-expression spring-jdbc spring-orm spring-tx | 4.3.3.RELEASE |
| springMVC基础包(2) | spring-web spring-webmvc | 4.3.3.RELEASE |
| 数据库基础包 | c3p0 mysql-connector-java | 0.9.1.2 5.1.27 |
| mybatis基础包 | mybatis mybatis-spring | 3.2.1 1.3.0 |
| 通用必备包 | commons-logging | 1.2 |
| 其他包 | javax.servlet-api fastjson | 2.5 1.2.47 |
最终项目的pom.xml文件如下:
<?xml version="1.0" encoding="UTF-8"?>
<project xmlns="http://maven.apache.org/POM/4.0.0" xmlns:xsi="http://www.w3.org/2001/XMLSchema-instance"
xsi:schemaLocation="http://maven.apache.org/POM/4.0.0 http://maven.apache.org/xsd/maven-4.0.0.xsd">
<modelVersion>4.0.0</modelVersion>
<groupId>org.example</groupId>
<artifactId>ct_web</artifactId>
<version>1.0-SNAPSHOT</version>
<packaging>war</packaging>
<name>ct_web</name>
<!-- FIXME change it to the project's website -->
<url>http://www.example.com</url>
<properties>
<project.build.sourceEncoding>UTF-8</project.build.sourceEncoding>
<maven.compiler.source>1.7</maven.compiler.source>
<maven.compiler.target>1.7</maven.compiler.target>
</properties>
<dependencies>
<dependency>
<groupId>junit</groupId>
<artifactId>junit</artifactId>
<version>4.12</version>
<scope>test</scope>
</dependency>
<dependency>
<groupId>mysql</groupId>
<artifactId>mysql-connector-java</artifactId>
<version>5.1.27</version>
</dependency>
<dependency>
<groupId>c3p0</groupId>
<artifactId>c3p0</artifactId>
<version>0.9.1.2</version>
</dependency>
<dependency>
<groupId>org.mybatis</groupId>
<artifactId>mybatis</artifactId>
<version>3.2.1</version>
</dependency>
<dependency>
<groupId>org.springframework</groupId>
<artifactId>spring-context-support</artifactId>
<version>4.3.3.RELEASE</version>
</dependency>
<dependency>
<groupId>org.springframework</groupId>
<artifactId>spring-jdbc</artifactId>
<version>4.3.3.RELEASE</version>
</dependency>
<dependency>
<groupId>org.springframework</groupId>
<artifactId>spring-webmvc</artifactId>
<version>4.3.3.RELEASE</version>
</dependency>
<dependency>
<groupId>org.mybatis</groupId>
<artifactId>mybatis-spring</artifactId>
<version>1.3.0</version>
</dependency>
<dependency>
<groupId>org.aspectj</groupId>
<artifactId>aspectjweaver</artifactId>
<version>1.8.10</version>
</dependency>
<dependency>
<groupId>javax.servlet</groupId>
<artifactId>servlet-api</artifactId>
<version>2.5</version>
</dependency>
<dependency>
<groupId>javax.servlet</groupId>
<artifactId>jstl</artifactId>
<version>1.2</version>
</dependency>
<dependency>
<groupId>org.springframework.data</groupId>
<artifactId>spring-data-redis</artifactId>
<version>1.7.2.RELEASE</version>
</dependency>
<dependency>
<groupId>redis.clients</groupId>
<artifactId>jedis</artifactId>
<version>2.9.0</version>
</dependency>
<dependency>
<groupId>com.fasterxml.jackson.core</groupId>
<artifactId>jackson-core</artifactId>
<version>2.8.5</version>
</dependency>
<dependency>
<groupId>com.fasterxml.jackson.core</groupId>
<artifactId>jackson-databind</artifactId>
<version>2.8.5</version>
</dependency>
<dependency>
<groupId>com.fasterxml.jackson.core</groupId>
<artifactId>jackson-annotations</artifactId>
<version>2.8.5</version>
</dependency>
<dependency>
<groupId>com.alibaba</groupId>
<artifactId>fastjson</artifactId>
<version>1.2.47</version>
</dependency>
<dependency>
<groupId>commons-logging</groupId>
<artifactId>commons-logging</artifactId>
<version>1.2</version>
</dependency>
<dependency>
<groupId>commons-fileupload</groupId>
<artifactId>commons-fileupload</artifactId>
<version>1.3.1</version>
</dependency>
</dependencies>
<build>
<finalName>ct_web</finalName>
<pluginManagement><!-- lock down plugins versions to avoid using Maven defaults (may be moved to parent pom) -->
<plugins>
<plugin>
<artifactId>maven-clean-plugin</artifactId>
<version>3.1.0</version>
</plugin>
<!-- see http://maven.apache.org/ref/current/maven-core/default-bindings.html#Plugin_bindings_for_war_packaging -->
<plugin>
<artifactId>maven-resources-plugin</artifactId>
<version>3.0.2</version>
</plugin>
<plugin>
<artifactId>maven-compiler-plugin</artifactId>
<version>3.8.0</version>
</plugin>
<plugin>
<artifactId>maven-surefire-plugin</artifactId>
<version>2.22.1</version>
</plugin>
<plugin>
<artifactId>maven-war-plugin</artifactId>
<version>3.2.2</version>
</plugin>
<plugin>
<artifactId>maven-install-plugin</artifactId>
<version>2.5.2</version>
</plugin>
<plugin>
<artifactId>maven-deploy-plugin</artifactId>
<version>2.8.2</version>
</plugin>
</plugins>
</pluginManagement>
</build>
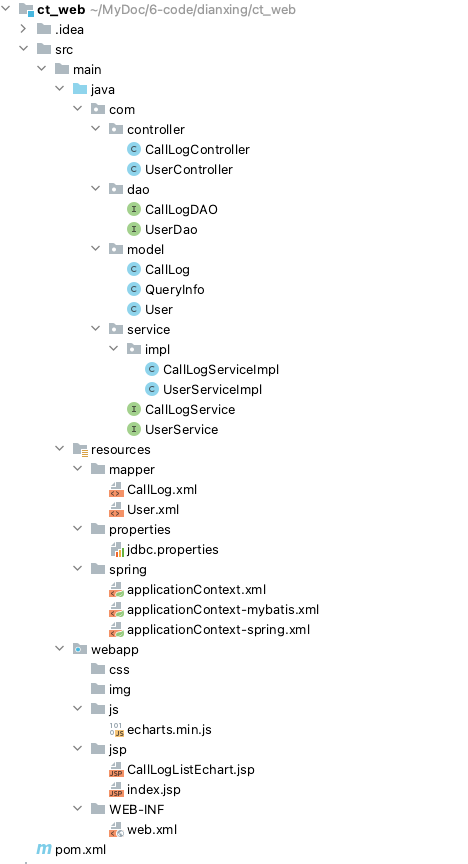
</project>2) 项目结构:
- 创建如下代码结构
- 在项目上点击右键,选择“Build Module ct_web”
- 配置部署Tomcat
在IDEA工具顶部,点击“Add Configuration”

在 Run/Debug Config 窗口,点击左上角的“+”,然后选择 Tomcat Server
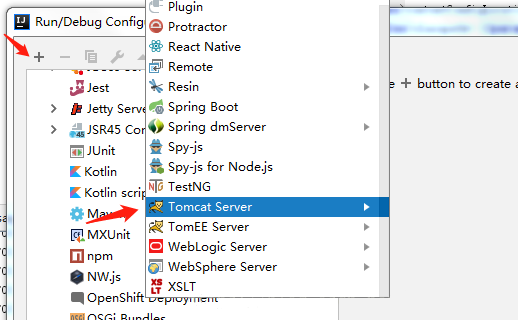
选择Tomcat Server --> Local

然后配置使用本地已经安装好的Tomcat(本地Tomcat在【/usr/local/】目录下)
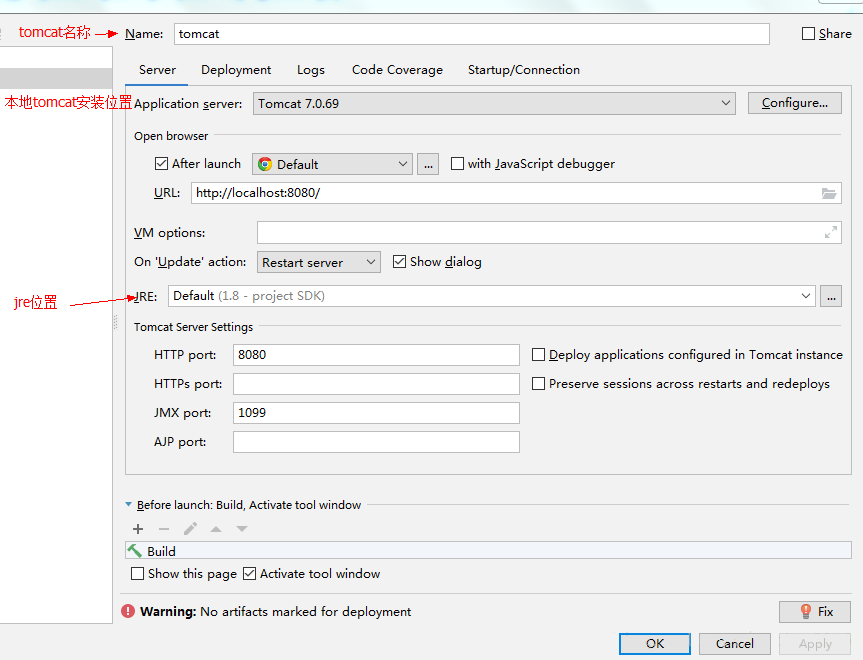
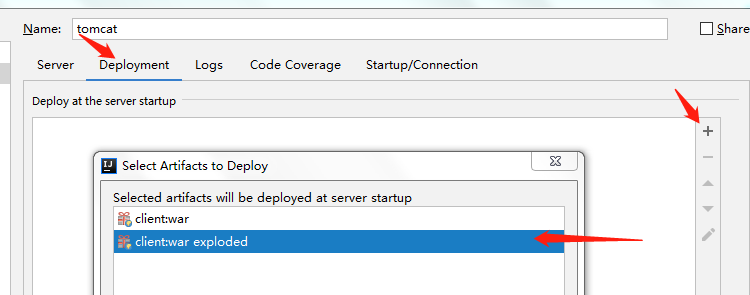
配置打包方式
3)代码实现
根据项目结构分别创建对应的包,并且实现相关代码:
- CallLog实体类用于存放返回给用户的数据,代码如下:
package com.model;

import java.io.Serializable;

/**
 * 用于存放返回给用户的数据
 */
public class CallLog implements Serializable{
    private String id_date_contact;
    private String id_date_dimension;
    private String id_contact;
    private String call_sum;
    private String call_duration_sum;
    private String telephone;
    private String name;
    private String year;
    private String month;
    private String day;

    public String getId_date_contact() {
        return id_date_contact;
    }

    public void setId_date_contact(String id_date_contact) {
        this.id_date_contact = id_date_contact;
    }

    public String getId_date_dimension() {
        return id_date_dimension;
    }

    public void setId_date_dimension(String id_date_dimension) {
        this.id_date_dimension = id_date_dimension;
    }

    public String getId_contact() {
        return id_contact;
    }

    public void setId_contact(String id_contact) {
        this.id_contact = id_contact;
    }

    public String getCall_sum() {
        return call_sum;
    }

    public void setCall_sum(String call_sum) {
        this.call_sum = call_sum;
    }

    public String getCall_duration_sum() {
        return call_duration_sum;
    }

    public void setCall_duration_sum(String call_duration_sum) {
        this.call_duration_sum = call_duration_sum;
    }

    public String getTelephone() {
        return telephone;
    }

    public void setTelephone(String telephone) {
        this.telephone = telephone;
    }

    public String getName() {
        return name;
    }

    public void setName(String name) {
        this.name = name;
    }

    public String getYear() {
        return year;
    }

    public void setYear(String year) {
        this.year = year;
    }

    public String getMonth() {
        return month;
    }

    public void setMonth(String month) {
        this.month = month;
    }

    public String getDay() {
        return day;
    }


    public void setDay(String day) {
        this.day = day;
    }

    @Override
    public String toString() {
        return "CallLog{" +
                "call_sum='" + call_sum + '\'' +
                ", call_duration_sum='" + call_duration_sum + '\'' +
                ", telephone='" + telephone + '\'' +
                ", name='" + name + '\'' +
                ", year='" + year + '\'' +
                ", month='" + month + '\'' +
                ", day='" + day + '\'' +
                '}';
    }
}- 用户实体类定义如下:
package com.model;

import java.io.Serializable;
import java.util.Date;

public class User implements Serializable{
    private int id;
    private String username;
    private String password;
    private String email;
    private String role;
    private int status;
    private Date regTime;
    private String regIp;

    public int getId() {
        return id;
    }

    public void setId(int id) {
        this.id = id;
    }

    public String getUsername() {
        return username;
    }

    public void setUsername(String username) {
        this.username = username;
    }

    public String getPassword() {
        return password;
    }

    public void setPassword(String password) {
        this.password = password;
    }

    public String getEmail() {
        return email;
    }

    public void setEmail(String email) {
        this.email = email;
    }

    public String getRole() {
        return role;
    }

    public void setRole(String role) {
        this.role = role;
    }

    public int getStatus() {
        return status;
    }

    public void setStatus(int status) {
        this.status = status;
    }

    public Date getRegTime() {
        return regTime;
    }

    public void setRegTime(Date regTime) {
        this.regTime = regTime;
    }

    public String getRegIP() {
        return regIp;
    }

    public void setRegIP(String regIp) {
        this.regIp = regIp;
    }
}- 定义QueryInfo实体类用于存放用户请求的数据
package com.model;

import java.io.Serializable;

/**
 * 该类用于存放用户请求的数据
 */
public class QueryInfo implements Serializable{
    private String telephone;
    private String year;
    private String month;
    private String day;

    public QueryInfo() {
        super();
    }

    public QueryInfo(String telephone, String year, String month, String day) {
        super();
        this.telephone = telephone;
        this.year = year;
        this.month = month;
        this.day = day;
    }

    public String getTelephone() {
        return telephone;
    }

    public void setTelephone(String telephone) {
        this.telephone = telephone;
    }

    public String getYear() {
        return year;
    }

    public void setYear(String year) {
        this.year = year;
    }

    public String getMonth() {
        return month;
    }

    public void setMonth(String month) {
        this.month = month;
    }

    public String getDay() {
        return day;
    }

    public void setDay(String day) {
        this.day = day;
    }
}- 创建CallLog对应的Dao实现类CallLogDao
package com.dao;

import com.model.CallLog;

import java.util.HashMap;
import java.util.List;

public interface CallLogDAO {
    List<CallLog> getCallLogList(HashMap<String, String> paramsMap);
}- 由于使用MyBatis,所以需要创建CallLogDao对应的mapper映射文件,文件位置 resources/mapper/CallLog.xml
<?xml version="1.0" encoding="UTF-8"?>
<!DOCTYPE mapper PUBLIC "-//mybatis.org//DTD Mapper 3.0//EN" "http://mybatis.org/dtd/mybatis-3-mapper.dtd">

<!-- 设置为IUserDao接口方法提供sql语句配置 -->
<mapper namespace="com.dao.CallLogDAO">
    <parameterMap type="java.util.HashMap" id="parameterMap">
        <parameter javaType="string" jdbcType="VARCHAR" property="telephone"/>
        <parameter javaType="string" jdbcType="VARCHAR" property="year"/>
        <parameter javaType="string" jdbcType="VARCHAR" property="month"/>
        <parameter javaType="string" jdbcType="VARCHAR" property="day"/>
    </parameterMap>
    <resultMap id="userList" type="com.model.CallLog">
        <id column="call_sum" property="call_sum"></id>
        <id column="call_duration_sum" property="call_duration_sum"></id>
        <id column="telephone" property="telephone"></id>
        <id column="name" property="name"></id>
        <id column="year" property="year"></id>
        <id column="month" property="month"></id>
        <id column="day" property="day"></id>
    </resultMap>
    <select id="getCallLogList" parameterMap="parameterMap" resultMap="userList">
        SELECT call_sum, call_duration_sum, telephone, name, year , month, day FROM tb_dimension_date t4
        INNER JOIN (SELECT id_date_dimension, call_sum, call_duration_sum, telephone, name FROM tb_call t2
                    INNER JOIN ( SELECT id, telephone, name FROM tb_contacts WHERE telephone = ? ) t1
                    ON t2.id_contact = t1.id ) t3
        ON t4.id = t3.id_date_dimension WHERE year = ? AND month = ? AND day = ? ORDER BY year, month
    </select>

</mapper>- 创建User对应的Dao实现类UserDao
package com.dao;

import com.model.User;

import java.util.List;

public interface UserDao {
    List<User> getAllUser();
}- 创建UserDao对应的mapper映射文件,文件位置 resources/mapper/User.xml
<?xml version="1.0" encoding="UTF-8"?>
<!DOCTYPE mapper PUBLIC "-//mybatis.org//DTD Mapper 3.0//EN" "http://mybatis.org/dtd/mybatis-3-mapper.dtd">

<!-- 设置为IUserDao接口方法提供sql语句配置 -->
<mapper namespace="com.dao.UserDao">
    <resultMap id="userList" type="com.model.User">
        <id column="id" property="id" ></id>
        <id column="email" property="email" ></id>
        <id column="password" property="password" ></id>
        <id column="username" property="username" ></id>
        <id column="role" property="role" ></id>
        <id column="status" property="status" ></id>
        <id column="regTime" property="regTime" ></id>
        <id column="regIp" property="regIp" ></id>
    </resultMap>
    <select id="getAllUser" resultMap="userList">
        SELECT * FROM user
    </select>

</mapper>- 创建CallLog对应的Service接口CallLogService
package com.service;

import com.model.CallLog;

import java.util.HashMap;
import java.util.List;

public interface CallLogService {
    List<CallLog> getCallLogList(HashMap<String, String> paramsMap);
}- 创建User对应的Service接口UserService
package com.service;

import com.model.User;

import java.util.List;

public interface UserService {
    List<User> getAllUser();
}- 创建CallLogService实现类CallLogServiceImpl
package com.service.impl;

import com.dao.CallLogDAO;
import com.model.CallLog;
import com.service.CallLogService;
import org.springframework.stereotype.Service;

import javax.annotation.Resource;
import java.util.HashMap;
import java.util.List;

@Service("callLogService")
public class CallLogServiceImpl implements CallLogService {
    @Resource
    private CallLogDAO callLogDAO;

    public List<CallLog> getCallLogList(HashMap<String, String> paramsMap) {
//        //按照年统计:统计某个用户,1年12个月的所有的数据(不精确到day)
//        String sql = "SELECT `call_sum`, `call_duration_sum`, `telephone`, `name`, `year` , `month`, `day` FROM tb_dimension_date t4 INNER JOIN ( SELECT `id_date_dimension`, `call_sum`, `call_duration_sum`, `telephone`, `name` FROM tb_call t2 INNER JOIN ( SELECT `id`, `telephone`, `name` FROM tb_contacts WHERE telephone = :telephone ) t1 ON t2.id_contact = t1.id ) t3 ON t4.id = t3.id_date_dimension WHERE `year` = :year AND `month` = :month AND `day` = :day ORDER BY `year`, `month`;";
//        BeanPropertyRowMapper<CallLog> beanPropertyRowMapper = new BeanPropertyRowMapper<CallLog>(CallLog.class);
//        List<CallLog> list = namedParameterJdbcTemplate.query(sql, paramsMap, beanPropertyRowMapper);
        List<CallLog> list = callLogDAO.getCallLogList(paramsMap);
        return list;
    }
}- 创建UserService实现类UserServiceImpl
package com.service.impl;

import com.dao.UserDao;
import com.model.User;
import com.service.UserService;
import org.springframework.cache.annotation.Cacheable;
import org.springframework.stereotype.Service;

import javax.annotation.Resource;
import java.lang.reflect.Method;
import java.util.List;

@Service("userService")
public class UserServiceImpl implements UserService {
    @Resource
    private UserDao userDao;

    @Cacheable(value="user",key = "#root.methodName")
    public List<User> getAllUser() {
        List<User> list=userDao.getAllUser();
        return list;
    }
}- 创建CallLog对应的Controller实现类CallLogController代码如下:
package com.controller;

import com.model.CallLog;
import com.model.QueryInfo;
import com.dao.CallLogDAO;
import com.service.CallLogService;
import org.springframework.beans.factory.annotation.Autowired;
import org.springframework.context.ApplicationContext;
import org.springframework.context.support.ClassPathXmlApplicationContext;
import org.springframework.stereotype.Controller;
import org.springframework.ui.Model;
import org.springframework.web.bind.annotation.RequestMapping;

import java.util.HashMap;
import java.util.List;

@Controller
@RequestMapping("/callLog")
public class CallLogController {

    @Autowired
    public CallLogService callLogService;

    @RequestMapping("/queryCallLogList")
    public String queryCallLog(Model model, QueryInfo queryInfo){

        HashMap<String, String> hashMap = new HashMap<String, String>();
        hashMap.put("telephone", queryInfo.getTelephone());
        hashMap.put("year", queryInfo.getYear());
        hashMap.put("month", queryInfo.getMonth());
        hashMap.put("day", queryInfo.getDay());

        List<CallLog> list = callLogService.getCallLogList(hashMap);

        StringBuilder dateSB = new StringBuilder();
        StringBuilder callSumSB = new StringBuilder();
        StringBuilder callDurationSumSB = new StringBuilder();

        for(int i = 0; i < list.size(); i++){
            CallLog callLog = list.get(i);
            //1月, 2月, ....12月,
            dateSB.append(callLog.getMonth() + "月,");
            callSumSB.append(callLog.getCall_sum() + ",");
            callDurationSumSB.append(callLog.getCall_duration_sum() + ",");
        }

        dateSB.deleteCharAt(dateSB.length() - 1);
        callSumSB.deleteCharAt(callSumSB.length() - 1);
        callDurationSumSB.deleteCharAt(callDurationSumSB.length() - 1);

        //通过model返回数据
        model.addAttribute("telephone", list.get(0).getTelephone());
        model.addAttribute("name", list.get(0).getName());
        model.addAttribute("date", dateSB.toString());
        model.addAttribute("count", callSumSB.toString());
        model.addAttribute("duration", callDurationSumSB.toString());

        return "/CallLogListEchart";
    }
}- 创建User对应的Controller实现类UserController代码如下:
package com.controller;

import com.model.User;
import com.service.UserService;
import org.springframework.beans.factory.annotation.Autowired;
import org.springframework.cache.annotation.Cacheable;
import org.springframework.stereotype.Controller;
import org.springframework.web.bind.annotation.RequestMapping;
import org.springframework.web.bind.annotation.ResponseBody;

import java.util.List;

@Controller
@RequestMapping("/user")
public class UserController {
    @Autowired
    public UserService userService;

    @RequestMapping("info")
    @ResponseBody
    public List<User> userInfo() {
        List<User> userList = userService.getAllUser();
        System.out.println("------------------------------------------");
        System.out.println(userList.size());
        return userList;
    }
}
2、前端数据展示
- 在项目导入 js/echarts.min.js文件(文件保存在master1服务器的/opt/software目录下)
- 在web.xml文件中导入Spring配置文件,并配置spring监听器和编码过滤器等
<?xml version="1.0" encoding="UTF-8"?>
<web-app xmlns="http://xmlns.jcp.org/xml/ns/javaee"
         xmlns:xsi="http://www.w3.org/2001/XMLSchema-instance"
         xsi:schemaLocation="http://xmlns.jcp.org/xml/ns/javaee http://xmlns.jcp.org/xml/ns/javaee/web-app_3_1.xsd"
         version="3.1">
  <display-name>SpringMVC_CRUD</display-name>
  <welcome-file-list>
    <welcome-file>jsp/index.jsp</welcome-file>
  </welcome-file-list>
  <servlet>
    <servlet-name>SpringMVC</servlet-name>
    <servlet-class>org.springframework.web.servlet.DispatcherServlet</servlet-class>
    <init-param>
      <param-name>contextConfigLocation</param-name>
      <param-value>classpath:spring/applicationContext*.xml</param-value>
      <!--  <param-value>classpath:bean/applicationContext.xml</param-value>-->
    </init-param>
    <load-on-startup>1</load-on-startup>
    <async-supported>true</async-supported>
  </servlet>
  <servlet-mapping>
    <servlet-name>SpringMVC</servlet-name>
    <url-pattern>*.do</url-pattern>
  </servlet-mapping>

  <context-param>
    <param-name>contextConfigLocation</param-name>
    <param-value>classpath:spring/applicationContext*.xml</param-value>
  </context-param>


  <!-- 编码过滤器 -->
  <filter>
    <filter-name>encodingFilter</filter-name>
    <filter-class>org.springframework.web.filter.CharacterEncodingFilter</filter-class>
    <init-param>
      <param-name>encoding</param-name>
      <param-value>UTF-8</param-value>
    </init-param>
  </filter>
  <filter-mapping>
    <filter-name>encodingFilter</filter-name>
    <url-pattern>/*</url-pattern>
  </filter-mapping>

  <!-- spring监听器 -->
  <listener>
    <listener-class>org.springframework.web.context.ContextLoaderListener</listener-class>
  </listener>

  <!-- 防止spring内存溢出监听器,比如quartz -->
  <listener>
    <listener-class>org.springframework.web.util.IntrospectorCleanupListener</listener-class>
  </listener>
  <session-config>
    <session-timeout>30</session-timeout>
  </session-config>

</web-app>- 编写jsp/index.jsp页面
<%@ taglib prefix="c" uri="http://java.sun.com/jsp/jstl/core" %>
<%@ page language="java" contentType="text/html; charset=utf-8"
         pageEncoding="utf-8" %>
<%
    String path = request.getContextPath();
%>
<!DOCTYPE html PUBLIC "-//W3C//DTD HTML 4.01 Transitional//EN" "http://www.w3.org/TR/html4/loose.dtd">
<html>
<head>
    <meta http-equiv="Content-Type" content="text/html; charset=UTF-8">
    <title>Show Time</title>
</head>
<body>
<form action="callLog/queryCallLogList.do" method="post">
    手机号码:<input type="text", name="telephone">
    年:<input type="text", name="year">
    月:<input type="text", name="month">
    日:<input type="text", name="day">
    <input type="submit" value="查询">
</form>
</body>
</html>- 编写jsp/CallLogListEchart.jsp
<%--
  Created by IntelliJ IDEA.
  User: Z
  Date: 2017/10/28
  Time: 14:36
  To change this template use File | Settings | File Templates.
--%>
<%@ page contentType="text/html;charset=UTF-8" language="java" isELIgnored="false" %>
<html>
<head>
    <meta http-equiv="Content-Type" content="text/html; charset=UTF-8">
    <title>显示通话记录</title>
    <script type="text/javascript" src="../js/echarts.min.js"></script>
    <%--<script type="text/javascript" src="${pageContext.request.contextPath}/js/echarts.min.js"></script>--%>
    <%--<script type="text/javascript" src="${pageContext.request.contextPath}/jquery-3.2.0.min.js"></script>--%>
    <%--<script type="text/javascript" src="http://echarts.baidu.com/gallery/vendors/echarts/echarts-all-3.js"></script>--%>
</head>
<body style="height: 100%; margin: 0; background-color: #3C3F41">
<style type="text/css">
    h3 {
        font-size: 12px;
        color: #ffffff;
        display: inline
    }
</style>
<h4 style="color: #ffffff;text-align:center">通话月单查询:${requestScope.name}</h4>
<%--<h3 style="margin-left: 70%">通话次数</h3>--%>
<%--<h3 style="margin-left: 20%">通话时长</h3>--%>
<div id="container1" style="height: 80%; width: 50%; float:left"></div>
<div id="container2" style="height: 80%; width: 50%; float:right"></div>
<script type="text/javascript">
    var telephone = "${requestScope.telephone}"
    var name = "${requestScope.name}"

    var date = "${requestScope.date}"//1月,2月,3月,xxxxx
    var count = "${requestScope.count}"

    var duration = "${requestScope.duration}"
    var pieData = converterFun(duration.split(","), date.split(","))
    callog1();
    callog2();

    function converterFun(duration, date) {
        var array = [];
        for (var i = 0; i < duration.length; i++) {
            var map = {};
            map['value'] = parseFloat(duration[i]);
            map['name'] = date[i];
            array.push(map);
        }
        return array;
    }

    function callog1() {
        var dom = document.getElementById("container1");
        var myChart = echarts.init(dom);
        myChart.showLoading();
        var option = {
            title: {
                text: '通话次数',
                textStyle: {
                    //文字颜色
                    color: '#ffffff',
                    //字体风格,'normal','italic','oblique'
                    fontStyle: 'normal',
                    //字体粗细 'normal','bold','bolder','lighter',100 | 200 | 300 | 400...
                    fontWeight: 'bold',
                    //字体系列
                    fontFamily: 'sans-serif',
                    //字体大小
                    fontSize: 13
                },
                itemGap: 12,
            },
            grid: {
                x: 80,
                y: 60,
                x2: 80,
                y2: 60,
                backgroundColor: 'rgba(0,0,0,0)',
                borderWidth: 1,
                borderColor: '#ffffff'
            },
            tooltip: {
                trigger: 'axis'
            },
            legend: {
                borderColor: '#ffffff',
                itemGap: 10,
                data: ['通话次数'],
                textStyle: {
                    color: '#ffffff'// 图例文字颜色
                }
            },
            toolbox: {
                show: false,
                feature: {
                    dataZoom: {
                        yAxisIndex: 'none'
                    },
                    dataView: {readOnly: false},
                    magicType: {type: ['line', 'bar']},
                    restore: {},
                    saveAsImage: {}
                }
            },
            xAxis: {
                data: date.split(","),
                axisLine: {
                    lineStyle: {
                        color: '#ffffff',
                        width: 2
                    }
                }
            },
            yAxis: {
                axisLine: {
                    lineStyle: {
                        color: '#ffffff',
                        width: 2
                    }
                }
            },
            series: [
                {
                    type: 'line',
                    data: count.split(","),
                    itemStyle: {
                        normal: {
                            color: '#ffca29',
                            lineStyle: {
                                color: '#ffd80d',
                                width: 2
                            }
                        }
                    },
                    markPoint: {
                        data: [
                            {type: 'max', name: '最大值'},
                            {type: 'min', name: '最小值'}
                        ]
                    },
                    markLine: {
                        data: [
                            {type: 'average', name: '平均值'}
                        ]
                    }
                }
            ]
        };
        if (option && typeof option === "object") {
            myChart.setOption(option, true);
        }
        myChart.hideLoading()
    }

    function callog2() {
        var dom = document.getElementById("container2");
        var myChart = echarts.init(dom);
        myChart.showLoading();
        var option = {
            title: {
                text: '通话时长',
                textStyle: {
                    //文字颜色
                    color: '#ffffff',
                    //字体风格,'normal','italic','oblique'
                    fontStyle: 'normal',
                    //字体粗细 'normal','bold','bolder','lighter',100 | 200 | 300 | 400...
                    fontWeight: 'bold',
                    //字体系列
                    fontFamily: 'sans-serif',
                    //字体大小
                    fontSize: 13
                },
                itemGap: 12,
            },
            tooltip: {
                trigger: 'item',
                formatter: "{a} <br/>{b} : {c} ({d}%)"
            },
            visualMap: {
                show: false,
                min: Math.min.apply(null, duration.split(",")),
                max: Math.max.apply(null, duration.split(",")),
                inRange: {
                    colorLightness: [0, 0.5]
                }
            },
            series: [
                {
                    name: '通话时长',
                    type: 'pie',
                    radius: '55%',
                    center: ['50%', '50%'],
                    data: pieData.sort(function (a, b) {
                        return a.value - b.value;
                    }),
                    roseType: 'radius',
                    label: {
                        normal: {
                            textStyle: {
                                color: 'rgba(255, 255, 255, 0.3)'
                            }
                        }
                    },
                    labelLine: {
                        normal: {
                            lineStyle: {
                                color: 'rgba(255, 255, 255, 0.3)'
                            },
                            smooth: 0.2,
                            length: 10,
                            length2: 20
                        }
                    },
                    itemStyle: {
                        normal: {
                            color: '#01c1c2',
                            shadowBlur: 200,
                            shadowColor: 'rgba(0, 0, 0, 0.5)'
                        }
                    },

                    animationType: 'scale',
                    animationEasing: 'elasticOut',
                    animationDelay: function (idx) {
                        return Math.random() * 200;
                    }
                }
            ]
        };
        if (option && typeof option === "object") {
            myChart.setOption(option, true);
        }
        myChart.hideLoading()
    }
</script>
</body>
</html>- 创建Spring配置文件,文件位置 resources/spring/applicationContext.xml,可以在此配置关于拦截器和事务
<?xml version="1.0" encoding="UTF-8"?>
<beans xmlns="http://www.springframework.org/schema/beans"
xmlns:xsi="http://www.w3.org/2001/XMLSchema-instance"
xmlns:context="http://www.springframework.org/schema/context"
xmlns:mvc="http://www.springframework.org/schema/mvc"
xmlns:aop="http://www.springframework.org/schema/aop"
xmlns:tx="http://www.springframework.org/schema/tx"
xsi:schemaLocation="http://www.springframework.org/schema/beans
http://www.springframework.org/schema/beans/spring-beans.xsd
http://www.springframework.org/schema/context
http://www.springframework.org/schema/context/spring-context.xsd
http://www.springframework.org/schema/mvc
http://www.springframework.org/schema/mvc/spring-mvc.xsd
http://www.springframework.org/schema/aop
http://www.springframework.org/schema/aop/spring-aop.xsd
http://www.springframework.org/schema/tx
http://www.springframework.org/schema/tx/spring-tx.xsd">
<!--自定义拦截器
<mvc:interceptors>
<mvc:interceptor>
<mvc:mapping path="/*.do"/>
<bean class="com.twjitm.aop.TwjItmInterceptor"></bean>
</mvc:interceptor>
</mvc:interceptors>
-->
<!-- 切入点 -->
<!--<tx:advice id="transactionAdvice" transaction-manager="transactionManager">
<!– spring事物管理 –>
<tx:attributes>
<tx:method name="add*" />
<tx:method name="save*" />
<tx:method name="Save*" />
<tx:method name="update*" />
<tx:method name="modify*" />
<tx:method name="edit*" />
<tx:method name="delete*" />
<tx:method name="remove*" />
<tx:method name="change*" />
<tx:method name="repair" />
<tx:method name="deleteAndRepair" />
<tx:method name="login*" />
<tx:method name="get*" propagation="SUPPORTS" />
<tx:method name="find*" propagation="SUPPORTS" />
<tx:method name="load*" propagation="SUPPORTS" />
<tx:method name="search*" propagation="SUPPORTS" />
<tx:method name="datagrid*" propagation="SUPPORTS" />
<tx:method name="*" propagation="SUPPORTS" />
</tx:attributes>
</tx:advice>
<aop:config proxy-target-class="true">
<aop:pointcut id="transactionPointcut" expression="execution(* com.twjitm.*.service.Impl.*.*(..))" />
<aop:advisor pointcut-ref="transactionPointcut"
advice-ref="transactionAdvice" />
</aop:config>-->
</beans>- 创建Mybatis配置文件,文件位置 resources/spring/applicationContext-mybatis.xml
<?xml version="1.0" encoding="UTF-8"?>
<beans xmlns="http://www.springframework.org/schema/beans"
       xmlns:xsi="http://www.w3.org/2001/XMLSchema-instance"
       xmlns:context="http://www.springframework.org/schema/context"
       xmlns:tx="http://www.springframework.org/schema/tx"
       xsi:schemaLocation="http://www.springframework.org/schema/beans
       http://www.springframework.org/schema/beans/spring-beans.xsd
       http://www.springframework.org/schema/context
       http://www.springframework.org/schema/context/spring-context.xsd
       http://www.springframework.org/schema/tx
       http://www.springframework.org/schema/tx/spring-tx.xsd">


    <context:component-scan base-package="com.service" use-default-filters="false"/>
    <!-- 配置数据库相关参数properties的属性:${url} -->
    <context:property-placeholder ignore-unresolvable="true" location="classpath:properties/jdbc.properties"/>

    <!-- 数据库连接池 -->
    <bean id="dataSource" class="com.mchange.v2.c3p0.ComboPooledDataSource">
        <property name="driverClass" value="${jdbc.driver}"/>
        <property name="jdbcUrl" value="${jdbc.url}"/>
        <property name="user" value="${jdbc.username}"/>
        <property name="password" value="${jdbc.password}"/>
        <property name="maxPoolSize" value="${c3p0.maxPoolSize}"/>
        <property name="minPoolSize" value="${c3p0.minPoolSize}"/>
        <property name="autoCommitOnClose" value="${c3p0.autoCommitOnClose}"/>
        <property name="checkoutTimeout" value="${c3p0.checkoutTimeout}"/>
        <property name="acquireRetryAttempts" value="${c3p0.acquireRetryAttempts}"/>
    </bean>

    <!-- 配置SqlSessionFactory对象 -->
    <bean id="sqlSessionFactory" class="org.mybatis.spring.SqlSessionFactoryBean">
        <!-- 注入数据库连接池 -->
        <property name="dataSource" ref="dataSource"/>
        <!-- 扫描model包 使用别名 -->
        <property name="typeAliasesPackage" value="com.model"/>
        <!-- 扫描sql配置文件:mapper需要的xml文件 -->
        <property name="mapperLocations" value="classpath:mapper/*.xml"/>
        <property name="configurationProperties">
            <props>
                <prop key="mapUnderscoreToCamelCase">true</prop>
            </props>
        </property>
    </bean>

    <!-- 配置扫描Dao接口包,动态实现Dao接口,注入到spring容器中 -->
    <bean class="org.mybatis.spring.mapper.MapperScannerConfigurer">
        <!-- 注入sqlSessionFactory -->
        <property name="sqlSessionFactoryBeanName" value="sqlSessionFactory"/>
        <!-- 给出需要扫描Dao接口包 -->
        <property name="basePackage" value="com.dao"/>
    </bean>

    <!-- 配置事务管理器 -->
    <bean id="transactionManager" class="org.springframework.jdbc.datasource.DataSourceTransactionManager">
        <!-- 注入数据库连接池 -->
        <property name="dataSource" ref="dataSource"/>
    </bean>

    <!-- 配置基于注解的声明式事务 -->
    <tx:annotation-driven transaction-manager="transactionManager"></tx:annotation-driven>

</beans>- 创建SpringMVC配置文件,文件位置 resources/spring/applicationContext-spring.xml
<?xml version="1.0" encoding="UTF-8"?>
<beans xmlns="http://www.springframework.org/schema/beans"
       xmlns:xsi="http://www.w3.org/2001/XMLSchema-instance"
       xmlns:context="http://www.springframework.org/schema/context"
       xmlns:mvc="http://www.springframework.org/schema/mvc"
       xsi:schemaLocation="http://www.springframework.org/schema/beans
       http://www.springframework.org/schema/beans/spring-beans.xsd
       http://www.springframework.org/schema/context
       http://www.springframework.org/schema/context/spring-context.xsd
         http://www.springframework.org/schema/mvc
        http://www.springframework.org/schema/mvc/spring-mvc.xsd">

    <context:component-scan base-package="com.*"/>

    <!-- 开启SpringMVC注解模式 -->
    <mvc:annotation-driven/>
    <!-- 静态资源默认servlet配置 -->
    <mvc:default-servlet-handler/>

    <bean name="mappingJacksonHttpMessageConverter"
          class="org.springframework.http.converter.json.MappingJackson2HttpMessageConverter">
        <property name="supportedMediaTypes">
            <list>
                <value>text/html;charset=UTF-8</value>
            </list>
        </property>
    </bean>
    <!-- 启动SpringMVC的注解功能,完成请求和注解POJO的映射 -->
    <bean class="org.springframework.web.servlet.mvc.method.annotation.RequestMappingHandlerAdapter">
        <property name="messageConverters">
            <list>
                <ref bean="mappingJacksonHttpMessageConverter"/> <!-- JSON转换器 -->
            </list>
        </property>
    </bean>
    <!-- 定义跳转的文件的前后缀 ,视图模式配置 -->
    <bean class="org.springframework.web.servlet.view.InternalResourceViewResolver">
        <property name="order" value="1"/>
        <property name="prefix" value="/jsp/" />
        <property name="suffix" value=".jsp"/>
    </bean>
    <!--这里是对静态资源的映射-->
    <mvc:resources mapping="/js/**" location="/js/" />
    <mvc:resources mapping="/css/**" location="/css/" />
    <mvc:resources mapping="/img/**" location="/img/" />

    <!-- 文件上传配置 -->
    <bean id="multipartResolver" class="org.springframework.web.multipart.commons.CommonsMultipartResolver">
        <!-- 默认编码 -->
        <property name="defaultEncoding" value="UTF-8"/>
        <!-- 上传文件大小限制为31M,31*1024*1024 -->
        <property name="maxUploadSize" value="32505856"/>
        <!-- 内存中的最大值 -->
        <property name="maxInMemorySize" value="4096"/>
    </bean>
</beans>
创建JDBC配置文件,文件位置 resources/properties/jdbc.properties
#数据库配置
jdbc.driver=com.mysql.jdbc.Driver
jdbc.url=jdbc:mysql://master1:3306/db_telecom?useUnicode=true&characterEncoding=UTF-8
jdbc.username=root
jdbc.password=Qst@123456
#连接池配置
#最大连接数
c3p0.maxPoolSize=30000
#最小连接数
c3p0.minPoolSize=10
#关闭连接后不自动commit
c3p0.autoCommitOnClose=false
#获取连接超时时间
c3p0.checkoutTimeout=10000
#当获取连接失败重试次数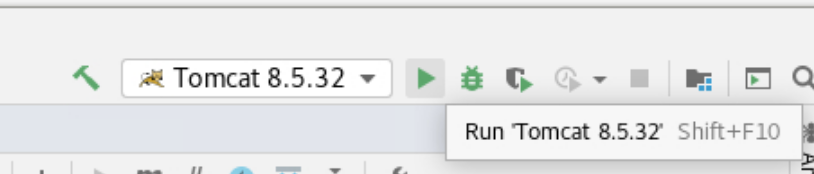
c3p0.acquireRetryAttempts=2- 启动项目
点击
![]()
按钮运行Tomcat
运行后如下图
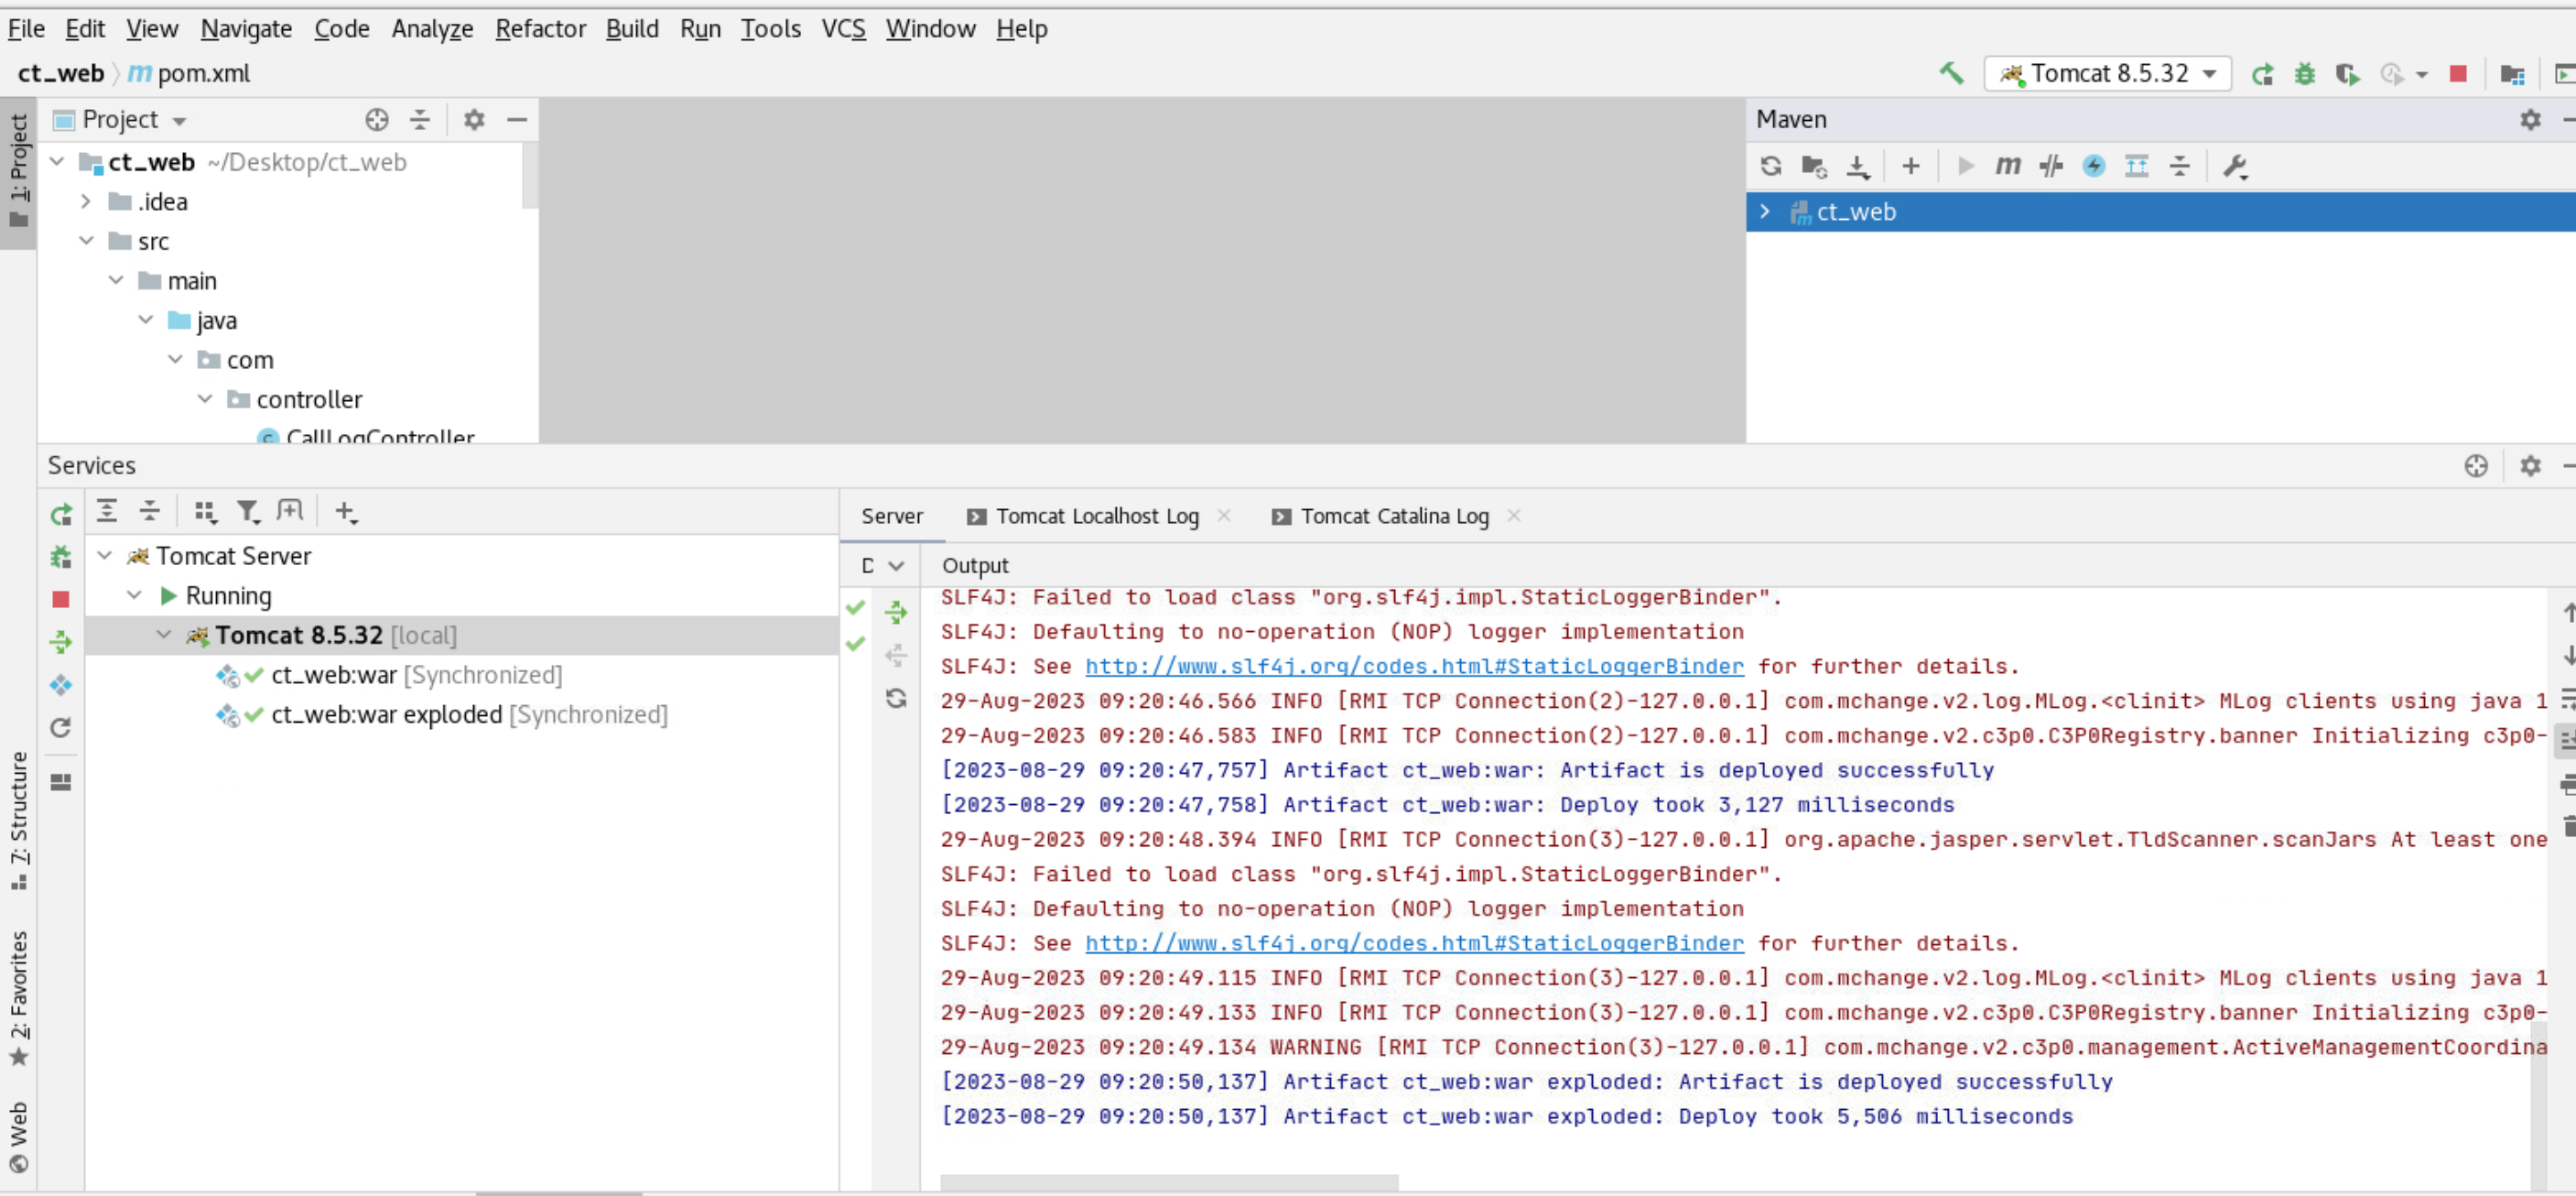
项目会自动打开Web浏览器,输入“数据生产”中的模拟的手机号和模拟数据对应的日期,如下图;

点击“查询按钮”,结果如下:

上图展示的图表依模拟数据的丰富程度决定,建议在模拟数据时尽量运行的时间长一点,则显示的图标将更加丰富。
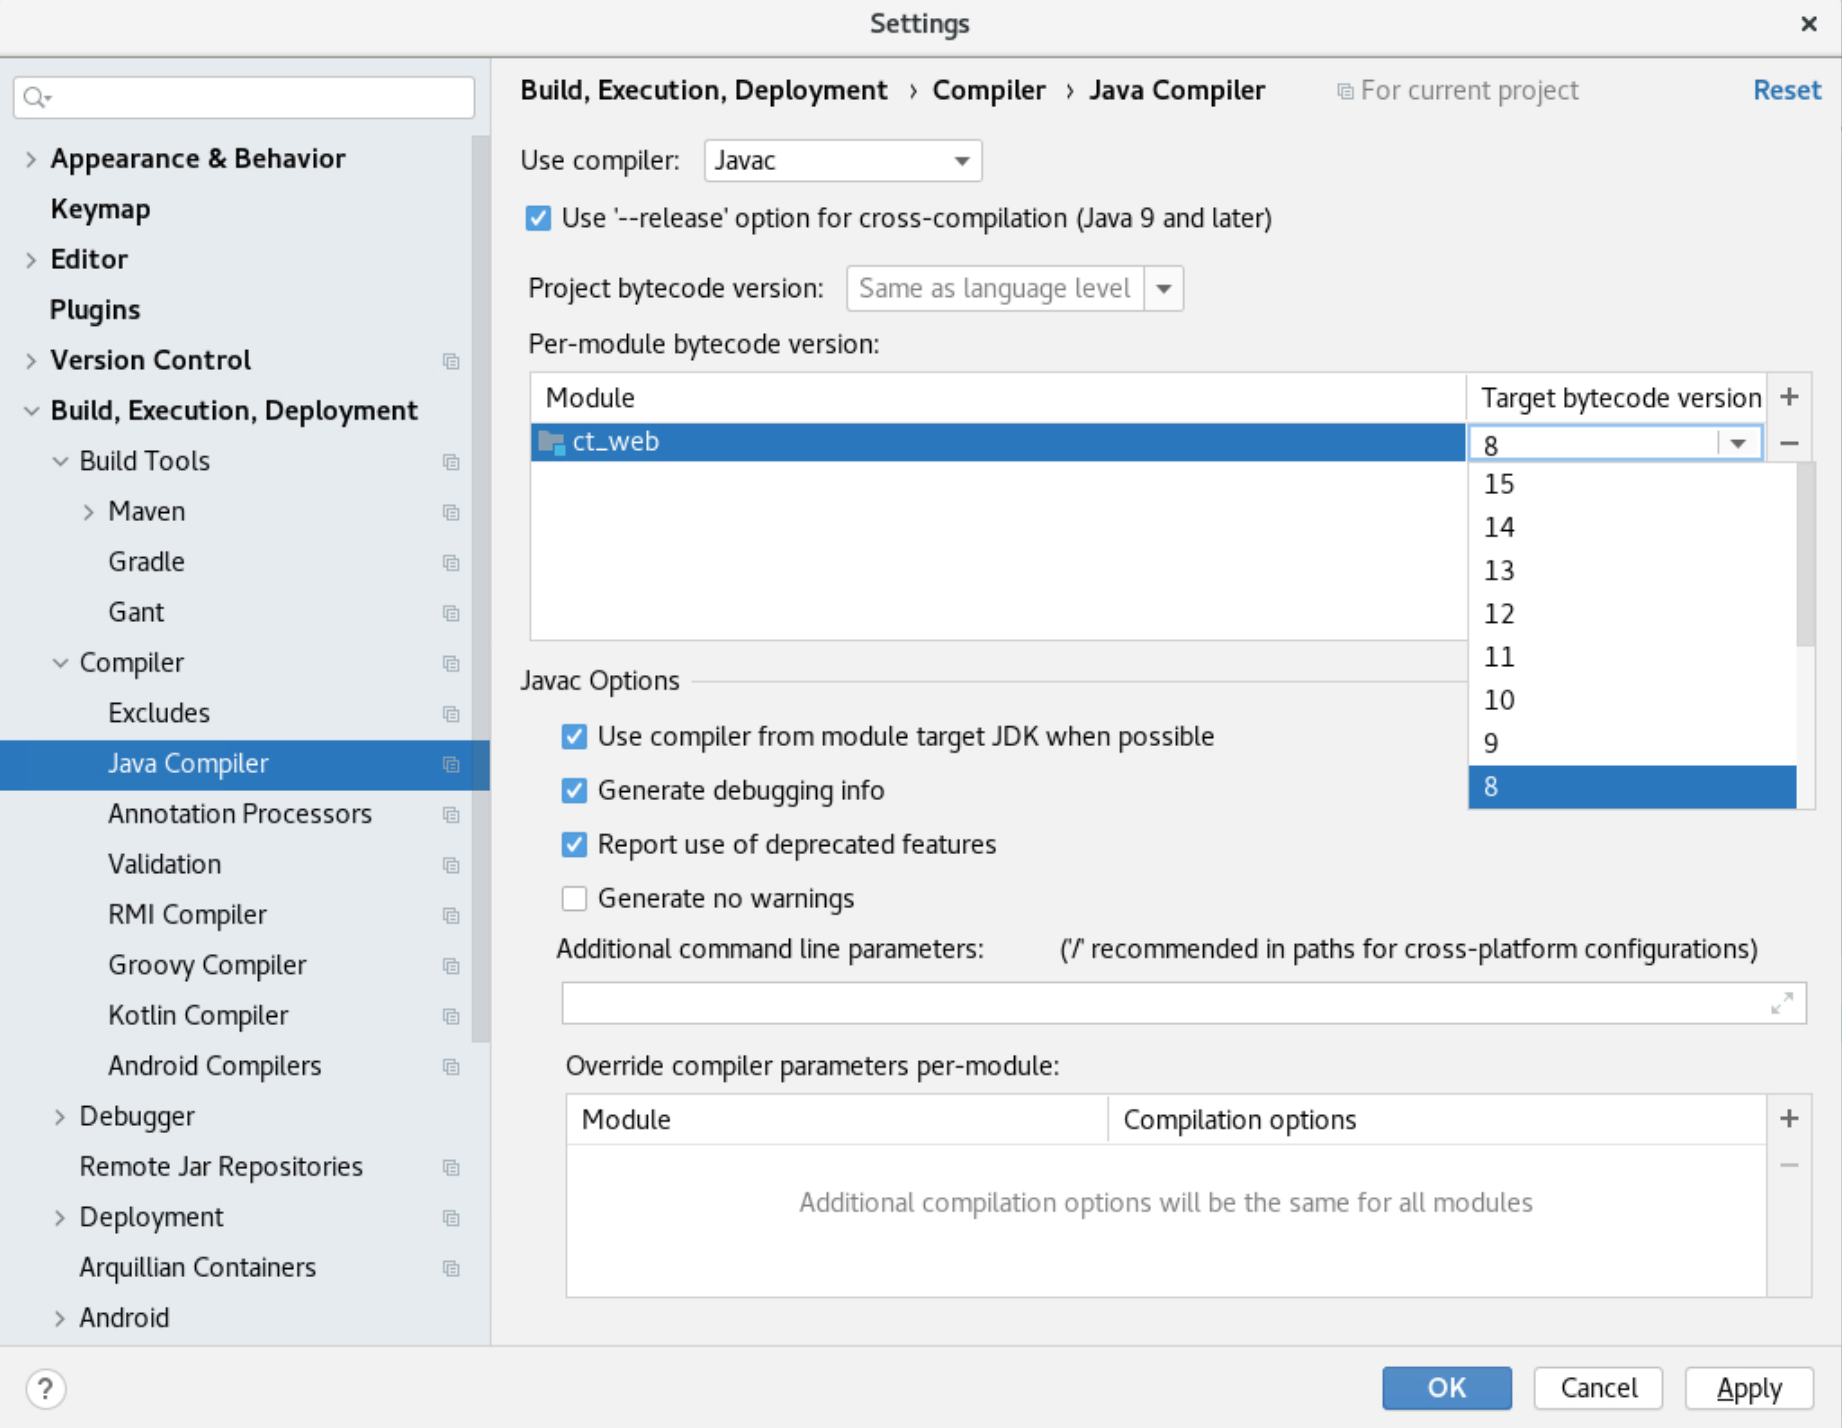
注:如果运行Tomcat时报错“java: Compilation failed: internal java compiler error”,则是IDEA的JDK版本与项目的JDK版本不一致,依次点击【File】->【Settings...】如下图将项目的JDK修改为【8】后尝试再次运行