Sharding-JDBC从入门到精通(7)- Sharding-JDBC 公共表 与 读写分离
一、Sharding-JDBC 公共表
1、公共表
公共表属于系统中数据量较小,变动少,而且属于高频联合查询的依赖表。参数表、数据字典表等属于此类型。可以将这类表在每个数据库都保存一份,所有更新操作都同时发送到所有分库执行。
2、Sharding-JDBC 实现公共表。
2.1 创建数据库:分别在 user_db、order_db_1、order_db_2 中创建 t_dict 表:
use user_db;

DROP TABLE IF EXISTS `t_dict`;

CREATE TABLE `t_dict` (
  `dict_id` bigint(20) NOT NULL COMMENT '字典id',
  `type` varchar(50) CHARACTER SET utf8 COLLATE utf8_general_ci NOT NULL COMMENT '字典类型',
  `code` varchar(50) CHARACTER SET utf8 COLLATE utf8_general_ci NOT NULL COMMENT '字典编码',
  `value` varchar(50) CHARACTER SET utf8 COLLATE utf8_general_ci NOT NULL COMMENT '字典值',
  PRIMARY KEY (`dict_id`) USING BTREE
) ENGINE=InnoDB DEFAULT CHARSET=utf8 COLLATE = utf8_general_ci ROW_FORMAT=Dynamic;


use order_db_1;

DROP TABLE IF EXISTS `t_dict`;

CREATE TABLE `t_dict` (
  `dict_id` bigint(20) NOT NULL COMMENT '字典id',
  `type` varchar(50) CHARACTER SET utf8 COLLATE utf8_general_ci NOT NULL COMMENT '字典类型',
  `code` varchar(50) CHARACTER SET utf8 COLLATE utf8_general_ci NOT NULL COMMENT '字典编码',
  `value` varchar(50) CHARACTER SET utf8 COLLATE utf8_general_ci NOT NULL COMMENT '字典值',
  PRIMARY KEY (`dict_id`) USING BTREE
) ENGINE=InnoDB DEFAULT CHARSET=utf8 COLLATE = utf8_general_ci ROW_FORMAT=Dynamic;

use order_db_2;

DROP TABLE IF EXISTS `t_dict`;

CREATE TABLE `t_dict` (
  `dict_id` bigint(20) NOT NULL COMMENT '字典id',
  `type` varchar(50) CHARACTER SET utf8 COLLATE utf8_general_ci NOT NULL COMMENT '字典类型',
  `code` varchar(50) CHARACTER SET utf8 COLLATE utf8_general_ci NOT NULL COMMENT '字典编码',
  `value` varchar(50) CHARACTER SET utf8 COLLATE utf8_general_ci NOT NULL COMMENT '字典值',
  PRIMARY KEY (`dict_id`) USING BTREE
) ENGINE=InnoDB DEFAULT CHARSET=utf8 COLLATE = utf8_general_ci ROW_FORMAT=Dynamic;
2.2 在 application.properties 配置文件中,配置公共表。
# 指定 t_dict 为公共表
spring.shardingsphere.sharding.broadcast-tables=t_dict
3、在 sharding_jdbc_simple 子工程(子模块)中,在 application.properties 配置文件中,配置公共表。
#  dbsharding\sharding_jdbc_simple\src\main\resources\application.properties

server.port = 56081

spring.application.name = sharding-jdbc-simple-demo

server.servlet.context-path = /sharding-jdbc-simple-demo
spring.http.encoding.enabled = true
spring.http.encoding.charset = utf-8
spring.http.encoding.force = true

spring.main.allow-bean-definition-overriding = true
mybatis.configuration.map-underscore-to-camel-case = true

# 配置 sharding-jdbc 分片规则(2024-6-29 分片规则修改)
# 定义数据源(定义 多个 数据源名为 m1, m2)
spring.shardingsphere.datasource.names = m0,m1,m2

spring.shardingsphere.datasource.m0.type = com.alibaba.druid.pool.DruidDataSource
spring.shardingsphere.datasource.m0.driver-class-name = com.mysql.jdbc.Driver
spring.shardingsphere.datasource.m0.url = jdbc:mysql://localhost:3306/user_db?useUnicode=true
spring.shardingsphere.datasource.m0.username = root
spring.shardingsphere.datasource.m0.password = 12311

spring.shardingsphere.datasource.m1.type = com.alibaba.druid.pool.DruidDataSource
spring.shardingsphere.datasource.m1.driver-class-name = com.mysql.jdbc.Driver
spring.shardingsphere.datasource.m1.url = jdbc:mysql://localhost:3306/order_db_1?useUnicode=true
spring.shardingsphere.datasource.m1.username = root
spring.shardingsphere.datasource.m1.password = 12311

spring.shardingsphere.datasource.m2.type = com.alibaba.druid.pool.DruidDataSource
spring.shardingsphere.datasource.m2.driver-class-name = com.mysql.jdbc.Driver
spring.shardingsphere.datasource.m2.url = jdbc:mysql://localhost:3306/order_db_2?useUnicode=true
spring.shardingsphere.datasource.m2.username = root
spring.shardingsphere.datasource.m2.password = 12311

# 分库策略:以 user_id 为分片键,分片策略为 user_id % 2 + 1,user_id 为偶数操作 m1 数据源,否则操作 m2
spring.shardingsphere.sharding.tables.t_order.database-strategy.inline.sharding-column = user_id
spring.shardingsphere.sharding.tables.t_order.database-strategy.inline.algorithm-expression = m$->{user_id % 2 + 1}


# 指定 t_order 表的数据分布情况,配置数据节点(t_order 映射到 t_order_1 或者 t_order_2): 只能路由到 m1 数据库
#spring.shardingsphere.sharding.tables.t_order.actual-data-nodes = m1.t_order_$->{1..2}
# 指定 t_order 表的数据分布情况,配置数据节点(t_order 映射到 t_order_1 或者 t_order_2): 动态路由到 m1 数据库 或 m2 数据库。
spring.shardingsphere.sharding.tables.t_order.actual-data-nodes = m$->{1..2}.t_order_$->{1..2}
# 配置 user_db 数据节点
spring.shardingsphere.sharding.tables.t_user.actual-data-nodes = m$->{0}.t_user


# 指定 t_order 表的主键生成策略为 SNOWFLAKE(雪花算法)
spring.shardingsphere.sharding.tables.t_order.key-generator.column = order_id
spring.shardingsphere.sharding.tables.t_order.key-generator.type = SNOWFLAKE

# 指定 t_order 表的分片策略,分片策略包括分片键和分片算法
spring.shardingsphere.sharding.tables.t_order.table-strategy.inline.sharding-column = order_id
spring.shardingsphere.sharding.tables.t_order.table-strategy.inline.algorithm-expression = t_order_$->{order_id % 2 + 1}

# 指定 t_user 表的分片策略,分片策略包括分片键和分片算法(未分库分表也需要配置)
spring.shardingsphere.sharding.tables.t_user.table-strategy.inline.sharding-column = user_id
spring.shardingsphere.sharding.tables.t_user.table-strategy.inline.algorithm-expression = t_user

# 指定 t_dict 为公共表
spring.shardingsphere.sharding.broadcast-tables=t_dict

# 打开 sql 输出日志
spring.shardingsphere.props.sql.show = true

swagger.enable = true

logging.level.root = info
logging.level.org.springframework.web = info
logging.level.djh.it.dbsharding = debug
logging.level.druid.sql = debug
4、在 sharding_jdbc_simple 子工程(子模块)中,创建 接口类 DictDao.java 类
/**
 *   bsharding\sharding_jdbc_simple\src\main\java\djh\it\dbsharding\simple\dao\DictDao.java
 *
 *   2024-7-2 创建 接口类 DictDao.java 类
 */
package djh.it.dbsharding.simple.dao;

import org.apache.ibatis.annotations.Delete;
import org.apache.ibatis.annotations.Insert;
import org.apache.ibatis.annotations.Mapper;
import org.apache.ibatis.annotations.Param;
import org.springframework.stereotype.Component;

@Mapper
@Component
public interface DictDao {
    //新增字典
    @Insert("insert into t_dict(dict_id, type,code,value) value(#{dictId}, #{type}, #{code}, #{value})")
    int insertDict(@Param("dictId") Long dictId, @Param("type") String type, @Param("code") String code,@Param("value") String value );

    //删除字典
    @Delete("delete from t_dict where dict_id = #{dictId}" )
    int deleteDict(@Param("dictId") Long dictId);
}
5、在 sharding_jdbc_simple 子工程(子模块)中,创建 接口类 DictDao.java 的测试类 DictDaoTest.java 进行插入数据 和 删除数据测试。
/**
 *   dbsharding\sharding_jdbc_simple\src\test\java\djh\it\dbsharding\simple\dao\DictDaoTest.java
 *
 *   2024-7-2 创建 接口类 DictDao.java 的测试类 DictDaoTest.java 进行插入数据 和 删除数据测试。
 */
package djh.it.dbsharding.simple.dao;

import djh.it.dbsharding.simple.ShardingJdbcSimpleBootstrap;
import org.junit.Test;
import org.junit.runner.RunWith;
import org.springframework.beans.factory.annotation.Autowired;
import org.springframework.boot.test.context.SpringBootTest;
import org.springframework.test.context.junit4.SpringRunner;

import java.util.ArrayList;
import java.util.List;
import java.util.Map;

@RunWith(SpringRunner.class)
@SpringBootTest(classes = {ShardingJdbcSimpleBootstrap.class})
public class DictDaoTest {

    @Autowired
    DictDao dictDao;

    @Test
    public void testInsertDict(){
        dictDao.insertDict(1L, "user_type", "0", "管理员");
        dictDao.insertDict(2L, "user_type", "1", "操作员");
    }
    @Test
    public void testDeleteDict(){
        dictDao.deleteDict(1L);
        dictDao.deleteDict(2L);
    }

}
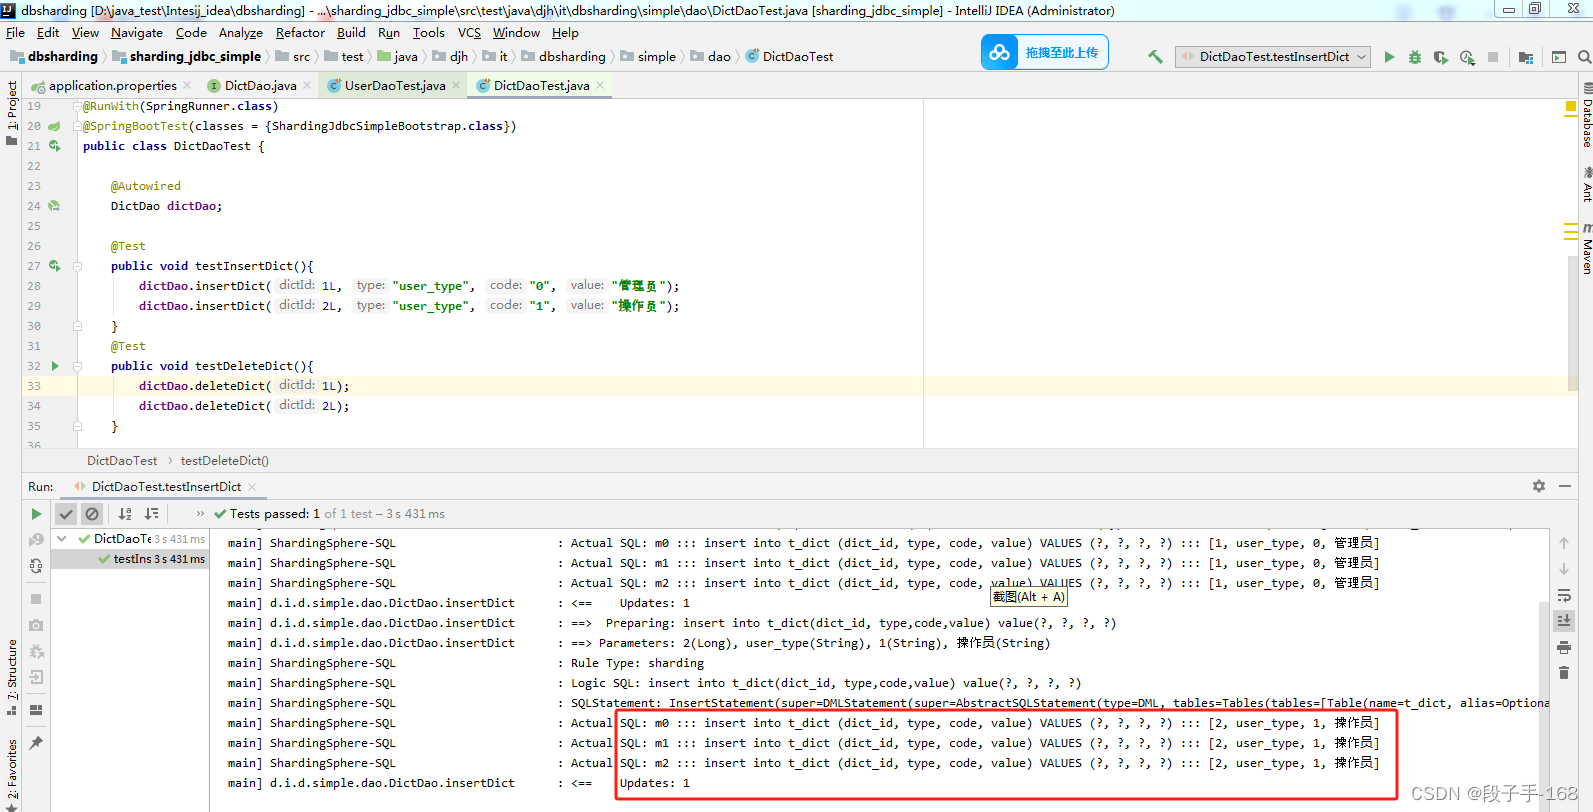
6、运行测试 DictDaoTest.java 进行插入数据 和 删除数据测试。
发现每次插入数据 和 删除数据,会同时向 m0,m1,m2 三个数据库同时关联操作。
7、在 sharding_jdbc_simple 子工程(子模块)中,修改 接口类 UserDao.java 添加关联公共表的方法。
/**
 *   dbsharding\sharding_jdbc_simple\src\main\java\djh\it\dbsharding\simple\dao\UserDao.java
 *
 *   2024-7-1 创建 接口类 UserDao.java
 */
package djh.it.dbsharding.simple.dao;

import org.apache.ibatis.annotations.Insert;
import org.apache.ibatis.annotations.Mapper;
import org.apache.ibatis.annotations.Param;
import org.apache.ibatis.annotations.Select;
import org.springframework.stereotype.Component;

import java.util.List;
import java.util.Map;

@Mapper
@Component
public interface UserDao {

    //新增用户
    @Insert("insert into t_user(user_id, fullname) value(#{userId}, #{fullname})")
    int insertUser(@Param("userId") Long userId, @Param("fullname") String fullname);

    //根据id列表查询多个用户
    @Select({ "<script>" ,
            " select" ,
            " * " ,
            " from t_user t " ,
            " where t.user_id in ",
            " <foreach collection=' userIds' open='(' separator=',' close=')' item='id'>" ,
            " #{id} " ,
            " </foreach>" ,
            "</script>" })
    List<Map> selectUserId(@Param("userIds") List<Long> userIds);

    //根据id列表查询多个用户,关联查询字典表
    @Select({ "<script>" ,
            " select" ,
            " * " ,
            " from t_user t, t_dict b " ,
            " where t.user_type = b.code and t.user_id in ",
            " <foreach collection=' userIds' open='(' separator=',' close=')' item='id'>" ,
            " #{id} " ,
            " </foreach>" ,
            "</script>" })
    List<Map> selectUserInfoByUserIds(@Param("userIds") List<Long> userIds);
}
8、在 sharding_jdbc_simple 子工程(子模块)中,修改 测试类 UserDaoTest.java 添加关联公共表的方法。
/**
 *   dbsharding\sharding_jdbc_simple\src\test\java\djh\it\dbsharding\simple\dao\UserDaoTest.java
 *
 *   2024-7-1 创建 接口类 UserDao.java 的测试类 UserDaoTest.java 进行插入数据 和 查询数据测试 UserDaoTest.java
 */
package djh.it.dbsharding.simple.dao;

import djh.it.dbsharding.simple.ShardingJdbcSimpleBootstrap;
import org.junit.Test;
import org.junit.runner.RunWith;
import org.springframework.beans.factory.annotation.Autowired;
import org.springframework.boot.test.context.SpringBootTest;
import org.springframework.test.context.junit4.SpringRunner;

import java.util.ArrayList;
import java.util.List;
import java.util.Map;

@RunWith(SpringRunner.class)
@SpringBootTest(classes = {ShardingJdbcSimpleBootstrap.class})
public class UserDaoTest {

    @Autowired
    UserDao userDao;

    @Test
    public void testInsertUser() {
        for(int i=0; i<10; i++){
            Long id = i + 1L;
            userDao.insertUser(id, "姓名" + id);
        }
    }

    @Test
    public void testSelectUserByIds() {
        List<Long> userIds = new ArrayList<>();
        userIds.add(1L);
        userIds.add(2L);
        List<Map> users = userDao.selectUserId(userIds);
        System.out.println(users);
    }

    @Test  //关联公共表字典,进行查询
    public void testSelectUserInfoByUserIds() {
        List<Long> userIds = new ArrayList<>();
        userIds.add(1L);
        userIds.add(2L);
        List<Map> users = userDao.selectUserInfoByUserIds(userIds);
        System.out.println(users);
    }
}
9、运行测试类 UserDaoTest.java 进行关联公共表测试。
发现每次插入数据 和 删除数据,会同时向 m0,m1,m2 三个数据库同时关联操作。

二、Sharding-JDBC 读写分离-理解读写分离
1、理解读写分离
面对日益增加的系统访问量,数据库的吞吐量面临着巨大瓶颈。对于同一时刻有大量并发读操作和较少写操作类型的应用系统来说,将数据库拆分为主库和从库,主库负责处理事务性的增删改操作,从库负责处理查询操作,能够有效的避免由数据更新导致的行锁,使得整个系统的查询性能得到极大的改善。

2、一主多从 与 多主多从的配置方式
通过一主多从的配置方式,可以将查询请求均匀的分散到多个数据副本,能够进一步的提升系统的处理能力。使用多主多从的方式,不但能够提升系统的吞吐量,还能够提升系统的可用性,可以达到在任何一个数据库宕机,甚至磁盘物理损坏的情况下仍然不影响系统的正常运行。

3、读写分离的数据节点中的数据内容是一致的,而水平分片的每个数据节点的数据内容却并不相同。将水平分片和读写分离联合使用,能够更加有效的提升系统的性能。
主从同步的N种实现方式?主从同步其实与读写分离是两码事。
4、Sharding-JDBC 读写分离则是根据 SQL 语义的分析,将读操作和写操作分别路由至主库与从库。它提供透明化读写分离,让使用方尽量像使用一个数据库一样使用主从数据库集群。

5、Sharding-JDBC 提供一主多从的读写分离配置,可独立使用,也可配合分库分表使用,同一线程且同一数据库
连接内,如有写入操作,以后的读操作均从主库读取,用于保证数据一致性。
6、Sharding-JDBC 不提供主从数据库的数据同步功能,需要采用其他机制支持。
三、Sharding-JDBC 读写分离-MySQL 主从同步配置
1、mysql 主从同步配置 (windows):新增 mysql 实例
1)复制原有 mysql (已经安装的),如: D:\mysql-5.7.25(作为主库) -> D:\mysql-5.7.25-s1(作为从库),
2)修改以下从库的 my.ini:
[mysq1d]
#设置3307端口
port =3307

# 设置mysql的安装目录
basedir=D:\mysql-5.7.25-s1

# 设置mysql数据库的数据的存放目录
datadir=D:\mysql-5.7.25-s1\data
3)安装 mysql 服务:将从库安装为 windows 服务,注意配置文件位置:
D:\mysql-5.7.25-s1\bin> mysqld install mysqls1 --defaults-file="D:\mysql-5.7.25-s1\my.ini"
4)由于从库是从主库复制过来的,因此里面的数据完全一致,可使用原来的账号、密码登录。
2、修改主、从库的配置文件(my.ini),新增内容如下:
2.1 主库配置 my.ini 文件。
[mysq1d]
#开启日志
log-bin = mysql-bin

#设置服务id,主从不能一致
server-id =1

#设置需要同步的数据库(不设置会同步所有数据库)
binlog-do-db=user_db

#屏蔽系统库同步
binlog-ignore-db=mysql
binlog-ignore-db=information_schema
binlog-ignore-db=performance_schema
2.2 从库配置 my.ini 文件。
[mysq1d]
#开启日志
log-bin = mysql-bin

#设置服务id,主从不能一致
server-id =2

#设置需要同步的数据库
replicate_wild_do_table=user_db.%

#屏蔽系统库同步
replicate_wild_ignore_table=mysq1.%
replicate_wild_ignore_table=information_schema.%
replicate_wild_ignore_table=performance_schema.%
3、重启主库和从库:
net start[主库服务名]  如: net start mysql
net start [从库服务名mysqls1]  如: net start mysqls1
请注意,主从 MySQL 下的数据(data)目录下有个文件 auto.cnf,文件中定义了 uuid,要保证主从数据库实例的 uuid 不一样,建议直接删除掉,重启服务后将会重新生成。
4、授权主从复制专用账号
#切换至主库 bin 目录,登录主库
mysql -h localhost -uroot -p

#授权主备复制专用账号
GRANT REPLICATION SLAVE ON *.* TO 'db_sync'@'%' IDENTIFIED BY 'db_sync';

#刷新权限
FLUSH PRIVILEGES;

#确认位点记录下文件名以及位点
show master status;
5、设置从库向主库同步数据、并检查链路
#切换至从库bin目录,登录从库
mysql -h localhost -P3307 -uroot-p

#先停止同步
STOP SLAVE;

#修改从库指向到主库,使用上一步记录的文件名以及位点
CHANGE MASTER TO
master_host = 'localhost',
master_user = 'db_sync',
master_password = 'db_sync',
master_log_file = 'mysql-bin.000002',
master_log_pos =154;

#启动同步
START SLAVE;

#查看从库状态Slave_IO_Runing和Slave_SQL_Runing都为Yes说明同步成功,如果不为Yes,请检查error_log,然后排查相关异常。

show slave status\G

#注意 如果之前此备库已有主库指向需要先执行以下命令清空
stop slave io_thread for channel '';
reset slave all;
6、请注意,主从 MySQL 下的数据(data)目录下有个文件 auto.cnf,文件中定义了 uuid,要保证主从数据库实例的 uuid 不一样,建议直接删除掉,重启服务后将会重新生成。
四、Sharding-JDBC 读写分离-插入和查询用户
1、在 application.properties 配置文件中,配置读写分离。
# 定义数据源(定义 多个 数据源名为 m1, m2)
spring.shardingsphere.datasource.names = m0,m1,m2,s0

# 配置主从数据库(同步数据库user_db)
spring.shardingsphere.datasource.s0.type = com.alibaba.druid.pool.DruidDataSource
spring.shardingsphere.datasource.s0.driver-class-name = com.mysql.jdbc.Driver
spring.shardingsphere.datasource.s0.url = jdbc:mysql://localhost:3307/user_db?useUnicode=true
spring.shardingsphere.datasource.s0.username = root
spring.shardingsphere.datasource.s0.password = 12311

# 主库从库逻辑数据源定义 ds0 为 user_db
spring.shardingsphere.sharding.master-slave-rules.ds0.master-data-source-name=m0
spring.shardingsphere.sharding.master-slave-rules.ds0.slave-data-source-names=s0

# 配置 user_db 数据节点
#spring.shardingsphere.sharding.tables.t_user.actual-data-nodes = m$->{0}.t_user
spring.shardingsphere.sharding.tables.t_user.actual-data-nodes = ds0.t_user
2、在 sharding_jdbc_simple 子工程(子模块)中,修改 application.properties 配置文件,配置读写分离。
#  dbsharding\sharding_jdbc_simple\src\main\resources\application.properties

server.port = 56081

spring.application.name = sharding-jdbc-simple-demo

server.servlet.context-path = /sharding-jdbc-simple-demo
spring.http.encoding.enabled = true
spring.http.encoding.charset = utf-8
spring.http.encoding.force = true

spring.main.allow-bean-definition-overriding = true
mybatis.configuration.map-underscore-to-camel-case = true

# 配置 sharding-jdbc 分片规则(2024-6-29 分片规则修改)
# 定义数据源(定义 多个 数据源名为 m1, m2)
spring.shardingsphere.datasource.names = m0,m1,m2,s0

spring.shardingsphere.datasource.m0.type = com.alibaba.druid.pool.DruidDataSource
spring.shardingsphere.datasource.m0.driver-class-name = com.mysql.jdbc.Driver
spring.shardingsphere.datasource.m0.url = jdbc:mysql://localhost:3306/user_db?useUnicode=true
spring.shardingsphere.datasource.m0.username = root
spring.shardingsphere.datasource.m0.password = 12311

# 配置主从数据库(同步数据库user_db)
spring.shardingsphere.datasource.s0.type = com.alibaba.druid.pool.DruidDataSource
spring.shardingsphere.datasource.s0.driver-class-name = com.mysql.jdbc.Driver
spring.shardingsphere.datasource.s0.url = jdbc:mysql://localhost:3307/user_db?useUnicode=true
spring.shardingsphere.datasource.s0.username = root
spring.shardingsphere.datasource.s0.password = 12311

spring.shardingsphere.datasource.m1.type = com.alibaba.druid.pool.DruidDataSource
spring.shardingsphere.datasource.m1.driver-class-name = com.mysql.jdbc.Driver
spring.shardingsphere.datasource.m1.url = jdbc:mysql://localhost:3306/order_db_1?useUnicode=true
spring.shardingsphere.datasource.m1.username = root
spring.shardingsphere.datasource.m1.password = 12311

spring.shardingsphere.datasource.m2.type = com.alibaba.druid.pool.DruidDataSource
spring.shardingsphere.datasource.m2.driver-class-name = com.mysql.jdbc.Driver
spring.shardingsphere.datasource.m2.url = jdbc:mysql://localhost:3306/order_db_2?useUnicode=true
spring.shardingsphere.datasource.m2.username = root
spring.shardingsphere.datasource.m2.password = 12311

# 主库从库逻辑数据源定义 ds0 为 user_db
spring.shardingsphere.sharding.master-slave-rules.ds0.master-data-source-name=m0
spring.shardingsphere.sharding.master-slave-rules.ds0.slave-data-source-names=s0

# 分库策略:以 user_id 为分片键,分片策略为 user_id % 2 + 1,user_id 为偶数操作 m1 数据源,否则操作 m2
spring.shardingsphere.sharding.tables.t_order.database-strategy.inline.sharding-column = user_id
spring.shardingsphere.sharding.tables.t_order.database-strategy.inline.algorithm-expression = m$->{user_id % 2 + 1}


# 指定 t_order 表的数据分布情况,配置数据节点(t_order 映射到 t_order_1 或者 t_order_2): 只能路由到 m1 数据库
#spring.shardingsphere.sharding.tables.t_order.actual-data-nodes = m1.t_order_$->{1..2}
# 指定 t_order 表的数据分布情况,配置数据节点(t_order 映射到 t_order_1 或者 t_order_2): 动态路由到 m1 数据库 或 m2 数据库。
spring.shardingsphere.sharding.tables.t_order.actual-data-nodes = m$->{1..2}.t_order_$->{1..2}
# 配置 user_db 数据节点
#spring.shardingsphere.sharding.tables.t_user.actual-data-nodes = m$->{0}.t_user
spring.shardingsphere.sharding.tables.t_user.actual-data-nodes = ds0.t_user

# 指定 t_order 表的主键生成策略为 SNOWFLAKE(雪花算法)
spring.shardingsphere.sharding.tables.t_order.key-generator.column = order_id
spring.shardingsphere.sharding.tables.t_order.key-generator.type = SNOWFLAKE

# 指定 t_order 表的分片策略,分片策略包括分片键和分片算法
spring.shardingsphere.sharding.tables.t_order.table-strategy.inline.sharding-column = order_id
spring.shardingsphere.sharding.tables.t_order.table-strategy.inline.algorithm-expression = t_order_$->{order_id % 2 + 1}

# 指定 t_user 表的分片策略,分片策略包括分片键和分片算法(未分库分表也需要配置)
spring.shardingsphere.sharding.tables.t_user.table-strategy.inline.sharding-column = user_id
spring.shardingsphere.sharding.tables.t_user.table-strategy.inline.algorithm-expression = t_user

# 指定 t_dict 为公共表
spring.shardingsphere.sharding.broadcast-tables=t_dict

# 打开 sql 输出日志
spring.shardingsphere.props.sql.show = true

swagger.enable = true

logging.level.root = info
logging.level.org.springframework.web = info
logging.level.djh.it.dbsharding = debug
logging.level.druid.sql = debug
3、在 sharding_jdbc_simple 子工程(子模块)中,运行 测试类 UserDaoTest.java 检查查询方法 和 插入数据 方法,的数据库有何不同。( 查询在 从库 s0, 插入数据在 主库 m0 )
/**
 *   dbsharding\sharding_jdbc_simple\src\test\java\djh\it\dbsharding\simple\dao\UserDaoTest.java
 *
 *   2024-7-1 创建 接口类 UserDao.java 的测试类 UserDaoTest.java 进行插入数据 和 查询数据测试 UserDaoTest.java
 */
package djh.it.dbsharding.simple.dao;

import djh.it.dbsharding.simple.ShardingJdbcSimpleBootstrap;
import org.junit.Test;
import org.junit.runner.RunWith;
import org.springframework.beans.factory.annotation.Autowired;
import org.springframework.boot.test.context.SpringBootTest;
import org.springframework.test.context.junit4.SpringRunner;

import java.util.ArrayList;
import java.util.List;
import java.util.Map;

@RunWith(SpringRunner.class)
@SpringBootTest(classes = {ShardingJdbcSimpleBootstrap.class})
public class UserDaoTest {

    @Autowired
    UserDao userDao;

    @Test
    public void testInsertUser() {
        for(int i=0; i<10; i++){
            Long id = i + 1L;
            userDao.insertUser(id, "姓名" + id);
        }
    }

    @Test
    public void testSelectUserByIds() {
        List<Long> userIds = new ArrayList<>();
        userIds.add(1L);
        userIds.add(2L);
        List<Map> users = userDao.selectUserId(userIds);
        System.out.println(users);
    }

    @Test  //关联公共表字典,进行查询
    public void testSelectUserInfoByUserIds() {
        List<Long> userIds = new ArrayList<>();
        userIds.add(1L);
        userIds.add(2L);
        List<Map> users = userDao.selectUserInfoByUserIds(userIds);
        System.out.println(users);
    }
}
上一节关联链接请点击
# Sharding-JDBC从入门到精通(6)-- Sharding-JDBC 水平分库 和 垂直分库。