提示:文章写完后,目录可以自动生成,如何生成可参考右边的帮助文档
文章目录
- 1.获取用户资料在Vuex中共享
- 登录成功跳转到主页之后,可以获取用户资料,获取的资料在Vuex中共享,这样用户就可以很方便的获取该信息
- 获取流程
- 在什么位置获取
- 在导航守卫的位置,可以确定已经有了token,获取资料更佳,在页面发生跳转时触发,此时不论你从何时何地进来,如果发现没获取资料,都可以清楚直观的获取资料。判断条件也使得不会发生重复的加载。
- 获取用户资料的api(src/api/user.js)
- Vuex中声明用户信息状态,修改用户信息的mutations,和获取用户信息的action src/store/modules/user.js
- 通过getters声明userId(快捷访问)-代码位置src/store/getters.js
- 在权限拦截处调用action-代码位置(src/pemission.js)
- 2、显式用户头像和用户名
- 顶部组件的内部位置
- Vuex中已经有用户资料数据,可以通过getters开发属性,直接在组件中引用即可
- 位置src/store/getters.js 暴露属性
- 在Navbar组件引入getters-代码位置(src/layout/components/NavBar.vue)
- NavBar组件显示用户名和头像-代码位置(src/layout/components/NavBar.vue)
- 🍕🍕🍕设置头像和用户名的样式-代码位置(src/layout/components/NavBar.vue)
- 3、处理头像为空的场景
- 🚜🚜🚜当用户没有头像时要显示用户名的第一个字
- 🍳🍳🍳条件判断-代码位置(src/layout/components/NavBar.vue)
- 🧀🧀🧀 ?可选链操作符,是当?前面的变量为空时,不会继续往下执行,防止报错,如果版本不支持?的编译,需升级版本
- 4.处理token失效的问题
- token是有时效性的,当token超时,我们需要做一下处理
- 🌮请求拦截器处理-代码位置(src/utils/request.js)
- 实现Vuex的登出action-代码位置(src/store/modules/user.js)
- 5.调整下拉菜单,实现退出登录
- 退出登录流程
- Navbar中点击退出登录-代码位置(src/layout/components/NavBar.vue)
- 退出方法-代码位置(src/layout/components/NavBar.vue)
- 注意:native修饰符表示给组件的根元素注册事件
- 6.修改密码功能实现
- 整体流程
- 6.1-修改密码-弹出层
- 🍿🍿🍿注册修改密码点击事件-代码位置(src/layout/components/NavBar.vue)
- 声明变量和方法控制弹层显示-代码位置
- 放置弹层组件-代码位置(src/layout/components/NavBar.vue)
- 6.2-修改密码-表单结构
- 表单结构-代码位置(src/layout/components/NavBar.vue)
- 6.3修改密码-表单校验
- 声明数据和规则-代码位置(src/layout/components/NavBar.vue)
- 绑定属性-代码位置(src/layout/components/NavBar.vue)
- 6.4-修改密码-确定和取消
- 确定和取消流程
- 修改密码方法-代码位置(src/api/user.js)
- 确定方法-代码位置(src/layout/components/NavBar.vue)
- 取消方法-代码位置(src/layout/components/NavBar.vue)
- 监听弹层关闭事件
- 这里确定修改关闭弹窗,监听close事件,将表单进行重置,修改了信息,再打开的时候这些信息应该都被重置
- 7. 清理组件和路由
- 路由只保留登录-主页-404
- 请求模块只保留user.js模块
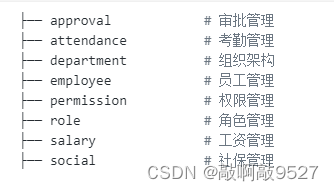
- 8.创建项目所需要的组件和路由
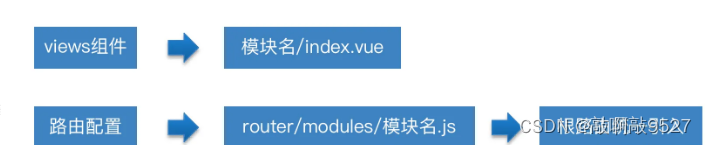
- 创建模块
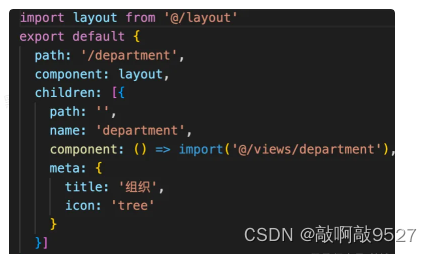
- 路由模块样例
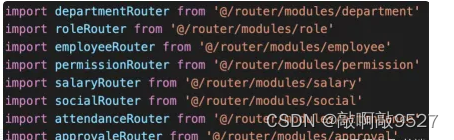
- 路由的统一导入
- 在src/router/index.js中集成到当前路由中
- 9.扩展-解析左侧菜单原理
- 左侧菜单的数据来源于路由模块的信息, 会根据路由信息的hidden属性来判断是否显示该路由信息到菜单,菜单属性中的图表和标题来源于路由meta中的icon和title属性
- sidebar组件引入路由信息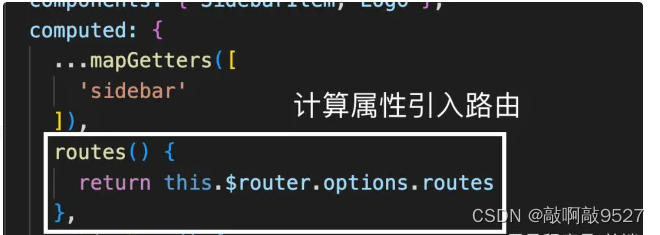
- 循环渲染路由信息
- sidebarItem组件根据条件渲染-传递icon和title属性给item组件
- item组件接收icon和title属性,使用函数型组件完成渲染
- 10.左侧菜单显示项目logo
- ogo有两种展示形态,当菜单展开时,显示大图,当菜单折叠时,显示小图
- 通过settings.js的设置,将logo显示出来-代码位置(src/settings.js)
- 调整logo的页面结构-代码位置(src/layout/components/Sidebar/Logo.vue)
- 调整logo样式-代码位置(src/layout/components/Sidebar/Logo.vue
1.获取用户资料在Vuex中共享
提示:这里可以添加本文要记录的大概内容:
登录成功跳转到主页之后,可以获取用户资料,获取的资料在Vuex中共享,这样用户就可以很方便的获取该信息
获取流程
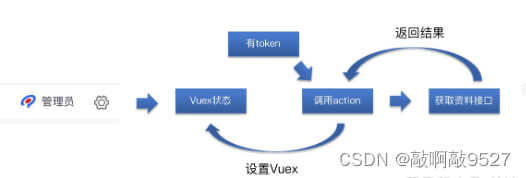
在什么位置获取
在导航守卫的位置,可以确定已经有了token,获取资料更佳,在页面发生跳转时触发,此时不论你从何时何地进来,如果发现没获取资料,都可以清楚直观的获取资料。判断条件也使得不会发生重复的加载。
获取用户资料的api(src/api/user.js)
export function getUserInfo(){
  return request({
    url:'/sys/profile'
  })
}
Vuex中声明用户信息状态,修改用户信息的mutations,和获取用户信息的action src/store/modules/user.js
const state = {
  token:getToken(),
  userInfo:{}//这里一个空对象,为了防止后面取数据报错
}
const mutations = {
 setUserInfo(state,userInfo){
   state.userInfo = userInfo
  }
}
const actions = {
  async getUserInfo(context){
    const result = await getUserInfo();
    context.commit("setUserInfo",result)
   }
}
通过getters声明userId(快捷访问)-代码位置src/store/getters.js
const getters = {
	userId: state => state.user.userInfo.userId,
}
export default getters
在权限拦截处调用action-代码位置(src/pemission.js)
import router from '@/router'
import nprogress from 'nprogress'
import 'nprogress/nprogress.css'
import store from '@/store'
/**
 *前置守卫
 *
*/
const whiteList = ['/login', '/404']
router.beforeEach(async(to,from,nex)=>{
 nprogress.start()
 if(store.getters.token){
  //存在token
  if(to.path === '/login'){
    //跳转到主页
    next('/');//中转到主页 不传地址 不会执行后置守卫
    nprogress.done()
   }else{
      if(!store.getters.userId){
        await store.dispatch("user/getUserInfo")
      }
      next()//放行
    }
 }else{
   //没有token
   if(whiteList.includes(to.path)){
    next();
    }else{
      next('/login');//中转到登录页
      nprogress.done()
     }
  }
})
2、显式用户头像和用户名
顶部组件的内部位置
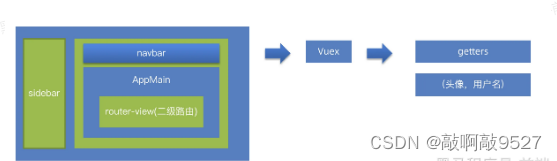
Vuex中已经有用户资料数据,可以通过getters开发属性,直接在组件中引用即可
位置src/store/getters.js 暴露属性
const getters = {
  token:state => state.user.token,
  userId:state =>state.user.userInfo.userId,//头像
  avatar:state=>state.user.userInfo.username,//用户名称
}
export default getters
在Navbar组件引入getters-代码位置(src/layout/components/NavBar.vue)
export default {
  computed: {
    // 引入头像和用户名称
    ...mapGetters([
      'sidebar',
      'avatar',
      'name'
    ])
  },
}
NavBar组件显示用户名和头像-代码位置(src/layout/components/NavBar.vue)
<div class="avatar-wrapper">
          <!-- 头像 -->
          <img :src="avatar" class="user-avatar">
          <!-- 用户名称 -->
          <span class="name">{{ name }}</span>
          <!-- 图标 -->
          <i class="el-icon-setting" />
</div>
🍕🍕🍕设置头像和用户名的样式-代码位置(src/layout/components/NavBar.vue)
.avatar-wrapper {
        margin-top: 5px;
        position: relative;
        display: flex;
        align-items: center;
        .name {
          //  用户名称距离右侧距离
          margin-right: 10px;
          font-size: 16px;
        }
        .el-icon-setting {
          font-size: 20px;
        }
        .user-avatar {
          cursor: pointer;
          width: 30px;
          height: 30px;
          border-radius: 50%;
        }
      }
3、处理头像为空的场景
🚜🚜🚜当用户没有头像时要显示用户名的第一个字
🍳🍳🍳条件判断-代码位置(src/layout/components/NavBar.vue)
<div class="avatar-wrapper">
          <!-- 头像 -->
          <img v-if="avatar" :src="avatar" class="user-avatar">
          <span v-else class="username">{{ name?.charAt(0) }}</span>
          <!-- 用户名称 -->
          <span class="name">{{ name }}</span>
          <!-- 图标 -->
          <i class="el-icon-setting" />
        </div>
 <style>
   .username {
          width: 30px;
          height: 30px;
          text-align: center;
          line-height: 30px;
          border-radius: 50%;
          background: #04c9be;
          color: #fff;
          margin-right: 4px;
        }
</style>
🧀🧀🧀 ?可选链操作符,是当?前面的变量为空时,不会继续往下执行,防止报错,如果版本不支持?的编译,需升级版本
npm i vue@2.7.0 vue-template-compiler@2.7.0 # 升级vue版本️
4.处理token失效的问题
token是有时效性的,当token超时,我们需要做一下处理

🌮请求拦截器处理-代码位置(src/utils/request.js)
//响应拦截器
service.interceptors.response.use(...,async(error)=>{
  if(error.response.status === 401){
    Message({type:'warning',message:'token超时了'})
   //说明token超时
   await store.dispatch('user/logout')//调用action退出登录
   router.push('/login');//跳转到登录页
   return Promise.reject(error)
   }
   //error.message
   Message.error(error.message)
   return Promise.reject(error)
})
实现Vuex的登出action-代码位置(src/store/modules/user.js)
const actions = {
  //退出登录
  logout(context){
    context.commit('removeToken');//删除token
    context.commit('setUserInfo',{});//设置用户信息为空对象
  }
}
5.调整下拉菜单,实现退出登录
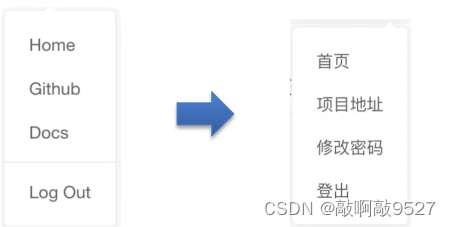
退出登录流程

Navbar中点击退出登录-代码位置(src/layout/components/NavBar.vue)
  <el-dropdown-item @click.native="logout">
          <span style="display:block;">登出</span>
  </el-dropdown-item>
退出方法-代码位置(src/layout/components/NavBar.vue)
export default{
  methods:{
    async logout(){
     //调用退出登录的action
     await this.$store.dispatch('user/logout')
     this.$router.push('/login')
     }
  }
}
注意:native修饰符表示给组件的根元素注册事件
6.修改密码功能实现
整体流程

6.1-修改密码-弹出层
🍿🍿🍿注册修改密码点击事件-代码位置(src/layout/components/NavBar.vue)
<!-- prevent阻止默认事件 -->
 <a target="_blank" @click.prevent="updatePassword">
    <el-dropdown-item>修改密码</el-dropdown-item>
 </a>
声明变量和方法控制弹层显示-代码位置
(src/layout/components/NavBar.vue)
export default {
 data(){
  return {
    showDialog:false
   }
  },
  methods:{
    updatePassword(){
      this.showDialog = true
     }
   }
}
放置弹层组件-代码位置(src/layout/components/NavBar.vue)
<el-dialog width="500px" title="修改密码" :visible.sync="showDialog" >
</el-dialog>
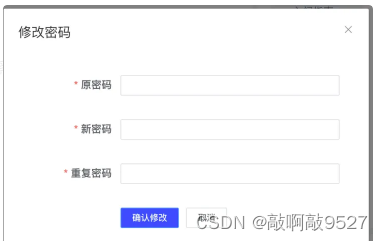
6.2-修改密码-表单结构
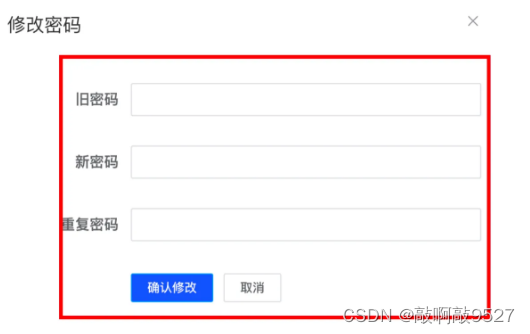
表单结构-代码位置(src/layout/components/NavBar.vue)
  <el-form  label-width="120px" >
        <el-form-item label="旧密码" >
          <el-input  show-password size="small" />
        </el-form-item>
        <el-form-item label="新密码" >
          <el-input  show-password size="small" />
        </el-form-item>
        <el-form-item label="重复密码" >
          <el-input  show-password size="small" />
        </el-form-item>
        <el-form-item>
          <el-button size="mini" type="primary" >确认修改</el-button>
          <el-button size="mini" >取消</el-button>
        </el-form-item>
      </el-form>
6.3修改密码-表单校验
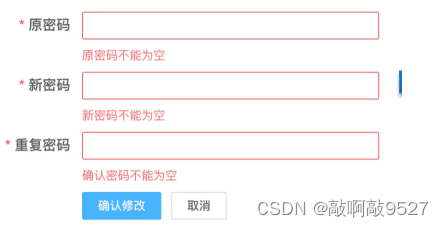
声明数据和规则-代码位置(src/layout/components/NavBar.vue)
export default {
  data () {
    return  {
     passForm: {
        oldPassword: '', // 旧密码
        newPassword: '', // 新密码
        confirmPassword: '' // 确认密码字段
      },
     rules: {
        oldPassword: [{ required: true, message: '旧密码不能为空', trigger: 'blur' }], // 旧密码
        newPassword: [{ required: true, message: '新密码不能为空', trigger: 'blur' }, {
          trigger: 'blur',
          min: 6,
          max: 16,
          message: '新密码的长度为6-16位之间'
        }], // 新密码
        confirmPassword: [{ required: true, message: '重复密码不能为空', trigger: 'blur' }, {
          trigger: 'blur',
          validator: (rule, value, callback) => {
            // value
            if (this.passForm.newPassword === value) {
              callback()
            } else {
              callback(new Error('重复密码和新密码输入不一致'))
            }
          }
        }] // 确认密码字段
      }
    }
  }
}
绑定属性-代码位置(src/layout/components/NavBar.vue)
      <el-form ref="passForm" label-width="120px" :model="passForm" :rules="rules">
        <el-form-item label="旧密码" prop="oldPassword">
          <el-input v-model="passForm.oldPassword" show-password size="small" />
        </el-form-item>
        <el-form-item label="新密码" prop="newPassword">
          <el-input v-model="passForm.newPassword" show-password size="small" />
        </el-form-item>
        <el-form-item label="重复密码" prop="confirmPassword">
          <el-input v-model="passForm.confirmPassword" show-password size="small" />
        </el-form-item>
        <el-form-item>
          <el-button size="mini" type="primary" >确认修改</el-button>
          <el-button size="mini" >取消</el-button>
        </el-form-item>
      </el-form>
6.4-修改密码-确定和取消
确定和取消流程

修改密码方法-代码位置(src/api/user.js)
/**
 * 更新密码
 * **/
export function updatePassword(data){
  return request({
     url:'/sys/user/updatePass',
     method:'put',
     data
   })
}
确定方法-代码位置(src/layout/components/NavBar.vue)
//确定
btnOk(){
  this.$refs.passForm.validate(async isOk =>{
    if(isOk){
      //调用接口
      await updatePassword(this.passForm)
      this.$message.success('修改密码成功')
      this.btnCancel()
     }
  })
}
取消方法-代码位置(src/layout/components/NavBar.vue)
btnCancel() {
      this.$refs.passForm.resetFields() // 重置表单
      // 关闭弹层
      this.showDialog = false
}
监听弹层关闭事件
<el-dialog @close="btnCancel" width="500px" title="修改密码" :visible.sync="showDialog" >
这里确定修改关闭弹窗,监听close事件,将表单进行重置,修改了信息,再打开的时候这些信息应该都被重置
7. 清理组件和路由

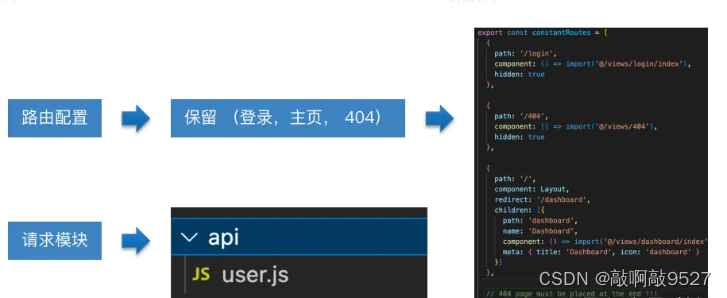
路由只保留登录-主页-404
请求模块只保留user.js模块
8.创建项目所需要的组件和路由
创建模块
路由模块样例
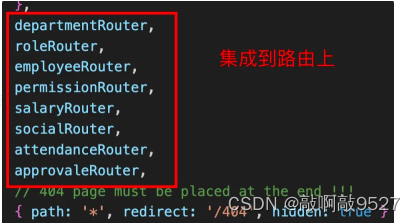
路由的统一导入
在src/router/index.js中集成到当前路由中
9.扩展-解析左侧菜单原理
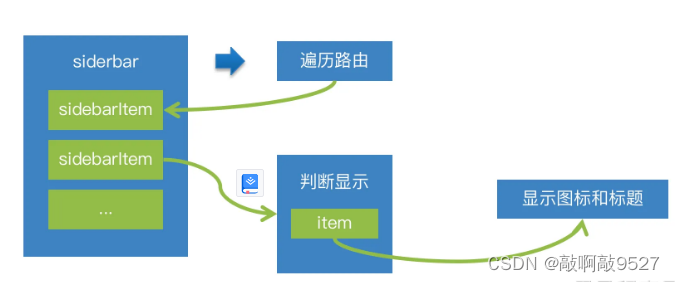
左侧菜单的数据来源于路由模块的信息, 会根据路由信息的hidden属性来判断是否显示该路由信息到菜单,菜单属性中的图表和标题来源于路由meta中的icon和title属性
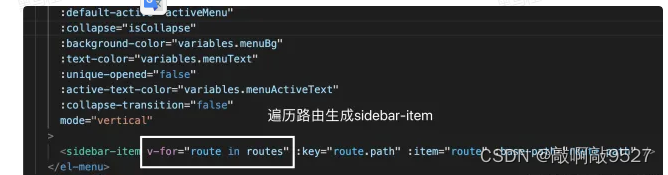
sidebar组件引入路由信息
循环渲染路由信息
sidebarItem组件根据条件渲染-传递icon和title属性给item组件

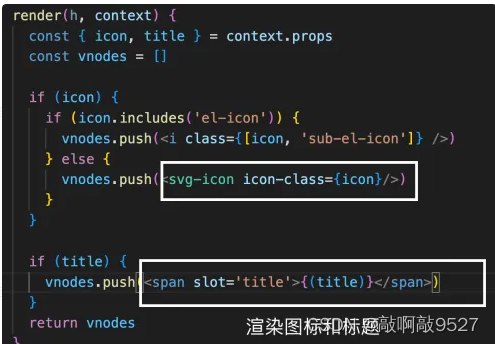
item组件接收icon和title属性,使用函数型组件完成渲染
10.左侧菜单显示项目logo
ogo有两种展示形态,当菜单展开时,显示大图,当菜单折叠时,显示小图

通过settings.js的设置,将logo显示出来-代码位置(src/settings.js)
sidebarLogo:true
调整logo的页面结构-代码位置(src/layout/components/Sidebar/Logo.vue)
<template>
  <div class="sidebar-logo-container" :class="{'collapse':collapse}">
    <transition name="sidebarLogoFade">
      <router-link key="collapse" class="sidebar-logo-link" to="/">
        <img src="@/assets/common/logo.png" class="sidebar-logo">
      </router-link>
    </transition>
  </div>
</template>
调整logo样式-代码位置(src/layout/components/Sidebar/Logo.vue
<style lang="scss" scoped>
.sidebarLogoFade-enter-active {
  transition: opacity 1.5s;
}

.sidebarLogoFade-enter,
.sidebarLogoFade-leave-to {
  opacity: 0;
}

.sidebar-logo-container {
  position: relative;
  width: 100%;
  height: 50px;
  line-height: 50px;
  text-align: center;
  overflow: hidden;

  & .sidebar-logo-link {
    height: 100%;
    width: 100%;

    & .sidebar-logo {
      width: 140px;
      vertical-align: middle;
      margin-right: 12px;
    }

    & .sidebar-title {
      display: inline-block;
      margin: 0;
      color: #fff;
      font-weight: 600;
      line-height: 50px;
      font-size: 14px;
      font-family: Avenir, Helvetica Neue, Arial, Helvetica, sans-serif;
      vertical-align: middle;
    }
  }

  &.collapse {
    .sidebar-logo {
      margin-right: 0px;
      width: 32px;
      height: 32px;
    }
  }
}
</style>