作者:翟天保Steven
版权声明:著作权归作者所有,商业转载请联系作者获得授权,非商业转载请注明出处
什么是二值阈值分割?
二值阈值分割是一种常见的图像处理技术,用于将图像的像素值分成两个类别:前景和背景。通过设定一个或多个阈值,图像中介于这些阈值之间的像素被归类为前景,其余的像素被归类为背景。这种方法简单高效,适用于许多基础的图像处理任务。
环境准备
参见:Windows下用CMake编译ITK及配置测试_itk配置-CSDN博客
功能解析
1.引入必要的头文件:
#include <itkImage.h>
#include <itkImageFileReader.h>
#include <itkImageFileWriter.h>
#include <itkBinaryThresholdImageFilter.h>
#include <itkImageIOFactory.h>
#include <itkPNGImageIOFactory.h>
#include <itkJPEGImageIOFactory.h>
我们需要引入ITK库的头文件,以便使用它们提供的图像读取、写入和处理功能。
2.初始化图像类型和读写器:
typedef itk::Image<unsigned char, 2> ImageType;
typedef itk::ImageFileReader<ImageType> ReaderType;
typedef itk::ImageFileWriter<ImageType> WriterType;
itk::JPEGImageIOFactory::RegisterOneFactory();
ReaderType::Pointer reader = ReaderType::New();
WriterType::Pointer writer = WriterType::New();
ImageType定义了图像的数据类型和维度。这里我们使用unsigned char类型的2D图像。ReaderType和WriterType分别定义了图像读取器和写入器的类型。itk::JPEGImageIOFactory::RegisterOneFactory()注册了JPEG格式的IO工厂,以便ITK可以处理JPEG格式的图像文件。ReaderType::Pointer reader = ReaderType::New()和WriterType::Pointer writer = WriterType::New()分别创建了图像读取器和写入器的实例。
3.设置文件名和阈值:
reader->SetFileName("test.jpg");      // 要读取的文件名
writer->SetFileName("output.jpg");    // 写入的文件名
int lowerThreshold = 100;
int upperThreshold = 200;
reader->SetFileName("test.jpg")设置要读取的图像文件的名称。writer->SetFileName("output.jpg")设置要写入的图像文件的名称。writer->SetInput(reader->GetOutput())将读取器的输出连接到写入器的输入,这样读取的图像可以直接写入到指定文件中。
4.创建和配置二值阈值分割过滤器:
typedef itk::BinaryThresholdImageFilter<ImageType, ImageType> FilterType;
FilterType::Pointer filter = FilterType::New();
filter->SetInput(reader->GetOutput());

// 设置阈值
filter->SetLowerThreshold(lowerThreshold);
filter->SetUpperThreshold(upperThreshold);

// 设置分割后像素值
filter->SetOutsideValue(0);
filter->SetInsideValue(255);
FilterType定义了二值阈值分割过滤器的类型。- 设置了阈值范围和分割后的像素值。
5.连接过滤器输出到写入器并执行写入操作:
try
{
    writer->Update();
}
catch (itk::ExceptionObject &error)
{
    std::cerr << "Error: " << error << std::endl;
    return EXIT_FAILURE;
}
writer->Update()执行写入操作,将读取的图像保存到指定的文件中。- 使用
try-catch块捕获可能的异常,并在发生错误时输出错误信息。
完整代码
#include <itkImage.h>
#include <itkImageFileReader.h>
#include <itkImageFileWriter.h>
#include <itkBinaryThresholdImageFilter.h>
#include <itkImageIOFactory.h>
#include <itkPNGImageIOFactory.h>
#include <itkJPEGImageIOFactory.h>

int main()
{
	// 初始化
	typedef itk::Image<unsigned char, 2> ImageType;
	typedef itk::ImageFileReader<ImageType> ReaderType;
	typedef itk::ImageFileWriter<ImageType> WriterType;
	itk::JPEGImageIOFactory::RegisterOneFactory();
	ReaderType::Pointer reader = ReaderType::New();
	WriterType::Pointer writer = WriterType::New();

	// 设置
	reader->SetFileName("test.jpg");      //要读取的文件名
	writer->SetFileName("output.jpg");    //写入的文件名
	int lowerThreshold = 100;
	int upperThreshold = 200;

	// 创建二值阈值分割过滤器
	typedef itk::BinaryThresholdImageFilter<ImageType, ImageType> FilterType;
	FilterType::Pointer filter = FilterType::New();
	filter->SetInput(reader->GetOutput());

	// 设置阈值
	filter->SetLowerThreshold(lowerThreshold);
	filter->SetUpperThreshold(upperThreshold);

	// 设置分割后像素值
	filter->SetOutsideValue(0);
	filter->SetInsideValue(255);

	// 输出
	writer->SetInput(filter->GetOutput());
	try
	{
		writer->Update();
	}
	catch (itk::ExceptionObject &error)
	{
		std::cerr << "Error: " << error << std::endl;
		return EXIT_FAILURE;
	}

	std::cout << "Image segmentation completed successfully." << std::endl;
	return EXIT_SUCCESS;
}
测试效果
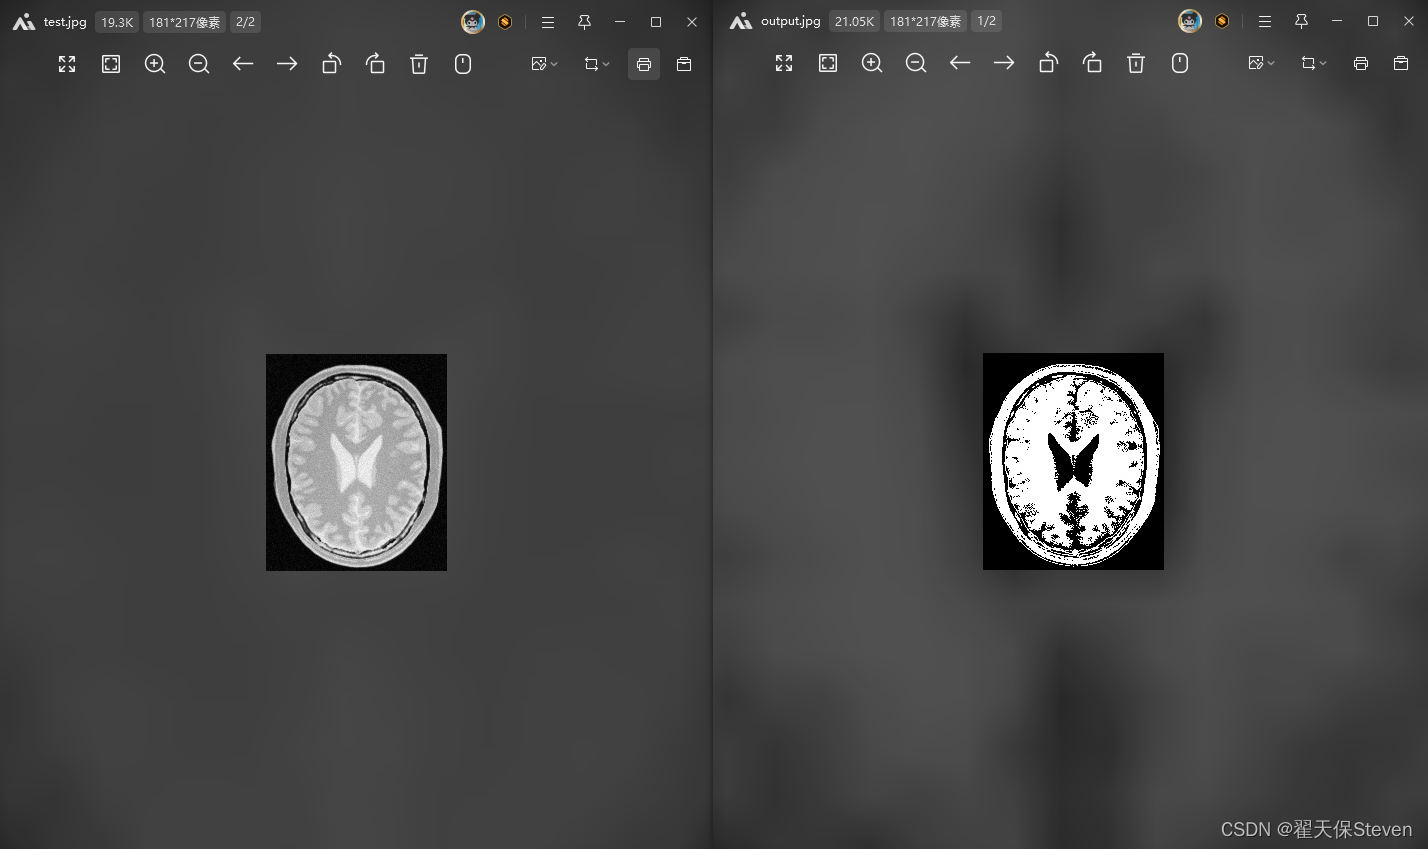
图像中介于100-200之间的值被设置为255(前景),0-100和200-255的值被设置0(背景),实现了基本的阈值分割。
如果文章帮助到你了,可以点个赞让我知道,我会很快乐~加油!

