文章目录
- 一. SpringBoot3 整合 SpringMVC
- 1.1 配置静态资源位置
- 1.2 自定义拦截器(SpringMVC配置)
- 二. SpringBoot3 整合 Druid 数据源
- 三. SpringBoot3 整合 Mybatis
- 3.1 Mybatis整合
- 3.2 声明式事务整合配置
- 3.3 AOP整合配置
- 四. SpringBoot3 项目打包和运行
- 4.1 添加打包插件
- 4.2 执行打包
- 4.3 命令启动
一. SpringBoot3 整合 SpringMVC
1.1 配置静态资源位置
spring.resources.static-locations:配置静态资源的位置。静态资源可以是CSS、JavaScript、图像等。
默认情况下,Spring Boot会将静态资源放在classpath:/static目录下。可以通过在配置文件中设置spring.resources.static-locations属性来自定义静态资源的位置。- 默认的静态资源路径为:
- classpath:/META-INF/resources/
- classpath:/resources/
- classpath:/static/
- classpath:/public/
- 在/static创建一个login.html

此时,浏览器访问路径:http://localhost:8081/huahua/login.html - 在webapp目录下创建一个register.html

在application.yaml中配置静态资源访问:server: port: 8081 servlet: context-path: /huahua spring: web: resources: static-locations: classpath:/webapp #配置静态资源的位置 # 配置后,会覆盖默认的静态资源文件夹 # 外部访问静态资源时,不需要写静态资源文件夹:http://localhost:8081/huahua/register.html
此时,访问路径:http://localhost:8081/huahua/register.html
1.2 自定义拦截器(SpringMVC配置)
- pom.xml文件
<?xml version="1.0" encoding="UTF-8"?> <project xmlns="http://maven.apache.org/POM/4.0.0" xmlns:xsi="http://www.w3.org/2001/XMLSchema-instance" xsi:schemaLocation="http://maven.apache.org/POM/4.0.0 http://maven.apache.org/xsd/maven-4.0.0.xsd"> <modelVersion>4.0.0</modelVersion> <parent> <groupId>org.springframework.boot</groupId> <artifactId>spring-boot-starter-parent</artifactId> <version>3.0.5</version> </parent> <groupId>com.hky</groupId> <artifactId>springboot-03-base-springmvc</artifactId> <version>1.0-SNAPSHOT</version> <dependencies> <dependency> <groupId>org.springframework.boot</groupId> <artifactId>spring-boot-starter-web</artifactId> </dependency> </dependencies> </project> - 拦截器声明
package com.hky.interceptor; import jakarta.servlet.http.HttpServletRequest; import jakarta.servlet.http.HttpServletResponse; import org.springframework.web.servlet.HandlerInterceptor; /** * @author hky * @date 2024/6/29 * @Description */ public class MyInterceptor implements HandlerInterceptor { @Override public boolean preHandle(HttpServletRequest request, HttpServletResponse response, Object handler) throws Exception { System.out.println("request = " + request + ", response = " + response + ", handler = " + handler); return true; } } - 拦截器配置
正常使用配置类,保证:配置类要在启动类的同包或者子包方可生效package com.hky.config; import com.hky.interceptor.MyInterceptor; import org.springframework.context.annotation.Configuration; import org.springframework.web.servlet.config.annotation.InterceptorRegistry; import org.springframework.web.servlet.config.annotation.WebMvcConfigurer; /** * @author hky * @date 2024/6/29 * @Description */ @Configuration public class WebMvcConfig implements WebMvcConfigurer { @Override public void addInterceptors(InterceptorRegistry registry) { registry.addInterceptor(new MyInterceptor()); } }
二. SpringBoot3 整合 Druid 数据源
- 创建程序
- 引入依赖:pom.xml
<?xml version="1.0" encoding="UTF-8"?> <project xmlns="http://maven.apache.org/POM/4.0.0" xmlns:xsi="http://www.w3.org/2001/XMLSchema-instance" xsi:schemaLocation="http://maven.apache.org/POM/4.0.0 http://maven.apache.org/xsd/maven-4.0.0.xsd"> <modelVersion>4.0.0</modelVersion> <parent> <groupId>org.springframework.boot</groupId> <artifactId>spring-boot-starter-parent</artifactId> <version>3.0.5</version> </parent> <groupId>com.hky</groupId> <artifactId>springboot-04-base-druid</artifactId> <version>1.0-SNAPSHOT</version> <dependencies> <!-- web开发的场景启动器 --> <dependency> <groupId>org.springframework.boot</groupId> <artifactId>spring-boot-starter-web</artifactId> </dependency> <!-- 数据库相关配置启动器 jdbctemplate 事务相关--> <dependency> <groupId>org.springframework.boot</groupId> <artifactId>spring-boot-starter-jdbc</artifactId> </dependency> <!-- druid启动器的依赖 --> <dependency> <groupId>com.alibaba</groupId> <artifactId>druid-spring-boot-3-starter</artifactId> <version>1.2.18</version> </dependency> <!-- 驱动类--> <dependency> <groupId>mysql</groupId> <artifactId>mysql-connector-java</artifactId> <version>8.0.28</version> </dependency> <dependency> <groupId>org.projectlombok</groupId> <artifactId>lombok</artifactId> <version>1.18.28</version> </dependency> </dependencies> </project> - 设置启动类
- 编写配置文件
spring: datasource: type: com.alibaba.druid.pool.DruidDataSource druid: url: jdbc:mysql://localhost:3306/exams username: root password: H13548361722 driver-class-name: com.mysql.cj.jdbc.Driver # 初始化时建立物理连接的个数 initial-size: 5 # 连接池的最小空闲数量 min-idle: 5 # 连接池最大连接数量 max-active: 20 # 获取连接时最大等待时间,单位毫秒 max-wait: 60000 # 申请连接的时候检测,如果空闲时间大于timeBetweenEvictionRunsMillis,执行validationQuery检测连接是否有效。 test-while-idle: true # 既作为检测的间隔时间又作为testWhileIdel执行的依据 time-between-eviction-runs-millis: 60000 # 销毁线程时检测当前连接的最后活动时间和当前时间差大于该值时,关闭当前连接(配置连接在池中的最小生存时间) min-evictable-idle-time-millis: 30000 # 用来检测数据库连接是否有效的sql 必须是一个查询语句(oracle中为 select 1 from dual) validation-query: select 1 # 申请连接时会执行validationQuery检测连接是否有效,开启会降低性能,默认为true test-on-borrow: false # 归还连接时会执行validationQuery检测连接是否有效,开启会降低性能,默认为true test-on-return: false # 是否缓存preparedStatement, 也就是PSCache,PSCache对支持游标的数据库性能提升巨大,比如说oracle,在mysql下建议关闭。 pool-prepared-statements: false # 要启用PSCache,必须配置大于0,当大于0时,poolPreparedStatements自动触发修改为true。在Druid中,不会存在Oracle下PSCache占用内存过多的问题,可以把这个数值配置大一些,比如说100 max-pool-prepared-statement-per-connection-size: -1 # 合并多个DruidDataSource的监控数据 use-global-data-source-stat: true server: port: 8081 - 实体类
package com.hky.pojo; import lombok.Data; /** * @author hky * @date 2024/6/29 * @Description */ @Data public class College { private Integer collegeID; private String collegeName; } - 编写Controller
package com.hky.controller; import com.hky.pojo.College; import lombok.Data; import org.springframework.beans.factory.annotation.Autowired; import org.springframework.jdbc.core.BeanPropertyRowMapper; import org.springframework.jdbc.core.JdbcTemplate; import org.springframework.web.bind.annotation.GetMapping; import org.springframework.web.bind.annotation.RequestMapping; import org.springframework.web.bind.annotation.RestController; import java.util.List; /** * @author hky * @date 2024/6/29 * @Description */ @RestController @RequestMapping("college") public class CollegeController { @Autowired private JdbcTemplate jdbcTemplate; @GetMapping("list") public List<College> list(){ String sql = "select * from college"; List<College> list = jdbcTemplate.query(sql, new BeanPropertyRowMapper<>(College.class)); return list; } } 注:druid-spring-boot-3-starter虽然适配了SpringBoot3,但缺少自动装配的配置文件,需要手动在resources目录下创建META-INF/spring/org.springframework.boot.autoconfigure.AutoConfiguration.imports,写入内容:com.alibaba.druid.spring.boot3.autoconfigure.DruidDataSourceAutoConfigure- druid 1.2.20 后可不用上述配置
三. SpringBoot3 整合 Mybatis
3.1 Mybatis整合
- 创建程序
- 导入依赖,pom.xml:
<parent> <groupId>org.springframework.boot</groupId> <artifactId>spring-boot-starter-parent</artifactId> <version>3.0.5</version> </parent> <dependencies> <dependency> <groupId>org.springframework.boot</groupId> <artifactId>spring-boot-starter-web</artifactId> </dependency> <dependency> <groupId>org.mybatis.spring.boot</groupId> <artifactId>mybatis-spring-boot-starter</artifactId> <version>3.0.1</version> </dependency> <!-- 数据库相关配置启动器 --> <dependency> <groupId>org.springframework.boot</groupId> <artifactId>spring-boot-starter-jdbc</artifactId> </dependency> <!-- druid启动器的依赖 --> <dependency> <groupId>com.alibaba</groupId> <artifactId>druid-spring-boot-3-starter</artifactId> <version>1.2.18</version> </dependency> <!-- 驱动类--> <dependency> <groupId>mysql</groupId> <artifactId>mysql-connector-java</artifactId> <version>8.0.28</version> </dependency> <dependency> <groupId>org.projectlombok</groupId> <artifactId>lombok</artifactId> <version>1.18.28</version> </dependency> </dependencies> - application.yaml配置文件
spring: datasource: type: com.alibaba.druid.pool.DruidDataSource druid: url: jdbc:mysql://localhost:3306/exams username: root password: H13548361722 driver-class-name: com.mysql.cj.jdbc.Driver # 初始化时建立物理连接的个数 initial-size: 5 # 连接池的最小空闲数量 min-idle: 5 # 连接池最大连接数量 max-active: 20 # 获取连接时最大等待时间,单位毫秒 max-wait: 60000 # 申请连接的时候检测,如果空闲时间大于timeBetweenEvictionRunsMillis,执行validationQuery检测连接是否有效。 test-while-idle: true # 既作为检测的间隔时间又作为testWhileIdel执行的依据 time-between-eviction-runs-millis: 60000 # 销毁线程时检测当前连接的最后活动时间和当前时间差大于该值时,关闭当前连接(配置连接在池中的最小生存时间) min-evictable-idle-time-millis: 30000 # 用来检测数据库连接是否有效的sql 必须是一个查询语句(oracle中为 select 1 from dual) validation-query: select 1 # 申请连接时会执行validationQuery检测连接是否有效,开启会降低性能,默认为true test-on-borrow: false # 归还连接时会执行validationQuery检测连接是否有效,开启会降低性能,默认为true test-on-return: false # 是否缓存preparedStatement, 也就是PSCache,PSCache对支持游标的数据库性能提升巨大,比如说oracle,在mysql下建议关闭。 pool-prepared-statements: false # 要启用PSCache,必须配置大于0,当大于0时,poolPreparedStatements自动触发修改为true。在Druid中,不会存在Oracle下PSCache占用内存过多的问题,可以把这个数值配置大一些,比如说100 max-pool-prepared-statement-per-connection-size: -1 # 合并多个DruidDataSource的监控数据 use-global-data-source-stat: true mybatis: mapper-locations: classpath:/mappers/*.xml #指定xml文件的位置 type-aliases-package: com.hky.pojo configuration: map-underscore-to-camel-case: true auto-mapping-behavior: full log-impl: org.apache.ibatis.logging.slf4j.Slf4jImpl server: port: 8081 servlet: context-path: /huahua - 实体类
- Mapper接口
- Mapper接口实现(XML)
- 编写三层架构代码
- 启动类和扫描包配置
@MapperScan("com.hky.mapper")
@SpringBootApplication
public class Main {

    public static void main(String[] args) {
        SpringApplication.run(Main.class,args);
    }
}
3.2 声明式事务整合配置
- 导入依赖
<dependency> <groupId>org.springframework.boot</groupId> <artifactId>spring-boot-starter-jdbc</artifactId> </dependency> - SpringBoot项目会自动配置一个DataSourceTransactionManager,所以只需在方法(或者类)加上
@Transactional注解,就自动纳入 Spring 的事务管理@Service public class CollegeService { @Autowired private CollegeMapper collegeMapper; @Transactional public List<College> query(){ List<College> colleges = collegeMapper.queryAll(); //int i = 1/0; return colleges; } }
3.3 AOP整合配置
- 导入依赖
<dependency> <groupId>org.springframework.boot</groupId> <artifactId>spring-boot-starter-aop</artifactId> </dependency> - 使用AOP注解
@Component
@Aspect
@Order(5)
public class LogAdvice {

    @Before("execution(* com..service.*.*(..))")
    public void before(JoinPoint point){
        String className = point.getTarget().getClass().getSimpleName();
        String methodName = point.getSignature().getName();
        System.out.println("className = "+ className + "  methodName = " + methodName + " 开始执行了!");
    }
}
四. SpringBoot3 项目打包和运行
4.1 添加打包插件
<!--    SpringBoot应用打包插件-->
<build>
    <plugins>
        <plugin>
            <groupId>org.springframework.boot</groupId>
            <artifactId>spring-boot-maven-plugin</artifactId>
        </plugin>
    </plugins>
</build>
4.2 执行打包
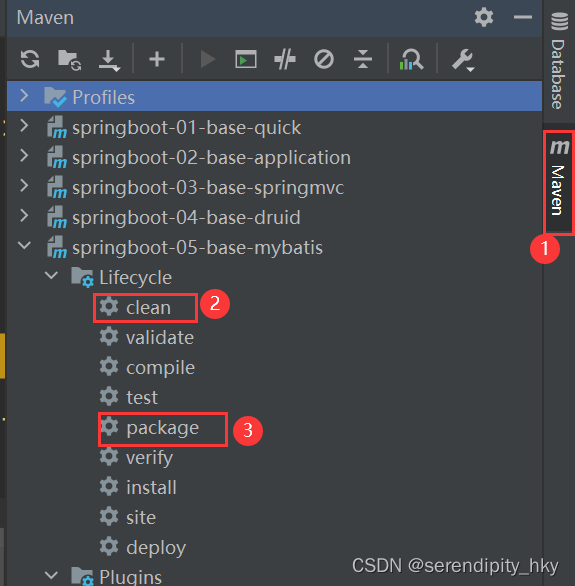
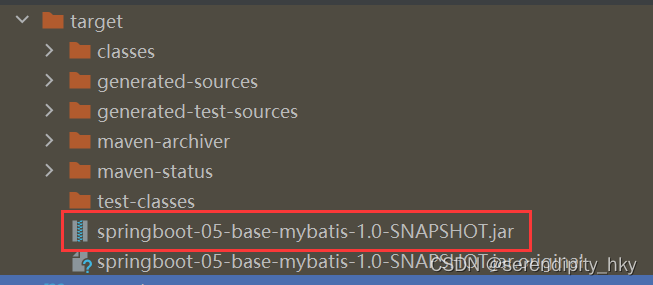
打包后,会生成一个 jar 包:
4.3 命令启动
- 在Java环境中执行可执行的 jar 文件:
命令格式:java -jar [选项] [参数] <jar文件名>-D<name>=<value>:设置系统属性java -jar -Dserver.port=8080 springboot-05-base-mybatis-1.0-SNAPSHOT.jar-X:设置JVM参数,例如内存大小、垃圾回收策略等-Dspring.profiles.active=<profile>:指定Spring Boot的激活配置文件
- 启动和测试

