文章目录
- 前言
- 解析
- 配置文件解析源码
- Mapper文件解析过程
- 二级缓存解析过程
- SQL的解析
- SQL执行流程
- openSession()流程
- Executor执行器
- 二级缓存查询数据流程
- 插件
- 使用
- 原理
前言
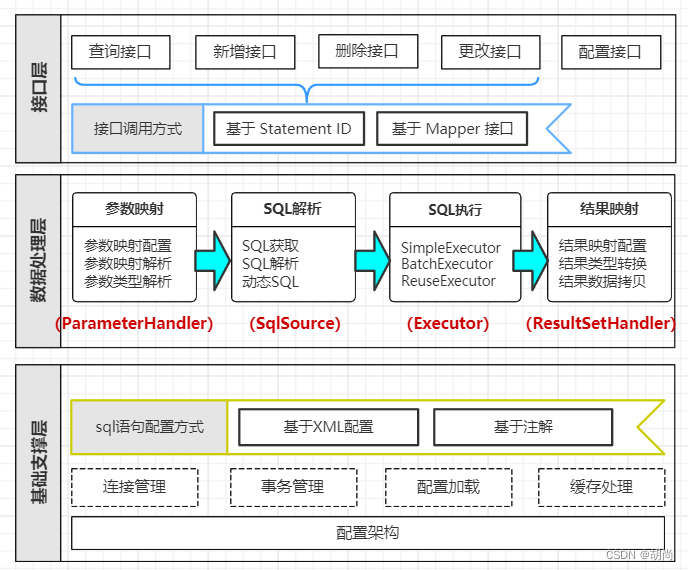
mybatis的体系结构:
public class App {
    public static void main(String[] args) {
        String resource = "mybatis-config.xml";
        Reader reader;
        try {
            //将XML配置文件构建为Configuration配置类
            reader = Resources.getResourceAsReader(resource);
            // 通过加载配置文件流构建一个SqlSessionFactory  DefaultSqlSessionFactory
            SqlSessionFactory sqlMapper = new SqlSessionFactoryBuilder().build(reader);
            // 数据源 执行器  DefaultSqlSession
            SqlSession session = sqlMapper.openSession();
            try {
                // 执行查询 底层执行jdbc
                //User user = (User)session.selectOne("com.tuling.mapper.selectById", 1);

                UserMapper mapper = session.getMapper(UserMapper.class);
                System.out.println(mapper.getClass());
                User user = mapper.selectById(1L);
                System.out.println(user.getUserName());
            } catch (Exception e) {
                e.printStackTrace();
            }finally {
                session.close();
            }
        } catch (IOException e) {
            e.printStackTrace();
        }
    }
}
核心步骤就是:
- 从配置文件,通常是XML配置文件,获得SqlSessionFactory
- 从SqlSessionFactory中获得SqlSession
- 通过SqlSession执行CRUD
- 执行完相关操作后关闭session
解析
配置文件解析源码
我们单纯的使用Mybatis,会创建一个全局配置文件,在全局配置文件中指定接口映射的XML文件,如下所示定义一个简单的全局配置文件
<?xml version="1.0" encoding="UTF-8"?>
<!DOCTYPE configuration PUBLIC "-//mybatis.org//DTD Config 3.0//EN"
        "http://mybatis.org/dtd/mybatis-3-config.dtd">
<configuration>
    <!--properties 扫描属性文件.properties 其中指定了连接数据库的用户名与密码  -->
    <properties resource="db.properties"></properties>


    <settings>
        <!-- 下划线转驼峰命名 -->
        <setting name="mapUnderscoreToCamelCase" value="true"/>
    </settings>

   <plugins>
       <!-- 自定义一个插件类,实现Interceptor接口 -->
       <plugin interceptor="com.tuling.plugins.ExamplePlugin" ></plugin>
    </plugins>

    <environments default="development">
        <environment id="development">
           <transactionManager type="JDBC"/>
            <!--//  mybatis内置了JNDI、POOLED、UNPOOLED三种类型的数据源,其中POOLED对应的实现为org.apache.ibatis.datasource.pooled.PooledDataSource,它是mybatis自带实现的一个同步、线程安全的数据库连接池 一般在生产中,我们会使用c3p0或者druid连接池-->
            <dataSource type="POOLED">
            <property name="driver" value="${mysql.driverClass}"/>
            <property name="url" value="${mysql.jdbcUrl}"/>
            <property name="username" value="${mysql.user}"/>
            <property name="password" value="${mysql.password}"/>
        </dataSource>
        </environment>
    </environments>


    <mappers>
        <!--1.必须保证接口名(例如IUserDao)和xml名(IUserDao.xml)相同,还必须在同一个包中-->
        <package name="com.tuling.mapper"/>

        <!--2.不用保证同接口同包同名
         <mapper resource="com/mybatis/mappers/EmployeeMapper.xml"/>

        3.保证接口名(例如IUserDao)和xml名(IUserDao.xml)相同,还必须在同一个包中
        <mapper class="com.mybatis.dao.EmployeeMapper"/>

        4.不推荐:引用网路路径或者磁盘路径下的sql映射文件 file:///var/mappers/AuthorMapper.xml
         <mapper url="file:E:/Study/myeclipse/_03_Test/src/cn/sdut/pojo/PersonMapper.xml"/>-->

    </mappers>
</configuration>
在java代码中通过SqlSessionFactoryBuilder类的build过程中就会去解析我们的xml配置文件,通过XML节点去解析所有信息。解析的主要内容为:settings、插件、数据库环境(数据库连接、事务等)、类型处理器、别名解析器、mapper.xml文件(CRUD、resultMap等)等等
在源码中解析核心配置文件是通过XMLConfigBuilder类去解析,而解析Mapper映射文件是通过XmlMapperBuilder类去解析的
所以方法的入口为build() —> new XMLConfigBuilder —> parse()
String resource = "mybatis-config.xml";
//将XML配置文件构建为Configuration配置类
Reader reader = Resources.getResourceAsReader(resource);
// 通过加载配置文件流构建一个SqlSessionFactory   解析xml文件  1
SqlSessionFactory sqlSessionFactory = new SqlSessionFactoryBuilder().build(reader);
parse()方法的流程就是首先检查是否已经解析过了,然后拿到核心配置文件的根节点<configuration>,调用各自的方法区一个一个解析对应的子节点,最终将所有解析出来的数据存入一个Configuration对象中
public Configuration parse() {
  /**
   * 若已经解析过了 就抛出异常
   */
  if (parsed) {
    throw new BuilderException("Each XMLConfigBuilder can only be used once.");
  }
  /**
   * 设置解析标志位
   */
  parsed = true;
  /**
   * 解析我们的mybatis-config.xml的
   * 节点
   * <configuration>
   *
   *
   * </configuration>
   */
  parseConfiguration(parser.evalNode("/configuration"));
  return configuration;
}

/**
 * 方法实现说明:解析我们mybatis-config.xml的 configuration节点
 * @author:xsls
 * @param root:configuration节点对象
 * @return:
 * @exception:
 * @date:2019/8/30 15:57
 */
private void parseConfiguration(XNode root) {
  try {
    /**
     * 解析 properties节点
     *     <properties resource="mybatis/db.properties" />
     *     解析到org.apache.ibatis.parsing.XPathParser#variables
     *           org.apache.ibatis.session.Configuration#variables
     */
    propertiesElement(root.evalNode("properties"));
    /**
     * 解析我们的mybatis-config.xml中的settings节点
     * 具体可以配置哪些属性:http://www.mybatis.org/mybatis-3/zh/configuration.html#settings
     * <settings>
          <setting name="cacheEnabled" value="true"/>
          <setting name="lazyLoadingEnabled" value="true"/>
         <setting name="mapUnderscoreToCamelCase" value="false"/>
         <setting name="localCacheScope" value="SESSION"/>
         <setting name="jdbcTypeForNull" value="OTHER"/>
          ..............
         </settings>
     *
     */
    Properties settings = settingsAsProperties(root.evalNode("settings"));
    /**
     * 基本没有用过该属性
     * VFS含义是虚拟文件系统;主要是通过程序能够方便读取本地文件系统、FTP文件系统等系统中的文件资源。
       Mybatis中提供了VFS这个配置,主要是通过该配置可以加载自定义的虚拟文件系统应用程序
       解析到:org.apache.ibatis.session.Configuration#vfsImpl
     */
    loadCustomVfs(settings);
    /**
     * 指定 MyBatis 所用日志的具体实现,未指定时将自动查找。
     * SLF4J | LOG4J | LOG4J2 | JDK_LOGGING | COMMONS_LOGGING | STDOUT_LOGGING | NO_LOGGING
     * 解析到org.apache.ibatis.session.Configuration#logImpl
     */
    loadCustomLogImpl(settings);
    /**
     * 解析我们的别名
     * <typeAliases>
         <typeAlias alias="Author" type="cn.tulingxueyuan.pojo.Author"/>
      </typeAliases>
     <typeAliases>
        <package name="cn.tulingxueyuan.pojo"/>
     </typeAliases>
     解析到oorg.apache.ibatis.session.Configuration#typeAliasRegistry.typeAliases
     除了自定义的,还有内置的
     */
    typeAliasesElement(root.evalNode("typeAliases"));
    /**
     * 解析我们的插件(比如分页插件)
     * mybatis自带的
     * Executor (update, query, flushStatements, commit, rollback, getTransaction, close, isClosed)
       ParameterHandler (getParameterObject, setParameters)
       ResultSetHandler (handleResultSets, handleOutputParameters)
       StatementHandler (prepare, parameterize, batch, update, query)
      解析到:org.apache.ibatis.session.Configuration#interceptorChain.interceptors
     */
    pluginElement(root.evalNode("plugins"));

    /**
     * 可以配置  一般不会去设置
     * 对象工厂 用于反射实例化对象、对象包装工厂、
     * 反射工厂 用于属性和setter/getter 获取
     */
    objectFactoryElement(root.evalNode("objectFactory"));
    objectWrapperFactoryElement(root.evalNode("objectWrapperFactory"));
    reflectorFactoryElement(root.evalNode("reflectorFactory"));

    // 设置settings 和默认值到configuration
    settingsElement(settings);

    /**
     * 解析我们的mybatis环境
       <environments default="dev">
         <environment id="dev">
           <transactionManager type="JDBC"/>
           <dataSource type="POOLED">
           <property name="driver" value="${jdbc.driver}"/>
           <property name="url" value="${jdbc.url}"/>
           <property name="username" value="root"/>
           <property name="password" value="Zw726515"/>
           </dataSource>
         </environment>

       <environment id="test">
         <transactionManager type="JDBC"/>
         <dataSource type="POOLED">
         <property name="driver" value="${jdbc.driver}"/>
         <property name="url" value="${jdbc.url}"/>
         <property name="username" value="root"/>
         <property name="password" value="123456"/>
         </dataSource>
       </environment>
     </environments>
     *  解析到:org.apache.ibatis.session.Configuration#environment
     *  在集成spring情况下由 spring-mybatis提供数据源 和事务工厂
     */
    environmentsElement(root.evalNode("environments"));
    /**
     * 解析数据库厂商
     *     <databaseIdProvider type="DB_VENDOR">
              <property name="SQL Server" value="sqlserver"/>
              <property name="DB2" value="db2"/>
              <property name="Oracle" value="oracle" />
              <property name="MySql" value="mysql" />
           </databaseIdProvider>
     *  解析到:org.apache.ibatis.session.Configuration#databaseId
     */
    databaseIdProviderElement(root.evalNode("databaseIdProvider"));
    /**
     * 解析我们的类型处理器节点
     * <typeHandlers>
          <typeHandler handler="org.mybatis.example.ExampleTypeHandler"/>
        </typeHandlers>
        解析到:org.apache.ibatis.session.Configuration#typeHandlerRegistry.typeHandlerMap
     */
    typeHandlerElement(root.evalNode("typeHandlers"));
    /**
     * 最最最最最重要的就是解析我们的mapper
     *
     resource:来注册我们的class类路径下的
     url:来指定我们磁盘下的或者网络资源的
     class:
     若注册Mapper不带xml文件的,这里可以直接注册
     若注册的Mapper带xml文件的,需要把xml文件和mapper文件同名 同路径
     -->
     <mappers>
        <mapper resource="mybatis/mapper/EmployeeMapper.xml"/>
        <mapper class="com.tuling.mapper.DeptMapper"></mapper>


          <package name="com.tuling.mapper"></package>
        -->
     </mappers>
     * package
     *     ·解析mapper接口代理工厂(传入需要代理的接口) 解析到:org.apache.ibatis.session.Configuration#mapperRegistry.knownMappers
           ·解析mapper.xml  最终解析成MappedStatement 到:org.apache.ibatis.session.Configuration#mappedStatements
     */
    mapperElement(root.evalNode("mappers"));
  } catch (Exception e) {
    throw new BuilderException("Error parsing SQL Mapper Configuration. Cause: " + e, e);
  }
}
Mapper文件解析过程
解析Mapper映射文件是通过XmlMapperBuilder类去解析的
我们在Mybatis的核心配置文件中指定mapper映射文件,比如使用下面这中方式,通过指定java接口的包名
<mappers>
    <!--1.必须保证接口名(例如IUserDao)和xml名(IUserDao.xml)相同,还必须在同一个包中-->
    <package name="com.tuling.mapper"/>

    <!--2.不用保证同接口同包同名
    <mapper resource="com/mybatis/mappers/EmployeeMapper.xml"/>

   3.保证接口名(例如IUserDao)和xml名(IUserDao.xml)相同,还必须在同一个包中
  <mapper class="com.mybatis.dao.EmployeeMapper"/>

   4.不推荐:引用网路路径或者磁盘路径下的sql映射文件 file:///var/mappers/AuthorMapper.xml
   <mapper url="file:E:/Study/myeclipse/_03_Test/src/cn/sdut/pojo/PersonMapper.xml"/>-->

</mappers>
一个Mapper的xml文件内容如下
<mapper namespace="com.tuling.mapper.UserMapper">

    <cache ></cache>

    <!-- Mybatis 是如何将 sql 执行结果封装为目标对象并返回的?都有哪些映射形式?-->
    <resultMap id="result" type="com.tuling.entity.User">
        <id column="id" jdbcType="BIGINT" property="id"/>
        <result column="user_name" jdbcType="VARCHAR" property="userName"/>
        <result column="create_time" jdbcType="DATE" property="createTime"/>
    </resultMap>


    <select id="selectById" resultMap="result"  >
        select id,user_name,create_time from t_user
        <where>
            <if test="id > 0">
                and id=#{id}
            </if>
        </where>
    </select>


    <!--
      动态sql数据源  需要在调用crud 解析sql
      静态sql数据源        解析CURD节点的就会把sql解析好

      1  select id,user_name,create_time from t_user where id=1   动态

      2  select id,user_name,create_time from t_user where id= ?   静态

      3  select id,user_name,create_time from t_user
      <where>
         <if test="id>0">
         and id=${id}
         </if>
      </where>
      动态
    -->
</mapper>
当解析完包路径下的接口后就要去解析对应的Mapper.xml文件了。源码入口为:MapperAnnotationBuilder.loadXmlResource()
private void loadXmlResource() {
    if (!configuration.isResourceLoaded("namespace:" + type.getName())) {
        // 根据我们java接口的包名,直接转换我对应路径的.xml文件
        // 比如com.hs.mapper.UserMapper变为com/hs/mapper/UserMapper.xml
        String xmlResource = type.getName().replace('.', '/') + ".xml";
        // #1347
        InputStream inputStream = type.getResourceAsStream("/" + xmlResource);
        if (inputStream == null) {
            try {
                inputStream = Resources.getResourceAsStream(type.getClassLoader(), xmlResource);
            } catch (IOException e2) {
            }
        }
        if (inputStream != null) {
            // 通过XMLMapperBuilder对象的parse()方法去进行解析
            XMLMapperBuilder xmlParser = new XMLMapperBuilder(inputStream, assistant.getConfiguration(), xmlResource, configuration.getSqlFragments(), type.getName());
            xmlParser.parse();
        }
    }
}
接下来进入到xmlParser.parse()中
public void parse() {
  /**
   * 判断当前的Mapper是否被加载过
   */
  if (!configuration.isResourceLoaded(resource)) {
    /**
     * 真正的解析我们的 <mapper namespace="com.tuling.mapper.EmployeeMapper">
     * 从mapper根节点开始解析
     */
    configurationElement(parser.evalNode("/mapper"));
    /**
     * 把资源保存到我们Configuration中
     */
      configuration.addLoadedResource(resource);

    bindMapperForNamespace();
  }

  parsePendingResultMaps();
  parsePendingCacheRefs();
  parsePendingStatements();
}
configurationElement(XNode context)方法的详细情况如下所示,
private void configurationElement(XNode context) {
  try {
    /**
     * 解析我们的namespace属性
     * <mapper namespace="com.tuling.mapper.EmployeeMapper">
     */
    String namespace = context.getStringAttribute("namespace");
    if (namespace == null || namespace.equals("")) {
      throw new BuilderException("Mapper's namespace cannot be empty");
    }
    /**
     * 保存我们当前的namespace  并且判断接口完全类名==namespace
     */
    builderAssistant.setCurrentNamespace(namespace);
    /**
     * 解析我们的缓存引用
     * 说明我当前的缓存引用和DeptMapper的缓存引用一致
     * <cache-ref namespace="com.tuling.mapper.DeptMapper"></cache-ref>
          解析到org.apache.ibatis.session.Configuration#cacheRefMap<当前namespace,ref-namespace>
          异常下(引用缓存未使用缓存):org.apache.ibatis.session.Configuration#incompleteCacheRefs
     */
    cacheRefElement(context.evalNode("cache-ref"));

    /**
     * 解析我们的cache节点,也就是二级缓存
     * <cache ></cache>
        解析到:org.apache.ibatis.session.Configuration#caches
               org.apache.ibatis.builder.MapperBuilderAssistant#currentCache
     */
    cacheElement(context.evalNode("cache"));

    /**
     * 解析paramterMap节点(该节点mybaits3.5貌似不推荐使用了)
     */
    parameterMapElement(context.evalNodes("/mapper/parameterMap"));
    /**
     * 解析我们的resultMap节点
     * 解析到:org.apache.ibatis.session.Configuration#resultMaps
     *    异常 org.apache.ibatis.session.Configuration#incompleteResultMaps
     *
     */
    resultMapElements(context.evalNodes("/mapper/resultMap"));
    /**
     * 解析我们通过sql片段
     *  解析到org.apache.ibatis.builder.xml.XMLMapperBuilder#sqlFragments
     *   其实等于 org.apache.ibatis.session.Configuration#sqlFragments
     *   因为他们是同一引用,在构建XMLMapperBuilder 时把Configuration.getSqlFragments传进去了
     */
    sqlElement(context.evalNodes("/mapper/sql"));
    /**
     * 解析我们的select | insert |update |delete节点
     * 解析到org.apache.ibatis.session.Configuration#mappedStatements
     */
    buildStatementFromContext(context.evalNodes("select|insert|update|delete"));
  } catch (Exception e) {
    throw new BuilderException("Error parsing Mapper XML. The XML location is '" + resource + "'. Cause: " + e, e);
  }
}
二级缓存解析过程

二级缓存详情 有道云笔记
我们从上面Mapper文件的解析过程中找到了解析二级缓存的入口XMLMapperBuilder.cacheElement(XNode context)
private void cacheElement(XNode context) {
    if (context != null) {
        //解析cache节点的type属性,如果没有指定则使用默认的PERPETUAL
        String type = context.getStringAttribute("type", "PERPETUAL");
        // 根据别名(或完整限定名)  加载为Class
        Class<? extends Cache> typeClass = typeAliasRegistry.resolveAlias(type);
        /*获取缓存过期策略:默认是LRU
    	LRU – 最近最少使用:移除最长时间不被使用的对象。(默认)
    	FIFO – 先进先出:按对象进入缓存的顺序来移除它们。
   	 	SOFT – 软引用:基于垃圾回收器状态和软引用规则移除对象。
    	WEAK – 弱引用:更积极地基于垃圾收集器状态和弱引用规则移除对象。
    	*/
        String eviction = context.getStringAttribute("eviction", "LRU");
        Class<? extends Cache> evictionClass = typeAliasRegistry.resolveAlias(eviction);
        //flushInterval(刷新间隔)属性可以被设置为任意的正整数,设置的值应该是一个以毫秒为单位的合理时间量。
        //默认情况是不设置,也就是没有刷新间隔,缓存仅仅会在调用语句时刷新。
        Long flushInterval = context.getLongAttribute("flushInterval");
        //size(引用数目)属性可以被设置为任意正整数,要注意欲缓存对象的大小和运行环境中可用的内存资源。默认值是 1024。
        Integer size = context.getIntAttribute("size");
        //只读)属性可以被设置为 true 或 false。只读的缓存会给所有调用者返回缓存对象的相同实例。 因此这些对象不能被修改。
        //这就提供了可观的性能提升。而可读写的缓存会(通过序列化)返回缓存对象的拷贝。 速度上会慢一些,但是更安全,因此默认值是 false
        boolean readWrite = !context.getBooleanAttribute("readOnly", false);
        boolean blocking = context.getBooleanAttribute("blocking", false);
        Properties props = context.getChildrenAsProperties();
        //把缓存节点加入到Configuration中
        // 在useNewCache()就会构建出一个Cache对象,并添加到configuration对象中
        builderAssistant.useNewCache(typeClass, evictionClass, flushInterval, size, readWrite, blocking, props);
    }
}
useNewCache() --> build()
public Cache build() {
    setDefaultImplementations();
    // 创建最里面一层缓存实现,如果没指定默认使用的是PerpetualCache
    Cache cache = newBaseCacheInstance(implementation, id);
    setCacheProperties(cache);

    if (PerpetualCache.class.equals(cache.getClass())) {
        // 装饰器模式。循环遍历所有的包装,并进行包装,如果没指定这里默认是使用LRU缓存包装
        for (Class<? extends Cache> decorator : decorators) {
            cache = newCacheDecoratorInstance(decorator, cache);
            setCacheProperties(cache);
        }
        // 进行其他的包装
        cache = setStandardDecorators(cache);
    } else if (!LoggingCache.class.isAssignableFrom(cache.getClass())) {
        cache = new LoggingCache(cache);
    }
    return cache;
}
private Cache setStandardDecorators(Cache cache) {
    try {
        MetaObject metaCache = SystemMetaObject.forObject(cache);
        if (size != null && metaCache.hasSetter("size")) {
            metaCache.setValue("size", size);
        }
        if (clearInterval != null) {
            cache = new ScheduledCache(cache);//ScheduledCache:调度缓存,负责定时清空缓存
            ((ScheduledCache) cache).setClearInterval(clearInterval);
        }
        if (readWrite) {
            cache = new SerializedCache(cache); //SerializedCache:缓存序列化和反序列化存储
        }
        // LoggingCache缓存
        cache = new LoggingCache(cache);
        // SynchronizedCache缓存
        cache = new SynchronizedCache(cache);
        if (blocking) {
            // BlockingCache缓存
            cache = new BlockingCache(cache);
        }
        return cache;
    } catch (Exception e) {
        throw new CacheException("Error building standard cache decorators.  Cause: " + e, e);
    }
}
SQL的解析
-
我们每一个CRUD的sql标签最终最后解析成一个一个的MappedStatement对象,这其中存放了该标签的所有信息。它包含了SqlSource。
-
在XML中的SQL,在解析过程中会解析成SqlSource。如果是静态SQL就会直接解析成RawSqlSource,如果是动态sql,需要通过参数才能确定的sql语句就会解析成DynamicSqlSource。
动态sql会将一个一个的sql标签解析成SqlNode。
在运行Sql时会通过
sqlSource.getBoundSql()作为入口,调用这些SqlNode的apply()方法得到最终要执行的sql语句
比如:

正文开始:
我们从上面Mapper文件的解析过程中找到了解析Sql增删改查的入口XMLMapperBuilder.buildStatementFromContext(List<XNode> list)
private void buildStatementFromContext(List<XNode> list) {
    /**
   	* 判断有没有配置数据库厂商ID
   	*/
    if (configuration.getDatabaseId() != null) {
        buildStatementFromContext(list, configuration.getDatabaseId());
    }
    // 核心方法
    buildStatementFromContext(list, null);
}
private void buildStatementFromContext(List<XNode> list, String requiredDatabaseId) {
    /**
   	* 循环我们的select|delte|insert|update节点
   	*/
    for (XNode context : list) {
        /**
     	* 创建一个xmlStatement的构建器对象
     	*/
        final XMLStatementBuilder statementParser = new XMLStatementBuilder(configuration, builderAssistant, context, requiredDatabaseId);
        try {
            // 真正解析sql标签的方法
            statementParser.parseStatementNode();
        } catch (IncompleteElementException e) {
            configuration.addIncompleteStatement(statementParser);
        }
    }
}
public void parseStatementNode() {
  /**
   * 我们的insert|delte|update|select 语句的sqlId
   */
  String id = context.getStringAttribute("id");
  /**
   * 判断我们的insert|delte|update|select  节点是否配置了
   * 数据库厂商标注
   */
  String databaseId = context.getStringAttribute("databaseId");

  /**
   * 匹配当前的数据库厂商id是否匹配当前数据源的厂商id
   */
  if (!databaseIdMatchesCurrent(id, databaseId, this.requiredDatabaseId)) {
    return;
  }

  /**
   * 获得节点名称:select|insert|update|delete
   */
  String nodeName = context.getNode().getNodeName();
  /**
   * 根据nodeName 获得 SqlCommandType枚举
   */
  SqlCommandType sqlCommandType = SqlCommandType.valueOf(nodeName.toUpperCase(Locale.ENGLISH));
  /**
   * 判断是不是select语句节点
   */
  boolean isSelect = sqlCommandType == SqlCommandType.SELECT;
  /**
   *  获取flushCache属性
   *  默认值为isSelect的反值:查询:flushCache=false   增删改:flushCache=true
   */
  boolean flushCache = context.getBooleanAttribute("flushCache", !isSelect);
  /**
   * 获取useCache属性
   * 默认值为isSelect:查询:useCache=true   增删改:useCache=false
   */
  boolean useCache = context.getBooleanAttribute("useCache", isSelect);

  /**
   * resultOrdered:  是否需要分组:
   *  select * from user-->User{id=1, name='User1', groups=[1, 2], roles=[1, 2, 3]}
   */
  boolean resultOrdered = context.getBooleanAttribute("resultOrdered", false);

  /**
   * 解析我们的sql公用片段
   *     <select id="qryEmployeeById" resultType="Employee" parameterType="int">
            <include refid="selectInfo"></include>
            employee where id=#{id}
        </select>
      将 <include refid="selectInfo"></include> 解析成sql语句 放在<select>Node的子节点中
   */
  // Include Fragments before parsing
  XMLIncludeTransformer includeParser = new XMLIncludeTransformer(configuration, builderAssistant);
  includeParser.applyIncludes(context.getNode());

  /**
   * 解析我们sql节点的参数类型,Mybatis会根据我们传的参数去自动解析类型,所以这里一般我们也没有再写了
   */
  String parameterType = context.getStringAttribute("parameterType");
  // 把参数类型字符串转化为class
  Class<?> parameterTypeClass = resolveClass(parameterType);

  /**
   * 查看sql是否支撑自定义语言
   * <delete id="delEmployeeById" parameterType="int" lang="tulingLang">
   <settings>
        <setting name="defaultScriptingLanguage" value="tulingLang"/>
   </settings>
   */
  String lang = context.getStringAttribute("lang");
  /**
   * 获取自定义sql脚本语言驱动 默认:class org.apache.ibatis.scripting.xmltags.XMLLanguageDriver
   */
  LanguageDriver langDriver = getLanguageDriver(lang);

  // Parse selectKey after includes and remove them.
  /**
   * 解析我们<insert 语句的的selectKey节点, 一般在oracle里面设置自增id
   */
  processSelectKeyNodes(id, parameterTypeClass, langDriver);

  // Parse the SQL (pre: <selectKey> and <include> were parsed and removed)
  /**
   * 我们insert语句 用于主键生成组件
   */
  KeyGenerator keyGenerator;
  /**
   * selectById!selectKey
   * id+!selectKey
   */
  String keyStatementId = id + SelectKeyGenerator.SELECT_KEY_SUFFIX;
  /**
   * 把我们的命名空间拼接到keyStatementId中
   * com.tuling.mapper.Employee.saveEmployee!selectKey
   */
  keyStatementId = builderAssistant.applyCurrentNamespace(keyStatementId, true);
  /**
   *<insert id="saveEmployee" parameterType="com.tuling.entity.Employee" useGeneratedKeys="true" keyProperty="id">
   *判断我们全局的配置类configuration中是否包含以及解析过的主键生成器对象
   */
  if (configuration.hasKeyGenerator(keyStatementId)) {
    keyGenerator = configuration.getKeyGenerator(keyStatementId);
  } else {

    /**
     * 若我们<insert 配置了useGeneratedKeys 那么就取useGeneratedKeys的配置值,
     * 否者就看我们的mybatis-config.xml配置文件中是配置了
     * <setting name="useGeneratedKeys" value="true"></setting> 默认是false
     * 并且判断sql操作类型是否为insert
     * 若是的话,那么使用的生成策略就是Jdbc3KeyGenerator.INSTANCE
     * 否则就是NoKeyGenerator.INSTANCE
     */
    keyGenerator = context.getBooleanAttribute("useGeneratedKeys",
        configuration.isUseGeneratedKeys() && SqlCommandType.INSERT.equals(sqlCommandType))
        ? Jdbc3KeyGenerator.INSTANCE : NoKeyGenerator.INSTANCE;
  }


    /**
   * 通过class org.apache.ibatis.scripting.xmltags.XMLLanguageDriver来解析我们的
   * sql脚本对象  .  解析SqlNode. 注意, 只是解析成一个个的SqlNode, 并不会完全解析sql,因为这个时候参数都没确定,动态sql无法解析
   */
  SqlSource sqlSource = langDriver.createSqlSource(configuration, context, parameterTypeClass);


    /**
   * STATEMENT,PREPARED 或 CALLABLE 中的一个。这会让 MyBatis 分别使用 Statement,PreparedStatement 或 CallableStatement,默认值:PREPARED
   */
  StatementType statementType = StatementType.valueOf(context.getStringAttribute("statementType", StatementType.PREPARED.toString()));
  /**
   * 这是一个给驱动的提示,尝试让驱动程序每次批量返回的结果行数和这个设置值相等。 默认值为未设置(unset)(依赖驱动)
   */
  Integer fetchSize = context.getIntAttribute("fetchSize");
  /**
   * 这个设置是在抛出异常之前,驱动程序等待数据库返回请求结果的秒数。默认值为未设置(unset)(依赖驱动)。
   */
  Integer timeout = context.getIntAttribute("timeout");
  /**
   * 将会传入这条语句的参数类的完全限定名或别名。这个属性是可选的,因为 MyBatis 可以通过类型处理器(TypeHandler) 推断出具体传入语句的参数,默认值为未设置
   */
  String parameterMap = context.getStringAttribute("parameterMap");
  /**
   * 从这条语句中返回的期望类型的类的完全限定名或别名。 注意如果返回的是集合,那应该设置为集合包含的类型,而不是集合本身。
   * 可以使用 resultType 或 resultMap,但不能同时使用
   */
  String resultType = context.getStringAttribute("resultType");
  /**解析我们查询结果集返回的类型     */
  Class<?> resultTypeClass = resolveClass(resultType);
  /**
   * 外部 resultMap 的命名引用。结果集的映射是 MyBatis 最强大的特性,如果你对其理解透彻,许多复杂映射的情形都能迎刃而解。
   * 可以使用 resultMap 或 resultType,但不能同时使用。
   */
  String resultMap = context.getStringAttribute("resultMap");

  String resultSetType = context.getStringAttribute("resultSetType");
  ResultSetType resultSetTypeEnum = resolveResultSetType(resultSetType);
  if (resultSetTypeEnum == null) {
    resultSetTypeEnum = configuration.getDefaultResultSetType();
  }

  /**
   * 解析 keyProperty  keyColumn 仅适用于 insert 和 update
   */
  String keyProperty = context.getStringAttribute("keyProperty");
  String keyColumn = context.getStringAttribute("keyColumn");
  String resultSets = context.getStringAttribute("resultSets");

  /**
   * 为我们的insert|delete|update|select节点构建成我们的mappedStatment对象
   */
  builderAssistant.addMappedStatement(id, sqlSource, statementType, sqlCommandType,
      fetchSize, timeout, parameterMap, parameterTypeClass, resultMap, resultTypeClass,
      resultSetTypeEnum, flushCache, useCache, resultOrdered,
      keyGenerator, keyProperty, keyColumn, databaseId, langDriver, resultSets);
}
SQL执行流程
public class App {
    public static void main(String[] args) throws IOException {
        // 下面三行代码的功能是解析配置文件 ---> 得到configuration对象 ---> 封装成DefaultSqlSessionFactory
        String resource = "mybatis-config.xml";
        Reader reader = Resources.getResourceAsReader(resource);
        SqlSessionFactory sqlSessionFactory = new SqlSessionFactoryBuilder().build(reader);

        // 接下来的流程是执行sql, 会创建执行器executor
        SqlSession session = sqlSessionFactory.openSession();
        try {
            User user =  session.selectOne("com.tuling.mapper.UserMapper.selectById", 1);
            session.commit();
        } catch (Exception e) {
            e.printStackTrace();
            session.rollback();
        } finally {
            session.close();
        }
    }
}
openSession()流程
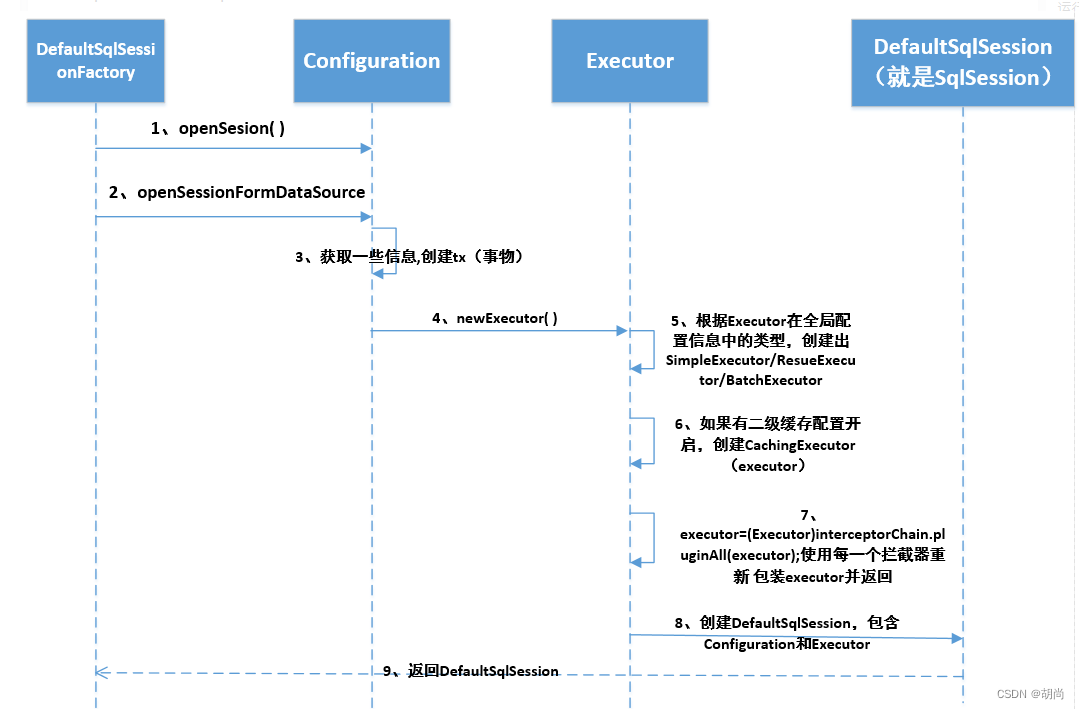
- SqlSession它是一个门面模式,它只是对外提供一个门面,真正执行sql的是Executor执行器
- 返回的DefaultSqlSession对象中包含了:configuration对象和executor对象
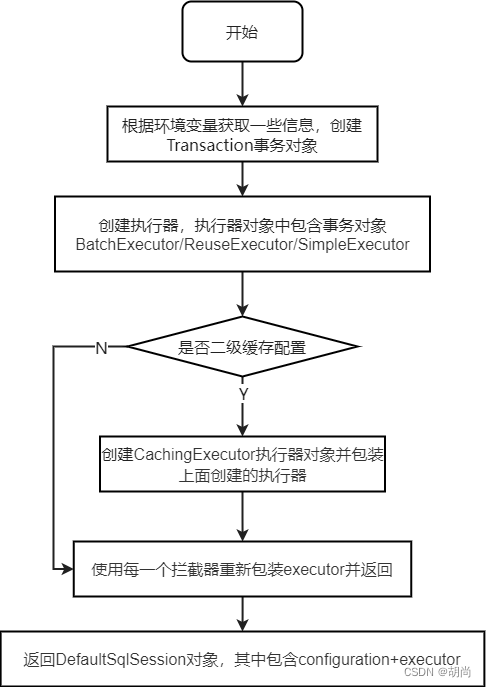
openSession() --> openSessionFromDataSource()
// 执行器中有事务对象,SqlSession有执行器对象
private SqlSession openSessionFromDataSource(ExecutorType execType, TransactionIsolationLevel level, boolean autoCommit) {
  Transaction tx = null;
  try {
    // 获取环境变量
    final Environment environment = configuration.getEnvironment();

    //获取事务工厂
    final TransactionFactory transactionFactory = getTransactionFactoryFromEnvironment(environment);
    tx = transactionFactory.newTransaction(environment.getDataSource(), level, autoCommit);

    /**
     * 创建一个sql执行器对象
     * 一般情况下 若我们的mybaits的全局配置文件的cacheEnabled默认为ture就返回一个cacheExecutor
     * 若关闭的话返回的就是一个SimpleExecutor
     */
    final Executor executor = configuration.newExecutor(tx, execType);
    /**
     * 创建返回一个DefaultSqlSession对象返回
     */
    return new DefaultSqlSession(configuration, executor, autoCommit);
  } catch (Exception e) {
    ...
  }
}
public Executor newExecutor(Transaction transaction, ExecutorType executorType) {
    // 没有指定执行器类型就使用默认的SIMPLE执行器类型
    executorType = executorType == null ? defaultExecutorType : executorType;
    executorType = executorType == null ? ExecutorType.SIMPLE : executorType;
    Executor executor;

    //判断执行器的类型
    if (ExecutorType.BATCH == executorType) {
        // 批量的执行器
        executor = new BatchExecutor(this, transaction);
    } else if (ExecutorType.REUSE == executorType) {
        //可重复使用的执行器
        executor = new ReuseExecutor(this, transaction);
    } else {
        //简单的sql执行器对象
        executor = new SimpleExecutor(this, transaction);
    }

    //判断mybatis的全局配置文件是否开启缓存,如果开启了二级缓存
    if (cacheEnabled) {
        //把当前的简单的执行器包装成一个CachingExecutor
        executor = new CachingExecutor(executor);
    }

    /**
     * 使用每一个拦截器重新包装executor并返回
     * 调用所有的拦截器对象plugin方法
     * 插件: 责任链+ 装饰器模式(动态代理)
     */
    executor = (Executor) interceptorChain.pluginAll(executor);
    return executor;
}
Executor执行器
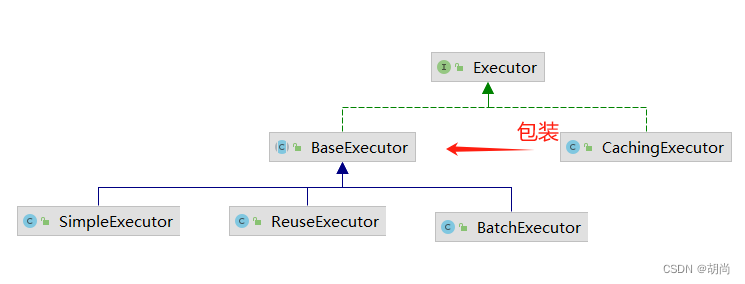
Executor分成两大类,一类是CacheExecutor,另一类是普通Executor。
普通执行器有三种:
-
SIMPLE,就是普通的执行器,默认的,执行一条sql就会有一个新的PreparedStatement对象
每执行一次update或select,就开启一个Statement对象,用完立刻关闭Statement对象。
-
REUSE,执行器会重用预处理语句(PreparedStatement对象)
执行update或select,以sql作为key查找Statement对象,存在就使用,不存在就创建,用完后,不关闭Statement对象
而是放置于Map<String, Statement>内,供下一次使用。简言之,就是重复使用Statement对象。
-
BATCH,执行器不仅会重用预处理,而且还会批量更新
执行update(没有select,JDBC批处理不支持select),将所有sql都添加到批处理中(
addBatch()),等待统一执行(executeBatch())它缓存了多个Statement对象,每个Statement对象都是
addBatch()完毕后,等待逐一执行executeBatch()批处理。与JDBC批处理相同。
CachingExecutor其实是封装了普通的Executor,和普通的区别是在查询前先会查询缓存中是否存在结果,如果存在就使用缓存中的结果,如果不存在还是使用普通的Executor进行查询,再将查询出来的结果存入缓存。
CachingExecutor中的缓存对应的是二级缓存,一级缓存存在BaseExecutor这个父类中,各个子类没必要自己去创建各自的一级缓存,共用部分移到父类即可。
一级缓存的存活周期是围绕SqlSession对象,因为每次提交/回滚时都会调用clearLocalCache()方法将BaseExecutor类中的一级缓存PerpetualCache对象给清理掉。二级缓存的存活周期是整个应用,二级缓存最里面的缓存也是PerpetualCache类型的对象,只不过相比较一级缓存而言它包装了很多其他的cache。
执行器设置方式,在Mybatis的核心配置文件中设置
<settings>
    <!-- 下划线转驼峰命名 -->
    <setting name="mapUnderscoreToCamelCase" value="true"/>
 	<!-- 修改执行器 -->
    <setting name="defaultExecutorType" value="REUSE"/>
</settings>
具体运行时序图如下所示
二级缓存查询数据流程
二级缓存中查询数据是根据同一条sql去查询的
// 当我们经过创建执行器,并且得到SqlSession对象之后,进入了执行sql语句的阶段
User user =  session.selectOne("com.tuling.mapper.UserMapper.selectById", 1);
这里的selectOne()方法最终就会调用到CachingExecutor.query()方法中来
public <E> List<E> query(MappedStatement ms, Object parameterObject, RowBounds rowBounds, ResultHandler resultHandler, CacheKey key, BoundSql boundSql) throws SQLException {
    // 判断我们我们的mapper中是否开启了二级缓存<cache></cache>
    Cache cache = ms.getCache();
    // 判断是否配置了<cache></cache>
    if (cache != null) {
        // 判断是否需要刷新缓存
        flushCacheIfRequired(ms);
        if (ms.isUseCache() && resultHandler == null) {
            ensureNoOutParams(ms, boundSql);

            // 先去二级缓存中获取,这里就会一层一层的脱二级缓存的包装
            @SuppressWarnings("unchecked")
            List<E> list = (List<E>) tcm.getObject(cache, key);

            // 二级缓存中没有获取到
            if (list == null) {
                // 这里实际上是调用的BaseExecutor.query(),因为CachingExecutor这个二级缓存已经查完了
                //通过查询数据库去查询,这里会经过查询一级缓存这个过程,一级缓存查询不到才会到数据库
                list = delegate.query(ms, parameterObject, rowBounds, resultHandler, key, boundSql);
                //加入到二级缓存中
                tcm.putObject(cache, key, list); // issue #578 and #116
            }
            return list;
        }
    }
    //没有整合二级缓存,直接去查询
    return delegate.query(ms, parameterObject, rowBounds, resultHandler, key, boundSql);
}
插件
使用
插件只能为Mybatis的四大核心对象来进行增强:Executor、StatementHandler、ParameterHandler、ResultSetHandler
接下来就举个例子,比如要对Executor的查询进行增强,自定义一个类,实现Interceptor接口,并使用@Intercepts注解
// type表示为Executor进行增强,这里只能写上面这四种的其中一种
// method表示为哪个类中的哪个方法进行增强,这里的query()方法是真实在Executor类中存在的
// args表示要进行增强方法的参数类型,因为在一个类中同名的方法可能存在多个,所以需要使用方法参数来确定具体要增强的哪一个方法
@Intercepts({@Signature(type = Executor.class, method = "query", args = {
        MappedStatement.class, Object.class, RowBounds.class, ResultHandler.class
})})
//@Intercepts({@Signature( type= StatementHandler.class,  method = "update", args ={Statement.class})})
public class ExamplePlugin implements Interceptor {

		// 插件常用场景: 分页   读写分离    Select就去读的数据源  增删改就去更新的数据源

    @Override
    public Object intercept(Invocation invocation) throws Throwable {
        System.out.println("代理。。。");
        Object[] args = invocation.getArgs();
        MappedStatement ms = (MappedStatement) args[0];
		// 责任链模式 执行下一个拦截器、直到尽头
        return invocation.proceed();
    }

}
java类创建完成后还需要在Mybatis的核心配置文件中指定
<configuration>

   <plugins>
       <plugin interceptor="com.hs.plugins.ExamplePlugin" ></plugin>
    </plugins>

</configuration>
原理
接下来在创建Mybatis的四大核心对象:Executor、StatementHandler、ParameterHandler、ResultSetHandler时,就会经过Interceptor链,并生成代理对象返回。
在构建SqlSessionFactory时,我们知道此时会去解析Mybatis的核心配置文件,将解析的所有数据都存储在configuration这个对象中,其中插件interceptor相关的解析数据会保存在configuration对象中的interceptorChain这个属性中。这个属性对象内部其实就是一个interceptor集合List<Interceptor>
接下来在回到SqlSession.openSession()方法的逻辑中,这里会调用到创建Executor的方法中
public Executor newExecutor(Transaction transaction, ExecutorType executorType) {
    // 执行器类型,如果没有指定就使用默认的SIMPLE
    executorType = executorType == null ? defaultExecutorType : executorType;
    executorType = executorType == null ? ExecutorType.SIMPLE : executorType;
    Executor executor;

    // 判断执行器的类型,去创建相应的Executor
    if (ExecutorType.BATCH == executorType) {
        executor = new BatchExecutor(this, transaction);
    } else if (ExecutorType.REUSE == executorType) {
        executor = new ReuseExecutor(this, transaction);
    } else {
        executor = new SimpleExecutor(this, transaction);
    }
    if (cacheEnabled) {
        executor = new CachingExecutor(executor);
    }
    // 这里的interceptorChain就是configuration对象中的属性
    executor = (Executor) interceptorChain.pluginAll(executor);
    return executor;
}
public class InterceptorChain {

    private final List<Interceptor> interceptors = new ArrayList<>();

    // 这里会循环遍历interceptor,并去执行各自的plugin()方法
    public Object pluginAll(Object target) {
        for (Interceptor interceptor : interceptors) {
            target = interceptor.plugin(target);
        }
        return target;
    }

    public void addInterceptor(Interceptor interceptor) {
        interceptors.add(interceptor);
    }

    public List<Interceptor> getInterceptors() {
        return Collections.unmodifiableList(interceptors);
    }

}
default Object plugin(Object target) {
  	return Plugin.wrap(target, this);
}
public static Object wrap(Object target, Interceptor interceptor) {
    // 因为@Intercepts注解中的@Signature是一个数组
    // 获得interceptor配置的@Signature的type
    Map<Class<?>, Set<Method>> signatureMap = getSignatureMap(interceptor);
    // 当前代理类型
    Class<?> type = target.getClass();
    // 根据当前代理类型 和 @signature指定的type进行配对
    Class<?>[] interfaces = getAllInterfaces(type, signatureMap);
    // 配对成功则可以代理,创建一个代理对象
    if (interfaces.length > 0) {
        return Proxy.newProxyInstance(
            type.getClassLoader(),
            interfaces,
            new Plugin(target, interceptor, signatureMap));
    }
    return target;
}
至此,代理对象创建完成。当使用代理对象调用方法时,就会到代理对象的invoke()方法中进行判断,当前调用的方法和我@Intercepts注解中指定的方法是否匹配,如果匹配上就就会去调用我们重写的intercept()方法逻辑
public Object invoke(Object proxy, Method method, Object[] args) throws Throwable {
    try {
        // 进行方法匹配
        Set<Method> methods = signatureMap.get(method.getDeclaringClass());
        if (methods != null && methods.contains(method)) {
            // 这里会封装成Invocation对象,我们可以在我们要增强方法逻辑中对该对象进行相应的处理
            return interceptor.intercept(new Invocation(target, method, args));
        }
        // 不匹配,直接去执行目标方法
        return method.invoke(target, args);
    } catch (Exception e) {
        throw ExceptionUtil.unwrapThrowable(e);
    }
}


