文章目录
- 昇思MindSpore快速入门
- 基于MindSpore的函数式自动微分
- 1、简介
- 2、函数与计算图算例
- 3、微分函数与梯度计算
- 4、Stop Gradient(停止梯度计算)
- 5、Auxiliary data
- 6、神经网络梯度计算
- Reference
昇思MindSpore快速入门
基于MindSpore的函数式自动微分
1、简介
神经网络的训练主要使用反向传播算法。反向传播顾名思义,将模型前向传播的预测值(logits)与正确标签(label)送入损失函数(loss function)获得loss值,然后沿着网络结构中的反向信息流传播,通过链式求导法则对每枝路线上神经元的参数求偏导,从而实现反向传播计算,利用求得的梯度(gradients),最终更新至模型参数(parameters):

至于为什么要求导(微分),求梯度,是为了最优化(最小化)使目标函数(损失函数loss function),通常采用梯度下降算法。
Mindspore提供的自动微分(Autograd)能够计算可导函数在某点处的导数值,解决了将一个复杂的数学运算分解为一系列简单的基本运算,该功能对用户屏蔽了大量的求导细节和过程(不用手动推公式链式求导了,感兴趣的同学可以尝试对一个小型的BP神经网络进行反向传播梯度下降求导计算),大大降低了框架的使用门槛。
MindSpore提供更接近于数学语义的自动微分接口grad和value_and_grad;
2、函数与计算图算例
下面我们根据这个计算图中单个神经元构成的网络结构构造计算函数并进行反向传播参数计算:
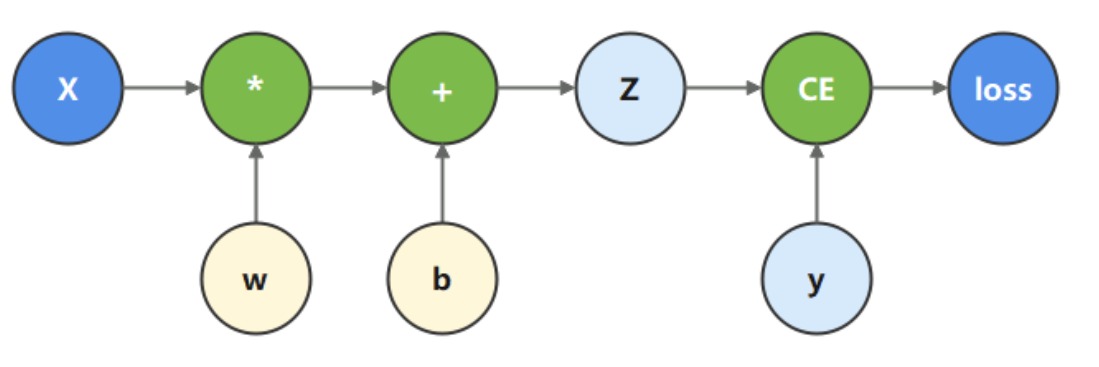
在这个模型中, 𝑥 为输入, 𝑦 为正确值(Ground Truth, GT), 𝑤 和 𝑏 是我们需要优化的参数,使得预测值
z
=
w
x
+
b
z=wx+b
z=wx+b近似于 𝑦,也就是使
z
z
z和
y
y
y之间的 loss 最小。
# 导入必要的MindSpore接口
import numpy as np
import mindspore
from mindspore import nn
from mindspore import ops
from mindspore import Tensor, Parameter

x = ops.ones(5, mindspore.float32)  # input tensor,输入5x1的全1向量
y = ops.zeros(3, mindspore.float32)  # expected output,GT为3x1的全0向量
w = Parameter(Tensor(np.random.randn(5, 3), mindspore.float32), name='w') # weight,参数w为5行3列的形状,对应5个输入和3个输出
b = Parameter(Tensor(np.random.randn(3,), mindspore.float32), name='b') # bias,参数bias为3x1的形状
print(x)
print(y)
print(w)
print(b)

# print_log:
[1. 1. 1. 1. 1.]
[0. 0. 0.]
Parameter (name=w, shape=(5, 3), dtype=Float32, requires_grad=True)
Parameter (name=b, shape=(3,), dtype=Float32, requires_grad=True)

# 定义网络中的神经元功能,并使用二元交叉熵损失作为损失函数返回loss值
def function(x, y, w, b):
    z = ops.matmul(x, w) + b
    loss = ops.binary_cross_entropy_with_logits(z, y, ops.ones_like(z), ops.ones_like(z))
    return loss

loss = function(x, y, w, b)
print(loss)

# print_log:
1.189936
3、微分函数与梯度计算
为了优化模型参数,需要求参数对loss的导数:
∂
l
o
s
s
∂
w
\frac{\partial loss}{\partial w}
∂w∂loss 和
∂
l
o
s
s
∂
b
\frac{\partial loss}{\partial b}
∂b∂loss
,通过调用mindspore.grad函数,来获得function的微分函数。
这里使用了grad函数的两个入参,分别为:
fn:待求导的function;
grad_position:指定求导输入位置的索引。
由于我们对 𝑤 和 𝑏 求导,因此配置其在grad_fn入参对应的位置(2, 3)。
使用grad获得微分函数是一种函数变换,即输入为函数,输出也为函数:
grad_fn = mindspore.grad(function, (2, 3))

grads = grad_fn(x, y, w, b)
print(grads)

# print_log:
(Tensor(shape=[5, 3], dtype=Float32, value=   # w的偏导数
 [[ 6.56869709e-02,  5.37334494e-02,  3.01467031e-01],
  [ 6.56869709e-02,  5.37334494e-02,  3.01467031e-01],
  [ 6.56869709e-02,  5.37334494e-02,  3.01467031e-01],
  [ 6.56869709e-02,  5.37334494e-02,  3.01467031e-01],
  [ 6.56869709e-02,  5.37334494e-02,  3.01467031e-01]]),
 Tensor(shape=[3], dtype=Float32, value= [ 6.56869709e-02,  5.37334494e-02,  3.01467031e-01]) # b的偏导数)
4、Stop Gradient(停止梯度计算)
通常情况下,求导时会求 loss 对参数的偏导数,因此函数的输出只有loss一项。当我们希望函数输出多项时,微分函数会求所有输出项对参数的导数。此时如果想实现对某个输出项的梯度截断,或消除某个Tensor对梯度的影响,需要用到Stop Gradient操作。
这里通过将 function 改为同时输出 loss 和 z 的 function_with_logits,获得微分函数并执行:
def function_with_logits(x, y, w, b):
    z = ops.matmul(x, w) + b
    loss = ops.binary_cross_entropy_with_logits(z, y, ops.ones_like(z), ops.ones_like(z))
    return loss, z

grad_fn = mindspore.grad(function_with_logits, (2, 3))
grads = grad_fn(x, y, w, b)
print(grads)

# print_log
(Tensor(shape=[5, 3], dtype=Float32, value=    # w的偏导数
 [[ 1.06568694e+00,  1.05373347e+00,  1.30146706e+00],
  [ 1.06568694e+00,  1.05373347e+00,  1.30146706e+00],
  [ 1.06568694e+00,  1.05373347e+00,  1.30146706e+00],
  [ 1.06568694e+00,  1.05373347e+00,  1.30146706e+00],
  [ 1.06568694e+00,  1.05373347e+00,  1.30146706e+00]]),
 Tensor(shape=[3], dtype=Float32, value= [ 1.06568694e+00,  1.05373347e+00,  1.30146706e+00]) # b的偏导数)

def function_stop_gradient(x, y, w, b):
    z = ops.matmul(x, w) + b
    loss = ops.binary_cross_entropy_with_logits(z, y, ops.ones_like(z), ops.ones_like(z))
    return loss, ops.stop_gradient(z)  # 屏蔽掉z对梯度的影响,即仍只求参数对loss的导数

grad_fn = mindspore.grad(function_stop_gradient, (2, 3))
grads = grad_fn(x, y, w, b)
print(grads)

# print_log:
(Tensor(shape=[5, 3], dtype=Float32, value=   # w的偏导数
 [[ 6.56869709e-02,  5.37334494e-02,  3.01467031e-01],
  [ 6.56869709e-02,  5.37334494e-02,  3.01467031e-01],
  [ 6.56869709e-02,  5.37334494e-02,  3.01467031e-01],
  [ 6.56869709e-02,  5.37334494e-02,  3.01467031e-01],
  [ 6.56869709e-02,  5.37334494e-02,  3.01467031e-01]]),
 Tensor(shape=[3], dtype=Float32, value= [ 6.56869709e-02,  5.37334494e-02,  3.01467031e-01]) # b的偏导数)
由于上述算例中输入的是全1向量,w参数对应的偏导数变化不是很明显,为了区分,可以尝试输入一组随机噪声作为网络的样本观测数据,这在实际深度学习的网络验证时也是常见的作法:
x_rand = np.random.rand(5)
x = Tensor(x_rand, mindspore.float32)
# x = ops.ones(5, mindspore.float32)   # input tensor
y = ops.zeros(3, mindspore.float32)  # expected output
w = Parameter(Tensor(np.random.randn(5, 3), mindspore.float32), name='w')  # weight
b = Parameter(Tensor(np.random.randn(3,), mindspore.float32), name='b')    # bias
print(x)
print(y)
print(w)
print(b)

# print_log:
[0.7097724  0.98406976 0.6969981  0.5849176  0.6543453 ]
[0. 0. 0.]
Parameter (name=w, shape=(5, 3), dtype=Float32, requires_grad=True)
Parameter (name=b, shape=(3,), dtype=Float32, requires_grad=True)

loss = function(x, y, w, b)
print(loss)

# print_log:
1.0480353

grad_fn = mindspore.grad(function, (2, 3))
grads = grad_fn(x, y, w, b)
print(grads)

# print_log:
(Tensor(shape=[5, 3], dtype=Float32, value=
[[ 1.82850987e-01,  1.81477696e-01,  4.38495465e-02],
 [ 2.53515244e-01,  2.51611233e-01,  6.07955605e-02],
 [ 1.79560080e-01,  1.78211510e-01,  4.30603549e-02],
 [ 1.50685996e-01,  1.49554282e-01,  3.61360498e-02],
 [ 1.68571889e-01,  1.67305842e-01,  4.04252708e-02]]), Tensor(shape=[3], dtype=Float32, value= [ 2.57619172e-01,  2.55684346e-01,  6.17797263e-02]))

# 再求一篇梯度,并考虑return loss, z
grad_fn = mindspore.grad(function_with_logits, (2, 3))
grads = grad_fn(x, y, w, b)
print(grads)

# print_log:
(Tensor(shape=[5, 3], dtype=Float32, value=
[[ 8.92623365e-01,  8.91250134e-01,  7.53621936e-01],
 [ 1.23758495e+00,  1.23568106e+00,  1.04486537e+00],
 [ 8.76558185e-01,  8.75209630e-01,  7.40058482e-01],
 [ 7.35603571e-01,  7.34471917e-01,  6.21053636e-01],
 [ 8.22917163e-01,  8.21651161e-01,  6.94770575e-01]]), Tensor(shape=[3], dtype=Float32, value= [ 1.25761914e+00,  1.25568438e+00,  1.06177974e+00]))

# Stop Gradient
grad_fn = mindspore.grad(function_stop_gradient, (2, 3))
grads = grad_fn(x, y, w, b)
print(grads)

# print_log:
(Tensor(shape=[5, 3], dtype=Float32, value=
[[ 1.82850987e-01,  1.81477696e-01,  4.38495465e-02],
 [ 2.53515244e-01,  2.51611233e-01,  6.07955605e-02],
 [ 1.79560080e-01,  1.78211510e-01,  4.30603549e-02],
 [ 1.50685996e-01,  1.49554282e-01,  3.61360498e-02],
 [ 1.68571889e-01,  1.67305842e-01,  4.04252708e-02]]), Tensor(shape=[3], dtype=Float32, value= [ 2.57619172e-01,  2.55684346e-01,  6.17797263e-02]))
可以看到加入Stop Gradient后,和第一次的梯度求解效果一致,梯度信息不再更新。
5、Auxiliary data
Auxiliary data意为辅助数据,是函数除第一个输出项外的其他输出。通常我们会将函数的loss设置为函数的第一个输出,其他的输出即为辅助数据。
grad和value_and_grad提供has_aux参数,当其设置为True时,可以自动实现前文手动添加stop_gradient的功能,满足返回辅助数据的同时不影响梯度计算的效果。
下面仍使用function_with_logits,配置has_aux=True,并执行。
grad_fn = mindspore.grad(function_with_logits, (2, 3), has_aux=True)
grads, (z,) = grad_fn(x, y, w, b)
print(grads, z)

# print_log:
((Tensor(shape=[5, 3], dtype=Float32, value=
  [[ 6.56869709e-02,  5.37334494e-02,  3.01467031e-01],
   [ 6.56869709e-02,  5.37334494e-02,  3.01467031e-01],
   [ 6.56869709e-02,  5.37334494e-02,  3.01467031e-01],
   [ 6.56869709e-02,  5.37334494e-02,  3.01467031e-01],
   [ 6.56869709e-02,  5.37334494e-02,  3.01467031e-01]]),
  Tensor(shape=[3], dtype=Float32, value= [ 6.56869709e-02,  5.37334494e-02,  3.01467031e-01])),
 Tensor(shape=[3], dtype=Float32, value= [-1.40476596e+00, -1.64932394e+00,  2.24711204e+00]))
可以看到,求得 𝑤 、 𝑏 对应的梯度值与初始function求得的梯度值一致,同时z能够作为微分函数的输出返回。
6、神经网络梯度计算
我们了解了基于MindSpore的函数式自动微分后,可以进一步熟悉实际的神经网络构造往往是继承自面向对象编程范式的nn.Cell。
在MindSpore中可以通过Cell构造同样的神经网络,利用函数式自动微分来实现反向传播。
首先以继承nn.Cell构造单层线性变换神经网络为例。这里我们直接使用前文的 𝑤 、 𝑏 作为模型参数,使用mindspore.Parameter进行封装后,作为内部属性,并在construct内实现相同的Tensor操作,并使用value_and_grad接口获得微分函数,用于计算梯度:
# Define model
class Network(nn.Cell):
    def __init__(self):
        super().__init__()
        self.w = w
        self.b = b

    def construct(self, x):
        z = ops.matmul(x, self.w) + self.b
        return z

# Instantiate model,实例化定义的模型
model = Network()
# Instantiate loss function
loss_fn = nn.BCEWithLogitsLoss()

# Define forward function,定义前向传播函数
def forward_fn(x, y):
    z = model(x)
    loss = loss_fn(z, y)
    return loss

# 使用value_and_grad接口获得微分函数,计算梯度
grad_fn = mindspore.value_and_grad(forward_fn, None, weights=model.trainable_params())
loss, grads = grad_fn(x, y)
print(grads)

# print_log:
(Tensor(shape=[5, 3], dtype=Float32, value=
[[ 1.82850987e-01,  1.81477696e-01,  4.38495465e-02],
 [ 2.53515244e-01,  2.51611233e-01,  6.07955605e-02],
 [ 1.79560080e-01,  1.78211510e-01,  4.30603549e-02],
 [ 1.50685996e-01,  1.49554282e-01,  3.61360498e-02],
 [ 1.68571889e-01,  1.67305842e-01,  4.04252708e-02]]), Tensor(shape=[3], dtype=Float32, value= [ 2.57619172e-01,  2.55684346e-01,  6.17797263e-02]))
2024-06-28 10:41:54 Wayn_Fan-sail
Reference
mindspore.cn/lab/tree/初学入门/初学教程/07-函数式自动微分
昇思大模型平台
昇思25天学习打卡训练营打卡指南
