目录
- 前言
- 1. 基本知识
- 2. Demo
- 3. 实战
- 3.1 项目测试
- 3.2 功能测试
前言
书写测试类,一般只需要加入@Test即可,但是结合Springboot项目来整体测试对应需要怎么下手
详细的Java知识点推荐阅读:java框架 零基础从入门到精通的学习路线 附开源项目面经等(超全)
1. 基本知识
涉及测试类的基本注解分析如下:
一、@SpringBootTest:加载完整的Spring应用上下文
使用场景:需要测试整个Spring Boot应用时使用,确保所有的Bean都能被正确加载
@SpringBootTest
public class MyApplicationTests {
    // 测试方法
}
二、@RunWith(SpringRunner.class):指定测试运行器,这里使用SpringRunner来运行Spring Boot测试
使用场景:结合JUnit 4使用时指定测试运行器
@RunWith(SpringRunner.class)
public class MyApplicationTests {
    // 测试方法
}
三、@Autowired:自动注入Spring管理的Bean
使用场景:在测试类中需要注入服务、仓库等Bean时使用
@Autowired
private MyService myService;
四、@Slf4j:使用Lombok提供的日志记录功能
使用场景:需要在类中记录日志时使用
@Slf4j
public class MyApplicationTests {
    // 可以使用log.info(), log.debug()等记录日志
}
五、@Test:标记一个方法为测试方法
使用场景:任何需要进行单元测试的方法都应使用该注解
@Test
public void testMethod() {
    // 测试逻辑
}
常出现的情况有如下:
-
注入的Bean为null
使用@Autowired注入的Bean为null
》》》》确保被注入的类被Spring管理(例如,使用@Service、@Component等注解),确保测试类使用@SpringBootTest注解以加载完整的Spring上下文 -
测试类无法加载上下文
测试类无法加载Spring上下文,抛出BeanCreationException等异常
》》》》确保@SpringBootTest注解的classes属性指向正确的主应用程序类,例如AccidentApplication.class
2. Demo
结合实战中的Demo进行讲解
import com.sinosoft.springbootplus.AccidentApplication;
import lombok.extern.slf4j.Slf4j;
import org.junit.jupiter.api.Test;
import org.springframework.beans.factory.annotation.Autowired;
import org.springframework.boot.test.context.SpringBootTest;
import org.springframework.test.context.junit4.SpringRunner;

@SpringBootTest(classes = AccidentApplication.class)
@Slf4j
public class TestClass {

    @Autowired
    private XXXService xxxService;

    @Test
    public void testDemo() {
        // 示例测试代码
        log.info("Starting testDemo");
        // 调用XXXService的某个方法,并进行断言
        String result = xxxService.someMethod();
        assertNotNull(result);
        log.info("testDemo completed");
    }
}
其中的注意事项如下:
- 类路径:确保AccidentApplication类在你的类路径下,并且可以被正确加载
- Service注入:XXXService必须在Spring上下文中被定义为一个Bean,否则@Autowired注入会失败
- JUnit版本:确保项目使用JUnit 5(JUnit Jupiter)或者JUnit 4,不要混用
上面的代码中使用的是JUnit 5,如果你需要使用JUnit 4,请使用org.junit.Test和org.junit.runner.RunWith - 日志使用:通过@Slf4j注解,可以在测试方法中方便地记录日志,这有助于调试
而且基本的项目结构如下:
src
├── main
│   └── java
│       └── com
│           └── manong
│               └── springbootplus
│                   ├── AccidentApplication.java
│                   └── service
│                       └── XXXService.java
└── test
    └── java
        └── com
            └── manong
                └── springbootplus
                    └── TestClass.java
3. 实战
3.1 项目测试
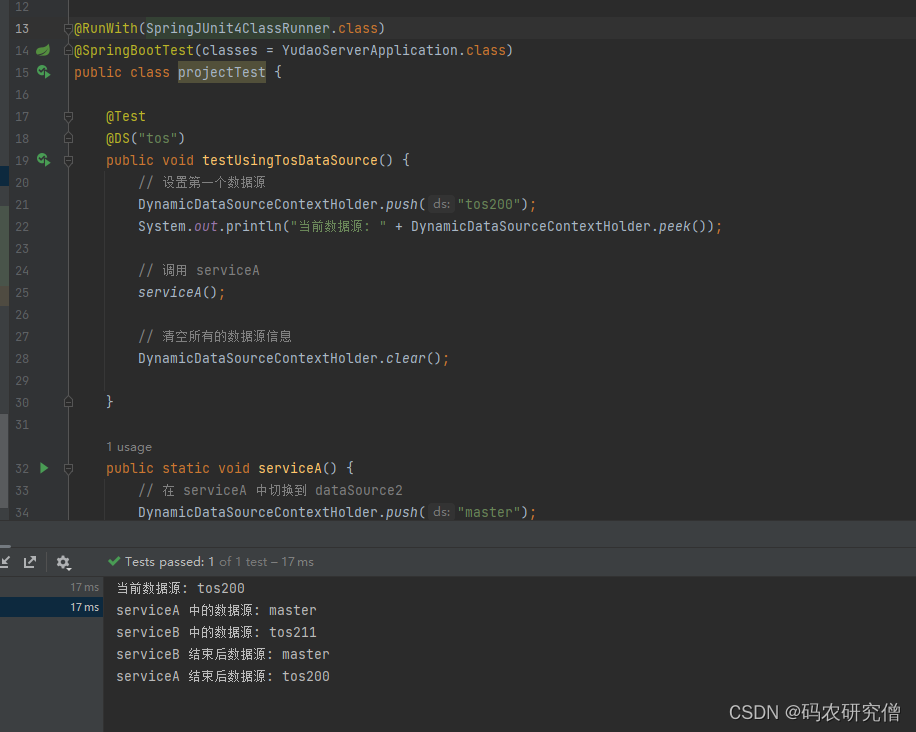
Demo与实战中大同小异,上述使用的是JUnit 5 ,下面使用一个JUnit 4进行演示
import org.junit.Test;
import org.junit.runner.RunWith;
import org.springframework.boot.test.context.SpringBootTest;
import org.springframework.test.context.junit4.SpringJUnit4ClassRunner;


@RunWith(SpringJUnit4ClassRunner.class)
@SpringBootTest(classes = YudaoServerApplication.class)
public class projectTest {

    @Test
    public void testUsingTosDataSource() {
    }

}
实际截图如下:
3.2 功能测试
实战中可能有多个模块,对应的配置需如下:
package cn.example.module.dangerous.service.enterpriseregistry;

import org.junit.jupiter.api.Disabled;
import org.junit.jupiter.api.Test;
import org.springframework.boot.test.mock.mockito.MockBean;

import javax.annotation.Resource;

import cn.example.framework.test.core.ut.BaseDbUnitTest;

import cn.example.module.dangerous.controller.admin.enterpriseregistry.vo.*;
import cn.example.module.dangerous.dal.dataobject.enterpriseregistry.EnterpriseRegistryDO;
import cn.example.module.dangerous.dal.mysql.enterpriseregistry.EnterpriseRegistryMapper;
import cn.example.framework.common.pojo.PageResult;

import javax.annotation.Resource;
import org.springframework.context.annotation.Import;
import java.util.*;
import java.time.LocalDateTime;

import static cn.hutool.core.util.RandomUtil.*;
import static cn.example.module.dangerous.enums.ErrorCodeConstants.*;
import static cn.example.framework.test.core.util.AssertUtils.*;
import static cn.example.framework.test.core.util.RandomUtils.*;
import static cn.example.framework.common.util.date.LocalDateTimeUtils.*;
import static cn.example.framework.common.util.object.ObjectUtils.*;
import static cn.example.framework.common.util.date.DateUtils.*;
import static org.junit.jupiter.api.Assertions.*;
import static org.mockito.Mockito.*;

/**
 * {@link EnterpriseRegistryServiceImpl} 的单元测试类
 *
 * @author 管理员
 */
@Import(EnterpriseRegistryServiceImpl.class)
public class EnterpriseRegistryServiceImplTest extends BaseDbUnitTest {

    @Resource
    private EnterpriseRegistryServiceImpl enterpriseRegistryService;

    @Resource
    private EnterpriseRegistryMapper enterpriseRegistryMapper;

    @Test
    public void testCreateEnterpriseRegistry_success() {
        // 准备参数
        EnterpriseRegistrySaveReqVO createReqVO = randomPojo(EnterpriseRegistrySaveReqVO.class).setId(null);

        // 调用
        Long enterpriseRegistryId = enterpriseRegistryService.createEnterpriseRegistry(createReqVO);
        // 断言
        assertNotNull(enterpriseRegistryId);
        // 校验记录的属性是否正确
        EnterpriseRegistryDO enterpriseRegistry = enterpriseRegistryMapper.selectById(enterpriseRegistryId);
        assertPojoEquals(createReqVO, enterpriseRegistry, "id");
    }

    @Test
    public void testUpdateEnterpriseRegistry_success() {
        // mock 数据
        EnterpriseRegistryDO dbEnterpriseRegistry = randomPojo(EnterpriseRegistryDO.class);
        enterpriseRegistryMapper.insert(dbEnterpriseRegistry);// @Sql: 先插入出一条存在的数据
        // 准备参数
        EnterpriseRegistrySaveReqVO updateReqVO = randomPojo(EnterpriseRegistrySaveReqVO.class, o -> {
            o.setId(dbEnterpriseRegistry.getId()); // 设置更新的 ID
        });

        // 调用
        enterpriseRegistryService.updateEnterpriseRegistry(updateReqVO);
        // 校验是否更新正确
        EnterpriseRegistryDO enterpriseRegistry = enterpriseRegistryMapper.selectById(updateReqVO.getId()); // 获取最新的
        assertPojoEquals(updateReqVO, enterpriseRegistry);
    }

    @Test
    public void testUpdateEnterpriseRegistry_notExists() {
        // 准备参数
        EnterpriseRegistrySaveReqVO updateReqVO = randomPojo(EnterpriseRegistrySaveReqVO.class);

        // 调用, 并断言异常
        assertServiceException(() -> enterpriseRegistryService.updateEnterpriseRegistry(updateReqVO), ENTERPRISE_REGISTRY_NOT_EXISTS);
    }

    @Test
    public void testDeleteEnterpriseRegistry_success() {
        // mock 数据
        EnterpriseRegistryDO dbEnterpriseRegistry = randomPojo(EnterpriseRegistryDO.class);
        enterpriseRegistryMapper.insert(dbEnterpriseRegistry);// @Sql: 先插入出一条存在的数据
        // 准备参数
        Long id = dbEnterpriseRegistry.getId();

        // 调用
        enterpriseRegistryService.deleteEnterpriseRegistry(id);
        // 校验数据不存在了
        assertNull(enterpriseRegistryMapper.selectById(id));
    }

    @Test
    public void testDeleteEnterpriseRegistry_notExists() {
        // 准备参数
        Long id = randomLongId();

        // 调用, 并断言异常
        assertServiceException(() -> enterpriseRegistryService.deleteEnterpriseRegistry(id), ENTERPRISE_REGISTRY_NOT_EXISTS);
    }

    @Test
    @Disabled  // TODO 请修改 null 为需要的值,然后删除 @Disabled 注解
    public void testGetEnterpriseRegistryPage() {
        // mock 数据
        EnterpriseRegistryDO dbEnterpriseRegistry = randomPojo(EnterpriseRegistryDO.class, o -> { // 等会查询到
            o.setEnterpriseName(null);
            o.setCreditCode(null);
            o.setRegistrant(null);
            o.setCreateTime(null);
            o.setEnterpriseCode(null);
            o.setContactNumber(null);
        });
        enterpriseRegistryMapper.insert(dbEnterpriseRegistry);
        // 测试 enterpriseName 不匹配
        enterpriseRegistryMapper.insert(cloneIgnoreId(dbEnterpriseRegistry, o -> o.setEnterpriseName(null)));
        // 测试 creditCode 不匹配
        enterpriseRegistryMapper.insert(cloneIgnoreId(dbEnterpriseRegistry, o -> o.setCreditCode(null)));
        // 测试 registrant 不匹配
        enterpriseRegistryMapper.insert(cloneIgnoreId(dbEnterpriseRegistry, o -> o.setRegistrant(null)));
        // 测试 createTime 不匹配
        enterpriseRegistryMapper.insert(cloneIgnoreId(dbEnterpriseRegistry, o -> o.setCreateTime(null)));
        // 测试 enterpriseCode 不匹配
        enterpriseRegistryMapper.insert(cloneIgnoreId(dbEnterpriseRegistry, o -> o.setEnterpriseCode(null)));
        // 测试 contactNumber 不匹配
        enterpriseRegistryMapper.insert(cloneIgnoreId(dbEnterpriseRegistry, o -> o.setContactNumber(null)));
        // 准备参数
        EnterpriseRegistryPageReqVO reqVO = new EnterpriseRegistryPageReqVO();
        reqVO.setEnterpriseName(null);
        reqVO.setCreditCode(null);
        reqVO.setRegistrant(null);
        reqVO.setCreateTime(buildBetweenTime(2023, 2, 1, 2023, 2, 28));
        reqVO.setEnterpriseCode(null);
        reqVO.setContactNumber(null);

        // 调用
        PageResult<EnterpriseRegistryDO> pageResult = enterpriseRegistryService.getEnterpriseRegistryPage(reqVO);
        // 断言
        assertEquals(1, pageResult.getTotal());
        assertEquals(1, pageResult.getList().size());
        assertPojoEquals(dbEnterpriseRegistry, pageResult.getList().get(0));
    }

}
![[CAN] 通讯协议手动解析与手动打包 [手撕编码格式]](https://i-blog.csdnimg.cn/direct/7d4182e77f8d4c1dab41562a7d78d1ba.png#pic_center)




![[论文阅读笔记33] Matching Anything by Segmenting Anything (CVPR2024 highlight)](https://img-blog.csdnimg.cn/direct/af9ef3cfc1734d39bab2c1aa3df9f670.png)


