延迟任务精准发布文章
延迟任务概述
什么是延迟任务
-
定时任务:有固定周期的,有明确的触发时间
-
延迟队列:没有固定的开始时间,它常常是由一个事件触发的,而在这个事件触发之后的一段时间内触发另一个事件,任务可以立即执行,也可以延迟

应用场景:
场景一:订单下单之后30分钟后,如果用户没有付钱,则系统自动取消订单;如果期间下单成功,任务取消
场景二:接口对接出现网络问题,1分钟后重试,如果失败,2分钟重试,直到出现阈值终止
技术对比
DelayQueue
JDK自带DelayQueue 是一个支持延时获取元素的阻塞队列, 内部采用优先队列 PriorityQueue 存储元素,同时元素必须实现 Delayed 接口;在创建元素时可以指定多久才可以从队列中获取当前元素,只有在延迟期满时才能从队列中提取元素

DelayQueue属于排序队列,它的特殊之处在于队列的元素必须实现Delayed接口,该接口需要实现compareTo和getDelay方法
getDelay方法:获取元素在队列中的剩余时间,只有当剩余时间为0时元素才可以出队列。
compareTo方法:用于排序,确定元素出队列的顺序。
实现:
1:在测试包jdk下创建延迟任务元素对象DelayedTask,实现compareTo和getDelay方法,
2:在main方法中创建DelayQueue并向延迟队列中添加三个延迟任务,
3:循环的从延迟队列中拉取任务
public class DelayedTask implements Delayed{
// 任务的执行时间
private int executeTime = 0;
public DelayedTask(int delay){
Calendar calendar = Calendar.getInstance();
calendar.add(Calendar.SECOND,delay);
this.executeTime = (int)(calendar.getTimeInMillis() /1000 );
}
/**
* 元素在队列中的剩余时间
* @param unit
* @return
*/
@Override
public long getDelay(TimeUnit unit) {
Calendar calendar = Calendar.getInstance();
return executeTime - (calendar.getTimeInMillis()/1000);
}
/**
* 元素排序
* @param o
* @return
*/
@Override
public int compareTo(Delayed o) {
long val = this.getDelay(TimeUnit.NANOSECONDS) - o.getDelay(TimeUnit.NANOSECONDS);
return val == 0 ? 0 : ( val < 0 ? -1: 1 );
}
public static void main(String[] args) {
DelayQueue<DelayedTask> queue = new DelayQueue<DelayedTask>();
queue.add(new DelayedTask(5));
queue.add(new DelayedTask(10));
queue.add(new DelayedTask(15));
System.out.println(System.currentTimeMillis()/1000+" start consume ");
while(queue.size() != 0){
DelayedTask delayedTask = queue.poll();
if(delayedTask !=null ){
System.out.println(System.currentTimeMillis()/1000+" cosume task");
}
//每隔一秒消费一次
try {
Thread.sleep(1000);
} catch (InterruptedException e) {
e.printStackTrace();
}
}
}
}DelayQueue实现完成之后思考一个问题:
使用线程池或者原生DelayQueue程序挂掉之后,任务都是放在内存,需要考虑未处理消息的丢失带来的影响,如何保证数据不丢失,需要持久化(磁盘)
RabbitMQ实现延迟任务
-
TTL:Time To Live (消息存活时间)
-
死信队列:Dead Letter Exchange(死信交换机),当消息成为Dead message后,可以重新发送另一个交换机(死信交换机)
redis实现
zset数据类型的去重有序(分数排序)特点进行延迟。例如:时间戳作为score进行排序
redis实现延迟任务
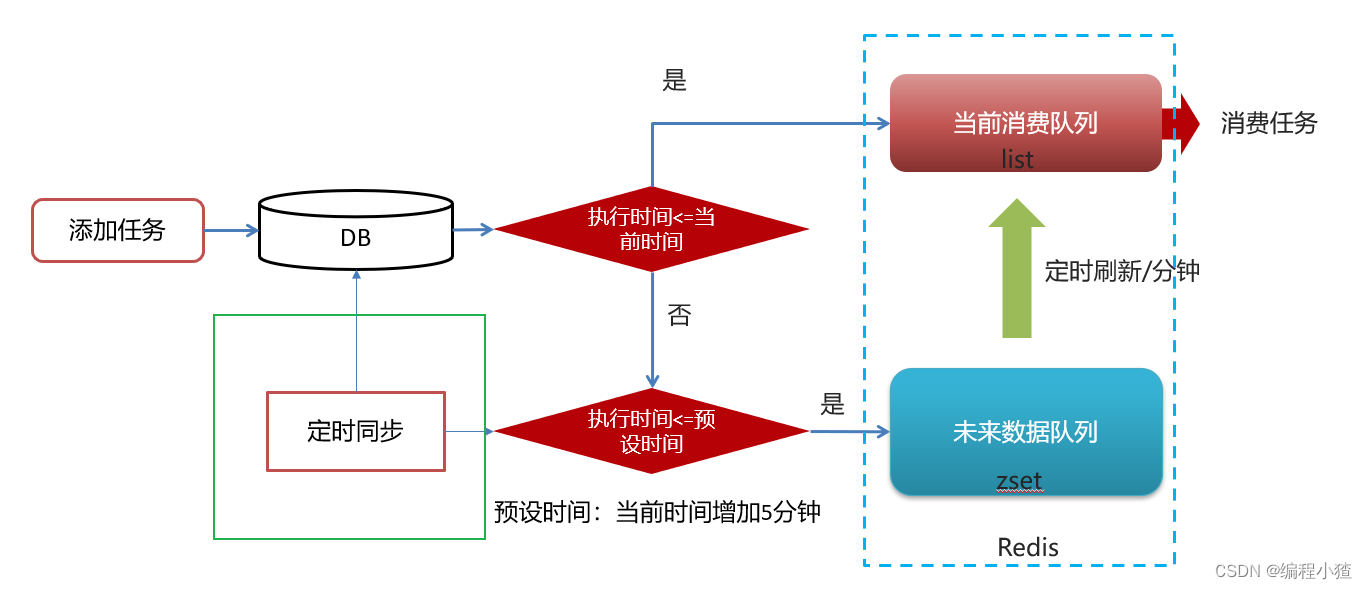
实现思路
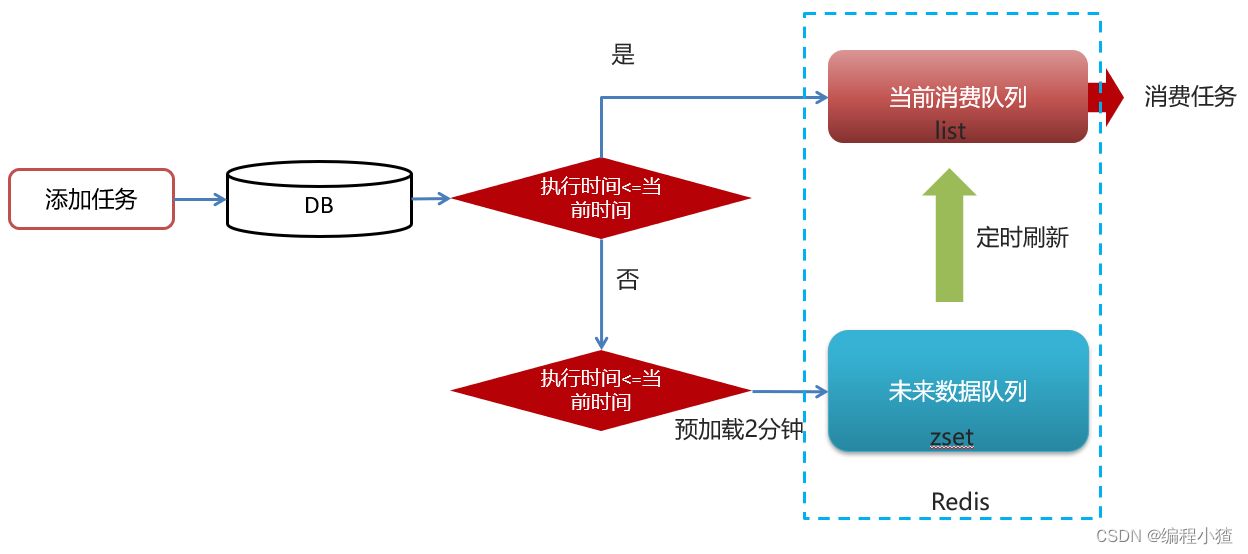
问题思路
1.为什么任务需要存储在数据库中?
延迟任务是一个通用的服务,任何需要延迟得任务都可以调用该服务,需要考虑数据持久化的问题,存储数据库中是一种数据安全的考虑。
2.为什么redis中使用两种数据类型,list和zset?
效率问题,算法的时间复杂度
3.在添加zset数据的时候,为什么不需要预加载?
任务模块是一个通用的模块,项目中任何需要延迟队列的地方,都可以调用这个接口,要考虑到数据量的问题,如果数据量特别大,为了防止阻塞,只需要把未来几分钟要执行的数据存入缓存即可。
延迟任务服务实现
搭建changli-lnformation-schedule模块
Information-schedule是一个通用的服务,单独创建模块来管理任何类型的延迟任务
数据库准备
导入资料中leadnews_schedule数据库
taskinfo 任务表

实体类
package com.kjz.model.schedule.pojos;
import com.baomidou.mybatisplus.annotation.IdType;
import com.baomidou.mybatisplus.annotation.TableField;
import com.baomidou.mybatisplus.annotation.TableId;
import com.baomidou.mybatisplus.annotation.TableName;
import lombok.Data;
import java.io.Serializable;
import java.util.Date;
/**
* <p>
*
* </p>
*
* @author kjz
*/
@Data
@TableName("taskinfo")
public class Taskinfo implements Serializable {
private static final long serialVersionUID = 1L;
/**
* 任务id
*/
@TableId(type = IdType.ID_WORKER)
private Long taskId;
/**
* 执行时间
*/
@TableField("execute_time")
private Date executeTime;
/**
* 参数
*/
@TableField("parameters")
private byte[] parameters;
/**
* 优先级
*/
@TableField("priority")
private Integer priority;
/**
* 任务类型
*/
@TableField("task_type")
private Integer taskType;
}taskinfo_logs 任务日志表

实体类
package com.heima.model.schedule.pojos;
import com.baomidou.mybatisplus.annotation.*;
import lombok.Data;
import java.io.Serializable;
import java.util.Date;
/**
* <p>
*
* </p>
*
* @author itheima
*/
@Data
@TableName("taskinfo_logs")
public class TaskinfoLogs implements Serializable {
private static final long serialVersionUID = 1L;
/**
* 任务id
*/
@TableId(type = IdType.ID_WORKER)
private Long taskId;
/**
* 执行时间
*/
@TableField("execute_time")
private Date executeTime;
/**
* 参数
*/
@TableField("parameters")
private byte[] parameters;
/**
* 优先级
*/
@TableField("priority")
private Integer priority;
/**
* 任务类型
*/
@TableField("task_type")
private Integer taskType;
/**
* 版本号,用乐观锁
*/
@Version
private Integer version;
/**
* 状态 0=int 1=EXECUTED 2=CANCELLED
*/
@TableField("status")
private Integer status;
}乐观锁支持:
/**
     * mybatis-plus乐观锁支持
     * @return
     */
@Bean
public MybatisPlusInterceptor optimisticLockerInterceptor(){
    MybatisPlusInterceptor interceptor = new MybatisPlusInterceptor();
    interceptor.addInnerInterceptor(new OptimisticLockerInnerInterceptor());
    return interceptor;
}
安装redis
①拉取镜像
docker pull redis
② 创建容器
docker run -d --name redis --restart=always -p 6379:6379 redis --requirepass "1234"
③链接测试
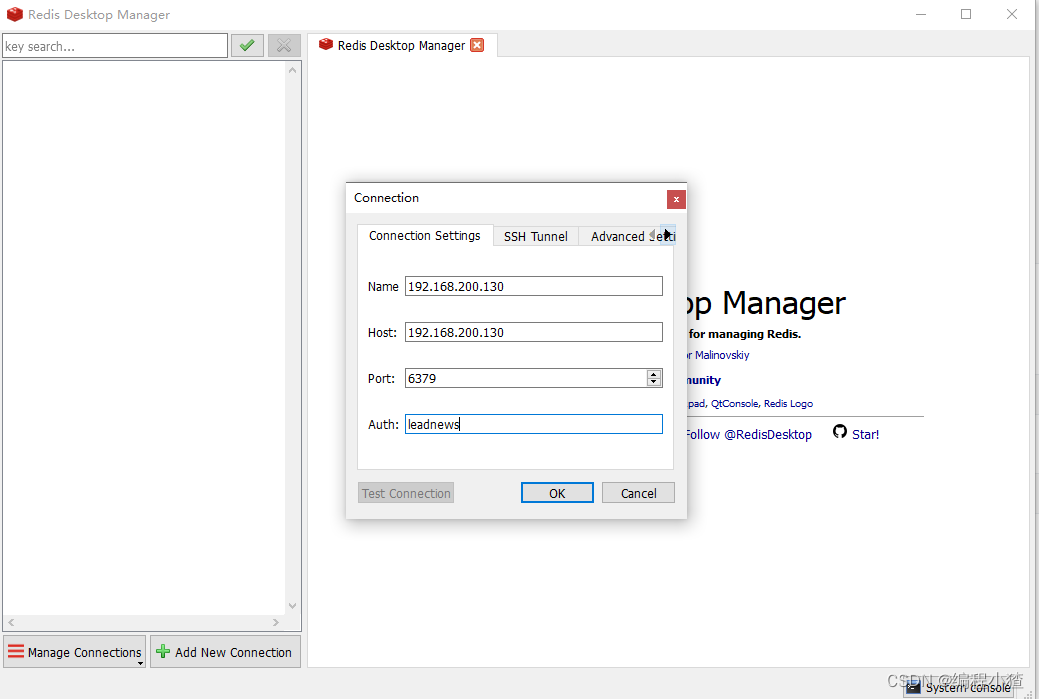
能链接成功,即可
项目集成redis
① 在项目导入redis相关依赖,已经完成
<dependency>
    <groupId>org.springframework.boot</groupId>
    <artifactId>spring-boot-starter-data-redis</artifactId>
</dependency>
<!-- redis依赖commons-pool 这个依赖一定要添加 -->
<dependency>
    <groupId>org.apache.commons</groupId>
    <artifactId>commons-pool2</artifactId>
</dependency>
② 在changli-lnformation-schedule中集成redis,添加以下nacos配置,链接上redis
spring:
  redis:
    host: 192.168.200.130
    password: leadnews
    port: 6379
③ 工具类CacheService到heima-leadnews-common模块下,并添加自动配置
④:测试
package com.kjz.schedule.test;
import com.kjz.common.redis.CacheService;
import com.kjz.schedule.ScheduleApplication;
import org.junit.Test;
import org.junit.runner.RunWith;
import org.springframework.beans.factory.annotation.Autowired;
import org.springframework.boot.test.context.SpringBootTest;
import org.springframework.test.context.junit4.SpringRunner;
import java.util.Set;
@SpringBootTest(classes = ScheduleApplication.class)
@RunWith(SpringRunner.class)
public class RedisTest {
@Autowired
private CacheService cacheService;
@Test
public void testList(){
//在list的左边添加元素
// cacheService.lLeftPush("list_001","hello,redis");
//在list的右边获取元素,并删除
String list_001 = cacheService.lRightPop("list_001");
System.out.println(list_001);
}
@Test
public void testZset(){
//添加数据到zset中 分值
/*cacheService.zAdd("zset_key_001","hello zset 001",1000);
cacheService.zAdd("zset_key_001","hello zset 002",8888);
cacheService.zAdd("zset_key_001","hello zset 003",7777);
cacheService.zAdd("zset_key_001","hello zset 004",999999);*/
//按照分值获取数据
Set<String> zset_key_001 = cacheService.zRangeByScore("zset_key_001", 0, 8888);
System.out.println(zset_key_001);
}
}添加任务
①:拷贝mybatis-plus生成的文件,mapper
②:创建task类,用于接收添加任务的参数
package com.kjz.model.schedule.dtos;
import lombok.Data;
import java.io.Serializable;
@Data
public class Task implements Serializable {
/**
* 任务id
*/
private Long taskId;
/**
* 类型
*/
private Integer taskType;
/**
* 优先级
*/
private Integer priority;
/**
* 执行id
*/
private long executeTime;
/**
* task参数
*/
private byte[] parameters;
}③:创建TaskService
package com.kjz.schedule.service;
import com.kjz.model.schedule.dtos.Task;
/**
* 对外访问接口
*/
public interface TaskService {
/**
* 添加任务
* @param task 任务对象
* @return 任务id
*/
public long addTask(Task task) ;
}实现:
package com.kjz.schedule.service.impl;
import com.alibaba.fastjson.JSON;
import com.kjz.common.constants.ScheduleConstants;
import com.kjz.common.redis.CacheService;
import com.kjz.model.schedule.dtos.Task;
import com.kjz.model.schedule.pojos.Taskinfo;
import com.kjz.model.schedule.pojos.TaskinfoLogs;
import com.kjz.schedule.mapper.TaskinfoLogsMapper;
import com.kjz.schedule.mapper.TaskinfoMapper;
import com.kjz.schedule.service.TaskService;
import lombok.extern.slf4j.Slf4j;
import org.springframework.beans.BeanUtils;
import org.springframework.beans.factory.annotation.Autowired;
import org.springframework.stereotype.Service;
import org.springframework.transaction.annotation.Transactional;
import java.util.Calendar;
import java.util.Date;
@Service
@Transactional
@Slf4j
public class TaskServiceImpl implements TaskService {
/**
* 添加延迟任务
*
* @param task
* @return
*/
@Override
public long addTask(Task task) {
//1.添加任务到数据库中
boolean success = addTaskToDb(task);
if (success) {
//2.添加任务到redis
addTaskToCache(task);
}
return task.getTaskId();
}
@Autowired
private CacheService cacheService;
/**
* 把任务添加到redis中
*
* @param task
*/
private void addTaskToCache(Task task) {
String key = task.getTaskType() + "_" + task.getPriority();
//获取5分钟之后的时间 毫秒值
Calendar calendar = Calendar.getInstance();
calendar.add(Calendar.MINUTE, 5);
long nextScheduleTime = calendar.getTimeInMillis();
//2.1 如果任务的执行时间小于等于当前时间,存入list
if (task.getExecuteTime() <= System.currentTimeMillis()) {
cacheService.lLeftPush(ScheduleConstants.TOPIC + key, JSON.toJSONString(task));
} else if (task.getExecuteTime() <= nextScheduleTime) {
//2.2 如果任务的执行时间大于当前时间 && 小于等于预设时间(未来5分钟) 存入zset中
cacheService.zAdd(ScheduleConstants.FUTURE + key, JSON.toJSONString(task), task.getExecuteTime());
}
}
@Autowired
private TaskinfoMapper taskinfoMapper;
@Autowired
private TaskinfoLogsMapper taskinfoLogsMapper;
/**
* 添加任务到数据库中
*
* @param task
* @return
*/
private boolean addTaskToDb(Task task) {
boolean flag = false;
try {
//保存任务表
Taskinfo taskinfo = new Taskinfo();
BeanUtils.copyProperties(task, taskinfo);
taskinfo.setExecuteTime(new Date(task.getExecuteTime()));
taskinfoMapper.insert(taskinfo);
//设置taskID
task.setTaskId(taskinfo.getTaskId());
//保存任务日志数据
TaskinfoLogs taskinfoLogs = new TaskinfoLogs();
BeanUtils.copyProperties(taskinfo, taskinfoLogs);
taskinfoLogs.setVersion(1);
taskinfoLogs.setStatus(ScheduleConstants.SCHEDULED);
taskinfoLogsMapper.insert(taskinfoLogs);
flag = true;
} catch (Exception e) {
e.printStackTrace();
}
return flag;
}
}ScheduleConstants常量类
package com.kjz.common.constants;
public class ScheduleConstants {
//task状态
public static final int SCHEDULED=0; //初始化状态
public static final int EXECUTED=1; //已执行状态
public static final int CANCELLED=2; //已取消状态
public static String FUTURE="future_"; //未来数据key前缀
public static String TOPIC="topic_"; //当前数据key前缀
}④:测试
取消任务
在TaskService中添加方法
/**
     * 取消任务
     * @param taskId        任务id
     * @return              取消结果
     */
public boolean cancelTask(long taskId);
实现
/**
* 取消任务
* @param taskId
* @return
*/
@Override
public boolean cancelTask(long taskId) {
boolean flag = false;
//删除任务,更新日志
Task task = updateDb(taskId,ScheduleConstants.EXECUTED);
//删除redis的数据
if(task != null){
removeTaskFromCache(task);
flag = true;
}
return false;
}
/**
* 删除redis中的任务数据
* @param task
*/
private void removeTaskFromCache(Task task) {
String key = task.getTaskType()+"_"+task.getPriority();
if(task.getExecuteTime()<=System.currentTimeMillis()){
cacheService.lRemove(ScheduleConstants.TOPIC+key,0,JSON.toJSONString(task));
}else {
cacheService.zRemove(ScheduleConstants.FUTURE+key, JSON.toJSONString(task));
}
}
/**
* 删除任务,更新任务日志状态
* @param taskId
* @param status
* @return
*/
private Task updateDb(long taskId, int status) {
Task task = null;
try {
//删除任务
taskinfoMapper.deleteById(taskId);
TaskinfoLogs taskinfoLogs = taskinfoLogsMapper.selectById(taskId);
taskinfoLogs.setStatus(status);
taskinfoLogsMapper.updateById(taskinfoLogs);
task = new Task();
BeanUtils.copyProperties(taskinfoLogs,task);
task.setExecuteTime(taskinfoLogs.getExecuteTime().getTime());
}catch (Exception e){
log.error("task cancel exception taskid={}",taskId);
}
return task;
}测试
消费任务
在TaskService中添加方法
/**
 * 按照类型和优先级来拉取任务
 * @param type
 * @param priority
 * @return
 */
public Task poll(int type,int priority);
实现
/**
* 按照类型和优先级拉取任务
* @return
*/
@Override
public Task poll(int type,int priority) {
Task task = null;
try {
String key = type+"_"+priority;
String task_json = cacheService.lRightPop(ScheduleConstants.TOPIC + key);
if(StringUtils.isNotBlank(task_json)){
task = JSON.parseObject(task_json, Task.class);
//更新数据库信息
updateDb(task.getTaskId(),ScheduleConstants.EXECUTED);
}
}catch (Exception e){
e.printStackTrace();
log.error("poll task exception");
}
return task;
}未来数据定时刷新
reids key值匹配
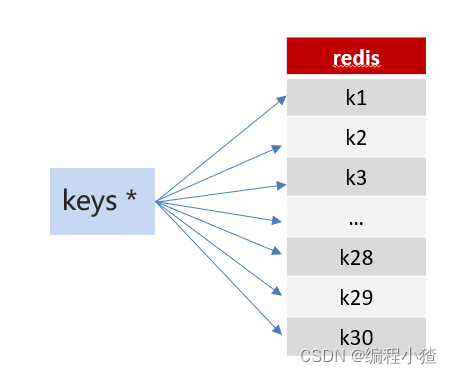
方案1:keys 模糊匹配
keys的模糊匹配功能很方便也很强大,但是在生产环境需要慎用!开发中使用keys的模糊匹配却发现redis的CPU使用率极高,所以公司的redis生产环境将keys命令禁用了!redis是单线程,会被堵塞
方案2:scan
SCAN 命令是一个基于游标的迭代器,SCAN命令每次被调用之后, 都会向用户返回一个新的游标, 用户在下次迭代时需要使用这个新游标作为SCAN命令的游标参数, 以此来延续之前的迭代过程。

代码案例:
@Test
public void testKeys(){
Set<String> keys = cacheService.keys("future_*");
System.out.println(keys);
Set<String> scan = cacheService.scan("future_*");
System.out.println(scan);
}reids管道
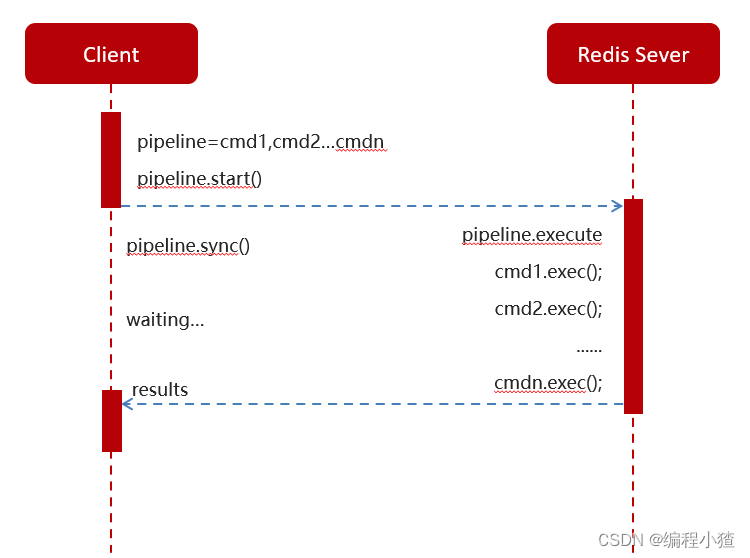
普通redis客户端和服务器交互模式

Pipeline请求模型
官方测试结果数据对比
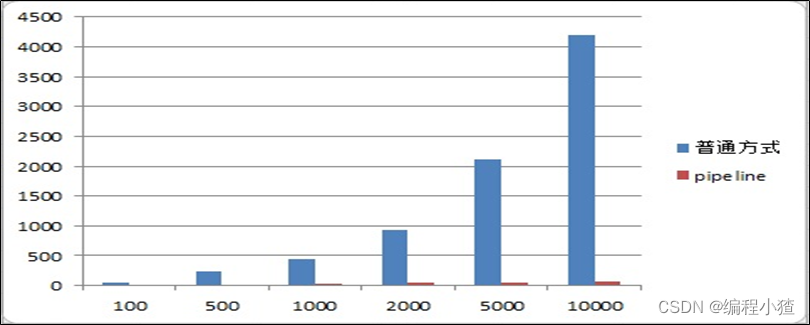
测试案例对比:
//耗时6151
@Test
public void testPiple1(){
long start =System.currentTimeMillis();
for (int i = 0; i <10000 ; i++) {
Task task = new Task();
task.setTaskType(1001);
task.setPriority(1);
task.setExecuteTime(new Date().getTime());
cacheService.lLeftPush("1001_1", JSON.toJSONString(task));
}
System.out.println("耗时"+(System.currentTimeMillis()- start));
}
@Test
public void testPiple2(){
long start = System.currentTimeMillis();
//使用管道技术
List<Object> objectList = cacheService.getstringRedisTemplate().executePipelined(new RedisCallback<Object>() {
@Nullable
@Override
public Object doInRedis(RedisConnection redisConnection) throws DataAccessException {
for (int i = 0; i <10000 ; i++) {
Task task = new Task();
task.setTaskType(1001);
task.setPriority(1);
task.setExecuteTime(new Date().getTime());
redisConnection.lPush("1001_1".getBytes(), JSON.toJSONString(task).getBytes());
}
return null;
}
});
System.out.println("使用管道技术执行10000次自增操作共耗时:"+(System.currentTimeMillis()-start)+"毫秒");
}4.8.3)未来数据定时刷新-功能完成
在TaskService中添加方法
@Scheduled(cron = "0 */1 * * * ?")
public void refresh() {
System.out.println(System.currentTimeMillis() / 1000 + "执行了定时任务");
// 获取所有未来数据集合的key值
Set<String> futureKeys = cacheService.scan(ScheduleConstants.FUTURE + "*");// future_*
for (String futureKey : futureKeys) { // future_250_250
String topicKey = ScheduleConstants.TOPIC + futureKey.split(ScheduleConstants.FUTURE)[1];
//获取该组key下当前需要消费的任务数据
Set<String> tasks = cacheService.zRangeByScore(futureKey, 0, System.currentTimeMillis());
if (!tasks.isEmpty()) {
//将这些任务数据添加到消费者队列中
cacheService.refreshWithPipeline(futureKey, topicKey, tasks);
System.out.println("成功的将" + futureKey + "下的当前需要执行的任务数据刷新到" + topicKey + "下");
}
}
}在引导类中添加开启任务调度注解:@EnableScheduling
分布式锁解决集群下的方法抢占执行
问题描述
启动两台changli-lnformation-schedule服务,每台服务都会去执行refresh定时任务方法
分布式锁
分布式锁:控制分布式系统有序的去对共享资源进行操作,通过互斥来保证数据的一致性。
解决方案:

redis分布式锁
sexnx (SET if Not eXists) 命令在指定的 key 不存在时,为 key 设置指定的值。

这种加锁的思路是,如果 key 不存在则为 key 设置 value,如果 key 已存在则 SETNX 命令不做任何操作
-
客户端A请求服务器设置key的值,如果设置成功就表示加锁成功
-
客户端B也去请求服务器设置key的值,如果返回失败,那么就代表加锁失败
-
客户端A执行代码完成,删除锁
-
客户端B在等待一段时间后再去请求设置key的值,设置成功
-
客户端B执行代码完成,删除锁
在工具类CacheService中添加方法
/**
* 加锁
*
* @param name
* @param expire
* @return
*/
public String tryLock(String name, long expire) {
name = name + "_lock";
String token = UUID.randomUUID().toString();
RedisConnectionFactory factory = stringRedisTemplate.getConnectionFactory();
RedisConnection conn = factory.getConnection();
try {
//参考redis命令:
//set key value [EX seconds] [PX milliseconds] [NX|XX]
Boolean result = conn.set(
name.getBytes(),
token.getBytes(),
Expiration.from(expire, TimeUnit.MILLISECONDS),
RedisStringCommands.SetOption.SET_IF_ABSENT //NX
);
if (result != null && result)
return token;
} finally {
RedisConnectionUtils.releaseConnection(conn, factory,false);
}
return null;
}修改未来数据定时刷新的方法,如下:
/**
* 未来数据定时刷新
*/
@Scheduled(cron = "0 */1 * * * ?")
public void refresh(){
String token = cacheService.tryLock("FUTURE_TASK_SYNC", 1000 * 30);
if(StringUtils.isNotBlank(token)){
log.info("未来数据定时刷新---定时任务");
//获取所有未来数据的集合key
Set<String> futureKeys = cacheService.scan(ScheduleConstants.FUTURE + "*");
for (String futureKey : futureKeys) {//future_100_50
//获取当前数据的key topic
String topicKey = ScheduleConstants.TOPIC+futureKey.split(ScheduleConstants.FUTURE)[1];
//按照key和分值查询符合条件的数据
Set<String> tasks = cacheService.zRangeByScore(futureKey, 0, System.currentTimeMillis());
//同步数据
if(!tasks.isEmpty()){
cacheService.refreshWithPipeline(futureKey,topicKey,tasks);
log.info("成功的将"+futureKey+"刷新到了"+topicKey);
}
}
}
}数据库同步到redis
@Scheduled(cron = "0 */5 * * * ?")
@PostConstruct
public void reloadData() {
clearCache();
log.info("数据库数据同步到缓存");
Calendar calendar = Calendar.getInstance();
calendar.add(Calendar.MINUTE, 5);
//查看小于未来5分钟的所有任务
List<Taskinfo> allTasks = taskinfoMapper.selectList(Wrappers.<Taskinfo>lambdaQuery().lt(Taskinfo::getExecuteTime,calendar.getTime()));
if(allTasks != null && allTasks.size() > 0){
for (Taskinfo taskinfo : allTasks) {
Task task = new Task();
BeanUtils.copyProperties(taskinfo,task);
task.setExecuteTime(taskinfo.getExecuteTime().getTime());
addTaskToCache(task);
}
}
}
private void clearCache(){
// 删除缓存中未来数据集合和当前消费者队列的所有key
Set<String> futurekeys = cacheService.scan(ScheduleConstants.FUTURE + "*");// future_
Set<String> topickeys = cacheService.scan(ScheduleConstants.TOPIC + "*");// topic_
cacheService.delete(futurekeys);
cacheService.delete(topickeys);
}延迟队列解决精准时间发布文章
延迟队列服务提供对外接口
提供远程的feign接口,在heima-leadnews-feign-api编写类如下:
package com.heima.apis.schedule;
import com.heima.model.common.dtos.ResponseResult;
import com.heima.model.schedule.dtos.Task;
import org.springframework.cloud.openfeign.FeignClient;
import org.springframework.web.bind.annotation.GetMapping;
import org.springframework.web.bind.annotation.PathVariable;
import org.springframework.web.bind.annotation.PostMapping;
import org.springframework.web.bind.annotation.RequestBody;
@FeignClient("leadnews-schedule")
public interface IScheduleClient {
/**
* 添加任务
* @param task 任务对象
* @return 任务id
*/
@PostMapping("/api/v1/task/add")
public ResponseResult addTask(@RequestBody Task task);
/**
* 取消任务
* @param taskId 任务id
* @return 取消结果
*/
@GetMapping("/api/v1/task/cancel/{taskId}")
public ResponseResult cancelTask(@PathVariable("taskId") long taskId);
/**
* 按照类型和优先级来拉取任务
* @param type
* @param priority
* @return
*/
@GetMapping("/api/v1/task/poll/{type}/{priority}")
public ResponseResult poll(@PathVariable("type") int type,@PathVariable("priority") int priority);
}在changli-Information-schedule微服务下提供对应的实现
package com.heima.schedule.feign;
import com.heima.apis.schedule.IScheduleClient;
import com.heima.model.common.dtos.ResponseResult;
import com.heima.model.schedule.dtos.Task;
import com.heima.schedule.service.TaskService;
import org.springframework.beans.factory.annotation.Autowired;
import org.springframework.web.bind.annotation.*;
@RestController
public class ScheduleClient implements IScheduleClient {
@Autowired
private TaskService taskService;
/**
* 添加任务
* @param task 任务对象
* @return 任务id
*/
@PostMapping("/api/v1/task/add")
@Override
public ResponseResult addTask(@RequestBody Task task) {
return ResponseResult.okResult(taskService.addTask(task));
}
/**
* 取消任务
* @param taskId 任务id
* @return 取消结果
*/
@GetMapping("/api/v1/task/cancel/{taskId}")
@Override
public ResponseResult cancelTask(@PathVariable("taskId") long taskId) {
return ResponseResult.okResult(taskService.cancelTask(taskId));
}
/**
* 按照类型和优先级来拉取任务
* @param type
* @param priority
* @return
*/
@GetMapping("/api/v1/task/poll/{type}/{priority}")
@Override
public ResponseResult poll(@PathVariable("type") int type, @PathVariable("priority") int priority) {
return ResponseResult.okResult(taskService.poll(type,priority));
}
}发布文章集成添加延迟队列接口
在创建WmNewsTaskService
package com.heima.wemedia.service;
import com.heima.model.wemedia.pojos.WmNews;
public interface WmNewsTaskService {
/**
* 添加任务到延迟队列中
* @param id 文章的id
* @param publishTime 发布的时间 可以做为任务的执行时间
*/
public void addNewsToTask(Integer id, Date publishTime);
}实现:
package com.heima.wemedia.service.impl;
import com.heima.apis.schedule.IScheduleClient;
import com.heima.model.common.enums.TaskTypeEnum;
import com.heima.model.schedule.dtos.Task;
import com.heima.model.wemedia.pojos.WmNews;
import com.heima.utils.common.ProtostuffUtil;
import com.heima.wemedia.service.WmNewsTaskService;
import lombok.SneakyThrows;
import lombok.extern.slf4j.Slf4j;
import org.springframework.beans.factory.annotation.Autowired;
import org.springframework.scheduling.annotation.Async;
import org.springframework.stereotype.Service;
@Service
@Slf4j
public class WmNewsTaskServiceImpl implements WmNewsTaskService {
@Autowired
private IScheduleClient scheduleClient;
/**
* 添加任务到延迟队列中
* @param id 文章的id
* @param publishTime 发布的时间 可以做为任务的执行时间
*/
@Override
@Async
public void addNewsToTask(Integer id, Date publishTime) {
log.info("添加任务到延迟服务中----begin");
Task task = new Task();
task.setExecuteTime(publishTime.getTime());
task.setTaskType(TaskTypeEnum.NEWS_SCAN_TIME.getTaskType());
task.setPriority(TaskTypeEnum.NEWS_SCAN_TIME.getPriority());
WmNews wmNews = new WmNews();
wmNews.setId(id);
task.setParameters(ProtostuffUtil.serialize(wmNews));
scheduleClient.addTask(task);
log.info("添加任务到延迟服务中----end");
}
}枚举类:
package com.heima.model.common.enums;
import lombok.AllArgsConstructor;
import lombok.Getter;
@Getter
@AllArgsConstructor
public enum TaskTypeEnum {
NEWS_SCAN_TIME(1001, 1,"文章定时审核"),
REMOTEERROR(1002, 2,"第三方接口调用失败,重试");
private final int taskType; //对应具体业务
private final int priority; //业务不同级别
private final String desc; //描述信息
}序列化工具对比
-
JdkSerialize:java内置的序列化能将实现了Serilazable接口的对象进行序列化和反序列化, ObjectOutputStream的writeObject()方法可序列化对象生成字节数组
-
Protostuff:google开源的protostuff采用更为紧凑的二进制数组,表现更加优异,然后使用protostuff的编译工具生成pojo类
拷贝资料中的两个类到heima-leadnews-utils下
Protostuff需要引导依赖:
<dependency>
<groupId>io.protostuff</groupId>
<artifactId>protostuff-core</artifactId>
<version>1.6.0</version>
</dependency>
<dependency>
<groupId>io.protostuff</groupId>
<artifactId>protostuff-runtime</artifactId>
<version>1.6.0</version>
</dependency>修改发布文章代码:
把之前的异步调用修改为调用延迟任务
@Autowired
private WmNewsTaskService wmNewsTaskService;
/**
* 发布修改文章或保存为草稿
* @param dto
* @return
*/
@Override
public ResponseResult submitNews(WmNewsDto dto) {
//0.条件判断
if(dto == null || dto.getContent() == null){
return ResponseResult.errorResult(AppHttpCodeEnum.PARAM_INVALID);
}
//1.保存或修改文章
WmNews wmNews = new WmNews();
//属性拷贝 属性名词和类型相同才能拷贝
BeanUtils.copyProperties(dto,wmNews);
//封面图片 list---> string
if(dto.getImages() != null && dto.getImages().size() > 0){
//[1dddfsd.jpg,sdlfjldk.jpg]--> 1dddfsd.jpg,sdlfjldk.jpg
String imageStr = StringUtils.join(dto.getImages(), ",");
wmNews.setImages(imageStr);
}
//如果当前封面类型为自动 -1
if(dto.getType().equals(WemediaConstants.WM_NEWS_TYPE_AUTO)){
wmNews.setType(null);
}
saveOrUpdateWmNews(wmNews);
//2.判断是否为草稿 如果为草稿结束当前方法
if(dto.getStatus().equals(WmNews.Status.NORMAL.getCode())){
return ResponseResult.okResult(AppHttpCodeEnum.SUCCESS);
}
//3.不是草稿,保存文章内容图片与素材的关系
//获取到文章内容中的图片信息
List<String> materials = ectractUrlInfo(dto.getContent());
saveRelativeInfoForContent(materials,wmNews.getId());
//4.不是草稿,保存文章封面图片与素材的关系,如果当前布局是自动,需要匹配封面图片
saveRelativeInfoForCover(dto,wmNews,materials);
//审核文章
// wmNewsAutoScanService.autoScanWmNews(wmNews.getId());
wmNewsTaskService.addNewsToTask(wmNews.getId(),wmNews.getPublishTime());
return ResponseResult.okResult(AppHttpCodeEnum.SUCCESS);
}消费任务进行审核文章
WmNewsTaskService中添加方法
/**
 * 消费延迟队列数据
 */
public void scanNewsByTask();
实现
@Autowired
private WmNewsAutoScanServiceImpl wmNewsAutoScanService;
/**
* 消费延迟队列数据
*/
@Scheduled(fixedRate = 1000)
@Override
@SneakyThrows
public void scanNewsByTask() {
log.info("文章审核---消费任务执行---begin---");
ResponseResult responseResult = scheduleClient.poll(TaskTypeEnum.NEWS_SCAN_TIME.getTaskType(), TaskTypeEnum.NEWS_SCAN_TIME.getPriority());
if(responseResult.getCode().equals(200) && responseResult.getData() != null){
String json_str = JSON.toJSONString(responseResult.getData());
Task task = JSON.parseObject(json_str, Task.class);
byte[] parameters = task.getParameters();
WmNews wmNews = ProtostuffUtil.deserialize(parameters, WmNews.class);
System.out.println(wmNews.getId()+"-----------");
wmNewsAutoScanService.autoScanWmNews(wmNews.getId());
}
log.info("文章审核---消费任务执行---end---");
}在WemediaApplication自媒体的引导类中添加开启任务调度注解@EnableScheduling


