【Android】三种常见的布局LinearLayout、GridLayout、RelativeLayout
在 Android 开发中,布局(Layout)是构建用户界面的基础。通过合理的布局管理,可以确保应用在不同设备和屏幕尺寸上都能有良好的用户体验。本文将简单介绍 Android 中的三种常见布局管理器:线性布局(LinearLayout)、网格布局(GridLayout)和相对布局(RelativeLayout)。
1. LinearLayout
LinearLayout 是一种简单的布局管理器,它按照水平或垂直方向排列子视图。
基础属性和特点:
在 Android 开发中,常见的布局属性包括方向(orientation)、对齐方式(gravity)、权重(weight)、布局宽度(layout_width)、背景(background)。以下是详细解释和多个示例,展示它们的用法和特点。
1. orientation(方向)
- 作用: 确定布局中子视图的排列方向。
- 特点: 可以设置为
horizontal(水平)或vertical(垂直),影响子视图的排列方式。
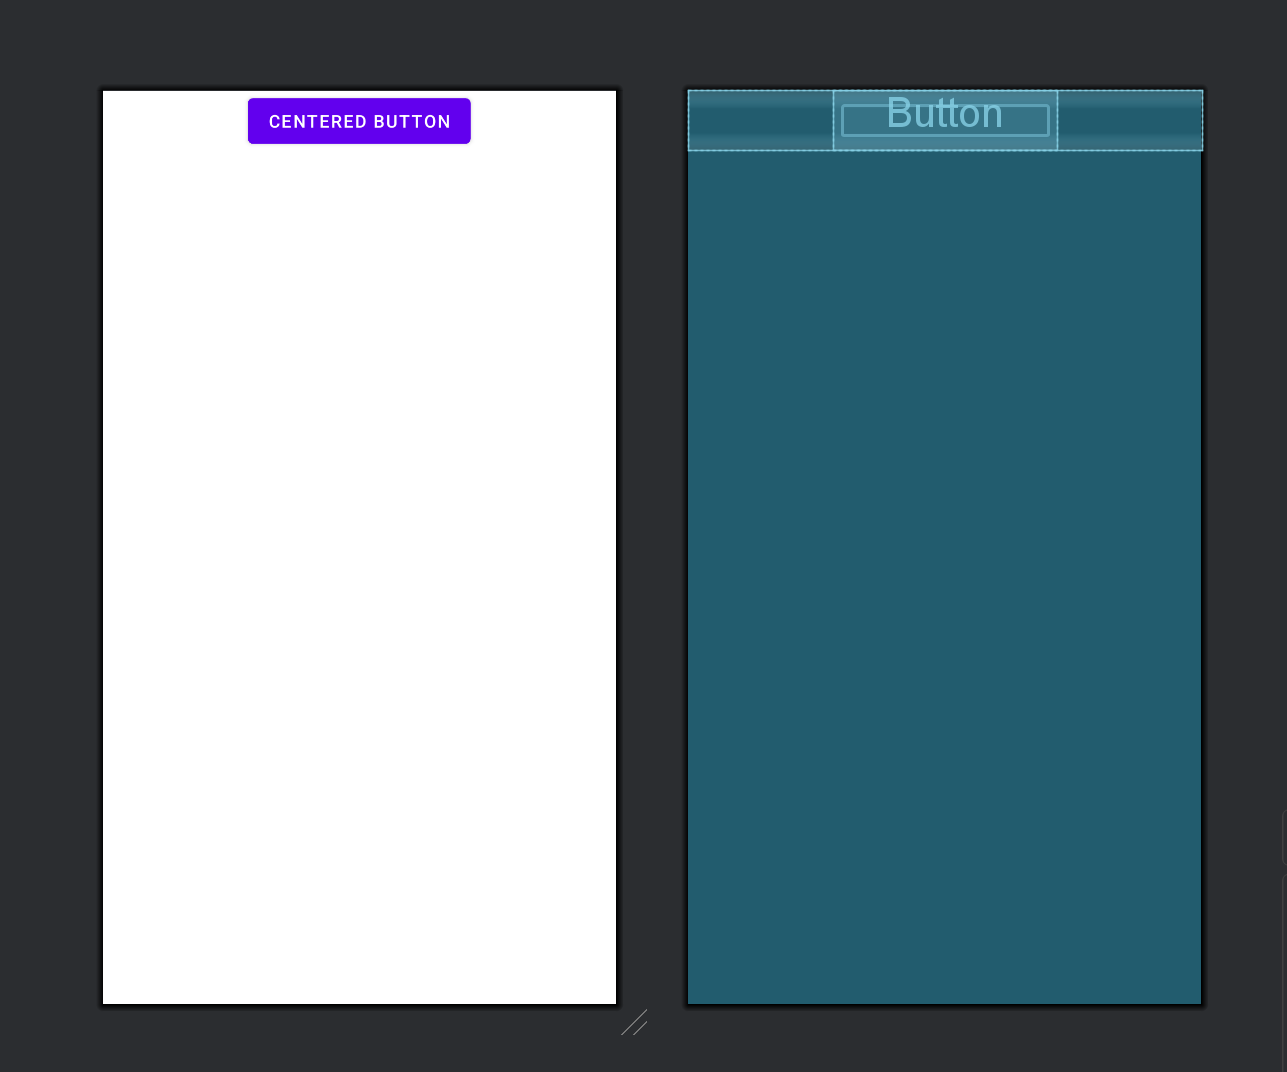
2. gravity(对齐方式)
- 作用: 控制子视图在布局中的对齐方式。
- 特点: 可以设置为
top、bottom、center等,使子视图相对于布局的位置对齐。 - 示例:
<LinearLayout xmlns:android="http://schemas.android.com/apk/res/android"
    android:layout_width="match_parent"
    android:layout_height="wrap_content"
    android:orientation="vertical"
    android:gravity="center">

    <!-- 子视图居中对齐 -->

    <Button
        android:layout_width="wrap_content"
        android:layout_height="wrap_content"
        android:text="Centered Button"/>

</LinearLayout>
3. weight(权重)
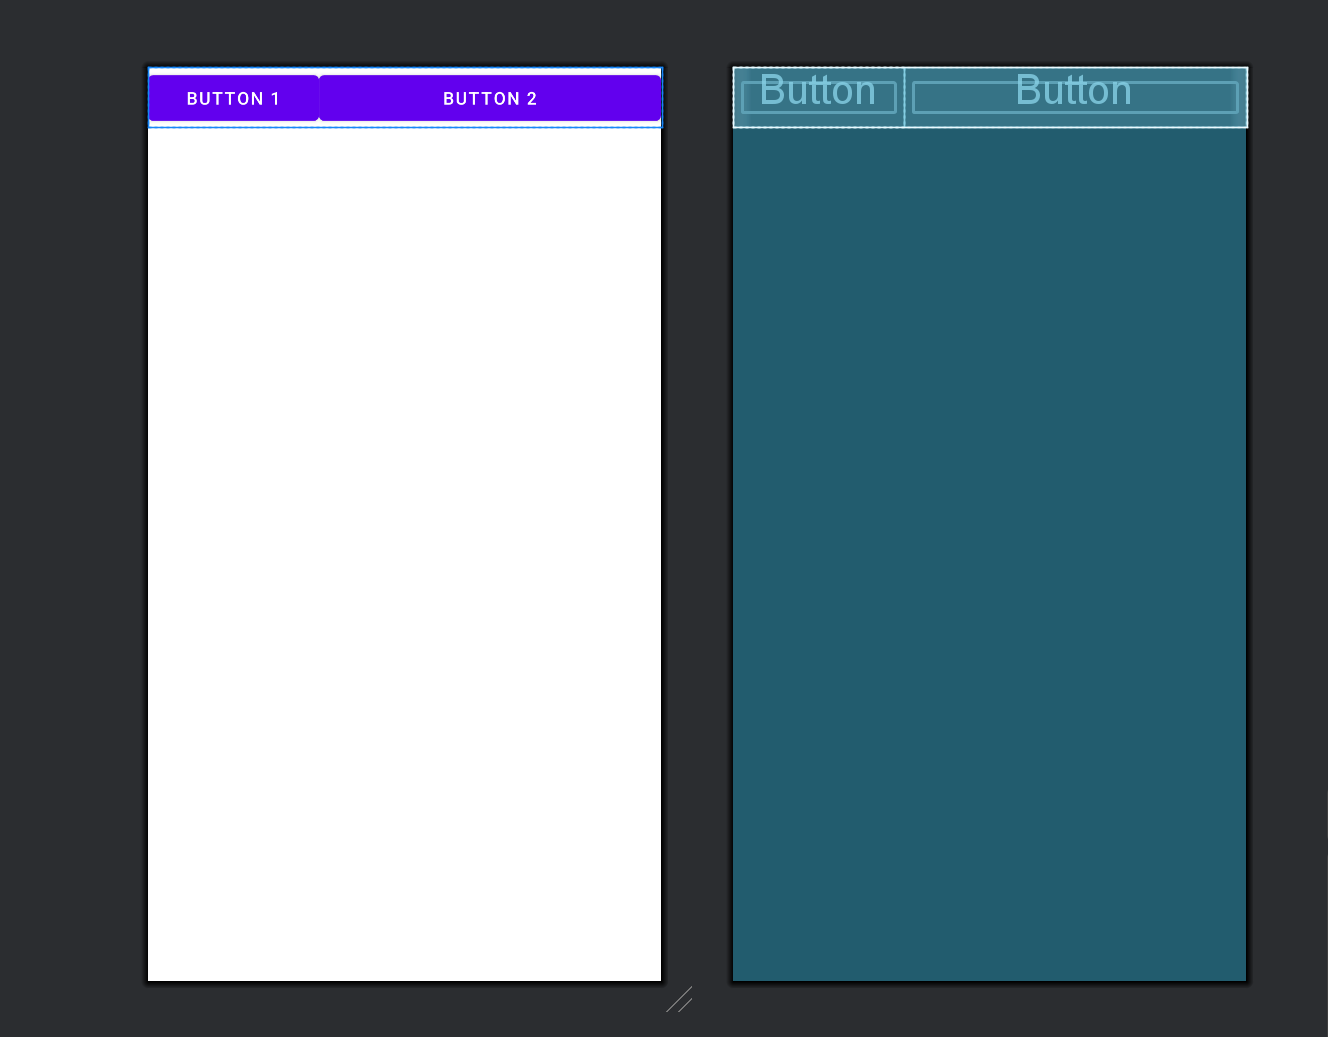
- 作用: 控制子视图在剩余空间中的分配比例。
- 特点: 可以用来实现弹性布局,使得某些子视图占据更多的空间。
- 示例:
<LinearLayout xmlns:android="http://schemas.android.com/apk/res/android"
    android:layout_width="match_parent"
    android:layout_height="wrap_content"
    android:orientation="horizontal">

    <!-- 水平方向排列,使用权重分配空间 -->

    <Button
        android:layout_width="0dp"
        android:layout_height="wrap_content"
        android:layout_weight="1"
        android:text="Button 1"/>

    <Button
        android:layout_width="0dp"
        android:layout_height="wrap_content"
        android:layout_weight="2"
        android:text="Button 2"/>

</LinearLayout>
4. layout_width(布局宽度)
- 作用: 设置子视图的宽度。
- 特点: 可以设置为
wrap_content(根据内容自适应)或match_parent(填充父容器)。 - 示例:
<TextView
    android:layout_width="wrap_content"
    android:layout_height="wrap_content"
    android:text="Hello, World!"/>
<Button
    android:layout_width="match_parent"
    android:layout_height="wrap_content"
    android:text="Click Me"/>
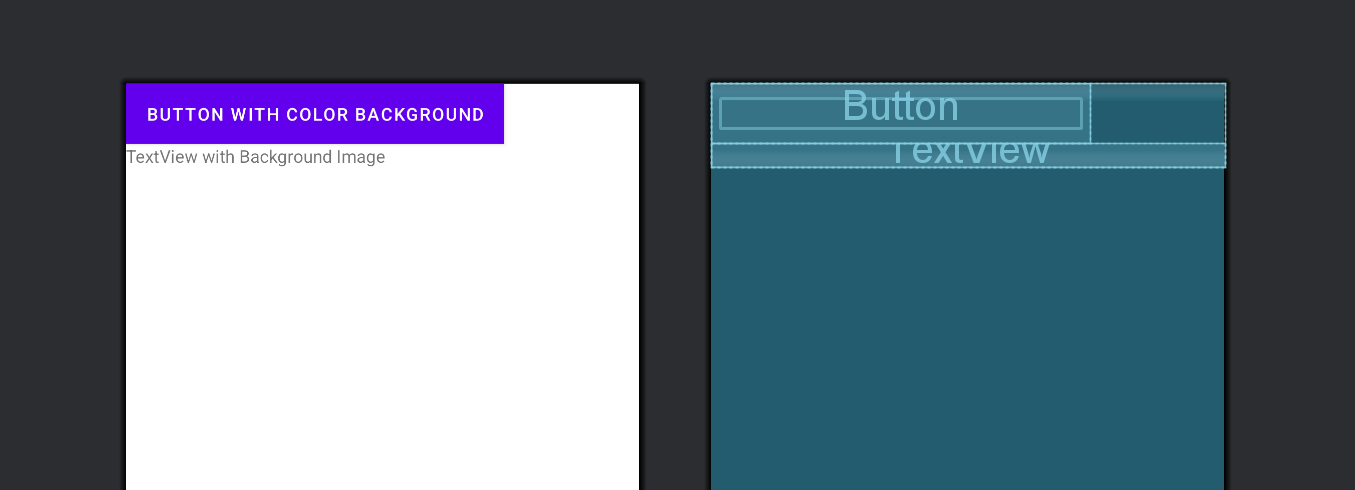
5. background(背景)
- 作用: 为视图设置背景颜色或背景图像。
- 特点: 可以是颜色值(如
#RRGGBB)、图片资源(如@drawable/bg_image)或者使用系统提供的样式。 - 示例:
<Button
    android:layout_width="wrap_content"
    android:layout_height="wrap_content"
    android:text="Button with Color Background"
    android:background="#FF5722"/>

<TextView
    android:layout_width="match_parent"
    android:layout_height="wrap_content"
    android:text="TextView with Background Image"
    android:background="@drawable/bg_pattern"/>
示例代码:
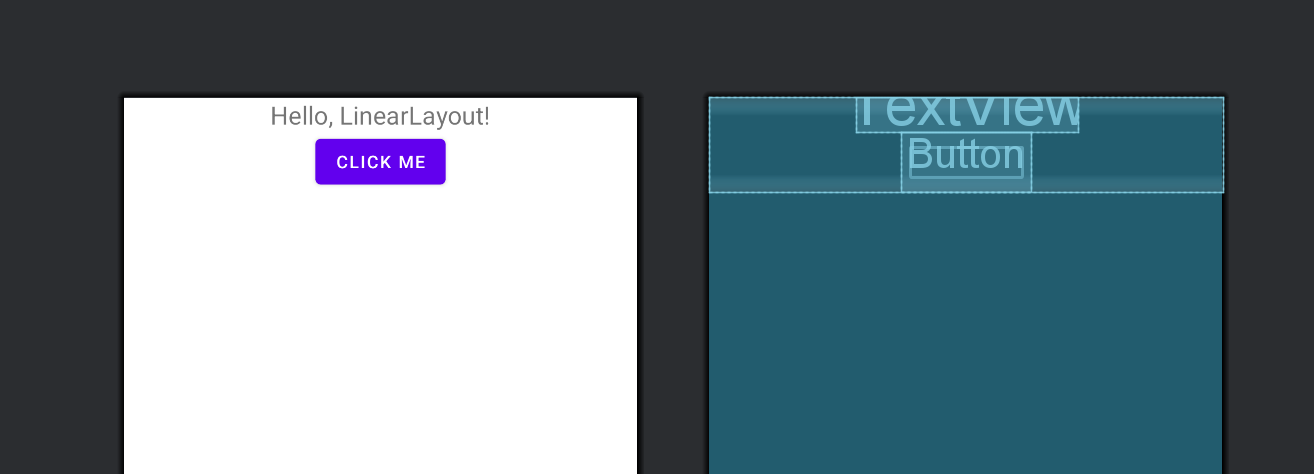
<LinearLayout xmlns:android="http://schemas.android.com/apk/res/android"
    android:layout_width="match_parent"
    android:layout_height="wrap_content"
    android:orientation="vertical"
    android:gravity="center">

    <TextView
        android:layout_width="wrap_content"
        android:layout_height="wrap_content"
        android:text="Hello, LinearLayout!"
        android:textSize="20sp"/>

    <Button
        android:layout_width="wrap_content"
        android:layout_height="wrap_content"
        android:text="Click Me"/>

</LinearLayout>
权重(Weight)的概念
在 LinearLayout 中,权重(weight)是一种布局属性,用于控制子视图在剩余空间中的分配比例。具体来说:
-
android
属性允许您为每个子视图分配一个权重值,这个值决定了子视图在剩余空间中所占的比例。
-
当布局的尺寸是确定的(例如
match_parent或具体的尺寸)时,布局管理器会计算所有没有指定尺寸的子视图的权重总和(例如layout_width或layout_height设置为0dp),然后按照各自的权重值来分配剩余空间。
2. GridLayout
GridLayout 是 Android 中用于实现网格布局的强大工具,允许开发者以行和列的方式排列子视图。
1. rowCount 和 columnCount
- 作用: 分别指定 GridLayout 的行数和列数,用于确定网格布局的大小和结构。
- 示例:
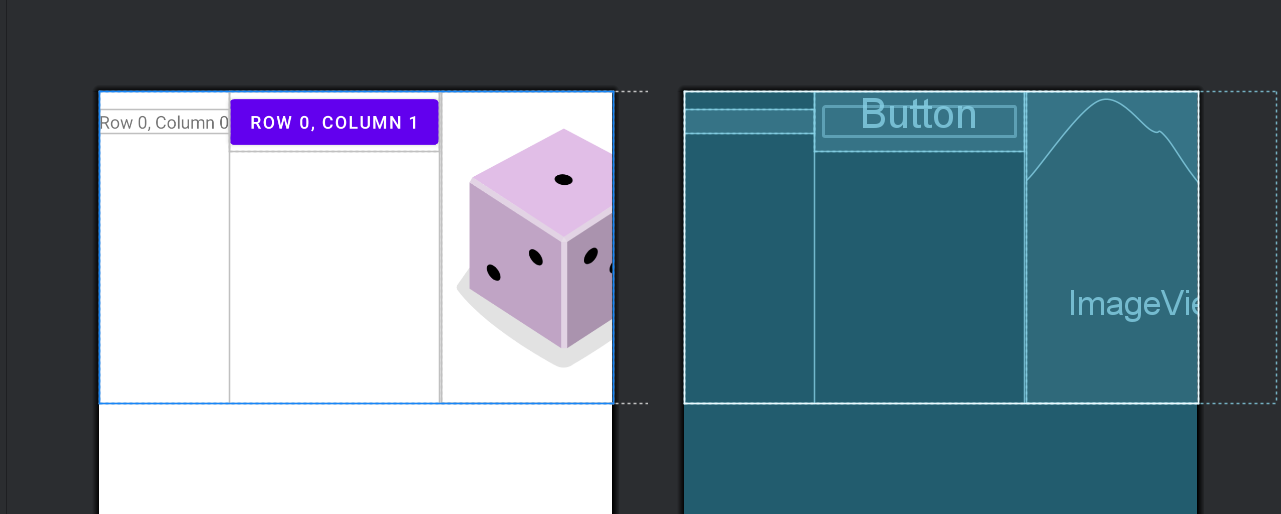
<GridLayout xmlns:android="http://schemas.android.com/apk/res/android"
    android:layout_width="match_parent"
    android:layout_height="wrap_content"
    android:columnCount="3"
    android:rowCount="3">

    <!-- 子视图按顺序排列,从左上角到右下角 -->
    <TextView
        android:layout_width="wrap_content"
        android:layout_height="wrap_content"
        android:text="Row 0, Column 0"
        android:layout_row="0"
        android:layout_column="0"/>

    <Button
        android:layout_width="wrap_content"
        android:layout_height="wrap_content"
        android:text="Row 0, Column 1"
        android:layout_row="0"
        android:layout_column="1"/>

    <ImageView
        android:layout_width="wrap_content"
        android:layout_height="wrap_content"
        android:src="@drawable/image"
        android:layout_row="0"
        android:layout_column="2"/>

    <!-- 添加更多子视图,填满网格 -->
</GridLayout>
2. layout_row 和 layout_column
- 作用: 指定子视图在 GridLayout 中的行和列位置。
- 示例:
<GridLayout xmlns:android="http://schemas.android.com/apk/res/android"
    android:layout_width="match_parent"
    android:layout_height="wrap_content"
    android:columnCount="3"
    android:rowCount="3">

    <TextView
        android:layout_width="wrap_content"
        android:layout_height="wrap_content"
        android:text="Row 1, Column 1"
        android:layout_row="1"
        android:layout_column="1"/>

    <Button
        android:layout_width="wrap_content"
        android:layout_height="wrap_content"
        android:text="Row 2, Column 0"
        android:layout_row="2"
        android:layout_column="0"/>

    <!-- 添加更多子视图,根据需要设置 layout_row 和 layout_column -->
</GridLayout>

3. layout_gravity
- 作用: 控制子视图在其网格单元格中的对齐方式,类似于 LinearLayout 的 gravity 属性。
- 示例:
<GridLayout xmlns:android="http://schemas.android.com/apk/res/android"
    android:layout_width="match_parent"
    android:layout_height="wrap_content"
    android:columnCount="2"
    android:rowCount="2">

    <TextView
        android:layout_width="wrap_content"
        android:layout_height="wrap_content"
        android:text="Center"
        android:layout_gravity="center"
        android:layout_row="0"
        android:layout_column="0"/>

    <Button
        android:layout_width="wrap_content"
        android:layout_height="wrap_content"
        android:text="Bottom-Right"
        android:layout_gravity="bottom|right"
        android:layout_row="1"
        android:layout_column="1"/>

</GridLayout>

4. layout_rowSpan 和 layout_columnSpan
- 作用: 设置子视图在 GridLayout 中跨越的行数和列数,使其占据多个网格单元格。
- 示例:
<GridLayout xmlns:android="http://schemas.android.com/apk/res/android"

    android:layout_width="match_parent"
    android:layout_height="wrap_content"
    android:columnCount="3"
    android:rowCount="3">

    <TextView
        android:layout_width="wrap_content"
        android:layout_height="wrap_content"
        android:text="Span 2 Rows"
        android:layout_row="0"
        android:layout_column="0"
        android:layout_rowSpan="2"/>

    <Button
        android:layout_width="wrap_content"
        android:layout_height="wrap_content"
        android:text="Span 3 Columns"
        android:layout_row="1"
        android:layout_column="1"
        android:layout_columnSpan="3"/>

</GridLayout>
3. RelativeLayout
RelativeLayout 是 Android 中一种灵活的布局管理器,允许开发者通过相对位置来布局子视图。以下详细介绍 RelativeLayout 的基础属性和特点,并提供多个示例演示其灵活性和应用场景。
1. layout_alignParentTop, layout_alignParentBottom, layout_alignParentLeft, layout_alignParentRight
- 作用: 将子视图相对于父视图的顶部、底部、左侧、右侧进行对齐。
- 示例:
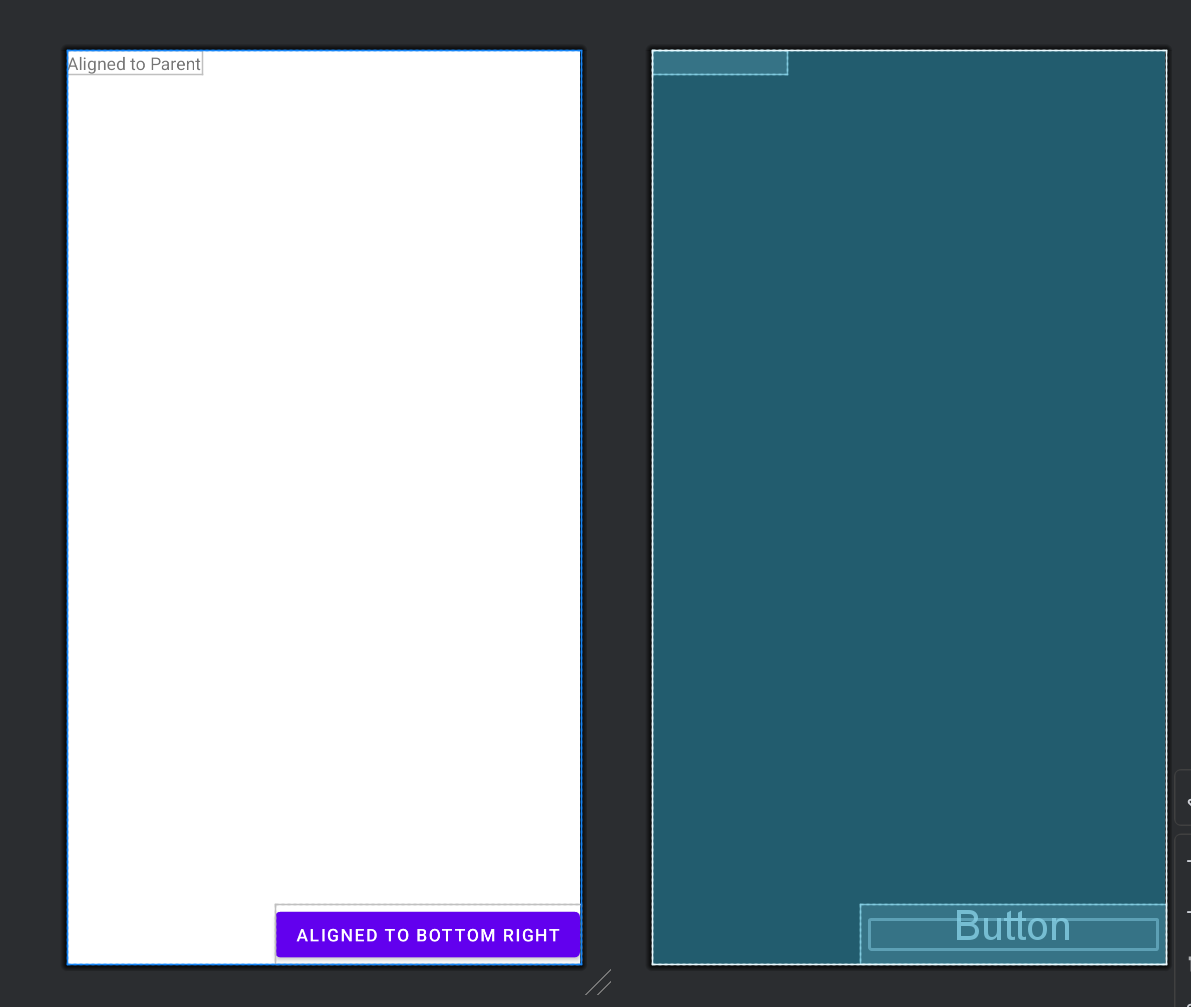
<RelativeLayout xmlns:android="http://schemas.android.com/apk/res/android"

    android:layout_width="match_parent"
    android:layout_height="wrap_content">

    <TextView
        android:id="@+id/textView"
        android:layout_width="wrap_content"
        android:layout_height="wrap_content"
        android:text="Aligned to Parent"
        android:layout_alignParentTop="true"
        android:layout_alignParentLeft="true"/>

    <Button
        android:id="@+id/button"
        android:layout_width="wrap_content"
        android:layout_height="wrap_content"
        android:text="Aligned to Bottom Right"
        android:layout_alignParentBottom="true"
        android:layout_alignParentRight="true"/>

</RelativeLayout>
在这个示例中,TextView 设置了 layout_alignParentTop="true" 和 layout_alignParentLeft="true",使其分别相对于父视图的顶部和左侧对齐。Button 设置了 layout_alignParentBottom="true" 和 layout_alignParentRight="true",使其分别相对于父视图的底部和右侧对齐。
2. layout_above, layout_below, layout_toLeftOf, layout_toRightOf
- 作用: 将子视图相对于其他子视图的位置进行对齐。
3. layout_centerInParent, layout_centerHorizontal, layout_centerVertical
- 作用: 将子视图在父视图中居中对齐。
- 示例:
<RelativeLayout xmlns:android="http://schemas.android.com/apk/res/android"

    android:layout_width="match_parent"
    android:layout_height="wrap_content">

    <TextView
        android:id="@+id/textViewCenter"
        android:layout_width="wrap_content"
        android:layout_height="wrap_content"
        android:text="Centered in Parent"
        android:layout_centerInParent="true"/>

    <Button
        android:id="@+id/buttonCenterHorizontal"
        android:layout_width="wrap_content"
        android:layout_height="wrap_content"
        android:text="Centered Horizontally"
        android:layout_centerHorizontal="true"
        android:layout_below="@id/textViewCenter"/>

    <TextView
        android:id="@+id/textViewCenterVertical"
        android:layout_width="wrap_content"
        android:layout_height="wrap_content"
        android:text="Centered Vertically"
        android:layout_centerVertical="true"
        android:layout_toRightOf="@id/buttonCenterHorizontal"/>

</RelativeLayout>
TextView textViewCenter 使用 layout_centerInParent="true" 居中于父视图中心。Button buttonCenterHorizontal 使用 layout_centerHorizontal="true" 水平居中,且位于 textViewCenter 的下方。TextView textViewCenterVertical 使用 layout_centerVertical="true" 垂直居中,且位于 buttonCenterHorizontal 的右侧。

总结
以上是 LinearLayout、GridLayout 和 RelativeLayout 的基础知识和使用示例。
参考:
2.2.5 GridLayout(网格布局) | 菜鸟教程 (runoob.com)
2.2.2 RelativeLayout(相对布局) | 菜鸟教程 (runoob.com)
2.2.1 LinearLayout(线性布局) | 菜鸟教程 (runoob.com)
