简介
VuePress 是尤雨溪(vue.js 框架作者)4月12日发布的一个全新的基于 vue 的静态网站生成器,实际上就是一个 vue 的 spa 应用,内置 webpack,可以用来写文档。详见 VuePress中文网
其实类似的建站工具有很多,比如 WordPress、Jekyll、Hexo 等,其中 WordPress 需要自己购买虚拟主机,不考虑;Jekyll 是 Github-Page 默认支持的,听说操作比较复杂。
初步使用
如果想快速搭建的话直接clone我的demo项目
git clone https://github.com/zhangyongtian/VuepressBlog.gitgit clone git@github.com:zhangyongtian/VuepressBlog.git1.创建一个文件夹
mkdir vuepressBlogDemo
2.全局安装 VuePress
npm install -g vuepress
如果有下列问题,按提示安装对应的npm版本。

npm install -g npm@9.3.03.进入 vuepressBlogDemo 文件夹,初始化项目(作用就是安装相关的依赖)
cd vuepressBlogDemonpm init -y
4.创建文件夹和文件
初始化以后的目录结构为

在 vuepressBlogDemo 文件夹中创建 docs 文件夹,在 docs 中创建 .vuepress 文件夹,在.vuepress中创建 public 文件夹和 config.js 文件,最终项目结构如下所示:
vuepressBlogDemo
├─── docs
│   ├── README.md
│   └── .vuepress
│       ├── public
│       └── config.js
└── package.json
5.在 config.js 文件中配置网站标题、描述、主题等信息。
module.exports = {
    title: 'Zhang\'s blog',
    description: '我的个人网站',
    head: [ // 注入到当前页面的 HTML <head> 中的标签
      ['link', { rel: 'icon', href: '/logo.jpg' }], // 增加一个自定义的 favicon(网页标签的图标)
    ],
    base: '/', // 这是部署到github相关的配置
    markdown: {
      lineNumbers: false // 代码块显示行号
    },
    themeConfig: {
      nav:[ // 导航栏配置
        {text: '大数据', link: '/accumulate/' },
        {text: '算法', link: '/algorithm/'},
        {text: '微博', link: 'https://baidu.com'}
      ],
      sidebar: 'auto', // 侧边栏配置
      sidebarDepth: 2, // 侧边栏显示2级
    }
  };
6.在 package.json 文件里添加两个启动命令
"scripts": {
  "dev": "vuepress dev docs",
  "build": "vuepress build docs"
}
7.一切就绪 跑起来看看吧
npm run dev如果出现下面的问题

安装上面显示的依赖就行,然后继续npm run dev
npm install vue-template-compiler可以看到运行成功。


MarkDown基本语法
完成了基础搭建后,就可以在docs目录下新建 .md 文件写文章了(.md 是 Markdown 语法文件,你需要知道 Markdown 的一些基本写法)
代码块高亮
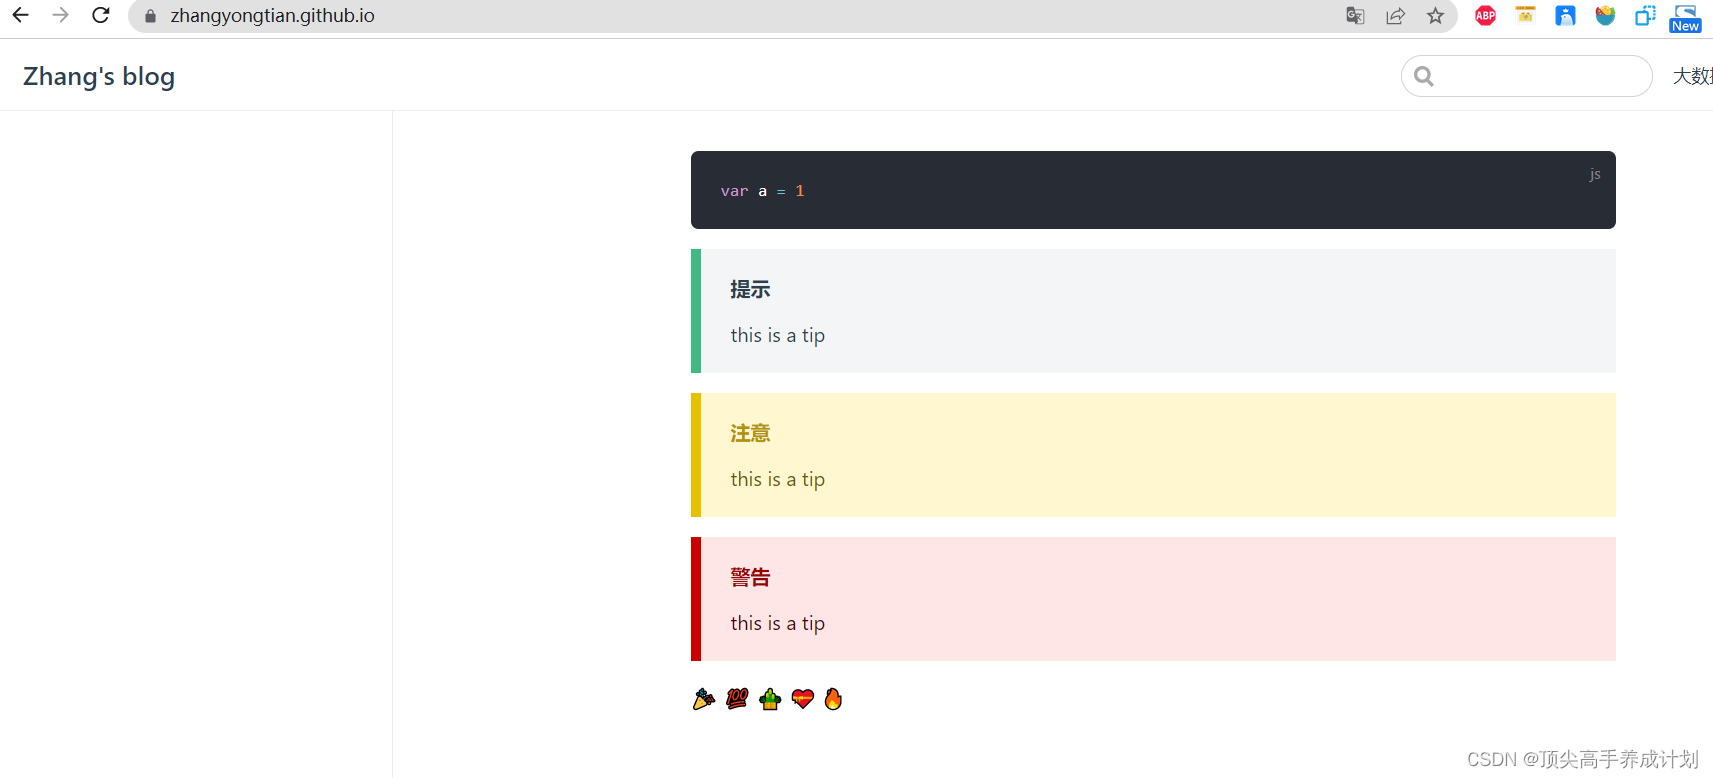
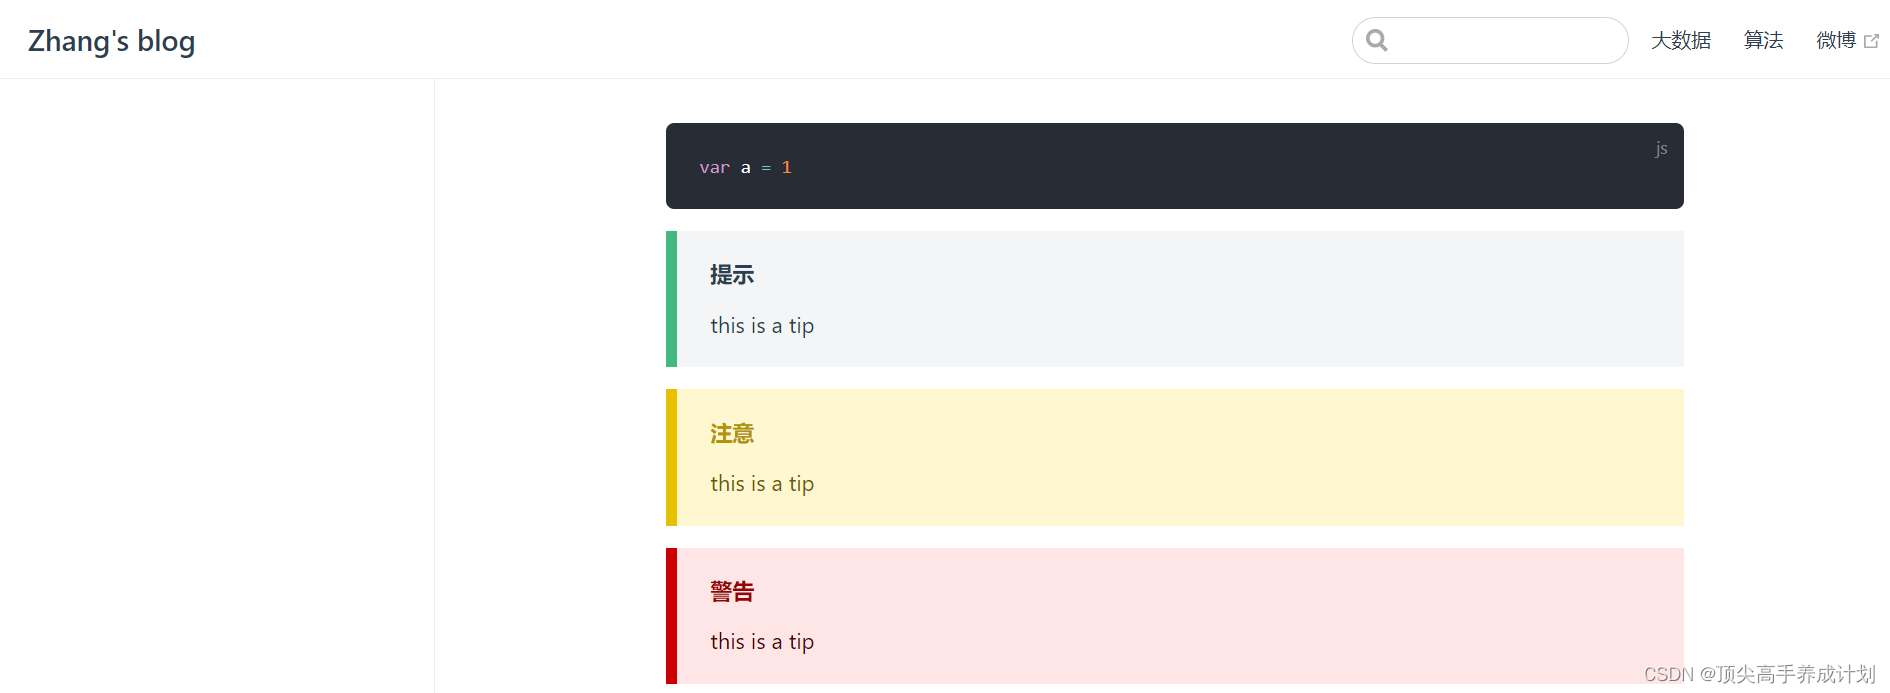
在 .md 文件中书写代码时,可在 ``` 后增加 js、html、json等格式类型,代码块即可按照指定类型高亮,下面我创建了一个index.md


 ```js
 var a = 1
 ```
自定义容器
::: tip 提示
this is a tip
:::

::: warning 注意
this is a tip
:::

::: danger 警告
this is a tip
:::
效果
支持Emoji
:tada: :100: :bamboo: :gift_heart: :fire:效果

这里有一份 Emoji 大全https://www.webfx.com/tools/emoji-cheat-sheet/
支持 PWA(手机访问生成对应的图标)
VuePress 默认支持 PWA,配置方法如下:
config.js 文件中增加
head: [ // 注入到当前页面的 HTML <head> 中的标签
  ['link', { rel: 'manifest', href: '/photo.jpg' }],
  ['link', { rel: 'apple-touch-icon', href: '/photo.jpg' }],
],
serviceWorker: true // 是否开启 PWA
完整配置
module.exports = {
    title: 'Zhang\'s blog',
    description: '我的个人网站',
    head: [ // 注入到当前页面的 HTML <head> 中的标签
      ['link', { rel: 'icon', href: '/logo.jpg' }], // 增加一个自定义的 favicon(网页标签的图标)
      ['link', { rel: 'manifest', href: '/photo.jpg' }],
      ['link', { rel: 'apple-touch-icon', href: '/photo.jpg' }]
    ],
    serviceWorker: true, // 是否开启 PWA
    base: '/', // 这是部署到github相关的配置
    markdown: {
      lineNumbers: false // 代码块显示行号
    },
    themeConfig: {
      nav:[ // 导航栏配置
        {text: '大数据', link: '/accumulate/' },
        {text: '算法', link: '/algorithm/'},
        {text: '微博', link: 'https://baidu.com'}
      ],
      sidebar: 'auto', // 侧边栏配置
      sidebarDepth: 2, // 侧边栏显示2级
    }
  };
public 文件夹下新建 manifest.json 文件,添加
{
    "name": "张三",
    "short_name": "张三",
    "start_url": "index.html",
    "display": "standalone",
    "background_color": "#2196f3",
    "description": "张三的个人主页",
    "theme_color": "blue",
    "icons": [
      {
        "src": "./photo.jpg",
        "sizes": "144x144",
        "type": "image/png"
      }
    ],
    "related_applications": [
      {
        "platform": "web"
      },
      {
        "platform": "play",
        "url": "https://play.google.com/store/apps/details?id=cheeaun.hackerweb"
      }
    ]
  }
配置好以后的目录结构

最后访问下启动的服务,下面是无连接wifi以后在和手机同一局域网访问的效果。
http://192.168.193.136:8080
效果图

点击下拉


部署上线(Github Pages)
说了这么多都是在本地进行的,现在我们要把本地的内容推送到某个服务器上,这样只要有网络,就可以随时随地看自己的网站了。
一般来说,有两种方案可供选择:
自己买一个服务器,阿里云、腾讯云等,这种方式的好处是速度有保证、可以被搜索引擎收录,坏处是要花钱啊 土豪同学可以考虑。
使用 Github Pages 。什么是 Github Pages 呢?简单说就是 Github 提供的、用于搭建个人网站的静态站点托管服务。很多人用它搭建个人博客。这种方式的好处是免费、方便,坏处是速度可能会有些慢、不能被国内的搜索引擎收录。
最终我选择了方案2,下面将给大家讲解如何使用 Github Pages 服务。
登陆github
打开 github 网站,登陆自己的 github 账号(没有账号的快去注册并面壁思过作为一个优秀的程序员为啥连一个github账号都没有)
接着我们新建两个仓库,
新建仓库一 USERNAME.github.io (不用克隆到本地)
注意!
USERNAME必须是你 Github 的账号名称,不是你的名字拼音,也不是你的非主流网名,不要瞎起,要保证和Github账号名一模一样!
例如我的 Github 账号名称是 zhangyongtianZYT

那么新建仓库,Repository name 就填写为:zhangyongtianZYT.github.io

这个仓库建好后,不用克隆到本地,内容更新修改都在下面的仓库中进行。
新建仓库二:随便起一个名字,比如:vuepressBlog (克隆到本地)
这个项目是用来开发博客的,以后只需要改这个项目就够了。
使用工具包的,将 vuepress-devkit 中的内容拷贝到 vuepressBlog 文件夹中
自己从头搭建的,将 vuepressBlogDemo 文件夹的内容拷贝到仓库二,并在根目录下创建 deploy.sh 文件,内容如下:

1.删除npm安装好的node_modules

2.先进入之前创建的项目。

初始化这个仓库然后推送到远程仓库
echo "# zhangyongtian.github.io" >> README.md
git init
git add README.md
git commit -m "first commit"
git branch -M main
git remote add origin git@github.com:zhangyongtian/zhangyongtian.github.io.git
git push -u origin main
3.在根目录下创建 deploy.sh 文件 。(这个操作要在能够执行shell的环境才行)
#!/usr/bin/env sh

# 确保脚本抛出遇到的错误
set -e

# 生成静态文件
npm run build

# 进入生成的文件夹
cd docs/.vuepress/dist

# 如果是发布到自定义域名
# echo 'www.yourwebsite.com' > CNAME

git init
git add -A
git commit -m 'deploy'

# 如果你想要部署到 https://USERNAME.github.io
git push -f git@github.com:USERNAME/USERNAME.github.io.git master

# 如果发布到 https://USERNAME.github.io/<REPO>  REPO=github上的项目
# git push -f git@github.com:USERNAME/<REPO>.git master:gh-pages

cd -
这样仓库二和仓库一就建立了关联。
简单说二者的关系是:仓库一负责显示网站内容,我们不需要改动它;日常开发和新增内容,都在仓库二中,并通过 npm run deploy 命令,将代码发布到仓库一。
在 package.json 文件夹中添加发布命令(使用工具包的请忽略)
"scripts": {
  "deploy": "bash deploy.sh"
}
大功告成,运行发布命令(前提是本地可以运行shell脚本才行)
npm run deploy上面的一系列操作就是相当于打包上传到创建的github.io第一个仓库,如果脚本没有用,那么手动执行也可以。
npm run build
然后把dist里面的数据推送到第一个仓库,先进入到dist文件夹
echo "# zhangyongtian.github.io" >> README.md
git init
git add -A
git commit -m "first commit"
git branch -M main
git remote add origin git@github.com:zhangyongtian/zhangyongtian.github.io.git
git push -u origin main 

进入对应自己的github pages

Zhang's blog
访问上面的地址就能够看到页面了
