一、引言
配置是一个项目中不那么起眼,但却有非常重要的东西。在工程项目中,我们一般会将可修改、易变、不确定的值作为配置项,在配置文件/配置中心中设置。
比方说,不同环境有不同的数据库地址、不同的线程池大小等,可以通过每个环境单独配置文件的方式,实现不修改代码的情况下修改配置项。
再比方说,我们有一个功能上线,可能存在兼容性问题,我们需要在开始的时候开关打开,执行旧的代码逻辑,待一些操作执行结束之后,再将开关关闭,执行新的代码逻辑。那么我们可以把开关写到配置里面,通过配置中心修改配置的方式,在不停机的情况下,热更新配置,从而实现开关的修改。
那么,Spring应用是如何管理配置的呢?对于热更新的一些场景,我们在实际开发中需要做哪些事情呢?本文将对这些问题进行介绍。
二、Spring配置使用
本章节将简单介绍Spring对于配置的使用。
2.1 读配置
比如,我们在配置文件或者配置中心(如Apollo)中添加了一个配置,Spring应用可以通过以下几种方式取出配置。
x:
  y:
    z: 1
1. @Value
通过注解@Value+配置占位符,可以实现配置注入。对于需要默认值的情况,可以在配置项(x.y.z)后添加:然后跟上默认值(1)
@Component
public class MyComponent {
    // @Value("${x.y.z}") // 无默认值的情况
    @Value("${x.y.z:1}")
    private int z;
}
2. @ConfigurationProperties
为了方便配置管理,也经常会将配置放到单独的Properties类中。通过@ConfigurationProperties 可以指定配置项前缀(x.y),这个前缀后面的所有配置会反序列化到该类上。
@Data
@ConfigurationProperties("x.y")
public class MyProperties {
    private int z = 1;
}
为了让这个配置可以作为Spring bean被使用,一般可以直接在类上添加@Component注解
@Data
@Component
@ConfigurationProperties("x.y")
public class MyProperties {
    private int z = 1;
}
对于一些自动配置情况,需要在满足条件的情况下,才将Properties加载到Spring容器。那么这个时候,可以在自动配置类上添加配置@EnableConfigurationProperties,在满足条件的情况下会将Properties类引入。
@EnableConfigurationProperties({MyProperties.class})
//@ConditionOnXXX("")  //满足条件的才自动装配
public class SnowflakeAutoConfiguration {
    // ...
}
另外,还有一个提升我们开发效率和体验的小技巧。我们在改配置文件的时候,发现Spring官方提供的配置,编辑的时候会有自动提示,但是我们自己的配置没有自动提示。
我们可以pom.xml添加以下依赖。添加依赖之后,在前端编译的时候(也就是编译class文件的时候),会自动将@ConfigurationProperties的配置类的信息提取成json格式的元数据,保存在类路径的META-INF/spring-configuration-metadata.json文件中。这样IDE就可以通过元数据文件实现配置编辑的自动提示。
<dependency>
    <groupId>org.springframework.boot</groupId>
    <artifactId>spring-boot-configuration-processor</artifactId>
    <optional>true</optional>
</dependency>
spring-configuration-metadata.json内容如下,不需要手动编写。
{
  "groups": [
    {
      "name": "x.y",
      "type": "ltd.dujiabao.configtests.config.MyProperties",
      "sourceType": "ltd.dujiabao.configtests.config.MyProperties"
    }
  ],
  "properties": [
    {
      "name": "x.y.z",
      "type": "java.lang.Integer",
      "sourceType": "ltd.dujiabao.configtests.config.MyProperties",
      "defaultValue": 1
    }
  ],
  "hints": []
}
3. EnvironmentAware
通过实现EnvironmentAware接口,可以获取Environment的实现类,从而取出需要的配置。
这种方式的获取配置比较常见的使用场景是,在生成BeanDefinition阶段,需要取出一些配置值,上面提到的两种方式,bean都还没生成,没办法通过上面提到的方式拿到配置。需要直接拿到专门用于管理应用配置的接口Environment,直接取出所需的配置。对于Environment,后续会在第三章第一节详细介绍。
getProperty方法指定配置键名称,从而获取配置。
public class MyImport implements EnvironmentAware {
    private Environment environment;

    @Override
    public void setEnvironment(Environment environment) {
        this.environment = environment;
        String z = environment.getProperty("x.y.z");
    }
}
通过Binder指定配置前缀,将配置前缀后的所有配置都绑定到指定类中。
public class MyImport implements EnvironmentAware {
    private Environment environment;

    @Override
    public void setEnvironment(Environment environment) {
        this.environment = environment;
        MyProperties myProperties = Binder.get(environment).bind("x.y", MyProperties.class).get();
    }
}
2.2 配置的多环境使用
1. profile
对于不同环境,可能会有不同的配置,比如说线程池大小、连接池大小。可以通过配置profile去控制当前使用的是哪个环境,用哪个配置。
比如,当前有dev、uat环境。
dev的配置文件为application-dev.yml
x:
  y:
    z: 2
uat的配置文件为application-uat.yml
x:
  y:
    z: 3
在application.yml中,可以选择profile,从而选择对应的配置。也可以在启动服务时,通过命令行的方式传入。当spring.profiles.active=uat,会使用application-uat.yml,当spring.profiles.active=dev会使用application-dev.yml。
spring:
  profiles:
    active: uat
java -Dspring.profiles.active=dev -jar xxx.jar
三、Spring配置原理
第二章中,介绍了Spring配置日常的基本使用。在本章节,将从配置组件、配置注入、配置热更新三个方面详细介绍Spring配置的原理及使用。
1. 配置组件
本章节,将介绍Spring配置中重要的几个组件,并通过介绍组件,将Spring对于配置管理逻辑进行介绍。
1.1 Environment
1.1.1 Environment
在Spring中,配置最重要的组件就是Environment,它集成了Spring应用的所有配置。
我们可以简单看下Environment的源码。Environment主要包括两部分,一部分是Profile,另一部分是Property。Profile表示当前进程激活了哪个环境,用了哪个环境的配置;Property表示当前进程的配置项。
方法getActiveProfiles获取当前激活的Profile;getDefaultProfiles获取默认的Profile;acceptsProfiles判断是否满足所有Profile。
public interface Environment extends PropertyResolver {

	String[] getActiveProfiles();

	String[] getDefaultProfiles();

	@Deprecated
	boolean acceptsProfiles(String... profiles);

	boolean acceptsProfiles(Profiles profiles);
}
containsProperty判断是否包含某个配置项;getProperty获取配置项的值;getRequiredProperty获取配置项的值,当配置项不存在抛出IllegalStateException;resolvePlaceholders、resolveRequiredPlaceholders主要用于处理${..}占位符
public interface PropertyResolver {

	boolean containsProperty(String key);

	@Nullable
	String getProperty(String key);

	String getProperty(String key, String defaultValue);

	@Nullable
	<T> T getProperty(String key, Class<T> targetType);

	<T> T getProperty(String key, Class<T> targetType, T defaultValue);

	String getRequiredProperty(String key) throws IllegalStateException;

	<T> T getRequiredProperty(String key, Class<T> targetType) throws IllegalStateException;

	String resolvePlaceholders(String text);

	String resolveRequiredPlaceholders(String text) throws IllegalArgumentException;
}
1.1.2 ConfigurableEnvironment
ConfigurableEnvironment,顾名思义提供了可配置的Environment接口,它继承了Environment。
可通过方法setActiveProfiles、addActiveProfile、setDefaultProfiles 修改激活、默认的Profile;通过getPropertySources获取PropertySource列表,并且对PropertySource列表进行修改;通过getSystemProperties、getSystemEnvironment可以获取一些和系统参数相关的map。
public interface ConfigurableEnvironment extends Environment, ConfigurablePropertyResolver {

	void setActiveProfiles(String... profiles);

	void addActiveProfile(String profile);

	void setDefaultProfiles(String... profiles);

	MutablePropertySources getPropertySources();

	Map<String, Object> getSystemProperties();

	Map<String, Object> getSystemEnvironment();
}
1.1.3 AbstractEnvironment
接口Environment的默认实现类是AbstractEnvironment,我们简单分析它的实现原理。
public abstract class AbstractEnvironment implements ConfigurableEnvironment {
	//...
}
1.1.2.1 成员变量
AbstractEnvironment包含两个重要的成员:
- propertySources:维护所有配置来源
PropertySource的一个集合类 - propertyResolver:用于提供一些读配置的方法,比如说获取配置值、通过占位符获取配置值等,propertySources会传入作为配置来源
我们这里引出了一个很重要的组件PropertySource,可以简单理解为每一个配置来源都有一个PropertySource,将在1.2介绍。
	private final MutablePropertySources propertySources = new MutablePropertySources();

	private final ConfigurablePropertyResolver propertyResolver =
			new PropertySourcesPropertyResolver(this.propertySources);
1.1.2.2 构造方法
构造方法将成员变量propertySources传入方法customizePropertySources,为子类提供一个可以自定义PropertySource并加入到的propertySources方法。
	public AbstractEnvironment() {
		customizePropertySources(this.propertySources);
	}

	protected void customizePropertySources(MutablePropertySources propertySources) {
	}
Spring应用默认的Environment实现类StandardEnvironment,它会继承AbstractEnvironment,重写方法customizePropertySources。我们可以看到,它添加了两个PropertySource,systemProperties是系统属性的来源,systemEnvironment是系统环境变量的来源。
比方说,在启动服务时传入设置系统属性property_name,那么这个系统属性会因为systemProperties被Environment管理,可以直接通过第二章介绍的方式获取该值。
java -Dproperty_name=value -jar your_application.jar
比方说,在Linux环境下,设置了环境变量VARIABLE_NAME,那么它也会因为systemEnvironment被Environment管理,可以直接通过第二章介绍的方式获取该值。
export VARIABLE_NAME="value"
public class StandardEnvironment extends AbstractEnvironment {

	public static final String SYSTEM_ENVIRONMENT_PROPERTY_SOURCE_NAME = "systemEnvironment";

	public static final String SYSTEM_PROPERTIES_PROPERTY_SOURCE_NAME = "systemProperties";

	@Override
	protected void customizePropertySources(MutablePropertySources propertySources) {
		propertySources.addLast(
				new PropertiesPropertySource(SYSTEM_PROPERTIES_PROPERTY_SOURCE_NAME, getSystemProperties()));
		propertySources.addLast(
				new SystemEnvironmentPropertySource(SYSTEM_ENVIRONMENT_PROPERTY_SOURCE_NAME, getSystemEnvironment()));
	}
}
	@Override
	@SuppressWarnings({"rawtypes", "unchecked"})
	public Map<String, Object> getSystemProperties() {
		try {
			return (Map) System.getProperties();
		}
		catch (AccessControlException ex) {
			return (Map) new ReadOnlySystemAttributesMap() {
				@Override
				@Nullable
				protected String getSystemAttribute(String attributeName) {
					try {
						return System.getProperty(attributeName);
					}
					catch (AccessControlException ex) {
						if (logger.isInfoEnabled()) {
							logger.info("Caught AccessControlException when accessing system property '" +
									attributeName + "'; its value will be returned [null]. Reason: " + ex.getMessage());
						}
						return null;
					}
				}
			};
		}
	}

	@Override
	@SuppressWarnings({"rawtypes", "unchecked"})
	public Map<String, Object> getSystemEnvironment() {
		if (suppressGetenvAccess()) {
			return Collections.emptyMap();
		}
		try {
			return (Map) System.getenv();
		}
		catch (AccessControlException ex) {
			return (Map) new ReadOnlySystemAttributesMap() {
				@Override
				@Nullable
				protected String getSystemAttribute(String attributeName) {
					try {
						return System.getenv(attributeName);
					}
					catch (AccessControlException ex) {
						if (logger.isInfoEnabled()) {
							logger.info("Caught AccessControlException when accessing system environment variable '" +
									attributeName + "'; its value will be returned [null]. Reason: " + ex.getMessage());
						}
						return null;
					}
				}
			};
		}
	}
1.1.2.3 getProperty
通过getProperty取出配置项的值。我们可以看到这个方法实际上用的就是propertyResolver。
	private final MutablePropertySources propertySources = new MutablePropertySources();

	private final ConfigurablePropertyResolver propertyResolver =
			new PropertySourcesPropertyResolver(this.propertySources);

	@Override
	@Nullable
	public String getProperty(String key) {
		return this.propertyResolver.getProperty(key);
	}
我们通过源码可以找到propertyResolver获取配置的位置,简单来说就是遍历所有PropertySource,第一个找到值的就直接返回。因此PropertySource的顺序还有一个优先级问题,排前面的优先使用。
	@Nullable
	protected <T> T getProperty(String key, Class<T> targetValueType, boolean resolveNestedPlaceholders) {
		if (this.propertySources != null) {
      // 遍历所有PropertySource
			for (PropertySource<?> propertySource : this.propertySources) {
				if (logger.isTraceEnabled()) {
					logger.trace("Searching for key '" + key + "' in PropertySource '" +
							propertySource.getName() + "'");
				}
				Object value = propertySource.getProperty(key);
				if (value != null) {
					if (resolveNestedPlaceholders && value instanceof String) {
						value = resolveNestedPlaceholders((String) value);
					}
					logKeyFound(key, propertySource, value);
					return convertValueIfNecessary(value, targetValueType);
				}
			}
		}
		if (logger.isTraceEnabled()) {
			logger.trace("Could not find key '" + key + "' in any property source");
		}
		return null;
	}
1.1.2.4 getActiveProfiles
顾名思义,方法就是用来获取当前被激活的Profile。
从方法中可以看到,获取激活的Profile的基本逻辑就是,在没有初始化的情况下,从配置项spring.profiles.active中获取,随后保存到成员变量activeProfiles中;之后可以直接从activeProfiles获取。
	public static final String ACTIVE_PROFILES_PROPERTY_NAME = "spring.profiles.active";
	private final Set<String> activeProfiles = new LinkedHashSet<>();

	public String[] getActiveProfiles() {
		return StringUtils.toStringArray(doGetActiveProfiles());
	}

	protected Set<String> doGetActiveProfiles() {
		synchronized (this.activeProfiles) {
			if (this.activeProfiles.isEmpty()) {
				String profiles = getProperty(ACTIVE_PROFILES_PROPERTY_NAME);
				if (StringUtils.hasText(profiles)) {
					setActiveProfiles(StringUtils.commaDelimitedListToStringArray(
							StringUtils.trimAllWhitespace(profiles)));
				}
			}
			return this.activeProfiles;
		}
	}
1.2 PropertySource
简单来说就是对配置来源的抽象,也就是说每一种配置来源都有一个PropertySource。比如说,配置文件的配置来源是OriginTrackedMapPropertySource,Apollo的配置来源是ConfigPropertySource的对象。而如果我们想自定义配置来源,也可以通过继承PropertySource来实现。
1.2.1 PropertySource
首先介绍一下抽象类PropertySource。成员主要由几部分组成,name配置来源的名称,source来源的实体。最重要的方法getProperty是抽象方法,由子类实现查询配置的逻辑。
public abstract class PropertySource<T> {

	protected final Log logger = LogFactory.getLog(getClass());

	protected final String name;

	protected final T source;

	public PropertySource(String name, T source) {
		Assert.hasText(name, "Property source name must contain at least one character");
		Assert.notNull(source, "Property source must not be null");
		this.name = name;
		this.source = source;
	}

	@SuppressWarnings("unchecked")
	public PropertySource(String name) {
		this(name, (T) new Object());
	}

	public String getName() {
		return this.name;
	}

	public T getSource() {
		return this.source;
	}

	public boolean containsProperty(String name) {
		return (getProperty(name) != null);
	}

	@Nullable
	public abstract Object getProperty(String name);

	public static PropertySource<?> named(String name) {
		return new ComparisonPropertySource(name);
	}
}
1.3 ConfigFileApplicationListener
接下来,我们将介绍ConfigFileApplicationListener,通过它可以了解到配置文件是如何变成PropertySource的,并且可以了解到如何自定义PropertySource,自定义的PropertySource如何被发现并使用。
我们可以看到,ConfigFileApplicationListener实现了三个接口EnvironmentPostProcessor、SmartApplicationListener、Ordered。
public class ConfigFileApplicationListener implements EnvironmentPostProcessor, SmartApplicationListener, Ordered {
	//..
}
1.3.1 Ordered
简单来说Ordered是用来表示多个同类组件之间顺序,后续在处理所有EnvironmentPostProcessor时会用到这个顺序。
	public static final int DEFAULT_ORDER = Ordered.HIGHEST_PRECEDENCE + 10;
	private int order = DEFAULT_ORDER;

	@Override
	public int getOrder() {
		return this.order;
	}
1.3.2 SmartApplicationListener
SmartApplicationListener简单来说就是可以同时监听多种应用事件ApplicationEvent,ConfigFileApplicationListener会监听ApplicationEnvironmentPreparedEvent、ApplicationPreparedEvent这两个事件,针对这两个事件,分别会执行onApplicationEnvironmentPreparedEvent、onApplicationPreparedEvent这两个方法。
	@Override
	public boolean supportsEventType(Class<? extends ApplicationEvent> eventType) {
		return ApplicationEnvironmentPreparedEvent.class.isAssignableFrom(eventType)
				|| ApplicationPreparedEvent.class.isAssignableFrom(eventType);
	}

	@Override
	public void onApplicationEvent(ApplicationEvent event) {
		if (event instanceof ApplicationEnvironmentPreparedEvent) {
			onApplicationEnvironmentPreparedEvent((ApplicationEnvironmentPreparedEvent) event);
		}
		if (event instanceof ApplicationPreparedEvent) {
			onApplicationPreparedEvent(event);
		}
	}
在Spring应用启动的前期,会创建并准备一个应用的Environment,完成准备之后会发布一个ApplicationEnvironmentPreparedEvent事件。这个事件会触发执行
ConfigFileApplicationListener的方法onApplicationEnvironmentPreparedEvent,对一系列PropertySource进行加载并注册到Environment中。
我们可以看到,这个方法做的事情主要是将所有EnvironmentPostProcessor加载进来,随后按照设定的顺序逐一执行。
	private void onApplicationEnvironmentPreparedEvent(ApplicationEnvironmentPreparedEvent event) {
        // 加载所有EnvironmentPostProcessor
		List<EnvironmentPostProcessor> postProcessors = loadPostProcessors();
        // 把当前对象也加入到处理器列表中
		postProcessors.add(this);
        // 根据Ordered设置的顺序进行排序
		AnnotationAwareOrderComparator.sort(postProcessors);
        // EnvironmentPostProcessor逐一执行
		for (EnvironmentPostProcessor postProcessor : postProcessors) {
			postProcessor.postProcessEnvironment(event.getEnvironment(), event.getSpringApplication());
		}
	}

	// 通过Spring Factory的机制加载所有EnvironmentPostProcessor
	List<EnvironmentPostProcessor> loadPostProcessors() {
		return SpringFactoriesLoader.loadFactories(EnvironmentPostProcessor.class, getClass().getClassLoader());
	}
我们通过方法loadPostProcessors可以看出,Spring Boot为开发者提供了扩展接口。开发者可以自定义EnvironmentPostProcessor,然后在META-INF/spring.factories中将该自定义类进行注册。SpringFactoriesLoader会通过扫描每个jar包类路径的文件META-INF/spring.factories将EnvironmentPostProcessor的实现类找出,然后将它们进行实例化。
因此,如果我们想自定义配置来源PropertySource,可以先实现EnvironmentPostProcessor,EnvironmentPostProcessor中将PropertySource加入到Environment中,然后将这个类写到文件META-INF/spring.factories中
org.springframework.boot.env.EnvironmentPostProcessor=ltd.dujiabao.configtests.config.CustomEnvironmentPostProcessor
1.3.3 EnvironmentPostProcessor
在Spring应用生成Environment之后,会通过调用EnvironmentPostProcessor,对Environment进行进一步增强。也就是说,如果我们想添加自定义的PropertySource,可以通过实现这个接口,然后通过spring.factories进行注册。比如,Apollo的com.ctrip.framework.apollo.spring.boot.ApolloApplicationContextInitializer。
ConfigFileApplicationListener自身就是EnvironmentPostProcessor的实现类,这个实现方法会将向Environment添加若干个PropertySource,包括基于配置文件的PropertySource。下面我们将详细介绍这个过程。
	@Override
	public void postProcessEnvironment(ConfigurableEnvironment environment, SpringApplication application) {
		addPropertySources(environment, application.getResourceLoader());
	}

	protected void addPropertySources(ConfigurableEnvironment environment, ResourceLoader resourceLoader) {
        // 添加RandomValuePropertySource
		RandomValuePropertySource.addToEnvironment(environment);
        // 加载
		new Loader(environment, resourceLoader).load();
	}
首先,将RandomValuePropertySource添加到Environment,简单来说就是我们取配置的时候可以通过配置项random.int、random.long、random.uuid取出随机值,比较简单,不再赘述。
之后,通过内部类Loader进行加载。也就是说,加载PropertySource的核心逻辑在Loader
1.3.4 ConfigFileApplicationListener.Loader
1.3.4.1 成员变量&构造方法
我们先来看下Loader的成员变量:
environment:当前Spring应用的EnvironmentplaceholdersResolver:用于解析占位符,从Environment中取出值resourceLoader:用于从文件系统中读取配置文件propertySourceLoaders:包含所有用于将配置文件加载为PropertySource的PropertySourceLoaderprofiles:保存当前待处理的激活的Profile,这是一个队列。一开始的时候,会有一个默认的Profile,并且在读入配置文件的时候,可以增加Profile。循环从队列中取出Profile,直到队列为空。processedProfiles:保存所有被处理过的ProfileactivatedProfiles:是否已取出被激活的Profile列表。意思是只会读取spring.profiles.active一次,先被读取的优先级高,会被采纳;其他不会被采纳。loaded:map保存每个Profile的PropertySourceloadDocumentsCache:缓存读入的文件,避免需要每次都从文件系统中读入
从构造方法中,我们可以看出PropertySourceLoader也提供了可扩展的spi。构造方法中,通过SpringFactoriesLoader查出所有PropertySourceLoader。我们可以通过实现PropertySourceLoader,自定义解析配置文件的方法。
	private class Loader {
		private final Log logger = ConfigFileApplicationListener.this.logger;
		// 当前Spring应用的`Environment`
		private final ConfigurableEnvironment environment;
		// 用于解析占位符,从`Environment`中取出值
		private final PropertySourcesPlaceholdersResolver placeholdersResolver;
		// 用于从文件系统中读取配置文件
		private final ResourceLoader resourceLoader;
		// 包含所有用于将配置文件加载为PropertySource的PropertySourceLoader
		private final List<PropertySourceLoader> propertySourceLoaders;
		// 保存当前待处理的激活的`Profile`,这是一个队列。一开始的时候,会有一个默认的`Profile`,并且在读入配置文件的时候,可以增加Profile。循环从队列中取出`Profile`,直到队列为空。
		private Deque<Profile> profiles;
		// 保存所有被处理过的`Profile`
		private List<Profile> processedProfiles;
		// 是否已取出被激活的`Profile`列表。意思是只会读取`spring.profiles.active`一次,先被读取的优先级高,会被采纳;其他不会被采纳。
		private boolean activatedProfiles;
		// map保存每个Profile的`PropertySource`
		private Map<Profile, MutablePropertySources> loaded;
		// 缓存读入的文件,避免需要每次都从文件系统中读入
		private Map<DocumentsCacheKey, List<Document>> loadDocumentsCache = new HashMap<>();

		Loader(ConfigurableEnvironment environment, ResourceLoader resourceLoader) {
			this.environment = environment;
      // 传入environment,构造PropertySourcesPlaceholdersResolver
			this.placeholdersResolver = new PropertySourcesPlaceholdersResolver(this.environment);
      // 创建资源加载器
			this.resourceLoader = (resourceLoader != null) ? resourceLoader : new DefaultResourceLoader(null);
      // 从Spring Loader中取出配置加载器列表
			this.propertySourceLoaders = SpringFactoriesLoader.loadFactories(PropertySourceLoader.class,
					getClass().getClassLoader());
		}
  }
1.3.4.2 Loader#load
接下来介绍加载配置的方法。FilteredPropertySource.apply 里面实际上没做什么,我们就直接忽略。我们直接看最后的lambda表达式即可。
基本逻辑就是:
-
从现有的
PropertySource初始化profiles队列。也就是从环境变量、系统变量中取出。 -
从
profiles队头取出Profile,然后从文件系统读入该Profile的配置文件。并且若配置文件中有指定spring.profiles.active,并且之前未激活过,则将这些Profile加入到队列中。循环读,直到队列为空。
因此,下面主要介绍两个方法:initializeProfiles、load
		void load() {
			FilteredPropertySource.apply(this.environment, DEFAULT_PROPERTIES, LOAD_FILTERED_PROPERTY,
					(defaultProperties) -> {
						this.profiles = new LinkedList<>();
						this.processedProfiles = new LinkedList<>();
						this.activatedProfiles = false;
						this.loaded = new LinkedHashMap<>();
            // 初始化Profile列表
						initializeProfiles();
            // 取出当前Profile,扫描配置文件
						while (!this.profiles.isEmpty()) {
							Profile profile = this.profiles.poll();
							if (isDefaultProfile(profile)) {
                // 将非默认Profile加入到Environment
								addProfileToEnvironment(profile.getName());
							}
              // 加载配置文件
							load(profile, this::getPositiveProfileFilter,
									addToLoaded(MutablePropertySources::addLast, false));
							this.processedProfiles.add(profile);
						}
						load(null, this::getNegativeProfileFilter, addToLoaded(MutablePropertySources::addFirst, true));
						addLoadedPropertySources();
						applyActiveProfiles(defaultProperties);
					});
		}
1.3.4.3 Loader#initializeProfiles
初始化成员变量profiles,基本逻辑是:
- 默认添加一个null,后续会读入文件application.yml或者其他application.文件
- 从现有的
PropertySource中读入激活的Profile,并将其加入到队列后 - 若未指定激活的
Profile,则添加一个叫default的Profile
private void initializeProfiles() {
  		// 默认添加一个null,后续会读入文件application.yml或者其他application.文件
			this.profiles.add(null);
			Binder binder = Binder.get(this.environment);
  		// 从现有的PropertySource中读入spring.profiles.active
			Set<Profile> activatedViaProperty = getProfiles(binder, ACTIVE_PROFILES_PROPERTY);
  		// 从现有的PropertySource中读入spring.profiles.include
			Set<Profile> includedViaProperty = getProfiles(binder, INCLUDE_PROFILES_PROPERTY);
  		// 从environment中读入其他active的Profile,可能是硬编码指定的
			List<Profile> otherActiveProfiles = getOtherActiveProfiles(activatedViaProperty, includedViaProperty);
			this.profiles.addAll(otherActiveProfiles);
			this.profiles.addAll(includedViaProperty);
  		// 添加激活的Profile
			addActiveProfiles(activatedViaProperty);
  		// 若没有指定,那添加一个default的Profile,后续会读入文件application-default.yml或者其他application-default.文件
			if (this.profiles.size() == 1) {
				for (String defaultProfileName : this.environment.getDefaultProfiles()) {
					Profile defaultProfile = new Profile(defaultProfileName, true);
					this.profiles.add(defaultProfile);
				}
			}
		}

void addActiveProfiles(Set<Profile> profiles) {
			if (profiles.isEmpty()) {
				return;
			}
  		// 只允许添加一次激活的Profile
			if (this.activatedProfiles) {
				if (this.logger.isDebugEnabled()) {
					this.logger.debug("Profiles already activated, '" + profiles + "' will not be applied");
				}
				return;
			}
  		// 添加激活的Profile
			this.profiles.addAll(profiles);
			if (this.logger.isDebugEnabled()) {
				this.logger.debug("Activated activeProfiles " + StringUtils.collectionToCommaDelimitedString(profiles));
			}
  		// 设置标识位
			this.activatedProfiles = true;
  		// 删除默认的profile default
			removeUnprocessedDefaultProfiles();
		}
1.3.4.4 Loader#load(Profile, DocumentFilterFactory, DocumentConsumer)
基本逻辑为:
- 获取配置文件的的路径位置,通过配置项
spring.config.location。若没有则默认用这些目录,classpath:/、classpath:/config/、file:./、file:./config/*/、file:./config/ - 遍历每个路径,在每个路径下搜索配置文件。配置文件的文件名从配置项
spring.config.name获取。若没有则默认用,application
		private void load(Profile profile, DocumentFilterFactory filterFactory, DocumentConsumer consumer) {
      // 遍历所有配置文件的路径,加载配置文件
			getSearchLocations().forEach((location) -> {
				boolean isDirectory = location.endsWith("/");
        // 获取配置文件名前缀
				Set<String> names = isDirectory ? getSearchNames() : NO_SEARCH_NAMES;
        // 加载
				names.forEach((name) -> load(location, name, profile, filterFactory, consumer));
			});
		}

		private Set<String> getSearchLocations() {
      // 获取额外的配置文件路径,spring.config.additional-location
			Set<String> locations = getSearchLocations(CONFIG_ADDITIONAL_LOCATION_PROPERTY);
      // 获取配置文件文件路径,spring.config.location,如果没有指定,则用默认值
			if (this.environment.containsProperty(CONFIG_LOCATION_PROPERTY)) {
				locations.addAll(getSearchLocations(CONFIG_LOCATION_PROPERTY));
			}
			else {
				locations.addAll(
          	// 默认从这些路径搜索文件classpath:/,classpath:/config/,file:./,file:./config/*/,file:./config/
						asResolvedSet(ConfigFileApplicationListener.this.searchLocations, DEFAULT_SEARCH_LOCATIONS));
			}
			return locations;
		}

		private Set<String> getSearchNames() {
      // 获取配置文件前缀名,spring.config.name
			if (this.environment.containsProperty(CONFIG_NAME_PROPERTY)) {
				String property = this.environment.getProperty(CONFIG_NAME_PROPERTY);
				Set<String> names = asResolvedSet(property, null);
				names.forEach(this::assertValidConfigName);
				return names;
			}
      // 若没有设置,默认为application
			return asResolvedSet(ConfigFileApplicationListener.this.names, DEFAULT_NAMES);
		}
1.3.4.5 Loader#load(String, Profile, DocumentFilterFactory, DocumentConsumer)
基本逻辑就是:
- 若传进来的location是文件,遍历所有PropertySourceLoader,对文件进行加载
- 若传进来的location是文件夹,遍历所有PropertySourceLoader,对所有可能的文件进行尝试加载
		private void load(String location, String name, Profile profile, DocumentFilterFactory filterFactory,
				DocumentConsumer consumer) {
      // 当传进来的location是文件,不是文件夹,name为空,直接进入下面的加载逻辑
			if (!StringUtils.hasText(name)) {
        // 遍历所有PropertySourceLoader,只有支持文件后缀的能加载
				for (PropertySourceLoader loader : this.propertySourceLoaders) {
					if (canLoadFileExtension(loader, location)) {
						load(loader, location, profile, filterFactory.getDocumentFilter(profile), consumer);
						return;
					}
				}
				throw new IllegalStateException("File extension of config file location '" + location
						+ "' is not known to any PropertySourceLoader. If the location is meant to reference "
						+ "a directory, it must end in '/'");
			}
      // 当传进来的location是文件夹
			Set<String> processed = new HashSet<>();
      // 遍历所有PropertySourceLoader,获取该加载器支持的文件后缀,然后拼接成路径,对文件进行加载
			for (PropertySourceLoader loader : this.propertySourceLoaders) {
				for (String fileExtension : loader.getFileExtensions()) {
					if (processed.add(fileExtension)) {
						loadForFileExtension(loader, location + name, "." + fileExtension, profile, filterFactory,
								consumer);
					}
				}
			}
		}
1.3.4.6 Loader#loadForFileExtension
这个方法的逻辑比较复杂,一般来说有用的只有注释的那两处。
- 在
Profile不为空时,拼接文件名 prefix + “-” + profile + fileExtension,随后在文件系统查找并加载文件。 - 在
Profile为空时,拼接文件名 prefix + fileExtension,随后在文件系统查找并加载文件。
		private void loadForFileExtension(PropertySourceLoader loader, String prefix, String fileExtension,
				Profile profile, DocumentFilterFactory filterFactory, DocumentConsumer consumer) {
			DocumentFilter defaultFilter = filterFactory.getDocumentFilter(null);
			DocumentFilter profileFilter = filterFactory.getDocumentFilter(profile);
			if (profile != null) {
				String profileSpecificFile = prefix + "-" + profile + fileExtension;
        // 在Profile不为null时,一般会通过这个方法加载配置文件
				load(loader, profileSpecificFile, profile, defaultFilter, consumer);
				load(loader, profileSpecificFile, profile, profileFilter, consumer);
				for (Profile processedProfile : this.processedProfiles) {
					if (processedProfile != null) {
						String previouslyLoaded = prefix + "-" + processedProfile + fileExtension;
						load(loader, previouslyLoaded, profile, profileFilter, consumer);
					}
				}
			}
			// 在在Profile为null时,一般会通过这个方法加载配置文件
			load(loader, prefix + fileExtension, profile, profileFilter, consumer);
		}
1.3.4.7 Loader#load(PropertySourceLoader, String, Profile, DocumentFilter, DocumentConsumer)
基本逻辑就是将文件读进Document,随后将Document的PropertySource 插入到loaded中,这样就完成了从配置文件到PropertySource的转换
private void load(PropertySourceLoader loader, String location, Profile profile, DocumentFilter filter,
				DocumentConsumer consumer) {
  		// 通过路径查找资源
			Resource[] resources = getResources(location);
			for (Resource resource : resources) {
				try {
          // 文件不存在,直接返回
					if (resource == null || !resource.exists()) {
						if (this.logger.isTraceEnabled()) {
							StringBuilder description = getDescription("Skipped missing config ", location, resource,
									profile);
							this.logger.trace(description);
						}
						continue;
					}
          // 文件后缀为空,直接返回
					if (!StringUtils.hasText(StringUtils.getFilenameExtension(resource.getFilename()))) {
						if (this.logger.isTraceEnabled()) {
							StringBuilder description = getDescription("Skipped empty config extension ", location,
									resource, profile);
							this.logger.trace(description);
						}
						continue;
					}
          // 包含一些隐藏的元素,不重要。。
					if (resource.isFile() && isPatternLocation(location) && hasHiddenPathElement(resource)) {
						if (this.logger.isTraceEnabled()) {
							StringBuilder description = getDescription("Skipped location with hidden path element ",
									location, resource, profile);
							this.logger.trace(description);
						}
						continue;
					}
          // 将文件加载为Document列表
					String name = "applicationConfig: [" + getLocationName(location, resource) + "]";
					List<Document> documents = loadDocuments(loader, name, resource);
					if (CollectionUtils.isEmpty(documents)) {
						if (this.logger.isTraceEnabled()) {
							StringBuilder description = getDescription("Skipped unloaded config ", location, resource,
									profile);
							this.logger.trace(description);
						}
						continue;
					}
					List<Document> loaded = new ArrayList<>();
          // 一般我们不会配filter,认为考虑满足的情况就好了
					for (Document document : documents) {
						if (filter.match(document)) {
							addActiveProfiles(document.getActiveProfiles());
							addIncludedProfiles(document.getIncludeProfiles());
							loaded.add(document);
						}
					}
					Collections.reverse(loaded);
          // 将文档转换为
					if (!loaded.isEmpty()) {
						loaded.forEach((document) -> consumer.accept(profile, document));
						if (this.logger.isDebugEnabled()) {
							StringBuilder description = getDescription("Loaded config file ", location, resource,
									profile);
							this.logger.debug(description);
						}
					}
				}
				catch (Exception ex) {
					StringBuilder description = getDescription("Failed to load property source from ", location,
							resource, profile);
					throw new IllegalStateException(description.toString(), ex);
				}
			}
		}

		private DocumentConsumer addToLoaded(BiConsumer<MutablePropertySources, PropertySource<?>> addMethod,
				boolean checkForExisting) {
			return (profile, document) -> {
				if (checkForExisting) {
					for (MutablePropertySources merged : this.loaded.values()) {
						if (merged.contains(document.getPropertySource().getName())) {
							return;
						}
					}
				}
        // 将文档的PropertySource加入到loaded里面
				MutablePropertySources merged = this.loaded.computeIfAbsent(profile,
						(k) -> new MutablePropertySources());
				addMethod.accept(merged, document.getPropertySource());
			};
		}
1.3.4.8 Loader#addLoadedPropertySources
1.3.4.2 在完成加载之后,会将加载成功的所有PropertySource加入到Environment中
		private void addLoadedPropertySources() {
			MutablePropertySources destination = this.environment.getPropertySources();
			List<MutablePropertySources> loaded = new ArrayList<>(this.loaded.values());
			Collections.reverse(loaded);
			String lastAdded = null;
			Set<String> added = new HashSet<>();
      // 遍历所有被load的PropertySource
			for (MutablePropertySources sources : loaded) {
				for (PropertySource<?> source : sources) {
					if (added.add(source.getName())) {
            // 将其加入到environment中
						addLoadedPropertySource(destination, lastAdded, source);
						lastAdded = source.getName();
					}
				}
			}
		}

		private void addLoadedPropertySource(MutablePropertySources destination, String lastAdded,
				PropertySource<?> source) {
			if (lastAdded == null) {
				if (destination.contains(DEFAULT_PROPERTIES)) {
					destination.addBefore(DEFAULT_PROPERTIES, source);
				}
				else {
					destination.addLast(source);
				}
			}
			else {
				destination.addAfter(lastAdded, source);
			}
		}
至此,终于介绍完Spring Boot加载配置文件至Environment的逻辑。
2. 配置注入
本小节主要介绍@Value、@ConfigurationProperties是如何从Environment中拿到配置的。
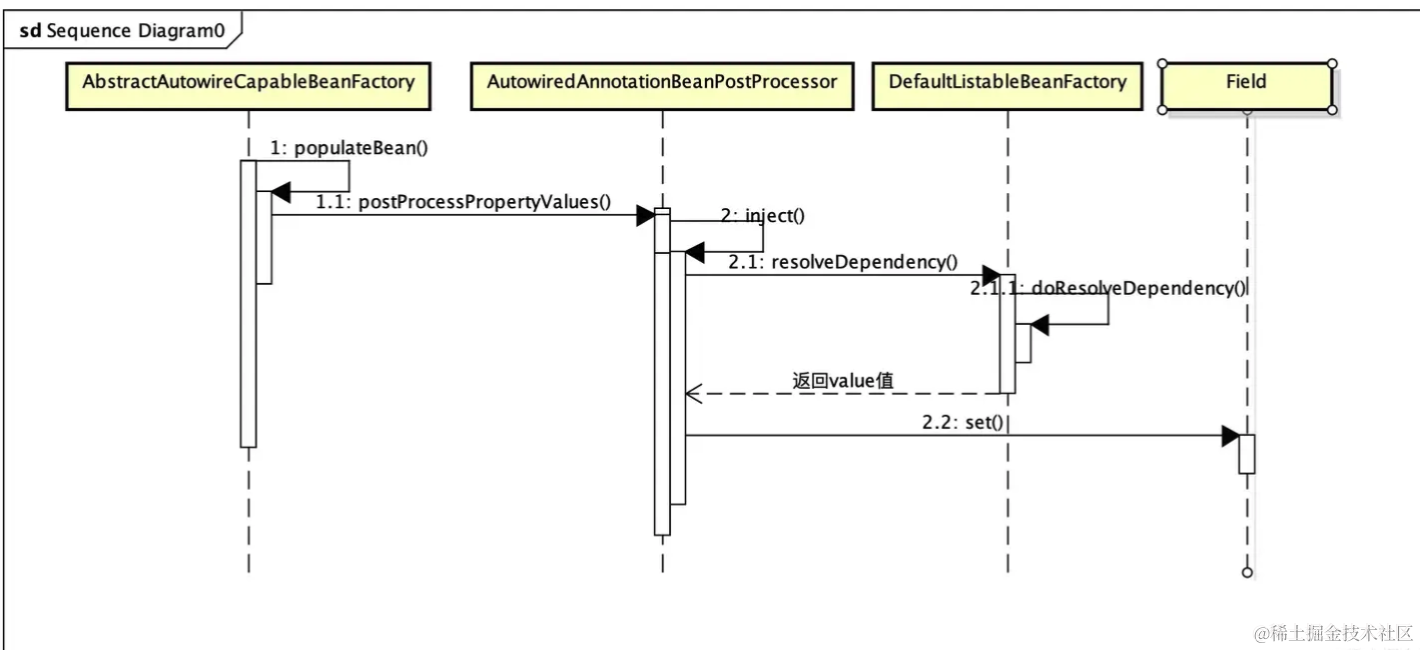
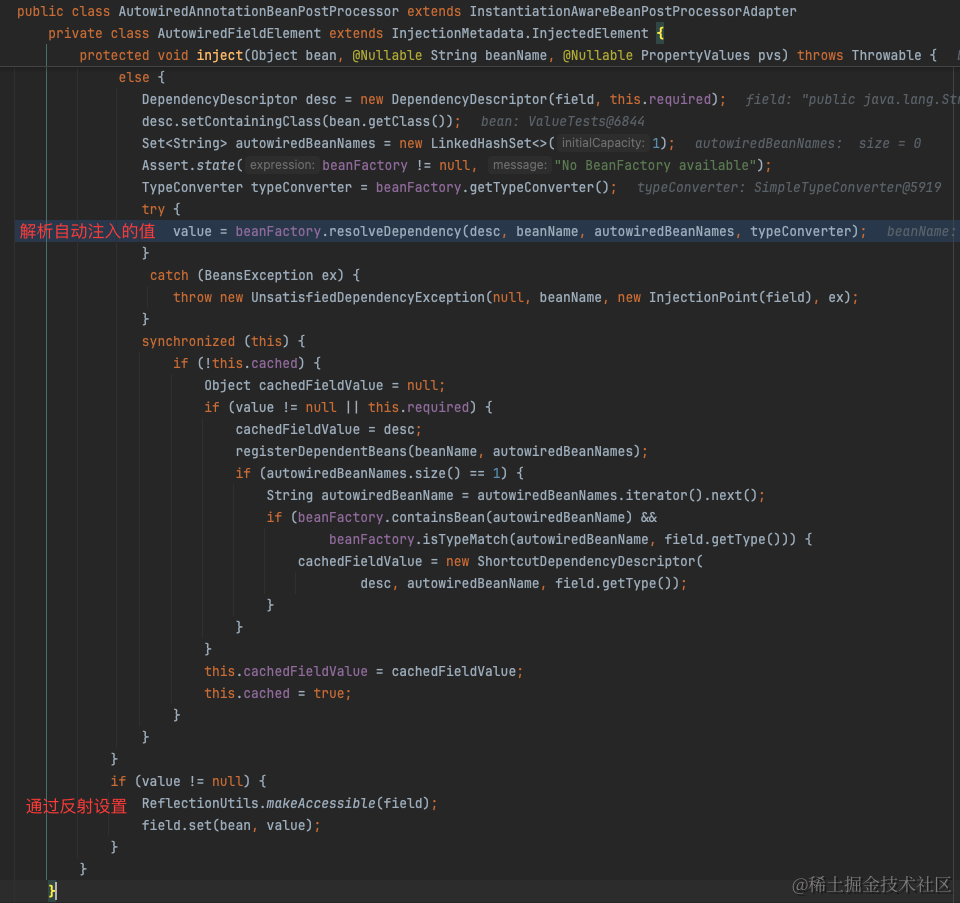
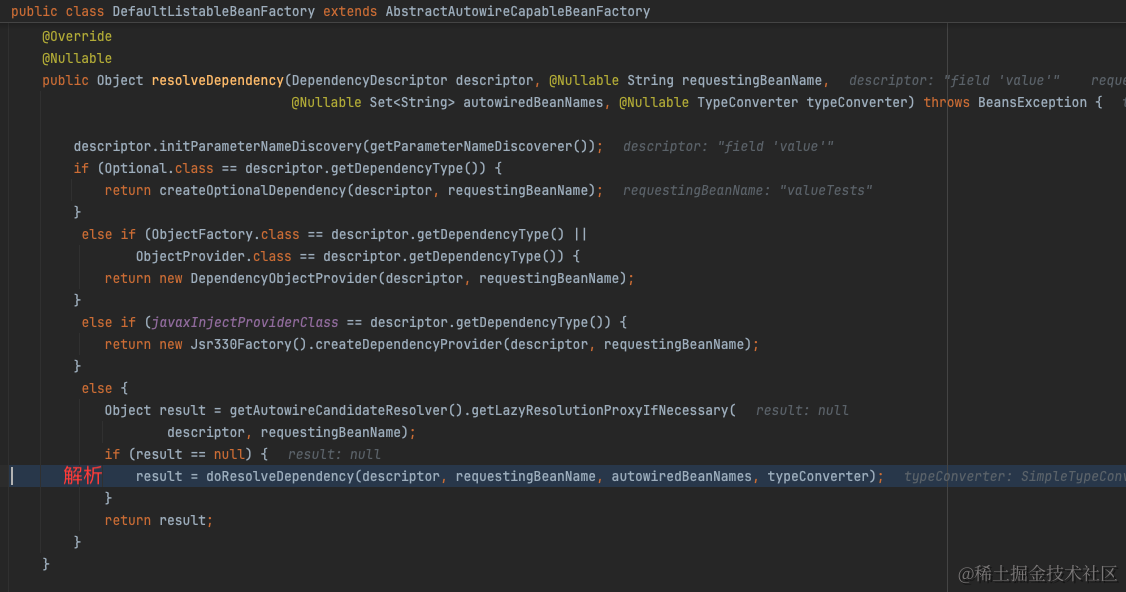
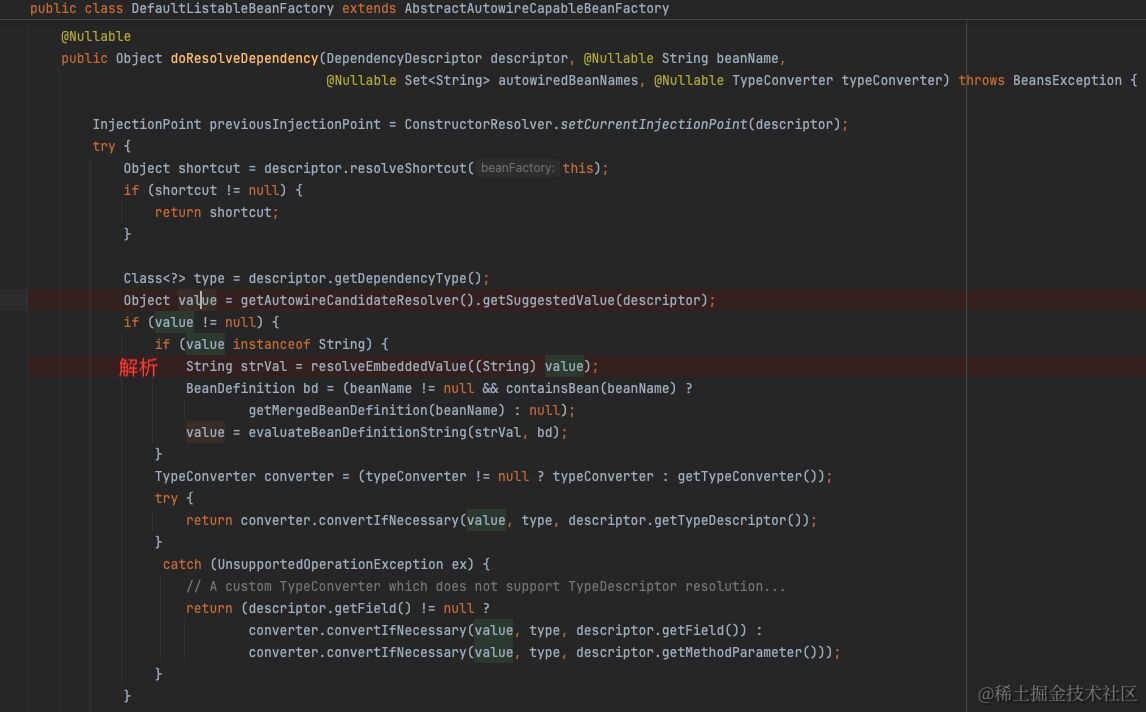
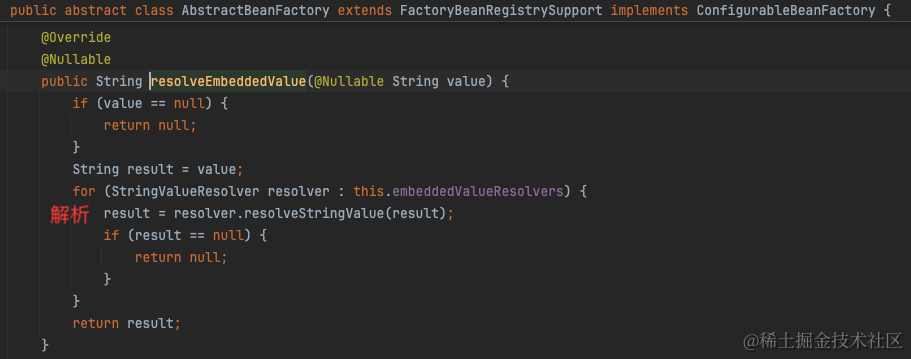
2.1 @Value 原理
简单来说,就是在构建bean的时候,在处理自动注入时,解析@Value的占位符之后,从所有PropertySource中找到配置值。
详见https://juejin.cn/post/7043315611744600094
2.2 @ConfigurationProperties
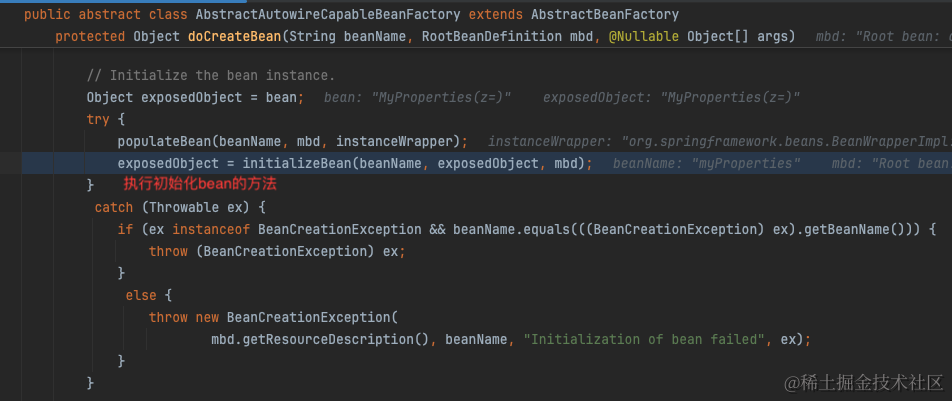
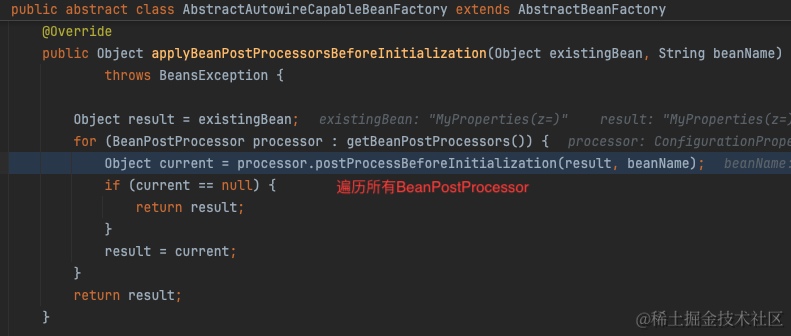
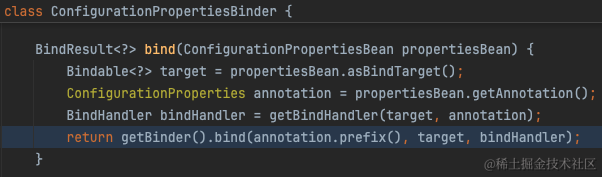
简单来说,在创建标注了@ConfigurationProperties的bean之后,会遍历所有BeanPostProcessor执行postProcessBeforeInitialization方法。BeanPostProcessor有一个实现类ConfigurationPropertiesBindingPostProcessor专门负责将配置值绑定到bean上。
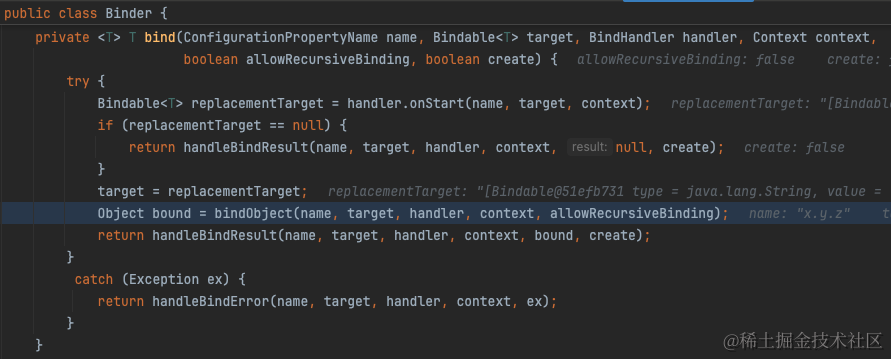
绑定的逻辑也就是从PropertySource中取出配置值,随后设置到bean的字段上。详见org.springframework.boot.context.properties.bind.Binder
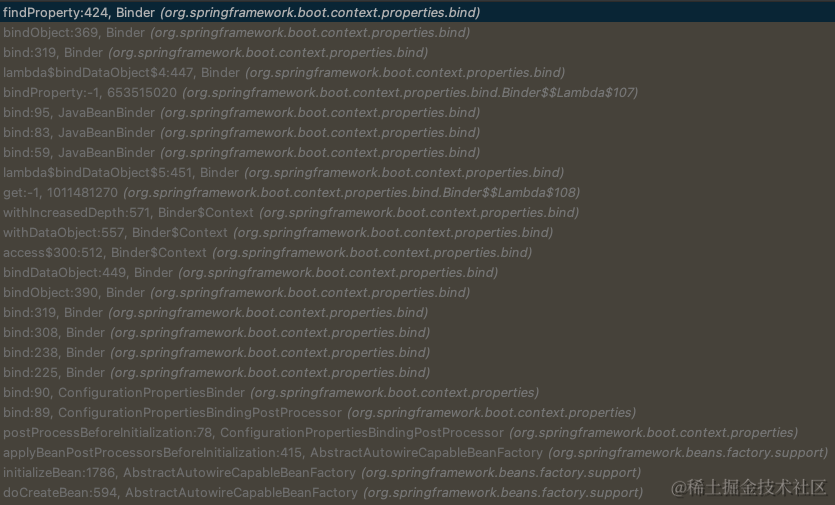

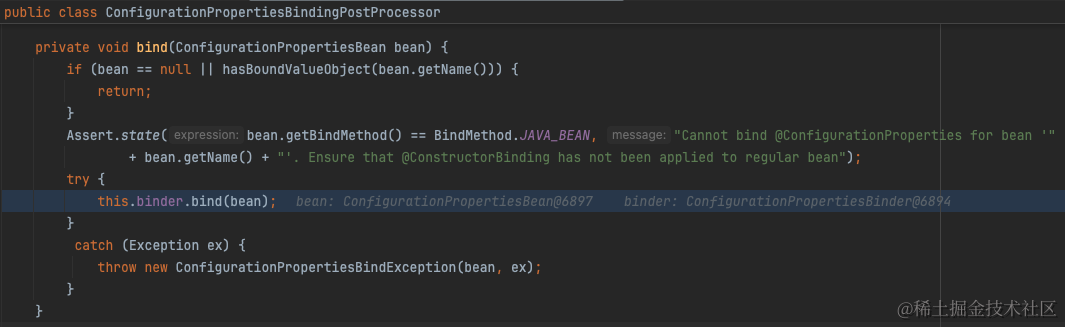

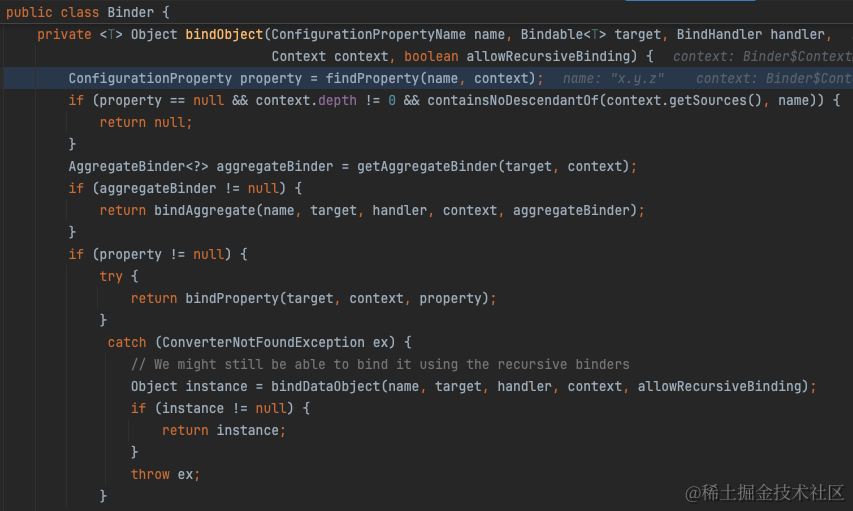
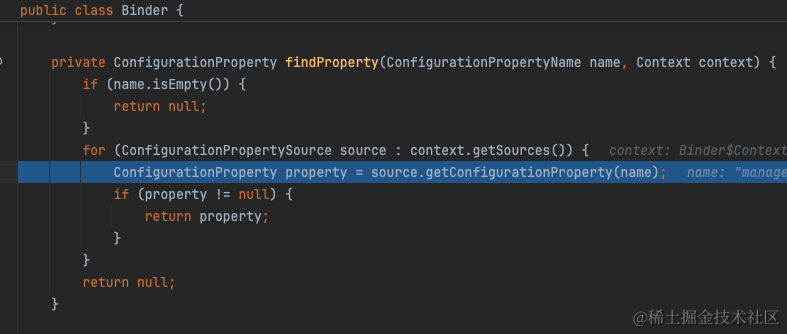
从org.springframework.boot.context.properties.bind.Binder#findProperty我们可以看出实际上就是从ConfigurationPropertySource中取出配置值。
四、配置热更新的实践
考虑到Apollo是比较常见的配置中心,我们将以Apollo为例介绍如何实现热更新的Spring应用的配置的。
1. @Value
apollo-client 默认支持热更新 @Value的字段值,无需额外配置或开发。
原理可见 com.ctrip.framework.apollo.spring.property.AutoUpdateConfigChangeListener
Apollo 上更新配置之后,AutoUpdateConfigChangeListener会收到消息,随后从消息中拿出被修改的key,重新查询最新的值,通过反射对字段值进行重新设置。
public class AutoUpdateConfigChangeListener implements ConfigChangeListener{
  @Override
  public void onChange(ConfigChangeEvent changeEvent) {
    // 获取所有修改的key
    Set<String> keys = changeEvent.changedKeys();
    if (CollectionUtils.isEmpty(keys)) {
      return;
    }
    for (String key : keys) {
      // 查出key对应的SpringValue,SpringValue存储
      Collection<SpringValue> targetValues = springValueRegistry.get(beanFactory, key);
      if (targetValues == null || targetValues.isEmpty()) {
        continue;
      }

      // 通过反射更新值
      for (SpringValue val : targetValues) {
        updateSpringValue(val);
      }
    }
  }

  private void updateSpringValue(SpringValue springValue) {
    try {
      // 查出最新的值,若有需要对值进行转换
      Object value = resolvePropertyValue(springValue);
      // 通过反射更新
      springValue.update(value);

      logger.info("Auto update apollo changed value successfully, new value: {}, {}", value,
          springValue);
    } catch (Throwable ex) {
      logger.error("Auto update apollo changed value failed, {}", springValue.toString(), ex);
    }
  }

    private Object resolvePropertyValue(SpringValue springValue) {
    // value will never be null, as @Value and @ApolloJsonValue will not allow that
    Object value = placeholderHelper
        .resolvePropertyValue(beanFactory, springValue.getBeanName(), springValue.getPlaceholder());

    if (springValue.isJson()) {
      value = parseJsonValue((String)value, springValue.getGenericType());
    } else {
      if (springValue.isField()) {
        // org.springframework.beans.TypeConverter#convertIfNecessary(java.lang.Object, java.lang.Class, java.lang.reflect.Field) is available from Spring 3.2.0+
        if (typeConverterHasConvertIfNecessaryWithFieldParameter) {
          value = this.typeConverter
              .convertIfNecessary(value, springValue.getTargetType(), springValue.getField());
        } else {
          value = this.typeConverter.convertIfNecessary(value, springValue.getTargetType());
        }
      } else {
        value = this.typeConverter.convertIfNecessary(value, springValue.getTargetType(),
            springValue.getMethodParameter());
      }
    }

    return value;
  }
}
public class SpringValue {
 public void update(Object newVal) throws IllegalAccessException, InvocationTargetException {
    if (isField()) {
      injectField(newVal);
    } else {
      injectMethod(newVal);
    }
  }

  private void injectField(Object newVal) throws IllegalAccessException {
    Object bean = beanRef.get();
    if (bean == null) {
      return;
    }
    boolean accessible = field.isAccessible();
    field.setAccessible(true);
    field.set(bean, newVal);
    field.setAccessible(accessible);
  }

  private void injectMethod(Object newVal)
      throws InvocationTargetException, IllegalAccessException {
    Object bean = beanRef.get();
    if (bean == null) {
      return;
    }
    methodParameter.getMethod().invoke(bean, newVal);
  }
}
2. @ConfigurationProperties
@ConfigurationProperties默认是不能自动更新的,但是我们从上一小节可以看出,当Apollo配置更新的时候,会通知监听器ConfigChangeListener。我们可以通过自定义一个ConfigChangeListener,在出现配置更新的时候,触发@ConfigurationProperties bean的自动更新。
首先引入依赖,用于发布EnvironmentChangeEvent,以及发布EnvironmentChangeEvent之后自动更新@ConfigurationProperties的bean。
<dependency>
  <groupId>org.springframework.cloud</groupId>
  <artifactId>spring-cloud-context</artifactId>
</dependency>
之后,实现一个ConfigChangeListener,监听配置变更,发布事件EnvironmentChangeEvent,至此就可以实现ConfigurationProperties bean的热更新。
@Configuration
public class ConfigurationPropertiesLiveRefresher implements ConfigChangeListener, ApplicationRunner {

    @Autowired
    private ApplicationEventPublisher publisher;

    @Value("#{'${apollo.bootstrap.namespaces:}'.split(',')}")
    private List<String> namespaces;

    private static final Logger log = LoggerFactory.getLogger(ConfigurationPropertiesLiveRefresher.class);

    @Override
    public void run(ApplicationArguments args) {
      	// 启动时,注册监听器,将当前类注册进去
        for (String namespace : namespaces) {
            ConfigService.getConfig(namespace).addChangeListener(this);
            log.info("Successfully added config change listener to namespace {}", namespace);
        }
    }

    @Override
    public void onChange(ConfigChangeEvent changeEvent) {
      	// 当存在配置更新时,发布一个EnvironmentChangeEvent事件
        publisher.publishEvent(new EnvironmentChangeEvent(changeEvent.changedKeys()));
        log.info("Successfully changed config change event {}", changeEvent.changedKeys());
    }
}
我们可以通过源码分析一下EnvironmentChangeEvent触发更新的原理。
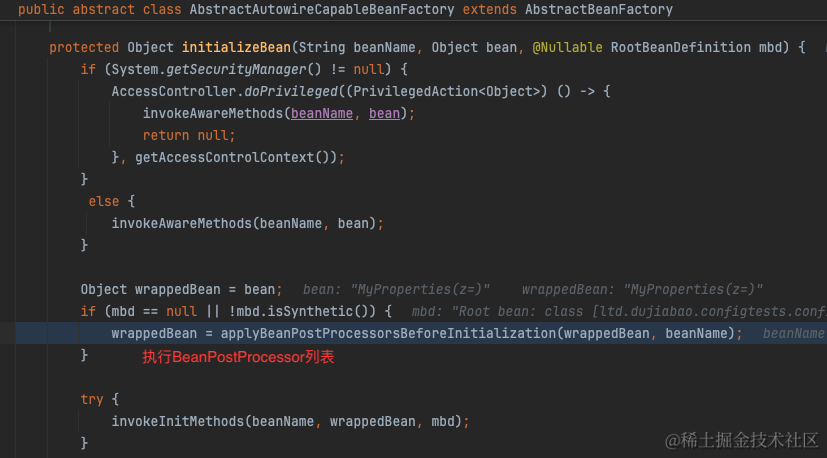
当发布事件EnvironmentChangeEvent之后,监听器ConfigurationPropertiesRebinder监听到事件之后,会触发bean到重新绑定。这样就实现了ConfigurationProperties bean的重新绑定。重新绑定里面会调用到方法initializeBean,这个方法又会走到刚刚2.2小节提到的配置绑定逻辑。
@Component
@ManagedResource
public class ConfigurationPropertiesRebinder
		implements ApplicationContextAware, ApplicationListener<EnvironmentChangeEvent> {
  // 所有ConfigurationPropertie的bean的容器
  private ConfigurationPropertiesBeans beans;

	@Override
	public void onApplicationEvent(EnvironmentChangeEvent event) {
		if (this.applicationContext.equals(event.getSource())
				|| event.getKeys().equals(event.getSource())) {
      // 重新绑定
			rebind();
		}
	}


	@ManagedOperation
	public void rebind() {
		this.errors.clear();
    // 遍历所有ConfigurationPropertie的bean,进行重新绑定
		for (String name : this.beans.getBeanNames()) {
			rebind(name);
		}
	}

	@ManagedOperation
	public boolean rebind(String name) {
		if (!this.beans.getBeanNames().contains(name)) {
			return false;
		}
		if (this.applicationContext != null) {
			try {
				Object bean = this.applicationContext.getBean(name);
				if (AopUtils.isAopProxy(bean)) {
					bean = ProxyUtils.getTargetObject(bean);
				}
				if (bean != null) {
          // 对bean执行销毁方法
					this.applicationContext.getAutowireCapableBeanFactory()
							.destroyBean(bean);
          // 对bean重新初始化
					this.applicationContext.getAutowireCapableBeanFactory()
							.initializeBean(bean, name);
					return true;
				}
			}
			catch (RuntimeException e) {
				this.errors.put(name, e);
				throw e;
			}
			catch (Exception e) {
				this.errors.put(name, e);
				throw new IllegalStateException("Cannot rebind to " + name, e);
			}
		}
		return false;
	}
}
public abstract class AbstractAutowireCapableBeanFactory extends AbstractBeanFactory
		implements AutowireCapableBeanFactory {

	@Override
	public Object initializeBean(Object existingBean, String beanName) {
		return initializeBean(beanName, existingBean, null);
	}

  protected Object initializeBean(String beanName, Object bean, @Nullable RootBeanDefinition mbd) {
		if (System.getSecurityManager() != null) {
			AccessController.doPrivileged((PrivilegedAction<Object>) () -> {
				invokeAwareMethods(beanName, bean);
				return null;
			}, getAccessControlContext());
		}
		else {
			invokeAwareMethods(beanName, bean);
		}

		Object wrappedBean = bean;
		if (mbd == null || !mbd.isSynthetic()) {
      // 这里!!又重新进入这个方法,对bean的值进行重新绑定!
			wrappedBean = applyBeanPostProcessorsBeforeInitialization(wrappedBean, beanName);
		}

		try {
			invokeInitMethods(beanName, wrappedBean, mbd);
		}
		catch (Throwable ex) {
			throw new BeanCreationException(
					(mbd != null ? mbd.getResourceDescription() : null),
					beanName, "Invocation of init method failed", ex);
		}
		if (mbd == null || !mbd.isSynthetic()) {
			wrappedBean = applyBeanPostProcessorsAfterInitialization(wrappedBean, beanName);
		}

		return wrappedBean;
	}
}
3. 依赖@ConfigurationProperties的bean更新
但是,还有另一个问题。有些bean的字段值是根据ConfigurationProperties bean的配置值而生成的。当Configuration bean的配置值更新之后,使用这个配置值的bean的字段也需要更新。
比如说MyPropertiesUsage依赖MyProperties的配置值z,生成自身的字段值myValue。
@Component
@ConfigurationProperties("x.y")
@Data
public class MyProperties {
    private String z = "";
}
@Data
@Component
public class MyPropertiesUsage {
    @Autowired
    private MyProperties myProperties;

    private String myValue;

    @PostConstruct
    public void init() {
        myValue = "my-" + myProperties.getZ();
    }
}
为了在更新MyProperties之后,触发MyPropertiesUsage的更新,主要有几个思路。
MyProperties添加初始化方法(比如实现接口InitializingBean、注解@PostConstruct指定),调用方法MyPropertiesUsage.init(),触发MyPropertiesUsage重新初始化。缺点是不够优雅,没有做到依赖反转,不够通用。MyProperties添加初始化方法(比如实现接口InitializingBean、注解@PostConstruct指定),调用发布自定义的事件MyPropertiesChangedEvent,MyPropertiesUsage监听事件MyPropertiesChangedEvent,重新执行初始化方法。缺点是不够通用,每次有相似的需求时,都需要进行额外的改造。- 自定义注解
RefreshAfterConfigurationPropertiesChanged,标注在需要在配置变化时更新的bean上。当监听到配置发生变化时,自动将所有标注了该注解的bean重新初始化。
第三个思路比较通用,并且开发成本也比较低。我们可以代码实现:
自定义注解RefreshAfterConfigurationPropertiesChanged
@Target(ElementType.TYPE)
@Retention(RetentionPolicy.RUNTIME)
@Documented
public @interface RefreshAfterConfigurationPropertiesChanged {
}
MyPropertiesUsage添加注解RefreshAfterConfigurationPropertiesChanged
@Data
@Component
@RefreshAfterConfigurationPropertiesChanged
public class MyPropertiesUsage {

    @Autowired
    private MyProperties myProperties;

    private String myValue;

    @PostConstruct
    public void init() {
        myValue = "my-" + myProperties.getZ();
    }
}
修改ConfigurationPropertiesLiveRefresher,添加方法refreshBeansDependsOnConfigurationProperties,在监听到配置变更事件,并且配置已重新绑定之后,对标注了ConfigurationPropertiesLiveRefresher对bean进行重新初始化。
@Configuration
public class ConfigurationPropertiesLiveRefresher implements ConfigChangeListener, ApplicationRunner, ApplicationContextAware {

    @Autowired
    private ApplicationEventPublisher publisher;

    @Value("#{'${apollo.bootstrap.namespaces:}'.split(',')}")
    private List<String> namespaces;

    @Autowired
    private ApplicationContext applicationContext;

    private static final Logger log = LoggerFactory.getLogger(ConfigurationPropertiesLiveRefresher.class);

    @Override
    public void run(ApplicationArguments args) {
        for (String namespace : namespaces) {
            ConfigService.getConfig(namespace).addChangeListener(this);
            log.info("Successfully added config change listener to namespace {}", namespace);
        }
    }

    @Override
    public void onChange(ConfigChangeEvent changeEvent) {
        publisher.publishEvent(new EnvironmentChangeEvent(changeEvent.changedKeys()));
        // 新增方法,刷新bean
        refreshBeansDependsOnConfigurationProperties();
        log.info("Successfully changed config change event {}", changeEvent.changedKeys());
    }

    private void refreshBeansDependsOnConfigurationProperties() {
      // 从容器中拿到所有标注了RefreshAfterConfigurationPropertiesChanged的bean
        Map<String, Object> beans = applicationContext.getBeansWithAnnotation(RefreshAfterConfigurationPropertiesChanged.class);
      // 对所有bean先进行销毁,再对bean进行初始化
        for (Map.Entry<String, Object> entry : beans.entrySet()) {
            this.applicationContext.getAutowireCapableBeanFactory()
                    .destroyBean(entry.getValue());
            this.applicationContext.getAutowireCapableBeanFactory()
                    .initializeBean(entry.getValue(), entry.getKey());
        }
    }

    @Override
    public void setApplicationContext(ApplicationContext applicationContext) throws BeansException {
        this.applicationContext = applicationContext;
    }
}
四、总结
本文在第二章中介绍了Spring配置的基本使用、第三章中介绍了Spring配置原理、第四章中介绍了日常开发中配置热更新的一些实践。
五、参考资料
- Spring Framework源码
- Apollo Client源码
- Spring Environment介绍
- Apollo 源码解析 —— 客户端配置 Spring 集成(一)之 XML 配置
- 自定义EnvironmentPostProcessor