mouceMice智能垃圾分类系统
1.成员名称和任务分配
| 成员 | 认领任务 |
|---|---|
| 陈曦 | 实现登录、注册、检索垃圾类型和前端部分实现、连接树莓派实现socket通信传输图片 |
| 杨雨佳 | 需求分析和总体进展监督 |
| 郑博文 | 部分前端页面实现及其优化 |
| 李睿 | 初步实现深度学习算法、树莓派连接和算法效率提升 |
| 范兴宇 | 项目测试 |
2、项目简介,涉及技术
自19年垃圾分类政策试行,全国从46个垃圾分类试点城市实行开始,垃圾分类就变成了城市生活中的该同志们的一个重要需求。垃圾分类有助于该同志们日常生活的清洁方便,同样也有助于垃圾回收的高效利用。但对于许多人来说,如何甄别垃圾类型并正确投放是一件比较困难的事情。在大城市生活的人们日常的时间精力已经被生活所压榨殆尽,没有更多的时间和意愿去系统的学习垃圾分类的专业知识。智能垃圾分类系统可以省去人们学习专业知识的时间,并尽可能减少人为误差,做到全民普及的垃圾精准分类识别。
涉及技术:
微服务框架及其中间键:springCloudAlibaba、spring、redis、nacos、ribbon、gateway
数据库:mysql、mybatis plus
机器学习:Pythoch、resnet18、随机森林
前端:HTML 、css、javaScript、Vue
树莓派:raspberry pi、socket
测试工具:postman、jmeter
3、本项目的git地址
https://github.com/xiudian7/LitterSortSystem
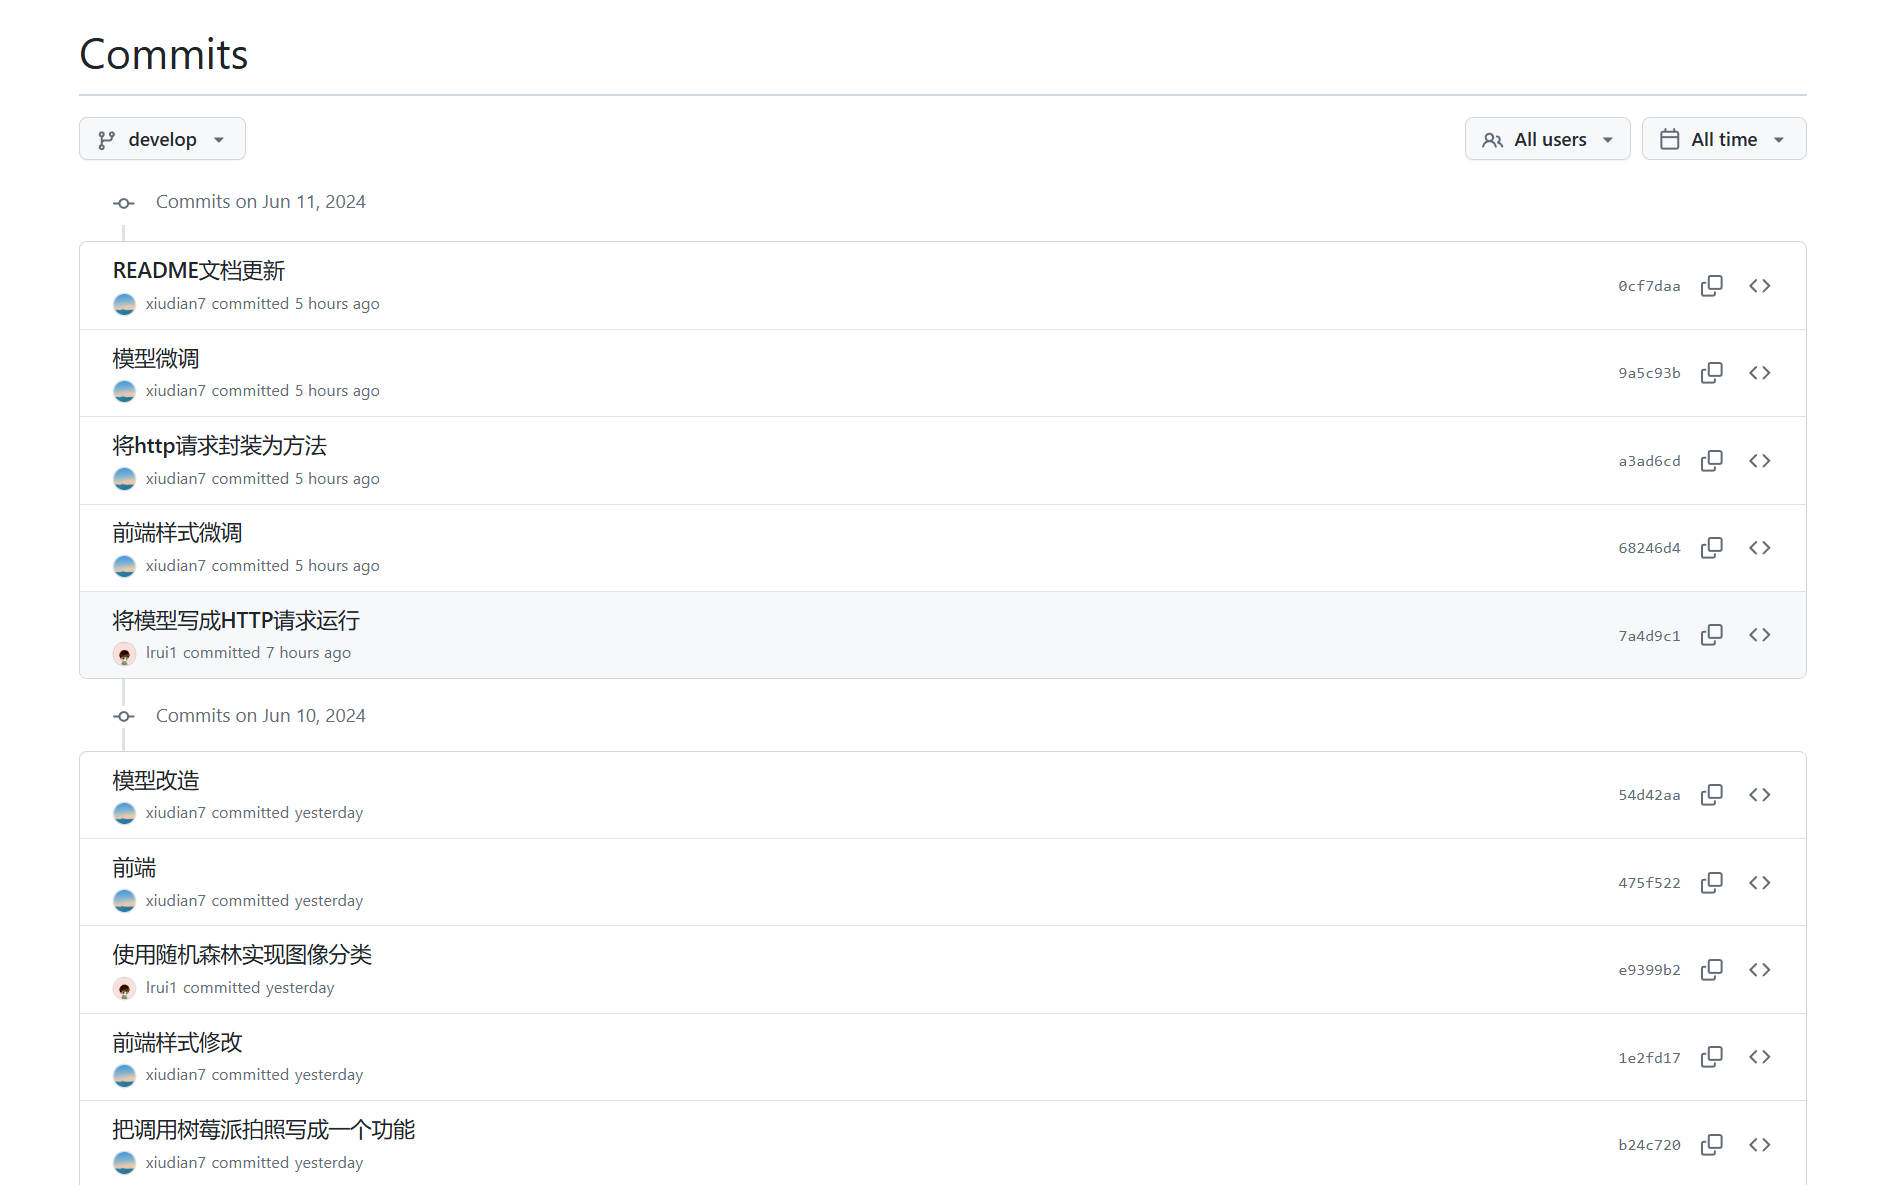
4、项目git提交记录截图

5、前期调查
5.1 功能需求
(1)数据收集:收集大量垃圾图像数据,并进行标记分类,建立训练所需的数据集。
(2)特征提取:使用图像处理技术提取垃圾图像的特征,如颜色、形状、纹理等,以便于机器学习模型识别。
(3)模型选择与训练:选择合适的机器学习模型,如卷积神经网络(CNN),进行训练以实现图像分类任务。
(4)模型优化与评估:通过交叉验证、超参数调优等方法优化模型性能,并使用测试集评估模型准确率和泛化能力。
(5)系统集成:将训练好的模型集成到垃圾分类系统中,实现实时监测和自动分类功能。
(6)用户界面设计:设计用户友好的界面,使用户可以轻松地与系统交互和操作。
5.2 限制条件
垃圾分类目前还停留在人工识别分类上,智能分类的普及度不高。
系统应该能够适应不同的屏幕大小和分辨率,以便用户在不同的设备上使用。
5.3 目标用户
垃圾分类智能监测的目标市场主要包括城市管理部门、垃圾处理企业和居民社区等。 垃圾分类智能监测系统的应用将帮助城市管理部门更加高效地监测和管理垃圾分类工作,提高垃圾分类的准确率和效率,从而解决垃圾问题,促进城市的可持续发展。 垃圾处理企业也是垃圾分类智能监测的重要用户。
6.项目代码结构图

本次的实验我们分为了几个模块来写,首先第一个模块是机器学习模型训练模块model_code,其次是后端微服务的模块,有sort_common、sort_gateway等等模块,最后是前端的模块sort_website
7.项目运行截图

树莓派拍摄图片:


8.项目关键代码分模块描述
8.1 前端模块
login.html
<!DOCTYPE html>
<html>

<head>
    <meta http-equiv="Content-Type" content="text/html; charset=UTF-8">
    <title>用户登录</title>
    <link href="/styles/base.css" rel="stylesheet" type="text/css">
    <link href="/styles/login.css" rel="stylesheet" type="text/css">
    <script src="/js/plugins/js-cookie/js.cookie.min.js"></script>
    <script src="/js/vue/md5.js"></script>
    <script src="/js/jquery/jquery.js"></script>
    <script src="/js/vue/common.js"></script>
    <script src="/js/vue/vue.min.js"></script>
</head>
<body>
<div class="wrapper"  id="app" v-cloak>
    <div class="container container-login">
        <a href="javascript:;" title="返回首页" class="logo">老鼠爱大米</a>
        <div class="signup-forms flip">
            <div class="login-box" id="_j_login_box">
                <div class="inner inner_v2 clearfix">
                    <div class="inner_v2_left">
                        <form id="_j_login_form" method="post" >
                            <div class="form-field">
                                <input name="username" type="text" placeholder="您的手机号" autocomplete="off"
                                       data-verification-name="帐号"  value="13700000000">
                                <div class="err-tip"></div>
                            </div>
                            <div class="form-field">
                                <input name="password" type="password" placeholder="您的密码" autocomplete="off" data-verification-name="密码"
                                       class="verification[required,minSize[4],maxSize[50]]" value="1111">
                                <div class="err-tip"></div>
                            </div>
                            <div class="form-link"><a href="javascript:;">忘记密码</a></div>
                            <div class="submit-btn">
                                <button @click="login" type="button">登 录</button>
                            </div>
                        </form>
                        <div class="connect">
                            <p class="hd">用合作网站账户直接登录</p>
                            <div class="bd">
                                <a href="javascript:;" class="weibo"><i></i>新浪微博</a>
                                <a href="javascript:;" class="qq"><i></i>QQ</a>
                                <a href="javascript:;" class="weixin"><i></i>微信</a>
                                <div class="clear"></div>
                            </div>
                        </div>                        </div>
                    <div class="inner_v2_right">
                        <img src="/images/xiudian.jpg">
                        <p>欢迎来到老鼠爱大米智能垃圾分类系统</p>
                    </div>
                </div>
                <div class="bottom-link">
                    还没有帐号?<a href="/regist.html">马上注册</a>
                </div>
            </div>
        </div>

    </div>
</div>
<div class="fullscreen-bg"
     style="background-image: url(images/34.jpg);">
    <img src="images/34.jpg" style="width: auto; height: 657px; margin-top: -213px;">
</div>
</body>
<script src="js/vue/system/userinfo/login.js"></script>
</html>
regist.html
<!DOCTYPE html>
<html>
<head>
    <meta http-equiv="Content-Type" content="text/html; charset=UTF-8">
    <title>用户注册</title>
    <link href="/styles/base.css" rel="stylesheet" type="text/css">
    <link href="/styles/regist.css" rel="stylesheet" type="text/css">
    <script type="text/javascript" src="/js/jquery/jquery.js"></script>
    <script src="/js/plugins/js-cookie/js.cookie.min.js"></script>
    <script type="text/javascript" src="/js/vue/common.js"></script>
    <script src="/js/vue/vue.min.js"></script>

</head>
<body>
<div class="wrapper"  id="app" v-cloak>
    <div class="container container-login">
        <a href="javascript:;" title="返回首页" class="logo">老鼠爱大米</a>
        <div class="signup-forms flip">
            <div class="login-box" id="_j_login_box">
                <div class="inner inner_v2 clearfix">
                    <div class="inner_v2_left">
                        <form id="_j_login_form" action="javascript:;">
                            <div class="form-field">
                                <input id="inputPhone" type="text" placeholder="您的手机号" autocomplete="off"  value="">
                                <div class="err-tip"></div>
                            </div>
                            <div class="submit-btn">
                                <button id="_js_loginBtn" @click="phoneCheck">立即注册</button>
                            </div>
                        </form>
                        <div class="agreement">
                            注册视为同意<a target="_blank" href="javascript:;">《老鼠爱大米用户使用协议》</a>
                        </div>
                        <div class="connect">
                            <p class="hd">用合作网站账户直接登录</p>
                            <div class="bd">
                                <a href="javascript:;" class="weibo"><i></i>新浪微博</a>
                                <a href="javascript:;" class="qq"><i></i>QQ</a>
                                <a href="javascript:;" class="weixin"><i></i>微信</a>
                                <div class="clear"></div>
                            </div>
                        </div>                        </div>
                    <div class="inner_v2_right">
                        <img src="/images/xiudian.jpg">
                        <p>我是老鼠爱吃大米</p>
                    </div>
                </div>
            </div>
            <div class="signup-box" style="display: none;">
                <div class="add-info">
                    <div class="hd">账号注册</div>
                    <form  method="post" id="editForm">
                        <input type="hidden" name="phone" value="" id="phone">
                        <div class="form-field m-t-10">
                            <input name="gender" type="text" placeholder="您的性别 0:男 1:女" >
                            <div class="err-tip"></div>
                        </div>
                        <div class="form-field">
                            <input name="password" type="password" placeholder="您的密码">
                            <div class="err-tip"></div>
                        </div>
                        <div class="form-field">
                            <input name="rpassword" type="password" placeholder="确认密码" >
                            <div class="err-tip"></div>
                        </div>

                        <div class="form-field">
                            <div class="clearfix">
                                <a href="#" class="vcode-send sms-code-send" @click="sendCode($event)">获取验证码</a>
                                <input name="verifyCode" type="text" placeholder="短信验证码" autocomplete="off"class="vcode-input">
                            </div>
                            <div class="err-tip clearfix"></div>
                        </div>
                        <div class="submit-btn">
                            <button type="button" @click="regist">立即注册</button>
                        </div>
                    </form>
                </div>
            </div>
        </div>
    </div>
</div>
<div class="fullscreen-bg"
     style="background-image: url('images/27.jpg');">
    <img src="images/27.jpg" style="width: auto; height: 657px; margin-top: -213px;">
</div>
</body>
<script src="js/vue/system/userinfo/regist.js"></script>
</html>
识别垃圾模块index.html
<!DOCTYPE html>
<html lang="en">
<head>
    <meta charset="UTF-8">
    <title>狼行天下</title>
    <link href="/styles/base.css" rel="stylesheet" type="text/css">
    <link href="/styles/index.css" rel="stylesheet" type="text/css">
    <link href="/js/plugins/jqPaginator/jqPagination.css" rel="stylesheet" type="text/css">
    <script type="text/javascript" src="/js/jquery/jquery.js"></script>
    <script type="text/javascript" src="/js/plugins/jquery-form/jquery.form.js"></script>
    <script type="text/javascript" src="/js/plugins/jqPaginator/jq-paginator.min.js"></script>
    <script src="/js/vue/md5.js"></script>
    <script src="/js/plugins/js-cookie/js.cookie.min.js"></script>
    <script type="text/javascript" src="/js/vue/common.js"></script>
    <script type="text/javascript" src="/js/system/index/index.js"></script>
    <script src="./js/vue/vue.min.js"></script>
    <script src="/js/vue/system/index/index.js"></script>
    <style>
        button {
            margin: 20px;
        }
        .frame{
            height: 100vh;
            width: 100%;
            justify-content: center;
            display: flex;
            align-items: center;
        }
        .custom-btn {
            width: 200px;
            height: 100px;
            color: #fff;
            border-radius: 5px;
            padding: 10px 25px;
            font-family: 'Lato', sans-serif;
            font-weight: 1000;
            font-size: large;
            background: transparent;
            cursor: pointer;
            transition: all 0.3s ease;
            position: relative;
            display: inline-block;
            box-shadow: inset 2px 2px 2px 0px rgba(255, 255, 255, .5),
            7px 7px 20px 0px rgba(0, 0, 0, .1),
            4px 4px 5px 0px rgba(0, 0, 0, .1);
            outline: none;
        }
        /* 9 */
        .btn-9 {
            border: none;
            transition: all 0.3s ease;
            overflow: hidden;
            margin: 0 auto;
        }

        .btn-9:after {
            position: absolute;
            content: " ";
            z-index: -1;
            top: 0;
            left: 0;
            width: 100%;
            height: 100%;
            background-color: #1fd1f9;
            background-image: linear-gradient(315deg, #1fd1f9 0%, #b621fe 74%);
            transition: all 0.3s ease;
        }

        .btn-9:hover {
            background: transparent;
            box-shadow: 4px 4px 6px 0 rgba(255, 255, 255, .5),
            -4px -4px 6px 0 rgba(116, 125, 136, .2),
            inset -4px -4px 6px 0 rgba(255, 255, 255, .5),
            inset 4px 4px 6px 0 rgba(116, 125, 136, .3);
            color: #fff;
        }

        .btn-9:hover:after {
            -webkit-transform: scale(2) rotate(180deg);
            transform: scale(2) rotate(180deg);
            box-shadow: 4px 4px 6px 0 rgba(255, 255, 255, .5),
            -4px -4px 6px 0 rgba(116, 125, 136, .2),
            inset -4px -4px 6px 0 rgba(255, 255, 255, .5),
            inset 4px 4px 6px 0 rgba(116, 125, 136, .3);
        }
    .loading {
        width: 100px;
        height: 100px;
        background: url("../images/loading.png") no-repeat;
        background-size: 100% 100%;
        display: none;
        animation: rotating 3s infinite linear;
    }
        @keyframes rotating {
            0% {
                transform: rotate(0deg) /*动画起始位置为旋转0度*/
            }

            to {
                transform: rotate(1turn) /*动画结束位置为旋转1圈*/
            }
        }

    </style>
</head>
<body>
<div id="navbar">
    <!--导航栏-->
    <script>
        var currentNav = "index";
        $('#navbar').load('/views/common/navbar.html');
    </script>
</div>

<div class="frame">
    <button class="custom-btn btn-9" @click="identifyClick">点我分类!</button>
    <div class="loading"></div>
</div>

</body>
<!--<script src="./js/vue/system/index/index.js"></script>-->
<script>
    $('.btn-9').click(function (){
        console.log(1111)
        console.log('执行click')
        const formData = new FormData()
        $('.btn-9').hide()
        $('.loading').show()
        console.log('user', user)
        formData.append('token', token)
        formData.append('user', JSON.stringify(user))
        fetch("http://localhost:8082/functions/identify", {
            method: "POST",
            headers:{
                "token":getToken()
            },
            body: formData
        })
            .then(response => {
                $('.btn-9').show()
                $('.loading').hide()
                if (!response.ok) {
                    throw new Error('网络错误,请稍后再试!');
                }
                return response.json(); // 解析后端返回的JSON数据
            })
            .then(data => {
                // 输出后端返回的data值
                if(data.code == 200){
                    console.log('后端返回的data值:', data);
                    popup("垃圾类型为:"+data.data)
                }
                else{
                    popup(data.msg)
                }

            });
    })
</script>
</html>
8.2 后端代码模块
8.2.1 鉴定模块
public String identify() {
        String substring = UUID.randomUUID().toString().substring(0, 6);
        String imagePath="D:\\CodePractice\\litter_sort_system\\model_code\\images\\"+substring+".jpg";
        takePhoto(imagePath);
        int res=sendIdentifyMsg("images/"+substring+".jpg");
        //int i = identifyResult(substring+".jpg");
        //数字标识:class_labels = ["glass", "paper", "cardboard", "plastic", "metal", "trash"]
        String []information={"玻璃","纸张","纸皮","塑料","金属","废料"};
        System.out.println(information[res]);
        return information[res];
    }
8.2.2 请求连接树莓派,并且拍照
public void takePhoto(String filePath) {
        // 配置连接参数
        final String ip = "192.168.60.193";
        final int port = 4567;
        // 获取当前工作目录
        String workingDirectory = System.getProperty("user.dir");
        // 打印工作目录
        System.out.println("当前工作目录: " + workingDirectory);
        // 创建文件并加载流
        File file = new File(filePath);
        if(!file.exists()) {
            try {
                if (file.createNewFile()) {
                    System.out.println("文件已创建: " + filePath);
                } else {
                    System.out.println("文件创建失败: " + filePath);
                }
            } catch (IOException e) {
                throw new RuntimeException(e);
            }
        }
        try(Socket socket = new Socket(ip, port);
            FileOutputStream fos=new FileOutputStream(filePath)
        ) {
            System.out.println("已连接到服务器端口,准备接收图片...");

            InputStream inputStream = socket.getInputStream();
            // 定义缓存数组,每次只读1024字节
            byte[] buf = new byte[1024];
            int len = 0;
            while((len = inputStream.read(buf)) != -1) {
                fos.write(buf, 0, len);
            }

        } catch (IOException e) {
            throw new RuntimeException(e);
        }
    }
8.2.3 树莓派socketServer
package edu.jmu;

import java.io.BufferedOutputStream;
import java.io.FileInputStream;
import java.io.IOException;
import java.net.ServerSocket;
import java.net.Socket;
import java.util.UUID;
import java.util.concurrent.*;

public class SocketServer {
    // 配置连接参数
    public final static int port = 4567;

    // 执行拍照,返回图片路径
    public static String getPhoto() throws IOException, InterruptedException {
        String substring = UUID.randomUUID().toString().substring(0, 6);
        Process process = Runtime.getRuntime().exec("ffmpeg -i /dev/video0 -frames:v 1 -f image2 "+substring+".jpg");
        process.waitFor(); //等待拍照完成
        return "/home/xiudian/mouseMice/"+substring+".jpg";
    }

    // 发送图片
    public static void send(Socket socket, String filePath) throws IOException {
        // 加载图片
        FileInputStream fis = new FileInputStream(filePath);
        // 获取自己的输出流
        BufferedOutputStream bufferedOutputStream = new BufferedOutputStream(socket.getOutputStream());
        // 设置缓存数组
        byte[] buf = new byte[1024];
        int len = 0;
        // 发送图片
        while ((len = fis.read(buf)) != -1) {
            bufferedOutputStream.write(buf, 0, len);
        }
        // 通知, 数据发送完毕
        bufferedOutputStream.flush();
        // 关闭资源
        socket.shutdownOutput();
        bufferedOutputStream.close();
    }

    public static void main(String[] args) throws IOException {
        ExecutorService executorService = new ThreadPoolExecutor(5, 10, 5, TimeUnit.SECONDS,
                new ArrayBlockingQueue<>(5, true),
                Executors.defaultThreadFactory());

        ServerSocket server = null;
        try {
            server = new ServerSocket(port);
            System.out.println("服务器启动成功");
            Socket socket = null;
            int count = 0; // 统计客户端的数量
            while (true) {
                socket = server.accept();
                count++;
                String clientIp = socket.getInetAddress().getHostAddress();
                System.out.println("第 " + count + " 个客户端成功连接,IP 地址: " + clientIp);
                final Socket clientSocket = socket;
                executorService.execute(() -> {
                    try {
                        String filePath = getPhoto();
                        send(clientSocket, filePath);
                        clientSocket.close(); //关闭Socket
                    } catch (IOException | InterruptedException e) {
                        throw new RuntimeException(e);
                    }
                });
            }

        } catch (IOException e) {
            throw new RuntimeException(e);
        } finally {
            if (server != null) {
                server.close(); //关闭ServerSocket
            }
        }
    }
}
8.2.4 调用http请求,请求使用python封装的识别垃圾的代码
 public int sendIdentifyMsg(String path) {
        int prediction = -1;
        try {

            // 创建 URL 对象
            URL url = new URL("http://localhost:5000");

            // 打开连接
            HttpURLConnection connection = (HttpURLConnection) url.openConnection();

            // 设置请求方法为 POST
            connection.setRequestMethod("POST");

            // 设置请求头
            connection.setRequestProperty("Content-Type", "application/json; utf-8");
            connection.setRequestProperty("Accept", "application/json");

            // 允许写入
            connection.setDoOutput(true);

            // 创建 JSON 请求体
            String jsonInputString = String.format("{\"imagePath\": \"%s\"}", path);

            // 将请求体写入到连接的输出流中
            try (OutputStream os = connection.getOutputStream()) {
                byte[] input = jsonInputString.getBytes("utf-8");
                os.write(input, 0, input.length);
            }

            // 获取响应码
            int code = connection.getResponseCode();
            System.out.println("Response Code: " + code);

            // 读取响应内容
            StringBuilder response = new StringBuilder();
            try (BufferedReader br = new BufferedReader(new InputStreamReader(connection.getInputStream(), "utf-8"))) {
                String responseLine;
                while ((responseLine = br.readLine()) != null) {
                    response.append(responseLine.trim());
                }
            }

            // 解析 JSON 响应
            JSONObject jsonResponse = JSON.parseObject(response.toString());
            prediction = jsonResponse.getIntValue("prediction");
            System.out.println(prediction);

        } catch (Exception e) {
            e.printStackTrace();
        }
        return prediction;
    }
这一步是提升运行效率的关键一步,在alpha阶段我们使用jpython使用java调用python的代码,每次调用代码的时候都得重新启动,效率极低,一次的鉴定结果大概需要4-5s,而这次我们将python代码直接打包成一个web服务,我们直接使用http端口请求,时间大概为1-2s,效率大幅提升。
8.2.5 训练模型
使用Resnet18提取图像特征,随机森林作为分类器
model = models.resnet50(pretrained=True)
feature_extractor = FeatureExtractor(model)
feature_extractor.eval()

# 使用GPU
device = torch.device('cuda' if torch.cuda.is_available() else 'cpu')
feature_extractor = feature_extractor.to(device)

print("特征提取器加载完成")

# 将数据集加载到特征提取器中
def extract_features(data_loader):
    features = []
    labels = []
    with torch.no_grad():
        for images, label in data_loader:
            images = images.to(device)
            output = feature_extractor(images)
            features.append(output.cpu().numpy())
            labels.append(label.numpy())
    features = np.vstack(features)
    labels = np.concatenate(labels)
    return features, labels

# 定义训练和验证函数
def train_and_evaluate(epochs):
    best_val_accuracy = 0.0
    for epoch in range(epochs):
        print(f"Epoch {epoch + 1}/{epochs}")

        # 提取训练、验证和测试集的特征
        print("开始提取训练集特征...")
        train_features, train_labels = extract_features(train_loader)
        print("训练集特征提取完成")

        print("开始提取验证集特征...")
        val_features, val_labels = extract_features(val_loader)
        print("验证集特征提取完成")

        print("开始提取测试集特征...")
        test_features, test_labels = extract_features(test_loader)
        print("测试集特征提取完成")

        # 训练随机森林分类器
        print("开始训练随机森林分类器...")
        random_forest = RandomForestClassifier(n_estimators=100)
        random_forest.fit(train_features, train_labels)
        print("随机森林分类器训练完成")

        # 验证随机森林分类器
        print("开始验证随机森林分类器...")
        val_preds_rf = random_forest.predict(val_features)
        val_accuracy_rf = accuracy_score(val_labels, val_preds_rf)
        print(f"随机森林验证集准确率: {val_accuracy_rf * 100:.2f}%")

        if val_accuracy_rf > best_val_accuracy:
            best_val_accuracy = val_accuracy_rf
            best_random_forest = random_forest

    # 保存最好的随机森林分类器
    joblib.dump(best_random_forest, 'best_random_forest.pkl')
    print("最好的随机森林分类器已保存")

    # 测试最好的随机森林分类器
    print("开始测试最好的随机森林分类器...")
    test_preds_rf = best_random_forest.predict(test_features)
    test_accuracy_rf = accuracy_score(test_labels, test_preds_rf)
    print(f"随机森林测试集准确率: {test_accuracy_rf * 100:.2f}%")

# 训练和评估模型
epochs = 5
train_and_evaluate(epochs)
8.2.6 将模型通过HTTP提供服务
这是python的Web服务端,客户端在8.2.4有请求示例
import torch
import torch.nn as nn
from torchvision import transforms, models
from PIL import Image
import joblib
from flask import Flask, request, jsonify

torch.hub.set_dir('./modelCache')
# 定义特征提取器
class FeatureExtractor(nn.Module):
    def __init__(self, model):
        super(FeatureExtractor, self).__init__()
        self.features = nn.Sequential(*list(model.children())[:-1])

    def forward(self, x):
        x = self.features(x)
        x = torch.flatten(x, 1)
        return x


model = models.resnet50(pretrained=True)
feature_extractor = FeatureExtractor(model)
feature_extractor.eval()

# 使用GPU
device = torch.device('cuda' if torch.cuda.is_available() else 'cpu')
feature_extractor = feature_extractor.to(device)

# print("特征提取器加载完成")

# 数据转换
transform = transforms.Compose([
    transforms.Resize((512, 384)),
    transforms.ToTensor(),
])

# 加载保存的模型
random_forest = joblib.load('best_random_forest.pkl')

# print("模型加载完成")

def classify_image(image_path, model):
    image = Image.open(image_path)
    image = transform(image)
    image = image.unsqueeze(0).to(device)

    with torch.no_grad():
        feature = feature_extractor(image).cpu().numpy()

    prediction = model.predict(feature)
    return prediction[0]


# 创建Flask应用
app = Flask(__name__)


@app.route('/', methods=['POST'])
def classify():
    data = request.json
    if 'imagePath' not in data:
        return jsonify({'error': 'No imagePath provided'}), 400

    imagePath = data['imagePath']
    try:
        prediction = classify_image(imagePath, random_forest)
        return jsonify({'prediction': int(prediction)}), 200
    except Exception as e:
        return jsonify({'error': str(e)}), 500

if __name__ == '__main__':
    app.run(host='0.0.0.0', port=5000)
9.项目测试
| 步骤编号 | 测试步骤 | 预测结果 | 测试结果 |
|---|---|---|---|
| LitterSort-1 | 登录账号为空 | 提示账号为空 | Pass |
| LitterSort-2 | 登录账号格式错误 | 提示格式错误 | Pass |
| LitterSort-3 | 登录密码为空 | 提示密码为空 | Pass |
| LitterSort-4 | 登录密码错误 | 提示密码错误 | Pass |
| LitterSort-5 | 登入账号密码正确 | 提示账号密码正确并跳转 | Pass |
| LitterSort-6 | 未登录上传图片鉴别 | 提示请先登录 | Pass |
| LitterSort-7 | 上传图片鉴别结果 | 输出垃圾类型 | Pass |
| LitterSort-8 | 照片中有些杂物 | 准确识别 | Fail |
| LitterSort-9 | 鉴定代码 | 后端控制台返回正确结果 | Pass |
| LitterSort-10 | 页面正确显示 | 点击每个按键有回应 | Pass |
| LitterSort-11 | 页面参数正确传送到后台 | 后台正确接受参数 | Pass |
| LitterSort-12 | 账号已经被注册 | 提示账号已经被注册 | Pass |
| LitterSort-13 | 发送验证码 | 正确发送验证码并给出提示 | Pass |
| LitterSort-14 | 注册账号格式错误 | 提示账号格式错误 | Pass |
| LitterSort-15 | 注册时两次密码不一致 | 提示两次密码不一致 | Pass |
| LitterSort-16 | 正确填写信息 | 注册成功数据库添加代码并且跳转登录界面 | Pass |
| LitterSort-17 | 使用拍照功能进行图片识别输出 | 输出垃圾类型 | Pass |
对鉴定垃圾模块进行压力测试(点击50次,间隔1ms)

10.项目总结
从我们的调查结果和使用反馈来看,我们的系统做的还是相对比较成功的,识别垃圾的准确率能达到80%左右,在这个项目中,我们使用一些目前比较流行的中间键和主流的框架,也基本达到了项目代码简洁和注释清楚的要求。用户也对我们的系统提出了挺多的意见,虽然我们的识别速度相对于alpha阶段已经有了很大的提升,从4-5s的识别时间提升到了1-2s,但是用户对于这些时间还是比较敏感的,所以我们后续还得继续对机器学习的准确度和效率进行改进提升,当然当我们所拍摄的图片中有一些杂物的话,系统还是不能很准确的显示出垃圾类型,也需要进行改进。


