文章目录
- 前⾔
- 背景
- 技术⽅案
- Sentry私有化部署
- 部署
- 环境准备
- 项目集成
- 前端
- 后端
- agent探针集成
- sentry sdk集成
- 增强探针为⽇志注⼊TraceID
- 异常处理
- SDK⾃定义开发
- sentry sdk⾃定义开发
- ⾃定义SentryEvent注⼊otel追踪信息
- ⾃定义全局异常上报issue事件
- 新增动态过滤功能
- Java Agent Extension⾃定义扩展
- 参考⽂档
前⾔
在微服务架构中,“可观测性” 是微服务得以稳健运行的至关重要一环。在生产环境若缺乏良好的观测性工具和方法,就好比高空的⻜机在没有仪表板的情况下⻜行一样,两眼一抹黑,充满不确定性因素和未知⻛险,无法及时发现、定位、转移和修复错误。
业界通常将可观测性大致分为三大类:Metrics,Tracing 和 Logging。通常来说 Metrics 监控侧重于技术指标的收集与观测,如服务调用 QPS、响应时间、错误率和资源使用率;Logging 侧重于运行日志的采集、存储与检索;而Tracing则偏向于调用链的串联、追踪与APM分析。
Metrics比较火的方案就是Prometheus+Grafana,思路就是通过应用内埋入SDK,选择Pull或者Push的方式将数据收集到prometheus中,然后通过Grafana实现可视化。
Tracing也并不是可观测性提出后才诞生的概念,在微服务化的进程中就已经有Google的Dapper落地实践,并慢慢形成OpenTracing规范,这一规范又被多家第三方框架所支持,如Jaeger、Zipkin、skywalking等。
OpenTelemetry就是结合了OpenTracing + OpenCensus规范,约定并提供完成的可观测性套件。
背景
项目之前惯⽤的链路追踪组件是skywalking,skywalking针对服务端链路追踪⾮常⽅便,开箱即⽤,提供丰富UI,但是skywalking的⽅案对浏览器侧和app侧⽀持不完善,⽽恰好项⽬有这⽅⾯的需求。经过调研OpenTelemetry +Sentry整合的⽅案可以满⾜前后端服务的“可观测性”⽅案:
- OpenTelemetry专注数据采集,兼容OpenTracing和OpenCensus规范,提供数据采集和标准规范的统⼀,实现Metrics、Tracing、Logging的融合及⼤⼀统。同时开放的Collector设计,⽀持多种Vendor(Jaeger/Skywalking/Grafana/Sentry/Zipkin等等),更加灵活。
- Sentry更加专注前端⻚⾯采集(⻚⾯加载/路径/⽇志),包括⻚⾯异常数据;主要根据在于它独有的链路采集概念。⽀持Node.js、apple、android等等。
技术⽅案
使⽤Sentry+OpenTelemetry前后端全链路打通:
- 前端借助sentry sdk完成前端(浏览器、安卓、ios、node服务)指标数据采集,并通过header传递追踪信息到后端。
- 后端通过sentry-opentelemetry-agent+ Sentry SDK⽅案,sentry-opentelemetry-agent以⽆侵⼊⽅式按照otel标准采集应⽤指标数据,Sentry SDK采集应⽤issue数据。
整体架构如下:

Sentry私有化部署
Sentry的管理后台是基于Python Django开发的。这个管理后台由背后的Postgres数据库(管理后台默认的数据库,后续会以Postgres代指管理后台数据库并进⾏分享)、ClickHouse(存数据特征的
数据库)、relay、kafka、redis等⼀些基础服务或由Sentry官⽅维护的总共23个服务⽀撑运⾏。
在部署服务前,我们应该先对sentry整体架构和服务依赖有⼀定了解,⻅官⽅⽂档。
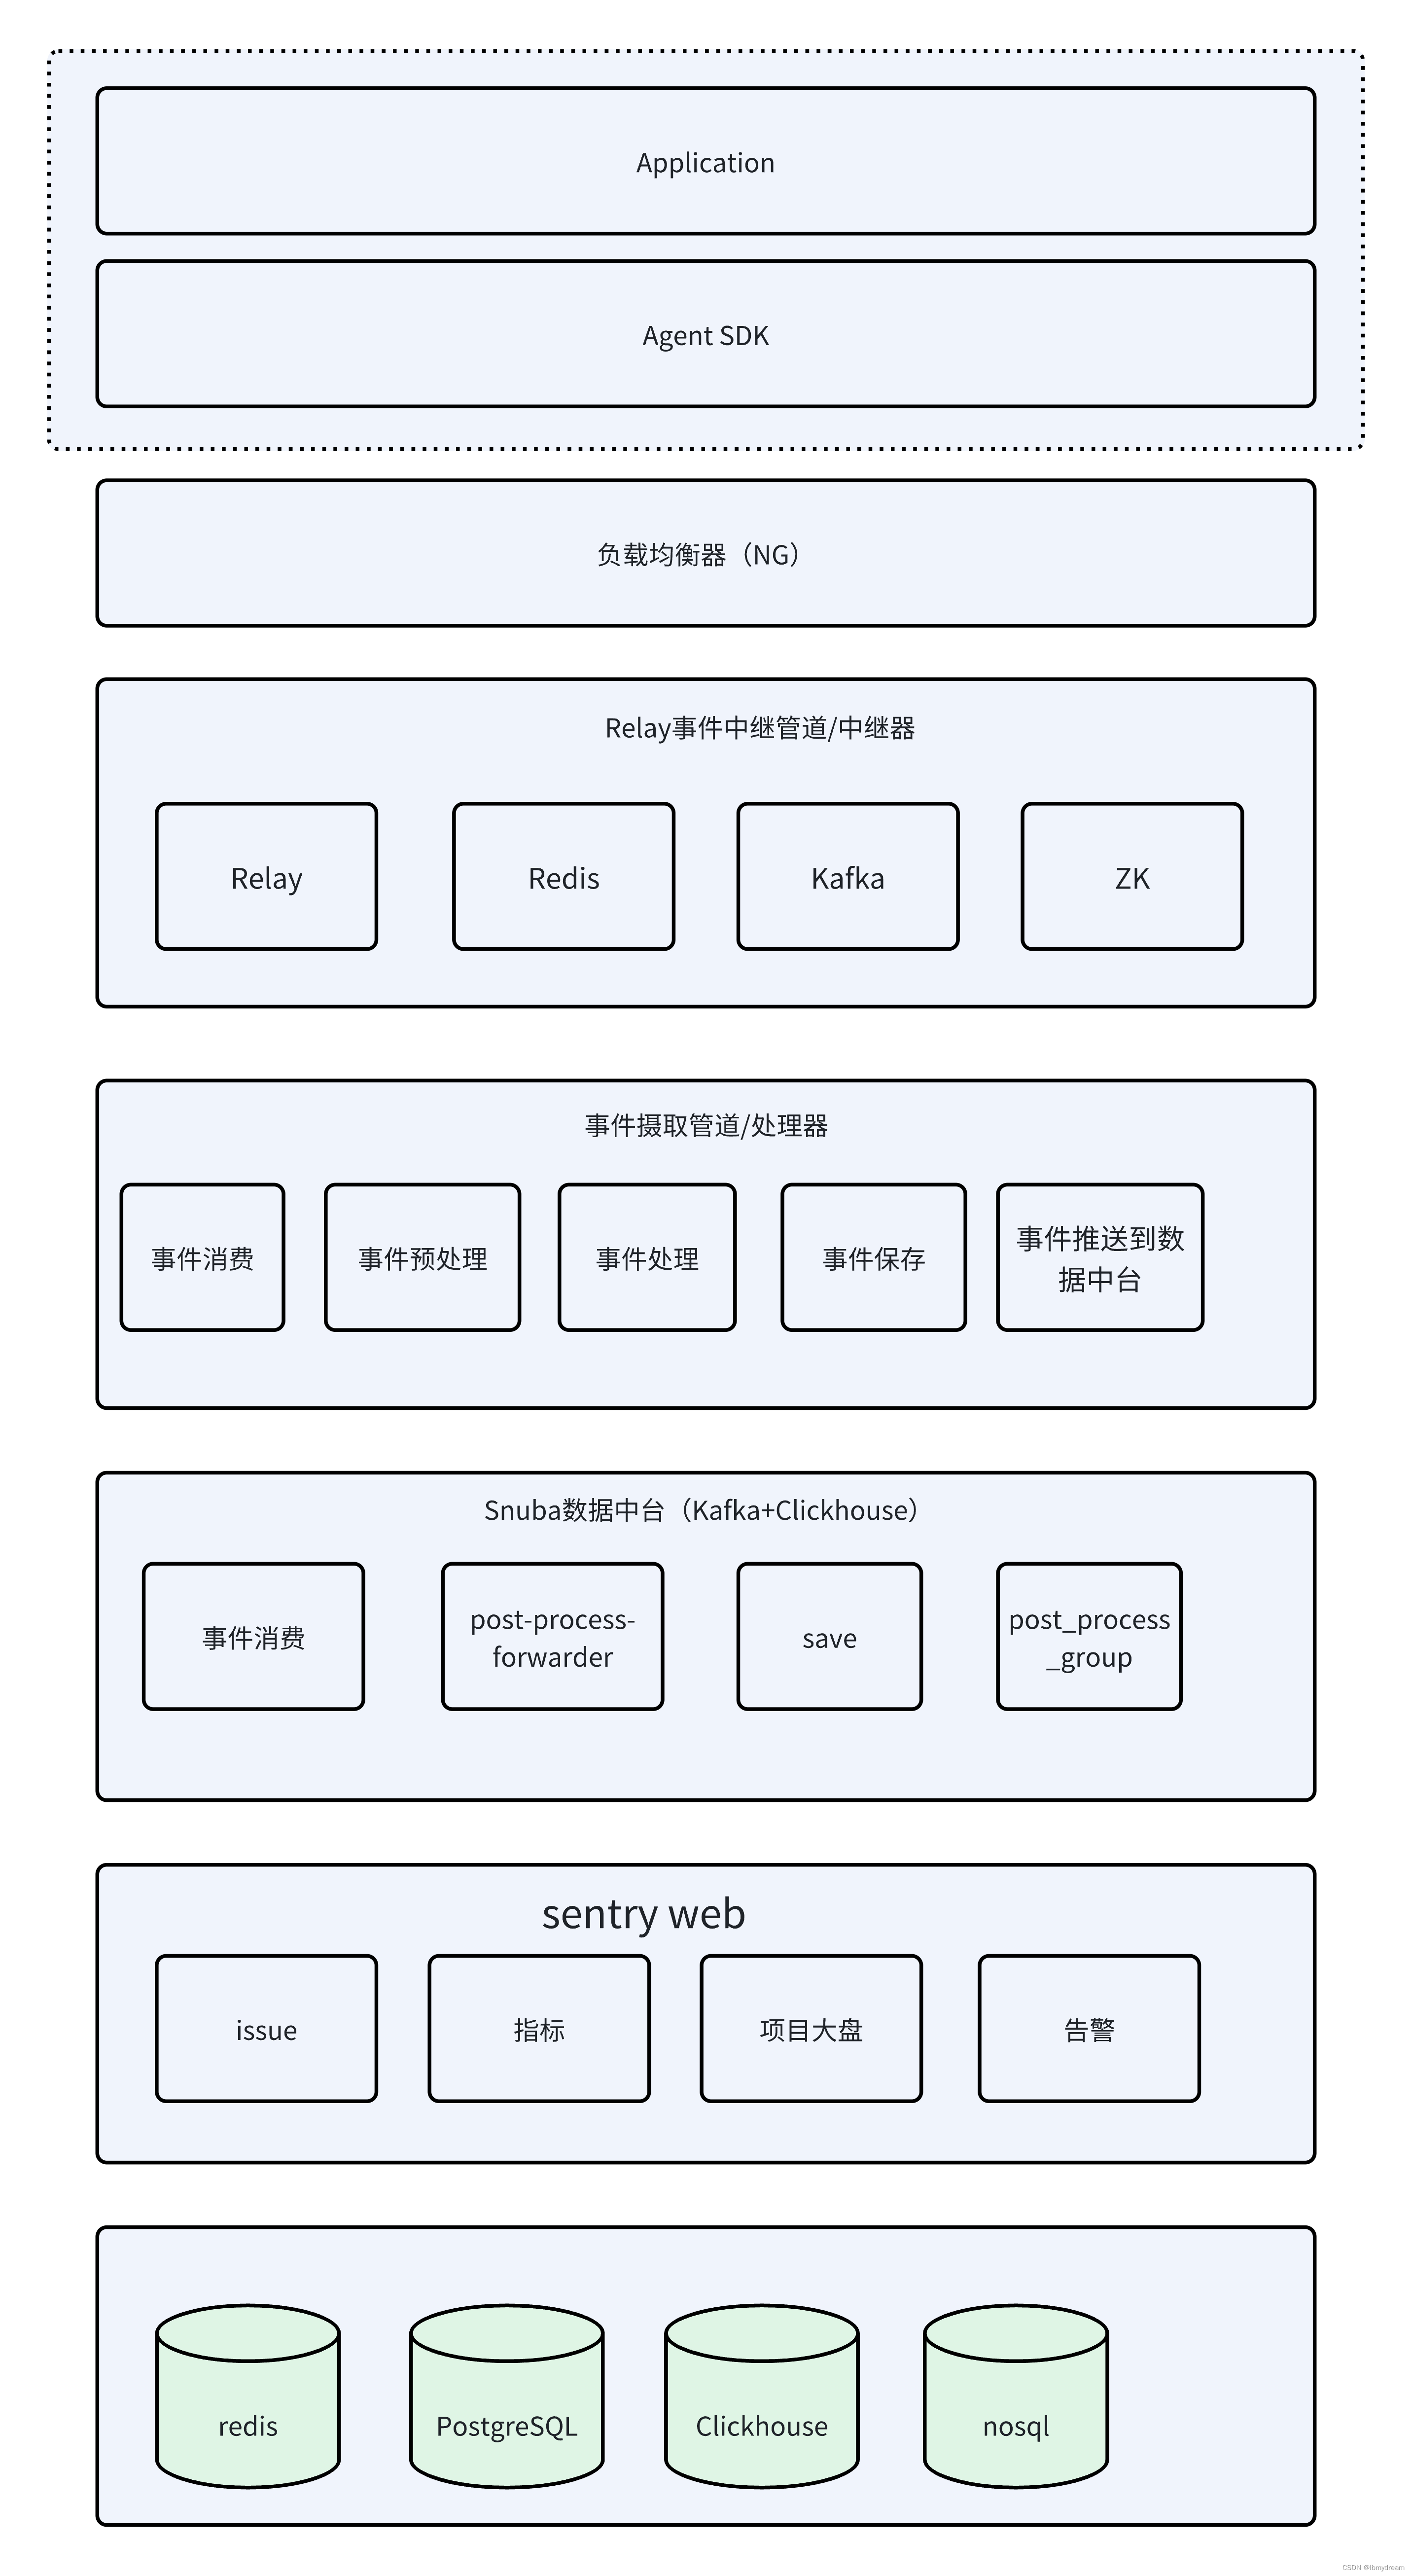
从上图所述,sentry整体架构包含四⼤板块,中继器、处理器、数据中台、web,应⽤通过agent和sdk将应⽤数据通过负载均衡器(NG)上报到中继器,由中继器缓存事件信息,并将事件消息推送到kafka,再由处理器消费事件,对事件进⾏预处理、处理、保存到数据库并将处理后的事件数据消息推送到数据中台kafka,最后由数据中台消费并将数据存储到Clickhouse,最后sentry web 对数据中台数据进⾏展⽰、分析、以及告警设置。
部署
环境准备
Sentry 提供并维护了⼀个最⼩的设置,可以开箱即⽤地⽤于简单的⾃托管存储库,⽅便使⽤者进⾏私有化部署。在整体架构中提到sentry管理平台由23个服务⽀撑运⾏,如果独⽴的部署和维护这23个服
务将是异常复杂和困难的,为了简单安装部署,官⽅提供了⾃动化脚本(./install.sh)使⽤Docker和Docker Compose以及基于bash的安装和升级脚本。该脚本将处理我们开始所需的所有事情,包括基线配置,然后会告诉我们运⾏ docker compose up -d 以启动Sentry。要部署sentry需要准备:
- 4C8G内存机器 200G(尽量⾜够磁盘需要存储数据
- 部署⽅式依赖于Docker 19.03.6+和Compose 1.24.1+(Docker Compose安装这⾥就不⼀⼀说明了)
具体步骤如下:
 # 下载最新存储库
cd usr
mkdir software
cd software
chmod -R 777 /usr/software
wget https://github.com/getsentry/self-hosted/archive/refs/tags/23.11.2.tar.gz
tar -zxvf 23.11.2.tar.gz
cd self-hosted-23.11.2
# 执⾏./install.sh
./install.sh
############### 等待执⾏结束后,会提⽰创建完毕,运⾏ docker-compose up -d 启动服务
# 运⾏ docker-compose up -d 启动服务
 docker-compose up -d
项目集成
前端
后端
sentry-opentelemetry监控主要包含3⼤板块:
- 通过agent探针⾃动化追踪Tracing、Metrics(sentry指标不包含cpu内存指标)
- 通过sentry sdk主动上报issue
- 使⽤OpenTelementry增强探针为⽇志注⼊TraceID
agent探针集成
后端微服务采⽤sentry-opentelemetry-agent+引⼊sdk完成⽇志注⼊TraceID和⾃定义事件追踪功能。
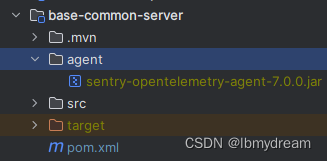
- agent引入
下载sentry-opentelemetry-agent-7.0.0.jar,并在⼯程⽬录创建agent⽬录(与src平⾏),如下图
2. 环境变量配置
基于nacos配置中⼼进⾏环境配置,配置中⼼增加如下配置
sentry:
 	dsn: http://7054f91f1c90d5cf2fea604f0fd798f7@192.168.128.43:9000/2
 	environment: prod
 	traces-sample-rate: 1.0
 	instrumenter: otel
3. 本地启动调试(idea)
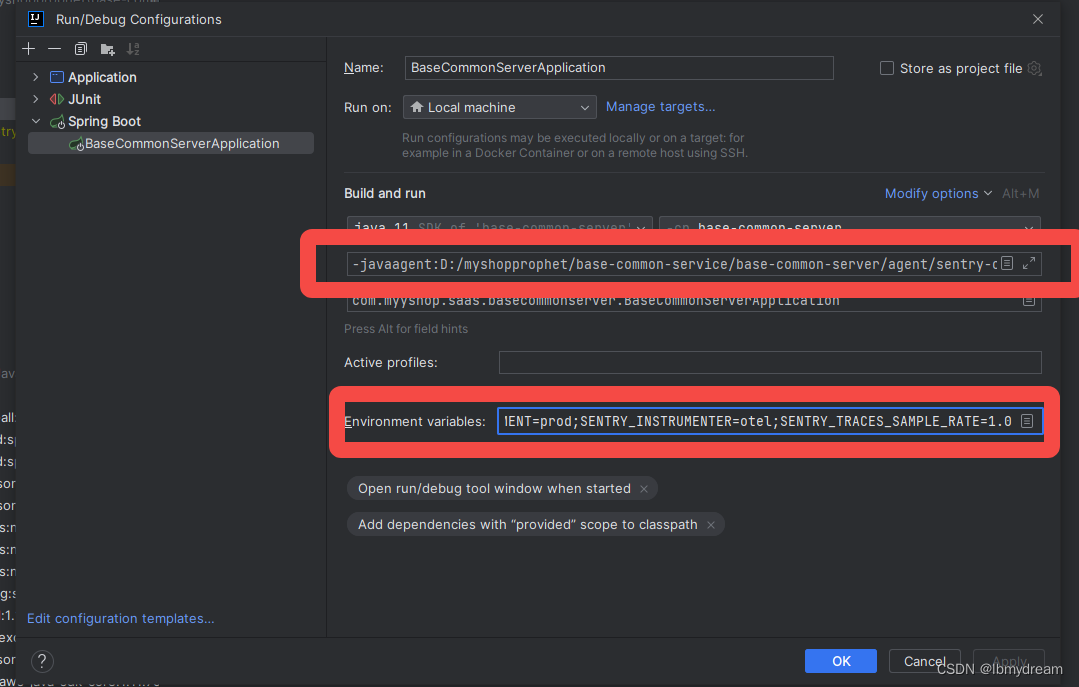
如上图,使⽤idea启动项⽬调试agent,⼊⼝变量新增-javaagent引⼊sentry-opentelemetry-agent7.0.0.jar
# 这⾥亲测需要指定绝对路径,否则启动时会报找不到jar,从⽽导致服务⽆法启动
-javaagent:D:/myshopprophet/base-common-service/base-commonserver/agent/sentry-opentelemetry-agent-7.0.0.jar
# 这里需要显示指定none否则启动后会报打印大量警告日志,如果本身需要上报元数据和traces不用考虑
-Dotel.metrics.exporter=none
-Dotel.traces.exporter=none
启动项⽬后,登陆控制台检查Tracing、Metrics信息是否同步到sentry
如下图,如果成功便可以在Discover、Dashboards、Performance、Project Details菜单下观察到相关指标数据。

sentry sdk集成
针对接⼝异常、业务异常等事件需要通过sentry sdk主动上报。
step1引⼊依赖
<dependency>
 <groupId>io.sentry</groupId>
 <artifactId>sentry-spring-boot-starter</artifactId>
 <version>7.0.0</version>// 这里的版本号应该和agent版本一致
</dependency>
step2配置环境变量
环境变量同agent弹出集成环境变量设置,sentry-spring-boot-starter⾃动装配sentry sdk配置,项⽬⽆需显⽰配置。
step3代码层⾯主动上报⽇志
// 省略
findAny().orElseThrow(() -> {
 BusinessException e = new BusinessException("not support this bizType[" +
bizType + "]");
 // log.info(Sentry.getSpan().toString());
 Sentry.captureException(e);
 return e;
});
step4登陆sentry.io查看异常事件

增强探针为⽇志注⼊TraceID
sentry-opentelemetry-agent⽇志注⼊traceID需要使⽤opentelemetry⽇志包,具体步骤如下:
step1引⼊opentelemetry⽇志包相关依赖
<dependency>
 <groupId>io.opentelemetry.instrumentation</groupId>
 <artifactId>opentelemetry-log4j-context-data-2.17-
autoconfigure</artifactId>
 <version>1.23.0-alpha</version>
 <scope>runtime</scope>
</dependency>
<dependency>
 <groupId>io.opentelemetry</groupId>
 <artifactId>opentelemetry-api</artifactId>
 <version>1.23.1</version>
</dependency>
step2修改log42.xml配置
日志增加trace_id
<Properties>
 <property name="app_name" value="${spring:spring.application.name}"/>
 <property name="patternLayout">[%d{yyyy-MM-dd'T'HH:mm:ss.SSSZZ}]
[%level{length=5}] [%thread-%tid] [%logger] [traceId:%X{trace_id}]
[%X{hostName}] [%X{ip}] [${app_name}] [%F,%L,%C,%M] [%m] ## '%ex'%n</property>
 <property name="rolling_pattern">%d{yyyy-MM-dd}-%i.gz</property>
 <property name="every_file_size">10MB</property>
</Properties>
step3修改elk-logstash config⽇志采集配置
⽇志输出增加traceID,elk⽇志采集logstash config需要同步修改,⽀持traceID解析。没有集成elk的忽略该步骤。
## gork提取⽇志字段,这⾥使⽤中括号进⾏⽇志字段拆分grok {
 match => ["message", "\[%{NOTSPACE:currentDateTime}\] \[%
{NOTSPACE:level}\] \[%{DATA:thread-id}\] \[%{NOTSPACE:class}\] \[%
{NOTSPACE:traceId}\] \[%{DATA:hostName}\] \[%{DATA:ip}\] \[%
{DATA:applicationName}\] \[%{DATA:location}\] \[%{DATA:messageInfo}\] ##
(\'\'|%{QUOTEDSTRING:throwable})"]
 }
step4启动服务,验证⽇志打印
启动服务验证接⼝⽇志打印的traceID和sentry.io链路追踪的id是否⼀致,如下图:

sentry.io链路追踪信息

异常处理
后端集成opentelemetry出现如下错误⽇志:
ERROR io.opentelemetry.exporter.internal.grpc.OkHttpGrpcExporter - Failed to
export spans. The request could not be executed. Full error message: Failed to
connect to localhost/[0:0:0:0:0:0:0:1]:4317
该异常是项目没有配置元数据和traces数据上报导致,要忽略该日志可以添加环境变量,详⻅官方文档。
OTEL_METRICS_EXPORTER=none;OTEL_TRACES_EXPORTER=none
SDK⾃定义开发
sentry sdk⾃定义开发
sentry sdk扩展主要实现了如下功能:
- ⾃定义SentryEvent注⼊otel追踪信息
- ⾃定义全局异常上报issue事件
- 新增动态过滤功能,过滤指定path和异常不上报issue
- 新增动态过滤功能,针对BusinessException需要配置指定code才上报
sentry sdk上报事件默认是不包含追踪信息,需要⾃定义SentryEvent,代码⽚段如下:
⾃定义SentryEvent注⼊otel追踪信息
sentry sdk上报事件默认是不包含追踪信息,需要⾃定义SentryEvent,代码⽚段如下:
Span otelSpan = Span.current();

String traceId = otelSpan.getSpanContext().getTraceId();

String spanId = otelSpan.getSpanContext().getSpanId();

// 将otel 追踪信息注⼊到SentryEvent上下⽂

if (TraceId.isValid(traceId) && SpanId.isValid(spanId)) {
 Optional.ofNullable(Sentry.getSpan()).ifPresent(sentrySpan -> {
 SpanContext sentrySpanSpanContext = sentrySpan.getSpanContext();
 String operation = sentrySpanSpanContext.getOperation();
 io.sentry.SpanId parentSpanId =
sentrySpanSpanContext.getParentSpanId();
 SpanContext spanContext = new SpanContext(new SentryId(traceId), new

io.sentry.SpanId(spanId), operation, parentSpanId, null);
 event.getContexts().setTrace(spanContext);
 });
}
⾃定义全局异常上报issue事件
sentry提供spring boot sdk利⽤SpringBootStarter⾃动装配的特性实现sdk⾃动初始化,同时针对springmvc全局异常做了扩展,捕获全局异常上报issue,依赖及源码如下:
<dependency>
 <groupId>io.sentry</groupId>
 <artifactId>sentry-spring-boot-starter</artifactId>
 <version>7.0.0</version>
 <!--使⽤log4j2 需要移除logback模块-->
 <exclusions>
 <exclusion>
 <groupId>org.springframework.boot</groupId>
 <artifactId>spring-boot-starter-logging</artifactId>
 </exclusion>
 </exclusions>
</dependency>
// io.sentry.spring.boot.SentryAutoConfiguration

@Bean
@ConditionalOnMissingBean
@ConditionalOnClass({HandlerExceptionResolver.class})

public @NotNull SentryExceptionResolver sentryExceptionResolver(@NotNull IHub
sentryHub, @NotNull TransactionNameProvider transactionNameProvider, @NotNull
SentryProperties options) {
 return new SentryExceptionResolver(sentryHub, transactionNameProvider,
options.getExceptionResolverOrder());
}

// io.sentry.spring.SentryExceptionResolver

public @Nullable ModelAndView resolveException(@NotNull HttpServletRequest
request, @NotNull HttpServletResponse response, @Nullable Object handler,

@NotNull Exception ex) {
 SentryEvent event = this.createEvent(request, ex);
 Hint hint = this.createHint(request, response);
 this.hub.captureEvent(event, hint);
 return null;
}
但是spring boot sdk扩展的ExceptionResolver优先级低于微服务框架扩展的
@ControllerAdvice+@ExceptionHandler
debug可以看到springmvc全局异常handler处理链如下:
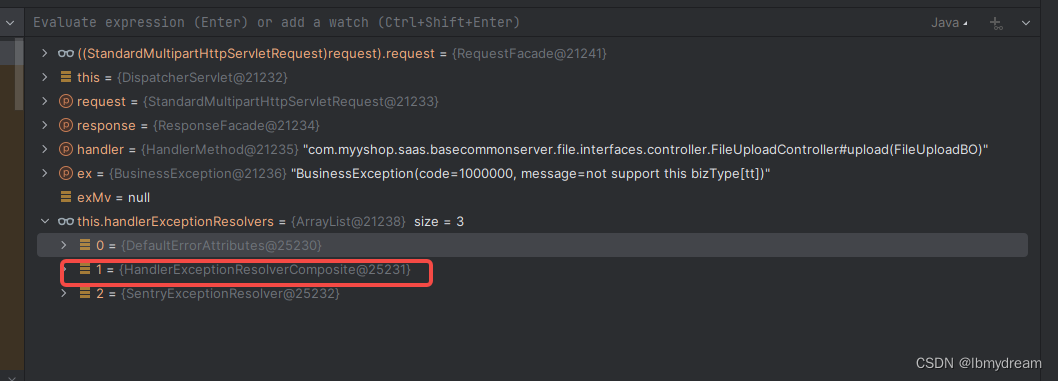
因此spring boot sdk扩展的ExceptionResolver在项目中实际不⽣效。
⾃定义CustomSentryExceptionResolver,继承SentryExceptionResolver,同时在初始化bean时指定最⾼优先级。
@Bean
@ConditionalOnClass({HandlerExceptionResolver.class})
public SentryExceptionResolver sentryExceptionResolver(IHub sentryHub,
TransactionNameProvider transactionNameProvider, SentryProperties options,
CustomSentryEventIgnoreFilter customSentryEventIgnoreFilter) {
 return new CustomSentryEventIgnoreFilter (sentryHub,
transactionNameProvider, Ordered.HIGHEST_PRECEDENCE,
myyshopSentryEventIgnoreFilter);
}

@Override

public ModelAndView resolveException(@NotNull HttpServletRequest request,

@NotNull HttpServletResponse response, @Nullable Object handler, @NotNull
Exception ex) {
 SentryEvent event = createTraceEvent(request, ex);
 Hint hint = super.createHint(request, response);
 this.hub.captureEvent(event, hint);

 // null = run other HandlerExceptionResolvers to actually handle the
exception

 // 这⾥仅上报SentryEvent 返回null将继续执行后续的异常处理链
 return null;
}
引⼊⾃定义SentryExceptionResolver后全局异常处理链路如下:
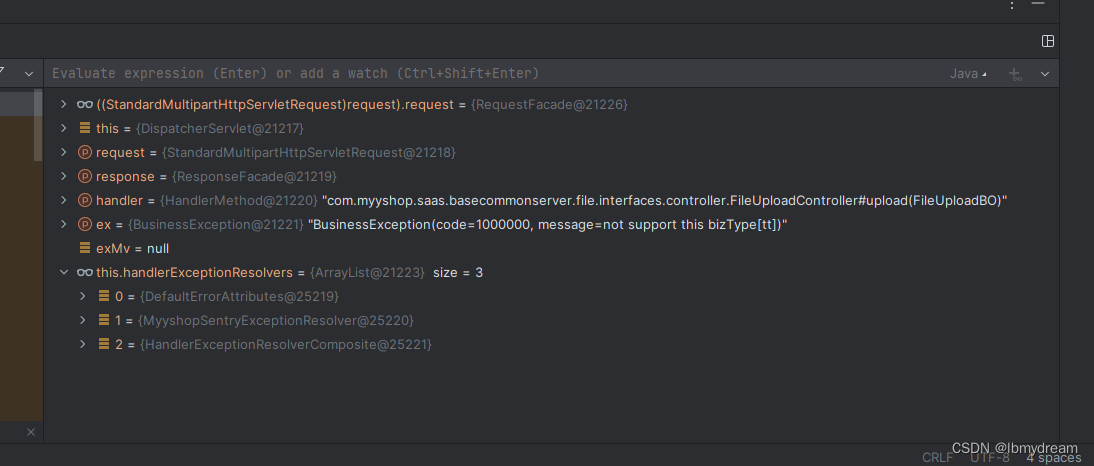
可以看出⾃定义SentryExceptionResolver后全局异常处理优先级⾼于微服务框架
扩展的@ControllerAdvice+@ExceptionHandler,当请求出现异常
MyyshopSentryExceptionResolver先进⾏issue上报,然后才交予@ControllerAdvice+@ExceptionHandler全局异常进⾏异常处理。
新增动态过滤功能
自定义SentryExceptionResolver提供了全局异常上报issue功能,但是通常不是所有异常和接⼝请求需要上报issue,⽐如IllegalArgumentException、
HttpRequestMethodNotSupportedException、BindException、ConstraintViolationException、HttpMediaTypeNotSupportedException参数解析/校验,媒体类型错误等异常,诸如/actuator、/test等健康检查或者测试接就不需要上报issue。
因此使⽤@RefreshScope+nacos配置中⼼,实现异常动态过滤功能,代码⽚段如下:
@Override

public ModelAndView resolveException(@NotNull HttpServletRequest request,

@NotNull HttpServletResponse response, @Nullable Object handler, @NotNull
Exception ex) {
 // 忽略指定异常和path
 if (ignoreFilter.ignore(request, ex)) {
 return null;
 }
 // BusinessException需要配置指定code才上报
 if (ex instanceof BusinessException && !ignoreFilter.isNeed(ex)) {
 return null;
 }
 SentryEvent event = createTraceEvent(request, ex);
 Hint hint = super.createHint(request, response);
 this.hub.captureEvent(event, hint);
 return null;
}

// 动态配置 SentryIgnoreProperties
@Setter
@Getter
@ConfigurationProperties("sentry.ignore")
@RefreshScope
public class SentryIgnoreProperties {
 private static final String[] ENDPOINTS = {
 "/**/actuator/**",
 "/**/api/checkHealth",
 "/**/webjars/**"

 };
 /**
 * 设置不需要上报的静态url
 */
 private String[] httpUrls = {};

 /**
 * 设置需要上报的动态bizcode
 */
 private String[] bizCodes = {};

// 默认忽略异常和动态请求过滤SentryEventIgnoreFilter

public boolean ignore(HttpServletRequest request, @NotNull Exception ex) {
 if (ex instanceof IllegalArgumentException
 || ex instanceof HttpRequestMethodNotSupportedException
 || ex instanceof HttpMediaTypeNotSupportedException
 || ex instanceof ConstraintViolationException
 || ex instanceof BindException
 ) {
 return true;
 }
 return Optional.ofNullable(request)
 .map(HttpServletRequest::getServletPath)
 .map(ServletPath -> MatchPathUtil.isMatchPath(ServletPath,
ignoreProperties.getUrls()))
 .orElse(false);
}

// BusinessException 错误码匹配

public boolean isNeed(Exception ex) {
 return Optional.ofNullable(ex)
 .map(BusinessException.class::cast)
 .map(BusinessException::getCode)
 .map(code -> MatchPathUtil.isMatchPath(code,
ignoreProperties.getAllBizCodes()))
 .orElse(false);
}

// 初始SentryEventIgnoreFilter,动态注⼊配置

@Bean
public CustomSentryEventIgnoreFilter
customSentryEventIgnoreFilter (SentryIgnoreProperties ignoreProperties) {
 return new CustomSentryEventIgnoreFilter(ignoreProperties);
}
上述代码实现了零侵⼊接⼝请求全局异常上报issue功能,将sentrysdk抽象封装成公共依赖,业务系统仅需要简单添加依赖并动态新增nacos配置即可:
// 这⾥将sentry 相关依赖全部封装进xxxx-commons-sentry,包括⽇志注⼊TraceID、sdk相关依赖
// 业务系统仅需要引⼊xxxx-commons-sentry即可
// 这里根据各自项目来定也可以不封装公共依赖
<dependency>
 <groupId>com.xxxx</groupId>
 <artifactId>xxxx-commons-sentry</artifactId>
 <version>1.0.0-SNAPSHOT</version>
</dependency>
Java Agent Extension⾃定义扩展
sentry提供sentry-opentelemetry-agent包,使⽤Java Agent⾃动上报应⽤数据。保证上报应⽤数据的合理性、准确性不仅有利于分析应⽤性能,还可以减少⼤量系统开销。下图为默认otel上报应⽤结果效果图:
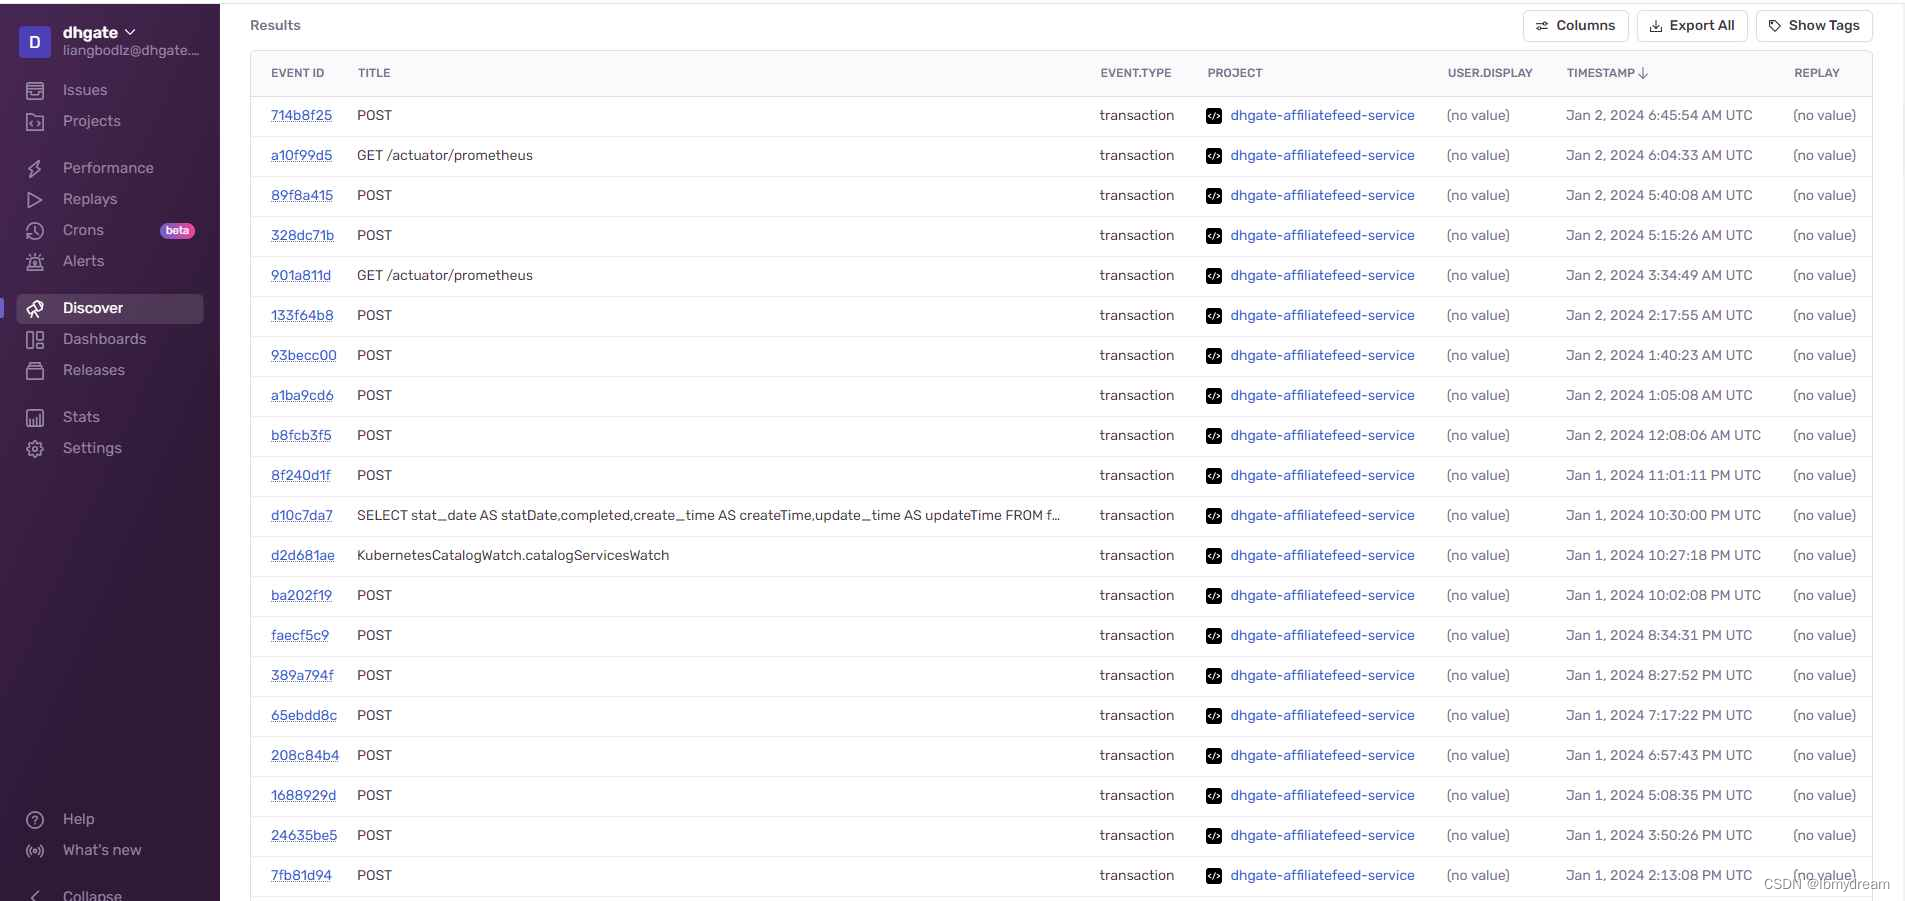
上图⼀览包含⼤量nacos⼼跳、健康检查等事件,不利分析和查看系统指标数据,同时也会污染相关系统指标,使监控系统⽆法准备统计系统指标,同时⼤量⽆效事件也会对sentry监控系统带来开销。因此对Java Agent上报的应⽤数据进⾏过滤⾮常有必要,这不仅可以提供上报数据的合理性、准确性,也能消除了发送应⽤实际上不需要的事件的开销。
opentelemetry提供⾃定义扩展功能(SPI机制),可以为代理添加额外的功能,我们通过⾃定义Sampler(采样器),为代理添加过滤功能,过滤指定的Span。
引⼊otel依赖
<!--google ⾃定spi注册⼯具,会根据@AutoService注解⾃动⽣成spi列表-->
<dependency>
 <groupId>com.google.auto.service</groupId>
 <artifactId>auto-service-annotations</artifactId>
 <version>1.1.1</version>
</dependency>
<dependency>
 <groupId>com.google.auto.service</groupId>
 <artifactId>auto-service</artifactId>
 <version>1.1.1</version>
</dependency>
<dependency>
 <groupId>io.opentelemetry.javaagent</groupId>
 <artifactId>opentelemetry-javaagent</artifactId>
 <version>1.23.0</version>
 <!--这⾥要设置为compile的-->
 <scope>compile</scope>
</dependency>

<dependency>
 <groupId>io.opentelemetry</groupId>
 <artifactId>opentelemetry-sdk-trace</artifactId>
 <version>1.23.0</version>
</dependency>
<dependency>
 <groupId>io.opentelemetry</groupId>
 <artifactId>opentelemetry-sdk-extension-autoconfigure</artifactId>
 <version>1.23.0-alpha</version>
</dependency>
<dependency>
 <groupId>io.opentelemetry</groupId>
 <artifactId>opentelemetry-semconv</artifactId>
 <version>1.23.0-alpha</version>
</dependency>
注意:opentelemetry依赖版本应该和javaagent对应的otel版本⼀致。
⾃定义Sampler代码⽚段:
public class CustomSpanFilterSampler implements Sampler {
 public CustomSpanFilterSampler() {
 }
 /*
 * 过滤Span名称在EXCLUDED_SPAN_NAMES中的所有Span
 */
 private static List<String> EXCLUDED_SPAN_NAMES =
Collections.unmodifiableList(
 Arrays.asList("spanName1", "spanName2")
 );

 /*
 * 过滤attributes.http.target在EXCLUDED_HTTP_REQUEST_TARGETS中的所有Span
 */
 private static List<String> EXCLUDED_HTTP_REQUEST_TARGETS =
Collections.unmodifiableList(
 Arrays.asList(
 "/actuator",
 "/api/checkHealth",
 "/health/checks",
 "/nacos/v1",
 "sqs.cn-north-1.amazonaws.com.cn",
 "sqs.us-west-2.amazonaws.com"
 )
 );
 @Override

 public SamplingResult shouldSample(Context parentContext, String traceId,
String name, SpanKind spanKind, Attributes attributes, List<LinkData> list) {
 String httpUrl =
Optional.ofNullable(attributes.get(SemanticAttributes.HTTP_TARGET))
 .orElseGet(() ->
Optional.ofNullable(attributes.get(SemanticAttributes.HTTP_URL)).orElse(""));
 // nacos Discovery attributes

 String codeNamespace =
Optional.ofNullable(attributes.get(SemanticAttributes.CODE_NAMESPACE)).orElse("
");
 String codeFun =
Optional.ofNullable(attributes.get(SemanticAttributes.CODE_FUNCTION)).orElse(""

);
 // redis pin attributes

 String dbSystem =
Optional.ofNullable(attributes.get(SemanticAttributes.DB_SYSTEM)).orElse("");
 String dbStatement =
Optional.ofNullable(attributes.get(SemanticAttributes.DB_STATEMENT)).orElse("")
;
 String dbOperation =
Optional.ofNullable(attributes.get(SemanticAttributes.DB_OPERATION)).orElse("")
;
 if (SpanIgnoredUtil.isNacosDiscovery(codeNamespace, codeFun) || // 过滤

nacos注册中⼼线程
 SpanIgnoredUtil.isMatchPath(httpUrl,
EXCLUDED_HTTP_REQUEST_TARGETS) || // 过滤http请求
 SpanIgnoredUtil.isRedisPIN(dbSystem, dbStatement, dbOperation)

// 过滤 redission redis pin
 ) { // 根据条件进⾏过滤
 return SamplingResult.create(SamplingDecision.DROP);
 } else {
 return SamplingResult.create(SamplingDecision.RECORD_AND_SAMPLE);
 }
 }
 @Override
 public String getDescription() {
 return "CustomSpanFilterSampler";
 }
}

// ⾃定义spi

@AutoService(ConfigurableSamplerProvider.class)

public class CustomSpanFilterSamplerProvider implements

ConfigurableSamplerProvider {
 @Override

 public Sampler createSampler(ConfigProperties configProperties) {
 return new CustomSpanFilterSampler();
 }
 @Override

 public String getName() {
 return "CustomSpanFilterSampler";
 }
}
完成⾃定义扩展还需要执⾏以下步骤才能实现代理扩展功能:
- 将⾃定义扩展项⽬打包成jar(xxxx-commons-sentry-spi-xxx.jar)
- 将jar包放⼊指定⽬录,并添加启动命令环境变量,将扩展添加到检测代理
-Dotel.javaagent.extensions=D:/bin/xxxx-commons-sentry-spi-1.0.0-
SNAPSHOT.jar
-Dotel.traces.sampler=MyyshopSpanFilterSampler
参考⽂档
https://opentelemetry.io/
https://docs.sentry.io/






![BUUCTF---web---[SUCTF 2019]CheckIn](https://img-blog.csdnimg.cn/direct/409c44a657a34ba8b16d2e1d42c3a067.png)

