1. 实现功能
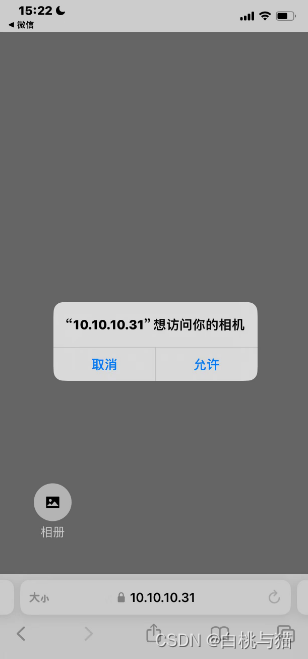
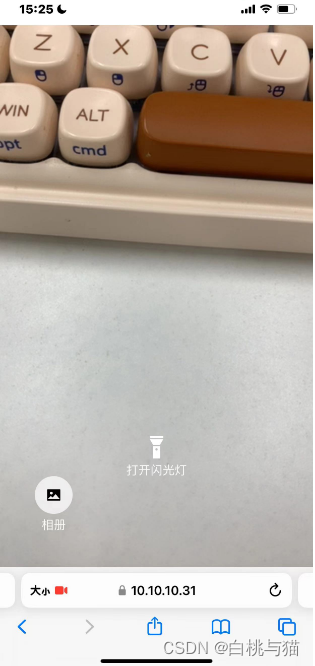
类似扫一扫的功能,自动识别到画面中的二维码并进行识别,也可以选择从相册中上传。
2. 涉及到的一些插件介绍
vue-qrcode-reader
一组用于检测和解码二维码的Vue.js组件
jsQR
一个纯粹的javascript二维码阅读库,该库接收原始图像,并将定位、提取和解析在其中找到的任何二维码。
zxing-wasm
ZXing-C++ WebAssembly 作为带有类型的 ES/CJS 模块。读/写 web、node、bun 和 deno 中的条形码。
2. vite项目配置本地开发使用https访问
安装basicSsl
pnpm i @vitejs/plugin-basic-ssl
import { defineConfig } from 'vite'
import vue from '@vitejs/plugin-vue'
import path from 'path'
import basicSsl from '@vitejs/plugin-basic-ssl'

// https://vitejs.dev/config/
export default defineConfig({
  plugins: [vue(), basicSsl()],
  server: {
    host: '0.0.0.0',
    https: true
  },
  resolve: {
    alias: {
      '@': path.resolve(__dirname, 'src')
    }
  }
})
3. 方式一:vue-qrcode-reader实现
npm install vue-qrcode-reader
🔍vue-qrcode-reader Api 介绍
<template>
  <div>
    <qrcode-stream
      class="qrcode-wrap"
      :torch="torch"
      v-memo="[torch]"
      :constraints="selectedConstraints"
      :track="paintBoundingBox"
      @error="onError"
      @detect="onDetect"
      @camera-on="onCameraReady"
    >
      <div v-if="isSupportTorch" class="torch-wrap">
        <div class="torch" @click="() => (torch = !torch)">
          <div class="flash-light" v-if="torch">
            <MdiFlashlightOff style="width: 36px; height: 36px" />
          </div>
          <div class="flash-light" v-else>
            <MdiFlashlight style="width: 36px; height: 36px" />
          </div>
          {{ torch ? "关闭闪光灯" : "打开闪光灯" }}
        </div>
      </div>
      <div class="photo-wrap">
        <div class="photo" @click="handleOpenFile">
          <el-icon size="20">
            <PictureFilled />
          </el-icon>
        </div>
        <div class="color-[#fff]">相册</div>
      </div>
    </qrcode-stream>
  </div>
</template>
<script setup lang="ts">
// https://gruhn.github.io/vue-qrcode-reader/api/QrcodeStream.html
import { QrcodeStream } from "vue-qrcode-reader";
import { PictureFilled } from "@element-plus/icons-vue";
import MdiFlashlight from "~icons/mdi/flashlight";
import MdiFlashlightOff from "~icons/mdi/flashlight-off";
import { ElMessage } from "element-plus";
import { fileOpen } from "browser-fs-access";
import _ from "lodash";

const error = ref("");
const cameraIsReady = ref(false);
const isSupportTorch = ref(false); // 是否支持闪光灯
const torch = ref(false); // 闪光灯状态
// 相机配置选项: 'user'|'environment' (默认:environment)
const selectedConstraints = ref({ facingMode: "environment" });

// 检测到二维码后绘制画布类型
function paintBoundingBox(detectedCodes: any, ctx: CanvasRenderingContext2D) {
  for (const detectedCode of detectedCodes) {
    const {
      boundingBox: { x, y, width, height },
    } = detectedCode;

    ctx.lineWidth = 2;
    ctx.strokeStyle = "#007bff";
    // 绘制边框矩形
    ctx.strokeRect(x, y, width, height);
  }
}

async function onCameraReady(capabilities: any) {
  // NOTE: on iOS we can't invoke `enumerateDevices` before the user has given
  // camera access permission. `QrcodeStream` internally takes care of
  // requesting the permissions. The `camera-on` event should guarantee that this
  // has happened.
  try {
    isSupportTorch.value = !!capabilities.torch;
    cameraIsReady.value = true;
    error.value = "";
  } catch (error) {
    onError(error);
    cameraIsReady.value = false;
  }
}
// 错误提示
function onError(err: any) {
  error.value = `[${err.name}]: `;
  if (err.name === "NotAllowedError") {
    error.value += "you need to grant camera access permission";
  } else if (err.name === "NotFoundError") {
    error.value += "no camera on this device";
  } else if (err.name === "NotSupportedError") {
    error.value += "secure context required (HTTPS, localhost)";
  } else if (err.name === "NotReadableError") {
    error.value += "is the camera already in use?";
  } else if (err.name === "OverconstrainedError") {
    error.value += "installed cameras are not suitable";
  } else if (err.name === "StreamApiNotSupportedError") {
    error.value += "Stream API is not supported in this browser";
  } else if (err.name === "InsecureContextError") {
    error.value +=
      "Camera access is only permitted in secure context. Use HTTPS or localhost rather than HTTP.";
  } else {
    error.value += err.message;
  }
  ElMessage.warning(error.value);
}
// 用户摄像头的流后
function onDetect(detectedCodes: any) {
  if (detectedCodes.length > 0) {
    onDecode(detectedCodes[0]?.rawValue);
  }
}

const emit = defineEmits(["on-success"]);

// 解码(交给父组件处理:进行网络请求)
function onDecode(text: string) {
  emit("on-success", text);
}
// 文件转成base64
const processFile = async (file: any) => {
    let reader = new FileReader();
    reader.readAsDataURL(file);
    reader.onload = (e) => {
      let base64String = e.target?.result as string ||'';
      // 此处可对该base64进行获取赋值传入后端, 如果有直接上传文件的接口就可以直接传文件
      onDecode(base64String)
    };
};
// 打开图片选择
async function handleOpenFile() {
  try {
    const file = await fileOpen({ mimeTypes: ["image/*"] }).catch(() => null);
    if (!file) return;
    // 计算文件的大小
    const fileSizeMb = _.round(file.size / 1024 / 1024, 2);
    // 文件大小不能超过 10MB
    const limitSizeMb = 10;
    if (fileSizeMb > limitSizeMb) {
      return ElMessage.warning(`图片大小限制 ${limitSizeMb}MB`);
    }
    processFile(file)
  } catch (error) {
    console.log(`[log] - handleOpenUploadIcon - error:`, error);
  }
}
</script>
<style scoped>
.qrcode-wrap {
  position: fixed !important;
  top: 0;
  right: 0;
  bottom: 0;
  left: 0;
  width: 100vw;
  height: 100vh;
  z-index: 1 !important;
  background: rgba(0, 0, 0, 0.5);
}
.torch-wrap {
  width: 18.75rem;
  height: 12.5rem;
  position: fixed !important;
  left: 50%;
  top: 50%;
  transform: translate(-50%, -30%);
  z-index: 20;
}

.torch {
  position: fixed;
  bottom: -6.25rem;
  left: 50%;
  transform: translateX(-50%);
  z-index: 20;
  color: #fff;
  display: flex;
  flex-direction: column;
  align-items: center;
}
.photo-wrap {
  position: fixed;
  bottom: 2.875rem;
  left: 2.875rem;
  display: flex;
  flex-direction: column;
  align-items: center;
  gap: 6px;
}

.photo {
  height: 3.125rem;
  width: 3.125rem;
  background-color: rgba(250, 250, 250, 0.8);
  border-radius: 50%;
  display: grid;
  place-items: center;
  cursor: pointer;
}
</style>
browser-fs-access 这个包需要提前下载
pnpm i browser-fs-access
如果需要在离线的环境解析二维码,则需要使用zxing-wasm,在上面文件的js部分添加以下代码:
// 该文件由zxing-wasm项目构建而来
import wasmFile from './zxing_reader.wasm?url';

// !为了离线加载
// https://github.com/gruhn/vue-qrcode-reader/issues/354
setZXingModuleOverrides({
  locateFile: (path: string, prefix: any) => {
    if (path.endsWith('.wasm')) {
      return wasmFile;
    }
    return prefix + path;
  },
});
✨ 该部分完整Demo代码在该文件夹下:Demo (二维码实现之vue-qrcode-reader)
4. 方式二:jsQR实现
🔍Canvas的基本介绍与使用
<template>
  <div>
    <div class="canvasBox">
      <div class="box">
        <div class="line"></div>
        <div class="angle"></div>
      </div>
      <div v-if="isUseTorch" class="box2">
        <div class="track" @click="openTrack">
          <div class="flash-light" v-if="trackStatus">
            <MdiFlashlightOff style="width: 36px; height: 36px" />
          </div>
          <div class="flash-light" v-else>
            <MdiFlashlight style="width: 36px; height: 36px" />
          </div>
          {{ trackStatus ? "关闭闪光灯" : "打开闪光灯" }}
        </div>
      </div>

      <div class="photo-wrap">
        <div class="photo" @click="handleClickFile">
          <el-icon size="20">
            <input
              class="hide_file"
              ref="fileRef"
              type="file"
              accept="image/*;"
              @change="getFile"
            />
            <PictureFilled />
          </el-icon>
        </div>
        <div class="color-[#fff]">相册</div>
      </div>
    </div>
  </div>
</template>

<script setup lang="ts">
// https://github.com/cozmo/jsQR
import jsQR from "jsqr";
import { PictureFilled } from "@element-plus/icons-vue";
import MdiFlashlight from "~icons/mdi/flashlight";
import MdiFlashlightOff from "~icons/mdi/flashlight-off";
import { ElMessage } from "element-plus";
import _ from "lodash";

const props = withDefaults(
  defineProps<{
    // environment 后摄像头  user 前摄像头
    exact?: "environment" | "user";
    //  whole 全屏  half 半屏
    size?: "whole" | "half";
    // 清晰度: fasle 正常  true 高清
    definition?: boolean;
  }>(),
  {
    exact: "environment",
    size: "whole",
    definition: false,
  }
);
const video = ref();
const canvas2d = ref();
const canvasWidth = ref(520);
const canvasHeight = ref(500);
const c = ref();
const track = ref();
const isUseTorch = ref(false);
const trackStatus = ref(false);
const fileRef = ref();

onMounted(() => {
  const windowWidth = window.screen.availWidth;
  const windowHeight = window.screen.availHeight;

  canvasWidth.value = windowWidth;
  canvasHeight.value = windowHeight;

  nextTick(() => {
    video.value = document.createElement("video");
    c.value = document.createElement("canvas");
    c.value.id = "c";
    c.value.width = canvasWidth.value;
    c.value.height = canvasHeight.value;
    c.value.style.width = "100%";
    document.querySelector(".canvasBox")?.append(c.value);
    openScan();
  });
});

onUnmounted(() => {
  closeCamera();
});
// 开始扫描
async function openScan() {
  try {
    let width = canvasHeight.value;
    width = props.size === "whole" ? width : width * 0.5;
    width = props.definition ? width * 1.6 : width;
    let height = canvasWidth.value;
    height = props.definition ? height * 1.6 : height;
    const videoParam = {
      audio: false,
      video: {
        facingMode: { exact: props.exact }, //强制使用摄像头类型
        width,
        height,
      },
    };
    // 获取用户摄像头的视频流
    const stream = await navigator.mediaDevices.getUserMedia(videoParam);
    if (stream) {
      video.value.srcObject = stream;
      video.value.setAttribute("playsinline", true); //内联播放
      video.value.play();
      requestAnimationFrame(tick);
      // 返回所有的媒体内容流的轨道列表
      track.value = stream.getVideoTracks()?.[0];
      setTimeout(() => {
        // 检测摄像头是否支持闪光灯
        isUseTorch.value = track.value.getCapabilities().torch || null;
      }, 500);
    }
  } catch (error) {
    ElMessage.warning("设备不支持,请检查是否允许摄像头权限!");
    console.log("获取本地设备(摄像头)---失败", error);
  }
}
function closeCamera() {
  if (video.value.srcObject) {
    video.value.srcObject.getTracks().forEach((track: any) => {
      track.stop();
    });
  }
}
function tick() {
  if (video.value.readyState === video.value.HAVE_ENOUGH_DATA) {
    canvasHeight.value = video.value.videoHeight;
    canvasWidth.value = video.value.videoWidth;
    c.value.width = canvasWidth.value;
    c.value.height = canvasHeight.value;
    if (canvas2d.value === undefined) {
      canvas2d.value = c.value.getContext("2d");
    }

    canvas2d.value.drawImage(
      video.value,
      0,
      0,
      canvasWidth.value,
      canvasHeight.value
    );

    const imageData = canvas2d.value.getImageData(
      0,
      0,
      canvasWidth.value,
      canvasHeight.value
    );
    // 解析二维码数据
    const code = jsQR(imageData.data, imageData.width, imageData.height, {
      inversionAttempts: "dontInvert",
    });

    if (!_.isEmpty(code)) {
      drawLine(
        code.location.topLeftCorner,
        code.location.topRightCorner,
        "#FF3B58"
      );
      drawLine(
        code.location.topRightCorner,
        code.location.bottomRightCorner,
        "#FF3B58"
      );
      drawLine(
        code.location.bottomRightCorner,
        code.location.bottomLeftCorner,
        "#FF3B58"
      );
      drawLine(
        code.location.bottomLeftCorner,
        code.location.topLeftCorner,
        "#FF3B58"
      );
      if (code.data) {
        getData(code.data);
      }
    }
  }
  requestAnimationFrame(tick);
}
function drawLine(begin: any, end: any, color: string) {
  canvas2d.value.beginPath();
  canvas2d.value.moveTo(begin.x, begin.y);
  canvas2d.value.lineTo(end.x, end.y);
  canvas2d.value.lineWidth = 4;
  canvas2d.value.strokeStyle = color;
  canvas2d.value.stroke();
}
const emit = defineEmits(["on-success"]);

function getData(data: string) {
  emit("on-success", data);
  closeCamera();
}

function openTrack() {
  trackStatus.value = !trackStatus.value;
  track.value.applyConstraints({
    advanced: [{ torch: trackStatus.value }],
  });
}
const handleClickFile = () => {
  fileRef.value.click();
};
const getFile = (e: any) => {
  const file = e.target.files[0];
  emit("on-success", file);
  closeCamera();
};
</script>

<style scoped>
.flash-light {
  display: grid;
  place-content: center;
  margin-bottom: 6px;
}

.photo-wrap {
  position: fixed;
  bottom: 2.875rem;
  left: 2.875rem;
  display: flex;
  flex-direction: column;
  align-items: center;
  gap: 6px;
}

.photo {
  height: 3.125rem;
  width: 3.125rem;
  background-color: rgba(250, 250, 250, 0.8);
  border-radius: 50%;
  display: grid;
  place-items: center;
  cursor: pointer;
}

.hide_file {
  display: none;
}

page {
  background-color: #333333;
}

.canvasBox {
  width: 100vw;
  position: relative;
  top: 0;
  bottom: 0;
  left: 0;
  right: 0;
  background-image: linear-gradient(
      0deg,
      transparent 24%,
      rgba(32, 255, 77, 0.1) 25%,
      rgba(32, 255, 77, 0.1) 26%,
      transparent 27%,
      transparent 74%,
      rgba(32, 255, 77, 0.1) 75%,
      rgba(32, 255, 77, 0.1) 76%,
      transparent 77%,
      transparent
    ),
    linear-gradient(
      90deg,
      transparent 24%,
      rgba(32, 255, 77, 0.1) 25%,
      rgba(32, 255, 77, 0.1) 26%,
      transparent 27%,
      transparent 74%,
      rgba(32, 255, 77, 0.1) 75%,
      rgba(32, 255, 77, 0.1) 76%,
      transparent 77%,
      transparent
    );
  background-size: 3rem 3rem;
  background-position: -1rem -1rem;
  z-index: 10;
  background-color: #1110;
}

.box {
  width: 11.9375rem;
  height: 11.9375rem;
  position: absolute;
  left: 50%;
  top: 50%;
  transform: translate(-50%, -80%);
  overflow: hidden;
  border: 0.1rem solid rgba(0, 255, 51, 0.2);
  z-index: 11;
}

.line {
  height: calc(100% - 2px);
  width: 100%;
  background: linear-gradient(180deg, rgba(0, 255, 51, 0) 43%, #00ff33 211%);
  border-bottom: 3px solid #00ff33;
  transform: translateY(-100%);
  animation: radar-beam 2s infinite alternate;
  animation-timing-function: cubic-bezier(0.53, 0, 0.43, 0.99);
  animation-delay: 1.4s;
}

.box:after,
.box:before,
.angle:after,
.angle:before {
  content: "";
  display: block;
  position: absolute;
  width: 3vw;
  height: 3vw;
  z-index: 12;
  border: 0.2rem solid transparent;
}

.box:after,
.box:before {
  top: 0;
  border-top-color: #00ff33;
}

.angle:after,
.angle:before {
  bottom: 0;
  border-bottom-color: #00ff33;
}

.box:before,
.angle:before {
  left: 0;
  border-left-color: #00ff33;
}

.box:after,
.angle:after {
  right: 0;
  border-right-color: #00ff33;
}

@keyframes radar-beam {
  0% {
    transform: translateY(-100%);
  }

  100% {
    transform: translateY(0);
  }
}

.box2 {
  width: 18.75rem;
  height: 12.5rem;
  position: absolute;
  left: 50%;
  top: 50%;
  transform: translate(-50%, -80%);
  z-index: 20;
}

.track {
  position: absolute;
  bottom: -6.25rem;
  left: 50%;
  transform: translateX(-50%);
  z-index: 20;
  color: #fff;
  display: flex;
  flex-direction: column;
  align-items: center;
}
</style>
✨该部分完整Demo代码在该文件夹下:Demo (二维码实现之jsQR)
5. 总结
方式一结合vue-qrcode-reader的封装性更强且识别二维码速度更快。
方式二接近了vue-qrcode-reader的底层实现过程。
实际项目开发中更推荐方式一,兼容性与稳定性会更好些。
