本文参考自https://github.com/fastai/course-nlp。
使用 RNN 预测数字的英文单词版本
在上一课中,我们将 RNN 用作语言模型的一部分。今天,我们将深入了解 RNN 是什么以及它们如何工作。我们将使用尝试预测数字的英文单词版本的问题来实现这一点。
让我们预测这个序列中接下来应该是什么:
eight thousand one , eight thousand two , eight thousand three , eight thousand four , eight thousand five , eight thousand six , eight thousand seven , eight thousand eight , eight thousand nine , eight thousand ten , eight thousand eleven , eight thousand twelve…
Jeremy 创建了这个合成数据集,以便有更好的方法来检查事情是否正常、调试和了解发生了什么。在尝试新想法时,最好有一个较小的数据集来这样做,以便快速了解你的想法是否有前途(有关其他示例,请参阅 Imagenette 和 Imagewoof)这个英文单词数字将作为学习 RNN 的良好数据集。我们今天的任务是预测计数时接下来会出现哪个单词。
在深度学习中,有两种类型的数字
参数是学习到的数字。激活是计算出的数字(通过仿射函数和元素非线性)。
当你学习深度学习中的任何新概念时,问问自己:这是一个参数还是一个激活?
提醒自己:指出隐藏状态,从没有 for 循环的版本转到 for 循环。这是人们感到困惑的步骤。
Data
from fastai.text import *
bs=64
path = untar_data(URLs.HUMAN_NUMBERS)
path.ls()
[PosixPath('/home/racheltho/.fastai/data/human_numbers/models'),
 PosixPath('/home/racheltho/.fastai/data/human_numbers/valid.txt'),
 PosixPath('/home/racheltho/.fastai/data/human_numbers/train.txt')]
def readnums(d): return [', '.join(o.strip() for o in open(path/d).readlines())]
train.txt 为我们提供了以英文单词写出的数字序列:
train_txt = readnums('train.txt'); train_txt[0][:80]
'one, two, three, four, five, six, seven, eight, nine, ten, eleven, twelve, thirt'
valid_txt = readnums('valid.txt'); valid_txt[0][-80:]
' nine thousand nine hundred ninety eight, nine thousand nine hundred ninety nine'
train = TextList(train_txt, path=path)
valid = TextList(valid_txt, path=path)

src = ItemLists(path=path, train=train, valid=valid).label_for_lm()
data = src.databunch(bs=bs)
train[0].text[:80]
'xxbos one , two , three , four , five , six , seven , eight , nine , ten , eleve'
len(data.valid_ds[0][0].data)
13017
bptt 代表时间反向传播。这告诉我们正在考虑多少历史步骤。
data.bptt, len(data.valid_dl)
(70, 3)
我们的验证集中有 3 个批次:
13017 个标记,每行文本中约有 ~70 个标记,每批次有 64 行文本。
13017/70/bs
2.905580357142857
我们将每个批次存储在单独的变量中,这样我们就可以通过这个过程更好地理解 RNN 在每个步骤中的作用:
it = iter(data.valid_dl)
x1,y1 = next(it)
x2,y2 = next(it)
x3,y3 = next(it)
it.close()
x1
tensor([[ 2, 19, 11,  ..., 36,  9, 19],
        [ 9, 19, 11,  ..., 24, 20,  9],
        [11, 27, 18,  ...,  9, 19, 11],
        ...,
        [20, 11, 20,  ..., 11, 20, 10],
        [20, 11, 20,  ..., 24,  9, 20],
        [20, 10, 26,  ..., 20, 11, 20]], device='cuda:0')
numel() is a PyTorch method to return the number of elements in a tensor:
x1.numel()+x2.numel()+x3.numel()
13440
x1.shape, y1.shape
(torch.Size([64, 70]), torch.Size([64, 70]))
x2.shape, y2.shape
(torch.Size([64, 70]), torch.Size([64, 70]))
x3.shape, y3.shape
(torch.Size([64, 70]), torch.Size([64, 70]))
v = data.valid_ds.vocab
v.itos
['xxunk',
 'xxpad',
 'xxbos',
 'xxeos',
 'xxfld',
 'xxmaj',
 'xxup',
 'xxrep',
 'xxwrep',
 ',',
 'hundred',
 'thousand',
 'one',
 'two',
 'three',
 'four',
 'five',
 'six',
 'seven',
 'eight',
 'nine',
 'twenty',
 'thirty',
 'forty',
 'fifty',
 'sixty',
 'seventy',
 'eighty',
 'ninety',
 'ten',
 'eleven',
 'twelve',
 'thirteen',
 'fourteen',
 'fifteen',
 'sixteen',
 'seventeen',
 'eighteen',
 'nineteen']
x1[:,0]
tensor([ 2,  9, 11, 12, 13, 11, 10,  9, 10, 14, 19, 25, 19, 15, 16, 11, 19,  9,
        10,  9, 19, 25, 19, 11, 19, 11, 10,  9, 19, 20, 11, 26, 20, 23, 20, 20,
        24, 20, 11, 14, 11, 11,  9, 14,  9, 20, 10, 20, 35, 17, 11, 10,  9, 17,
         9, 20, 10, 20, 11, 20, 11, 20, 20, 20], device='cuda:0')
y1[:,0]
tensor([19, 19, 27, 10,  9, 12, 32, 19, 26, 10, 11, 15, 11, 10,  9, 15, 11, 19,
        26, 19, 11, 18, 11, 18,  9, 18, 21, 19, 10, 10, 20,  9, 11, 16, 11, 11,
        13, 11, 13,  9, 13, 14, 20, 10, 20, 11, 24, 11,  9,  9, 16, 17, 20, 10,
        20, 11, 24, 11, 19,  9, 19, 11, 11, 10], device='cuda:0')
v.itos[9], v.itos[11], v.itos[12], v.itos[13], v.itos[10]
(',', 'thousand', 'one', 'two', 'hundred')
v.textify(x1[0])
'xxbos eight thousand one , eight thousand two , eight thousand three , eight thousand four , eight thousand five , eight thousand six , eight thousand seven , eight thousand eight , eight thousand nine , eight thousand ten , eight thousand eleven , eight thousand twelve , eight thousand thirteen , eight thousand fourteen , eight thousand fifteen , eight thousand sixteen , eight thousand seventeen , eight'
v.textify(x1[1])
', eight thousand forty six , eight thousand forty seven , eight thousand forty eight , eight thousand forty nine , eight thousand fifty , eight thousand fifty one , eight thousand fifty two , eight thousand fifty three , eight thousand fifty four , eight thousand fifty five , eight thousand fifty six , eight thousand fifty seven , eight thousand fifty eight , eight thousand fifty nine ,'
v.textify(x2[1])
'eight thousand sixty , eight thousand sixty one , eight thousand sixty two , eight thousand sixty three , eight thousand sixty four , eight thousand sixty five , eight thousand sixty six , eight thousand sixty seven , eight thousand sixty eight , eight thousand sixty nine , eight thousand seventy , eight thousand seventy one , eight thousand seventy two , eight thousand seventy three , eight thousand'
v.textify(y1[0])
'eight thousand one , eight thousand two , eight thousand three , eight thousand four , eight thousand five , eight thousand six , eight thousand seven , eight thousand eight , eight thousand nine , eight thousand ten , eight thousand eleven , eight thousand twelve , eight thousand thirteen , eight thousand fourteen , eight thousand fifteen , eight thousand sixteen , eight thousand seventeen , eight thousand'
v.textify(x2[0])
'thousand eighteen , eight thousand nineteen , eight thousand twenty , eight thousand twenty one , eight thousand twenty two , eight thousand twenty three , eight thousand twenty four , eight thousand twenty five , eight thousand twenty six , eight thousand twenty seven , eight thousand twenty eight , eight thousand twenty nine , eight thousand thirty , eight thousand thirty one , eight thousand thirty two ,'
v.textify(x3[0])
'eight thousand thirty three , eight thousand thirty four , eight thousand thirty five , eight thousand thirty six , eight thousand thirty seven , eight thousand thirty eight , eight thousand thirty nine , eight thousand forty , eight thousand forty one , eight thousand forty two , eight thousand forty three , eight thousand forty four , eight thousand forty five , eight thousand forty six , eight'
v.textify(x1[1])
', eight thousand forty six , eight thousand forty seven , eight thousand forty eight , eight thousand forty nine , eight thousand fifty , eight thousand fifty one , eight thousand fifty two , eight thousand fifty three , eight thousand fifty four , eight thousand fifty five , eight thousand fifty six , eight thousand fifty seven , eight thousand fifty eight , eight thousand fifty nine ,'
v.textify(x2[1])
'eight thousand sixty , eight thousand sixty one , eight thousand sixty two , eight thousand sixty three , eight thousand sixty four , eight thousand sixty five , eight thousand sixty six , eight thousand sixty seven , eight thousand sixty eight , eight thousand sixty nine , eight thousand seventy , eight thousand seventy one , eight thousand seventy two , eight thousand seventy three , eight thousand'
v.textify(x3[1])
'seventy four , eight thousand seventy five , eight thousand seventy six , eight thousand seventy seven , eight thousand seventy eight , eight thousand seventy nine , eight thousand eighty , eight thousand eighty one , eight thousand eighty two , eight thousand eighty three , eight thousand eighty four , eight thousand eighty five , eight thousand eighty six , eight thousand eighty seven , eight thousand eighty'
v.textify(x3[-1])
'ninety , nine thousand nine hundred ninety one , nine thousand nine hundred ninety two , nine thousand nine hundred ninety three , nine thousand nine hundred ninety four , nine thousand nine hundred ninety five , nine thousand nine hundred ninety six , nine thousand nine hundred ninety seven , nine thousand nine hundred ninety eight , nine thousand nine hundred ninety nine xxbos eight thousand one , eight'
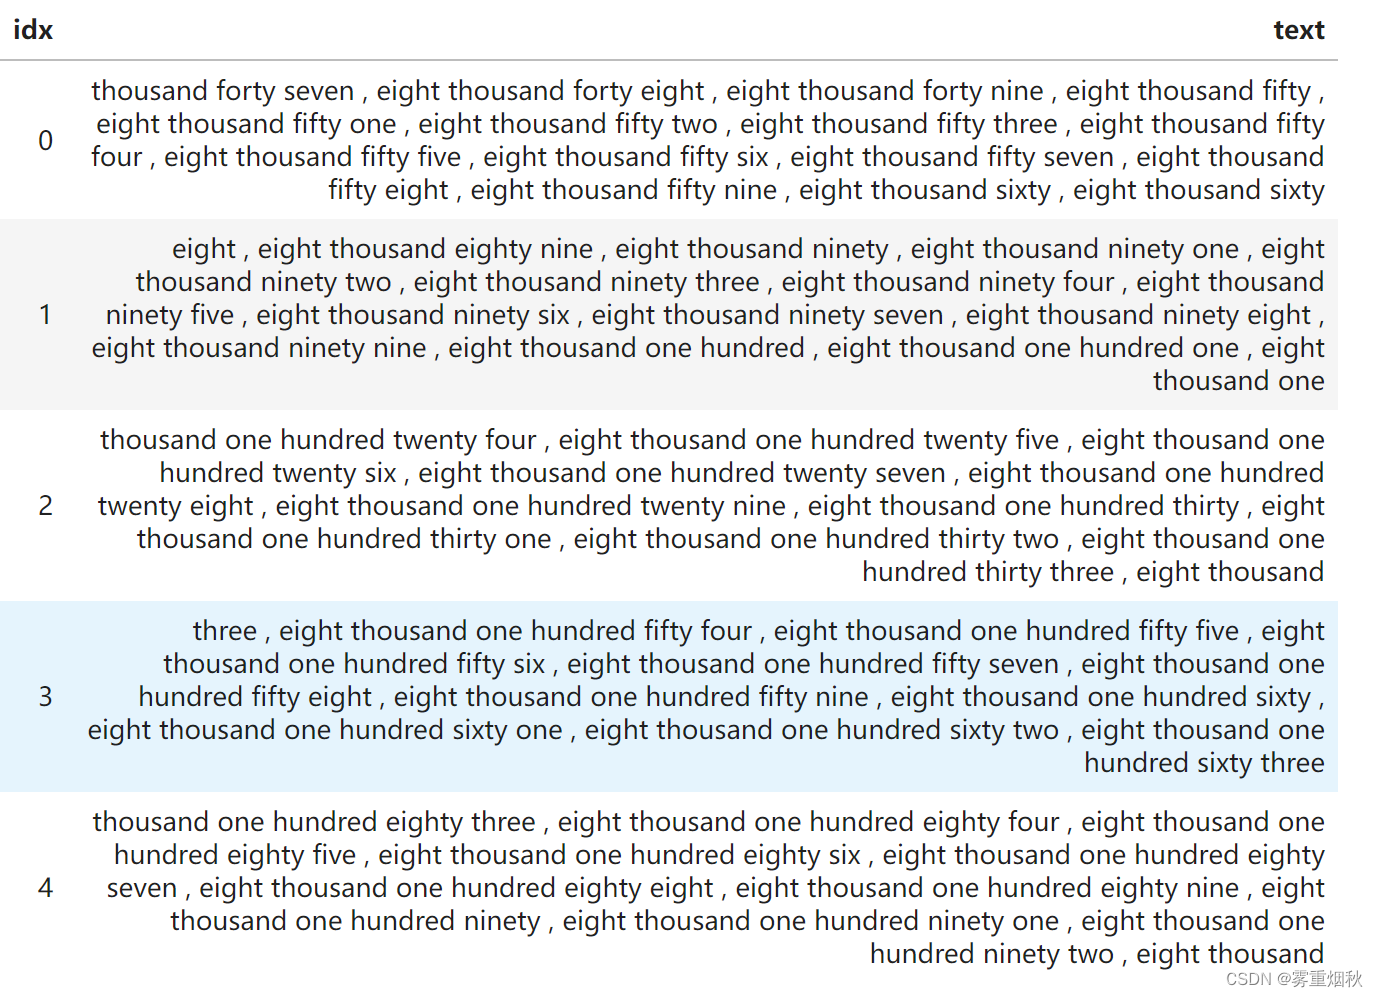
data.show_batch(ds_type=DatasetType.Valid)
我们将迭代地考虑一些不同的模型,构建更传统的 RNN。
单一全连接模型
data = src.databunch(bs=bs, bptt=3)
x,y = data.one_batch()
x.shape,y.shape
(torch.Size([64, 3]), torch.Size([64, 3]))
nv = len(v.itos); nv
39
nh=64
def loss4(input,target): return F.cross_entropy(input, target[:,-1])
def acc4 (input,target): return accuracy(input, target[:,-1])
x[:,0]
tensor([13, 13, 10,  9, 18,  9, 11, 11, 13, 19, 16, 23, 24,  9, 12,  9, 13, 14,
        15, 11, 10, 22, 15,  9, 10, 14, 11, 16, 10, 28, 11,  9, 20,  9, 15, 15,
        11, 18, 10, 28, 23, 24,  9, 16, 10, 16, 19, 20, 12, 10, 22, 16, 17, 17,
        17, 11, 24, 10,  9, 15, 16,  9, 18, 11])
Layer names:
i_h: input to hiddenh_h: hidden to hiddenh_o: hidden to outputbn: batchnorm
class Model0(nn.Module):
    def __init__(self):
        super().__init__()
        self.i_h = nn.Embedding(nv,nh)  # green arrow
        self.h_h = nn.Linear(nh,nh)     # brown arrow
        self.h_o = nn.Linear(nh,nv)     # blue arrow
        self.bn = nn.BatchNorm1d(nh)

    def forward(self, x):
        h = self.bn(F.relu(self.i_h(x[:,0])))
        if x.shape[1]>1:
            h = h + self.i_h(x[:,1])
            h = self.bn(F.relu(self.h_h(h)))
        if x.shape[1]>2:
            h = h + self.i_h(x[:,2])
            h = self.bn(F.relu(self.h_h(h)))
        return self.h_o(h)
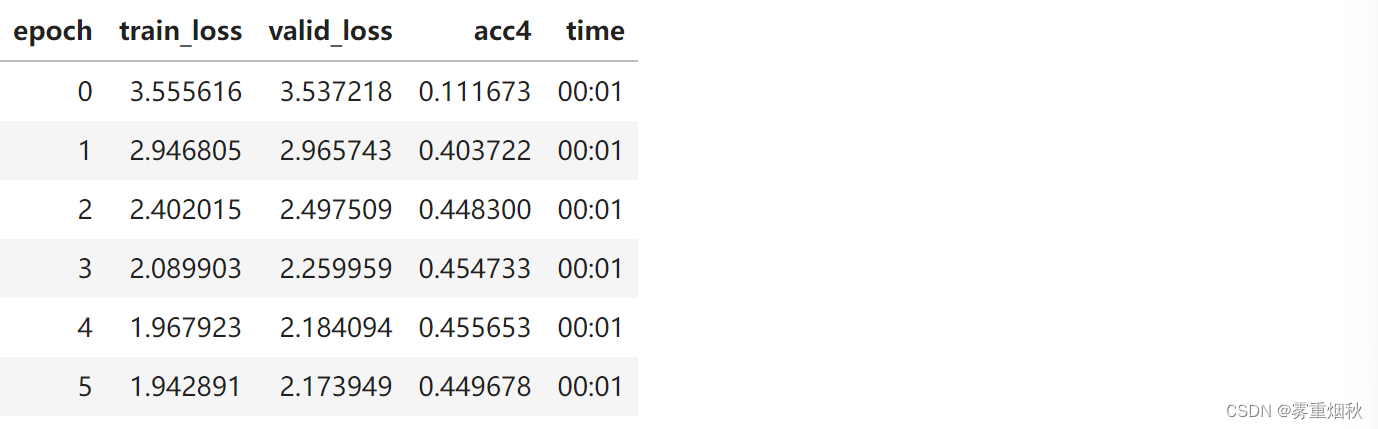
learn = Learner(data, Model0(), loss_func=loss4, metrics=acc4)
learn.fit_one_cycle(6, 1e-4)

循环也一样
让我们重构一下,使用 for 循环。它的作用和之前一样:
class Model1(nn.Module):
    def __init__(self):
        super().__init__()
        self.i_h = nn.Embedding(nv,nh)  # green arrow
        self.h_h = nn.Linear(nh,nh)     # brown arrow
        self.h_o = nn.Linear(nh,nv)     # blue arrow
        self.bn = nn.BatchNorm1d(nh)

    def forward(self, x):
        h = torch.zeros(x.shape[0], nh).to(device=x.device)
        for i in range(x.shape[1]):
            h = h + self.i_h(x[:,i])
            h = self.bn(F.relu(self.h_h(h)))
        return self.h_o(h)
这是展开的 RNN 图(我们之前的 RNN 图)和卷起的 RNN 图(我们现在的 RNN 图)之间的区别:
learn = Learner(data, Model1(), loss_func=loss4, metrics=acc4)
learn.fit_one_cycle(6, 1e-4)
我们的准确性大致相同,因为我们做的事情与以前相同。
多重全连接模型
之前,我们只是预测一行文本中的最后一个单词。给定 70 个标记,标记 71 是什么?这种方法会丢弃大量数据。为什么不根据标记 1 预测标记 2,然后预测标记 3,然后预测标记 4,依此类推?我们将修改模型来做到这一点。
data = src.databunch(bs=bs, bptt=20)
x,y = data.one_batch()
x.shape,y.shape
(torch.Size([64, 20]), torch.Size([64, 20]))
class Model2(nn.Module):
    def __init__(self):
        super().__init__()
        self.i_h = nn.Embedding(nv,nh)
        self.h_h = nn.Linear(nh,nh)
        self.h_o = nn.Linear(nh,nv)
        self.bn = nn.BatchNorm1d(nh)

    def forward(self, x):
        h = torch.zeros(x.shape[0], nh).to(device=x.device)
        res = []
        for i in range(x.shape[1]):
            h = h + self.i_h(x[:,i])
            h = F.relu(self.h_h(h))
            res.append(self.h_o(self.bn(h)))
        return torch.stack(res, dim=1)
learn = Learner(data, Model2(), metrics=accuracy)
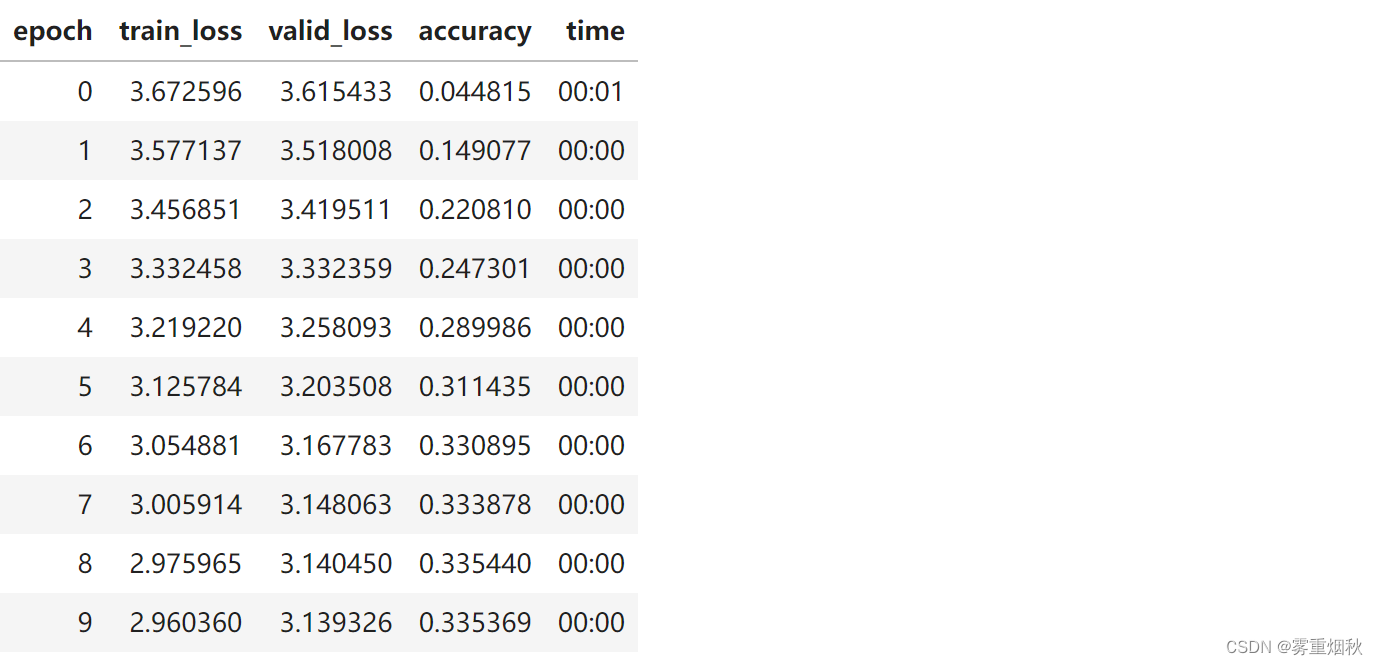
请注意,我们的准确率现在变差了,因为我们在做一项更艰巨的任务。当我们预测单词 k(k<70)时,我们能获得的历史记录比我们仅预测单词 71 时要少。(Model2每次forward调用时都重新初始化h)
维持状态
为了解决这个问题,让我们保留上一行文本的隐藏状态,这样我们就不会在每一行新文本上重新开始。
class Model3(nn.Module):
    def __init__(self):
        super().__init__()
        self.i_h = nn.Embedding(nv,nh)
        self.h_h = nn.Linear(nh,nh)
        self.h_o = nn.Linear(nh,nv)
        self.bn = nn.BatchNorm1d(nh)
        self.h = torch.zeros(bs, nh).cuda()

    def forward(self, x):
        res = []
        h = self.h
        for i in range(x.shape[1]):
            h = h + self.i_h(x[:,i])
            h = F.relu(self.h_h(h))
            res.append(self.bn(h))
        self.h = h.detach()
        res = torch.stack(res, dim=1)
        res = self.h_o(res)
        return res
learn = Learner(data, Model3(), metrics=accuracy)
earn.fit_one_cycle(20, 3e-3)
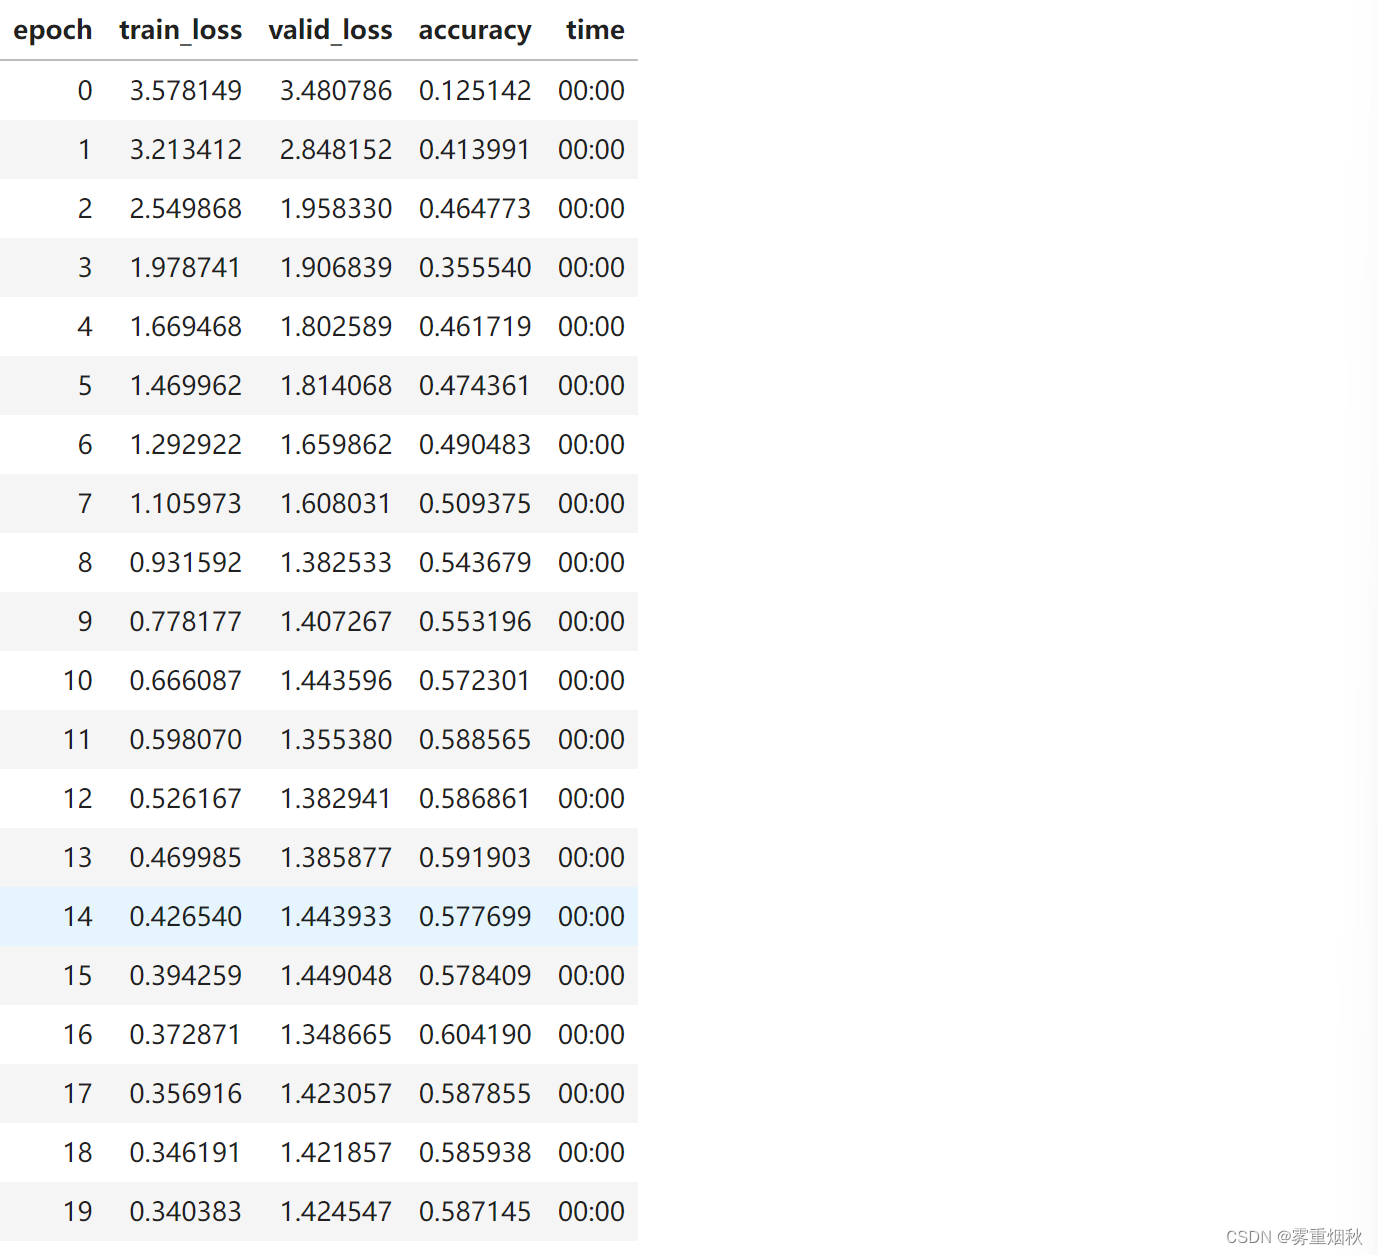
现在我们获得的准确性比以前更高了!(h.detach()防止累积梯度回传)
nn.RNN
class Model4(nn.Module):
    def __init__(self):
        super().__init__()
        self.i_h = nn.Embedding(nv,nh)
        self.rnn = nn.RNN(nh,nh, batch_first=True)
        self.h_o = nn.Linear(nh,nv)
        self.bn = BatchNorm1dFlat(nh)
        self.h = torch.zeros(1, bs, nh).cuda()

    def forward(self, x):
        res,h = self.rnn(self.i_h(x), self.h)
        self.h = h.detach()
        return self.h_o(self.bn(res))
learn = Learner(data, Model4(), metrics=accuracy)
learn.fit_one_cycle(20, 3e-3)

2-layer GRU
当你拥有较长的时间尺度和较深的网络时,这些就变得无法训练。解决这个问题的一种方法是添加 mini-NN 来决定保留多少绿色箭头和多少橙色箭头。这些 mini-NN 可以是 GRU 或 LSTM。我们将在后面的课程中介绍更多细节。
class Model5(nn.Module):
    def __init__(self):
        super().__init__()
        self.i_h = nn.Embedding(nv,nh)
        self.rnn = nn.GRU(nh, nh, 2, batch_first=True)
        self.h_o = nn.Linear(nh,nv)
        self.bn = BatchNorm1dFlat(nh)
        self.h = torch.zeros(2, bs, nh).cuda()

    def forward(self, x):
        res,h = self.rnn(self.i_h(x), self.h)
        self.h = h.detach()
        return self.h_o(self.bn(res))
learn = Learner(data, Model5(), metrics=accuracy)
learn.fit_one_cycle(10, 1e-2)
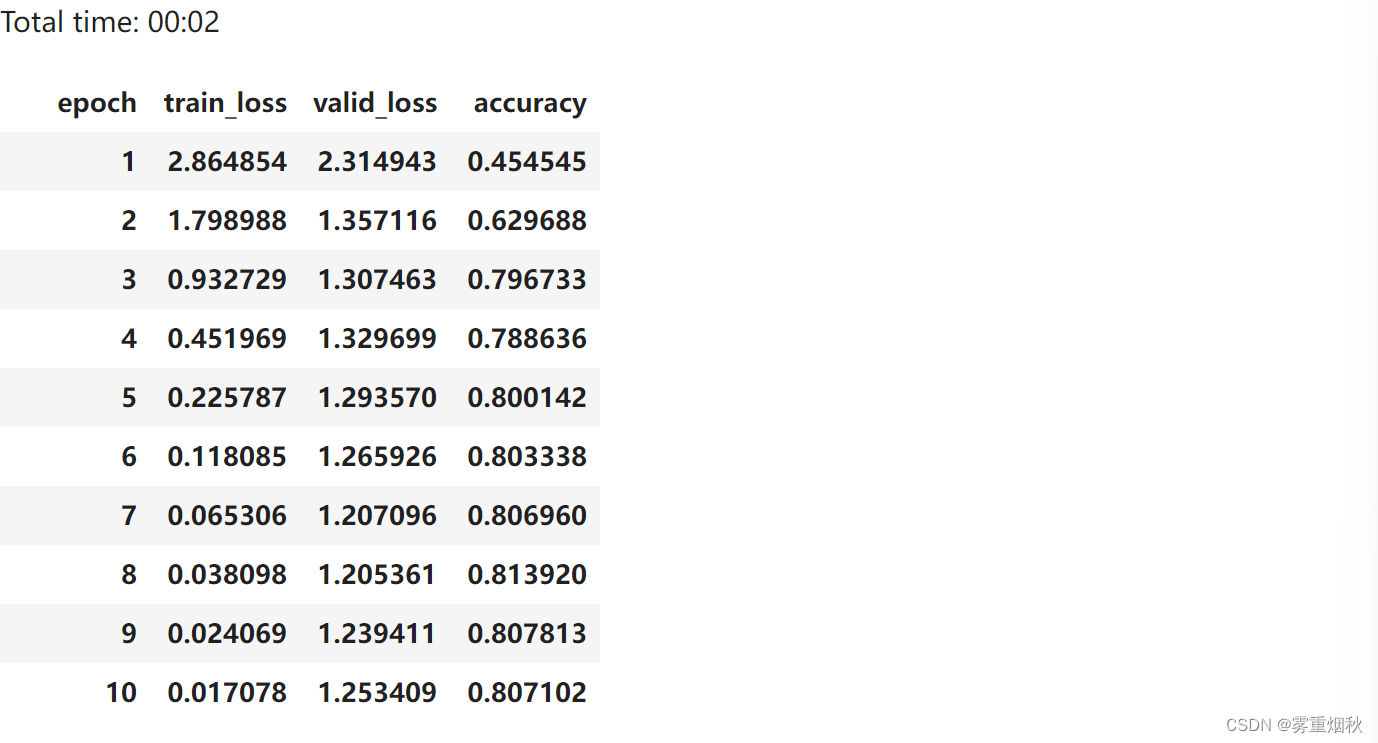
Connection to ULMFit
在上一课中,我们基本上用分类器替换了 self.h_o 来对文本进行分类。
结尾
RNN 只是一个重构的全连接神经网络。
你可以使用相同的方法处理任何序列标记任务(词性、分类材料是否敏感等)