多层感知机版本
import torch
import torch.nn as nn
import numpy as np
import torch.utils
from torch.utils.data import DataLoader, Dataset
import torchvision
from torchvision import transforms
import matplotlib.pyplot as plt
import matplotlib
import os
# 前置配置:
matplotlib.use('Agg')
class Config():
base_dir = os.path.dirname(os.path.abspath(__file__))
device = "cuda" if torch.cuda.is_available() else "cpu"
# 超参配置:
batch_size=128
lr=0.0001
# 数据集初步加工
train_ds = torchvision.datasets.MNIST(os.path.join(Config.base_dir,"data"),train=True,download=False,transform=transforms.ToTensor())
test_ds = torchvision.datasets.MNIST(os.path.join(Config.base_dir,"data"),train=False,download=False,transform=transforms.ToTensor())
# 生成dataLoader
train_dl = DataLoader(train_ds,batch_size=Config.batch_size,shuffle=True)
test_dl = DataLoader(test_ds,batch_size=Config.batch_size)
def show_pic_and_label():
# 查看dataloader
print(len(train_dl.dataset))
# 查看 它的img 和 label
imgs, labels = next(iter(train_dl))
# print(imgs, labels)
sample_img = imgs[0:10]
sample_label = labels[0:10]
print(sample_img,sample_label)
for idx,npimg in enumerate(sample_img,1):
# plt.subplot()
# 也可以挤一挤
npimg = npimg.squeeze()
# npimg = npimg.reshape(28,28)
plt.subplot(1,10,idx)
plt.imshow(npimg)
plt.axis('off')
plt.savefig(os.path.join(Config.base_dir,"1.jpg"))
print(sample_label)
# 构建模型
class Model(nn.Module):
def __init__(self):
super().__init__()
# 第一层 28*28, 120
self.liner1 = nn.Linear(28*28,120)
# 第二层 输出84
self.liner2 = nn.Linear(120, 84)
# 第三层 输出10
self.liner3 = nn.Linear(84,10)
def forward(self, input):
x = input.view(-1,28*28)
# @todo 这里踩坑了,不是nn.ReLU, 而是torch.ReLu
x = torch.relu(self.liner1(x))
x = torch.relu(self.liner2(x))
x = self.liner3(x)
return x
model = Model().to(Config.device)
# print(model)
optim = torch.optim.Adam(model.parameters(), lr = Config.lr)
loss_fn = nn.CrossEntropyLoss()
def model_test():
"""
确认输入输出是没问题的。
"""
res = model(torch.randn(10,28*28).to(Config.device))
print(res.shape)
print(res)
def accuracy(y_pred,y_true):
y_pred = (torch.argmax(y_pred,dim=1) == y_true).type(torch.int64)
return y_pred.sum()
# 编写训练过程
def train(dataloader, model, loss_fn, optimizer):
total_row_count = len(dataloader.dataset)
total_batch_count = len(dataloader)
total_acc = 0
total_loss = 0
for X,y in dataloader:
X,y = X.to(Config.device),y.to(Config.device)
y_pred = model(X)
acc = accuracy(y_pred,y)
loss = loss_fn(y_pred,y)
optimizer.zero_grad()
loss.backward()
optimizer.step()
with torch.no_grad():
total_acc+=acc
total_loss+=loss
total_acc = total_acc/total_row_count
total_loss = total_loss/total_batch_count
return total_loss, total_acc
# 编写测试过程
def test(dataloader, model, loss_fn):
total_row_count = len(dataloader.dataset)
total_batch_count = len(dataloader)
total_acc = 0
total_loss = 0
with torch.no_grad():
for X,y in dataloader:
X,y = X.to(Config.device),y.to(Config.device)
y_pred = model(X)
acc = accuracy(y_pred,y)
loss = loss_fn(y_pred,y)
total_acc+=acc
total_loss+=loss
total_acc = total_acc/total_row_count
total_loss = total_loss/total_batch_count
return total_loss, total_acc
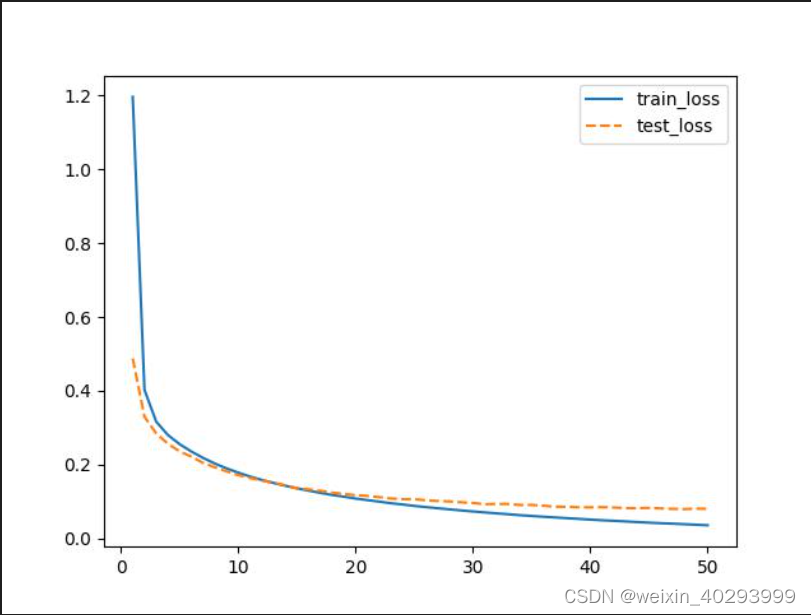
epochs = 50
train_loss = []
train_acc = []
test_loss = []
test_acc = []
for epoch in range(epochs):
epoch_loss, epoch_acc = train(train_dl,model,loss_fn,optim)
epoch_test_loss, epoch_test_acc = test(test_dl,model,loss_fn)
template = "epoch:{:2d}, train_loss:{:.5f}, train_acc:{:.1f}%, test_loss:{:.5f},test_acc:{:.1f}%"
print(template.format(epoch, epoch_loss.data.item(), epoch_acc.data.item()*100, epoch_test_loss.data.item(), epoch_test_acc.data.item()*100))
#print(epoch, epoch_loss.data.item(),epoch_acc.data.item(),epoch_test_loss.data.item(),epoch_test_acc.data.item())
if __name__ == "__main__":
# model_test()
pass
# y_pred = torch.tensor([
# [1,2,3],
# [2,1,3],
# [3,2,1],
# ])
# y_true = torch.tensor([2,0,1])
# res = accuracy(y_pred,y_true)
# print(res)
(pytorchbook) (base) justin@justin-System-Product-Name:~/Desktop/code/python_project/mypaper$ /home/justin/miniconda3/envs/pytorchbook/bin/python /home/justin/Desktop/code/python_project/mypaper/pytorchbook/chapter4/手写体识别.py
epoch: 0, train_loss:1.17435, train_acc:70.1%, test_loss:0.47829,test_acc:88.7%
epoch: 1, train_loss:0.39913, train_acc:89.5%, test_loss:0.33029,test_acc:91.0%
epoch: 2, train_loss:0.31837, train_acc:91.1%, test_loss:0.28821,test_acc:91.8%
epoch: 3, train_loss:0.28331, train_acc:92.0%, test_loss:0.26157,test_acc:92.5%
epoch: 4, train_loss:0.26049, train_acc:92.5%, test_loss:0.24704,test_acc:93.1%
epoch: 5, train_loss:0.24122, train_acc:93.1%, test_loss:0.22766,test_acc:93.4%
epoch: 6, train_loss:0.22516, train_acc:93.6%, test_loss:0.21446,test_acc:93.7%
epoch: 7, train_loss:0.21048, train_acc:94.0%, test_loss:0.20211,test_acc:94.2%
epoch: 8, train_loss:0.19786, train_acc:94.4%, test_loss:0.19200,test_acc:94.5%
epoch: 9, train_loss:0.18692, train_acc:94.6%, test_loss:0.18458,test_acc:94.7%
epoch:10, train_loss:0.17689, train_acc:95.0%, test_loss:0.17440,test_acc:94.9%
epoch:11, train_loss:0.16766, train_acc:95.2%, test_loss:0.16584,test_acc:95.0%
epoch:12, train_loss:0.15932, train_acc:95.5%, test_loss:0.16011,test_acc:95.3%
epoch:13, train_loss:0.15149, train_acc:95.7%, test_loss:0.15269,test_acc:95.5%
epoch:14, train_loss:0.14443, train_acc:95.9%, test_loss:0.14685,test_acc:95.5%
epoch:15, train_loss:0.13801, train_acc:96.0%, test_loss:0.14179,test_acc:95.7%
epoch:16, train_loss:0.13172, train_acc:96.2%, test_loss:0.13724,test_acc:95.8%
epoch:17, train_loss:0.12594, train_acc:96.3%, test_loss:0.13256,test_acc:96.1%
epoch:18, train_loss:0.12016, train_acc:96.5%, test_loss:0.13012,test_acc:96.1%
epoch:19, train_loss:0.11557, train_acc:96.7%, test_loss:0.12416,test_acc:96.2%
epoch:20, train_loss:0.11037, train_acc:96.8%, test_loss:0.12220,test_acc:96.4%
epoch:21, train_loss:0.10601, train_acc:97.0%, test_loss:0.11851,test_acc:96.5%
epoch:22, train_loss:0.10160, train_acc:97.1%, test_loss:0.11445,test_acc:96.6%
epoch:23, train_loss:0.09774, train_acc:97.2%, test_loss:0.11242,test_acc:96.5%
epoch:24, train_loss:0.09388, train_acc:97.3%, test_loss:0.10876,test_acc:96.6%
epoch:25, train_loss:0.09008, train_acc:97.4%, test_loss:0.10713,test_acc:96.7%
epoch:26, train_loss:0.08692, train_acc:97.5%, test_loss:0.10526,test_acc:96.7%
epoch:27, train_loss:0.08370, train_acc:97.6%, test_loss:0.10490,test_acc:96.8%
epoch:28, train_loss:0.08067, train_acc:97.7%, test_loss:0.10183,test_acc:96.8%
epoch:29, train_loss:0.07805, train_acc:97.7%, test_loss:0.10172,test_acc:96.9%
epoch:30, train_loss:0.07480, train_acc:97.8%, test_loss:0.09779,test_acc:97.0%
epoch:31, train_loss:0.07235, train_acc:97.8%, test_loss:0.09650,test_acc:97.0%
epoch:32, train_loss:0.06958, train_acc:98.0%, test_loss:0.09472,test_acc:97.1%
epoch:33, train_loss:0.06747, train_acc:98.0%, test_loss:0.09349,test_acc:97.1%
epoch:34, train_loss:0.06504, train_acc:98.1%, test_loss:0.09270,test_acc:97.1%
epoch:35, train_loss:0.06236, train_acc:98.2%, test_loss:0.09221,test_acc:97.2%
epoch:36, train_loss:0.06039, train_acc:98.3%, test_loss:0.09187,test_acc:97.2%
epoch:37, train_loss:0.05850, train_acc:98.3%, test_loss:0.08917,test_acc:97.3%
epoch:38, train_loss:0.05624, train_acc:98.4%, test_loss:0.08657,test_acc:97.3%
epoch:39, train_loss:0.05456, train_acc:98.4%, test_loss:0.08722,test_acc:97.4%
epoch:40, train_loss:0.05246, train_acc:98.5%, test_loss:0.08660,test_acc:97.4%
epoch:41, train_loss:0.05088, train_acc:98.5%, test_loss:0.08511,test_acc:97.4%
epoch:42, train_loss:0.04919, train_acc:98.6%, test_loss:0.08628,test_acc:97.4%
epoch:43, train_loss:0.04726, train_acc:98.7%, test_loss:0.08620,test_acc:97.4%
epoch:44, train_loss:0.04571, train_acc:98.7%, test_loss:0.08298,test_acc:97.5%
epoch:45, train_loss:0.04408, train_acc:98.8%, test_loss:0.08309,test_acc:97.5%
epoch:46, train_loss:0.04274, train_acc:98.8%, test_loss:0.08241,test_acc:97.5%
epoch:47, train_loss:0.04122, train_acc:98.9%, test_loss:0.08229,test_acc:97.6%
epoch:48, train_loss:0.03967, train_acc:98.9%, test_loss:0.08120,test_acc:97.6%
epoch:49, train_loss:0.03829, train_acc:99.0%, test_loss:0.08134,test_acc:97.5%
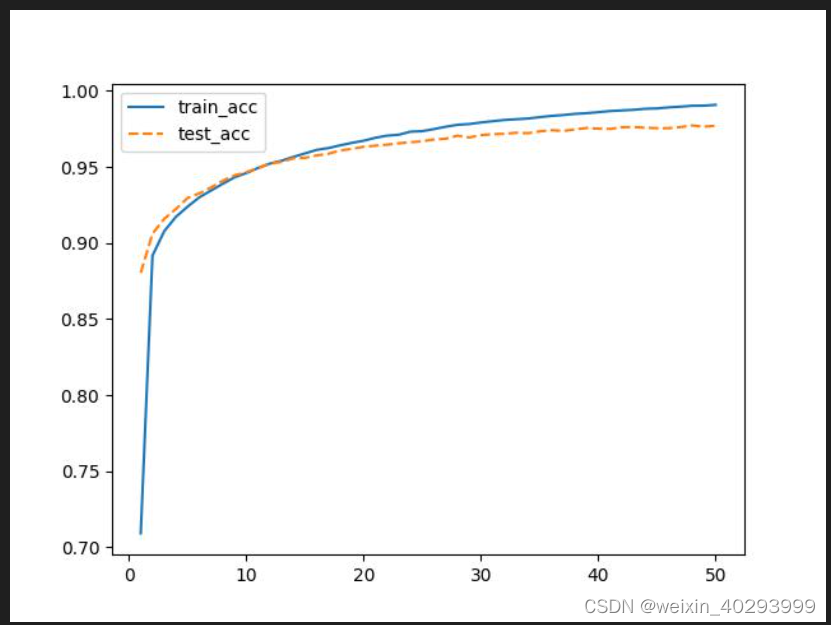
问题1:
epoch: 0, train_loss:1.17435, train_acc:70.1%, test_loss:0.47829,test_acc:88.7%
为什么第一轮训练train_acc要比test_acc掉点不少,是因为第一轮,是刚开始,train按批次比完了,才会到test。因此test是高
那么为什么其它轮,又是test比train低呢?
因为即使train是按批次的,但仍然有可能过拟合,契合的好。所以test是比不过的。
CNN版本
只需要将model换一下,其它的毛也不需要动
class Model(nn.Module):
    def __init__(self) -> None:
        super().__init__()
        self.conv1 = nn.Conv2d(in_channels=1,out_channels=6,kernel_size=5) # 1X28X28 --> 6X24X24 # 池化 6X12X12
        self.conv2 = nn.Conv2d(in_channels=6,out_channels=16,kernel_size=5) # 6X12X12--> 16X8X8
        # 池化 16X4X4
        self.liner_1 = nn.Linear(16*4*4,256)
        self.liner_2 = nn.Linear(256,10)

    def forward(self,input):
        x = torch.max_pool2d(torch.relu(self.conv1(input)),2)
        x = torch.max_pool2d(torch.relu(self.conv2(x)),2)
        # 展平层
        x = x.view(-1, 16*4*4)
        x = torch.relu(self.liner_1(x))
        x = self.liner_2(x)
        return x

# 这里是在学习一种调试的方式
class _Model(nn.Module):
    def __init__(self):
        super().__init__()
        self.conv1 = nn.Conv2d(1, 6, 5)
        self.conv2 = nn.Conv2d(6, 16, 5)

    def forward(self, input):
        a1 = self.conv1(input)
        a2 = F.max_pool2d(a1,2)
        a3 = self.conv2(a2)
        a4 = F.max_pool2d(a3,2)
        # print()
epoch: 0, train_loss:1.13144, train_acc:74.3%, test_loss:0.36698,test_acc:90.6%
epoch: 1, train_loss:0.30213, train_acc:91.6%, test_loss:0.22672,test_acc:93.5%
epoch: 2, train_loss:0.21874, train_acc:93.7%, test_loss:0.17848,test_acc:94.9%
epoch: 3, train_loss:0.17849, train_acc:94.8%, test_loss:0.14941,test_acc:95.4%
epoch: 4, train_loss:0.15203, train_acc:95.5%, test_loss:0.12645,test_acc:96.2%
epoch: 5, train_loss:0.13339, train_acc:96.1%, test_loss:0.11351,test_acc:96.5%
epoch: 6, train_loss:0.11952, train_acc:96.5%, test_loss:0.09954,test_acc:96.9%
epoch: 7, train_loss:0.10876, train_acc:96.7%, test_loss:0.09198,test_acc:97.3%
epoch: 8, train_loss:0.09943, train_acc:97.1%, test_loss:0.08412,test_acc:97.3%
epoch: 9, train_loss:0.09255, train_acc:97.2%, test_loss:0.07788,test_acc:97.6%
epoch:10, train_loss:0.08576, train_acc:97.4%, test_loss:0.07551,test_acc:97.6%
epoch:11, train_loss:0.08089, train_acc:97.5%, test_loss:0.06757,test_acc:97.9%
epoch:12, train_loss:0.07635, train_acc:97.7%, test_loss:0.06399,test_acc:98.0%
epoch:13, train_loss:0.07175, train_acc:97.8%, test_loss:0.05942,test_acc:98.1%
epoch:14, train_loss:0.06862, train_acc:97.9%, test_loss:0.05657,test_acc:98.2%
epoch:15, train_loss:0.06509, train_acc:98.0%, test_loss:0.05776,test_acc:98.1%
epoch:16, train_loss:0.06273, train_acc:98.1%, test_loss:0.05381,test_acc:98.3%
epoch:17, train_loss:0.05940, train_acc:98.2%, test_loss:0.05134,test_acc:98.4%
epoch:18, train_loss:0.05681, train_acc:98.3%, test_loss:0.05330,test_acc:98.2%
epoch:19, train_loss:0.05434, train_acc:98.4%, test_loss:0.04689,test_acc:98.6%
epoch:20, train_loss:0.05175, train_acc:98.5%, test_loss:0.04500,test_acc:98.6%
epoch:21, train_loss:0.05027, train_acc:98.6%, test_loss:0.04645,test_acc:98.5%
epoch:22, train_loss:0.04849, train_acc:98.6%, test_loss:0.04274,test_acc:98.7%
epoch:23, train_loss:0.04600, train_acc:98.6%, test_loss:0.04739,test_acc:98.5%
epoch:24, train_loss:0.04449, train_acc:98.7%, test_loss:0.04360,test_acc:98.7%
epoch:25, train_loss:0.04359, train_acc:98.7%, test_loss:0.04198,test_acc:98.7%
epoch:26, train_loss:0.04115, train_acc:98.8%, test_loss:0.04209,test_acc:98.7%
epoch:27, train_loss:0.03978, train_acc:98.8%, test_loss:0.04147,test_acc:98.7%
epoch:28, train_loss:0.03866, train_acc:98.9%, test_loss:0.03845,test_acc:98.8%
epoch:29, train_loss:0.03721, train_acc:98.9%, test_loss:0.04142,test_acc:98.7%
epoch:30, train_loss:0.03632, train_acc:98.9%, test_loss:0.03916,test_acc:98.8%
epoch:31, train_loss:0.03525, train_acc:98.9%, test_loss:0.04137,test_acc:98.7%
epoch:32, train_loss:0.03364, train_acc:99.0%, test_loss:0.03829,test_acc:98.8%
epoch:33, train_loss:0.03323, train_acc:99.0%, test_loss:0.04090,test_acc:98.7%
epoch:34, train_loss:0.03179, train_acc:99.0%, test_loss:0.03660,test_acc:98.9%
epoch:35, train_loss:0.03125, train_acc:99.1%, test_loss:0.03698,test_acc:98.9%
epoch:36, train_loss:0.03009, train_acc:99.1%, test_loss:0.03624,test_acc:98.8%
epoch:37, train_loss:0.02958, train_acc:99.1%, test_loss:0.03525,test_acc:98.9%
epoch:38, train_loss:0.02902, train_acc:99.1%, test_loss:0.03705,test_acc:98.9%
epoch:39, train_loss:0.02789, train_acc:99.2%, test_loss:0.03579,test_acc:98.9%
epoch:40, train_loss:0.02741, train_acc:99.2%, test_loss:0.03896,test_acc:98.9%
epoch:41, train_loss:0.02604, train_acc:99.2%, test_loss:0.03572,test_acc:98.9%
epoch:42, train_loss:0.02518, train_acc:99.2%, test_loss:0.03741,test_acc:98.7%
epoch:43, train_loss:0.02471, train_acc:99.3%, test_loss:0.03319,test_acc:98.9%
epoch:44, train_loss:0.02413, train_acc:99.3%, test_loss:0.03753,test_acc:98.8%
epoch:45, train_loss:0.02340, train_acc:99.3%, test_loss:0.03333,test_acc:98.9%
epoch:46, train_loss:0.02272, train_acc:99.3%, test_loss:0.03303,test_acc:99.0%
epoch:47, train_loss:0.02188, train_acc:99.3%, test_loss:0.03451,test_acc:98.9%
epoch:48, train_loss:0.02169, train_acc:99.4%, test_loss:0.03433,test_acc:98.9%
epoch:49, train_loss:0.02068, train_acc:99.4%, test_loss:0.03331,test_acc:98.9%
对比一下 cnn的到了98.9,而mlp的只有97.x
函数式API的调用方式
import torch.nn.functional as F
# 这里是在学习一种调试的方式
class _Model(nn.Module):
    def __init__(self):
        super().__init__()
        self.conv1 = nn.Conv2d(1, 6, 5)
        self.conv2 = nn.Conv2d(6, 16, 5)

    def forward(self, input):
        a1 = self.conv1(input)
        a2 = F.max_pool2d(a1,2)
        a3 = self.conv2(a2)
        a4 = F.max_pool2d(a3,2)
        # print()

class Model1(nn.Module):
    def __init__(self) -> None:
        super().__init__()
        self.conv1 = nn.Conv2d(in_channels=1,out_channels=6,kernel_size=5) # 1X28X28 --> 6X24X24 # 池化 6X12X12
        self.conv2 = nn.Conv2d(in_channels=6,out_channels=16,kernel_size=5) # 6X12X12--> 16X8X8
        # 池化 16X4X4
        self.liner_1 = nn.Linear(16*4*4,256)
        self.liner_2 = nn.Linear(256,10)

    def forward(self,input):
        x = F.max_pool2d(F.relu(self.conv1(input)),2)
        x = F.max_pool2d(F.relu(self.conv2(x)),2)
        # 展平层
        x = x.view(-1, 16*4*4)
        x = F.relu(self.liner_1(x))
        x = self.liner_2(x)
        return x