易语言高仿植物大战僵尸
- 效果图
- 运行教程与部分问题解决
- 部分源码
- 源码领取方式
- 下期更新预报
效果图
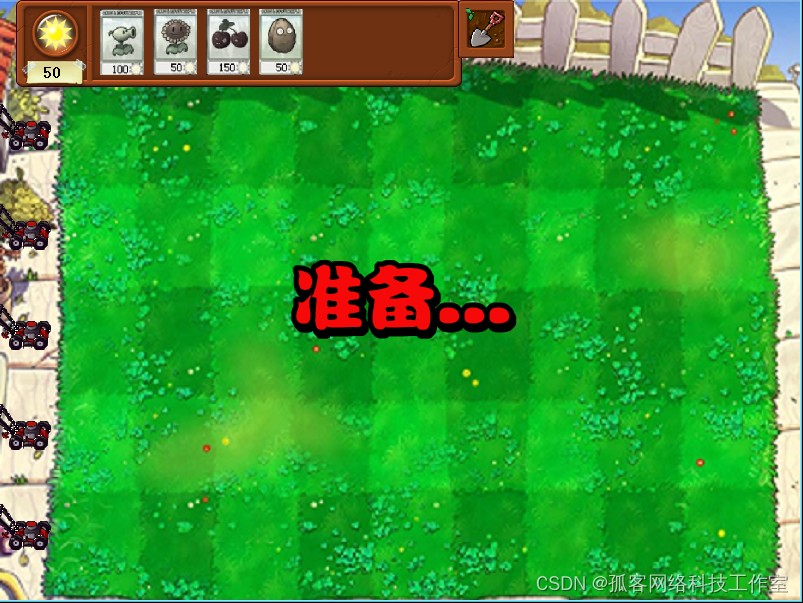
运行教程与部分问题解决
在第一次运行代码的时候会出现一下情况,让我们去下载精易模块[v10.3.5]
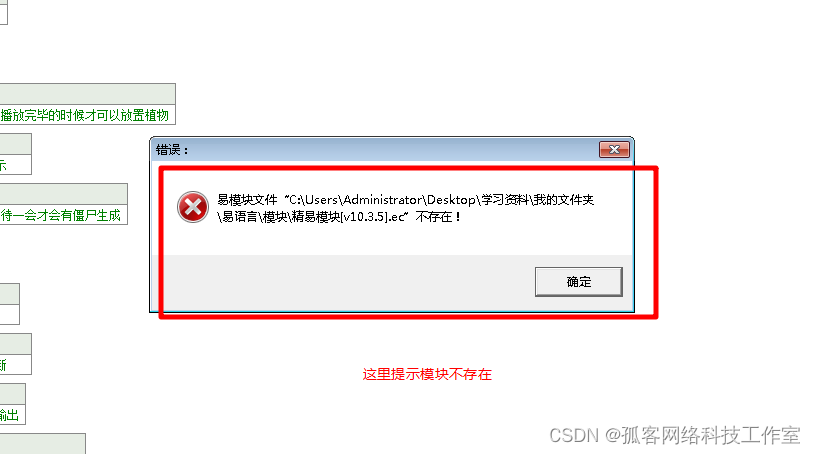
那怎么运行呢?放心我为你们准备了这个模块,把这个模块附加到源代码文件夹里,自行下载
解决这个问题很简单,要么把源码中的提示的模块路径更改,要么按提示的路径创建文件夹把模块考到这个路径C:\Users\Administrator\Desktop\学习资料\我的文件夹\易语言\模块

然后再易语言编辑器里运行就能玩了
部分源码
#1 引入需要的模块
import pygame
import random
#1 配置图片地址
IMAGE_PATH = 'imgs/'
#1 设置页面宽高
scrrr_width=800
scrrr_height =560
#1 创建控制游戏结束的状态
GAMEOVER = False
#4 图片加载报错处理
LOG = '文件:{}中的方法:{}出错'.format(__file__,__name__)
#3 创建地图类
class Map():
    #3 存储两张不同颜色的图片名称
    map_names_list = [IMAGE_PATH + 'map1.png', IMAGE_PATH + 'map2.png']
    #3 初始化地图
    def __init__(self, x, y, img_index):
        self.image = pygame.image.load(Map.map_names_list[img_index])
        self.position = (x, y)
        # 是否能够种植
        self.can_grow = True
    #3 加载地图
    def load_map(self):
         MainGame.window.blit(self.image,self.position)
#4 植物类
class Plant(pygame.sprite.Sprite):
    def __init__(self):
        super(Plant, self).__init__()
        self.live=True

    # 加载图片
    def load_image(self):
        if hasattr(self, 'image') and hasattr(self, 'rect'):
            MainGame.window.blit(self.image, self.rect)
        else:
            print(LOG)
#5 向日葵类
class Sunflower(Plant):
    def __init__(self,x,y):
        super(Sunflower, self).__init__()
        self.image = pygame.image.load('imgs/sunflower.png')
        self.rect = self.image.get_rect()
        self.rect.x = x
        self.rect.y = y
        self.price = 50
        self.hp = 100
        #5 时间计数器
        self.time_count = 0

    #5 新增功能:生成阳光
    def produce_money(self):
        self.time_count += 1
        if self.time_count == 25:
            MainGame.money += 5
            self.time_count = 0
    #5 向日葵加入到窗口中
    def display_sunflower(self):
        MainGame.window.blit(self.image,self.rect)
#6 豌豆射手类
class PeaShooter(Plant):
    def __init__(self,x,y):
        super(PeaShooter, self).__init__()
        # self.image 为一个 surface
        self.image = pygame.image.load('imgs/peashooter.png')
        self.rect = self.image.get_rect()
        self.rect.x = x
        self.rect.y = y
        self.price = 50
        self.hp = 200
        #6 发射计数器
        self.shot_count = 0

    #6 增加射击方法
    def shot(self):
        #6 记录是否应该射击
        should_fire = False
        for zombie in MainGame.zombie_list:
            if zombie.rect.y == self.rect.y and zombie.rect.x < 800 and zombie.rect.x > self.rect.x:
                should_fire = True
        #6 如果活着
        if self.live and should_fire:
            self.shot_count += 1
            #6 计数器到25发射一次
            if self.shot_count == 25:
                #6 基于当前豌豆射手的位置,创建子弹
                peabullet = PeaBullet(self)
                #6 将子弹存储到子弹列表中
                MainGame.peabullet_list.append(peabullet)
                self.shot_count = 0

    #6 将豌豆射手加入到窗口中的方法
    def display_peashooter(self):
        MainGame.window.blit(self.image,self.rect)

#7 豌豆子弹类
class PeaBullet(pygame.sprite.Sprite):
    def __init__(self,peashooter):
        self.live = True
        self.image = pygame.image.load('imgs/peabullet.png')
        self.damage = 50
        self.speed  = 10
        self.rect = self.image.get_rect()
        self.rect.x = peashooter.rect.x + 60
        self.rect.y = peashooter.rect.y + 15

    def move_bullet(self):
        #7 在屏幕范围内,实现往右移动
        if self.rect.x < scrrr_width:
            self.rect.x += self.speed
        else:
            self.live = False

    #7 新增,子弹与僵尸的碰撞
    def hit_zombie(self):
        for zombie in MainGame.zombie_list:
            if pygame.sprite.collide_rect(self,zombie):
                #打中僵尸之后,修改子弹的状态,
                self.live = False
                #僵尸掉血
                zombie.hp -= self.damage
                if zombie.hp <= 0:
                    zombie.live = False
                    self.nextLevel()
    #7闯关方法
    def nextLevel(self):
        MainGame.score += 20
        MainGame.remnant_score -=20
        for i in range(1,100):
            if MainGame.score==100*i and MainGame.remnant_score==0:
                    MainGame.remnant_score=100*i
                    MainGame.shaoguan+=1
                    MainGame.produce_zombie+=50


    def display_peabullet(self):
        MainGame.window.blit(self.image,self.rect)
#9 僵尸类
class Zombie(pygame.sprite.Sprite):
    def __init__(self,x,y):
        super(Zombie, self).__init__()
        self.image = pygame.image.load('imgs/zombie.png')
        self.rect = self.image.get_rect()
        self.rect.x = x
        self.rect.y = y
        self.hp = 1000
        self.damage = 2
        self.speed = 1
        self.live = True
        self.stop = False
    #9 僵尸的移动
    def move_zombie(self):
        if self.live and not self.stop:
            self.rect.x -= self.speed
            if self.rect.x < -80:
                #8 调用游戏结束方法
                MainGame().gameOver()

    #9 判断僵尸是否碰撞到植物,如果碰撞,调用攻击植物的方法
    def hit_plant(self):
        for plant in MainGame.plants_list:
            if pygame.sprite.collide_rect(self,plant):
                #8  僵尸移动状态的修改
                self.stop = True
                self.eat_plant(plant)
    #9 僵尸攻击植物
    def eat_plant(self,plant):
        #9 植物生命值减少
        plant.hp -= self.damage
        #9 植物死亡后的状态修改,以及地图状态的修改
        if plant.hp <= 0:
            a = plant.rect.y // 80 - 1
            b = plant.rect.x // 80
            map = MainGame.map_list[a][b]
            map.can_grow = True
            plant.live = False
            #8 修改僵尸的移动状态
            self.stop = False


    #9 将僵尸加载到地图中
    def display_zombie(self):
        MainGame.window.blit(self.image,self.rect)
#1 主程序
class MainGame():
    #2 创建关数,得分,剩余分数,钱数
    shaoguan = 1
    score = 0
    remnant_score = 100
    money = 200
    #3 存储所有地图坐标点
    map_points_list = []
    #3 存储所有的地图块
    map_list = []
    #4 存储所有植物的列表
    plants_list = []
    #7 存储所有豌豆子弹的列表
    peabullet_list = []
    #9 新增存储所有僵尸的列表
    zombie_list = []
    count_zombie = 0
    produce_zombie = 100
    #1 加载游戏窗口
    def init_window(self):
        #1 调用显示模块的初始化
        pygame.display.init()
        #1 创建窗口
        MainGame.window = pygame.display.set_mode([scrrr_width,scrrr_height])

    #2 文本绘制
    def draw_text(self, content, size, color):
        pygame.font.init()
        font = pygame.font.SysFont('kaiti', size)
        text = font.render(content, True, color)
        return text

    #2 加载帮助提示
    def load_help_text(self):
        text1 = self.draw_text('1.按左键创建向日葵 2.按右键创建豌豆射手', 26, (255, 0, 0))
        MainGame.window.blit(text1, (5, 5))

    #3 初始化坐标点
    def init_plant_points(self):
        for y in range(1, 7):
            points = []
            for x in range(10):
                point = (x, y)
                points.append(point)
            MainGame.map_points_list.append(points)
            print("MainGame.map_points_list", MainGame.map_points_list)

    #3 初始化地图
    def init_map(self):
        for points in MainGame.map_points_list:
            temp_map_list = list()
            for point in points:
                # map = None
                if (point[0] + point[1]) % 2 == 0:
                    map = Map(point[0] * 80, point[1] * 80, 0)
                else:
                    map = Map(point[0] * 80, point[1] * 80, 1)
                # 将地图块加入到窗口中
                temp_map_list.append(map)
                print("temp_map_list", temp_map_list)
            MainGame.map_list.append(temp_map_list)
        print("MainGame.map_list", MainGame.map_list)

    #3 将地图加载到窗口中
    def load_map(self):
        for temp_map_list in MainGame.map_list:
            for map in temp_map_list:
                map.load_map()

    #6 增加豌豆射手发射处理
    def load_plants(self):
        for plant in MainGame.plants_list:
            #6 优化加载植物的处理逻辑
            if plant.live:
                if isinstance(plant, Sunflower):
                    plant.display_sunflower()
                    plant.produce_money()
                elif isinstance(plant, PeaShooter):
                    plant.display_peashooter()
                    plant.shot()
            else:
                MainGame.plants_list.remove(plant)

    #7 加载所有子弹的方法
    def load_peabullets(self):
        for b in MainGame.peabullet_list:
            if b.live:
                b.display_peabullet()
                b.move_bullet()
                # v1.9 调用子弹是否打中僵尸的方法
                b.hit_zombie()
            else:
                MainGame.peabullet_list.remove(b)

    #8事件处理

    def deal_events(self):
        #8 获取所有事件
        eventList = pygame.event.get()
        #8 遍历事件列表,判断
        for e in eventList:
            if e.type == pygame.QUIT:
                self.gameOver()
            elif e.type == pygame.MOUSEBUTTONDOWN:
                # print('按下鼠标按键')
                print(e.pos)
                # print(e.button)#左键1  按下滚轮2 上转滚轮为4 下转滚轮为5  右键 3

                x = e.pos[0] // 80
                y = e.pos[1] // 80
                print(x, y)
                map = MainGame.map_list[y - 1][x]
                print(map.position)
                #8 增加创建时候的地图装填判断以及金钱判断
                if e.button == 1:
                    if map.can_grow and MainGame.money >= 50:
                        sunflower = Sunflower(map.position[0], map.position[1])
                        MainGame.plants_list.append(sunflower)
                        print('当前植物列表长度:{}'.format(len(MainGame.plants_list)))
                        map.can_grow = False
                        MainGame.money -= 50
                elif e.button == 3:
                    if map.can_grow and MainGame.money >= 50:
                        peashooter = PeaShooter(map.position[0], map.position[1])
                        MainGame.plants_list.append(peashooter)
                        print('当前植物列表长度:{}'.format(len(MainGame.plants_list)))
                        map.can_grow = False
                        MainGame.money -= 50

    #9 新增初始化僵尸的方法
    def init_zombies(self):
        for i in range(1, 7):
            dis = random.randint(1, 5) * 200
            zombie = Zombie(800 + dis, i * 80)
            MainGame.zombie_list.append(zombie)

    #9将所有僵尸加载到地图中
    def load_zombies(self):
        for zombie in MainGame.zombie_list:
            if zombie.live:
                zombie.display_zombie()
                zombie.move_zombie()
                # v2.0 调用是否碰撞到植物的方法
                zombie.hit_plant()
            else:
                MainGame.zombie_list.remove(zombie)
    #1 开始游戏
    def start_game(self):
        #1 初始化窗口
        self.init_window()
        #3 初始化坐标和地图
        self.init_plant_points()
        self.init_map()
        #9 调用初始化僵尸的方法
        self.init_zombies()
        #1 只要游戏没结束,就一直循环
        while not GAMEOVER:
            #1 渲染白色背景
            MainGame.window.fill((255, 255, 255))
            #2 渲染的文字和坐标位置
            MainGame.window.blit(self.draw_text('当前钱数$: {}'.format(MainGame.money), 26, (255, 0, 0)), (500, 40))
            MainGame.window.blit(self.draw_text(
                '当前关数{},得分{},距离下关还差{}分'.format(MainGame.shaoguan, MainGame.score, MainGame.remnant_score), 26,
                (255, 0, 0)), (5, 40))
            self.load_help_text()

            #3 需要反复加载地图
            self.load_map()
            #6 调用加载植物的方法
            self.load_plants()
            #7  调用加载所有子弹的方法
            self.load_peabullets()
            #8 调用事件处理的方法
            self.deal_events()
            #9 调用展示僵尸的方法
            self.load_zombies()
            #9 计数器增长,每数到100,调用初始化僵尸的方法
            MainGame.count_zombie += 1
            if MainGame.count_zombie == MainGame.produce_zombie:
                self.init_zombies()
                MainGame.count_zombie = 0
            #9 pygame自己的休眠
            pygame.time.wait(10)
            #1 实时更新
            pygame.display.update()

    #10 程序结束方法
    def gameOver(self):
        MainGame.window.blit(self.draw_text('游戏结束', 50, (255, 0, 0)), (300, 200))
        print('游戏结束')
        pygame.time.wait(400)
        global GAMEOVER
        GAMEOVER = True
#1 启动主程序
if __name__ == '__main__':
    game = MainGame()
    game.start_game()
#关注公众号:祖龙科技工作室
源码领取方式
易语言高仿植物大战僵尸源码地址:关注微信公众号祖龙科技工作室回复易语言植物大战即可领取源码
下期更新预报
网站源码
- 📢博客主页:孤客网络科技工作室官方账号
- 📢欢迎点赞👍收藏⭐️留言 📝如有错误敬请指正!
- 📢本文由孤客原创,若侵权联系作者,首发于CSDN博客
- 📢停下休息的时候不要忘了别人还在奔跑,希望大家抓紧时间学习,全力奔赴更好的生活💻

