参考来源:
Linux的启动过程,作者:阮一峰
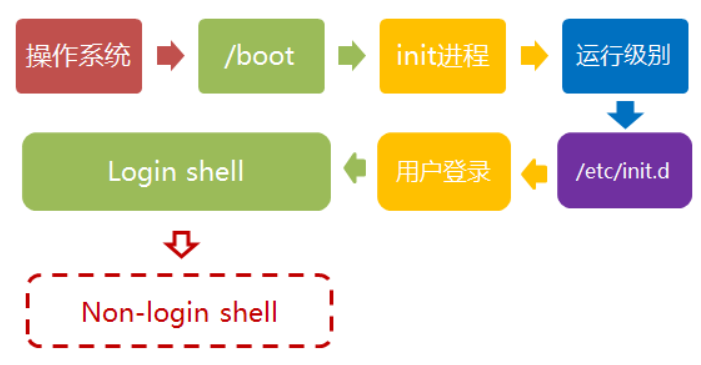
第一步、加载内核
操作系统接管硬件以后,首先读入 /boot 目录下的内核文件。
root@ub1804:/boot# ls -l
总用量 120636
-rw-r--r-- 1 root root   237767 5月  19  2023 config-5.4.0-150-generic
-rw-r--r-- 1 root root   237767 6月   8  2023 config-5.4.0-152-generic
drwxr-xr-x 5 root root     4096 3月  29 16:40 grub
-rw-r--r-- 1 root root 45647993 3月  25 21:30 initrd.img-5.4.0-150-generic
-rw-r--r-- 1 root root 45650233 3月  25 21:36 initrd.img-5.4.0-152-generic
-rw-r--r-- 1 root root   182704 1月  28  2016 memtest86+.bin
-rw-r--r-- 1 root root   184380 1月  28  2016 memtest86+.elf
-rw-r--r-- 1 root root   184840 1月  28  2016 memtest86+_multiboot.bin
-rw------- 1 root root  4587657 5月  19  2023 System.map-5.4.0-150-generic
-rw------- 1 root root  4587726 6月   8  2023 System.map-5.4.0-152-generic
-rw------- 1 root root 10981640 5月  19  2023 vmlinuz-5.4.0-150-generic
-rw------- 1 root root 11006216 6月   8  2023 vmlinuz-5.4.0-152-generic
查看默认启动的内核条目
运行 cat /boot/grub/grub.cfg | grep menuentry 命令会列出所有内核版本及其启动参数,包括常规模式和恢复模式,其中标记为默认启动的内核条目会包含 --class 参数,表示其类型和角色
root@ub1804:/etc/init# cat /boot/grub/grub.cfg | grep menuentry
if [ x"${feature_menuentry_id}" = xy ]; then
menuentry_id_option="--id"
menuentry_id_option=""
export menuentry_id_option
menuentry 'Ubuntu' --class ubuntu --class gnu-linux --class gnu --class os $menuentry_id_option 'gnulinux-simple-f767af68-b9f3-4980-9dd4-59e4384a541f' {
submenu 'Ubuntu 的高级选项' $menuentry_id_option 'gnulinux-advanced-f767af68-b9f3-4980-9dd4-59e4384a541f' {
menuentry 'Ubuntu,Linux 5.4.0-152-generic' --class ubuntu --class gnu-linux --class gnu --class os $menuentry_id_option 'gnulinux-5.4.0-152-generic-advanced-f767af68-b9f3-4980-9dd4-59e4384a541f' {
menuentry 'Ubuntu, with Linux 5.4.0-152-generic (recovery mode)' --class ubuntu --class gnu-linux --class gnu --class os $menuentry_id_option 'gnulinux-5.4.0-152-generic-recovery-f767af68-b9f3-4980-9dd4-59e4384a541f' {
menuentry 'Ubuntu,Linux 5.4.0-150-generic' --class ubuntu --class gnu-linux --class gnu --class os $menuentry_id_option 'gnulinux-5.4.0-150-generic-advanced-f767af68-b9f3-4980-9dd4-59e4384a541f' {
menuentry 'Ubuntu, with Linux 5.4.0-150-generic (recovery mode)' --class ubuntu --class gnu-linux --class gnu --class os $menuentry_id_option 'gnulinux-5.4.0-150-generic-recovery-f767af68-b9f3-4980-9dd4-59e4384a541f' {
menuentry 'Memory test (memtest86+)' {
menuentry 'Memory test (memtest86+, serial console 115200)' {
第二步、启动初始化进程
内核文件加载以后,就开始运行第一个程序 /sbin/init,它的作用是初始化系统环境
第三步、确定运行级别
许多程序需要开机启动。它们在Windows叫做"服务"(service),在Linux就叫做"守护进程"(daemon)。
init进程的一大任务,就是去运行这些开机启动的程序。但是,不同的场合需要启动不同的程序,比如用作服务器时,需要启动Apache,用作桌面就不需要。Linux允许为不同的场合,分配不同的开机启动程序,这就叫做"运行级别"(runlevel)。也就是说,启动时根据"运行级别",确定要运行哪些程序。
通过命令runlevel或者who -r查看默认运行级别
在/etc/rc5.d/下存放着运行级别5下的启动服务
root@ub1804:/etc/init.d# cd /etc/
root@ub1804:/etc# cd r
rc0.d/            rc2.d/            rc4.d/            rc6.d/            request-key.conf  resolvconf/       rmt               rsyslog.conf
rc1.d/            rc3.d/            rc5.d/            rcS.d/            request-key.d/    resolv.conf       rpc               rsyslog.d/
root@ub1804:/etc# runlevel
N 5
root@ub1804:/etc# who -r
         运行级别 5 2024-06-07 13:15
root@ub1804:/etc#
root@ub1804:/etc/rc5.d# ls -l
总用量 0
lrwxrwxrwx 1 root root 15 3月  20 23:40 S01acpid -> ../init.d/acpid
lrwxrwxrwx 1 root root 17 3月  20 23:40 S01anacron -> ../init.d/anacron
lrwxrwxrwx 1 root root 16 3月  20 23:40 S01apport -> ../init.d/apport
lrwxrwxrwx 1 root root 14 5月  18 11:39 S01atop -> ../init.d/atop
lrwxrwxrwx 1 root root 18 5月  18 11:39 S01atopacct -> ../init.d/atopacct
lrwxrwxrwx 1 root root 16 4月   2 21:27 S01autofs -> ../init.d/autofs
lrwxrwxrwx 1 root root 22 3月  20 23:40 S01avahi-daemon -> ../init.d/avahi-daemon
lrwxrwxrwx 1 root root 24 3月  22 17:04 S01binfmt-support -> ../init.d/binfmt-support
lrwxrwxrwx 1 root root 19 3月  20 23:40 S01bluetooth -> ../init.d/bluetooth
lrwxrwxrwx 1 root root 26 3月  20 23:40 S01console-setup.sh -> ../init.d/console-setup.sh
lrwxrwxrwx 1 root root 14 3月  20 23:40 S01cron -> ../init.d/cron
lrwxrwxrwx 1 root root 14 3月  20 23:40 S01cups -> ../init.d/cups
lrwxrwxrwx 1 root root 22 3月  20 23:40 S01cups-browsed -> ../init.d/cups-browsed
lrwxrwxrwx 1 root root 14 3月  20 23:40 S01dbus -> ../init.d/dbus
lrwxrwxrwx 1 root root 14 3月  20 23:40 S01gdm3 -> ../init.d/gdm3
lrwxrwxrwx 1 root root 21 3月  20 23:40 S01grub-common -> ../init.d/grub-common
lrwxrwxrwx 1 root root 20 3月  20 23:40 S01irqbalance -> ../init.d/irqbalance
lrwxrwxrwx 1 root root 20 3月  20 23:40 S01kerneloops -> ../init.d/kerneloops
lrwxrwxrwx 1 root root 22 5月  30 17:30 S01mountdebugfs -> ../init.d/mountdebugfs
lrwxrwxrwx 1 root root 18 3月  20 23:40 S01plymouth -> ../init.d/plymouth
lrwxrwxrwx 1 root root 15 3月  20 23:40 S01rsync -> ../init.d/rsync
lrwxrwxrwx 1 root root 17 3月  20 23:40 S01rsyslog -> ../init.d/rsyslog
lrwxrwxrwx 1 root root 15 3月  20 23:40 S01saned -> ../init.d/saned
lrwxrwxrwx 1 root root 27 3月  20 23:40 S01speech-dispatcher -> ../init.d/speech-dispatcher
lrwxrwxrwx 1 root root 23 3月  20 23:40 S01spice-vdagent -> ../init.d/spice-vdagent
lrwxrwxrwx 1 root root 13 3月  21 00:27 S01ssh -> ../init.d/ssh
lrwxrwxrwx 1 root root 17 3月  21 00:37 S01sysstat -> ../init.d/sysstat
lrwxrwxrwx 1 root root 20 3月  21 00:37 S01ubuntu-fan -> ../init.d/ubuntu-fan
lrwxrwxrwx 1 root root 29 3月  20 23:40 S01unattended-upgrades -> ../init.d/unattended-upgrades
lrwxrwxrwx 1 root root 15 3月  20 23:40 S01uuidd -> ../init.d/uuidd
lrwxrwxrwx 1 root root 18 3月  20 23:40 S01whoopsie -> ../init.d/whoopsie
/etc/rc5.d目录中的脚本命名方式
遵循特定的规则,这些规则对于理解系统启动过程中服务的管理至关重要。以下是具体介绍:
- 基本命名结构
- 启动与关闭指定:在
/etc/rc5.d目录下的脚本名称通常以"S"或"K"开头,后跟一个数字和脚本名。其中"S"表示启动(Start),而"K"表示关闭(Kill)。这种命名方式使得在系统启动或关闭时,可以根据需要在相应的运行级别下启动或停止服务。 - 执行顺序确定:紧跟在"S"或"K"后面的数字用于确定脚本的执行顺序。数字越小,该脚本将越早被执行。这一点在管理系统服务时尤为重要,因为某些服务可能需要其他服务先启动才能正常运行[1][2]。
- 启动与关闭指定:在
- 脚本链接内容
- 指向实际脚本:
/etc/rc5.d中的脚本实际上是符号链接,它们指向/etc/init.d/目录下的实际脚本文件。这种设计使得系统维护和升级更加灵活,因为管理员只需要编辑或替换/etc/init.d/中的脚本文件,而不必在每个运行级别的目录下都进行更改[2]。 - 简化操作流程:通过这种方式,添加或删除服务变得简单。管理员可以通过创建或删除符号链接来轻松地在不同的运行级别中添加或移除服务,而无需复制脚本文件到每个
rcX.d目录中[3]。
- 指向实际脚本:
第四步、加载开机启动程序
Linux的解决办法,就是七个 /etc/rcN.d 目录里列出的程序,都设为链接文件,指向另外一个目录 /etc/init.d ,真正的启动脚本都统一放在这个目录中。init进程逐一加载开机启动程序,其实就是运行这个目录里的启动脚本。
第五步、用户登录
开机启动程序加载完毕以后,就要让用户登录了
一般来说,用户的登录方式有三种:
(1)命令行登录
(2)ssh登录
(3)图形界面登录
这三种情况,都有自己的方式对用户进行认证。
(1)命令行登录:init进程调用getty程序(意为get teletype),让用户输入用户名和密码。输入完成后,再调用login程序,核对密码(Debian还会再多运行一个身份核对程序/etc/pam.d/login)。如果密码正确,就从文件 /etc/passwd 读取该用户指定的shell,然后启动这个shell。
root@ub1804:/etc# cat /etc/passwd | grep xiaoyue
xiaoyue:x:1000:1000:xiaoyue,,,:/home/xiaoyue:/bin/bash
(2)ssh登录:这时系统调用sshd程序(Debian还会再运行/etc/pam.d/ssh ),取代getty和login,然后启动shell。
(3)图形界面登录:init进程调用显示管理器,Gnome图形界面对应的显示管理器为gdm(GNOME Display Manager),然后用户输入用户名和密码。如果密码正确,就读取/etc/gdm3/Xsession,启动用户的会话。
第六步、进入 login shell
所谓shell,简单说就是命令行界面,让用户可以直接与操作系统对话。用户登录时打开的shell,就叫做login shell。
Debian默认的shell是Bash,它会读入一系列的配置文件。上一步的三种情况,在这一步的处理,也存在差异。
(1)命令行登录:首先读入 /etc/profile,这是对所有用户都有效的配置;然后依次寻找下面三个文件,这是针对当前用户的配置。
 ~/.bash_profile
  ~/.bash_login
 ~/.profile
需要注意的是,这三个文件只要有一个存在,就不再读入后面的文件了。比如,要是 ~/.bash_profile 存在,就不会再读入后面两个文件了。
root@ub1804:/etc/rc5.d# cat /etc/profile
# /etc/profile: system-wide .profile file for the Bourne shell (sh(1))
# and Bourne compatible shells (bash(1), ksh(1), ash(1), ...).

if [ "${PS1-}" ]; then
  if [ "${BASH-}" ] && [ "$BASH" != "/bin/sh" ]; then
    # The file bash.bashrc already sets the default PS1.
    # PS1='\h:\w\$ '
    if [ -f /etc/bash.bashrc ]; then
      . /etc/bash.bashrc
    fi
  else
    if [ "`id -u`" -eq 0 ]; then
      PS1='# '
    else
      PS1='$ '
    fi
  fi
fi

if [ -d /etc/profile.d ]; then
  for i in /etc/profile.d/*.sh; do
    if [ -r $i ]; then
      . $i
    fi
  done
  unset i
fi


