Linux 36.3 + JetPack v6.0@jetson-inference之目标检测
- 1. 源由
- 2. detectnet
- 2.1 命令选项
- 2.2 下载模型
- 2.3 操作示例
- 2.3.1 单张照片
- 2.3.2 多张照片
- 2.3.3 视频
- 3. 代码
- 3.1 Python
- 3.2 C++
- 4. 参考资料
1. 源由
从应用角度来说,目标检测是计算机视觉里面第二个重要环节。之前的识别示例输出了表示整个输入图像的类别概率。接下来,将专注于目标检测,通过提取边界框来找到帧中各种目标的位置。与图像分类不同,目标检测网络能够在每帧中检测到多个不同的目标。
2. detectnet
detectNet对象接受图像作为输入,并输出检测到的边界框坐标列表以及它们的类别和置信度值。detectNet可以在Python和C++中使用。请参阅下面可供下载的各种预训练检测模型。默认使用的模型是基于MS COCO数据集训练的91类SSD-Mobilenet-v2模型,该模型在Jetson上结合TensorRT实现了实时推理性能。
2.1 命令选项
$ detectnet --help
usage: detectnet [--help] [--network=NETWORK] [--threshold=THRESHOLD] ...
                 input [output]

Locate objects in a video/image stream using an object detection DNN.
See below for additional arguments that may not be shown above.

positional arguments:
    input           resource URI of input stream  (see videoSource below)
    output          resource URI of output stream (see videoOutput below)

detectNet arguments:
  --network=NETWORK     pre-trained model to load, one of the following:
                            * ssd-mobilenet-v1
                            * ssd-mobilenet-v2 (default)
                            * ssd-inception-v2
                            * peoplenet
                            * peoplenet-pruned
                            * dashcamnet
                            * trafficcamnet
                            * facedetect
  --model=MODEL         path to custom model to load (caffemodel, uff, or onnx)
  --prototxt=PROTOTXT   path to custom prototxt to load (for .caffemodel only)
  --labels=LABELS       path to text file containing the labels for each class
  --input-blob=INPUT    name of the input layer (default is 'data')
  --output-cvg=COVERAGE name of the coverage/confidence output layer (default is 'coverage')
  --output-bbox=BOXES   name of the bounding output layer (default is 'bboxes')
  --mean-pixel=PIXEL    mean pixel value to subtract from input (default is 0.0)
  --confidence=CONF     minimum confidence threshold for detection (default is 0.5)
  --clustering=CLUSTER  minimum overlapping area threshold for clustering (default is 0.75)
  --alpha=ALPHA         overlay alpha blending value, range 0-255 (default: 120)
  --overlay=OVERLAY     detection overlay flags (e.g. --overlay=box,labels,conf)
                        valid combinations are:  'box', 'lines', 'labels', 'conf', 'none'
  --profile             enable layer profiling in TensorRT

objectTracker arguments:
  --tracking               flag to enable default tracker (IOU)
  --tracker=TRACKER        enable tracking with 'IOU' or 'KLT'
  --tracker-min-frames=N   the number of re-identified frames for a track to be considered valid (default: 3)
  --tracker-drop-frames=N  number of consecutive lost frames before a track is dropped (default: 15)
  --tracker-overlap=N      how much IOU overlap is required for a bounding box to be matched (default: 0.5)

videoSource arguments:
    input                resource URI of the input stream, for example:
                             * /dev/video0               (V4L2 camera #0)
                             * csi://0                   (MIPI CSI camera #0)
                             * rtp://@:1234              (RTP stream)
                             * rtsp://user:pass@ip:1234  (RTSP stream)
                             * webrtc://@:1234/my_stream (WebRTC stream)
                             * file://my_image.jpg       (image file)
                             * file://my_video.mp4       (video file)
                             * file://my_directory/      (directory of images)
  --input-width=WIDTH    explicitly request a width of the stream (optional)
  --input-height=HEIGHT  explicitly request a height of the stream (optional)
  --input-rate=RATE      explicitly request a framerate of the stream (optional)
  --input-save=FILE      path to video file for saving the input stream to disk
  --input-codec=CODEC    RTP requires the codec to be set, one of these:
                             * h264, h265
                             * vp8, vp9
                             * mpeg2, mpeg4
                             * mjpeg
  --input-decoder=TYPE   the decoder engine to use, one of these:
                             * cpu
                             * omx  (aarch64/JetPack4 only)
                             * v4l2 (aarch64/JetPack5 only)
  --input-flip=FLIP      flip method to apply to input:
                             * none (default)
                             * counterclockwise
                             * rotate-180
                             * clockwise
                             * horizontal
                             * vertical
                             * upper-right-diagonal
                             * upper-left-diagonal
  --input-loop=LOOP      for file-based inputs, the number of loops to run:
                             * -1 = loop forever
                             *  0 = don't loop (default)
                             * >0 = set number of loops

videoOutput arguments:
    output               resource URI of the output stream, for example:
                             * file://my_image.jpg       (image file)
                             * file://my_video.mp4       (video file)
                             * file://my_directory/      (directory of images)
                             * rtp://<remote-ip>:1234    (RTP stream)
                             * rtsp://@:8554/my_stream   (RTSP stream)
                             * webrtc://@:1234/my_stream (WebRTC stream)
                             * display://0               (OpenGL window)
  --output-codec=CODEC   desired codec for compressed output streams:
                            * h264 (default), h265
                            * vp8, vp9
                            * mpeg2, mpeg4
                            * mjpeg
  --output-encoder=TYPE  the encoder engine to use, one of these:
                            * cpu
                            * omx  (aarch64/JetPack4 only)
                            * v4l2 (aarch64/JetPack5 only)
  --output-save=FILE     path to a video file for saving the compressed stream
                         to disk, in addition to the primary output above
  --bitrate=BITRATE      desired target VBR bitrate for compressed streams,
                         in bits per second. The default is 4000000 (4 Mbps)
  --headless             don't create a default OpenGL GUI window

logging arguments:
  --log-file=FILE        output destination file (default is stdout)
  --log-level=LEVEL      message output threshold, one of the following:
                             * silent
                             * error
                             * warning
                             * success
                             * info
                             * verbose (default)
                             * debug
  --verbose              enable verbose logging (same as --log-level=verbose)
  --debug                enable debug logging   (same as --log-level=debug)
注:关于照片、视频等基本操作,详见: 《Linux 36.3 + JetPack v6.0@jetson-inference之视频操作》
2.2 下载模型
两种方式:
- 创建 对象时,初始化会自动下载
- 通过手动将模型文件放置到
data/networks/目录下
国内,由于“墙”的存在,对于我们这种处于起飞阶段的菜鸟来说就是“障碍”。有条件的朋友可以参考《apt-get通过代理更新系统》进行设置网络。
不过,NVIDIA还是很热心的帮助我们做了“Work around”,所有的模型都已经预先存放在中国大陆能访问的位置:Github - model-mirror-190618
  --network=NETWORK     pre-trained model to load, one of the following:
                            * ssd-mobilenet-v1
                            * ssd-mobilenet-v2 (default)
                            * ssd-inception-v2
                            * peoplenet
                            * peoplenet-pruned
                            * dashcamnet
                            * trafficcamnet
                            * facedetect
  --model=MODEL         path to custom model to load (caffemodel, uff, or onnx)
根据以上Model方面信息,该命令支持:
- ssd-mobilenet-v1
- ssd-mobilenet-v2 (default)
- ssd-inception-v2
- peoplenet
- peoplenet-pruned
- dashcamnet
- trafficcamnet
- facedetect
- 支持定制模型(需要用到通用的模型文件caffemodel, uff, or onnx)
作为示例,就下载一个SSD-Mobilenet-v2(default)模型
$ mkdir model-mirror-190618
$ cd model-mirror-190618
$ wget https://github.com/dusty-nv/jetson-inference/releases/download/model-mirror-190618/SSD-Mobilenet-v2.tar.gz
$ tar -zxvf SSD-Mobilenet-v2.tar.gz -C ../data/networks
$ cd ..
注:这个模型文件下载要注意,将解压缩文件放置到SSD-Mobilenet-v2目录下。
2.3 操作示例
$ cd build/aarch64/bin/
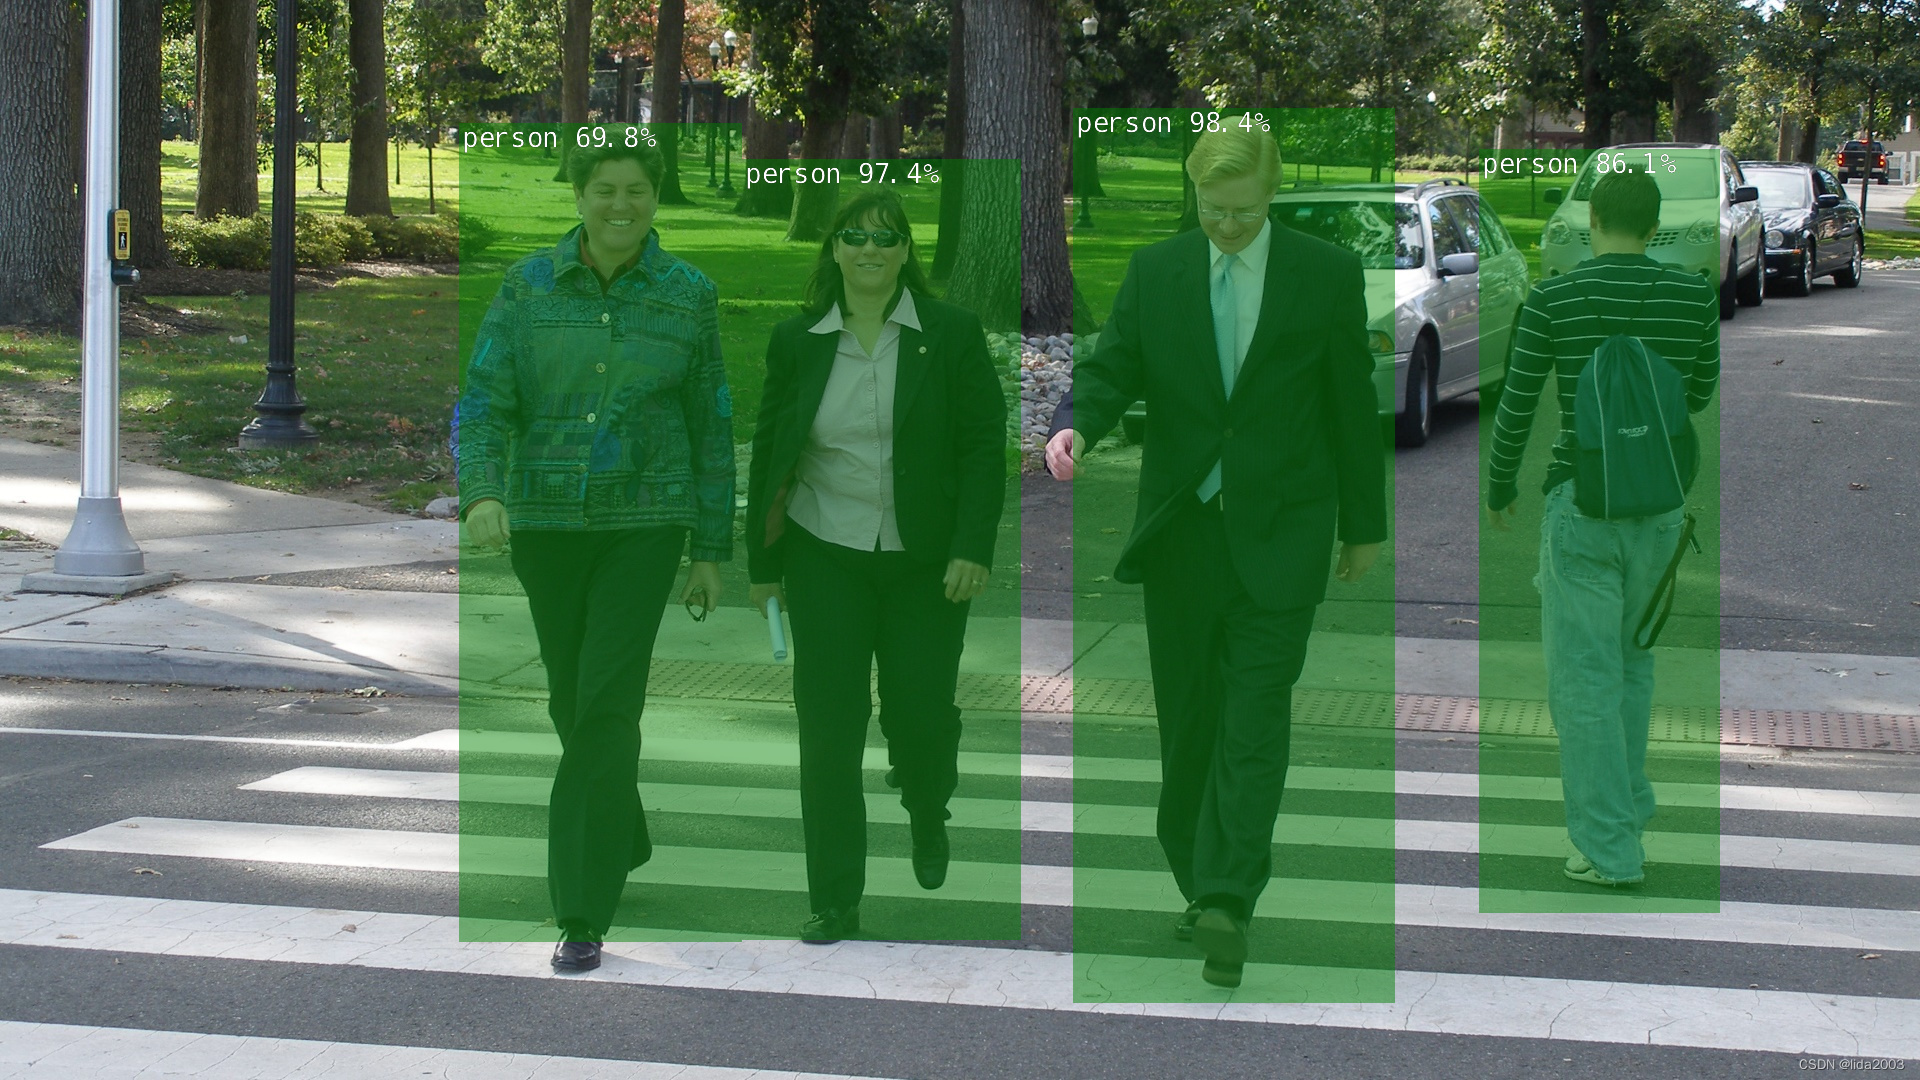
2.3.1 单张照片
# C++
$ ./detectnet --network=ssd-mobilenet-v2 images/peds_0.jpg images/test/output_detectnet_cpp.jpg
# Python
$ ./detectnet.py --network=ssd-mobilenet-v2 images/peds_0.jpg images/test/output_detectnet_python.jpg
本次CPP和Python执行概率结果一致,不像imagenet有差异。
2.3.2 多张照片
# C++
$ ./detectnet "images/peds_*.jpg" images/test/peds_output_detectnet_cpp_%i.jpg
# Python
$ ./detectnet.py "images/peds_*.jpg" images/test/peds_output_detectnet_python_%i.jpg
注:多张图片这里就不再放出了,感兴趣的朋友下载代码,本地运行一下即可。
2.3.3 视频
# Download test video
wget https://nvidia.box.com/shared/static/veuuimq6pwvd62p9fresqhrrmfqz0e2f.mp4 -O pedestrians.mp4
# C++
$ ./detectnet ../../../pedestrians.mp4 images/test/pedestrians_ssd_detectnet_cpp.mp4
# Python
$ ./detectnet.py ../../../pedestrians.mp4 images/test/pedestrians_ssd_detectnet_python.mp4
pedestrians
3. 代码
3.1 Python
Import statements
├── import sys
├── import argparse
├── from jetson_inference import detectNet
└── from jetson_utils import videoSource, videoOutput, Log

Command-line argument parsing
├── Create ArgumentParser
│   ├── description: "Locate objects in a live camera stream using an object detection DNN."
│   ├── formatter_class: argparse.RawTextHelpFormatter
│   └── epilog: detectNet.Usage() + videoSource.Usage() + videoOutput.Usage() + Log.Usage()
├── Add arguments
│   ├── input: "URI of the input stream"
│   ├── output: "URI of the output stream"
│   ├── --network: "pre-trained model to load (default: 'ssd-mobilenet-v2')"
│   ├── --overlay: "detection overlay flags (default: 'box,labels,conf')"
│   └── --threshold: "minimum detection threshold to use (default: 0.5)"
└── Parse arguments
    ├── args = parser.parse_known_args()[0]
    └── Exception handling
        ├── print("")
        └── parser.print_help()
        └── sys.exit(0)

Create video sources and outputs
├── input = videoSource(args.input, argv=sys.argv)
└── output = videoOutput(args.output, argv=sys.argv)

Load object detection network
└── net = detectNet(args.network, sys.argv, args.threshold)

# Note: Hard-code paths to load a model (commented out)
   ├── net = detectNet(model="model/ssd-mobilenet.onnx", labels="model/labels.txt",
   ├──                 input_blob="input_0", output_cvg="scores", output_bbox="boxes",
   └──                 threshold=args.threshold)

Process frames until EOS or user exits
└── while True:
    ├── Capture next image
    │   └── img = input.Capture()
    │       └── if img is None: # timeout
    │           └── continue
    ├── Detect objects in the image
    │   └── detections = net.Detect(img, overlay=args.overlay)
    ├── Print the detections
    │   ├── print("detected {:d} objects in image".format(len(detections)))
    │   └── for detection in detections:
    │       └── print(detection)
    ├── Render the image
    │   └── output.Render(img)
    ├── Update the title bar
    │   └── output.SetStatus("{:s} | Network {:.0f} FPS".format(args.network, net.GetNetworkFPS()))
    ├── Print performance info
    │   └── net.PrintProfilerTimes()
    └── Exit on input/output EOS
        ├── if not input.IsStreaming() or not output.IsStreaming():
        └── break
3.2 C++
#include statements
├── "videoSource.h"
├── "videoOutput.h"
├── "detectNet.h"
├── "objectTracker.h"
└── <signal.h>

Global variables
└── bool signal_recieved = false;

Function definitions
├── void sig_handler(int signo)
│   └── if (signo == SIGINT)
│       ├── LogVerbose("received SIGINT\n");
│       └── signal_recieved = true;
└── int usage()
    ├── printf("usage: detectnet [--help] [--network=NETWORK] [--threshold=THRESHOLD] ...\n");
    ├── printf("                 input [output]\n\n");
    ├── printf("Locate objects in a video/image stream using an object detection DNN.\n");
    ├── printf("See below for additional arguments that may not be shown above.\n\n");
    ├── printf("positional arguments:\n");
    ├── printf("    input           resource URI of input stream  (see videoSource below)\n");
    ├── printf("    output          resource URI of output stream (see videoOutput below)\n\n");
    ├── printf("%s", detectNet::Usage());
    ├── printf("%s", objectTracker::Usage());
    ├── printf("%s", videoSource::Usage());
    ├── printf("%s", videoOutput::Usage());
    └── printf("%s", Log::Usage());

main function
├── Parse command line
│   ├── commandLine cmdLine(argc, argv);
│   └── if (cmdLine.GetFlag("help"))
│       └── return usage();
├── Attach signal handler
│   └── if (signal(SIGINT, sig_handler) == SIG_ERR)
│       └── LogError("can't catch SIGINT\n");
├── Create input stream
│   ├── videoSource* input = videoSource::Create(cmdLine, ARG_POSITION(0));
│   └── if (!input)
│       ├── LogError("detectnet:  failed to create input stream\n");
│       └── return 1;
├── Create output stream
│   ├── videoOutput* output = videoOutput::Create(cmdLine, ARG_POSITION(1));
│   └── if (!output)
│       ├── LogError("detectnet:  failed to create output stream\n");
│       └── return 1;
├── Create detection network
│   ├── detectNet* net = detectNet::Create(cmdLine);
│   └── if (!net)
│       ├── LogError("detectnet:  failed to load detectNet model\n");
│       └── return 1;
│   └── const uint32_t overlayFlags = detectNet::OverlayFlagsFromStr(cmdLine.GetString("overlay", "box,labels,conf"));
├── Processing loop
│   └── while (!signal_recieved)
│       ├── Capture next image
│       │   ├── uchar3* image = NULL;
│       │   ├── int status = 0;
│       │   ├── if (!input->Capture(&image, &status))
│       │   │   └── if (status == videoSource::TIMEOUT)
│       │   │       └── continue;
│       │   │   └── break; // EOS
│       ├── Detect objects in the frame
│       │   ├── detectNet::Detection* detections = NULL;
│       │   ├── const int numDetections = net->Detect(image, input->GetWidth(), input->GetHeight(), &detections, overlayFlags);
│       │   └── if (numDetections > 0)
│       │       └── LogVerbose("%i objects detected\n", numDetections);
│       │       └── for (int n=0; n < numDetections; n++)
│       │           ├── LogVerbose("\ndetected obj %i  class #%u (%s)  confidence=%f\n", n, detections[n].ClassID, net->GetClassDesc(detections[n].ClassID), detections[n].Confidence);
│       │           ├── LogVerbose("bounding box %i  (%.2f, %.2f)  (%.2f, %.2f)  w=%.2f  h=%.2f\n", n, detections[n].Left, detections[n].Top, detections[n].Right, detections[n].Bottom, detections[n].Width(), detections[n].Height());
│       │           └── if (detections[n].TrackID >= 0)
│       │               └── LogVerbose("tracking  ID %i  status=%i  frames=%i  lost=%i\n", detections[n].TrackID, detections[n].TrackStatus, detections[n].TrackFrames, detections[n].TrackLost);
│       ├── Render outputs
│       │   ├── if (output != NULL)
│       │   │   ├── output->Render(image, input->GetWidth(), input->GetHeight());
│       │   │   ├── char str[256];
│       │   │   ├── sprintf(str, "TensorRT %i.%i.%i | %s | Network %.0f FPS", NV_TENSORRT_MAJOR, NV_TENSORRT_MINOR, NV_TENSORRT_PATCH, precisionTypeToStr(net->GetPrecision()), net->GetNetworkFPS());
│       │   │   ├── output->SetStatus(str);
│       │   │   └── if (!output->IsStreaming())
│       │   │       └── break;
│       └── Print out timing info
│           └── net->PrintProfilerTimes();
├── Destroy resources
│   ├── LogVerbose("detectnet:  shutting down...\n");
│   ├── SAFE_DELETE(input);
│   ├── SAFE_DELETE(output);
│   ├── SAFE_DELETE(net);
└── LogVerbose("detectnet:  shutdown complete.\n");
    └── return 0;
4. 参考资料
【1】jetson-inference - Locating Objects with DetectNet


![[leetcode hot 150]第七十题,爬楼梯(动态规划)](https://img-blog.csdnimg.cn/direct/2a650d3118e44ea5afb004bcab422245.png)