一、shared_preferences
- shared_preferences 是一个本地数据缓存库(类似 AsyncStorage)
- https://pub.dev/packages/shared_preferences
- 使用步骤
- 在 pubsepc.yaml 中添加 shared_preferences 依赖
- 安装依赖(pub get | flutter packages get | VS Code 中保存配置,自动下载
- 引入import ‘package:shared_preferences/shared_preferences.dart’;
- 使用 SharedPreferences prefs = await SharedPreferences.getInstance();
shared_preferences - 操作
- 增
- setString(key, value)
- 删
- remove(key) | clear()
- 改
- 更改就是重新设置数据setString(key, value)
- 查
- getString(key)
import 'package:flutter/material.dart';
import 'package:shared_preferences/shared_preferences.dart';
class Home extends StatelessWidget {
Widget build(BuildContext context) {
return Scaffold(
appBar: AppBar(
title: Text("shared_preferences"),
leading: Icon(Icons.menu),
actions: [
Icon(Icons.settings)
],
elevation: 0.0,
centerTitle: true,
),
body: SharedPreferencesDemo()
);
}
}
class SharedPreferencesDemo extends StatelessWidget {
Widget build(BuildContext context) {
return Container(
width: double.infinity,
child: Column(
mainAxisAlignment: MainAxisAlignment.spaceAround,
crossAxisAlignment: CrossAxisAlignment.center,
children: [
ElevatedButton(
onPressed: _incrementCounter,
child: Text('递增')
),
ElevatedButton(
onPressed: _decrementCounter,
child: Text('递减')
),
ElevatedButton(
onPressed: _removeCounter,
child: Text('删除')
),
ElevatedButton(
onPressed: _addMyContent,
child: Text('设置字符串')
),
ElevatedButton(
onPressed: _getMyContent,
child: Text('获取字符串')
),
ElevatedButton(
onPressed: _clearContent,
child: Text('清空')
),
],
)
);
}
_incrementCounter() async {
// 获取保存实例
SharedPreferences prefs = await SharedPreferences.getInstance();
int counter = (prefs.getInt('counter') ?? 0) + 1;
print('Pressed $counter times.');
await prefs.setInt('counter', counter);
}
_decrementCounter() async {
// 获取保存实例
SharedPreferences prefs = await SharedPreferences.getInstance();
int counter = prefs.getInt('counter') ?? 0;
if (counter > 0) {
counter--;
}
print('Pressed $counter times.');
await prefs.setInt('counter', counter);
}
_removeCounter() async {
// 获取保存实例
SharedPreferences prefs = await SharedPreferences.getInstance();
await prefs.remove('counter');
int counter = (prefs.getInt('counter') ?? 0) + 1;
print('Pressed $counter times.');
}
_addMyContent() async {
// 获取保存实例
SharedPreferences prefs = await SharedPreferences.getInstance();
await prefs.setString('hi', 'Hello World');
String content = prefs.getString('hi') ?? "";
print('设置字符串的内容是 $content');
}
_getMyContent() async {
// 获取保存实例
SharedPreferences prefs = await SharedPreferences.getInstance();
String content = prefs.getString('hi') ?? "";
print('获取字符串的内容是 $content');
}
_clearContent() async {
// 获取保存实例
SharedPreferences prefs = await SharedPreferences.getInstance();
await prefs.clear();
}
}

二、StatefulWidget

StatefulWidget
- Flutter 中的组件,按状态划分
- StatelessWidget (无状态组件)
- StatefulWidget(状态组件)
- 按状态作用域划分
- 组件内私有状态(StatefulWidget)
- 跨组件状态共享(InheritedWidget、 Provider)
- 全局状态(Redux | fish-redux、Mobx…
- 状态组件的组成
- StatefulWidget(组件本身不可变 - @immutable)
- State(将变化的状态放到 State 中维护)
import 'package:flutter/material.dart';
class Home extends StatelessWidget {
Widget build(BuildContext context) {
return Scaffold(
appBar: AppBar(
title: Text("StatefulWidget"),
leading: Icon(Icons.menu),
actions: [
Icon(Icons.settings)
],
elevation: 0.0,
centerTitle: true,
),
body: MyState()
);
}
}
class MyState extends StatefulWidget {
_MyStateState createState() => _MyStateState();
}
class _MyStateState extends State<MyState> {
int _num = 0;
void _increment() {
setState(() {
_num++;
});
}
void _decrement() {
setState(() {
_num--;
});
}
Widget build(BuildContext context) {
return Center(
child: Column(
children: [
ElevatedButton(
onPressed: _decrement,
child: Text('-')
),
Padding(
padding: EdgeInsets.all(20),
child: Text('$_num')
),
ElevatedButton(
onPressed: _increment,
child: Icon(Icons.add)
)
],
)
);
}
}
三、DataTable
- DataTable 是 Flutter 中的表格
- columns (声明表头列表)
- DataColumn (表头单元格)
- columns (声明表头列表)
- rows (声明数据列表)
- DataRow (一行数据)
- DataCell (数据单元格)
- DataRow (一行数据)
- 其他属性

import 'package:flutter/material.dart';
class Home extends StatelessWidget {
Widget build(BuildContext context) {
return Scaffold(
appBar: AppBar(
title: Text("DataTable"),
leading: Icon(Icons.menu),
actions: [
Icon(Icons.settings)
],
elevation: 0.0,
centerTitle: true,
),
body: UserList()
);
}
}
class User {
String name;
int age;
bool selected;
User(this.name, this.age, {this.selected = false});
}
class UserList extends StatefulWidget {
UserList({Key key}) : super(key: key);
_UserListState createState() => _UserListState();
}
class _UserListState extends State<UserList> {
List<User> data = [
User('张三', 18),
User('张三丰', 218, selected: true),
User('张翠山', 30),
User('张无忌', 60),
];
var _sortAscending = true;
List _getUserRows() {
List<DataRow> dataRows = [];
for (int i = 0; i < data.length; i++) {
dataRows.add(
DataRow(
selected: data[i].selected,
onSelectChanged: (selected) {
setState(() {
data[i].selected = selected;
});
},
cells: [
DataCell(Text('${data[i].name}')),
DataCell(Text('${data[i].age}')),
DataCell(Text('男')),
DataCell(Text('---')),
]
)
);
}
return dataRows;
}
Widget build(BuildContext context) {
return Container(
child: SingleChildScrollView(
scrollDirection: Axis.horizontal,
child: DataTable(
sortColumnIndex: 1,
sortAscending: _sortAscending,
dataRowHeight: 100,
horizontalMargin: 20,
columnSpacing: 100,
columns: [
DataColumn(label: Text('姓名')),
DataColumn(
label: Text('年龄'),
numeric: true,
onSort: (int columnIndex, bool asscending) {
setState(() {
_sortAscending = asscending;
if (asscending) {
data.sort((a, b) => a.age.compareTo(b.age));
} else {
data.sort((a, b) => b.age.compareTo(a.age));
}
});
}
),
DataColumn(label: Text('性别')),
DataColumn(label: Text('简介')),
],
rows: _getUserRows(),
// [
// DataRow(
// cells: [
// DataCell(Text('张三')),
// DataCell(Text('18')),
// DataCell(Text('男')),
// DataCell(Text('一个男人')),
// ]
// ),
// DataRow(
// cells: [
// DataCell(Text('张三')),
// DataCell(Text('18')),
// DataCell(Text('男')),
// DataCell(Text('一个男人')),
// ]
// ),
// DataRow(
// cells: [
// DataCell(Text('张三')),
// DataCell(Text('18')),
// DataCell(Text('男')),
// DataCell(Text('一个男人')),
// ]
// )
// ]
)
),
);
}
}
四、InheritedWidget
- What:提供了沿树向下,共享数据的功能
- 即子组件可以获取父组件(InheritedWidget的子类)的数据
- Why:
- 依赖构造函数传递数据的方式不能满足业务需求
- 所以,需要一个新的,更好的跨组件数据传输方案
- How:
- BuildContext.dependOnInheritedWidgetOfExactType()
import 'package:flutter/material.dart';
class Home extends StatelessWidget {
Widget build(BuildContext context) {
return Scaffold(
appBar: AppBar(
title: Text("InheritedWidget"),
leading: Icon(Icons.menu),
actions: [
Icon(Icons.settings)
],
elevation: 0.0,
centerTitle: true,
),
body: MyState()
);
}
}
class MyState extends StatefulWidget {
_MyStateState createState() => _MyStateState();
}
class _MyStateState extends State<MyState> {
int _num = 0;
void _increment() {
setState(() {
_num++;
});
}
void _decrement() {
setState(() {
_num--;
});
}
Widget build(BuildContext context) {
return ShareDataWidget(
num: _num,
child: Center(
child: Column(
children: [
ElevatedButton(
onPressed: _decrement,
child: Text('-')
),
Padding(
padding: EdgeInsets.all(20),
// child: Text('$_num')
// 跨组件访问数据
child: MyCounter(),
),
ElevatedButton(
onPressed: _increment,
child: Icon(Icons.add)
)
],
)
),
);
}
}
class MyCounter extends StatefulWidget {
MyCounter({Key key}) : super(key: key);
_MyCounterState createState() => _MyCounterState();
}
class _MyCounterState extends State<MyCounter> {
Widget build(BuildContext context) {
// 使用 InheritedWidget 中的共享数据
return Text(ShareDataWidget.of(context).num.toString());
}
}
// 数据共享组件
class ShareDataWidget extends InheritedWidget {
final int num;
final Widget child;
ShareDataWidget({Key key, this.child, this.num}) : super(key: key, child: child);
static ShareDataWidget of(BuildContext context) {
return context.dependOnInheritedWidgetOfExactType<ShareDataWidget>();
}
bool updateShouldNotify(ShareDataWidget oldWidget) {
return true;
}
}
五、生命周期
- initState() 组件对象插入到元素树中时
- didChangeDependencies() 当前状态对象的依赖改变时
- build() 组件渲染时
- setState() 组件对象的内部状态变更时
- didUpdateWidget() 组件配置更新时
- deactivate() 组件对象在元素树中暂时移除时
- dispose() 组件对象在元素树中永远移除时
import 'package:flutter/material.dart';
class Home extends StatelessWidget {
Widget build(BuildContext context) {
return Scaffold(
appBar: AppBar(
title: Text("Life Cycle"),
leading: Icon(Icons.menu),
actions: [
Icon(Icons.settings)
],
elevation: 0.0,
centerTitle: true,
),
body: MyState()
);
}
}
class MyState extends StatefulWidget {
// _MyStateState createState() => _MyStateState();
_MyStateState createState() {
print('create state');
return _MyStateState();
}
}
class _MyStateState extends State<MyState> {
int _num;
void initState() {
// TODO: implement initState
super.initState();
print('init state');
_num = 1;
}
void didChangeDependencies() {
// TODO: implement didChangeDependencies
super.didChangeDependencies();
print('didChangeDependencies');
}
void didUpdateWidget(covariant MyState oldWidget) {
// TODO: implement didUpdateWidget
super.didUpdateWidget(oldWidget);
print('didUpdateWidget');
}
void deactivate() {
// TODO: implement deactivate
super.deactivate();
print('deactivate');
}
void dispose() {
// TODO: implement dispose
super.dispose();
print('dispose');
}
void _increment() {
setState(() {
print('setState');
_num++;
});
}
void _decrement() {
setState(() {
print('setState');
_num--;
});
}
Widget build(BuildContext context) {
print('build');
return Center(
child: Column(
children: [
ElevatedButton(
onPressed: _decrement,
child: Text('-')
),
Padding(
padding: EdgeInsets.all(20),
child: Text('$_num')
),
ElevatedButton(
onPressed: _increment,
child: Icon(Icons.add)
)
],
)
);
}
}
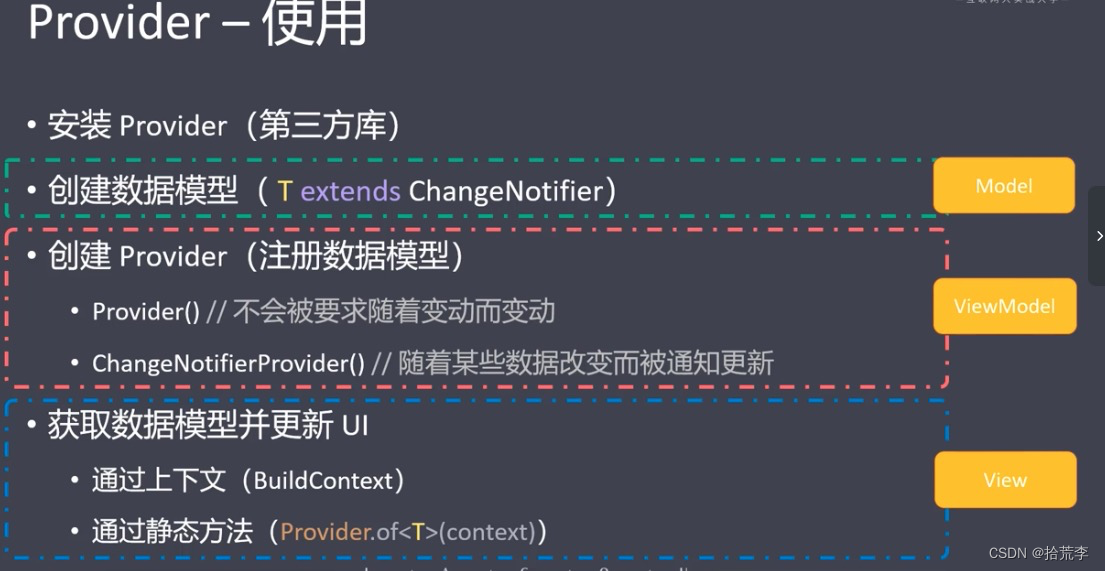
六、Provider
- Provider 是对 InheritedWidget 的封装
- https://pub.dev/packages/provider
- 优点:
- 简化资源的分配与处置
- 懒加载


import 'package:flutter/material.dart';
import 'package:provider/provider.dart';
class Home extends StatelessWidget {
Widget build(BuildContext context) {
// 2. 创建 Provider (注册数据模型)
return ChangeNotifierProvider(
create: (BuildContext context) => new LikesModel(),
child: Scaffold(
appBar: AppBar(
title: Text("Provider"),
leading: Icon(Icons.menu),
actions: [
Icon(Icons.settings)
],
elevation: 0.0,
centerTitle: true,
),
body: MyHomePage()
),
);
}
}
// 1. 创建数据模型
class LikesModel extends ChangeNotifier {
int _counter = 0;
int get counter => _counter;
incrementCounter() {
// 累加
_counter++;
// 通过 UI 更新
notifyListeners();
}
}
class MyHomePage extends StatelessWidget {
const MyHomePage({Key key}) : super(key: key);
Widget build(BuildContext context) {
return Container(
width: double.infinity,
child: Column(
mainAxisAlignment: MainAxisAlignment.center,
children: [
// 3. 在子组件中使用数据模型
Text(
'${context.watch<LikesModel>().counter}'
),
TextButton(
// 3. 在子组件中使用数据模型
onPressed: Provider.of<LikesModel>(context).incrementCounter,
child: Icon(Icons.thumb_up)
)
],
),
);
}
}
七、匿名路由
路由简介
- Route
- 一个路由是一个屏幕或页面的抽象
- Navigator
- 管理路由的组件。Navigator 可以通过路由入栈和出栈来实现页面之间的跳转
- 常用属性:
- initialRoute:初始路由,即默认页面
- onGenerateRoute: 动态路由(根据规则,匹配动态路由
- onUnknownRoute: 未知路由,也就是 404
- routes: 路由集合
匿名路由
- Navigator
- push (跳转到指定组件)
Navigator.push(
context,
MaterialPageRoute(builder: (context) => 组件名称())
- pop (回退)
Navigator.pop(context)
import 'package:flutter/material.dart';
class Home extends StatelessWidget {
Widget build(BuildContext context) {
return Scaffold(
appBar: AppBar(
title: Text("匿名路由"),
leading: Icon(Icons.menu),
actions: [
Icon(Icons.settings)
],
elevation: 0.0,
centerTitle: true,
),
body: HomePage()
);
}
}
class HomePage extends StatelessWidget {
const HomePage({Key key}) : super(key: key);
Widget build(BuildContext context) {
return Container(
child: Center(
child: ElevatedButton(
onPressed: () {
return Navigator.push(
context,
MaterialPageRoute(builder: (context) => Product())
);
},
child: Text('跳转到商品页面'),
)
),
);
}
}
class Product extends StatelessWidget {
const Product({Key key}) : super(key: key);
Widget build(BuildContext context) {
return Scaffold(
appBar: AppBar(
title: Text("商品页面"),
leading: Icon(Icons.menu),
actions: [
Icon(Icons.settings)
],
elevation: 0.0,
centerTitle: true,
),
body: Container(
child: Center(
child: ElevatedButton(
onPressed: () => Navigator.pop(context),
child: Text('返回')
)
),
),
);
}
}
八、命名路由
-
声明路由
- routes 路由表(Map 类型)
- initialRoute(初始路由)
- onUnknownRoute(未知路由-404)
-
跳转到命名路由
- Navigator.pushNamed(context,‘路由名称");

main.dart
void main() {
runApp(MyApp());
}
class MyApp extends StatelessWidget {
Widget build(BuildContext context) {
return MaterialApp(
title: "Flutter Demo",
home: Home(),
// 声明命名路由
routes: {
'home': (context) => Home(),
'product': (context) => Product(),
'productDetail': (context) => ProductDetail(),
},
initialRoute: 'home',
theme: CustomTheme.lightTheme,
darkTheme: CustomTheme.darkTheme,
debugShowCheckedModeBanner: false,
// 国际化
localizationsDelegates: [
// 本地化代理
CustomLocalizations.delegate,
GlobalMaterialLocalizations.delegate,
GlobalCupertinoLocalizations.delegate,
GlobalWidgetsLocalizations.delegate,
],
supportedLocales: [
const Locale('en', 'US'), // 美国英语
const Locale('zh', 'CN'), // 简体中文
],
localeResolutionCallback: (locale, supportedLocales) {
print('deviceLocale: $locale');
print('languageCode: ${locale.languageCode}');
print('countryCode: ${locale.countryCode}');
for (var supportedLocale in supportedLocales) {
if (supportedLocale.languageCode == locale.languageCode
&& supportedLocale.countryCode == locale.countryCode) {
return supportedLocale;
}
}
return supportedLocales.first;
},
);
}
_namedRoute.dart
import 'package:flutter/material.dart';
class Home extends StatelessWidget {
Widget build(BuildContext context) {
return Scaffold(
appBar: AppBar(
title: Text("首页"),
leading: Icon(Icons.menu),
actions: [
Icon(Icons.settings)
],
elevation: 0.0,
centerTitle: true,
),
body: Center(
child: Column(
children: [
ElevatedButton(
onPressed: () => Navigator.pushNamed(context, 'product'),
child: Text('跳转'),
),
ElevatedButton(
onPressed: () => Navigator.pushNamed(context, 'user'),
child: Text('未知路由'),
),
],
),
),
);
}
}
class Product extends StatelessWidget {
const Product({Key key}) : super(key: key);
Widget build(BuildContext context) {
return Scaffold(
appBar: AppBar(
title: Text("商品页"),
leading: Icon(Icons.menu),
actions: [
Icon(Icons.settings)
],
elevation: 0.0,
centerTitle: true,
),
body: Center(
child: Column(
children: [
ElevatedButton(
onPressed: () => Navigator.pop(context),
child: Text('返回'),
)
],
),
),
);
}
}
class UnknowPage extends StatelessWidget {
const UnknowPage({Key key}) : super(key: key);
Widget build(BuildContext context) {
return Scaffold(
appBar: AppBar(
title: Text("404"),
leading: Icon(Icons.menu),
actions: [
Icon(Icons.settings)
],
elevation: 0.0,
centerTitle: true,
),
body: Center(
child: Column(
children: [
ElevatedButton(
onPressed: () => Navigator.pop(context),
child: Text('返回'),
)
],
),
),
);
}
}
九、动态路由
- 动态路由是指,通过onGenerateRoute属性指定的路由
main.dart

import 'package:flutter/material.dart';
class Home extends StatelessWidget {
Widget build(BuildContext context) {
return Scaffold(
appBar: AppBar(
title: Text("首页"),
leading: Icon(Icons.menu),
actions: [
Icon(Icons.settings)
],
elevation: 0.0,
centerTitle: true,
),
body: Center(
child: Column(
children: [
ElevatedButton(
onPressed: () => Navigator.pushNamed(context, '/product'),
child: Text('跳转'),
),
ElevatedButton(
onPressed: () => Navigator.pushNamed(context, '/product/1'),
child: Text('商品1'),
),
ElevatedButton(
onPressed: () => Navigator.pushNamed(context, '/product/2'),
child: Text('商品2'),
),
ElevatedButton(
onPressed: () => Navigator.pushNamed(context, 'user'),
child: Text('未知路由'),
),
],
),
),
);
}
}
class Product extends StatelessWidget {
const Product({Key key}) : super(key: key);
Widget build(BuildContext context) {
return Scaffold(
appBar: AppBar(
title: Text("商品页"),
leading: Icon(Icons.menu),
actions: [
Icon(Icons.settings)
],
elevation: 0.0,
centerTitle: true,
),
body: Center(
child: Column(
children: [
ElevatedButton(
onPressed: () => Navigator.pop(context),
child: Text('返回'),
)
],
),
),
);
}
}
class ProductDetail extends StatelessWidget {
// product/1
final String id;
const ProductDetail({Key key, this.id}) : super(key: key);
Widget build(BuildContext context) {
return Scaffold(
appBar: AppBar(
title: Text("商品详情页"),
leading: Icon(Icons.menu),
actions: [
Icon(Icons.settings)
],
elevation: 0.0,
centerTitle: true,
),
body: Center(
child: Column(
children: [
Text('当前商品的id是:'+this.id),
ElevatedButton(
onPressed: () => Navigator.pop(context),
child: Text('返回'),
)
],
),
),
);
}
}
class UnknowPage extends StatelessWidget {
const UnknowPage({Key key}) : super(key: key);
Widget build(BuildContext context) {
return Scaffold(
appBar: AppBar(
title: Text("404"),
leading: Icon(Icons.menu),
actions: [
Icon(Icons.settings)
],
elevation: 0.0,
centerTitle: true,
),
body: Center(
child: Column(
children: [
ElevatedButton(
onPressed: () => Navigator.pop(context),
child: Text('返回'),
)
],
),
),
);
}
}
十、路由传参-匿名路由
-
路由中声明参数
- Navigator.push

- Navigator.push
-
组件中接收参数
路由传参-命名路由
- 路由中声明参数
- Navigator.pushNamed(context, routename, {arguments})
- 组件中接收参数
- ModalRoute.of(context).settings.arguments

- ModalRoute.of(context).settings.arguments
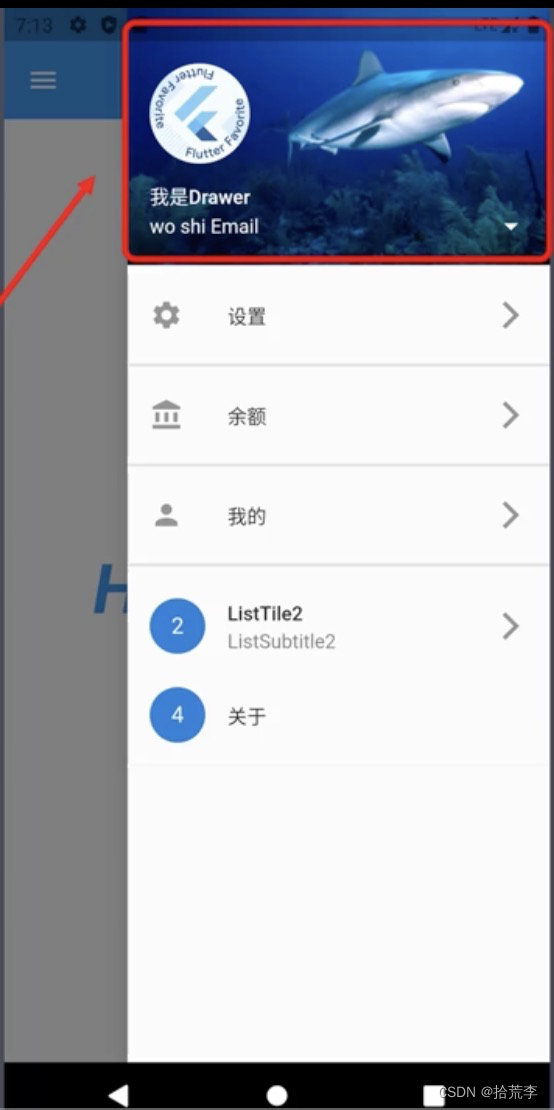
十一、Drawer 导航
- Scaffold
- drawer (左侧抽屉菜单)
- endDrawer (右侧抽屉菜单)
- UserAccountsDrawerHeader
- 抽屉菜单头部组件
- AboutListTile
- 关于弹窗
import 'package:flutter/material.dart';
class Home extends StatelessWidget {
Widget build(BuildContext context) {
return Scaffold(
appBar: AppBar(
title: Text("Drawer"),
leading: Icon(Icons.menu),
actions: [
Icon(Icons.settings)
],
elevation: 0.0,
centerTitle: true,
),
body: HomePage(),
drawer: DrawerList(),
endDrawer: DrawerList(),
);
}
}
class HomePage extends StatelessWidget {
const HomePage({Key key}) : super(key: key);
Widget build(BuildContext context) {
return Container(
child: Center(
child: Text('Home'),
),
);
}
}
class DrawerList extends StatelessWidget {
const DrawerList({Key key}) : super(key: key);
Widget build(BuildContext context) {
return Drawer(
child: ListView(
padding: EdgeInsets.all(0),
children: [
UserAccountsDrawerHeader(
accountName: Text('初六'),
accountEmail: Text('whoicliu@163.com'),
decoration: BoxDecoration(
image: DecorationImage(
image: AssetImage('images/bg1.jpg'),
fit: BoxFit.cover,
)
),
currentAccountPicture: CircleAvatar(
backgroundImage: AssetImage('images/flutter.jpg'),
),
),
ListTile(
leading: Icon(Icons.settings),
title: Text('设置'),
trailing: Icon(Icons.arrow_forward_ios),
),
Divider(thickness: 2,),
ListTile(
leading: Icon(Icons.account_balance),
title: Text('余额'),
trailing: Icon(Icons.arrow_forward_ios),
),
Divider(thickness: 2,),
ListTile(
leading: Icon(Icons.person),
title: Text('我的'),
trailing: Icon(Icons.arrow_forward_ios),
),
Divider(thickness: 2,),
ListTile(
leading: Icon(Icons.person),
title: Text('回退'),
onTap: () => Navigator.pop(context),
trailing: Icon(Icons.arrow_forward_ios),
),
AboutListTile(
child: Text('关于'),
applicationName: "你的应用名称",
applicationVersion: "1.0.0",
icon: CircleAvatar(
child: Text('aaa')
),
applicationLegalese: "应用法律条例",
aboutBoxChildren: [
Text('条例一:xxxx'),
Text('条例二:xxxx'),
],
applicationIcon: Image.asset(
'images/flutter.jpg',
width: 50,
height: 50,
)
),
// Text('Drawer')
]
),
);
}
}
十二、BottomNavigationBar 导航
- items
- 包含导航(BottomNavigationBarltem)的列表
- currentIndex
- 当前导航索引
- type
- 导航类型(BottomNavigationBarType)
- onTap()
- 导航的点击事件(一般会更新导航索引)
import 'package:flutter/material.dart';
class Home extends StatefulWidget {
Home({Key key}) : super(key: key);
_HomeState createState() => _HomeState();
}
class _HomeState extends State<Home> {
final List<BottomNavigationBarItem> bottomNavItems = [
BottomNavigationBarItem(
backgroundColor: Colors.blue,
icon: Icon(Icons.home),
label: '首页',
),
BottomNavigationBarItem(
backgroundColor: Colors.green,
icon: Icon(Icons.message),
label: '消息',
),
BottomNavigationBarItem(
backgroundColor: Colors.amber,
icon: Icon(Icons.shopping_cart),
label: '购物车',
),
BottomNavigationBarItem(
backgroundColor: Colors.red,
icon: Icon(Icons.person),
label: '我',
),
];
final pages = [
Center(
child: Text("Home", style: TextStyle(fontSize: 50)),
),
Center(
child: Text("Message", style: TextStyle(fontSize: 50)),
),
Center(
child: Text("Cart", style: TextStyle(fontSize: 50)),
),
Center(
child: Text("Profile", style: TextStyle(fontSize: 50)),
),
];
int currentIndex;
void initState() {
// TODO: implement initState
super.initState();
currentIndex = 0;
}
Widget build(BuildContext context) {
return Scaffold(
appBar: AppBar(
title: Text("底部导航"),
leading: Icon(Icons.menu),
actions: [
Icon(Icons.settings)
],
elevation: 0.0,
centerTitle: true,
),
bottomNavigationBar: BottomNavigationBar(
items: bottomNavItems,
currentIndex: currentIndex,
type: BottomNavigationBarType.fixed,
// type: BottomNavigationBarType.shifting,
onTap: (index) {
_changePage(index);
}
),
body: pages[currentIndex],
);
}
void _changePage(int index) {
if (index != currentIndex) {
setState(() {
currentIndex = index;
});
}
}
}

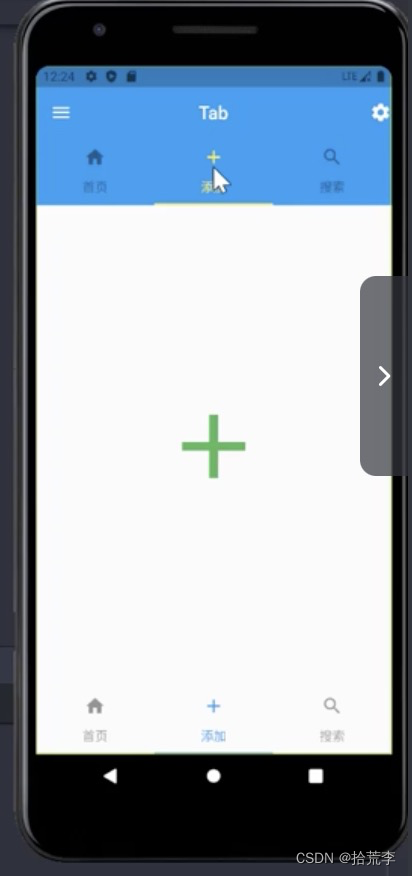
十三、Tab 导航
- DefaultTabController (整个Tab导航的容器)
- length (声明导航数量)
- child(指定子组件)
- TabBar (导航菜单)
- tabs (导航菜单数组)
- TabBarView (导航页面)
- children (多个导航页面内容)
import 'package:flutter/material.dart';
class Home extends StatelessWidget {
// 菜单数组
final List<Widget> _tabs = [
Tab(text: "首页", icon: Icon(Icons.home)),
Tab(text: "添加", icon: Icon(Icons.add)),
Tab(text: "搜索", icon: Icon(Icons.search)),
];
// 页面数组
final List<Widget> _tabViews = [
Icon(Icons.home, size: 120, color: Colors.red),
Icon(Icons.add, size: 120, color: Colors.green),
Icon(Icons.search, size: 120, color: Colors.black),
];
Widget build(BuildContext context) {
return DefaultTabController(
length: _tabs.length,
child: Scaffold(
appBar: AppBar(
title: Text("Tab"),
leading: Icon(Icons.menu),
actions: [
Icon(Icons.settings)
],
elevation: 0.0,
centerTitle: true,
bottom: TabBar(
tabs: _tabs,
labelColor: Colors.yellow,
unselectedLabelColor: Colors.black45,
indicatorSize: TabBarIndicatorSize.tab,
indicatorColor: Colors.yellow,
indicatorWeight: 10,
),
),
body: TabBarView(
children: _tabViews
),
bottomNavigationBar: TabBar(
tabs: _tabs,
labelColor: Colors.blue,
unselectedLabelColor: Colors.black45,
),
),
);
}
}
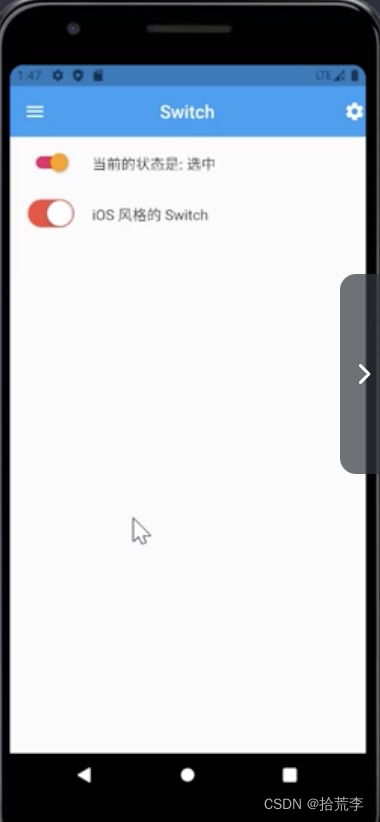
十四、表单-Switch
- value(开关的值,一般与状态字段绑定)
- onChanged(开关状态变更时调用)
- activeColor (开关开启时的圆圈颜色)
- activeTrackColor (开关开启时的轨道颜色)
- inactiveThumbColor (开关关闭时的圆圈颜色)
- inactiveTrackColor (开关关闭时的轨道颜色)
- CupertinoSwitch (iOS风格的开关)
- import ‘package:flutter/cupertino.dart’;

import 'package:flutter/material.dart';
import 'package:flutter/cupertino.dart';
class Home extends StatelessWidget {
Widget build(BuildContext context) {
return Scaffold(
appBar: AppBar(
title: Text("Switch"),
leading: Icon(Icons.menu),
actions: [
Icon(Icons.settings)
],
elevation: 0.0,
centerTitle: true,
),
body: SwitchDemo()
);
}
}
class SwitchDemo extends StatefulWidget {
SwitchDemo({Key key}) : super(key: key);
_SwitchDemoState createState() => _SwitchDemoState();
}
class _SwitchDemoState extends State<SwitchDemo> {
bool _switchValue = false;
Widget build(BuildContext context) {
return Container(
child: ListView(
children: [
ListTile(
leading: Switch(
value: _switchValue,
onChanged: (bool val) {
setState(() {
_switchValue = val;
});
},
activeColor: Colors.orange,
activeTrackColor: Colors.pink,
inactiveTrackColor: Colors.grey,
inactiveThumbColor: Colors.blue[100],
),
title: Text("当前的状态是: ${_switchValue == true ? "选中" : "未选中"}"),
),
ListTile(
leading: CupertinoSwitch(
value: _switchValue,
onChanged: (bool val) {
setState(() {
_switchValue = val;
});
},
activeColor: Colors.red,
trackColor: Colors.yellow,
),
title: Text('iOS 风格的 Switch'),
)
]
),
);
}
}
十五、表单-Checkbox
- value(复选框的值)
- onChanged (复选框状态更改时调用)
- activeColor (选中时,复选框背景的颜色)
- checkColor(选中时,复选框中对号的颜色)
- CheckboxListTile
- title (标题)
- subtitle (子标题)
import 'package:flutter/material.dart';
import 'package:flutter/cupertino.dart';
class Home extends StatelessWidget {
Widget build(BuildContext context) {
return Scaffold(
appBar: AppBar(
title: Text("Checkbox"),
leading: Icon(Icons.menu),
actions: [
Icon(Icons.settings)
],
elevation: 0.0,
centerTitle: true,
),
body: CheckboxDemo()
);
}
}
class CheckboxDemo extends StatefulWidget {
CheckboxDemo({Key key}) : super(key: key);
_CheckboxDemoState createState() => _CheckboxDemoState();
}
class _CheckboxDemoState extends State<CheckboxDemo> {
bool _male = true;
bool _female = false;
bool _transgender = true;
bool _value1 = true;
bool _value2 = false;
Widget build(BuildContext context) {
return Column(
children: [
ListTile(
leading: Checkbox(
value: this._male,
onChanged: (bool value) {
setState(() {
this._male = value;
});
},
),
title: Text('男'),
),
ListTile(
leading: Checkbox(
value: this._female,
onChanged: (bool value) {
setState(() {
this._female = value;
});
},
),
title: Text('女'),
),
ListTile(
leading: Checkbox(
value: this._transgender,
onChanged: (bool value) {
setState(() {
this._transgender = value;
});
},
activeColor: Colors.pink,
checkColor: Colors.yellow,
),
title: Text('人妖'),
),
CheckboxListTile(
secondary: Icon(Icons.settings, size: 50),
value: this._value1,
onChanged: (bool value) {
setState(() {
this._value1 = value;
});
},
title: Text('1:00 叫我起床'),
subtitle: Text('太困了,起不来'),
activeColor: Colors.green,
checkColor: Colors.green,
selected: this._value1,
),
CheckboxListTile(
secondary: Icon(Icons.settings, size: 50),
value: this._value2,
onChanged: (bool value) {
setState(() {
this._value2 = value;
});
},
title: Text('2:00 叫我起床'),
subtitle: Text('这还差不多'),
),
],
);
}
}

十六、表单-TextField
- autofocus(是否获取焦点)
- keyboardType (键盘类型)
- obscureText (设置为密码框)
- decoration (样式修饰)
- onChanged (内容更改时自动调用-value)
- labelText (标题)
- hintText(提示文字-placeholder)
- maxLines (显示行数-文本域)
import 'package:flutter/material.dart';
class Home extends StatelessWidget {
Widget build(BuildContext context) {
return Scaffold(
appBar: AppBar(
title: Text("TextField"),
leading: Icon(Icons.menu),
actions: [
Icon(Icons.settings)
],
elevation: 0.0,
centerTitle: true,
),
body: TextFieldDemo()
);
}
}
class TextFieldDemo extends StatefulWidget {
TextFieldDemo({Key key}) : super(key: key);
_TextFieldDemoState createState() => _TextFieldDemoState();
}
class _TextFieldDemoState extends State<TextFieldDemo> {
String phone;
String password;
String description;
_register() {
print(phone);
print(password);
print(description);
}
Widget build(BuildContext context) {
return Container(
padding: EdgeInsets.all(20),
child: Column(
children: [
TextField(
autofocus: true,
keyboardType: TextInputType.phone,
decoration: InputDecoration(
prefixIcon: Icon(Icons.mobile_screen_share),
// 获取焦点时,高亮的边框样式
focusedBorder: UnderlineInputBorder(
borderSide: BorderSide(
color: Colors.green,
)
),
// 默认边框样式
enabledBorder: UnderlineInputBorder(
borderSide: BorderSide(
color: Colors.yellow,
)
),
labelText: "手机号",
hintText: "请输入手机号",
hintStyle: TextStyle(
color: Colors.green,
fontSize: 14,
),
),
maxLength: 11,
onChanged: (value) {
setState(() {
phone = value;
});
},
),
TextField(
obscureText: true,
keyboardType: TextInputType.text,
decoration: InputDecoration(
prefixIcon: Icon(Icons.code_outlined),
// 获取焦点时,高亮的边框样式
focusedBorder: UnderlineInputBorder(
borderSide: BorderSide(
color: Colors.green,
)
),
// 默认边框样式
enabledBorder: UnderlineInputBorder(
borderSide: BorderSide(
color: Colors.yellow,
)
),
labelText: "密码",
hintText: "请输入密码",
hintStyle: TextStyle(
color: Colors.green,
fontSize: 14,
),
),
onChanged: (value) {
setState(() {
password = value;
});
},
),
TextField(
maxLines: 5,
keyboardType: TextInputType.text,
decoration: InputDecoration(
prefixIcon: Icon(Icons.person),
// 获取焦点时,高亮的边框样式
focusedBorder: UnderlineInputBorder(
borderSide: BorderSide(
color: Colors.green,
)
),
// 默认边框样式
enabledBorder: UnderlineInputBorder(
borderSide: BorderSide(
color: Colors.yellow,
)
),
labelText: "简介",
hintText: "请介绍一下自己",
hintStyle: TextStyle(
color: Colors.green,
fontSize: 14,
),
),
onChanged: (value) {
setState(() {
description = value;
});
},
),
// 声明按钮
Container(
width: double.infinity,
child: ElevatedButton(
onPressed: () {
_register();
},
child: Text('提交'),
),
)
],
),
);
}
}

十七、表单-日历
- CalendarDatePicker (日历选择器)
- initialCalendarMode
- DatePickerMode.day
- DatePickerMode.year
- initialCalendarMode
- showDatePicker (日期选择器)
- initialDatePickerMode (year | day)
- initialEntryMode (calendar | input)
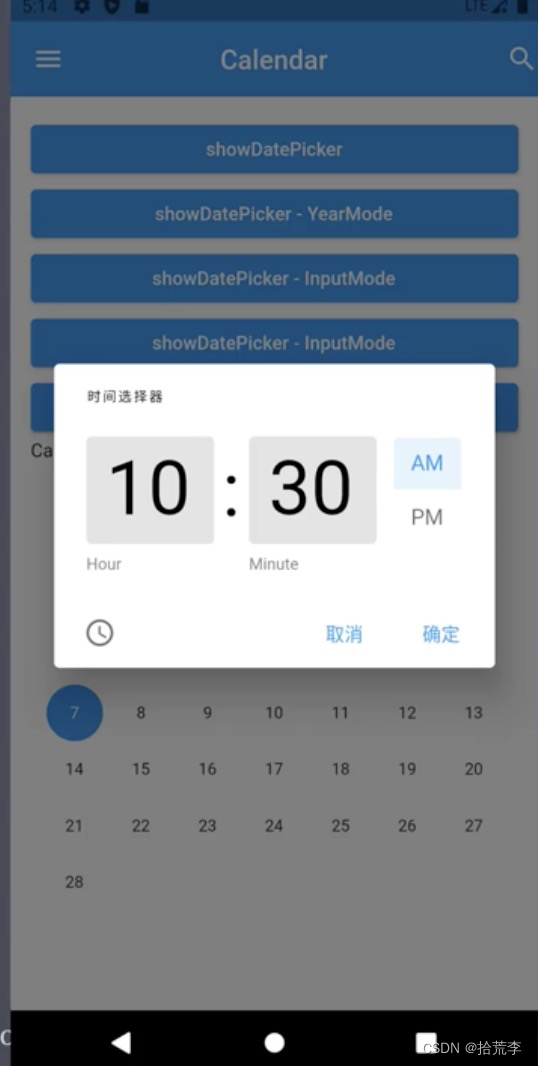
- showTimePicker (时间选择器)
import 'package:flutter/material.dart';
import 'package:flutter/cupertino.dart';
class Home extends StatelessWidget {
Widget build(BuildContext context) {
return Scaffold(
appBar: AppBar(
title: Text('Calendar'),
centerTitle: true,
elevation: 0.0,
leading: Icon(Icons.menu),
actions: [
Icon(Icons.search)
],
backgroundColor: Colors.blue,
),
body: CalendarDemo(),
);
}
}
class CalendarDemo extends StatefulWidget {
CalendarDemo({Key key}) : super(key: key);
_CalendarDemoState createState() => _CalendarDemoState();
}
class _CalendarDemoState extends State<CalendarDemo> {
Widget build(BuildContext context) {
return Container(
child: ListView(
padding: EdgeInsets.all(15),
children: [
_showDatePicker(context),
_showDatePickerForYear(context),
_showDatePickerForInput(context),
_showDatePickerForTheme(context),
_showTimePicker(context),
Text("CalendarDatePicker day"),
SizedBox(height: 30),
_calendarDatePicker(DatePickerMode.day),
SizedBox(height: 30),
Text("CalendarDatePicker year"),
SizedBox(height: 30),
_calendarDatePicker(DatePickerMode.year),
SizedBox(height: 30),
Text("_cupertinoTimePicker - hms"),
SizedBox(height: 30),
_cupertinoTimePicker(CupertinoTimerPickerMode.hms),
SizedBox(height: 30),
Text("_cupertinoTimePicker - hm"),
SizedBox(height: 30),
_cupertinoTimePicker(CupertinoTimerPickerMode.hm),
SizedBox(height: 30),
Text("_cupertinoTimePicker - ms"),
SizedBox(height: 30),
_cupertinoTimePicker(CupertinoTimerPickerMode.ms),
SizedBox(height: 30),
Text("CupertinoDatePicker - time"),
SizedBox(height: 30),
_cupertinoDatePicker(CupertinoDatePickerMode.time),
SizedBox(height: 30),
Text("CupertinoDatePicker - dateAndTime"),
SizedBox(height: 30),
_cupertinoDatePicker(CupertinoDatePickerMode.dateAndTime),
SizedBox(height: 30),
Text("CupertinoDatePicker - date"),
SizedBox(height: 30),
_cupertinoDatePicker(CupertinoDatePickerMode.date),
],
),
);
}
ElevatedButton _showDatePicker(context) {
return ElevatedButton(
child: Text("showDatePicker"),
onPressed: () {
showDatePicker(
context: context,
initialDatePickerMode: DatePickerMode.day, // 日期选择模式,默认为天数选择
initialDate: DateTime.now(), // 初始化选中日期
firstDate: DateTime(2020, 6), // 开始日期
lastDate: DateTime(2021, 6), // 结束日期
initialEntryMode: DatePickerEntryMode.calendar, // 日历弹框样式
currentDate: DateTime.now(), // 当前日期
helpText: "日期选择器", // 左上方提示
cancelText: "取消", // 取消按钮文案
confirmText: "确定", // 确认按钮文案
errorFormatText: "errorFormatText", // 格式错误提示
errorInvalidText: "errorInvalidText", // 输入不在 first 与 last 之间日期提示
fieldLabelText: "fieldLabelText", // 输入框上方提示
fieldHintText: "fieldHintText", // 输入框为空时内部提示
useRootNavigator: true, // 是否为根导航器
// 设置不可选日期
selectableDayPredicate: (dayTime) {
if (dayTime == DateTime(2021, 1, 15)) {
return false;
}
return true;
}
);
},
);
}
ElevatedButton _showDatePickerForYear(context) {
return ElevatedButton(
child: Text("showDatePicker - YearMode"),
onPressed: (){
showDatePicker(
context: context,
initialDatePickerMode: DatePickerMode.year, // 日期选择模式,默认为天数选择
initialEntryMode: DatePickerEntryMode.calendar, // 日历弹框样式
initialDate: DateTime.now(), // 初始化选中日期
firstDate: DateTime(2015, 6), // 开始日期
lastDate: DateTime(2025, 6), // 结束日期
currentDate: DateTime.now(), // 当前日期
helpText: "年份选择器", // 左上方提示
cancelText: "取消", // 取消按钮文案
confirmText: "确认", // 确认按钮文案
);
},
);
}
ElevatedButton _showDatePickerForInput(context) {
return ElevatedButton(
child: Text("showDatePicker - InputMode"),
onPressed: (){
showDatePicker(
context: context,
initialEntryMode: DatePickerEntryMode.input, // 日历弹框样式
initialDate: DateTime.now(), // 初始化选中日期
firstDate: DateTime(2020, 6), // 开始日期
lastDate: DateTime(2021, 6), // 结束日期
textDirection: TextDirection.rtl, // 文字方向
currentDate: DateTime(2020, 10, 20), // 当前日期
helpText: "helpText", // 左上方提示
cancelText: "cancelText", // 取消按钮文案
confirmText: "confirmText", // 确认按钮文案
errorFormatText: "errorFormatText", // 格式错误提示
errorInvalidText: "errorInvalidText", // 输入不在 first 与 last 之间日期提示
fieldLabelText: "fieldLabelText", // 输入框上方提示
fieldHintText: "fieldHintText", // 输入框为空时内部提示
// initialDatePickerMode: DatePickerMode.day, // 日期选择模式,默认为天数选择
useRootNavigator: true, // 是否为根导航器
// 设置不可选日期,这里将 2020-10-15,2020-10-16,2020-10-17 三天设置不可选
selectableDayPredicate: (dayTime){
if (dayTime == DateTime(2020, 10, 15) || dayTime == DateTime(2020, 10, 16) || dayTime == DateTime(2020, 10, 17)) {
return false;
}
return true;
}
);
},
);
}
ElevatedButton _showDatePickerForTheme(context) {
return ElevatedButton(
child: Text("showDatePicker - InputMode"),
onPressed: (){
showDatePicker(
context: context,
builder: (context, child) {
return Theme(
data: ThemeData(
cardColor: Colors.red,
brightness: Brightness.dark,
),
child: child,
);
},
initialDatePickerMode: DatePickerMode.year, // 日期选择模式,默认为天数选择
initialDate: DateTime.now(), // 初始化选中日期
firstDate: DateTime(2018, 6), // 开始日期
lastDate: DateTime(2025, 6), // 结束日期
currentDate: DateTime(2020, 10, 20), // 当前日期
helpText: "helpText", // 左上方提示
cancelText: "cancelText", // 取消按钮文案
confirmText: "confirmText", // 确认按钮文案
);
},
);
}
ElevatedButton _showTimePicker(context) {
return ElevatedButton(
child: Text("showTimePicker - InputMode"),
onPressed: (){
showTimePicker(
context: context,
initialTime: TimeOfDay(hour: 10, minute: 30),
initialEntryMode: TimePickerEntryMode.input,
helpText: "时间选择器",
cancelText: "取消",
confirmText: "确定"
);
},
);
}
CalendarDatePicker _calendarDatePicker(DatePickerMode mode) {
return CalendarDatePicker(
initialCalendarMode: mode, // 日期选择样式
initialDate: DateTime.now(), // 初始化选中日期~
currentDate: DateTime.now(), // 当前日期~
firstDate: DateTime(2010, 9, 10), // 开始日期
lastDate: DateTime(2030, 9, 10), // 结束日期
// 选中日期改变回调函数
onDateChanged: (dateTime){
print("选择日期 $dateTime");
},
// 月份改变回调函数
onDisplayedMonthChanged: (dateTime){
print("选择月份 $dateTime");
},
// 筛选日期可不可点回调函数
selectableDayPredicate: (dayTime) {
if (dayTime == DateTime(2021, 1, 15)) {
return false;
}
return true;
}
);
}
CupertinoTimerPicker _cupertinoTimePicker(CupertinoTimerPickerMode mode) {
return CupertinoTimerPicker(
mode: mode, // 展示模式,默认为 hms
initialTimerDuration: Duration(hours: 5, minutes: 10), // 默认选中时间
minuteInterval: 10, // 分钟间隔
secondInterval: 10, // 秒间隔
alignment: Alignment.center, // 对齐方式
backgroundColor: Colors.amber[200], // 背景颜色
// 滑动后,每次改变回调函数
onTimerDurationChanged: (dayTime){
print("选中时间 $dayTime");
},
);
}
Container _cupertinoDatePicker(CupertinoDatePickerMode mode) {
return Container(
height: 300,
child: CupertinoDatePicker(
mode: mode, // 展示模式, 默认为 dateAndTime
initialDateTime: DateTime(2020, 10, 10), // 默认选中日期
minimumDate: DateTime(2010, 10, 10), // 最小可选日期
maximumDate: DateTime(2021, 10, 10), // 最大可选日期
minuteInterval: 10, // 分钟间隔
use24hFormat: true, // 是否采用24小时制
backgroundColor: Colors.greenAccent[200], // 背景色
onDateTimeChanged: (dayTime) {
print("选择日期时间 $dayTime");
},
),
);
}
}
十八、表单-Form
- 使用步骤
- 创建表单 Form,并以 GlobalKey 作为唯一性标识
- 添加带验证逻辑的 TextFormField 到 Form 中
- 创建按钮以验证和提交表单
- Form (表单容器)
- key (GlobalKey)
- child (子组件)
- TextFormField (输入框)
- 与 TextField 的区别:必须在 Form 内使用 & 带有验证器
- validator (验证器)
import 'package:flutter/material.dart';
class Home extends StatelessWidget {
Widget build(BuildContext context) {
return Scaffold(
appBar: AppBar(
title: Text("Form"),
leading: Icon(Icons.menu),
actions: [
Icon(Icons.settings)
],
elevation: 0.0,
centerTitle: true,
),
body: FormDemo()
);
}
}
class FormDemo extends StatefulWidget {
FormDemo({Key key}) : super(key: key);
_FormDemoState createState() => _FormDemoState();
}
class _FormDemoState extends State<FormDemo> {
final GlobalKey<FormState> _formKey = GlobalKey<FormState>();
Widget build(BuildContext context) {
return Container(
padding: EdgeInsets.all(20),
child: Column(
children: [
Form(
key: _formKey,
child: Column(
children: [
TextFormField(
decoration: InputDecoration(
hintText: '手机号'
),
validator: (value) {
RegExp reg = new RegExp(r'^\d{11}$');
if (!reg.hasMatch(value)) {
return '手机号非法111';
}
return null;
}
)
],
)
),
Row(
children: [
Expanded(
child: ElevatedButton(
onPressed: () {
if (_formKey.currentState.validate()) {
print('提交成功');
}
},
child: Text('提交'),
)
)
],
)
],
),
);
}
}

十九、表单-Form
- Form (表单容器)
- 创建表单唯一键:final GlobalKey_formKey = GlobalKey();
- 验证表单: _formKey.currentState.validate()
- 提交表单:_formKey.currentState.ve()
- 重置表单: _formKey.currentState.reset()
- TextFormField (输入框)
- validator(验证器)
- obscureText (密码框)
- onSaved
- 设定表单字段的值
- 在表单的方法之后执行
import 'package:flutter/material.dart';
class Home extends StatelessWidget {
Widget build(BuildContext context) {
return Scaffold(
appBar: AppBar(
title: Text("Form"),
leading: Icon(Icons.menu),
actions: [
Icon(Icons.settings)
],
elevation: 0.0,
centerTitle: true,
),
body: FormDemo()
);
}
}
class FormDemo extends StatefulWidget {
FormDemo({Key key}) : super(key: key);
_FormDemoState createState() => _FormDemoState();
}
class _FormDemoState extends State<FormDemo> {
final GlobalKey<FormState> _formKey = GlobalKey<FormState>();
String _phone;
String _password;
Widget build(BuildContext context) {
return Container(
padding: EdgeInsets.all(20),
child: Column(
children: [
Form(
key: _formKey,
child: Column(
children: [
TextFormField(
decoration: InputDecoration(
hintText: '手机号'
),
validator: (value) {
RegExp reg = new RegExp(r'^\d{11}$');
if (!reg.hasMatch(value)) {
return '手机号非法111';
}
return null;
},
onSaved: (value) {
print('_phone onSaved');
_phone = value;
},
),
TextFormField(
obscureText: true,
decoration: InputDecoration(
hintText: '密码'
),
validator: (value) {
return value.length < 6 ? "密码长度不够": null;
},
onSaved: (value) {
print('_password onSaved');
_password = value;
},
)
],
)
),
Row(
children: [
Expanded(
child: ElevatedButton(
onPressed: () {
if (_formKey.currentState.validate()) {
print('提交成功');
// 提交表单
print('_formKey.currentState.save() - Before');
_formKey.currentState.save();
print('_formKey.currentState.save() - After');
print(_phone);
print(_password);
}
},
child: Text('提交'),
)
),
SizedBox(
width: 20,
),
Expanded(
child: ElevatedButton(
onPressed: () {
_formKey.currentState.reset();
},
child: Text('重置'),
)
)
],
)
],
),
);
}
}
二十、动画
- Why
- UI 界面设计合理的动画,可以让用户觉得更加流畅、直观,可以极大提高和改善用户体验。
- What (实现原理)
- 动画就是动起来的画面
- 视觉暂留:画面经视神经传入大脑后,不会立即消失(会存留一段时间)
- 帧(Frame):单个的画面,在学术上叫帧。
- 每秒中展示的帧数简称fps (Frame per Second)
动画分类
- 补间(Tween)动画
- 在补间动画中我们定义开始点和结束点、时间线以及定义转换时间和速度曲线。然后由系统计算,从开始点运动到结束点。从而形成动画效果
- 例如:透明度从 0 到 1,颜色值从 0 到 255
- 拟物动画
- 拟物动画是对真实世界的行为进行建模,使动画效果类似于现实中的物理效果。
- 例如:弹簧,阻尼,重力,抛物线等。
动画-Animation
- Animation,是 Flutter 动画库中的一个核心类。它包含动画的值和状态两个属性,定义了动画的一系列监听函数。
- 监听值:
- addListener
- removeListener
- 监听状态:
- addStatusListener
- removeStatusListener
- 监听值:
动画状态
- AnimationStatus.dismissed
- 动画初始状
- AnimationStatus.completed
- 动画结束状
- AnimationStatus.forward
- 动画处在从开始到结束的运行状态
- AnimationStatus.reverse
- 动画处在从结束到开始的运行状态
动画-AnimationController
- AnimationController (动画控制器)
- 在指定时间内,将组件属性值由初始值演变到终止值。从而形成动画效果。
- AnimationController 参数
- duration (动画的执行时间)
- reverseDuration (动画反向执行时间)
- lowerBound =0.0 (动画最小值)
- upperBound =1.0 (动画最大值)
- value(动画初始值,默认是 lowerBound)
- vsync(TickerProvider 类型的对象,用来创建 Ticker 对象)
动画-AnimationController
- 当创建一个 AnimationController 时,需要传递一个 vsync 参数
- vsync 的作用是:防止屏幕外动画(动画页面切换到后台时)消耗不必要的资源
- 通过将 SingleTickerProviderStateMixin 添加到类定义中,可以将 stateful 对象作为vsync 的值。
- AnimationController 具有控制动画的方法:
- forward()可以正向执行动画
- reverse()可以反向执行动画
- dispose()用来释放动画资源(在不使用时需要调用该方法,否则会造成资源泄露)
- stop()用来停止动画运行
动画-Tween
- 简介
- AnimationController 动画生成值的默认区间是 0.0 到 1.0,如果希望使用不同的区间,或不同的数据类型,需要使用Tween (补间动画)
- Tween 的唯一职责就是定义从输入范围到输出范围的映射。
- 例如:颜色区间是 0到 255
- Tween
- Tween(begin: 起始值,end: 终止值);
- ColorTween(begin: Colors.withe, end: Colors.black);
动画-CurvedAnimation
- 简介
- 动画执行的速度有多种(匀速、先快后慢或先慢后快)这里的速度称为动画曲线CurvedAnimation 的目的是为 AnimationController 添加动画曲线
- 组件
- CurvedAnimation(parent: controller, curve: Curves.easeln)
- parent (动画控制器对象)
- curve(正向执行的动画曲线)
- reverseCurve (反向执行的动画曲线)
- Curves
- 动画曲线: https://api.flutter.dev/flutter/animation/Curves-class.html
动画-步骤
- 创建动画控制器
- controller = AnimationController(duration, vsync)
- 创建动画
- 动画曲线(CurvedAnimation)
- 补间动画(Tween)
- 监听动画
- addListener() // 监听动画生成值addStatusListener() //监听动画状态执行动画
- controller.forward()// 正向执行
- controller.reverse()// 反向执行
import 'package:flutter/material.dart';
class Home extends StatelessWidget {
Widget build(BuildContext context) {
return Scaffold(
appBar: AppBar(
title: Text("Animation"),
leading: Icon(Icons.menu),
actions: [
Icon(Icons.settings)
],
elevation: 0.0,
centerTitle: true,
),
body: AnimationDemo()
);
}
}
class AnimationDemo extends StatefulWidget {
AnimationDemo({Key key}) : super(key: key);
_AnimationDemoState createState() => _AnimationDemoState();
}
class _AnimationDemoState extends State<AnimationDemo> with SingleTickerProviderStateMixin {
AnimationController controller;
Animation animation;
void initState() {
// TODO: implement initState
super.initState();
// 1.创建 AnimationController
controller = AnimationController(
duration: Duration(milliseconds: 400),
vsync: this
);
// 2.1 声明动画曲线
animation = CurvedAnimation(parent: controller, curve: Curves.bounceIn);
// 2.2 设置动画值的范围
animation = Tween(begin: 50.0, end: 400.0).animate(controller);
// 3. 监听动画
animation.addListener(() {
print(animation.value);
setState(() {
});
});
// 4. 执行动画
// controller.forward();
}
Widget build(BuildContext context) {
return Center(
child: Column(
children: [
ElevatedButton(
onPressed: () {
controller.forward();
},
child: Text('放大')
),
ElevatedButton(
onPressed: () {
controller.reverse();
},
child: Text('缩小')
),
ElevatedButton(
onPressed: () {
animation.addStatusListener((status) {
if (status == AnimationStatus.completed) {
// 反向执行动画
controller.reverse();
} else if (status == AnimationStatus.dismissed) {
// 正向执行动画
controller.forward();
}
});
controller.forward();
},
child: Text('重复')
),
ElevatedButton(
onPressed: () {
controller.stop();
},
child: Text('停止')
),
Icon(
Icons.favorite,
color: Colors.red,
size: animation.value
),
Opacity(
opacity: controller.value,
child: Text('Hello World')
)
],
),
);
}
void dispose() {
// TODO: implement dispose
super.dispose();
controller.dispose();
}
}

交织动画
- What?
- 交织动画是由多个单一动画叠加而成复杂动画
- 例如:组件变化可能涉及高度、宽度、颜色、透明度、位置等等
- 需要给每个动画设置时间间隔(Interval)
- Transform (对组件进行矩阵变换)
- 平移:Transform.translate()
- 旋转: Transform.rotate
- 缩放:Transform.scale()

import 'package:flutter/material.dart';
import 'dart:math';
class Home extends StatelessWidget {
Widget build(BuildContext context) {
return Scaffold(
appBar: AppBar(
title: Text("Stagger Animation"),
leading: Icon(Icons.menu),
actions: [
Icon(Icons.settings)
],
elevation: 0.0,
centerTitle: true,
),
body: AnimationDemo()
);
}
}
class AnimationDemo extends StatefulWidget {
AnimationDemo({Key key}) : super(key: key);
_AnimationDemoState createState() => _AnimationDemoState();
}
class _AnimationDemoState extends State<AnimationDemo> with SingleTickerProviderStateMixin {
AnimationController controller;
Animation animation;
Animation sizeAnimation;
Animation colorAnimation;
Animation rotationAnimation;
void initState() {
// TODO: implement initState
super.initState();
// 1. 创建 AnimationController
controller = AnimationController(
duration: Duration(seconds: 3),
vsync: this,
);
// 2. 创建动画
animation = CurvedAnimation(
parent: controller,
curve: Interval(0.0, 0.5)
)..addListener(() {
setState(() {
});
});
// 3. 让动画反复运行
animation.addStatusListener((status) {
if (status == AnimationStatus.completed) {
// 反向执行动画
controller.reverse();
} else if (status == AnimationStatus.dismissed) {
// 正向执行动画
controller.forward();
}
});
// 4. 设置其他动画
sizeAnimation = Tween(begin: 0.0, end: 200.0).animate(animation);
colorAnimation = ColorTween(begin: Colors.yellow, end: Colors.red)
.animate(CurvedAnimation(
parent: controller,
curve: Interval(0.5, 0.8, curve: Curves.bounceIn)
))
..addListener(() {
setState(() {
});
});
rotationAnimation = Tween(begin: 0.0, end: 2*pi).animate(
CurvedAnimation(
parent: controller,
curve: Interval(0.8, 1.0, curve: Curves.easeIn)
)
);
}
Widget build(BuildContext context) {
return Center(
child: Column(
children: [
ElevatedButton(
onPressed: () {
// animation.addStatusListener((status) {
// if (status == AnimationStatus.completed) {
// // 反向执行动画
// controller.reverse();
// } else if (status == AnimationStatus.dismissed) {
// // 正向执行动画
// controller.forward();
// }
// });
controller.forward();
},
child: Text('重复')
),
ElevatedButton(
onPressed: () {
controller.stop();
},
child: Text('停止')
),
Opacity(
opacity: controller.value,
child: Transform.rotate(
angle: rotationAnimation.value,
child: Container(
width: sizeAnimation.value,
height: sizeAnimation.value,
color: colorAnimation.value
)
)
)
],
),
);
}
void dispose() {
// TODO: implement dispose
super.dispose();
controller.dispose();
}
}
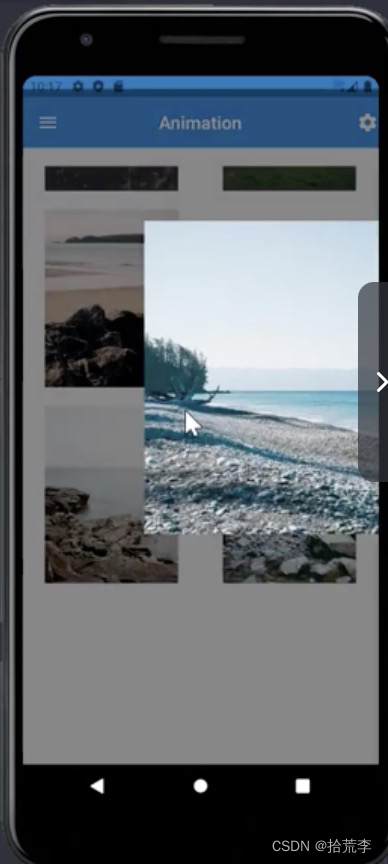
二十一、Hero 动画
- Hero 动画用来实现跨页面的动画效果
- 在不同页面中,声明一个共享组件(Hero)
- 由于共享组件在不同页面中的位置、外观等不同,路由切换时,形成动画效果
- 如何实现
- 在页面 A 中定义起始 Hero 组件(source hero),声明 tag
- 在页面 B 中定义目标 Hero 组件(destination hero),绑定相同的 tag
- 页面跳转时,通过 Navigator,传递 tag
- Hero 组件
- tag(路由切换时,共享组件的标记)
- child (声明子组件)
import 'package:flutter/material.dart';
import 'ImageDetail.dart';
class Home extends StatelessWidget {
Widget build(BuildContext context) {
return Scaffold(
appBar: AppBar(
title: Text("Hero Animation"),
leading: Icon(Icons.menu),
actions: [
Icon(Icons.settings)
],
elevation: 0.0,
centerTitle: true,
),
body: HeroAnimation()
);
}
}
class HeroAnimation extends StatelessWidget {
const HeroAnimation({Key key}) : super(key: key);
Widget build(BuildContext context) {
return Container(
padding: EdgeInsets.symmetric(vertical: 20),
child: GridView.extent(
maxCrossAxisExtent: 200.0,
mainAxisSpacing: 20,
children: List.generate(20, (index) {
String imageURL = "https://picsum.photos/id/$index/300/400";
return GestureDetector(
onTap: () {
Navigator.push(context, MaterialPageRoute(builder: (BuildContext ctx) {
return ImageDetail(imageURL);
}));
},
child: Hero(
tag: imageURL,
child: Image.network(imageURL)
)
);
})
),
);
}
}
import 'package:flutter/material.dart';
class ImageDetail extends StatelessWidget {
final String imageURL;
ImageDetail(this.imageURL);
Widget build(BuildContext context) {
return Scaffold(
backgroundColor: Colors.black,
body: Center(
child: GestureDetector(
onTap: () {
// 调回去
Navigator.pop(context);
},
child: Hero(
tag: imageURL,
child: Image.network(
imageURL,
width: double.infinity,
fit: BoxFit.cover
)
)
)
)
);
}
}
二十二、多语言(国际化)
- 国际化(internationalization 简称 i18n)
- 终端(手机)系统语言切换时, Flutter应用的跟随切换,
- 内容
- 组件(Widget)国际化
- 例如:日历,弹窗等常用组件的国际化
- 文本国际化(包括文本的顺序)
- 自定义文本的国际化
- 组件(Widget)国际化
多语言(国际化)-组件
- 在 pubspec.yaml 中引入 flutter_localizations
- 安装包: flutter pub get (VS Code 中保存自动安装)
- 设置 MaterialApp
- import ‘package:flutter_localizations/flutter_localizations.dart’;
- localizationsDelegates(指定哪些组件需要进行国际化)
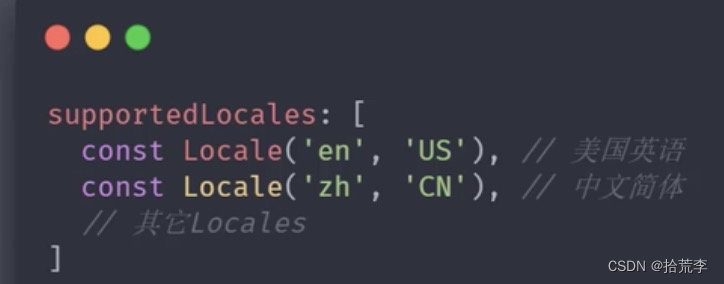
- supportedlocales(指定要支持哪些语言)

多语言(国际化) -文本
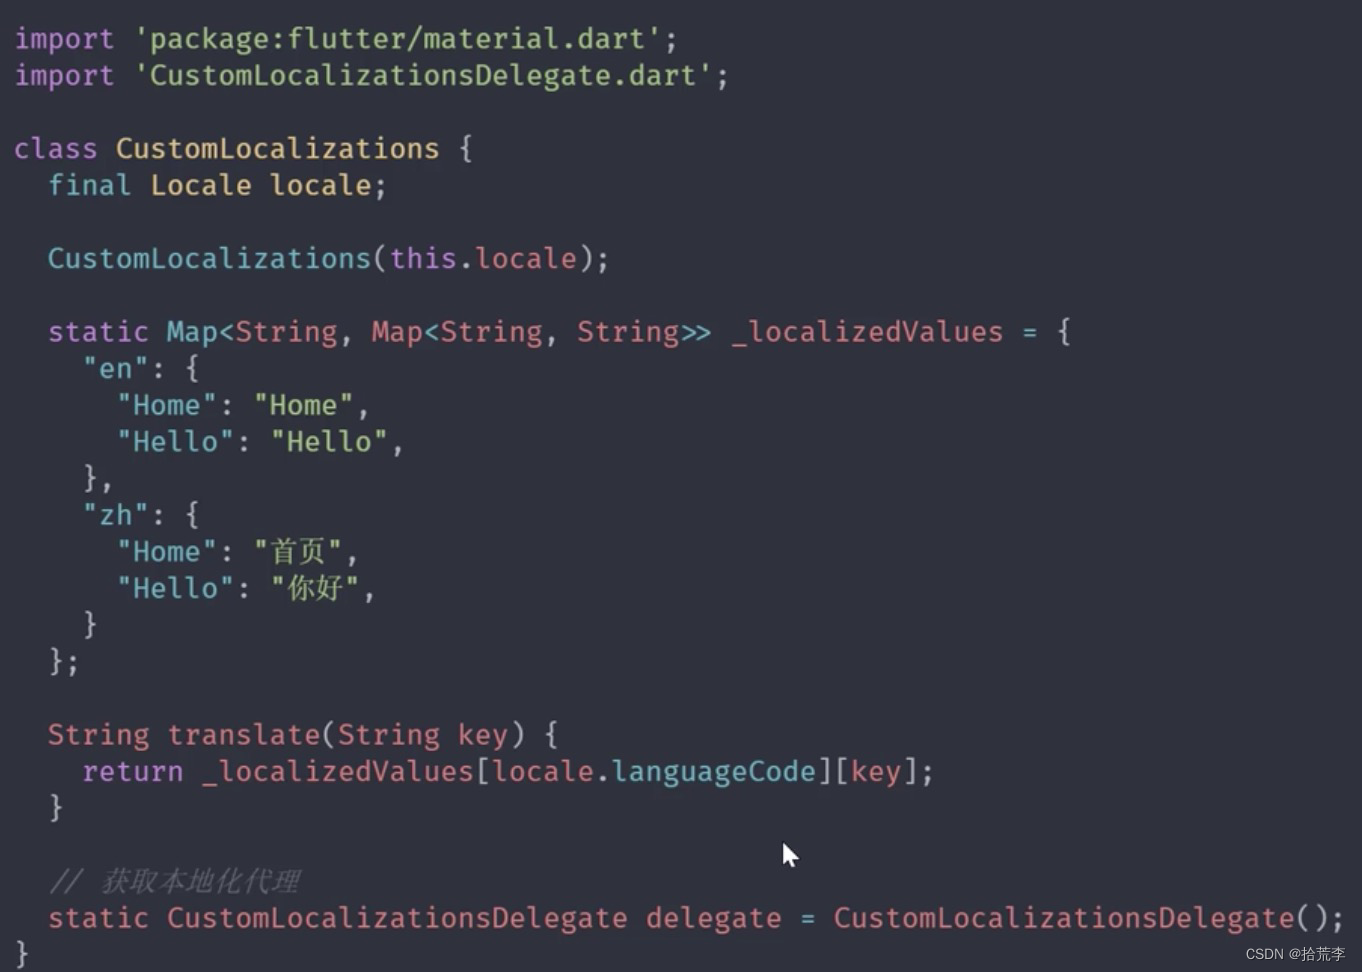
- 创建本地化类
- CustomLocalizations
- 创建本地化类的代理
- CustomLocalizationsDelegate extends LocalizationsDelegate
- isSupported(当前本地化,是否在有效的语言范围内
- shouldReload(本地化重新构建时,是否调用 load 方法,加载本地化资源)
- load(语言发生变更时,加载对应的本地化资源)
- CustomLocalizationsDelegate extends LocalizationsDelegate
- 使用本地化类
- CustomLocalizations.delegate

多语言(国际化)- 文本- 加载语言包
- CustomLocalizations.delegate
- 检测当前语言
- localeResolutionCallback
- locale. languageCode(语言代码,例如:en、zh)
- locale.countryCode(国家代码,例如:US,CN)

- localeResolutionCallback
- 设置语言包
- 创建语言文件
- 在 pubspec.yaml 中配置语言资源
- 异步加载语言包
- 在 CustomLocalizations 中,添加 loadJSON() 方法
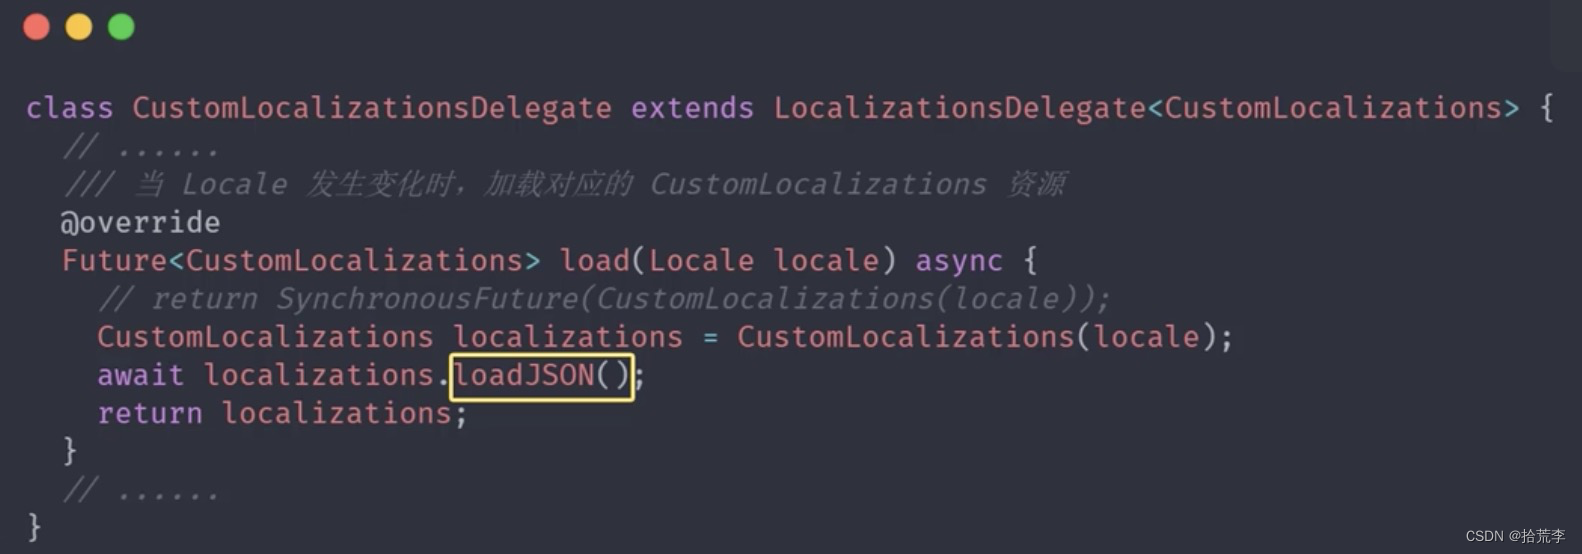
- 在 CustomLocalizationsDelegate 中,调用 CustomLocalizations 的 loadJSON() 方法

import 'package:flutter/foundation.dart';
import 'package:flutter/material.dart';
import 'package:flutter/services.dart';
import 'dart:convert';
class CustomLocalizations {
final Locale locale;
CustomLocalizations(this.locale);
// static Map<String, Map<String, String>> _localizedValues = {
// "en": {
// "title": "Home",
// "greet": "Hello",
// },
// "zh": {
// "title": "首页",
// "greet": "你好",
// },
// };
Map<String, String> _localizedValues;
Future<bool> loadJSON() async {
String jsonString = await rootBundle.loadString('lang/${locale.languageCode}.json');
Map<String, dynamic> jsonMap = json.decode(jsonString);
_localizedValues = jsonMap.map((key, value) {
return MapEntry(key, value.toString());
});
return true;
}
String t(String key) {
// _localizedValues['zh']['title']
// return _localizedValues[locale.languageCode][key];
return _localizedValues[key];
}
static CustomLocalizations of(BuildContext context) {
return Localizations.of(context, CustomLocalizations);
}
static CustomLocalizationsDelegate delegate = CustomLocalizationsDelegate();
}
class CustomLocalizationsDelegate extends LocalizationsDelegate<CustomLocalizations> {
bool isSupported(Locale locale) {
return ["en", "zh"].contains(locale.languageCode);
}
Future<CustomLocalizations> load(Locale locale) async {
// return SynchronousFuture(CustomLocalizations(locale));
CustomLocalizations localizations = CustomLocalizations(locale);
await localizations.loadJSON();
return localizations;
}
bool shouldReload(covariant LocalizationsDelegate<CustomLocalizations> old) {
return false;
}
}
二十三、多主题
- 主题(UI风格、样式、皮肤)
- 主题风格可通过 theme 来定义,从而实现整个 App 风格的统一
- 一旦设置了主题,那么应用程序中的某些 Widget, 就会直接使用主题的样式
组件
ThemeData
Brightness (Brightness.light | Brightness.dark)
primaryColor | accentColor
buttonTheme | cardTheme | iconTheme | textTheme
Theme (声明局部主题)
Theme.of(context) 获取上下文中的主题信息
多主题-适配终端
- 声明不同的主题
- CustomTheme
- 使用主题import ‘CustomTheme.dart’;
- theme: CustomTheme.lightTheme,
- darkTheme: CustomTheme.darkTheme,
- theme: ThemeData.light(),
- darkTheme: ThemeData.dark(),
- 查看效果
- 模拟器中切换主题,Flutter 应用中查看效果
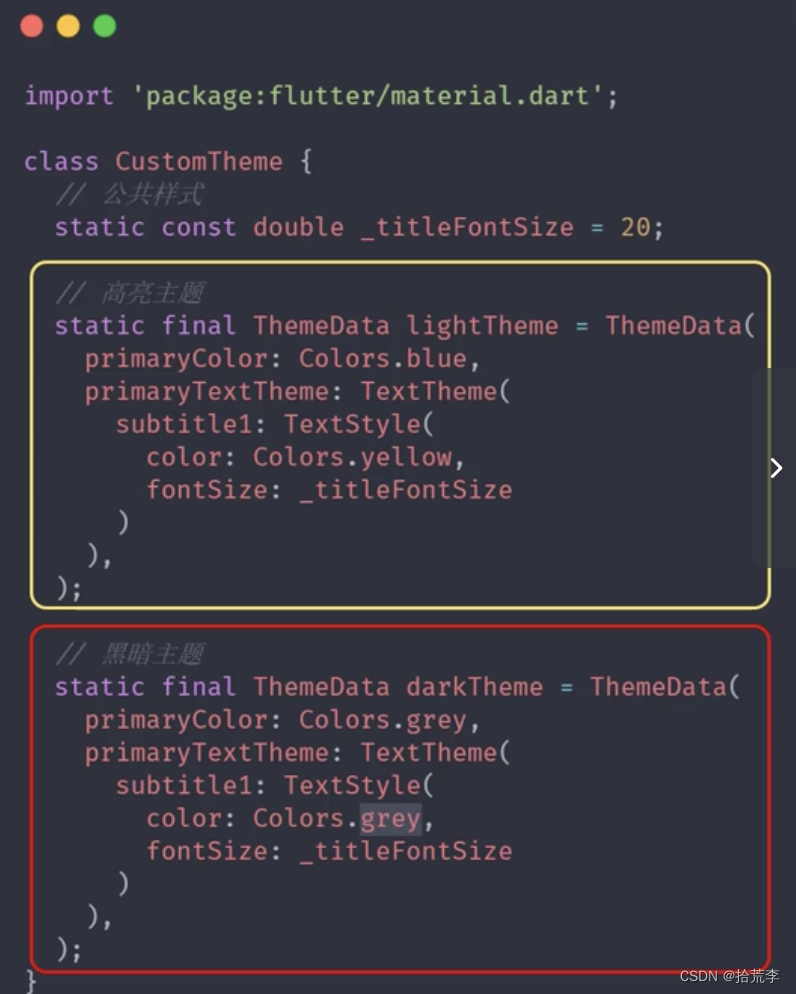
import 'package:flutter/material.dart';

class CustomTheme {
  // 公共样式
  static const double _CardBorderWidth = 20;
  static const double _CardElevation = 20;

  // 高亮主题
  static final ThemeData lightTheme = ThemeData(
    primaryColor: Colors.red,
    cardTheme: CardTheme(
      color: Colors.red[100],
      shape: Border.all(width: _CardBorderWidth, color: Colors.red),
      elevation: _CardElevation,
    )
  );

  // 黑暗主题
  static final ThemeData darkTheme = ThemeData(
    primaryColor: Colors.grey,
    cardTheme: CardTheme(
      color: Colors.grey[100],
      shape: Border.all(width: _CardBorderWidth, color: Colors.black45),
      elevation: _CardElevation,
    )
  );
}