Spring中bean有三种装配机制
一、在xml中显示装配
1. 基本类型装配
@Data
@NoArgsConstructor
@AllArgsConstructor
public class Student{
	private String name;
	private Address address;
	private String[] books;
	private List<String> hobbys;
	private Map<String String> card;
	private Set<String> games;
	private String wife;
	private Properties info;
}
<bean id="student" class="com.kuang.pojo.Student">
	<!--1. 普通注入-->
	<property name="name" value="狂神说"/>

	<!--2. 数组注入-->
	<property name="books">
		<array>
			<value>红楼梦</value>
			<value>西游记</value>
			<value>水浒传</value>
		</array>
	</property>

	<!--3. List注入-->
	<property name="hobbys">
		<list>
			<value>看书</value>
			<value>听歌</value>
			<value>打球</value>
		</list>
	</property>

	<!--4. Map注入-->
	<property name="card">
		<map>
			<entry key=“身份证” value=“12315454512312”/>
			<entry key=“银行卡” value=“15465415123156”/>
		</map>
	</property>

	<!--5. 数组注入-->
	<property name="games">
		<set>
			<value>红楼梦</value>
			<value>西游记</value>
			<value>水浒传</value>
		</set>
	</property>

	<!--6. 空值注入-->
	<property name="wife">
		<null/>
	</property>

	<!--7. Properties注入-->
	<property name="info">
		<props>
			<prop key="driver">20190525</prop>
			<prop key="url">男/prop>
			<prop key="username">root</prop>
			<prop key="password">123456</prop>
		</props>
	</property>
</bean>
2. 类装配
<!--1. 类装配-->
	<!--csBean类有两个属性:title和author-->
    <bean name="cdBean" class="com.my.spring.bean.CDBean">
        <property name="title" value="The World!!"/>
        <property name="author" value="Mr.D"/>
    </bean>
     <!--csPlayer类有一个属性:cdBean-->
     <!--对csPlayer的属性csBean进行依赖注入,称为Bean装配,或者依赖关系注入-->
    <bean name="cdPlayer" class="com.my.spring.service.impl.CDPlayerImpl">
        <property name="cdBean" ref="cdBean"/>
    </bean>
3. 有参构造方法装配
<!--2. 有参构造方法1-->
    <bean id="hello" class="com.kuang.pojo.Hello">
        <constructor-arg index="0" value="方法1"/>
    </bean>
<!--3. 有参构造方法2-->
    <bean id="hello" class="com.kuang.pojo.Hello">
        <constructor-arg type="java.lang.String" value="方法2"/>
    </bean>
<!--4. 有参构造方法3-->
    <bean id="hello" class="com.kuang.pojo.Hello">
        <constructor-arg name="name" value="方法3"/>
    </bean>
4. 扩展注入
- p命名空间注入
1. 先在beans框架中加入支持:xmlns:p="http://www/springframework.org/schema/p"
<!--p命名空间注入,可以直接注入属性的值,property-->
<bean id="user" class="com.kuang.pojo.User" p:name="小李" p:age="10"/>
- c命名空间注入
1. 先在beans框架中加入支持:xmlns:c="http://www/springframework.org/schema/c"
2. 其次使用c注入的Bean必须存在有参构造器
<!--c命名空间注入,通过构造器注入,construct-args-->
<bean id="user" class="com.kuang.pojo.User" c:name="小李" c:age="10"/>
5. Bean的作用域
- 单例模式(Spring默认机制):从Spring容器中get的每个对象都是同一个对象。
<bean id="user" class="com.kuang.pojo.User" scope="singleton"/>
ApplicationContext context = new ClassPathXmlApplicationContext("userbeans.xml");
User user1 = context.getBean("user");
User user2 = context.getBean("user");
System.out.println(user1==user2);	//true
- 原型模式:每次从容器中get的时候,都会产生一个新对象
<bean id="user" class="com.kuang.pojo.User" scope="prototype"/>
ApplicationContext context = new ClassPathXmlApplicationContext("userbeans.xml");
User user1 = context.getBean("user");
User user2 = context.getBean("user");
System.out.println(user1==user2);	//false
6. Bean的其他配置
6.1. 别名
<!--别名,如果添加了别名,我们可以使用别名获取这个对象-->
<alias name="user" alias="userNew">

<!--
	id:bean的唯一标识符,也就是相当于我们学的对象名
	class:bean对象所对应的全限定名:包名+类型
	name:也是别名,而且那么可以同时取多个别名
-->
	<bean id="user" class="com.kuang.pojo.user" name="user1,user2,user3">
	<property name="name" value="狂神说"/>
	</bean>
6.2 Import(一般用于团队开发使用,他可以将多个配置文件,导入合并为一个)
注意:如果导入的文件中,bean重名了,那么就会把重名的bean合并成一个,所以不会因为不同的bean.xml存在重名而发生冲突
<import resource="beans1.xml"/>
<import resource="beans2.xml"/>
<import resource="beans3.xml"/>
二、 在java中显式装配,都需要在Config配置类重写
//1. 注册Bean

/*
	@Configuration注解的作用:声明一个类为配置类,用于取代bean.xml配置文件注册bean对象。
	@Configuration(启动容器) 等同于spring的配置文件xml里的<beans>标签;
*/
@Configuration
class Config {
    @Bean	//@Bean(注册Bean) 等同于spring的配置文件xml里面的<bean>标签。
    public Seat seat(){ return new Seat();}
}

//2. 获取Bean
	@Bean	//通过set方法注入bean
    public Car car(){
        Car car = new Car();
        car.setSeat(seat());
        car.setEngine(engine());
        car.setWheel(wheel());
        return car;
    }
	@Bean	//通过构造器方法获取
    public Car anotherCar(Wheel wheel, Seat seat, Engine engine){
        Car car = new Car();
        car.setSeat(seat);
        car.setEngine(engine);
        car.setWheel(wheel);
        return car;
    }
三、自动装配
1. xml方式自动装配
1.1、byName: 会自动在容器上下文查找,和自己对象set方法后面的值对应的bean id(通过id匹配)
//实体类
@Data
public class Pepole {
    private String name;
    private Books books;
    private Hobbies hobbies;
    <bean id="books" class="com.lmy.pojo.Books"/>
    <bean id="hobbies" class="com.lmy.pojo.Hobbies"/>

    <bean id="pepole" class="com.lmy.pojo.Pepole" autowire="byName">
        <property name="name" value="zhangSan"/>
    </bean>
1.2、byType:会自动在容器上下文中查找,和自己对象属性类型相同的bean(通过class匹配)
注意:使用autowire byType首先需要保证:同一类型的bean对象,在spring容器中唯一。如果不唯一,会报不唯一的异常。
    <bean id="books" class="com.lmy.pojo.Books"/>
    <bean id="hobbies" class="com.lmy.pojo.Hobbies"/>

    <bean id="pepole" class="com.lmy.pojo.Pepole" autowire="byType">
        <property name="name" value="zhangSan"/>
    </bean>
2. 使用注解
注意:Spring使用注解前需要在xml文件中导入约束 + 配置注解的支持
<beans xmlns="http://www.springframework.org/schema/beans"
       xmlns:xsi="http://www.w3.org/2001/XMLSchema-instance"
       xmlns:context="http://www.springframework.org/schema/context"
       xsi:schemaLocation="http://www.springframework.org/schema/beans
	        https://www.springframework.org/schema/beans/spring-beans.xsd
	        http://www.springframework.org/schema/context
	        https://www.springframework.org/schema/context/spring-context.xsd">

		<!--开启注解的支持    -->
        <context:annotation-config/>
</beans>
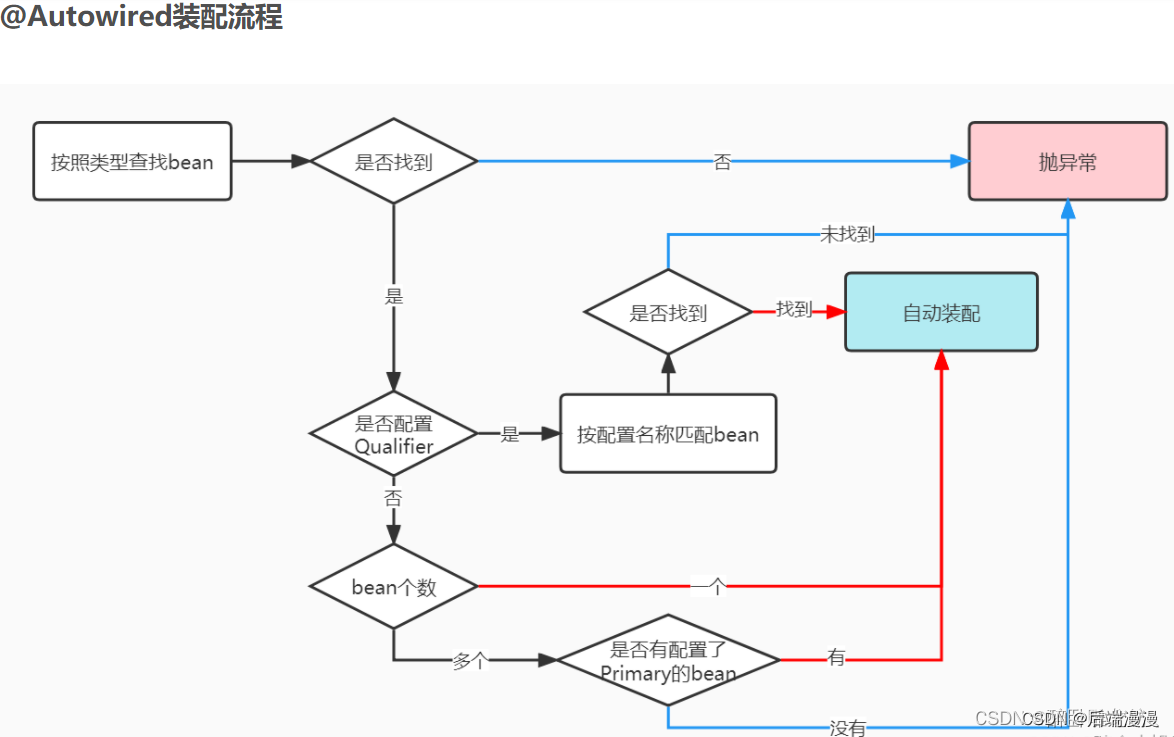
2.1、@Autowied装配方式
按类型装配(默认使用的装配方式)。
按名称装配(结合@Qualifier注解使用)。
public class Pepole {
    private String name;
    @Autowired
    @Qualifier("books1")
    private Books books;
    @Autowired
    private Hobbies hobbies;
}
	<!--开启属性注解支持!-->
    <context:annotation-config/>

    <bean id="books2" class="com.lmy.pojo.Books"/>
    <bean id="books1" class="com.lmy.pojo.Books"/>
    <bean id="hobbies" class="com.lmy.pojo.Hobbies"/>
    <bean id="pepole" class="com.lmy.pojo.Pepole"/>
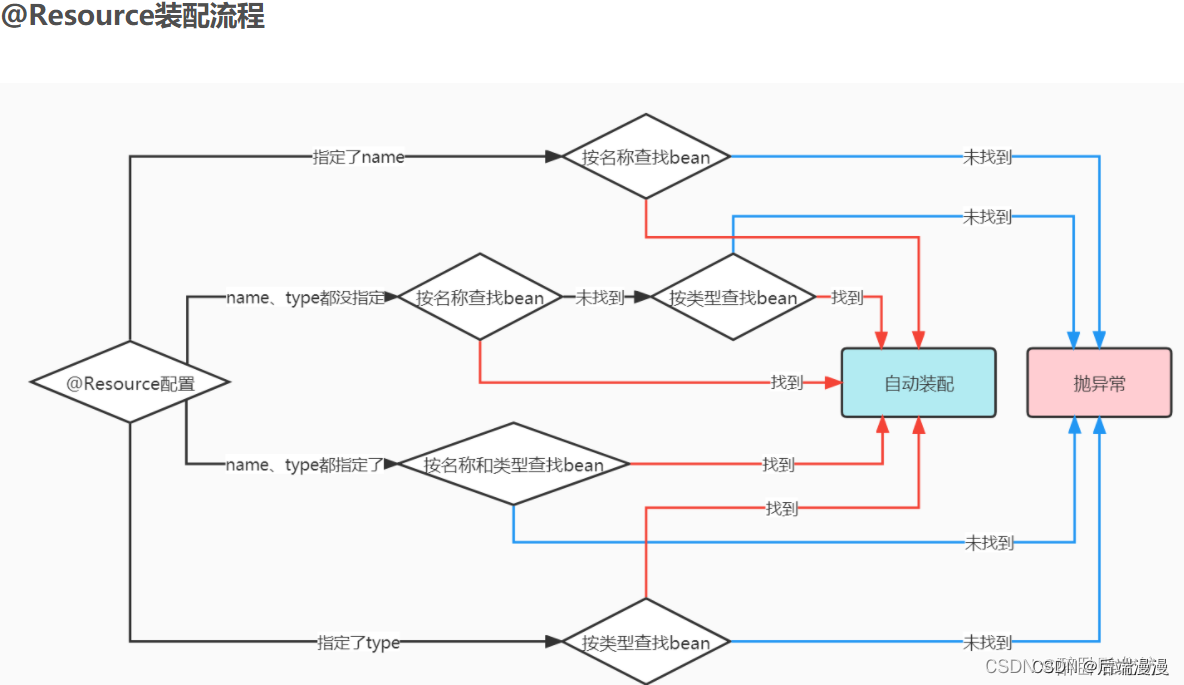
2.2、@Resource装配方式
@Resource指定按type自动装配
    @Resource(type = Books.class)
    private Books books;
@Resource指定按name自动装配:
    @Resource(name = "books")
    private Books books;
2.3、@Autowired与@Resource区别

