系列文章目录
文章目录
- 系列文章目录
- 一、zabbix介绍
- 一、zabbix部署
- 1、zabbix环境
- 2、安装zabbix的安装包
- 安装zabbix_server
- 安装被监控方 web001

一、zabbix介绍
百度百科:Zabbix 是一个基于WEB界面的提供分布式系统监视以及网络监视功能的企业级的开源解决方案。它是一个企业级的高度集成开源监控软件,可以用来监控设备、服务器、数据库等可用性和性能,保证服务器系统及数据库的安全运营。并提供灵活的通知机制以让系统管理员快速定位/解决存在的各种问题。
zabbix由2部分构成,zabbix server与可选组件zabbix agent。它可以通过SNMP,zabbix agent,ping,端口监视等方法提供对远程服务器/网络状态的监视,数据收集等功能,它可以运行在Linux,Solaris,HP-UX,AIX,Free BSD,Open BSD,OS X等平台上。
zabbix官网:https://www.zabbix.com/cn

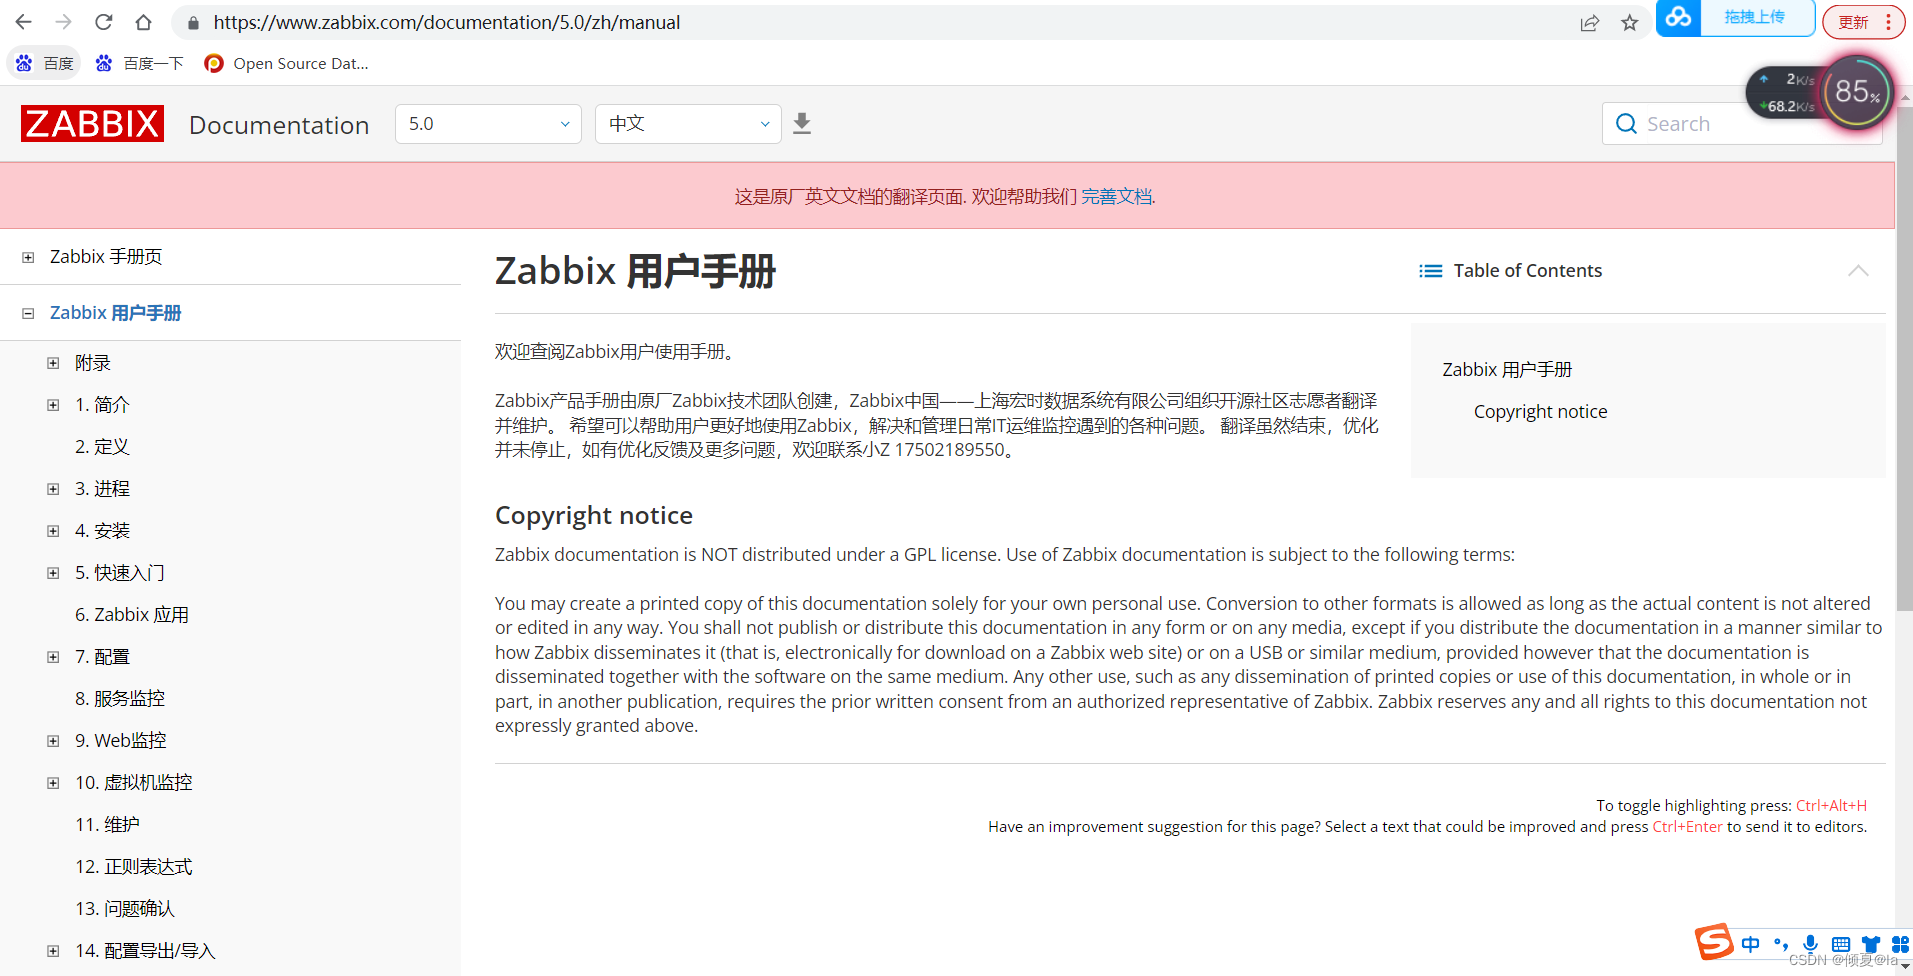
zabbix官方文档地址:https://www.zabbix.com/documentation/5.0/zh/manual
一、zabbix部署
1、zabbix环境
| IP | 主机名 | 角色 |
|---|---|---|
| 192.168.200.182 | zabbix_server | 监控服务器 |
| 192.168.200.183 | web001 | 业务主机 |
2、安装zabbix的安装包
安装zabbix_server
1.设置zabbix_server主机名
[root@zabbix_server ~]#hostnamectl set-hostname zabbix_server 或者 hostname zabbix_server #设置完成后需要退出终端然后重新打开,新的主机名就生效了
2.关闭防火墙和selinux
[root@zabbix_server ~]# systemctl stop firewalld.service  #停止防火墙服务
[root@zabbix_server ~]# systemctl disable firewalld.service
[root@zabbix_server ~]# setenforce 0  #临时关闭selinux
setenforce: SELinux is disabled
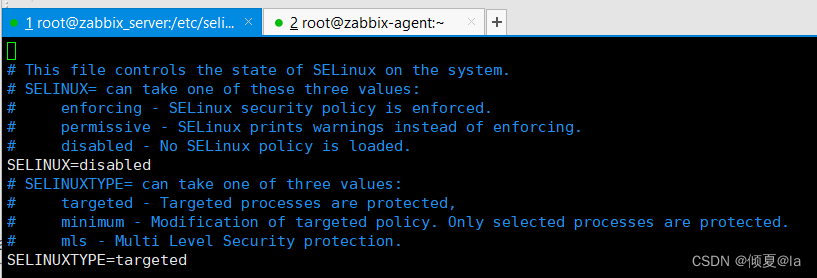
[root@zabbix_server selinux]# vim   /etc/selinux/config   #编辑配置文件为`SELINUX=disabled` 即可永久关闭selinux
3.准备zabbix-repo

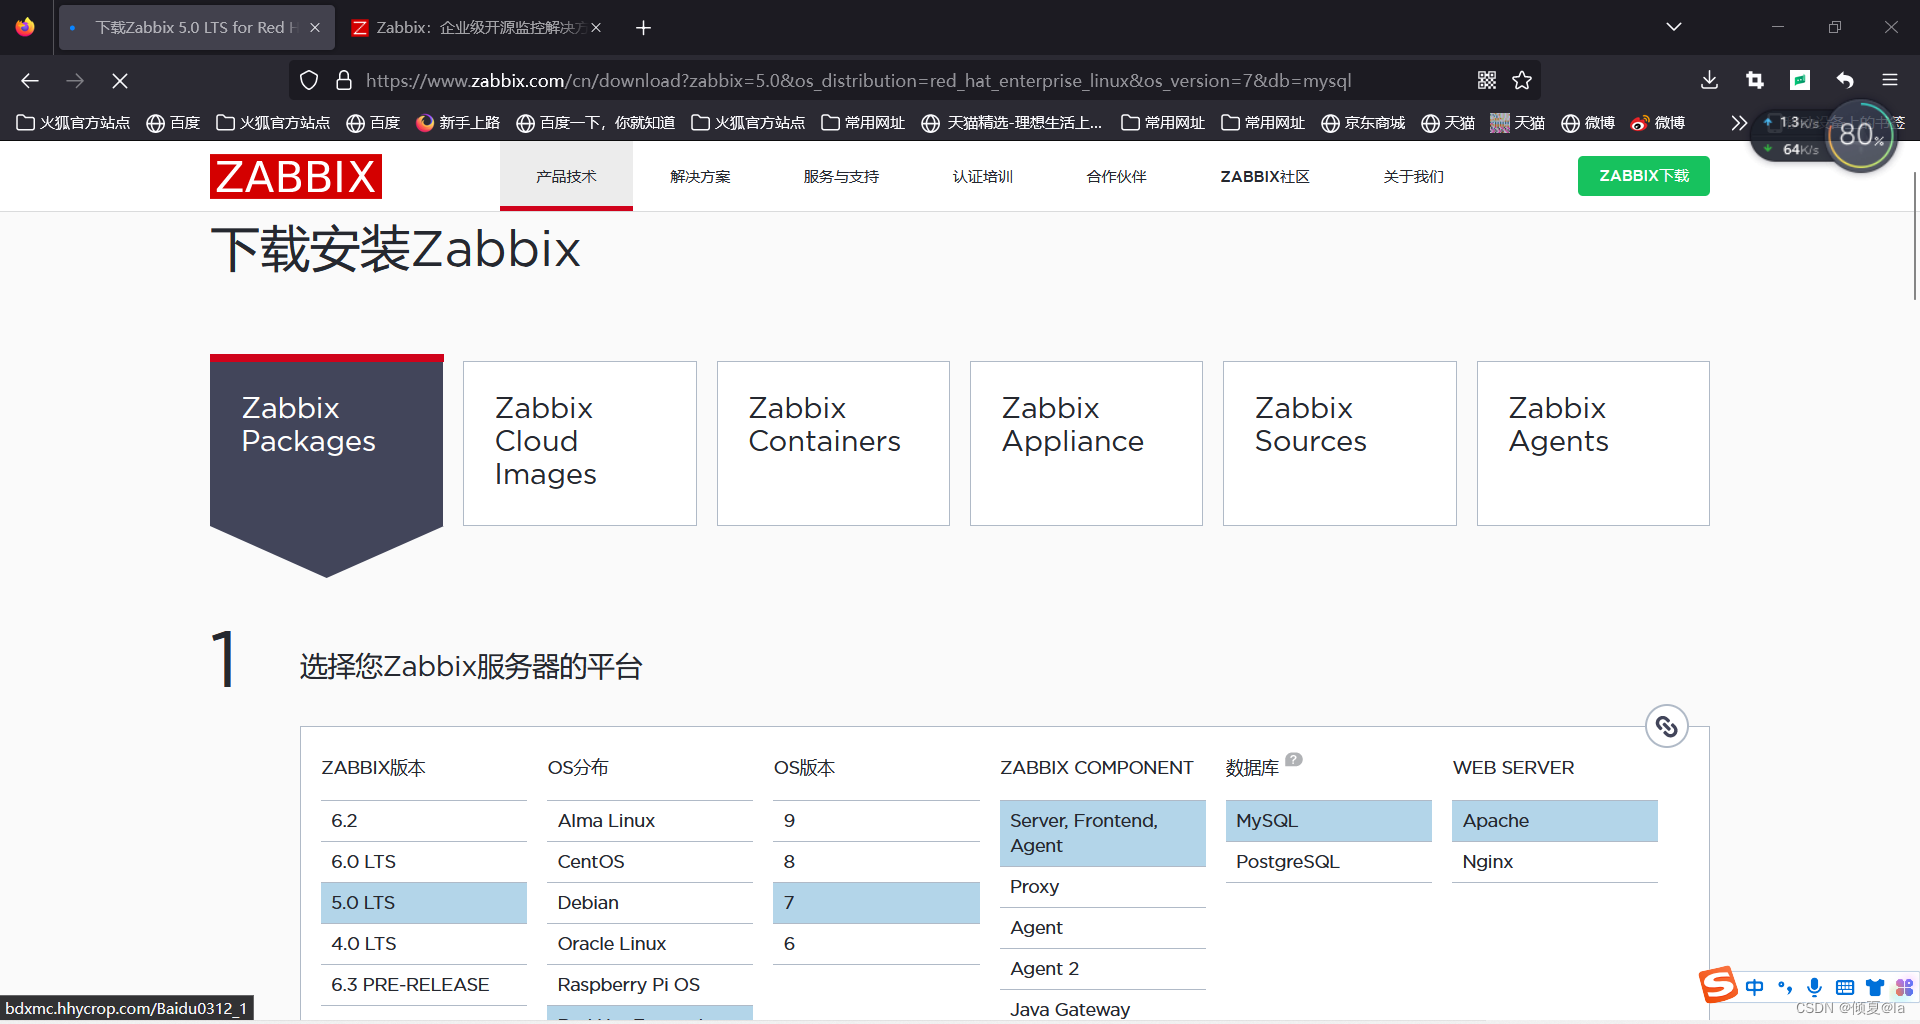
4.点击下载跳转到这里
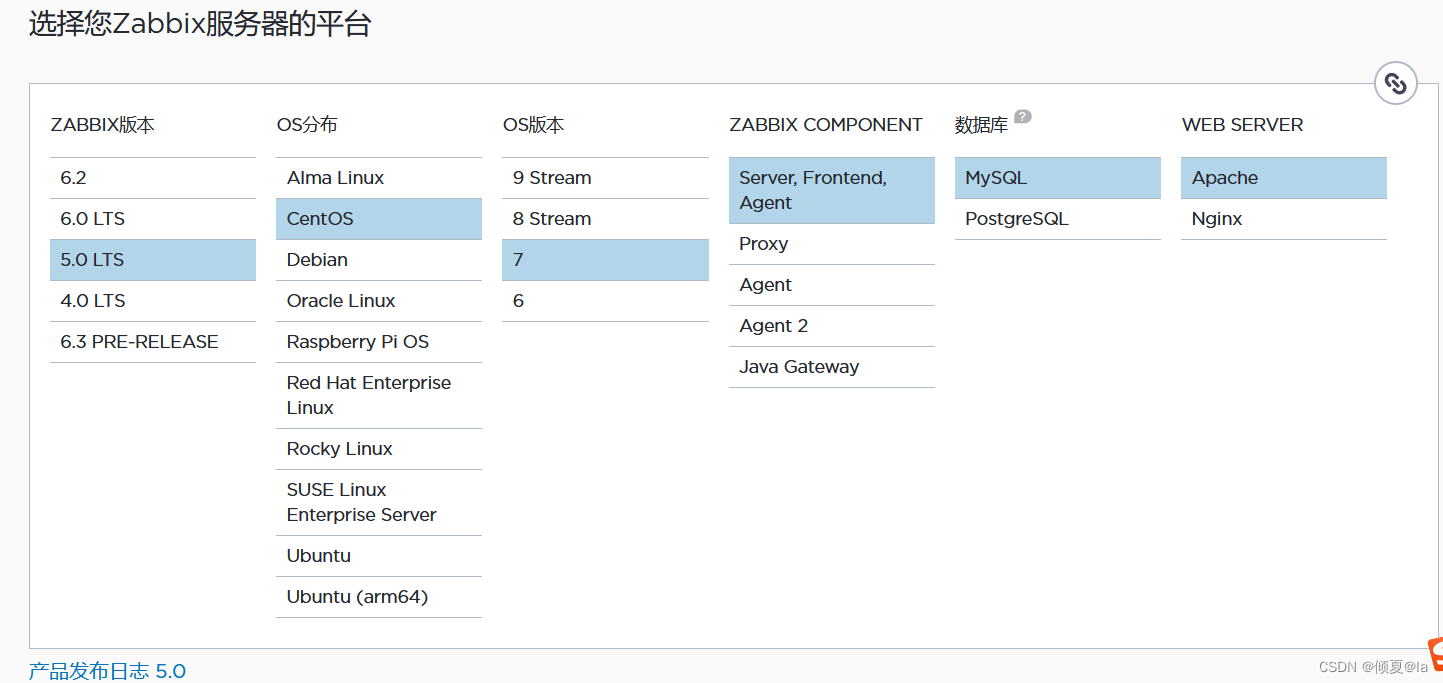
5.选择您Zabbix服务器的平台
6.安装Zabbix包
- 为您的平台安装和配置Zabbix

[root@zabbix_server ~]# rpm -Uvh https://repo.zabbix.com/zabbix/5.0/rhel/7/x86_64/zabbix-release-5.0-1.el7.noarch.rpm
获取https://repo.zabbix.com/zabbix/5.0/rhel/7/x86_64/zabbix-release-5.0-1.el7.noarch.rpm
- 卸载rpm包
[root@zabbix_server ~]# yum remove -y zabbix-release.noarch
- 上图是官方的仓库,下载速度很慢,不推荐使用。
国外镜像不可用时,可以使用阿里提供的zabbixYUM源或者国内其他的YUM源。
进入阿里镜像站 地址:https://developer.aliyun.com/mirror/?spm=a2c6h.25603864.0.0.3d501929Ml2fFi

下拉找到zabbix


- 配置zabbix YUM仓库
[root@zabbix_server ~]# cd /etc/yum.repos.d
[root@zabbix_server yum.repos.d]# ls
CentOS-Base.repo  CentOS-Base.repo.bak  epel.repo  epel-testing.repo  vscode.repo  zabbix.repo
[root@zabbix_server yum.repos.d]# vim zabbix.repo

[zabbix]
name=alibaba zabbix
baseurl=https://mirrors.aliyun.com/zabbix/zabbix/5.0/rhel/7/x86_64/
gpgcheck=0
enabled=1

[zabbix2]
name=alibaba zabbix frontend
baseurl=https://mirrors.aliyun.com/zabbix/zabbix/5.0/rhel/7/x86_64/frontend/
gpgcheck=0
enabled=1
- 配置好zabbix yum仓库之后,我清一下列表
[root@zabbix_server ~]# yum repolist
已加载插件:langpacks
zabbix                           | 2.9 kB     00:00
zabbix2                          | 2.9 kB     00:00
zabbix2/primary_db                 |  60 kB   00:00
源标识           源名称                           状态
base/7/x86_64    CentOS-7 - Base - mirrors.aliyun 10,072
code             Visual Studio Code                2,753
epel/x86_64      Extra Packages for Enterprise Li 13,735
extras/7/x86_64  CentOS-7 - Extras - mirrors.aliy    515
updates/7/x86_64 CentOS-7 - Updates - mirrors.ali  4,300
zabbix           alibaba zabbix                      321
zabbix2          alibaba zabbix frontend             293
repolist: 31,989

[root@zabbix_server ~]#  yum clean all
已加载插件:langpacks
正在清理软件源: base code epel extras updates zabbix
               : zabbix2
Other repos take up 32 M of disk space (use --verbose for details)
[root@zabbix_server ~]# yum repolist
已加载插件:langpacks
base                             | 3.6 kB     00:00
code                             | 3.0 kB     00:00
epel                             | 4.7 kB     00:00
extras                           | 2.9 kB     00:00
updates                          | 2.9 kB     00:00
zabbix                           | 2.9 kB     00:00
zabbix2                          | 2.9 kB     00:00
(1/10): epel/x86_64/group_gz       |  98 kB   00:00
(2/10): base/7/x86_64/group_gz     | 153 kB   00:00
(3/10): code/primary_db            | 2.6 MB   00:01
(4/10): extras/7/x86_64/primary_db | 249 kB   00:01
(5/10): zabbix/primary_db          | 187 kB   00:01
(6/10): zabbix2/primary_db         |  60 kB   00:00
(7/10): epel/x86_64/updateinfo     | 1.0 MB   00:03
(8/10): base/7/x86_64/primary_db   | 6.1 MB   00:20
(9/10): epel/x86_64/primary_db     | 7.0 MB   00:24
(10/10): updates/7/x86_64/primary_ |  17 MB   00:58
源标识           源名称                           状态
base/7/x86_64    CentOS-7 - Base - mirrors.aliyun 10,072
code             Visual Studio Code                2,753
epel/x86_64      Extra Packages for Enterprise Li 13,735
extras/7/x86_64  CentOS-7 - Extras - mirrors.aliy    515
updates/7/x86_64 CentOS-7 - Updates - mirrors.ali  4,300
zabbix           alibaba zabbix                      321
zabbix2          alibaba zabbix frontend             293
repolist: 31,989
- 安装Zabbix server,Web前端,agent

[root@zabbix_server yum.repos.d]# yum install zabbix-server-mysql zabbix-agent -y
已加载插件:langpacks
zabbix                                                                                                 | 2.9 kB  00:00:00
zabbix2                                                                                                | 2.9 kB  00:00:00
软件包 zabbix-server-mysql-5.0.28-1.el7.x86_64 已安装并且是最新版本
正在解决依赖关系
--> 正在检查事务
---> 软件包 zabbix-agent.x86_64.0.5.0.28-1.el7 将被 安装
--> 解决依赖关系完成

依赖关系解决

==============================================================================================================================
 Package                         架构                      版本                               源                         大小
==============================================================================================================================
正在安装:
 zabbix-agent                    x86_64                    5.0.28-1.el7                       zabbix                    479 k

事务概要
==============================================================================================================================
安装  1 软件包

总下载量:479 k
安装大小:1.9 M
Downloading packages:
No Presto metadata available for zabbix
zabbix-agent-5.0.28-1.el7.x86_64.rpm                                                                   | 479 kB  00:00:02
Running transaction check
Running transaction test
Transaction test succeeded
Running transaction
警告:RPM 数据库已被非 yum 程序修改。
** 发现 1 个已存在的 RPM 数据库问题, 'yum check' 输出如下:
yum-3.4.3-168.el7.centos.noarch 有缺少的需求 yum-plugin-fastestmirror
  正在安装    : zabbix-agent-5.0.28-1.el7.x86_64                                                                          1/1
  验证中      : zabbix-agent-5.0.28-1.el7.x86_64                                                                          1/1

已安装:
  zabbix-agent.x86_64 0:5.0.28-1.el7

完毕!
- 安装Zabbix前端

[root@zabbix_server yum.repos.d]# yum install centos-release-scl -y
已加载插件:langpacks
软件包 centos-release-scl-2-3.el7.centos.noarch 已安装并且是最新版本
无须任何处理
编辑配置文件 /etc/yum.repos.d/zabbix.repo and enable zabbix-frontend repository.
vim  /etc/yum.repos.d/zabbix.repo

[zabbix2]
name=alibaba zabbix frontend
baseurl=https://mirrors.aliyun.com/zabbix/zabbix/5.0/rhel/7/x86_64/frontend/
gpgcheck=0
enabled=1
- 安装Zabbix前端包
[root@zabbix_server yum.repos.d]# yum install centos-release-scl -y
已加载插件:langpacks
软件包 centos-release-scl-2-3.el7.centos.noarch 已安装并且是最新版本
无须任何处理
[root@zabbix_server yum.repos.d]# vim zabbix.repo
[root@zabbix_server yum.repos.d]# yum install zabbix-web[root@zabbix_server yum.repos.d]# yum install zabbix-web-mysql-scl zabbix-apache-conf-scl -y
已加载插件:langpacks
zabbix                           | 2.9 kB     00:00
zabbix2                          | 2.9 kB     00:00
软件包 zabbix-web-mysql-scl-5.0.28-1.el7.noarch 已安装并且是最新版本
正在解决依赖关系
--> 正在检查事务
---> 软件包 zabbix-apache-conf-scl.noarch.0.5.0.28-1.el7 将被 安装
--> 正在处理依赖关系 httpd,它被软件包 zabbix-apache-conf-scl-5.0.28-1.el7.noarch 需要
--> 正在检查事务
---> 软件包 httpd.x86_64.0.2.4.6-97.el7.centos.5 将被 安装
--> 解决依赖关系完成

依赖关系解决

========================================================
 Package     架构   版本                  源       大小
========================================================
正在安装:
 zabbix-apache-conf-scl
             noarch 5.0.28-1.el7          zabbix2  16 k
为依赖而安装:
 httpd       x86_64 2.4.6-97.el7.centos.5 updates 2.7 M

事务概要
========================================================
安装  1 软件包 (+1 依赖软件包)

总下载量:2.7 M
安装大小:9.4 M
Downloading packages:
(1/2): zabbix-apache-conf-scl-5.0. |  16 kB   00:00
(2/2): httpd-2.4.6-97.el7.centos.5 | 2.7 MB   00:09
--------------------------------------------------------
总计                       302 kB/s | 2.7 MB  00:09
Running transaction check
Running transaction test
Transaction test succeeded
Running transaction
  正在安装    : httpd-2.4.6-97.el7.centos.5.x86_6   1/2
  正在安装    : zabbix-apache-conf-scl-5.0.28-1.e   2/2
  验证中      : zabbix-apache-conf-scl-5.0.28-1.e   1/2
  验证中      : httpd-2.4.6-97.el7.centos.5.x86_6   2/2

已安装:
  zabbix-apache-conf-scl.noarch 0:5.0.28-1.el7

作为依赖被安装:
  httpd.x86_64 0:2.4.6-97.el7.centos.5

完毕!
7 创建初始数据库
- 安装数据库
[root@zabbix_server ~]# yum -y install mariadb mariadb-server
已加载插件:langpacks
软件包 1:mariadb-5.5.68-1.el7.x86_64 已安装并且是最新版本
软件包 1:mariadb-server-5.5.68-1.el7.x86_64 已安装并且是最新版本
无须任何处理
- 启动数据库
[root@zabbix_server ~]# systemctl enable mariadb
Created symlink from /etc/systemd/system/multi-user.target.wants/mariadb.service to /usr/lib/systemd/system/mariadb.service.

[root@zabbix_server ~]# systemctl start mariadb
[root@zabbix_server ~]# systemctl status mariadb
● mariadb.service - MariaDB database server
   Loaded: loaded (/usr/lib/systemd/system/mariadb.service; enabled; vendor preset: disabled)
   Active: active (running) since 六 2022-10-29 00:59:24 CST; 8s ago
  Process: 23579 ExecStartPost=/usr/libexec/mariadb-wait-ready $MAINPID (code=exited, status=0/SUCCESS)
  Process: 23543 ExecStartPre=/usr/libexec/mariadb-prepare-db-dir %n (code=exited, status=0/SUCCESS)
 Main PID: 23578 (mysqld_safe)
    Tasks: 20
   CGroup: /system.slice/mariadb.service
           ├─23578 /bin/sh /usr/bin/mysqld_safe --bas...
           └─23743 /usr/libexec/mysqld --basedir=/usr...

10月 29 00:59:22 zabbix_server systemd[1]: Starting ...
10月 29 00:59:22 zabbix_server mariadb-prepare-db-dir[23543]: ...
10月 29 00:59:22 zabbix_server mariadb-prepare-db-dir[23543]: ...
10月 29 00:59:22 zabbix_server mysqld_safe[23578]: 2...
10月 29 00:59:22 zabbix_server mysqld_safe[23578]: 2...
10月 29 00:59:24 zabbix_server systemd[1]: Started M...
Hint: Some lines were ellipsized, use -l to show in full.
- 登录数据库并授权zabbix账号
[root@zabbix_server ~]# mysql -uroot -p123456
Welcome to the MariaDB monitor.  Commands end with ; or \g.
Your MariaDB connection id is 24
Server version: 5.5.68-MariaDB MariaDB Server

Copyright (c) 2000, 2018, Oracle, MariaDB Corporation Ab and others.

Type 'help;' or '\h' for help. Type '\c' to clear the current input statement.


MariaDB [(none)]> create database zabbix character set utf8 collate utf8_bin;
MariaDB [(none)]> create user zabbix@localhost identified by '123456';
MariaDB [(none)]> grant all privileges on zabbix.* to zabbix@localhost;
Query OK, 0 rows affected (0.00 sec)
MariaDB [(none)]> flush privileges;
Query OK, 0 rows affected (0.00 sec)
MariaDB [(none)]> quit;
- 初始化zabbix
注意:存在版本问题
[root@zabbix_server ~]# ls /usr/share/doc/zabbix-server-mysql-5.0.28
AUTHORS    COPYING        double.sql  README
ChangeLog  create.sql.gz  NEWS
[root@zabbix_server ~]# zcat /usr/share/doc/zabbix-server-mysql-5.0.8/create.sql.gz | mysql -uzabbix    -p'123456'  zabbix
再次登录数据库,检查导入是否成功
[root@zabbix_server ~]# mysql -uroot -p123456
Welcome to the MariaDB monitor.  Commands end with ; or \g.
Your MariaDB connection id is 110
Server version: 5.5.68-MariaDB MariaDB Server

Copyright (c) 2000, 2018, Oracle, MariaDB Corporation Ab and others.

Type 'help;' or '\h' for help. Type '\c' to clear the current input statement.

MariaDB [(none)]> show databases;
+--------------------+
| Database           |
+--------------------+
| information_schema |
| mysql              |
| performance_schema |
| zabbix             |
+--------------------+
4 rows in set (0.00 sec)

MariaDB [(none)]> use zabbix;
Reading table information for completion of table and column names
You can turn off this feature to get a quicker startup with -A

Database changed
MariaDB [zabbix]> show tables;
+----------------------------+
| Tables_in_zabbix           |
+----------------------------+
| acknowledges               |
| actions                    |
| alerts                     |
| application_discovery      |
| application_prototype      |
| application_template       |
| applications               |
| auditlog                   |
| auditlog_details           |
| autoreg_host               |
| conditions                 |
| config                     |
| config_autoreg_tls         |
| corr_condition             |
| corr_condition_group       |
| corr_condition_tag         |
| corr_condition_tagpair     |
| corr_condition_tagvalue    |
| corr_operation             |
| correlation                |
| dashboard                  |
| dashboard_user             |
| dashboard_usrgrp           |
| dbversion                  |
| dchecks                    |
| dhosts                     |
| drules                     |
| dservices                  |
| escalations                |
| event_recovery             |
| event_suppress             |
| event_tag                  |
| events                     |
| expressions                |
| functions                  |
| globalmacro                |
| globalvars                 |
| graph_discovery            |
| graph_theme                |
| graphs                     |
| graphs_items               |
| group_discovery            |
| group_prototype            |
| history                    |
| history_log                |
| history_str                |
| history_text               |
| history_uint               |
| host_discovery             |
| host_inventory             |
| host_tag                   |
| hostmacro                  |
| hosts                      |
| hosts_groups               |
| hosts_templates            |
| housekeeper                |
| hstgrp                     |
| httpstep                   |
| httpstep_field             |
| httpstepitem               |
| httptest                   |
| httptest_field             |
| httptestitem               |
| icon_map                   |
| icon_mapping               |
| ids                        |
| images                     |
| interface                  |
| interface_discovery        |
| interface_snmp             |
| item_application_prototype |
| item_condition             |
| item_discovery             |
| item_preproc               |
| item_rtdata                |
| items                      |
| items_applications         |
| lld_macro_path             |
| lld_override               |
| lld_override_condition     |
| lld_override_opdiscover    |
| lld_override_operation     |
| lld_override_ophistory     |
| lld_override_opinventory   |
| lld_override_opperiod      |
| lld_override_opseverity    |
| lld_override_opstatus      |
| lld_override_optag         |
| lld_override_optemplate    |
| lld_override_optrends      |
| maintenance_tag            |
| maintenances               |
| maintenances_groups        |
| maintenances_hosts         |
| maintenances_windows       |
| mappings                   |
| media                      |
| media_type                 |
| media_type_message         |
| media_type_param           |
| module                     |
| opcommand                  |
| opcommand_grp              |
| opcommand_hst              |
| opconditions               |
| operations                 |
| opgroup                    |
| opinventory                |
| opmessage                  |
| opmessage_grp              |
| opmessage_usr              |
| optemplate                 |
| problem                    |
| problem_tag                |
| profiles                   |
| proxy_autoreg_host         |
| proxy_dhistory             |
| proxy_history              |
| regexps                    |
| rights                     |
| screen_user                |
| screen_usrgrp              |
| screens                    |
| screens_items              |
| scripts                    |
| service_alarms             |
| services                   |
| services_links             |
| services_times             |
| sessions                   |
| slides                     |
| slideshow_user             |
| slideshow_usrgrp           |
| slideshows                 |
| sysmap_element_trigger     |
| sysmap_element_url         |
| sysmap_shape               |
| sysmap_url                 |
| sysmap_user                |
| sysmap_usrgrp              |
| sysmaps                    |
| sysmaps_elements           |
| sysmaps_link_triggers      |
| sysmaps_links              |
| tag_filter                 |
| task                       |
| task_acknowledge           |
| task_check_now             |
| task_close_problem         |
| task_data                  |
| task_remote_command        |
| task_remote_command_result |
| task_result                |
| timeperiods                |
| trends                     |
| trends_uint                |
| trigger_depends            |
| trigger_discovery          |
| trigger_tag                |
| triggers                   |
| users                      |
| users_groups               |
| usrgrp                     |
| valuemaps                  |
| widget                     |
| widget_field               |
+----------------------------+
166 rows in set (0.00 sec)

若看到这些表则说明导入成功
8 为Zabbix server配置数据库
- 编辑配置文件 /etc/zabbix/zabbix_server.conf
将以下这几个配置好货去掉注释
[root@zabbix_server ~]# vim /etc/zabbix/zabbix_server.conf

DBHost=localhost
DBName=zabbix
DBUser=zabbix
DBPassword=123456
9 为Zabbix前端配置PHP
1.编辑配置文件 /etc/opt/rh/rh-php72/php-fpm.d/zabbix.conf 取消注释并为您设置正确的时区。
[root@zabbix_server ~]# vim  /etc/opt/rh/rh-php72/php-fpm.d/zabbix.conf

php_value[date.timezone] = Asia/Shanghai #只需将这行配置好就是行了,其它的不变
- 启动Zabbix server和agent进程
启动Zabbix server和agent进程,并为它们设置开机自启:
[root@zabbix_server ~]# systemctl restart zabbix-server zabbix-agent httpd rh-php72-php-fpm
Job for httpd.service failed because the control process exited with error code. See "systemctl status httpd.service" and "journalctl -xe" for details.
[root@zabbix_server ~]# systemctl status httpd.service
● httpd.service - The Apache HTTP Server
   Loaded: loaded (/usr/lib/systemd/system/httpd.service; disabled; vendor preset: disabled)
   Active: failed (Result: exit-code) since 六 2022-10-29 01:31:51 CST; 1min 33s ago
     Docs: man:httpd(8)
           man:apachectl(8)
  Process: 24463 ExecStop=/bin/kill -WINCH ${MAINPID} (code=exited, status=1/FAILURE)
  Process: 24440 ExecStart=/usr/sbin/httpd $OPTIONS -DFOREGROUND (code=exited, status=1/FAILURE)
 Main PID: 24440 (code=exited, status=1/FAILURE)

#说明80端口被占用 在终端: ps -ef|grep httpd察看占用的进程或者用netstat -lnp|grep 80
找到后用kill杀掉
10月 29 01:31:51 zabbix_server httpd[24440]: (98)Address already in use: AH00072: make_sock: could not bind to addres...:]:80
10月 29 01:31:51 zabbix_server httpd[24440]: (98)Address already in use: AH00072: make_sock: could not bind to addres....0:80
10月 29 01:31:51 zabbix_server httpd[24440]: no listening sockets available, shutting down
10月 29 01:31:51 zabbix_server httpd[24440]: AH00015: Unable to open logs
10月 29 01:31:51 zabbix_server systemd[1]: httpd.service: main process exited, code=exited, status=1/FAILURE
10月 29 01:31:51 zabbix_server kill[24463]: kill: cannot find process ""
10月 29 01:31:51 zabbix_server systemd[1]: httpd.service: control process exited, code=exited status=1
10月 29 01:31:51 zabbix_server systemd[1]: Failed to start The Apache HTTP Server.
10月 29 01:31:51 zabbix_server systemd[1]: Unit httpd.service entered failed state.
10月 29 01:31:51 zabbix_server systemd[1]: httpd.service failed.
Hint: Some lines were ellipsized, use -l to show in full.

[root@zabbix_server ~]#  ps -ef|grep httpd
root      24639  18075  0 01:35 pts/0    00:00:00 grep --color=auto httpd
[root@zabbix_server ~]# netstat -lnp|grep 80
tcp        0      0 0.0.0.0:80              0.0.0.0:*               LISTEN      6782/nginx: master
tcp6       0      0 :::80                   :::*                    LISTEN      6782/nginx: master
[root@zabbix_server ~]# kill -9 6782
[root@zabbix_server ~]# netstat -lnp|grep 80
tcp        0      0 0.0.0.0:80              0.0.0.0:*               LISTEN      6783/nginx: worker
tcp6       0      0 :::80                   :::*                    LISTEN      6783/nginx: worker
[root@zabbix_server ~]# kill -9 6783
[root@zabbix_server ~]# netstat -lnp|grep 80
tcp        0      0 0.0.0.0:80              0.0.0.0:*               LISTEN      6785/nginx: worker
tcp6       0      0 :::80                   :::*                    LISTEN      6785/nginx: worker
[root@zabbix_server ~]# netstat -lnp|grep 80
tcp        0      0 0.0.0.0:80              0.0.0.0:*               LISTEN      6787/nginx: worker
tcp6       0      0 :::80                   :::*                    LISTEN      6787/nginx: worker

[root@zabbix_server ~]# kill -9 6787
[root@zabbix_server ~]# netstat -lnp|grep 80
[root@zabbix_server ~]#  ps -ef|grep httpd
root      24806  18075  0 01:38 pts/0    00:00:00 grep --color=auto httpd
[root@zabbix_server ~]# systemctl restart zabbix-server zabbix-agent httpd rh-php72-php-fpm
[root@zabbix_server ~]# systemctl enable zabbix-server zabbix-agent httpd rh-php72-php-fpm
Created symlink from /etc/systemd/system/multi-user.target.wants/zabbix-server.service to /usr/lib/systemd/system/zabbix-server.service.
Created symlink from /etc/systemd/system/multi-user.target.wants/zabbix-agent.service to /usr/lib/systemd/system/zabbix-agent.service.
Created symlink from /etc/systemd/system/multi-user.target.wants/httpd.service to /usr/lib/systemd/system/httpd.service.
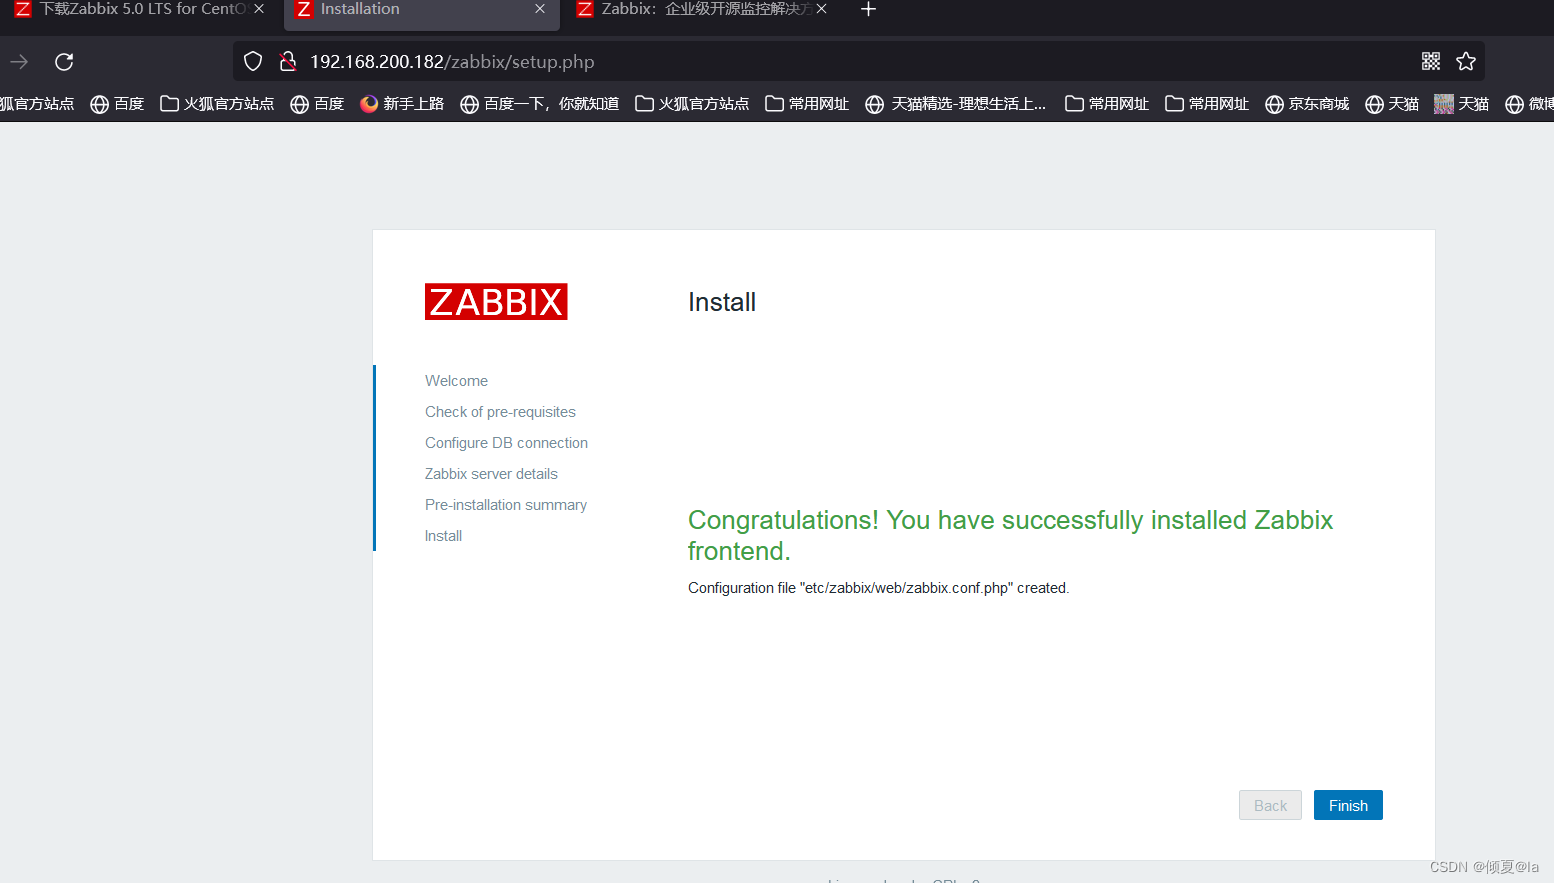
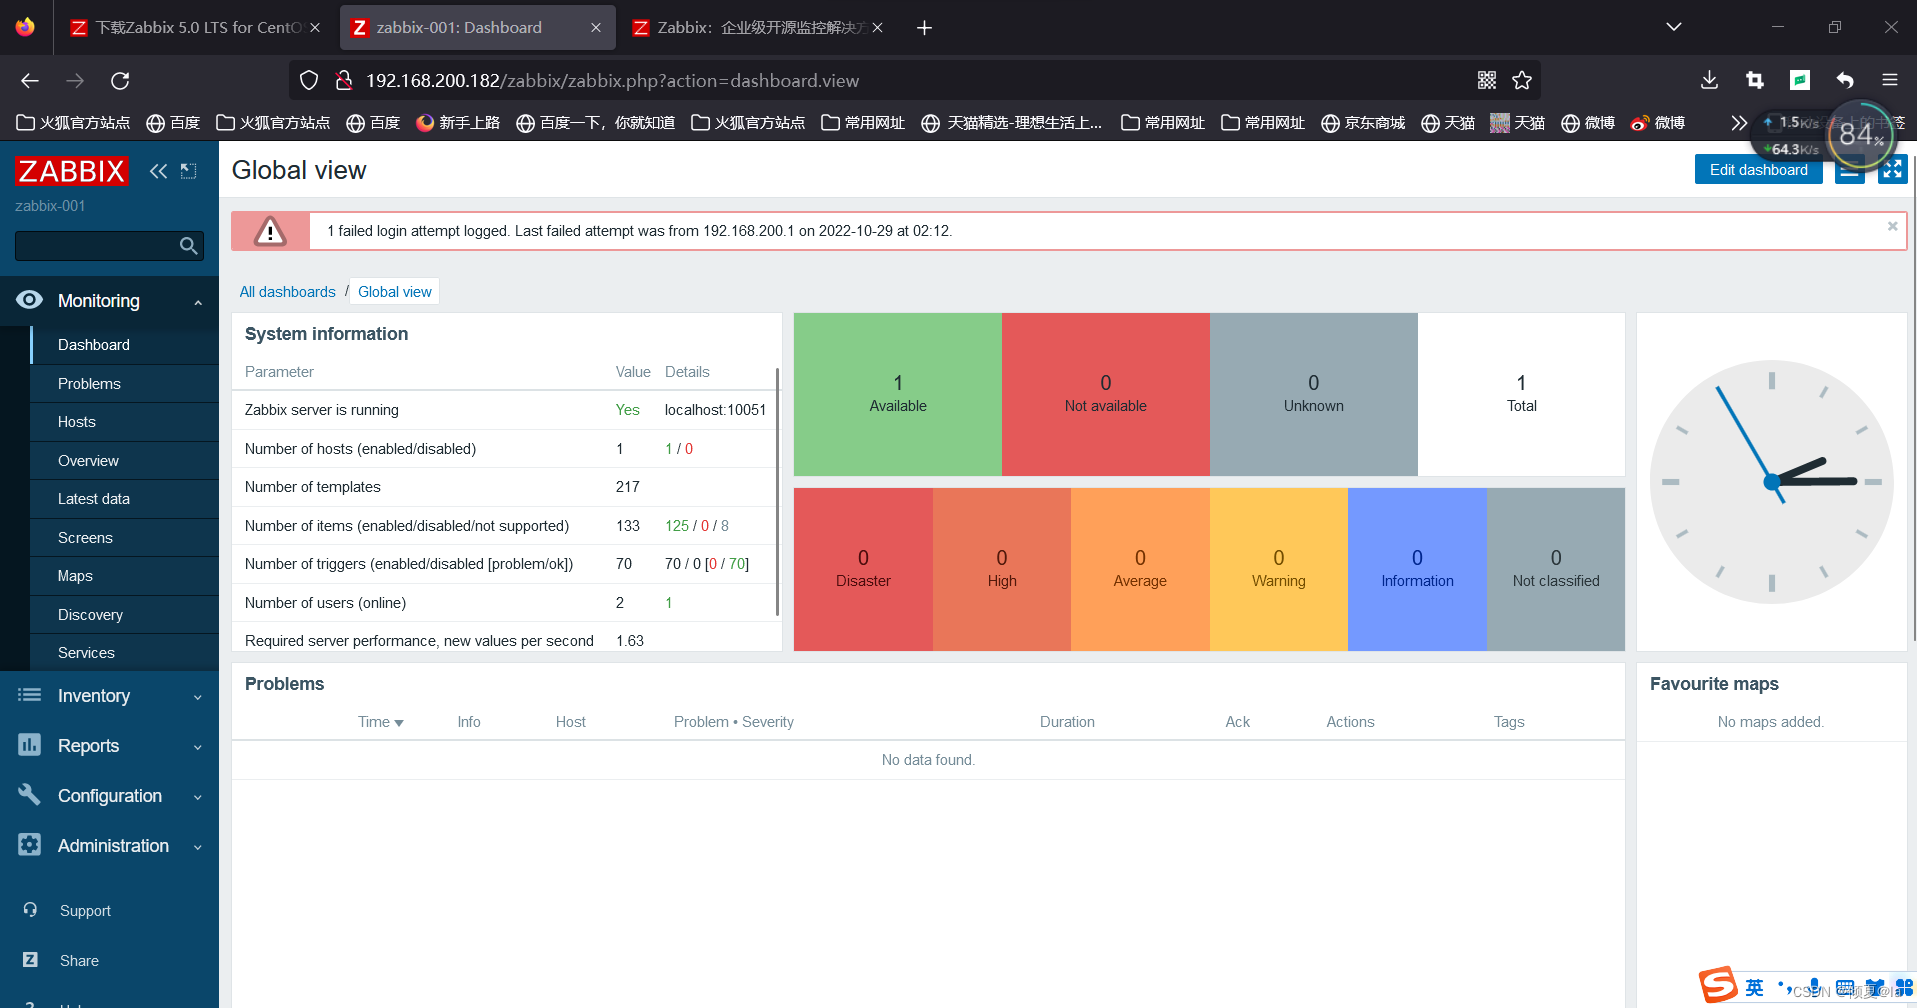
在浏览器输入zabbix_server的网址 ip/zabbix



安装被监控方 web001
- 设置 web001 为主机名
[root@web001 ~]#hostnamectl set-hostname web001 或者 hostname web001 #设置完成后需要退出终端然后重新打开,新的主机名就生效了
- 关闭防火墙和selinux
[root@web001 ~]# systemctl stop firewalld.service  #停止防火墙服务
[root@web001 ~]# systemctl disable firewalld.service
[root@web001 ~]# systemctl status firewalld.service  #查看防火墙状态
● firewalld.service - firewalld - dynamic firewall daemon
   Loaded: loaded (/usr/lib/systemd/system/firewalld.service; disabled; vendor preset: enabled)
   Active: inactive (dead)
     Docs: man:firewalld(1)

[root@web001 ~]# setenforce 0  #临时关闭selinux
setenforce: SELinux is disabled
[root@web001 ~ ]# vim   /etc/selinux/config   #编辑配置文件为`SELINUX=disabled` 即可永久关闭selinux

[root@web001 ~]# getenforce #查看selinux的状态
Disabled
- 准备zabbix-repo
#将zabbix_server(192.168.200.182) 的 zabbix.repo 拷贝到 web001(192.168.200.183)
[root@web001 ~]# scp 192.168.200.182:/etc/yum.repos.d/zabbix.repo  /etc/yum.repos.d/
The authenticity of host '192.168.200.182 (192.168.200.182)' can't be established.
ECDSA key fingerprint is SHA256:ygT6h9ejxNmaemQtyIzVYHEbRko0BaG4PstS2LTavDM.
ECDSA key fingerprint is MD5:88:1f:c4:d2:fe:73:b9:1f:7f:26:cd:2c:ba:ad:5c:b5.
Are you sure you want to continue connecting (yes/no)? yes
Warning: Permanently added '192.168.200.182' (ECDSA) to the list of known hosts.
root@192.168.200.182's password:
Permission denied, please try again.
root@192.168.200.182's password:
zabbix.repo                                                      100%  257   100.8KB/s   00:00

[root@web001 ~]# cd /etc/yum.repos.d
[root@web001 yum.repos.d]# ls
CentOS-Base.repo  CentOS-Base.repo.bak  epel.repo  epel-testing.repo  zabbix.repo

4. 安装zabbix-agent
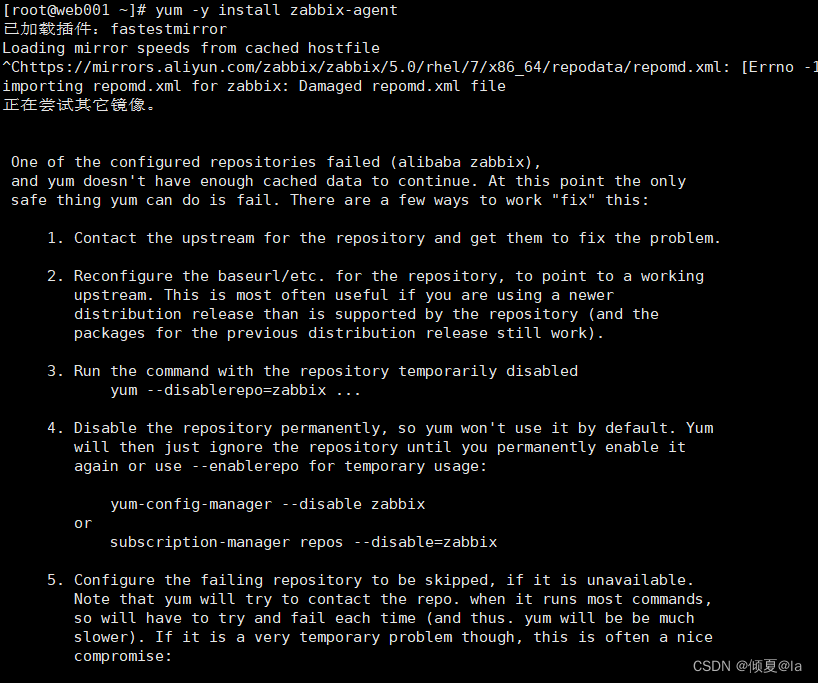

主要问题在于yum源问题或者可以重启网络试试。
5. 查看centos7系统本身所安装的yum依赖包
[root@web001 ~]# rpm -qa|grep yum
yum-metadata-parser-1.1.4-10.el7.x86_64
yum-plugin-fastestmirror-1.1.31-54.el7_8.noarch
yum-utils-1.1.31-54.el7_8.noarch
PackageKit-yum-1.1.10-2.el7.centos.x86_64
yum-3.4.3-168.el7.centos.noarch
- 卸载这些软件包
[root@web001 ~]# rpm -e yum-plugin-fastestmirror-1.1.31-54.el7_8.noarch --nodeps
warning: /etc/yum/pluginconf.d/fastestmirror.conf saved as /etc/yum/pluginconf.d/fastestmirror.conf.rpmsave
[root@web001 ~]# rpm -e yum-metadata-parser-1.1.4-10.el7.x86_64 --nodeps
[root@web001 ~]# rpm -e yum-3.4.3-168.el7.centos.noarch --nodeps
[root@web001 ~]#
- 进入centos镜像网站找到自己对应系统需要的yum包
查看系统的命令:
[root@web001 ~]# cat /etc/redhat-release
CentOS Linux release 7.9.2009 (Core)
查看系统的位数:
[root@web001 ~]# file /bin/ls
/bin/ls: ELF 64-bit LSB executable, x86-64, version 1 (SYSV), dynamically linked (uses shared libs), for GNU/Linux 2.6.32, BuildID[sha1]=c8ada1f7095f6b2bb7ddc848e088c2d615c3743e, stripped
[root@web001 ~]#
4.下载yum依赖包
[root@web001 ~]#wget http://vault.centos.org/7.2.1511/os/x86_64/Packages/yum-plugin-fastestmirror-1.1.31-34.el7.noarch.rpm
[root@web001 ~]#wget http://vault.centos.org/7.2.1511/os/x86_64/Packages/yum-metadata-parser-1.1.4-10.el7.x86_64.rpm
[root@web001 ~]#wget http://vault.centos.org/7.2.1511/os/x86_64/Packages/yum-3.4.3-132.el7.centos.0.1.noarch.rpm
- 安装yum依赖包
[root@web001 ~]# rpm -ivh yum-*
准备中...                          ################################# [100%]
	软件包 yum-metadata-parser-1.1.4-10.el7.x86_64 已经安装
	软件包 yum-plugin-fastestmirror-1.1.31-54.el7_8.noarch (比 yum-plugin-fastestmirror-1.1.31-34.el7.noarch 还要新) 已经安装
....
- 更新centos系统的repo文件
常用网址:
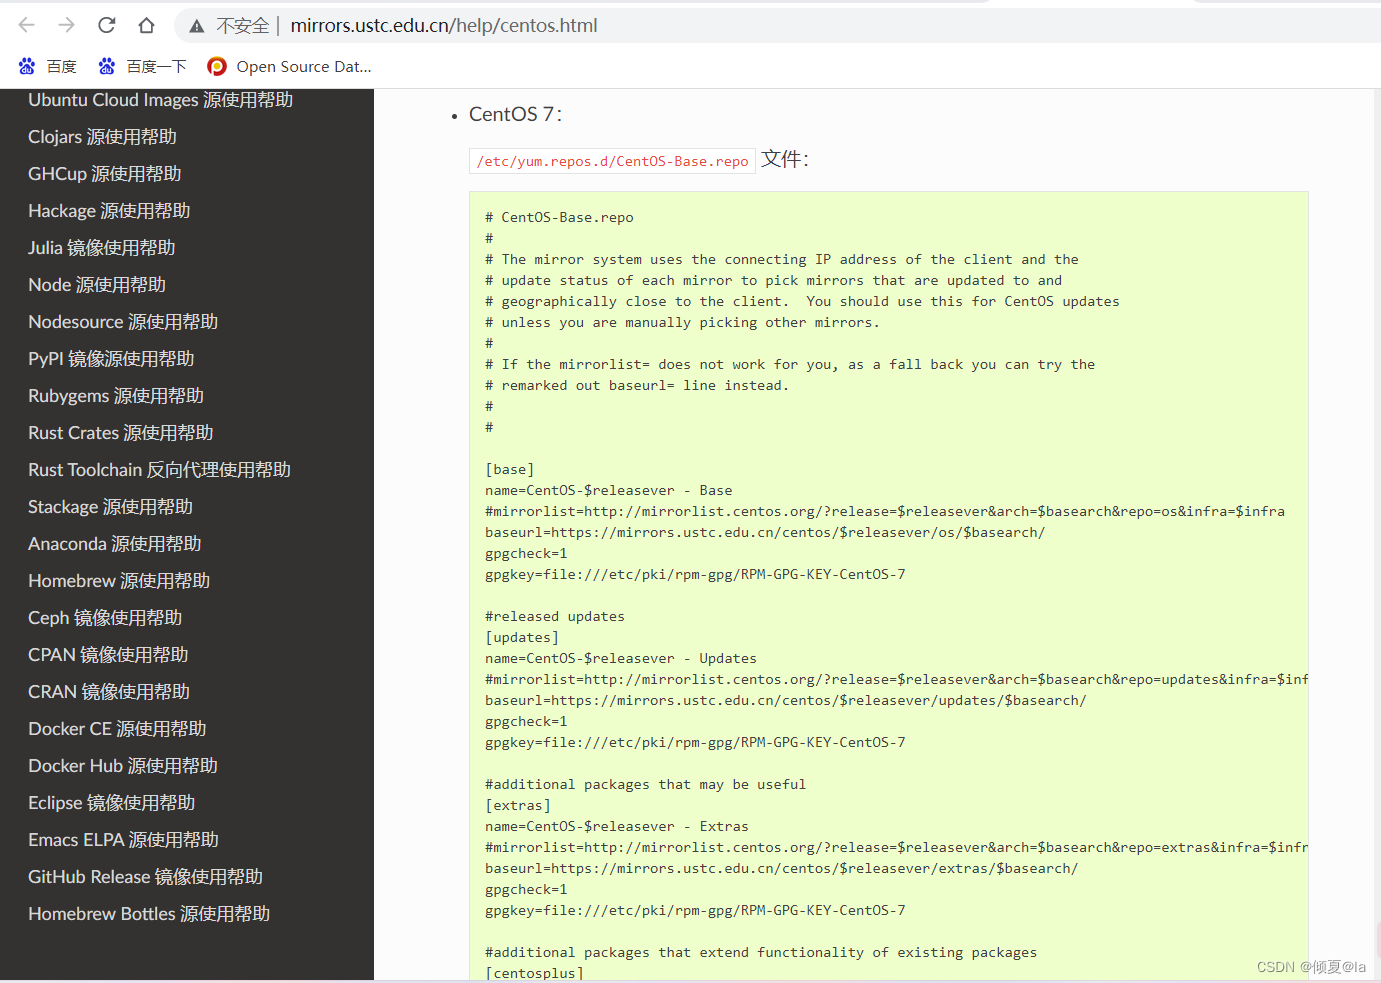
中科大网址:http://mirrors.ustc.edu.cn/help/centos.html
163网址:http://mirrors.163.com/.help/centos.html
6.1 首先备份一下,免得误操作 /etc/yum.repos.d/CentOS-Base.repo
[root@web001 ~]# mv /etc/yum.repos.d/CentOS-Base.repo /etc/yum.repos.d/CentOS-Base.repo.backup
选择自己对应版本的 /etc/yum.repos.d/CentOS-Base.repo文件, 放入/etc/yum.repos.d/ 操作前请做好相应备份
如自己centos版本为7,所以使用版本7的内容。
vim /etc/yum.repos.d/CentOS-Base.repo
# CentOS-Base.repo
#
# The mirror system uses the connecting IP address of the client and the
# update status of each mirror to pick mirrors that are updated to and
# geographically close to the client.  You should use this for CentOS updates
# unless you are manually picking other mirrors.
#
# If the mirrorlist= does not work for you, as a fall back you can try the
# remarked out baseurl= line instead.
#
#

[base]
name=CentOS-$releasever - Base
#mirrorlist=http://mirrorlist.centos.org/?release=$releasever&arch=$basearch&repo=os&infra=$infra
baseurl=https://mirrors.ustc.edu.cn/centos/$releasever/os/$basearch/
gpgcheck=1
gpgkey=file:///etc/pki/rpm-gpg/RPM-GPG-KEY-CentOS-7

#released updates
[updates]
name=CentOS-$releasever - Updates
#mirrorlist=http://mirrorlist.centos.org/?release=$releasever&arch=$basearch&repo=updates&infra=$infra
baseurl=https://mirrors.ustc.edu.cn/centos/$releasever/updates/$basearch/
gpgcheck=1
gpgkey=file:///etc/pki/rpm-gpg/RPM-GPG-KEY-CentOS-7

#additional packages that may be useful
[extras]
name=CentOS-$releasever - Extras
#mirrorlist=http://mirrorlist.centos.org/?release=$releasever&arch=$basearch&repo=extras&infra=$infra
baseurl=https://mirrors.ustc.edu.cn/centos/$releasever/extras/$basearch/
gpgcheck=1
gpgkey=file:///etc/pki/rpm-gpg/RPM-GPG-KEY-CentOS-7

#additional packages that extend functionality of existing packages
[centosplus]
name=CentOS-$releasever - Plus
#mirrorlist=http://mirrorlist.centos.org/?release=$releasever&arch=$basearch&repo=centosplus&infra=$infra
baseurl=https://mirrors.ustc.edu.cn/centos/$releasever/centosplus/$basearch/
gpgcheck=1
enabled=0
gpgkey=file:///etc/pki/rpm-gpg/RPM-GPG-KEY-CentOS-7
6.3 运行以下命令生成缓存
[root@web001 yum.repos.d]# yum clean all
已加载插件:fastestmirror
正在清理软件源: base extras updates
Cleaning up list of fastest mirrors
Other repos take up 26 M of disk space (use --verbose for details)
[root@web001 yum.repos.d]# yum makecache
已加载插件:fastestmirror
Determining fastest mirrors
base                                                                   | 3.6 kB  00:00:00
extras                                                                 | 2.9 kB  00:00:00
updates                                                                | 2.9 kB  00:00:00
(1/10): base/7/x86_64/group_gz                                         | 153 kB  00:00:00
(2/10): base/7/x86_64/filelists_db                                     | 7.2 MB  00:00:01
(3/10): base/7/x86_64/primary_db                                       | 6.1 MB  00:00:00
(4/10): base/7/x86_64/other_db                                         | 2.6 MB  00:00:00
(5/10): extras/7/x86_64/primary_db                                     | 249 kB  00:00:00
(6/10): extras/7/x86_64/filelists_db                                   | 276 kB  00:00:00
(7/10): extras/7/x86_64/other_db                                       | 149 kB  00:00:00
(8/10): updates/7/x86_64/filelists_db                                  | 9.6 MB  00:00:01
(9/10): updates/7/x86_64/other_db                                      | 1.2 MB  00:00:00
(10/10): updates/7/x86_64/primary_db                                   |  17 MB  00:00:01
元数据缓存已建立

[root@web001 yum.repos.d]# yum makecache
已加载插件:fastestmirror
Loading mirror speeds from cached hostfile
base                                                                   | 3.6 kB  00:00:00
extras                                                                 | 2.9 kB  00:00:00
updates                                                                | 2.9 kB  00:00:00
zabbix                                                                 | 2.9 kB  00:00:00
zabbix2                                                                | 2.9 kB  00:00:00
(1/16): base/7/x86_64/group_gz                                         | 153 kB  00:00:00
(2/16): base/7/x86_64/filelists_db                                     | 7.2 MB  00:00:00
(3/16): base/7/x86_64/primary_db                                       | 6.1 MB  00:00:00
(4/16): base/7/x86_64/other_db                                         | 2.6 MB  00:00:00
(5/16): extras/7/x86_64/primary_db                                     | 249 kB  00:00:00
(6/16): extras/7/x86_64/filelists_db                                   | 276 kB  00:00:00
(7/16): extras/7/x86_64/other_db                                       | 149 kB  00:00:00
(8/16): updates/7/x86_64/filelists_db                                  | 9.6 MB  00:00:01
(9/16): updates/7/x86_64/other_db                                      | 1.2 MB  00:00:00
(10/16): updates/7/x86_64/primary_db                                   |  17 MB  00:00:01
(11/16): zabbix/filelists_db                                           |  65 kB  00:00:00
(12/16): zabbix/primary_db                                             | 187 kB  00:00:01
(13/16): zabbix2/primary_db                                            |  60 kB  00:00:00
(14/16): zabbix2/filelists_db                                          | 118 kB  00:00:00
(15/16): zabbix/other_db                                               | 305 kB  00:00:01
(16/16): zabbix2/other_db                                              | 280 kB  00:00:00
元数据缓存已建立

[root@web001 yum.repos.d]# yum update
BDB2053 Freeing read locks for locker 0x1265: 15380/139687202490176
已加载插件:fastestmirror
Loading mirror speeds from cached hostfile
zabbix                                                                 | 2.9 kB  00:00:00
zabbix2                                                                | 2.9 kB  00:00:00
正在解决依赖关系
--> 正在检查事务
---> 软件包 GeoIP.x86_64.0.1.5.0-13.el7 将被 升级
---> 软件包 GeoIP.x86_64.0.1.5.0-14.el7 将被 更新
--> 正在处理依赖关系 geoipupdate,它被软件包 GeoIP-1.5.0-14.el7.x86_64 需要
---> 软件包 ModemManager.x86_64.0.1.6.10-1.el7 将被 升级
---> 软件包 ModemManager.x86_64.0.1.6.10-4.el7 将被 更新

.......
 xorg-x11-server-common.x86_64 0:1.20.4-18.el7_9
  xz.x86_64 0:5.2.2-2.el7_9
  xz-libs.x86_64 0:5.2.2-2.el7_9
  zenity.x86_64 0:3.28.1-2.el7_9

替代:
  iwl7265-firmware.noarch 0:22.0.7.0-69.el7                 urw-fonts.noarch 0:2.4-16.el7
  webkitgtk4-plugin-process-gtk2.x86_64 0:2.20.5-1.el7

完毕!
问题解决,成功安装
[root@web001 yum.repos.d]# yum -y install zabbix-agent
已加载插件:fastestmirror
Loading mirror speeds from cached hostfile
正在解决依赖关系
--> 正在检查事务
---> 软件包 zabbix-agent.x86_64.0.5.0.28-1.el7 将被 安装
--> 解决依赖关系完成

依赖关系解决

==============================================================================================
 Package                 架构              版本                       源                 大小
==============================================================================================
正在安装:
 zabbix-agent            x86_64            5.0.28-1.el7               zabbix            479 k

事务概要
==============================================================================================
安装  1 软件包

总下载量:479 k
安装大小:1.9 M
Downloading packages:
No Presto metadata available for zabbix
zabbix-agent-5.0.28-1.el7.x86_64.rpm                                   | 479 kB  00:00:01
Running transaction check
Running transaction test
Transaction test succeeded
Running transaction
  正在安装    : zabbix-agent-5.0.28-1.el7.x86_64                                          1/1
  验证中      : zabbix-agent-5.0.28-1.el7.x86_64                                          1/1

已安装:
  zabbix-agent.x86_64 0:5.0.28-1.el7

完毕!
6.4 配置主服务器地址
[root@web001 ~]# vim /etc/zabbix/zabbix_agentd.conf
Server=192.168.200.182   #者zabbix_server的IP地址
ServerActive=192.200.168.182
Hostname=web001
6.5 启动zabbix-agent:10050
[root@web001 ~]# systemctl start zabbix-agent
[root@web001 ~]# systemctl enable zabbix-agent
Created symlink from /etc/systemd/system/multi-user.target.wants/zabbix-agent.service to /usr/lib/systemd/system/zabbix-agent.service.
[root@web001 ~]# ss -anlp |grep :10050
tcp    LISTEN     0      128       *:10050                 *:*                   users:(("zabbix_agentd",pid=112433,fd=4),("zabbix_agentd",pid=112432,fd=4),("zabbix_agentd",pid=112431,fd=4),("zabbix_agentd",pid=112430,fd=4),("zabbix_agentd",pid=112429,fd=4),("zabbix_agentd",pid=112428,fd=4))
tcp    LISTEN     0      128    [::]:10050              [::]:*                   users:(("zabbix_agentd",pid=112433,fd=5),("zabbix_agentd",pid=112432,fd=5),("zabbix_agentd",pid=112431,fd=5),("zabbix_agentd",pid=112430,fd=5),("zabbix_agentd",pid=112429,fd=5),("zabbix_agentd",pid=112428,fd=5))
[root@web001 ~]#
测试
在zabbix_server(192.168.200.182) 上使用zabbix_get(命令行监控) 进行收集客户端数据收集
因为在5.0zabbix并没有默认安装zabbix-get,所以需要在zabbix_server上安装
[root@web001 ~]# yum install -y zabbix-get
已加载插件:fastestmirror
Loading mirror speeds from cached hostfile
软件包 zabbix-get-5.0.28-1.el7.x86_64 已安装并且是最新版本
无须任何处理
[root@zabbix_server ~]# zabbix_get -s 192.168.200.183 -k system.uname
Linux web001 3.10.0-957.el7.x86_64 #1 SMP Thu Nov 8 23:39:32 UTC 2018 x86_64

[root@zabbix_server ~]# zabbix_get -s 192.168.200.183 -k system.cpu.load[all,avg15]
0.050000
到这里则完成了zabbix_server 对 web001 的监控


