在WPF中使用Grid绘制表格的时候,如果元素较多、排列复杂的话,界面会看起来很糟糕,没有层次,这时用网格或边框线分割各元素(标签或单元格)将会是页面看起来整齐有条理。
默认没有边框线的如下图所示: 
<Window x:Class="GridLineTest.MainWindow"
        xmlns="http://schemas.microsoft.com/winfx/2006/xaml/presentation"
        xmlns:x="http://schemas.microsoft.com/winfx/2006/xaml"
        xmlns:d="http://schemas.microsoft.com/expression/blend/2008"
        xmlns:mc="http://schemas.openxmlformats.org/markup-compatibility/2006"
        xmlns:local="clr-namespace:GridLineTest"
        mc:Ignorable="d"
        Title="MainWindow" Height="450" Width="800">
    <Grid Width="600" Height="400">
        <Grid.Resources>
            <Style TargetType="TextBlock">
                <Setter Property="FontSize" Value="30"></Setter>
                <Setter Property="HorizontalAlignment" Value="Center"></Setter>
                <Setter Property="VerticalAlignment" Value="Center"></Setter>
            </Style>
        </Grid.Resources>
        <Grid.RowDefinitions>
            <RowDefinition></RowDefinition>
            <RowDefinition></RowDefinition>
            <RowDefinition></RowDefinition>
        </Grid.RowDefinitions>
        <Grid.ColumnDefinitions>
            <ColumnDefinition></ColumnDefinition>
            <ColumnDefinition></ColumnDefinition>
            <ColumnDefinition></ColumnDefinition>
        </Grid.ColumnDefinitions>
        <TextBlock Text="A01" Grid.Row="0" Grid.Column="0"></TextBlock>
        <TextBlock Text="A02" Grid.Row="0" Grid.Column="1"></TextBlock>
        <TextBlock Text="A03" Grid.Row="0" Grid.Column="2"></TextBlock>
        <TextBlock Text="A11" Grid.Row="1" Grid.Column="0"></TextBlock>
        <TextBlock Text="A12" Grid.Row="1" Grid.Column="1"></TextBlock>
        <TextBlock Text="A13" Grid.Row="1" Grid.Column="2"></TextBlock>
        <TextBlock Text="A21" Grid.Row="2" Grid.Column="0"></TextBlock>
        <TextBlock Text="A22" Grid.Row="2" Grid.Column="1"></TextBlock>
        <TextBlock Text="A23" Grid.Row="2" Grid.Column="2"></TextBlock>
    </Grid>
</Window>
一、使用ShowGridLines属性
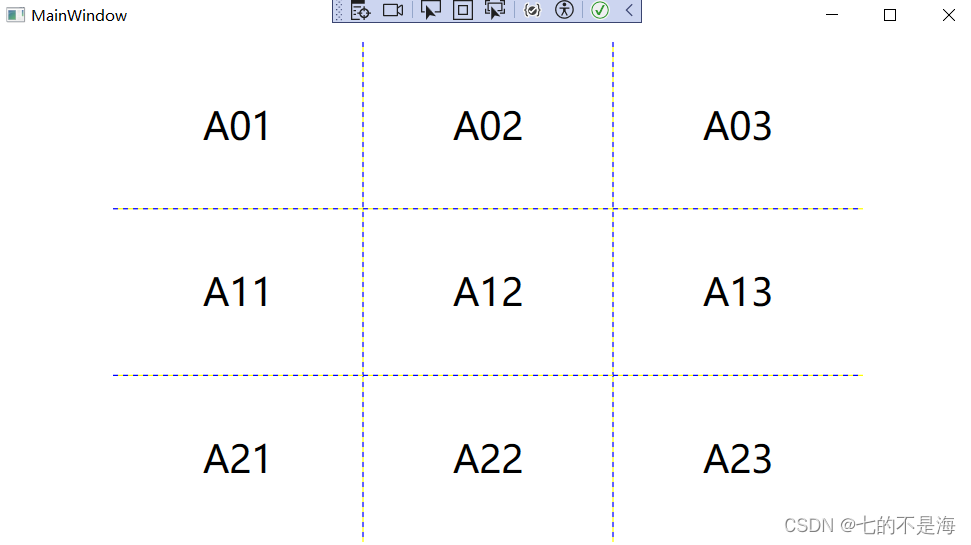
Grid控件自带属性:ShowGridLines,只需将它设为True即可显示网格线,效果如下:
<Window x:Class="GridLineTest.MainWindow"
        xmlns="http://schemas.microsoft.com/winfx/2006/xaml/presentation"
        xmlns:x="http://schemas.microsoft.com/winfx/2006/xaml"
        xmlns:d="http://schemas.microsoft.com/expression/blend/2008"
        xmlns:mc="http://schemas.openxmlformats.org/markup-compatibility/2006"
        xmlns:local="clr-namespace:GridLineTest"
        mc:Ignorable="d"
        Title="MainWindow" Height="450" Width="800">
    <Grid Width="600" Height="400" ShowGridLines="True">
        <Grid.Resources>
            <Style TargetType="TextBlock">
                <Setter Property="FontSize" Value="30"></Setter>
                <Setter Property="HorizontalAlignment" Value="Center"></Setter>
                <Setter Property="VerticalAlignment" Value="Center"></Setter>
            </Style>
        </Grid.Resources>
        <Grid.RowDefinitions>
            <RowDefinition></RowDefinition>
            <RowDefinition></RowDefinition>
            <RowDefinition></RowDefinition>
        </Grid.RowDefinitions>
        <Grid.ColumnDefinitions>
            <ColumnDefinition></ColumnDefinition>
            <ColumnDefinition></ColumnDefinition>
            <ColumnDefinition></ColumnDefinition>
        </Grid.ColumnDefinitions>
        <TextBlock Text="A01" Grid.Row="0" Grid.Column="0"></TextBlock>
        <TextBlock Text="A02" Grid.Row="0" Grid.Column="1"></TextBlock>
        <TextBlock Text="A03" Grid.Row="0" Grid.Column="2"></TextBlock>
        <TextBlock Text="A11" Grid.Row="1" Grid.Column="0"></TextBlock>
        <TextBlock Text="A12" Grid.Row="1" Grid.Column="1"></TextBlock>
        <TextBlock Text="A13" Grid.Row="1" Grid.Column="2"></TextBlock>
        <TextBlock Text="A21" Grid.Row="2" Grid.Column="0"></TextBlock>
        <TextBlock Text="A22" Grid.Row="2" Grid.Column="1"></TextBlock>
        <TextBlock Text="A23" Grid.Row="2" Grid.Column="2"></TextBlock>
    </Grid>
</Window>
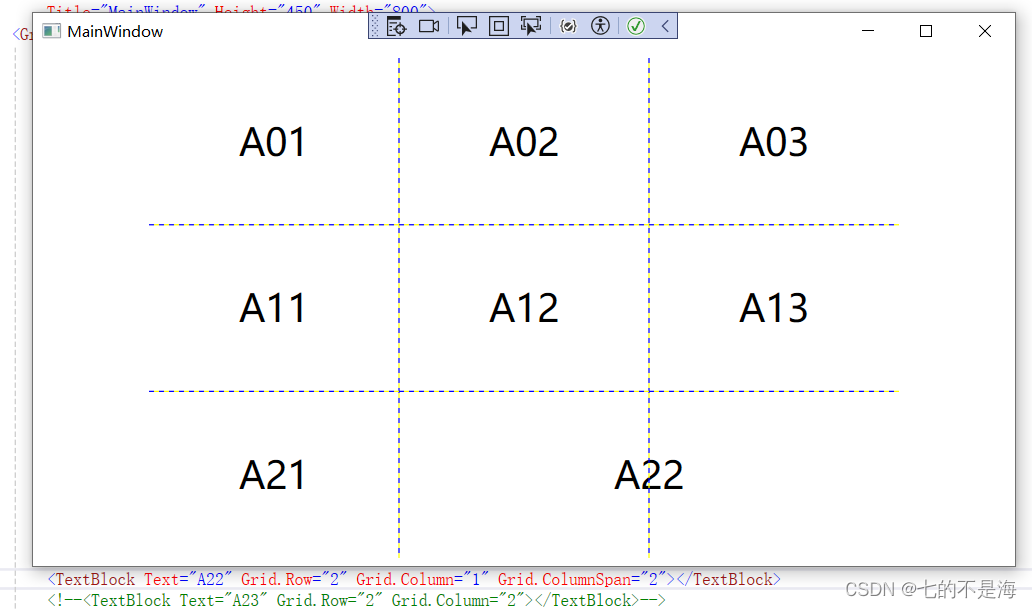
使用ShowGridLines属性的优点是简单,一般用于Grid内部元素排版使用;缺点有:1、无法变更样式,固定是虚线;2、不随单元格合并而改变;3、不会显示最大的外边框线。
二、使用Border添加边框线
适用于行和列较少的情况,不然CV工作量小不了,行号和列号还容易填错。 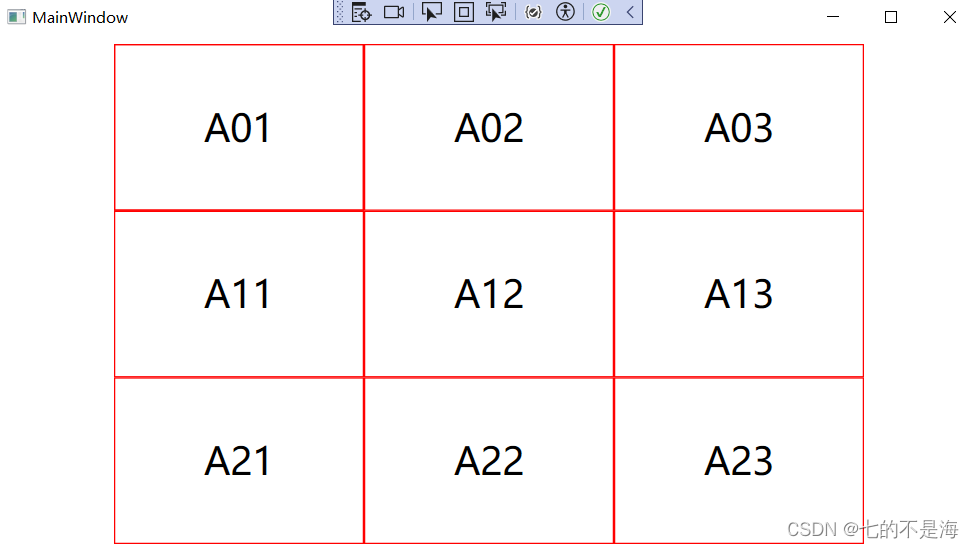
<Window x:Class="GridLineTest.MainWindow"
        xmlns="http://schemas.microsoft.com/winfx/2006/xaml/presentation"
        xmlns:x="http://schemas.microsoft.com/winfx/2006/xaml"
        xmlns:d="http://schemas.microsoft.com/expression/blend/2008"
        xmlns:mc="http://schemas.openxmlformats.org/markup-compatibility/2006"
        xmlns:local="clr-namespace:GridLineTest"
        mc:Ignorable="d"
        Title="MainWindow" Height="450" Width="800">
    <Grid Width="600" Height="400">
        <Grid.Resources>
            <Style TargetType="TextBlock">
                <Setter Property="FontSize" Value="30"></Setter>
                <Setter Property="HorizontalAlignment" Value="Center"></Setter>
                <Setter Property="VerticalAlignment" Value="Center"></Setter>
            </Style>
            <Style TargetType="Border">
                <Setter Property="BorderBrush" Value="Red"></Setter>
                <Setter Property="BorderThickness" Value="1"></Setter>
            </Style>
        </Grid.Resources>
        <Grid.RowDefinitions>
            <RowDefinition></RowDefinition>
            <RowDefinition></RowDefinition>
            <RowDefinition></RowDefinition>
        </Grid.RowDefinitions>
        <Grid.ColumnDefinitions>
            <ColumnDefinition></ColumnDefinition>
            <ColumnDefinition></ColumnDefinition>
            <ColumnDefinition></ColumnDefinition>
        </Grid.ColumnDefinitions>
        <TextBlock Text="A01" Grid.Row="0" Grid.Column="0"></TextBlock>
        <TextBlock Text="A02" Grid.Row="0" Grid.Column="1"></TextBlock>
        <TextBlock Text="A03" Grid.Row="0" Grid.Column="2"></TextBlock>
        <TextBlock Text="A11" Grid.Row="1" Grid.Column="0"></TextBlock>
        <TextBlock Text="A12" Grid.Row="1" Grid.Column="1"></TextBlock>
        <TextBlock Text="A13" Grid.Row="1" Grid.Column="2"></TextBlock>
        <TextBlock Text="A21" Grid.Row="2" Grid.Column="0"></TextBlock>
        <TextBlock Text="A22" Grid.Row="2" Grid.Column="1"></TextBlock>
        <TextBlock Text="A23" Grid.Row="2" Grid.Column="2"></TextBlock>

        <!--使用Border绘制边框-->
        <Border Grid.Row="0"></Border>
        <Border Grid.Row="1"></Border>
        <Border Grid.Row="2"></Border>
        <Border Grid.Column="0"></Border>
        <Border Grid.Column="1"></Border>
        <Border Grid.Column="2"></Border>
        <Border Grid.Row="1" Grid.Column="1"></Border>
        <Border Grid.Row="1" Grid.Column="2"></Border>
        <Border Grid.Row="2" Grid.Column="1"></Border>
        <Border Grid.Row="2" Grid.Column="2"></Border>
    </Grid>
</Window>
三、使用附加属性添加边框线
TextBlock元素本身并没有行和列的概念,但是可以通过Grid.GetColumn和Grid.SetColumn来附加属性,生成Grid布局。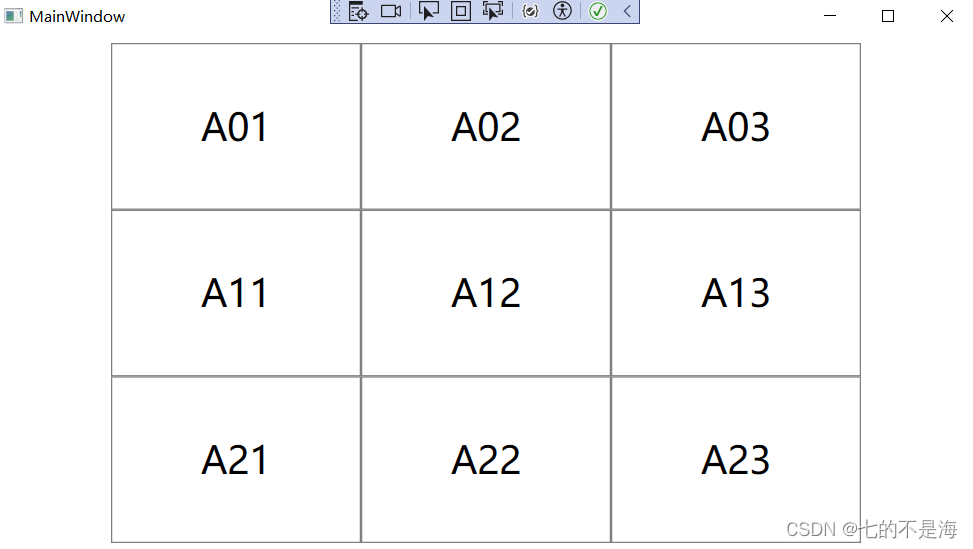
using System.Windows;
using System.Windows.Controls;
using System.Windows.Media;

namespace Helper
{
    public class GridLineHelper
    {

        #region 可以通过propa快捷方式生成下面段代码
        public static bool GetShowBorder(DependencyObject obj)
        {
            return (bool)obj.GetValue(ShowBorderProperty);
        }

        public static void SetShowBorder(DependencyObject obj, bool value)
        {
            obj.SetValue(ShowBorderProperty, value);
        }

        public static readonly DependencyProperty ShowBorderProperty =
            DependencyProperty.RegisterAttached("ShowBorder", typeof(bool), typeof(GridLineHelper), new PropertyMetadata(OnShowBorderChanged));
        #endregion

        //事件处理,需要手工编写,必须是静态方法
        private static void OnShowBorderChanged(DependencyObject d, DependencyPropertyChangedEventArgs e)
        {
            var grid = d as Grid;
            if ((bool)e.OldValue)
            {
                grid.Loaded -= (s, arg) => { };
            }
            if ((bool)e.NewValue)
            {
                grid.Loaded += (s, arg) =>
                {
                    //确定行和列数
                    var rows = grid.RowDefinitions.Count;
                    var columns = grid.ColumnDefinitions.Count;

                    //每个格子添加一个Border进去
                    for (int i = 0; i < rows; i++)
                    {
                        for (int j = 0; j < columns; j++)
                        {
                            var border = new Border() { BorderBrush = new SolidColorBrush(Colors.Gray), BorderThickness = new Thickness(1) };
                            Grid.SetRow(border, i);
                            Grid.SetColumn(border, j);

                            grid.Children.Add(border);
                        }
                    }
                };
            }
        }
    }
}
<Window x:Class="GridLineTest.MainWindow"
        xmlns="http://schemas.microsoft.com/winfx/2006/xaml/presentation"
        xmlns:x="http://schemas.microsoft.com/winfx/2006/xaml"
        xmlns:d="http://schemas.microsoft.com/expression/blend/2008"
        xmlns:mc="http://schemas.openxmlformats.org/markup-compatibility/2006"
        xmlns:local="clr-namespace:GridLineTest"
        xmlns:ext="clr-namespace:Helper"
        mc:Ignorable="d"
        Title="MainWindow" Height="450" Width="800">
    <Grid Width="600" Height="400" ext:GridLineHelper.ShowBorder="True">
        <Grid.Resources>
            <Style TargetType="TextBlock">
                <Setter Property="FontSize" Value="30"></Setter>
                <Setter Property="HorizontalAlignment" Value="Center"></Setter>
                <Setter Property="VerticalAlignment" Value="Center"></Setter>
            </Style>
            <Style TargetType="Border">
                <Setter Property="BorderBrush" Value="Red"></Setter>
                <Setter Property="BorderThickness" Value="1"></Setter>
            </Style>
        </Grid.Resources>
        <Grid.RowDefinitions>
            <RowDefinition></RowDefinition>
            <RowDefinition></RowDefinition>
            <RowDefinition></RowDefinition>
        </Grid.RowDefinitions>
        <Grid.ColumnDefinitions>
            <ColumnDefinition></ColumnDefinition>
            <ColumnDefinition></ColumnDefinition>
            <ColumnDefinition></ColumnDefinition>
        </Grid.ColumnDefinitions>
        <TextBlock Text="A01" Grid.Row="0" Grid.Column="0"></TextBlock>
        <TextBlock Text="A02" Grid.Row="0" Grid.Column="1"></TextBlock>
        <TextBlock Text="A03" Grid.Row="0" Grid.Column="2"></TextBlock>
        <TextBlock Text="A11" Grid.Row="1" Grid.Column="0"></TextBlock>
        <TextBlock Text="A12" Grid.Row="1" Grid.Column="1"></TextBlock>
        <TextBlock Text="A13" Grid.Row="1" Grid.Column="2"></TextBlock>
        <TextBlock Text="A21" Grid.Row="2" Grid.Column="0"></TextBlock>
        <TextBlock Text="A22" Grid.Row="2" Grid.Column="1"></TextBlock>
        <TextBlock Text="A23" Grid.Row="2" Grid.Column="2"></TextBlock>
    </Grid>
</Window>
如果有合并的单元格的情况又该如何处理呢?这时就需要用到Grid.SetRowSpan和Grid.SetColumnSpan来附加属性。
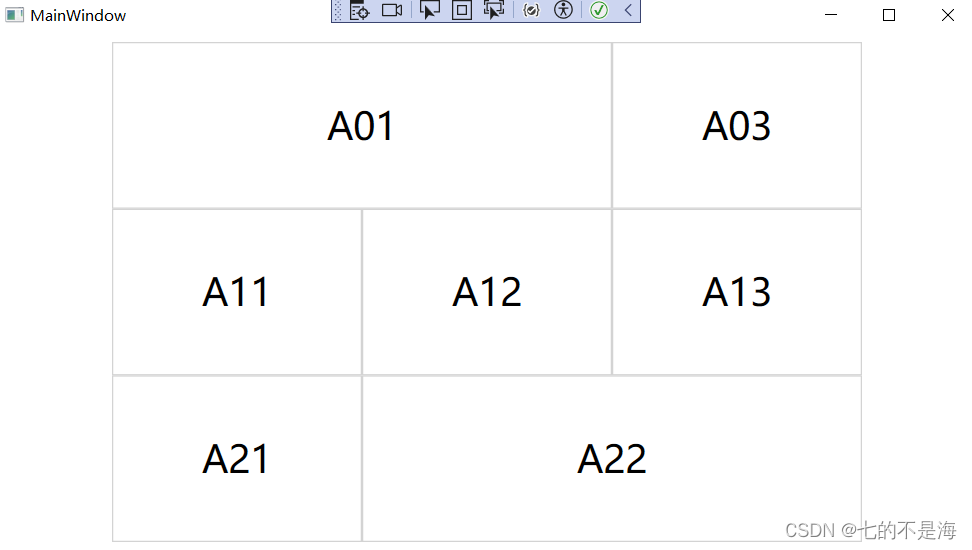
using System.Windows;
using System.Windows.Controls;
using System.Windows.Media;

namespace Helper
{
    public class GridLineHelper
    {

        #region 可以通过propa快捷方式生成下面段代码
        public static bool GetShowBorder(DependencyObject obj)
        {
            return (bool)obj.GetValue(ShowBorderProperty);
        }

        public static void SetShowBorder(DependencyObject obj, bool value)
        {
            obj.SetValue(ShowBorderProperty, value);
        }

        public static readonly DependencyProperty ShowBorderProperty =
            DependencyProperty.RegisterAttached("ShowBorder", typeof(bool), typeof(GridLineHelper), new PropertyMetadata(OnShowBorderChanged));
        #endregion

        //事件处理,需要手工编写,必须是静态方法
        private static void OnShowBorderChanged(DependencyObject d, DependencyPropertyChangedEventArgs e)
        {
            var grid = d as Grid;
            string name = grid.Name;
            if ((bool)e.OldValue)
            {
                grid.Loaded -= (s, arg) => { };
            }
            if ((bool)e.NewValue)
            {
                grid.Loaded += (s, arg) =>
                {
                    //根据Grid中子控件的个数去添加边框,同时考虑合并的情况
                    var controls = grid.Children;
                    var count = controls.Count;

                    for (int i = 0; i < count; i++)
                    {
                        var item = controls[i] as FrameworkElement;
                        var border = new Border()
                        {
                            BorderBrush = new SolidColorBrush(Colors.LightGray),
                            BorderThickness = new Thickness(1)
                        };

                        var row = Grid.GetRow(item);
                        var column = Grid.GetColumn(item);
                        var rowspan = Grid.GetRowSpan(item);
                        var columnspan = Grid.GetColumnSpan(item);

                        Grid.SetRow(border, row);
                        Grid.SetColumn(border, column);
                        Grid.SetRowSpan(border, rowspan);
                        Grid.SetColumnSpan(border, columnspan);

                        grid.Children.Add(border);
                    }
                };
            }
        }
    }
}
<Window x:Class="GridLineTest.MainWindow"
        xmlns="http://schemas.microsoft.com/winfx/2006/xaml/presentation"
        xmlns:x="http://schemas.microsoft.com/winfx/2006/xaml"
        xmlns:d="http://schemas.microsoft.com/expression/blend/2008"
        xmlns:mc="http://schemas.openxmlformats.org/markup-compatibility/2006"
        xmlns:local="clr-namespace:GridLineTest"
        xmlns:ext="clr-namespace:Helper"
        mc:Ignorable="d"
        Title="MainWindow" Height="450" Width="800">
    <Grid Width="600" Height="400" ext:GridLineHelper.ShowBorder="True" x:Name="MyGrid">
        <Grid.Resources>
            <Style TargetType="TextBlock">
                <Setter Property="FontSize" Value="30"></Setter>
                <Setter Property="HorizontalAlignment" Value="Center"></Setter>
                <Setter Property="VerticalAlignment" Value="Center"></Setter>
            </Style>
        </Grid.Resources>
        <Grid.RowDefinitions>
            <RowDefinition></RowDefinition>
            <RowDefinition></RowDefinition>
            <RowDefinition></RowDefinition>
        </Grid.RowDefinitions>
        <Grid.ColumnDefinitions>
            <ColumnDefinition></ColumnDefinition>
            <ColumnDefinition></ColumnDefinition>
            <ColumnDefinition></ColumnDefinition>
        </Grid.ColumnDefinitions>
        <TextBlock Text="A01" Grid.Row="0" Grid.Column="0" Grid.ColumnSpan="2"></TextBlock>
        <!--<TextBlock Text="A02" Grid.Row="0" Grid.Column="1"></TextBlock>-->
        <TextBlock Text="A03" Grid.Row="0" Grid.Column="2"></TextBlock>
        <TextBlock Text="A11" Grid.Row="1" Grid.Column="0"></TextBlock>
        <TextBlock Text="A12" Grid.Row="1" Grid.Column="1"></TextBlock>
        <TextBlock Text="A13" Grid.Row="1" Grid.Column="2"></TextBlock>
        <TextBlock Text="A21" Grid.Row="2" Grid.Column="0"></TextBlock>
        <TextBlock Text="A22" Grid.Row="2" Grid.Column="1" Grid.ColumnSpan="2"></TextBlock>
        <!--<TextBlock Text="A23" Grid.Row="2" Grid.Column="2"></TextBlock>-->
    </Grid>
</Window>
四、补充
有时需要遍历Grid中的所有元素来做映射等功能,为了方便和减少循环的数据量,会剔除其中的Border元素,可以使用下方行代码实现:
var childrens = this.MyGrid.Children.OfType<UIElement>().ToList().Except(this.MyGrid.Children.OfType<Border>().ToList()).ToList();
