Google Hardware-backed KeyStore Attestation 原理及流程
SafetyNet Hardware-backed Attestation
SafetyNet Hardware-backed Attestation:使用了Hardware-backed Keystore
SafetyNet 支持Software Attestation 和 Hardware-backed Attestation,根据设备是否支持Hardware Security Module (HSM)而定。
不同种类的Attestation,会导致Attestation Response的"evaluationType"字段值有所不同。
如果未进行Hardware-backed Attestation,或者Hardware-backed Attestation失败,则"ctsProfileMatch"值为false。
Hardware Security Module,包括ARM TrustZone、security co-processor like Google’s Titan M等。
对Google手机(例如Pixel)而言,Hardware-backed Attestation,基于Google Hardware-backed KeyStore实现。下面介绍其过程。
ro.boot.verifiedbootstate与Android Verified Boot
ro.boot.verifiedbootstate 代表着BootLoader的解锁状态。对于支持HSM(例如TEE)的手机而言,该值通常存储在HSM中。
以Pixel手机为例,相关的BootLoader验证过程是:
Pixel 在 TEE 中存储BootLoader状态(ro.boot.verifiedbootstate参数)。
当手机开机启动时,BootLoader会去加载Boot.img,如下图所示:
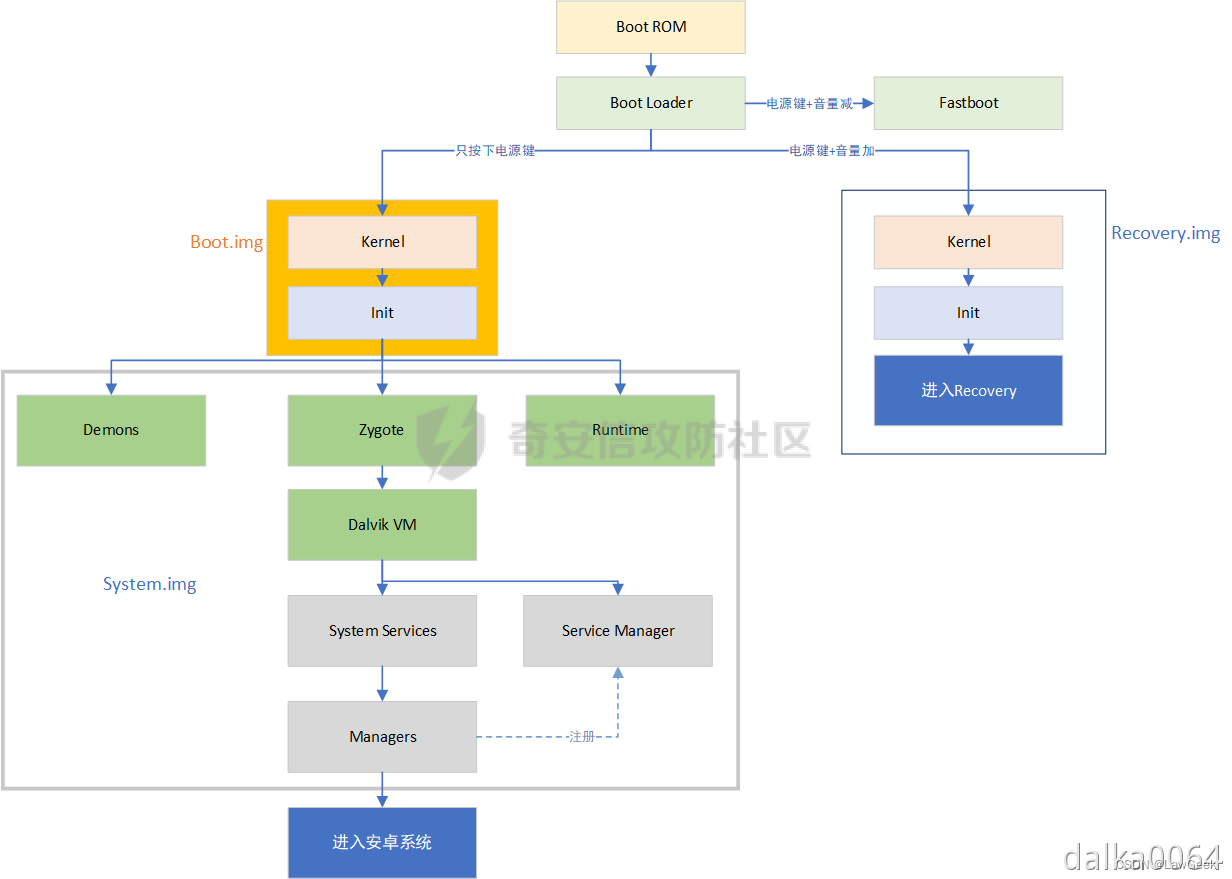
在加载Boot.img之前,BootLoader会去TEE中查询ro.boot.verifiedbootstate的值。
- 如果值为locked,则BootLoader会继续执行 Android Verified Boot,检查Boot.img的签名,并拒绝加载非官签的Boot.img
- 如果值为unlocked,则BootLoader将停止执行 Android Verified Boot,此时非官签的Boot.img也可以被加载
题外话:
常用的卡刷Root框架 Magisk,就是对Boot.img的patch。
patched Boot.img的签名自然是非官方的,所以能刷入patched Boot.img的前提是,设备的BootLoader已解锁。
详细原理参见:https://blog.csdn.net/qq_39441603?spm=1000.2115.3001.5343
关于Android Verified Boot,参考:
https://android.googlesource.com/platform/external/avb/+/master/README.md
SafetyNet对Hardware-backed Keystore的使用
从Keystore获取证书链
SafetyNet框架中的DroidGuard VM会从Google Server接收到一段bytecode,并执行这段bytecode。
这段bytecode的执行过程,会查询到一些系统属性。后续,这些属性会被发送给Google Server,用以判定设备完整性。
系统属性中包含一个证书链,该证书链是由Hardware-backed Keystore返回的。
如果想获取该证书链,可以调用getCertificateChain()。
例如:
Certificate certificates[] = keyStore.getCertificateChain(alias);
方法的文档:
https://developer.android.com/reference/java/security/KeyStore#getCertificateChain(java.lang.String)
Google security-key-attestation官方文档:
https://developer.android.com/training/articles/security-key-attestation#verifying
下面介绍:该证书链如何生成、该证书链是什么、该证书链有什么用
该证书链的内容及生成过程
本质上:该证书链相当于合法TEE签名过的ro.boot.verifiedbootstate等值,表明这些值是认证过的,是未被篡改的。
该合法TEE的私钥对应的公钥是Google备案过的。
该证书链的生成过程如下:
(1)Google相当于Root CA,手机生产商OEM相当于中间CA,TEE相当于叶CA
(2)TEE是在Google备案的:
Google用Google私钥签名Google公钥,形成自签名的根证书1;
Google用Google私钥签名OEM公钥,形成证书2;
OEM用OEM私钥签名TEE公钥,形成证书3;
(3)当DroidGuard请求证书链时,TEE生成一张证书4,证书4的Extensions 中包含ro.boot.verifiedbootstate等值。
而后,TEE用TEE私钥签名此证书4。
(4)TEE返回一个证书链,包括:
- 证书4(内容Extensions 包含verifiedbootstate,TEE私钥签名)
- 证书3(内容为TEE公钥,OEM私钥签名)
- 证书2(内容为OEM公钥,Google私钥签名)
- 证书1(内容为Google公钥,Google私钥签名)
需要注意的是:对证书的签名,是对整个证书文件的签名(包括元数据和公钥),而不只是对证书中公钥的签名。所以证书的元数据中的Extensions也在被签名的范畴,因此Extensions中的内容也被认证了。
该证书链的验证过程
应在服务器端进行,下面说明其在成功情况下的过程。
(1)获取Google根证书列表
https://developer.android.com/training/articles/security-key-attestation#root_certificate
(2)验证证书1在上述列表中
验证证书2的签名和证书1中的公钥对得上
验证证书3的签名和证书2中的公钥对得上
验证证书4的签名和证书3中的公钥对得上
由此可说明证书4的文件内容非伪造
(3)提取证书4中的Extensions,检查其中的ro.boot.verifiedbootstate等值,据此判断设备的状态(例如bootloader是否解锁、是否rooted等),给出"basicIntegrity"、"ctsProfileMatch"的结论
官方给出的验证步骤
Google官方文档:https://developer.android.com/training/articles/security-key-attestation#verifying
(1)Use a KeyStore object’s getCertificateChain() method to get a reference to the chain of X.509 certificates associated with the hardware-backed keystore.
客户端使用KeyStore对象的getCertificateChain()方法拿到证书链(和hardware-backed keystore相关联)
(2)Check each certificate’s validity using an X509Certificate object’s checkValidity() method. Also verify that the root certificate is trustworthy.
验证每一个证书的有效性
(3)On a separate server that you trust, obtain a reference to the ASN.1 parser library that is most appropriate for your toolset. Use this parser to extract the attestation certificate extension data, which appears within the first element of the certificate chain.
提取证书的extension data
(4)Compare the extension data that you’ve retrieved from your ASN.1 parser with the set of values that you expect the hardware-backed key to contain.
将提取出来的extension data和expected values进行比较
(也就是检查extension data中的verifiedbootstate等值)
(3)和(4)应该在服务端进行
服务端实现示例:https://github.com/google/android-key-attestation/tree/master/server


![[从零开始]用python制作识图翻译器·三](https://img-blog.csdnimg.cn/cc58a5ff935c41a6b615e1552c3d888a.png)
