文章目录
- 一、Plotly 图形工厂子图
- 1.1 垂直图形工厂图表
- 1.2 水平表格和图表
- 1.3 垂直表格和图表
- 二、表格和图表子图
- 三、地理子图
- 四、混合子图和 Plotly Express
一、Plotly 图形工厂子图
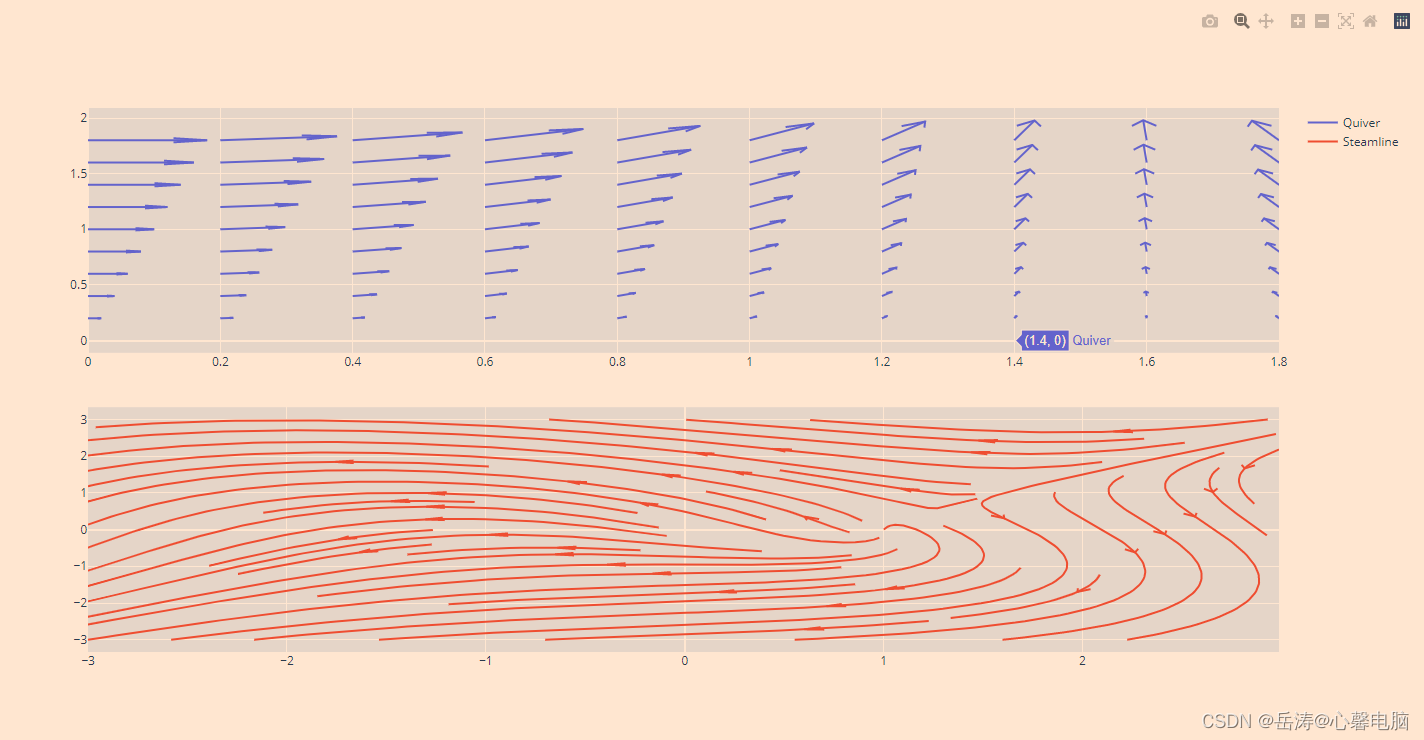
Plotly 的 Python API 包含一个图形工厂模块,其中包含许多包装函数,这些函数创建了尚未包含在Plotly的开源图形库 plotly.js 中的独特图表类型。图形工厂函数创建一个完整的图形,因此一些 Plotly 功能,例如子图,应该与这些图表略有不同。
1.1 垂直图形工厂图表
import plotly.figure_factory as ff
import plotly.graph_objects as go

import numpy as np

## Create first figure
x1,y1 = np.meshgrid(np.arange(0, 2, .2), np.arange(0, 2, .2))
u1 = np.cos(x1)*y1
v1 = np.sin(x1)*y1

fig1 = ff.create_quiver(x1, y1, u1, v1, name='Quiver')

## Create second figure
x = np.linspace(-3, 3, 100)
y = np.linspace(-3, 3, 100)
Y, X = np.meshgrid(x, y)
u = -1 - X**2 + Y
v = 1 + X - Y**2

fig2 = ff.create_streamline(x, y, u, v, arrow_scale=.1, name='Steamline')

for i in range(len(fig1.data)):
    fig1.data[i].xaxis='x1'
    fig1.data[i].yaxis='y1'

fig1.layout.xaxis1.update({'anchor': 'y1'})
fig1.layout.yaxis1.update({'anchor': 'x1', 'domain': [.55, 1]})

for i in range(len(fig2.data)):
    fig2.data[i].xaxis='x2'
    fig2.data[i].yaxis='y2'

# initialize xaxis2 and yaxis2
fig2['layout']['xaxis2'] = {}
fig2['layout']['yaxis2'] = {}

fig2.layout.xaxis2.update({'anchor': 'y2'})
fig2.layout.yaxis2.update({'anchor': 'x2', 'domain': [0, .45]})

fig = go.Figure()
fig.add_traces([fig1.data[0], fig2.data[0]])

fig.layout.update(fig1.layout)
fig.layout.update(fig2.layout)

fig.show()
1.2 水平表格和图表
import plotly.graph_objects as go
import plotly.figure_factory as ff

table_data = [['Team', 'Wins', 'Losses', 'Ties'],
              ['Montréal<br>Canadiens', 18, 4, 0],
              ['Dallas Stars', 18, 5, 0],
              ['NY Rangers', 16, 5, 0],
              ['Boston<br>Bruins', 13, 8, 0],
              ['Chicago<br>Blackhawks', 13, 8, 0],
              ['LA Kings', 13, 8, 0],
              ['Ottawa<br>Senators', 12, 5, 0]]

fig = ff.create_table(table_data, height_constant=60)

teams = ['Montréal Canadiens', 'Dallas Stars', 'NY Rangers',
         'Boston Bruins', 'Chicago Blackhawks', 'LA Kings', 'Ottawa Senators']
GFPG = [3.54, 3.48, 3.0, 3.27, 2.83, 2.45, 3.18]
GAPG = [2.17, 2.57, 2.0, 2.91, 2.57, 2.14, 2.77]

trace1 = go.Scatter(x=teams, y=GFPG,
                    marker=dict(color='#0099ff'),
                    name='目标<br>每场比赛的进球数',
                    xaxis='x2', yaxis='y2')
trace2 = go.Scatter(x=teams, y=GAPG,
                    marker=dict(color='#404040'),
                    name='进球<br>每场比赛对',
                    xaxis='x2', yaxis='y2')

fig.add_traces([trace1, trace2])

# 初始化xaxis2和yaxis2
fig['layout']['xaxis2'] = {}
fig['layout']['yaxis2'] = {}

# 编辑子地块的布局
fig.layout.xaxis.update({'domain': [0, .5]})
fig.layout.xaxis2.update({'domain': [0.6, 1.]})

# 图形的坐标轴必须锚定到图形的坐标轴
fig.layout.yaxis2.update({'anchor': 'x2'})
fig.layout.yaxis2.update({'title': '目标'})

# 更新页边距以添加标题,并查看图表x标签。
fig.layout.margin.update({'t':50, 'b':100})
fig.layout.update({'title': '2016年曲棍球统计数据'})

fig.show()

1.3 垂直表格和图表
import plotly.graph_objects as go
import plotly.figure_factory as ff

# 添加表数据
table_data = [['Team', 'Wins', 'Losses', 'Ties'],
              ['Montréal<br>Canadiens', 18, 4, 0],
              ['Dallas Stars', 18, 5, 0],
              ['NY Rangers', 16, 5, 0],
              ['Boston<br>Bruins', 13, 8, 0],
              ['Chicago<br>Blackhawks', 13, 8, 0],
              ['Ottawa<br>Senators', 12, 5, 0]]

# 用ff初始化图形。创建表格(表格数据)
fig = ff.create_table(table_data, height_constant=60)

# 添加图形数据
teams = ['Montréal Canadiens', 'Dallas Stars', 'NY Rangers',
         'Boston Bruins', 'Chicago Blackhawks', 'Ottawa Senators']
GFPG = [3.54, 3.48, 3.0, 3.27, 2.83, 3.18]
GAPG = [2.17, 2.57, 2.0, 2.91, 2.57, 2.77]

# 为图形绘制轨迹
trace1 = go.Bar(x=teams, y=GFPG, xaxis='x2', yaxis='y2',
                marker=dict(color='#0099ff'),
                name='进球<br>Per Game')
trace2 = go.Bar(x=teams, y=GAPG, xaxis='x2', yaxis='y2',
                marker=dict(color='#404040'),
                name='进球对抗<br>Per Game')

# 将跟踪数据添加到图中
fig.add_traces([trace1, trace2])

# 初始化xaxis2和yaxis2
fig['layout']['xaxis2'] = {}
fig['layout']['yaxis2'] = {}

# 编辑子地块的布局
fig.layout.yaxis.update({'domain': [0, .45]})
fig.layout.yaxis2.update({'domain': [.6, 1]})

# 图形的yaxis2必须锚定到图形的xaxis2,反之亦然
fig.layout.yaxis2.update({'anchor': 'x2'})
fig.layout.xaxis2.update({'anchor': 'y2'})
fig.layout.yaxis2.update({'title': 'Goals'})

# 更新页边距以添加标题,并查看图表x标签。
fig.layout.margin.update({'t':75, 'l':50})
fig.layout.update({'title': '2016 Hockey Stats'})

# 更新高度,因为垂直添加图形将与为表格计算的打印高度交互
fig.layout.update({'height':800})

# Plot!
fig.show()

二、表格和图表子图
import plotly.graph_objects as go
from plotly.subplots import make_subplots

import pandas as pd
import re
# "https://raw.githubusercontent.com/plotly/datasets/master/Mining-BTC-180.csv"
df = pd.read_csv("F:/Mining-BTC-180.csv")

for i, row in enumerate(df["Date"]):
    p = re.compile(" 00:00:00")
    datetime = p.split(df["Date"][i])[0]
    df.iloc[i, 1] = datetime

fig = make_subplots(
    rows=3, cols=1,
    shared_xaxes=True,
    vertical_spacing=0.03,
    specs=[[{"type": "table"}],
           [{"type": "scatter"}],
           [{"type": "scatter"}]]
)

fig.add_trace(
    go.Scatter(
        x=df["Date"],
        y=df["Mining-revenue-USD"],
        mode="lines",
        name="mining revenue"
    ),
    row=3, col=1
)

fig.add_trace(
    go.Scatter(
        x=df["Date"],
        y=df["Hash-rate"],
        mode="lines",
        name="hash-rate-TH/s"
    ),
    row=2, col=1
)

fig.add_trace(
    go.Table(
        header=dict(
            values=["Date", "Number<br>Transactions", "Output<br>Volume (BTC)",
                    "Market<br>Price", "Hash<br>Rate", "Cost per<br>trans-USD",
                    "Mining<br>Revenue-USD", "Trasaction<br>fees-BTC"],
            font=dict(size=10),
            align="left"
        ),
        cells=dict(
            values=[df[k].tolist() for k in df.columns[1:]],
            align = "left")
    ),
    row=1, col=1
)
fig.update_layout(
    height=800,
    showlegend=False,
    title_text="比特币开采统计数据持续180天",
)

fig.show()

三、地理子图
import plotly.graph_objects as go
import pandas as pd
# "https://raw.githubusercontent.com/plotly/datasets/master/1962_2006_walmart_store_openings.csv"
df = pd.read_csv('f:/1962_2006_walmart_store_openings.csv')
df.head()

data = []
layout = dict(
    title = '1962-2006年沃尔玛每年新增门店<br>\
Source: <a href="http://www.econ.umn.edu/~holmes/data/WalMart/index.html">\
University of Minnesota</a>',
    # showlegend = False,
    autosize = False,
    width = 1000,
    height = 900,
    hovermode = False,
    legend = dict(
        x=0.7,
        y=-0.1,
        bgcolor="rgba(255, 255, 255, 0)",
        font = dict( size=11 ),
    )
)
years = df['YEAR'].unique()

for i in range(len(years)):
    geo_key = 'geo'+str(i+1) if i != 0 else 'geo'
    lons = list(df[ df['YEAR'] == years[i] ]['LON'])
    lats = list(df[ df['YEAR'] == years[i] ]['LAT'])
    # 沃尔玛商店数据
    data.append(
        dict(
            type = 'scattergeo',
            showlegend=False,
            lon = lons,
            lat = lats,
            geo = geo_key,
            name = int(years[i]),
            marker = dict(
                color = "rgb(0, 0, 255)",
                opacity = 0.5
            )
        )
    )
    # Year markers
    data.append(
        dict(
            type = 'scattergeo',
            showlegend = False,
            lon = [-78],
            lat = [47],
            geo = geo_key,
            text = [years[i]],
            mode = 'text',
        )
    )
    layout[geo_key] = dict(
        scope = 'usa',
        showland = True,
        landcolor = 'rgb(229, 229, 229)',
        showcountries = False,
        domain = dict( x = [], y = [] ),
        subunitcolor = "rgb(255, 255, 255)",
    )


def draw_sparkline( domain, lataxis, lonaxis ):
    ''' 返回地理坐标的迷你图布局对象  '''
    return dict(
        showland = False,
        showframe = False,
        showcountries = False,
        showcoastlines = False,
        domain = domain,
        lataxis = lataxis,
        lonaxis = lonaxis,
        bgcolor = 'rgba(255,200,200,0.0)'
    )

# 每年的店数
layout['geo44'] = draw_sparkline({'x':[0.6,0.8], 'y':[0,0.15]}, \
                                 {'range':[-5.0, 30.0]}, {'range':[0.0, 40.0]} )
data.append(
    dict(
        type = 'scattergeo',
        mode = 'lines',
        lat = list(df.groupby(by=['YEAR']).count()['storenum']/1e1),
        lon = list(range(len(df.groupby(by=['YEAR']).count()['storenum']/1e1))),
        line = dict( color = "rgb(0, 0, 255)" ),
        name = "每年新店<br>1990年达到每年178家店的峰值",
        geo = 'geo44',
    )
)

# Cumulative sum sparkline
layout['geo45'] = draw_sparkline({'x':[0.8,1], 'y':[0,0.15]}, \
                                 {'range':[-5.0, 50.0]}, {'range':[0.0, 50.0]} )
data.append(
    dict(
        type = 'scattergeo',
        mode = 'lines',
        lat = list(df.groupby(by=['YEAR']).count().cumsum()['storenum']/1e2),
        lon = list(range(len(df.groupby(by=['YEAR']).count()['storenum']/1e1))),
        line = dict( color = "rgb(214, 39, 40)" ),
        name ="2006年累计门店总数为3176家",
        geo = 'geo45',
    )
)

z = 0
COLS = 5
ROWS = 9
for y in reversed(range(ROWS)):
    for x in range(COLS):
        geo_key = 'geo'+str(z+1) if z != 0 else 'geo'
        layout[geo_key]['domain']['x'] = [float(x)/float(COLS), float(x+1)/float(COLS)]
        layout[geo_key]['domain']['y'] = [float(y)/float(ROWS), float(y+1)/float(ROWS)]
        z=z+1
        if z > 42:
            break

fig = go.Figure(data=data, layout=layout)
fig.update_layout(width=800)
fig.show()

四、混合子图和 Plotly Express
Plotly Express是 Plotly 的易于使用的高级界面,它对各种类型的数据进行操作并生成易于样式化的图形。
注意:目前,Plotly Express 不支持创建具有任意混合子图的图形,即具有不同类型子图的图形。Plotly Express 仅支持构面图和边际分布子图。要制作具有混合子图的图形,请将该make_subplots()函数与图形对象结合使用,如下所述。
import plotly.graph_objects as go
from plotly.subplots import make_subplots

import pandas as pd

# read in volcano database data
# "https://raw.githubusercontent.com/plotly/datasets/master/volcano_db.csv"
df = pd.read_csv(
    "f:/volcano_db.csv",
    encoding="iso-8859-1",
)

# frequency of Country
freq = df
freq = freq.Country.value_counts().reset_index().rename(columns={"index": "x"})

# read in 3d volcano surface data
# "https://raw.githubusercontent.com/plotly/datasets/master/volcano.csv"
df_v = pd.read_csv("f:/volcano.csv")

# Initialize figure with subplots
fig = make_subplots(
    rows=2, cols=2,
    column_widths=[0.6, 0.4],
    row_heights=[0.4, 0.6],
    specs=[[{"type": "scattergeo", "rowspan": 2}, {"type": "bar"}],
           [            None                    , {"type": "surface"}]])

# Add scattergeo globe map of volcano locations
fig.add_trace(
    go.Scattergeo(lat=df["Latitude"],
                  lon=df["Longitude"],
                  mode="markers",
                  hoverinfo="text",
                  showlegend=False,
                  marker=dict(color="crimson", size=4, opacity=0.8)),
    row=1, col=1
)

# Add locations bar chart
fig.add_trace(
    go.Bar(x=freq["x"][0:10],y=freq["Country"][0:10], marker=dict(color="crimson"), showlegend=False),
    row=1, col=2
)

# Add 3d surface of volcano
fig.add_trace(
    go.Surface(z=df_v.values.tolist(), showscale=False),
    row=2, col=2
)

# Update geo subplot properties
fig.update_geos(
    projection_type="orthographic",
    landcolor="white",
    oceancolor="MidnightBlue",
    showocean=True,
    lakecolor="LightBlue"
)

# Rotate x-axis labels
fig.update_xaxes(tickangle=45)

# Set theme, margin, and annotation in layout
fig.update_layout(
    template="plotly_dark",
    margin=dict(r=10, t=25, b=40, l=60),
    annotations=[
        dict(
            text="Source: NOAA",
            showarrow=False,
            xref="paper",
            yref="paper",
            x=0,
            y=0)
    ]
)

fig.show()

