一、下载libuv源码,源码地址:libuvc/libuvc: a cross-platform library for USB video devices (github.com)
二、新建vs工程,将libuvc源码中的include和src目录下的文件拷贝到工程中。
1.include源码修改
①libuvc头文件修改
将
#include <sys/time.h>
改为
#include <time.h>
#include <winsock.h>
②将libuvc_config.h.in文件重命名为libuvc_config.h
并将内容改为
#ifndef LIBUVC_CONFIG_H
#define LIBUVC_CONFIG_H

#define LIBUVC_VERSION_MAJOR 0
#define LIBUVC_VERSION_MINOR 0
#define LIBUVC_VERSION_PATCH 6
#define LIBUVC_VERSION_STR "0.0.6"
#define LIBUVC_VERSION_INT                      \
  ((0 << 16) |             \
   (0 << 8) |              \
   (6)

/** @brief Test whether libuvc is new enough
 * This macro evaluates true if and only if the current version is
 * at least as new as the version specified.
 */
#define LIBUVC_VERSION_GTE(major, minor, patch)                         \
  (LIBUVC_VERSION_INT >= (((major) << 16) | ((minor) << 8) | (patch)))

/*#cmakedefine LIBUVC_HAS_JPEG 1 */

#endif // !def(LIBUVC_CONFIG_H)
③utlist.h和libuvc_internal.h无修改
2.src源码修改,由于我这边不需要JEPG相关的代码,所以删除了frame-mjpeg.c文件
①device.c源码修改
1.strdup改为_strdup

2.uvc_device_t *test_dev;改为 uvc_device_t *test_dev = NULL;
②修改example.c源码,从USB摄像头获取视频。
1.删除
#include <unistd.h>

2.添加

#include <stdint.h>
#include <string.h>
#include <windows.h>
#pragma comment(lib,"ws2_32.lib")


sleep(10); 改为 Sleep(10000);
三、使用 zadig-2.8.exe 软件将USB摄像头的默认驱动替换成winUSB驱动
①先option里面选择List All Devices,选中usb摄像头
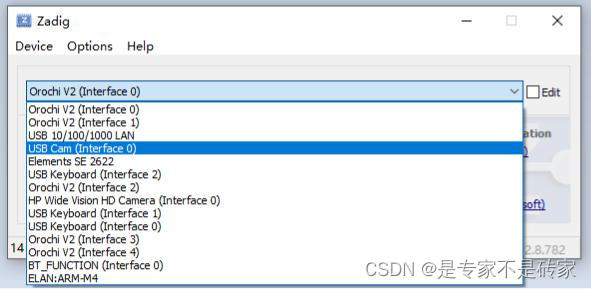
②点击Replace Driver,替换USB驱动
四、添加libuvc依赖库,libusb和pthread
1.下载libusb源码(libusb/libusb: A cross-platform library to access USB devices (github.com))
用Visual Studio2022打开msvc下面的libusb.sln,编译出动态库和dll,生成目录
build\v143\x64\Debug
2.下载pthread win32(https://github.com/GerHobbelt/pthread-win32 适配了MSVC的版本)
用Visual Studio2022打开windows/VS2022下面的pthread.2022.sln,编译出动态库和dll
五、在libuvc工程中添加依赖的头文件和动态库,这个可以参考我上一篇文章
六、将libusb和pthread编译生成的dll添加到系统环境中,后面运行程序需要。
参考文章:
1.Windows下基于MSVC搭建libuvc开发环境
2.Windows下使用pthread-开发环境搭建
