1,菜单栏,工具栏,状态栏。
1.1,Menu中可添加菜单分隔条<Separator></Separator>作为分割线,使用Separator可以通过改变其template来自定义,Separator是无焦点的,如果简单的在MenuItem中添加一个textBlock它是可以有焦点的
1.2,ToolBar没有ToolBarItem,ToolBar会将添加到其中的Button,CheckBox,Combobox样式进行修改.
1.3,通过附加属性ToolBar.OverFlowMode来设置该项的溢出方式
1.4,ToolBarTray.Band:确定工具栏放在哪一栏中(最顶部的一栏索引为0),BandIndex属性明确设置一栏中什么位置放置工具栏.
1.5,ToolBarTray.Orientation:设置工具栏方向
1.6,示例:
<Window x:Class="目录样例.MainWindow"
        xmlns="http://schemas.microsoft.com/winfx/2006/xaml/presentation"
        xmlns:x="http://schemas.microsoft.com/winfx/2006/xaml"
        xmlns:d="http://schemas.microsoft.com/expression/blend/2008"
        xmlns:mc="http://schemas.openxmlformats.org/markup-compatibility/2006"
        xmlns:local="clr-namespace:目录样例"
        mc:Ignorable="d"
        Title="MainWindow" Height="350" Width="525">
    <DockPanel LastChildFill="False">
        <Menu DockPanel.Dock="Top" >
            <MenuItem Header="File(_F)">
                <MenuItem Command="{x:Static ApplicationCommands.Open}"></MenuItem>
                <MenuItem Header="New(_N)" IsChecked="True" x:Name="menuitem01" ></MenuItem>
                <Separator ></Separator>

                <MenuItem Header="Save_S"></MenuItem>
            </MenuItem>
            <MenuItem Header="Eidt_E">
                <MenuItem Header="撤销"></MenuItem>
                <Separator>
                    <Separator.Template>
                        <ControlTemplate>
                            <Border Padding="10" BorderThickness="1" BorderBrush="Azure" CornerRadius="3">
                                <TextBlock HorizontalAlignment="Center">分割</TextBlock>
                            </Border>
                        </ControlTemplate>
                    </Separator.Template>
                </Separator>
                <Border Padding="10" BorderThickness="1" BorderBrush="Azure" CornerRadius="3">
                    <TextBlock HorizontalAlignment="Center">分割</TextBlock>
                </Border>
                <MenuItem Header="删除" InputGestureText="Ctr+D"></MenuItem>
            </MenuItem>
        </Menu>
        <ToolBarTray DockPanel.Dock="Top">
            <ToolBar Band="0" >
                <Button>Line</Button>
                <Button >Rectangle</Button>
            </ToolBar>
            <ToolBar Band="1">
                <Button>Color</Button>
                <Button >Font</Button>
            </ToolBar>
            <ToolBar Band="0" >
                <Button>One</Button>
                <Button >Two</Button>
            </ToolBar>
        </ToolBarTray>
        <StatusBar   DockPanel.Dock="Bottom">
            <!--<StatusBar.ItemTemplate>
                <ItemContainerTemplate>
                    <DockPanel></DockPanel>
                </ItemContainerTemplate>-->
            <!--</StatusBar.ItemTemplate>-->
            <StatusBarItem DockPanel.Dock="Right">账号:</StatusBarItem>
            <StatusBarItem DockPanel.Dock="Top" >状态1</StatusBarItem>
            <StatusBarItem  >状态2</StatusBarItem>
        </StatusBar>
        <ToolBarTray Orientation="Vertical" >
            <ToolBar   >
                <Button  >
                    <Button.Content>
                        <Image Source="/Img/download.png" Width="16" Height="16"></Image>
                    </Button.Content>
                </Button>
                <Button Content="Open"></Button>
                <Button Content="Save"></Button>
                <CheckBox FontWeight="Bold">Bold</CheckBox>
                <CheckBox FontStyle="Italic">Italic</CheckBox>
                <CheckBox >
                    <TextBlock TextDecorations="Underline">UnderLine</TextBlock>
                </CheckBox>
                <ComboBox ToolBar.OverflowMode="Never"  Width="80">

                    <ComboBoxItem>10%</ComboBoxItem>
                    <ComboBoxItem >20%</ComboBoxItem>
                    <ComboBoxItem>30%</ComboBoxItem>


                </ComboBox>
                <Separator></Separator>
            </ToolBar>
        </ToolBarTray>

    </DockPanel>
</Window>
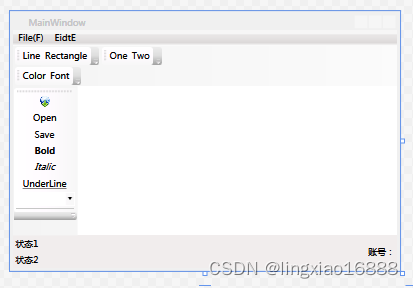
1.7,效果:
2,功能区
2.1,使用功能区需要添加程序集System.Windows.Controls.Ribbon。
2.2,引用程序集:
xmlns:r="clr-namespace:System.Windows.Controls.Ribbon;assembly=System.Windows.Controls.Ribbon"2.3,为了使快速访问工具栏出现在顶端,需要将默认继承自Window修改为继承自RibbonWindow
 public partial class MainWindow : RibbonWindow
    {
        public MainWindow()
        {
            InitializeComponent();

        }
    }
<r:RibbonWindow x:Class="功能区.MainWindow"
xmlns="http://schemas.microsoft.com/winfx/2006/xaml/presentation"
xmlns:x="http://schemas.microsoft.com/winfx/2006/xaml"
xmlns:d="http://schemas.microsoft.com/expression/blend/2008"
xmlns:mc="http://schemas.openxmlformats.org/markup-compatibility/2006"
xmlns:local="clr-namespace:功能区"
mc:Ignorable="d"
xmlns:r="clr-namespace:System.Windows.Controls.Ribbon;assembly=System.Windows.Controls.Ribbon"
Title="MainWindow" Height="350" Width="525">
<Grid>
</Grid>
</r:RibbonWindow>2.4,示例:
<r:RibbonWindow x:Class="功能区.MainWindow"
xmlns="http://schemas.microsoft.com/winfx/2006/xaml/presentation"
xmlns:x="http://schemas.microsoft.com/winfx/2006/xaml"
xmlns:d="http://schemas.microsoft.com/expression/blend/2008"
xmlns:mc="http://schemas.openxmlformats.org/markup-compatibility/2006"
xmlns:local="clr-namespace:功能区"
mc:Ignorable="d"
xmlns:r="clr-namespace:System.Windows.Controls.Ribbon;assembly=System.Windows.Controls.Ribbon"
Title="MainWindow" Height="350" Width="525">
<Grid>
<Grid.RowDefinitions>
<RowDefinition Height="auto"/>
<RowDefinition Height="279*"/>
</Grid.RowDefinitions>
<Ribbon>
<!--定义快速访问工具栏-->
<Ribbon.QuickAccessToolBar>
<RibbonQuickAccessToolBar>
<RibbonButton Label="Cut" SmallImageSource="/Img/cut.png"></RibbonButton>
<RibbonButton Label="Open" SmallImageSource="/Img/open1.png"></RibbonButton>
</RibbonQuickAccessToolBar>
</Ribbon.QuickAccessToolBar>
<Ribbon.ApplicationMenu>
<RibbonApplicationMenu SmallImageSource="Img/desktop.png">
<RibbonApplicationMenuItem Header="新建" ImageSource="Img/new window.png"></RibbonApplicationMenuItem>
<RibbonApplicationMenuItem Header="保存" ImageSource="Img/save.png">
<RibbonApplicationMenuItem Header="另存" ImageSource="Img/save-as.png"></RibbonApplicationMenuItem>
</RibbonApplicationMenuItem>
<RibbonSeparator></RibbonSeparator>
<RibbonApplicationMenuItem Header="另存" ImageSource="Img/save-as.png"></RibbonApplicationMenuItem>
</RibbonApplicationMenu>
</Ribbon.ApplicationMenu>
<RibbonTab Header="Home" GroupSizeReductionOrder="ClipBoard,Files">
<RibbonGroup Header="ClipBoard">
<RibbonButton Label="Copy" SmallImageSource="Img/copy.png" LargeImageSource="Img/copy.png"></RibbonButton>
<RibbonButton Label="Cut" SmallImageSource="Img/cut.png" LargeImageSource="Img/cut.png"></RibbonButton>
<RibbonButton Label="Paste" SmallImageSource="Img/paste.png" LargeImageSource="Img/paste.png" ToolTipTitle="粘贴" ToolTipDescription="对文档进行粘贴等操作" ToolTipImageSource="Img/cut.png" ToolTipFooterTitle="更多信息" ToolTipFooterDescription="按F1获取更多帮助" ToolTipFooterImageSource="Img/help.png"></RibbonButton>
</RibbonGroup>
<RibbonGroup Header="Task">
<RibbonButton Label="Copy" SmallImageSource="Img/copy.png" LargeImageSource="Img/copy.png"></RibbonButton>
<RibbonButton Label="Cut" SmallImageSource="Img/cut.png" LargeImageSource="Img/cut.png"></RibbonButton>
<RibbonButton Label="Paste" SmallImageSource="Img/paste.png" LargeImageSource="Img/paste.png" ToolTipTitle="粘贴" ToolTipDescription="对文档进行粘贴等操作" ToolTipImageSource="Img/cut.png" ToolTipFooterTitle="更多信息" ToolTipFooterDescription="按F1获取更多帮助" ToolTipFooterImageSource="Img/help.png"></RibbonButton>
</RibbonGroup>
<RibbonGroup Header="Files">
<RibbonButton Label="Copy" SmallImageSource="Img/copy.png" LargeImageSource="Img/copy.png"></RibbonButton>
<RibbonButton Label="Cut" SmallImageSource="Img/cut.png" LargeImageSource="Img/cut.png"></RibbonButton>
<RibbonButton Label="Paste" SmallImageSource="Img/paste.png" LargeImageSource="Img/paste.png" ToolTipTitle="粘贴" ToolTipDescription="对文档进行粘贴等操作" ToolTipImageSource="Img/cut.png" ToolTipFooterTitle="更多信息" ToolTipFooterDescription="按F1获取更多帮助" ToolTipFooterImageSource="Img/help.png"></RibbonButton>
</RibbonGroup>
</RibbonTab>
</Ribbon>
</Grid>
</r:RibbonWindow>注明:
GroupSizeReductionOrder="ClipBoard,Files" ribbonTab中首先被缩小的Group。
快速访问工具栏。Ribbon.QuickAccessToolBar
2.5,效果:

