任务: 识别猫咪。
目录
1. 直接使用
1.1 获取预训练权重
1.2 libtorch直接使用pt权重
2. 间接使用
2.1 BasicBlock
2.2 实现ResNet
2.3 BottleNeck
1. 直接使用
1.1 获取预训练权重
比如直接使用Pytorch版的预训练权重。先把权重保存下来,并打印分类类别(方便后面对比)
import torch
import torchvision.models as models
from PIL import Image
import numpy as np

# input
image = Image.open("E:\\code\\c++\\libtorch_models\\data\\cat.jpg")  # 图片发在了build文件夹下
image = image.resize((224, 224), Image.ANTIALIAS)
image = np.asarray(image)
image = image / 255.0
image = torch.Tensor(image).unsqueeze_(dim=0)  # (b,h,w,c)
image = image.permute((0, 3, 1, 2)).float()  # (b,h,w,c) -> (b,c,h,w)

# model
model = models.resnet18(pretrained=True)
model = model.eval()
resnet = torch.jit.trace(model, torch.rand(1, 3, 224, 224))

# infer
output = resnet(image)
max_index = torch.max(output, 1)[1].item()
print(max_index)  # ImageNet1000类的类别序号
resnet.save('resnet.pt')
将保存权重resnet.pt,并打印分类索引号是283,对应的是猫。
1.2 libtorch直接使用pt权重
使用接口torch::jit::load 即可载入权重并获取resnet18模型。
然后再使用std::vector<torch::jit::IValue>传送数据到模型中,即可得到类别。
打印结果是283,和前面的pytorch版是一样。
#include <iostream>
#include <opencv.hpp>

int main()
{
	// load weights and model.
	auto resnet18 = torch::jit::load("E:\\code\\c++\\libtorch_models\\weights\\resnet18.pt");
	assert(module != nullptr);
	resnet18.to(torch::kCUDA);
	resnet18.eval();

	// pre
	cv::Mat image = cv::imread("E:\\code\\c++\\libtorch_models\\data\\cat.jpg");
	cv::resize(image, image, cv::Size(224, 224));
	torch::Tensor tensor_image = torch::from_blob(image.data, {224, 224,3 }, torch::kByte);
	tensor_image = torch::unsqueeze(tensor_image, 0).permute({ 0,3,1,2 }).to(torch::kCUDA).to(torch::kFloat).div(255.0);  // (b,h,w,c) -> (b,c,h,w)
	std::cout << tensor_image.options() << std::endl;
	std::vector<torch::jit::IValue> inputs;
	inputs.push_back(tensor_image);

	// infer
	auto output = resnet18.forward(inputs).toTensor();
	auto max_result = output.max(1, true);
	auto max_index = std::get<1>(max_result).item<float>();
	std::cout << max_index << std::endl;

	return 0;
}
2. 间接使用
间接使用是指基于libtorch c++ 复现一遍resnet网络,再利用前面得到的权重,初始化模型。输出结果依然是283.
#include <iostream>
#include "resnet.h"  // libtorch实现的resnet
#include <opencv.hpp>

int main()
{
	// load weights and model.
	ResNet resnet = resnet18(1000);  // orig net
	torch::load(resnet, "E:\\code\\c++\\libtorch_models\\weights\\resnet18.pt");  // load weights.
	assert(resnet != nullptr);
	resnet->to(torch::kCUDA);
	resnet->eval();

	// pre
	cv::Mat image = cv::imread("E:\\code\\c++\\libtorch_models\\data\\cat.jpg");
	cv::resize(image, image, cv::Size(224, 224));
	torch::Tensor tensor_image = torch::from_blob(image.data, { 224, 224,3 }, torch::kByte);
	tensor_image = torch::unsqueeze(tensor_image, 0).permute({ 0,3,1,2 }).to(torch::kCUDA).to(torch::kFloat).div(255.0);  // (b,h,w,c) -> (b,c,h,w)
	std::cout << tensor_image.options() << std::endl;

	// infer
	auto output = resnet->forward(tensor_image);
	auto max_result = output.max(1, true);
	auto max_index = std::get<1>(max_result).item<float>();
	std::cout << max_index << std::endl;
	return 0;
}
接下来介绍resnet详细实现过程。
2.1 BasicBlock
先实现resnet最小单元BasicBlock,该单元是两次卷积组成的残差块。结构如下。
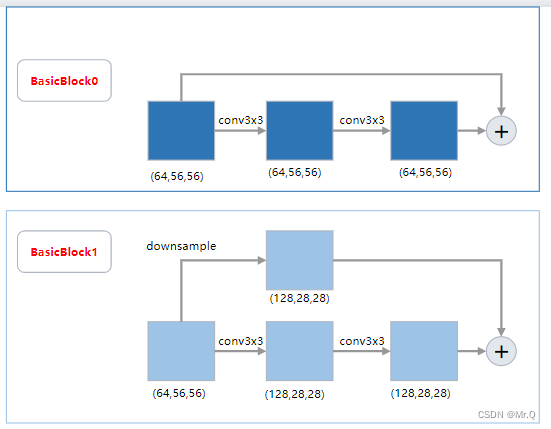
两种形式,如果第一个卷积stride等于2进行下采样,则跳层连接也需要下采样,维度才能一致,再进行对应相加。
// resnet18 and resnet34
class BasicBlockImpl : public torch::nn::Module {
public:
	BasicBlockImpl(int64_t in_channels, int64_t out_channels, int64_t stride, torch::nn::Sequential downsample);
	torch::Tensor forward(torch::Tensor x);
public:
	torch::nn::Sequential downsample{ nullptr };
private:
	torch::nn::Conv2d conv1{ nullptr };
	torch::nn::BatchNorm2d bn1{ nullptr };
	torch::nn::Conv2d conv2{ nullptr };
	torch::nn::BatchNorm2d bn2{ nullptr };
};
TORCH_MODULE(BasicBlock);

// other resnet using BottleNeck
class BottleNeckImpl : public torch::nn::Module {
public:
	BottleNeckImpl(int64_t in_channels, int64_t out_channels, int64_t stride,
		torch::nn::Sequential downsample, int groups, int base_width);
	torch::Tensor forward(torch::Tensor x);
public:
	torch::nn::Sequential downsample{ nullptr };
private:
	torch::nn::Conv2d conv1{ nullptr };
	torch::nn::BatchNorm2d bn1{ nullptr };
	torch::nn::Conv2d conv2{ nullptr };
	torch::nn::BatchNorm2d bn2{ nullptr };
	torch::nn::Conv2d conv3{ nullptr };
	torch::nn::BatchNorm2d bn3{ nullptr };
};
TORCH_MODULE(BottleNeck);
// conv3x3+bn+relu, conv3x3+bn,
// downsample: 用来对原始输入进行下采样.
// stride: 控制是否下采样,stride=2则是下采样,且downsample将用于对原始输入进行下采样.
BasicBlockImpl::BasicBlockImpl(int64_t in_channels, int64_t out_channels, int64_t stride, torch::nn::Sequential downsample) {
this->downsample = downsample;
conv1 = torch::nn::Conv2d(torch::nn::Conv2dOptions(in_channels, out_channels, 3).stride(stride).padding(1).bias(false));
bn1 = torch::nn::BatchNorm2d(torch::nn::BatchNorm2dOptions(out_channels));
conv2 = torch::nn::Conv2d(torch::nn::Conv2dOptions(out_channels, out_channels, 3).stride(1).padding(1).bias(false));
bn2 = torch::nn::BatchNorm2d(torch::nn::BatchNorm2dOptions(out_channels));
register_module("conv1", conv1);
register_module("bn1", bn1);
register_module("conv2", conv2);
register_module("bn2", bn2);
if (!downsample->is_empty()) {
register_module("downsample", downsample);
}
}
torch::Tensor BasicBlockImpl::forward(torch::Tensor x) {
torch::Tensor identity = x.clone();
x = conv1->forward(x); // scale/2. or keep scale unchange.
x = bn1->forward(x);
x = torch::relu(x);
x = conv2->forward(x);
x = bn2->forward(x);
// 加入x的维度减半,则原始输入必须也减半。
if (!downsample->is_empty()) identity = downsample->forward(identity);
x += identity;
x = torch::relu(x);
return x;
}2.2 实现ResNet
这里以resnet18为例。网络结构如下。

简单一句话,使用残差块多次卷积,最后接一个全链接层进行分类。
注意上图中的layer1到layer4是由BasicBlock0和BasicBlock1两种残差块组成。实现如下。
// out_channels: 每一个block输出的通道数。
// blocks: 每个layer包含的blocks数.
torch::nn::Sequential ResNetImpl::_make_layer(int64_t out_channels, int64_t blocks, int64_t stride) {
	// 1, downsampe: stride or channel
	torch::nn::Sequential downsample;
	if (stride != 1 || this->in_channels != out_channels * expansion) {  // 步长等于2,或者输入通道不等于输出通道,则都是接conv操作,改变输入x的维度
		downsample = torch::nn::Sequential(
			torch::nn::Conv2d(torch::nn::Conv2dOptions(this->in_channels, out_channels * this->expansion, 1).stride(stride).padding(0).groups(1).bias(false)),
			torch::nn::BatchNorm2d(out_channels * this->expansion)
		);
	}
	// 2, layers: first is downsample and others are conv with 1 stride.
	torch::nn::Sequential layers;
	if (this->is_basic) {
		layers->push_back(BasicBlock(this->in_channels, out_channels, stride, downsample));  // 控制是否下采样
		this->in_channels = out_channels;  // 更新输入通道,以备下次使用
		for (int64_t i = 1; i < blocks; i++) {  // 剩余的block都是in_channels == out_channels. and stride = 1.
			layers->push_back(BasicBlock(this->in_channels, this->in_channels, 1, torch::nn::Sequential()));  // 追加多个conv3x3,且不改变维度
		}
	}
	else {
		layers->push_back(BottleNeck(this->in_channels, out_channels, stride, downsample, this->groups, this->base_width));
		this->in_channels = out_channels * this->expansion;  // 更新输入通道,以备下次使用
		for (int64_t i = 1; i < blocks; i++) {  // 剩余的block都是in_channels == out_channels. and stride = 1.
			layers->push_back(BottleNeck(this->in_channels, this->in_channels, 1, torch::nn::Sequential(), this->groups, this->base_width));
		}
	}
	return layers;
}
resnet实现。
class ResNetImpl : public torch::nn::Module {
public:
	ResNetImpl(std::vector<int> layers, int num_classes, std::string model_type,
		int groups, int width_per_group);
	torch::Tensor forward(torch::Tensor x);
public:
	torch::nn::Sequential _make_layer(int64_t in_channels, int64_t blocks, int64_t stride = 1);
private:
	int expansion = 1;  // 通道扩大倍数,resnet50会用到
	bool is_basic = true;  // 是BasicBlock,还是BottleNeck
	int in_channels = 64;  // 记录输入通道数
	int groups = 1, base_width = 64;
	torch::nn::Conv2d conv1{ nullptr };
	torch::nn::BatchNorm2d bn1{ nullptr };
	torch::nn::Sequential layer1{ nullptr };
	torch::nn::Sequential layer2{ nullptr };
	torch::nn::Sequential layer3{ nullptr };
	torch::nn::Sequential layer4{ nullptr };
	torch::nn::Linear fc{ nullptr };
};
TORCH_MODULE(ResNet);
// layers: resnet18: { 2, 2, 2, 2 }, resnet34: { 3, 4, 6, 3 }, resnet50: { 3, 4, 6, 3 };
ResNetImpl::ResNetImpl(std::vector<int> layers, int num_classes = 1000, std::string model_type = "resnet18", int groups = 1, int width_per_group = 64) {
if (model_type != "resnet18" && model_type != "resnet34") // 即不使用BasicBlock,使用BottleNeck
{
this->expansion = 4;
is_basic = false;
}
this->groups = groups; // 1
this->base_width = base_width; // 64
this->conv1 = torch::nn::Conv2d(torch::nn::Conv2dOptions(3, 64, 7).stride(2).padding(3).groups(1).bias(false)); // scale/2
this->bn1 = torch::nn::BatchNorm2d(torch::nn::BatchNorm2dOptions(64));
this->layer1 = torch::nn::Sequential(_make_layer(64, layers[0])); // stride=1, scale and channels unchange
this->layer2 = torch::nn::Sequential(_make_layer(128, layers[1], 2)); // stride=2, scale/2. channels double
this->layer3 = torch::nn::Sequential(_make_layer(256, layers[2], 2)); // stride=2, scale/2. channels double
this->layer4 = torch::nn::Sequential(_make_layer(512, layers[3], 2)); // stride=2, scale/2. channels double
this->fc = torch::nn::Linear(512 * this->expansion, num_classes);
register_module("conv1", conv1);
register_module("bn1", bn1);
register_module("layer1", layer1);
register_module("layer2", layer2);
register_module("layer3", layer3);
register_module("layer4", layer4);
register_module("fc", fc);
}
torch::Tensor ResNetImpl::forward(torch::Tensor x) {
// 1,先是两次下采样. (b,3,224,224) -> (b,64,56,56)
x = conv1->forward(x); // (b,3,224,224)->(b,64,112,112)
x = bn1->forward(x);
x = torch::relu(x); // feature 1
x = torch::max_pool2d(x, 3, 2, 1); // k=3,s=2,p=1. (b,64,112,112)->(b,64,56,56)
x = layer1->forward(x); // feature 2. (b,64,56,56)
x = layer2->forward(x); // feature 3. (b,128,28,28)
x = layer3->forward(x); // feature 4. (b,256,14,14)
x = layer4->forward(x); // feature 5. (b,512,7,7)
x = torch::adaptive_avg_pool2d(x, {1, 1}); // (b,512,1,1)
//x = torch::avg_pool2d(x, 7, 1); // (b,512,1,1)
x = x.view({ x.sizes()[0], -1 }); // (b,512)
x = fc->forward(x); // (b,1000)
return torch::log_softmax(x, 1); // score (负无穷,0]
}创建resnet18和resnet34。其中layers中的数字代表当前layer中包含的BasicBlock个数。
// 创建不同resnet分类网络的函数
ResNet resnet18(int64_t num_classes) {
	std::vector<int> layers = { 2, 2, 2, 2 };
	ResNet model(layers, num_classes, "resnet18");
	return model;
}

ResNet resnet34(int64_t num_classes) {
	std::vector<int> layers = { 3, 4, 6, 3 };
	ResNet model(layers, num_classes, "resnet34");
	return model;
}
2.3 BottleNeck
resnet系列框架是一样的,不同点是组件有差异。
resnet18和resnet34都是用BasicBlock组件,而resnet50及以上则使用BottleNeck结构。如下所示。


BottleNeck有三种形式:
(1)BottleNeck0: stride=1, only 4*channels;
(2)BottleNeck1: stride=1, only 4*channels;
(3)BottleNeck2: stride=2, 4*channels and scales/2
// other resnet using BottleNeck
class BottleNeckImpl : public torch::nn::Module {
public:
	BottleNeckImpl(int64_t in_channels, int64_t out_channels, int64_t stride,
		torch::nn::Sequential downsample, int groups, int base_width);
	torch::Tensor forward(torch::Tensor x);
public:
	torch::nn::Sequential downsample{ nullptr };
private:
	torch::nn::Conv2d conv1{ nullptr };
	torch::nn::BatchNorm2d bn1{ nullptr };
	torch::nn::Conv2d conv2{ nullptr };
	torch::nn::BatchNorm2d bn2{ nullptr };
	torch::nn::Conv2d conv3{ nullptr };
	torch::nn::BatchNorm2d bn3{ nullptr };
};
TORCH_MODULE(BottleNeck);
// stride: 控制是否下采样,stride=2则是下采样,且downsample将用于对原始输入进行下采样.
// conv1x1+bn+relu, conv3x3+bn+relu, conv1x1+bn+relu
BottleNeckImpl::BottleNeckImpl(int64_t in_channels, int64_t out_channels, int64_t stride,
torch::nn::Sequential downsample, int groups, int base_width) {
this->downsample = downsample;
// 64 * (64 / 64) / 1 = 64, 128 * (64 / 64) / 1 = 128, 128 * (64 / 64) / 2 = 64.
int width = int(out_channels * (base_width / 64.)) * groups; // 64 * (64/64) / 1. 当前的输出通道数
// 1x1 conv
conv1 = torch::nn::Conv2d(torch::nn::Conv2dOptions(in_channels, width, 1).stride(1).padding(0).groups(1).bias(false));
bn1 = torch::nn::BatchNorm2d(torch::nn::BatchNorm2dOptions(width));
// 3x3 conv
conv2 = torch::nn::Conv2d(torch::nn::Conv2dOptions(width, width, 3).stride(stride).padding(1).groups(groups).bias(false));
bn2 = torch::nn::BatchNorm2d(torch::nn::BatchNorm2dOptions(width));
// 1x1 conv
conv3 = torch::nn::Conv2d(torch::nn::Conv2dOptions(width, out_channels * 4, 1).stride(1).padding(0).groups(1).bias(false));
bn3 = torch::nn::BatchNorm2d(torch::nn::BatchNorm2dOptions(out_channels * 4));
register_module("conv1", conv1);
register_module("bn1", bn1);
register_module("conv2", conv2);
register_module("bn2", bn2);
register_module("conv3", conv3);
register_module("bn3", bn3);
if (!downsample->is_empty()) {
register_module("downsample", downsample);
}
}
torch::Tensor BottleNeckImpl::forward(torch::Tensor x) {
torch::Tensor identity = x.clone();
// conv1x1+bn+relu
x = conv1->forward(x);
x = bn1->forward(x);
x = torch::relu(x);
// conv3x3+bn+relu
x = conv2->forward(x); // if stride==2, scale/2
x = bn2->forward(x);
x = torch::relu(x);
// conv1x1+bn+relu
x = conv3->forward(x); // double channels
x = bn3->forward(x);
if (!downsample->is_empty()) identity = downsample->forward(identity);
x += identity;
x = torch::relu(x);
return x;
}