使用 YOLO 进行自定义对象检测
1. 创建数据集
机器是通过数据集学习的。数据集必须包含图像和标签。例如,让我的目标是创建一个检测坦克的系统。

我准备了从网上下载的坦克图片。然后我们需要使用第三方工具对图像进行标记,例如;LabelImg、MakeSense 等。我们将在此示例中使用 MakeSense,可以在此处访问它:https://www.makesense.ai/
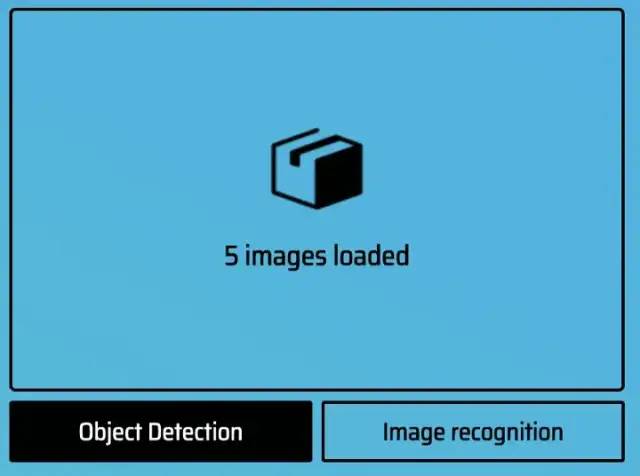
上传完所有图片后,点击 Object Detection 选择。你会看到你上传的照片。你需要标记对象的区域。

我们标记了对象的区域。(如果图像有很多对象,则必须标记所有对象。)然后查看页面右侧的“标签”。
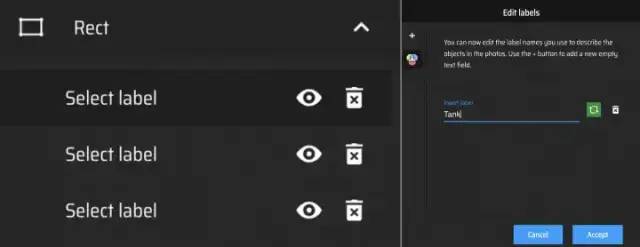
单击加号图标并在那里输入对象的名称。
现在我们的数据集准备好了!让我们下载数据集。
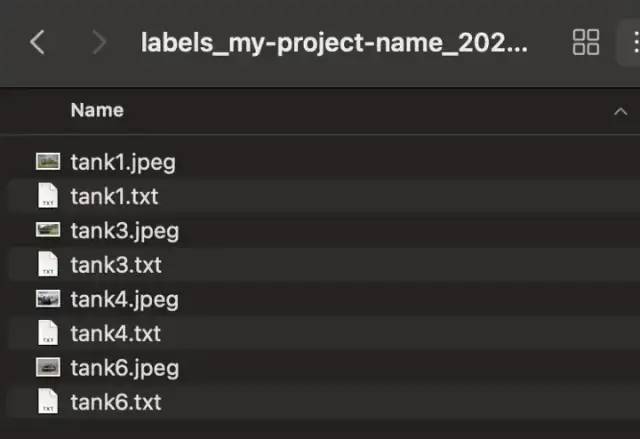
准备的数据集如上图。
2. 使用 Colab 进行训练
我们将使用 Google Colab 进行训练。

什么是 Colab?
Colaboratory,简称“Colab”,是谷歌研究院的一款产品。Colab 允许任何人通过浏览器编写和执行任意 python 代码,特别适合机器学习、数据分析和教育。
GPU 训练比 CPU 训练更快。
按照以下步骤进行训练
-
打开 Google Drive,创建一个名为“yolov3”的文件夹
-
将你的数据集上传为“images.zip”
-
从此处链接下载训练文件“Train_YoloV3.ipynb” :https://github.com/turgay2317/yolov3-training-files
-
打开 Colab:https://colab.research.google.com/
-
选择“上传”选项卡,并选择下载训练文件“Train_YoloV3.ipynb”
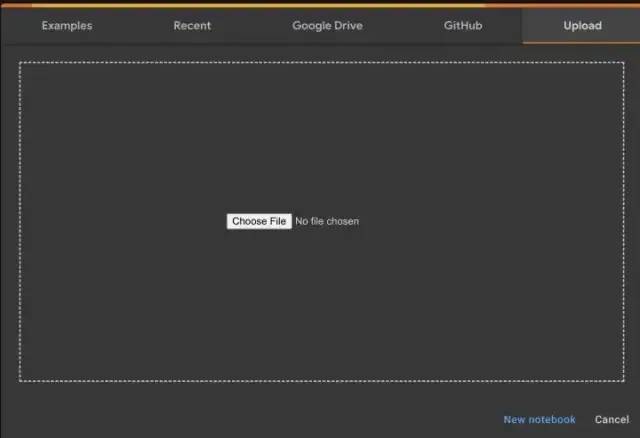
上传过程结束后,你会遇到如下页面。
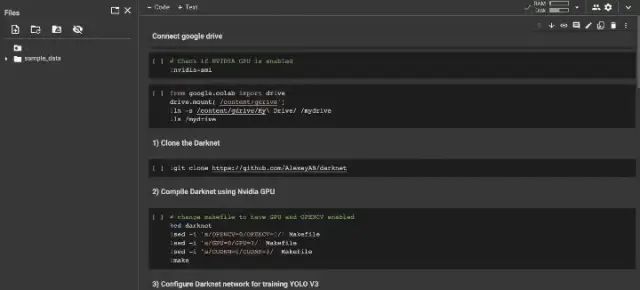
**该文件应用了这些步骤;**检查 Nvidia GPU,安装 Google Drive,克隆和编译 DarkNet,为标签创建 obj.names 文件,从 images.zip 中提取图像,开始训练
训练结束后可以查看Google Drive/yolov3目录下的权重文件。
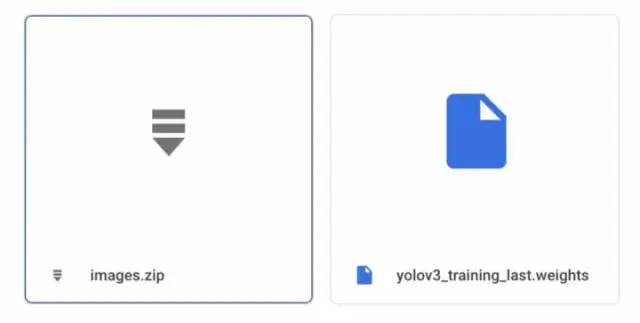
我们将使用权重文件。下载它。
3. 准备所有检测文件

我们将使用这些文件:
-
yolov3_training_last.weights -> 训练文件
-
coco.names -> 包含特定对象的标签
-
yolo_object_detection.py -> 使用 OpenCV 进行对象检测
-
yolov3_testing.cfg -> 一些配置
你可以从这里下载其他文件:https://github.com/turgay2317/yolov3-training-files
4. 运行自定义对象检测
不要忘记安装 OpenCV 和所需的库。然后运行“yolo_object_detection.py”文件!
import cv2
import numpy as np
import glob
import randomnet = cv2.dnn.readNet("yolov3_training_last.weights", "yolov3_testing.cfg")classes = ["Tank"]images_path = glob.glob(r"tests/*.jpeg")layer_names = net.getLayerNames()
output_layers = [layer_names[i - 1] for i in net.getUnconnectedOutLayers()]
colors = np.random.uniform(0, 255, size=(len(classes), 3))random.shuffle(images_path)for img_path in images_path:
    # Loading image
    img = cv2.imread(img_path)
    img = cv2.resize(img, None, fx=0.4, fy=0.4)
    height, width, channels = img.shape    # Detecting objects
    blob = cv2.dnn.blobFromImage(img, 0.00392, (416, 416), (0, 0, 0), True, crop=False)    net.setInput(blob)
    outs = net.forward(output_layers)    # Showing informations on the screen
    class_ids = []
    confidences = []
    boxes = []
    for out in outs:
        for detection in out:
            scores = detection[5:]
            class_id = np.argmax(scores)
            confidence = scores[class_id]
            if confidence > 0.3:
                # Object detected
                print(class_id)
                center_x = int(detection[0] * width)
                center_y = int(detection[1] * height)
                w = int(detection[2] * width)
                h = int(detection[3] * height)                # Rectangle coordinates
                x = int(center_x - w / 2)
                y = int(center_y - h / 2)                boxes.append([x, y, w, h])
                confidences.append(float(confidence))
                class_ids.append(class_id)    indexes = cv2.dnn.NMSBoxes(boxes, confidences, 0.5, 0.4)
    print(indexes)
    font = cv2.FONT_HERSHEY_PLAIN
    for i in range(len(boxes)):
        if i in indexes:
            x, y, w, h = boxes[i]
            label = str(classes[class_ids[i]])
            color = colors[class_ids[i]]
            cv2.rectangle(img, (x, y), (x + w, y + h), color, 2)
            cv2.putText(img, label, (x, y + 30), font, 3, color, 2)    cv2.imshow("Image", img)
    key = cv2.waitKey(0)cv2.destroyAllWindows()

检测实例
最后,你可以看到我们的检测成功了。现在我们的系统可以检测到坦克。
5. 视频中的自定义对象检测
import cv2
import numpy as np
import time# Load Yolo
net = cv2.dnn.readNet("yolov3_training_last.weights", "yolov3_testing.cfg")
classes = []
with open("coco.names", "r") as f:
    classes = [line.strip() for line in f.readlines()]
layer_names = net.getLayerNames()
output_layers = [layer_names[i - 1] for i in net.getUnconnectedOutLayers()]
colors = np.random.uniform(0, 255, size=(len(classes), 3))# Loading image
cap = cv2.VideoCapture("tests/test.mp4")font = cv2.FONT_HERSHEY_PLAIN
starting_time = time.time()
frame_id = 0
while True:
    _, frame = cap.read()
    frame_id += 1    height, width, channels = frame.shape    # Detecting objects
    blob = cv2.dnn.blobFromImage(frame, 0.00392, (416, 416), (0, 0, 0), True, crop=False)    net.setInput(blob)
    outs = net.forward(output_layers)    # Showing informations on the screen
    class_ids = []
    confidences = []
    boxes = []
    for out in outs:
        for detection in out:
            scores = detection[5:]
            class_id = np.argmax(scores)
            confidence = scores[class_id]
            if confidence > 0.1:
                # Object detected
                center_x = int(detection[0] * width)
                center_y = int(detection[1] * height)
                w = int(detection[2] * width)
                h = int(detection[3] * height)                # Rectangle coordinates
                x = int(center_x - w / 2)
                y = int(center_y - h / 2)                boxes.append([x, y, w, h])
                confidences.append(float(confidence))
                class_ids.append(class_id)    indexes = cv2.dnn.NMSBoxes(boxes, confidences, 0.8, 0.3)    for i in range(len(boxes)):
        if i in indexes:
            x, y, w, h = boxes[i]
            label = str(classes[class_ids[i]])
            confidence = confidences[i]
            color = colors[class_ids[i]]
            cv2.rectangle(frame, (x, y), (x + w, y + h), color, 2)
            cv2.putText(frame, label + " " + str(round(confidence, 2)), (x, y + 30), font, 3, color, 3)    elapsed_time = time.time() - starting_time
    fps = frame_id / elapsed_time
    cv2.putText(frame, "FPS: " + str(round(fps, 2)), (10, 50), font, 4, (0, 0, 0), 3)
    cv2.imshow("Image", frame)
    key = cv2.waitKey(1)
    if key == 27:
        breakcap.release()
cv2.destroyAllWindows()
6. 相机的自定义对象检测
import cv2
import numpy as np
import time# Load Yolo
net = cv2.dnn.readNet("yolov3_training_last.weights", "yolov3_testing.cfg")
classes = []
with open("coco.names", "r") as f:
    classes = [line.strip() for line in f.readlines()]
layer_names = net.getLayerNames()
output_layers = [layer_names[i - 1] for i in net.getUnconnectedOutLayers()]
colors = np.random.uniform(0, 255, size=(len(classes), 3))# Loading image
cap = cv2.VideoCapture(0)font = cv2.FONT_HERSHEY_PLAIN
starting_time = time.time()
frame_id = 0
while True:
    _, frame = cap.read()
    frame_id += 1    height, width, channels = frame.shape    # Detecting objects
    blob = cv2.dnn.blobFromImage(frame, 0.00392, (416, 416), (0, 0, 0), True, crop=False)    net.setInput(blob)
    outs = net.forward(output_layers)    # Showing informations on the screen
    class_ids = []
    confidences = []
    boxes = []
    for out in outs:
        for detection in out:
            scores = detection[5:]
            class_id = np.argmax(scores)
            confidence = scores[class_id]
            if confidence > 0.1:
                # Object detected
                center_x = int(detection[0] * width)
                center_y = int(detection[1] * height)
                w = int(detection[2] * width)
                h = int(detection[3] * height)                # Rectangle coordinates
                x = int(center_x - w / 2)
                y = int(center_y - h / 2)                boxes.append([x, y, w, h])
                confidences.append(float(confidence))
                class_ids.append(class_id)    indexes = cv2.dnn.NMSBoxes(boxes, confidences, 0.8, 0.3)    for i in range(len(boxes)):
        if i in indexes:
            x, y, w, h = boxes[i]
            label = str(classes[class_ids[i]])
            confidence = confidences[i]
            color = colors[class_ids[i]]
            cv2.rectangle(frame, (x, y), (x + w, y + h), color, 2)
            cv2.putText(frame, label + " " + str(round(confidence, 2)), (x, y + 30), font, 3, color, 3)    elapsed_time = time.time() - starting_time
    fps = frame_id / elapsed_time
    cv2.putText(frame, "FPS: " + str(round(fps, 2)), (10, 50), font, 4, (0, 0, 0), 3)
    cv2.imshow("Image", frame)
    key = cv2.waitKey(1)
    if key == 27:
        breakcap.release()
cv2.destroyAllWindows()




![[NSSRound#1 Basic]basic_check](https://img-blog.csdnimg.cn/img_convert/e44781c2d6f7112cb158501699d2e10d.png)

