目录
一、print函数的常见应用场景
二、print函数使用注意事项
三、如何用好print函数?
1、print函数:
1-1、Python:
1-2、VBA:
2、推荐阅读:
个人主页:神奇夜光杯-CSDN博客


一、print函数的常见应用场景
print函数在Python中具有广泛的应用场景,它不仅仅用于在控制台输出简单的信息,还可以用于多种复杂的情况,常见的应用场景有:
1、调试和输出信息:在编写程序或脚本时,print()函数经常用于输出变量的值、中间结果或调试信息,以帮助开发者理解程序的执行流程和状态。
2、用户交互:在命令行应用程序或交互式脚本中,print()函数可以用于向用户显示提示、消息或结果。
3、格式化输出:print()函数可以与字符串格式化方法(如str.format()方法或f-string)结合使用,以生成格式化的输出,这对于生成可读性强的报告、日志或用户界面非常有用。
4、日志记录:尽管有更专门的日志记录库(如logging模块),但在某些简单的情况下,print()函数可以作为一种轻量级的日志记录方式,将重要信息输出到控制台。
5、数据可视化:虽然Python有专门的库(如matplotlib、seaborn等)用于数据可视化,但在某些情况下,你可能只需要简单地将数据打印到控制台以进行初步检查,在这种情况下,你可以使用print()函数与字符串格式化来显示数据的摘要或特定部分。
6、脚本输出:对于自动化脚本或批处理任务,print()函数可以用于在控制台上显示脚本的进度、状态或结果。
7、快速测试:当你想快速测试某个表达式或函数的结果时,可以使用print()函数。
8、交互式环境:在Python的交互式环境(如 IDLE、Jupyter Notebook 或 Python 的 REPL)中,print()函数是查看变量值或执行结果的常用方法。
9、生成简单的文本文件:通过将输出重定向到文件(通过print()函数的file参数),你可以使用print()函数来生成简单的文本文件,这在需要快速创建包含特定数据的文本文件时非常有用。
10、命令行工具:对于简单的命令行工具或脚本,print()函数可以用于显示命令的帮助信息、版本信息或执行结果。
11、异常处理:在异常处理代码中,print()函数可以用于输出异常的详细信息或堆栈跟踪,以帮助开发者定位问题。
注意,虽然print()函数在许多情况下都很有用,但在生产环境的代码中,过度使用print()函数可能会导致性能问题或不必要的输出,在这种情况下,应该考虑使用更专门的日志记录库或调试工具。

二、print函数使用注意事项
在Python中使用print()函数时,需要注意以下事项:
1、避免在循环中过度使用:如果你在一个循环中大量使用print()函数,可能会产生大量的输出,这可能会使控制台变得难以阅读;在调试时,考虑使用条件语句来限制输出,或者只在需要时打印关键信息。
2、不要在生产环境中使用:在生产环境或部署的代码中,应该避免使用print()函数来记录信息或调试问题;相反,应该使用专门的日志记录库(如Python的logging模块)来记录信息,这样你可以更灵活地控制日志的级别、格式和输出位置。
3、注意输出格式:当你需要打印复杂的数据结构(如列表、字典或对象)时,注意输出的格式可能会变得难以阅读,考虑使用格式化字符串、json.dumps()或其他方法来使输出更易于理解。
4、不要打印敏感信息:不要使用print()函数来打印敏感信息,如密码、密钥或用户数据,这些信息如果被意外地记录或显示在控制台上,可能会被恶意用户利用。
5、注意文件参数:如果你使用print()函数的file参数将输出重定向到文件,确保你正确地管理了文件句柄,在写入大量数据或频繁写入时,考虑使用缓冲或异步写入来提高性能。
6、考虑性能影响:虽然print()函数本身的性能开销通常很小,但在某些情况下(如高频率地打印大量数据),它可能会对程序的性能产生影响,在这种情况下,考虑减少打印的频率或只打印关键信息。
7、不要依赖打印进行错误处理:不要依赖print()函数来捕获或处理错误;相反,应该使用Python的异常处理机制(如`try-except`块)来捕获和处理错误,并在必要时记录错误信息。
8、使用f-string进行格式化:Python 3.6及更高版本引入了f-string(格式化字符串字面量),它提供了一种简洁、易读的方式来嵌入表达式和变量到字符串中;与旧的字符串格式化方法(如%操作符或str.format()方法)相比,f-string通常更易于编写和理解。
9、注意换行符和空格:默认情况下,print()函数在每次调用后都会添加一个换行符(\n);如果你不希望添加换行符,可以通过设置end参数来自定义结束字符;同样,你也可以使用sep参数来指定多个值之间的分隔符。
10、避免在函数或类中打印:通常,函数和类应该具有明确的输入和输出,而不是直接打印到控制台,这样做可以使你的代码更易于复用和测试;相反,你可以让函数或类返回结果,并在需要时由调用者来决定如何处理这些结果(包括打印它们)。

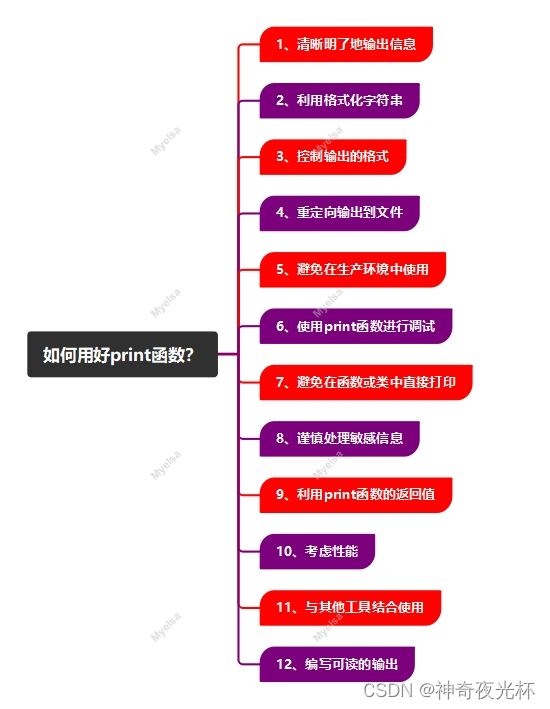
三、如何用好print函数?
要更好地使用Python中的print()函数,你可以遵循以下建议:
1、清晰明了地输出信息:使用有意义的变量名和字符串标签,使输出信息易于理解,避免在输出中包含不必要的噪声或冗长的信息。
2、利用格式化字符串:使用f-string(Python 3.6+)来嵌入变量和表达式,使输出更加灵活和易读,使用`.format()`方法(对于旧版本的Python)来格式化字符串。
3、控制输出的格式:使用`sep`参数来指定多个值之间的分隔符,使用`end`参数来指定在输出结束时添加的内容,而不是默认的换行符。
4、重定向输出到文件:使用`file`参数将输出重定向到文件,而不是控制台,确保正确处理文件句柄,并在完成后关闭它们。
5、避免在生产环境中使用:使用专门的日志记录库(如logging模块)来记录信息和错误,日志记录库提供了更强大的功能,如日志级别、格式化、文件旋转等。
6、使用print函数进行调试:在开发过程中,使用print()函数来输出关键变量的值或检查代码的执行流程;一旦代码稳定并经过测试,应移除或注释掉用于调试的print语句。
7、避免在函数或类中直接打印:让函数或类返回结果,而不是直接打印它们,这样可以使你的代码更易于复用和测试。
8、谨慎处理敏感信息:不要使用print()函数来输出敏感信息,如密码、密钥或用户数据;如果需要在调试过程中输出这些信息,请确保你的工作环境是安全的,并且输出信息不会被不当地记录或共享。
9、利用print函数的返回值:虽然print()函数通常用于输出信息到控制台,但它实际上返回None;在某些情况下,你可能需要在一个表达式中使用print(尽管这通常不推荐),但请记住它不会返回你打印的值。
10、考虑性能:虽然print()函数本身的性能开销通常很小,但在高频率地打印大量数据时,它可能会对程序的性能产生影响;在这种情况下,考虑减少打印的频率或只打印关键信息。
11、与其他工具结合使用:你可以将print与其他工具(如pdb调试器、unittest测试框架等)结合使用,以提高代码的质量和可维护性。
12、编写可读的输出:尝试编写清晰、简洁且易于理解的输出信息;使用适当的缩进、换行和分隔符来组织输出内容。
总之,只有通过遵循这些建议,你才能更好地利用Python中的print()函数来编写更高效、可维护和易于理解的代码。
1、print函数:
1-1、Python:
# 1.函数:print
# 2.功能:用于输出程序结果,默认输出到屏幕,也可以输出到指定文件中
# 3.语法:print(*args, sep=' ', end='\n', file=sys.stdout, flush=False)
# 4.参数:
# 4-1、*args:表示要输出的值,可以是数字、字符串、各种类型的变量等
# 4-2、sep:表示打印值时,各个值之间的间隔符,默认值是一个空格,可以设置为其他的分隔符
# 4-3、end:表示打印完最后一个值需要添加的字符串,用来设定输出语句以什么结尾,默认是换行符“\n”,即打印完会跳到新行,可以换成其他字符串,如end='\t'或end=''等,以实现不换行输出
# 4-4、file:表示输出的目标对象,可以是文件也可以是数据流,默认是sys.stdout;可以设置“file=文件存储对象”,把内容存到文件中
# 4-5、flush:表示是否立刻将输出语句输出到目标对象,flush值为False或者True,默认flush=False,表示输出值会保存在缓存中;当flush=True时,输出值强制写入文件中
# 5.返回值:无返回值
# 6.说明:
# 6-1、sep和end两个参数必须是字符串,或者为None,为None时意味着使用其默认值
# 6-2、sep、end、file、flush都必须以命名参数方式传参,否则会被当做需要输出的对象
# 6-3、如果print()函数不传递任何参数,将会输出end参数的默认值,即打印一个空行
# 7.示例:
# 用dir()函数获取该函数内置的属性和方法
print(dir(print))
# ['__call__', '__class__', '__delattr__', '__dir__', '__doc__', '__eq__', '__format__', '__ge__', '__getattribute__',
# '__getstate__', '__gt__', '__hash__', '__init__', '__init_subclass__', '__le__', '__lt__', '__module__', '__name__',
# '__ne__', '__new__', '__qualname__', '__reduce__', '__reduce_ex__', '__repr__', '__self__', '__setattr__', '__sizeof__',
# '__str__', '__subclasshook__', '__text_signature__']
# 用help()函数获取该函数的文档信息
help(print)
# 应用一:调试和输出信息
# 示例1:简单的输出
print("Hello, Python!")
# Hello, Python!
# 示例2:输出变量的值
x = 10
y = 24
print("x =", x, "y =", y)
# x = 10 y = 24
# 示例3:使用字符串格式化(旧式方法)
name = "Myelsa"
age = 18
print("My name is %s and I'm %d years old." % (name, age))
# My name is Myelsa and I'm 18 years old.
# 示例4:使用字符串格式化(新式方法,f-string,Python 3.6+)
name = "Bruce"
age = 6
print(f"My name is {name} and I'm {age} years old.")
# My name is Bruce and I'm 6 years old.
# 示例5:输出列表或数组的内容
my_list = [3, 5, 6, 8, 10, 11, 24]
print("List contents:", my_list)
# List contents: [3, 5, 6, 8, 10, 11, 24]
# 示例6:输出字典的内容
my_dict = {"name": "Myelsa", "age": 18, "city": "Guangzhou"}
print("Dictionary contents:", my_dict)
# Dictionary contents: {'name': 'Myelsa', 'age': 18, 'city': 'Guangzhou'}
# 示例7:调试:在函数中使用print
def add_numbers(a, b):
print(f"Inside the function, a = {a} and b = {b}")
return a + b
result = add_numbers(5, 7)
print("The result is:", result)
# Inside the function, a = 5 and b = 7
# The result is: 12
# 示例8:使用条件语句进行调试输出
x = 24
if x > 10:
print("x is greater than 10")
else:
print("x is not greater than 10")
# x is greater than 10
# 示例9:在循环中使用print进行调试
for i in range(5):
print(f"Current iteration: {i}")
# Current iteration: 0
# Current iteration: 1
# Current iteration: 2
# Current iteration: 3
# Current iteration: 4
# 示例10:使用print进行异常处理
try:
# 尝试执行一些可能会引发异常的代码
result = 10 / 0
except ZeroDivisionError as e:
print("An error occurred:", str(e))
# An error occurred: division by zero
# 应用二:用户交互
# 示例1:简单的问候语和名字输入
print("Hello, what's your name?")
name = input()
print(f"Hello, {name}!")
# Hello, what's your name?
# myelsa
# Hello, myelsa!
# 示例2:询问年龄并进行判断
print("Please enter your age:")
age = int(input()) # 将输入转换为整数
if age >= 18:
print("You are an adult.")
else:
print("You are not an adult.")
# Please enter your age:
# 15
# You are not an adult.
# 示例3:询问用户的选择
print("Please choose an option:")
print("1. Option A")
print("2. Option B")
choice = input("Enter your choice (1 or 2): ")
if choice == "1":
print("You chose Option A.")
elif choice == "2":
print("You chose Option B.")
else:
print("Invalid choice.")
# Please choose an option:
# 1. Option A
# 2. Option B
# Enter your choice (1 or 2): 1
# You chose Option A.
# 示例4:创建一个简单的计算器
print("Simple calculator:")
num1 = float(input("Enter the first number: "))
num2 = float(input("Enter the second number: "))
operation = input("Enter operation (+, -, *, /): ")
if operation == "+":
result = num1 + num2
elif operation == "-":
result = num1 - num2
elif operation == "*":
result = num1 * num2
elif operation == "/":
if num2 != 0:
result = num1 / num2
else:
print("Error: Division by zero is not allowed.")
result = None
else:
print("Invalid operation.")
result = None
if result is not None:
print(f"The result is: {result}")
# Simple calculator:
# Enter the first number: 10
# Enter the second number: 24
# Enter operation (+, -, *, /): *
# The result is: 240.0
# 示例5:用户登录模拟
username = "admin"
password = "password123"
print("User login:")
input_username = input("Enter username: ")
input_password = input("Enter password: ")
if username == input_username and password == input_password:
print("Login successful!")
else:
print("Invalid username or password.")
# User login:
# Enter username: admin
# Enter password: password123
# Login successful!
# 应用三:格式化输出
# 示例1:使用%操作符进行格式化
name = "Myelsa"
age = 18
print("My name is %s and I'm %d years old." % (name, age))
# My name is Myelsa and I'm 18 years old.
# 示例2:使用str.format()方法进行格式化
name = "Jimmy"
age = 15
print("My name is {} and I'm {} years old.".format(name, age))
# 也可以使用命名参数
print("My name is {name} and I'm {age} years old.".format(name=name, age=age))
# My name is Jimmy and I'm 15 years old.
# My name is Jimmy and I'm 15 years old.
# 示例3:使用f-string(Python 3.6+)
name = "Myelsa"
age = 18
print(f"My name is {name} and I'm {age} years old.")
# 可以在f-string中执行表达式
price = 10.99
quantity = 2
print(f"The total price for {quantity} items is {price * quantity}.")
# My name is Myelsa and I'm 18 years old.
# The total price for 2 items is 21.98.
# 示例4:格式化浮点数
# 使用str.format()指定小数点后的位数
pi = 3.141592653589793
print("Pi with 2 decimal places: {:.2f}".format(pi))
# 使用f-string指定小数点后的位数
print(f"Pi with 2 decimal places: {pi:.2f}")
# Pi with 2 decimal places: 3.14
# Pi with 2 decimal places: 3.14
# 示例5:格式化整数
# 使用str.format()指定整数的宽度和填充字符
number = 1024
print("{:05d}".format(number)) # 输出 '01024',宽度为5,用0填充
# 使用f-string指定整数的宽度和填充字符(但f-string本身不支持直接指定填充字符,需要配合f-string表达式和zfill方法)
print(f"{number:05d}" if isinstance(number, int) else f"{number:0>5}") # 输出 '01024',这里为了演示使用了条件表达式
# 01024
# 01024
# 示例6:格式化日期和时间
from datetime import datetime
now = datetime.now()
print("Current date and time: {}".format(now.strftime("%Y-%m-%d %H:%M:%S")))
# 使用f-string(Python 3.6+)
print(f"Current date and time: {now.strftime('%Y-%m-%d %H:%M:%S')}")
# Current date and time: 2024-05-06 21:43:37
# Current date and time: 2024-05-06 21:43:37
# 应用四:日志记录
# 示例1:简单的日志记录
def log_message(message, level='INFO'):
print(f"[{level.upper()}] {message}")
log_message("This is a log message.")
log_message("This is an error", level='ERROR')
# [INFO] This is a log message.
# [ERROR] This is an error
# 示例2:带有时间戳的日志记录
import datetime
def log_with_timestamp(message, level='INFO'):
timestamp = datetime.datetime.now().strftime('%Y-%m-%d %H:%M:%S')
print(f"[{timestamp}] [{level.upper()}] {message}")
log_with_timestamp("User logged in.")
log_with_timestamp("An error occurred", level='ERROR')
# [2024-05-06 21:47:07] [INFO] User logged in.
# [2024-05-06 21:47:07] [ERROR] An error occurred
# 示例3:将日志写入文件(不推荐仅使用print,但可以作为示例)
import sys
# 将标准输出重定向到一个文件
with open('file.txt', 'w') as f:
sys.stdout = f
print("[INFO] This is a log message written to a file.")
print("[ERROR] An error occurred.")
# 恢复标准输出
sys.stdout = sys.__stdout__
# 示例4:将日志写入文件(使用logging模块)
import logging
# 配置日志记录器
logging.basicConfig(filename='app.log', level=logging.INFO,
format='%(asctime)s - %(levelname)s - %(message)s')
# 记录日志
logging.info("This is an info message.")
logging.error("This is an error message.")
# 应用五:数据可视化
# 示例1:模拟表格输出
data = [
['Name', 'Age', 'Height(cm)'],
['Myelsa', 18, 160],
['Bruce', 6, 120],
['Jimmy', 15, 168]
]
# 打印表头
print(' '.join(map(str, data[0])))
# 打印数据行
for row in data[1:]:
print(' '.join(map(str, row)))
# Name Age Height(cm)
# Myelsa 18 160
# Bruce 6 120
# Jimmy 15 168
# 示例2:模拟条形图输出(使用星号*表示条形的高度)
heights = [165, 180, 175] # 假设这是之前表格中的Height数据
names = ['Myelsa', 'Bruce', 'Jimmy'] # 姓名列表
max_height = max(heights) # 找到最高值以决定条形的最大长度
# 打印条形图
for name, height in zip(names, heights):
print(f'{name}: {"*" * (height * 10 // max_height)}') # 假设每厘米对应10个星号,并根据最大高度进行缩放
# Myelsa: *********
# Bruce: **********
# Jimmy: *********
# 示例3:使用ASCII字符绘制简单的图形(例如直方图)
import random
# 生成一些随机数据
data = [random.randint(0, 10) for _ in range(10)]
# 打印直方图
for i, value in enumerate(data):
print(f'[{i}]: {"#" * value} {" " * (10 - value)}') # 假设每个值对应最多10个字符的宽度
# [0]: #####
# [1]: ##########
# [2]: #######
# [3]: ###
# [4]: ##
# [5]: ######
# [6]: ########
# [7]: ##########
# [8]: ##########
# [9]: ########
# 示例4:绘制简单条形图(使用matplotlib库)
import matplotlib.pyplot as plt
# 数据
names = ['Myelsa', 'Bruce', 'Jimmy']
heights = [160, 120, 168]
# 创建条形图
plt.bar(names, heights)
plt.xlabel('Name')
plt.ylabel('Height(cm)')
plt.title('Height of People')
plt.show()
# 应用六:脚本输出
# 示例1:条件判断输出
score = 85
if score >= 90:
print("你的成绩是优秀!")
elif score >= 70:
print("你的成绩是良好!")
else:
print("你的成绩需要加油!")
# 你的成绩是良好!
# 示例2:使用*args和**kwargs进行可变参数输出
def print_args(*args, **kwargs):
print("位置参数:", args)
print("关键字参数:", kwargs)
print_args(1, 2, 3, name="Myelsa", age=18)
# 位置参数: (1, 2, 3)
# 关键字参数: {'name': 'Myelsa', 'age': 18}
# 示例3:进度条输出(模拟)
import time
def print_progress_bar(iteration, total, prefix='', suffix='', decimals=1, length=100, fill='█', print_end="\r"):
"""
打印进度条
iteration - 当前迭代(Int)
total - 总迭代(Int)
prefix - 前缀字符串
suffix - 后缀字符串
decimals - 进度的小数位数(Int)
length - 进度条长度(Int)
fill - 进度条填充字符(Str)
print_end - 结束字符(Str)
"""
percent = ("{0:." + str(decimals) + "f}").format(100 * (iteration / float(total)))
filled_length = int(length * iteration // total)
bar = fill * filled_length + '-' * (length - filled_length)
print(f'\r{prefix} |{bar}| {percent}% {suffix}', end=print_end)
# Print New Line on Complete
if iteration == total:
print()
# 示例用法
for i in range(101):
time.sleep(0.1) # 模拟耗时任务
print_progress_bar(i, 100, prefix='进度:', suffix='完成', length=50)
# 进度: |██████████████████████████████████████████████████| 100.0% 完成
# 应用七:快速测试
# 示例1:测试文件读写
try:
with open('test.txt', 'r') as file:
content = file.read()
print("文件内容是:", content)
except FileNotFoundError:
print("文件不存在!")
# 文件内容是: 11111
# 2222
# 3333
# 4444
# 5555
# 6666
# 示例2:测试网络请求(使用requests库)
import requests
try:
response = requests.get('https://www.baidu.com.cn')
print("请求成功,状态码:", response.status_code)
print("响应内容:", response.text)
except requests.exceptions.RequestException as e:
print("请求失败:", e)
# 请求成功,状态码: 200
# 响应内容: <!DOCTYPE html>
# <!--STATUS OK--><html> <head><meta http-equiv=content-type content=text/html;charset=utf-8><meta http-equiv=X-UA-Compatible
# content=IE=Edge><meta content=always name=referrer><link rel=stylesheet type=text/css href=http://s1.bdstatic.com/r/www/cache
# /bdorz/baidu.min.css><title>ç¾åº¦ä¸ä¸ï¼ä½ å°±ç¥é</title></head> <body link=#0000cc> <div id=wrapper>
# <div id=head> <div class=head_wrapper> <div class=s_form> <div class=s_form_wrapper> <div id=lg> <img hidefocus=true src=//www.baidu.com/img/bd_logo1.png
# width=270 height=129> </div> <form id=form name=f action=//www.baidu.com/s class=fm> <input type=hidden name=bdorz_come value=1> <input type=hidden name=ie
# value=utf-8> <input type=hidden name=f value=8> <input type=hidden name=rsv_bp value=1> <input type=hidden name=rsv_idx value=1> <input type=hidden name=tn
# value=baidu><span class="bg s_ipt_wr"><input id=kw name=wd class=s_ipt value maxlength=255 autocomplete=off autofocus></span><span class="bg s_btn_wr"><input
# type=submit id=su value=ç¾åº¦ä¸ä¸ class="bg s_btn"></span> </form> </div> </div> <div id=u1> <a href=http://news.baidu.com name=tj_trnews class=mnav>æ°é»</a>
# <a href=http://www.hao123.com name=tj_trhao123 class=mnav>hao123</a> <a href=http://map.baidu.com name=tj_trmap class=mnav>å°å¾</a>
# a href=http://v.baidu.com name=tj_trvideo class=mnav>è§é¢</a> <a href=http://tieba.baidu.com name=tj_trtieba class=mnav>è´´å§</a>
# <noscript> <a href=http://www.baidu.com/bdorz/login.gif?login&tpl=mn&u=http%3A%2F%2Fwww.baidu.com%2f%3fbdorz_come%3d1 name=tj_login
# class=lb>ç»å½</a> </noscript> <script>document.write('<a href="http://www.baidu.com/bdorz/login.gif?login&tpl=mn&u='+
# encodeURIComponent(window.location.href+ (window.location.search === "" ? "?" : "&")+ "bdorz_come=1")+ '" name="tj_login" class="lb">
# ç»å½</a>');</script> <a href=//www.baidu.com/more/ name=tj_briicon class=bri style="display: block;">æ´å¤äº§å</a> </div>
# </div> </div> <div id=ftCon> <div id=ftConw> <p id=lh> <a href=http://home.baidu.com>å³äºç¾åº¦</a> <a href=http://ir.baidu.com>About
# Baidu</a> </p> <p id=cp>©2017 Baidu <a href=http://www.baidu.com/duty/>使ç¨ç¾åº¦åå¿è¯»</a> <a href=http://jianyi.baidu.com/
# class=cp-feedback>æè§åé¦</a> 京ICPè¯030173å· <img src=//www.baidu.com/img/gs.gif> </p> </div> </div> </div> </body> </html>
# 应用八:交互式环境
# 示例1:创建交互式菜单
def show_menu():
print("请选择操作:")
print("1. 查看列表")
print("2. 添加元素")
print("3. 退出")
choice = input("请输入你的选择(1-3): ")
if choice == '1':
print("当前列表内容: ...") # 这里假设有一个列表可以显示
elif choice == '2':
element = input("请输入要添加的元素: ")
# 这里假设有一个列表可以添加元素
print("已添加元素:", element)
elif choice == '3':
print("退出程序")
exit()
else:
print("无效的选择,请重新输入")
show_menu()
show_menu()
# 请选择操作:
# 1. 查看列表
# 2. 添加元素
# 3. 退出
# 请输入你的选择(1-3): 3
# 退出程序
# 应用九:生成简单的文本文件
def write_or_print(text, filename=None):
"""
根据参数,将文本写入文件或打印到控制台
参数:
text (str): 要写入或打印的文本。
filename (str, optional): 文件名(如果提供,则写入文件)。默认为None,表示打印到控制台。
"""
if filename:
with open(filename, 'w', encoding='utf-8') as file:
file.write(text)
print(f"文本已写入文件: {filename}")
else:
print(text)
# 示例用法
text = "Hello, Python!\n这是一个简单的文本文件示例。"
# 打印到控制台
write_or_print(text)
# 写入到文件
write_or_print(text, filename='file.txt')
# Hello, Python!
# 这是一个简单的文本文件示例。
# 文本已写入文件: file.txt
# 应用十:命令行工具
# 示例1:显示欢迎信息和帮助
def main():
print("欢迎使用我的命令行工具!")
print("输入'help'以获取帮助信息。")
# 示例:获取用户输入并执行相应操作
while True:
command = input("> ")
if command == 'help':
print("""
命令列表:
help 显示此帮助信息
quit 退出程序
# 其他命令...
""")
elif command == 'quit':
print("再见!")
break
else:
print("未知命令:", command)
if __name__ == "__main__":
main()
# 欢迎使用我的命令行工具!
# 输入
# 'help'
# 以获取帮助信息。
# > help
#
# 命令列表:
# help
# 显示此帮助信息
# quit
# 退出程序
# # 其他命令...
#
# >
# 示例2:交互式命令行工具(使用argparse库)
import argparse
def main(args):
if args.verbose:
print("Verbose mode is on.")
print(f"Processing file: {args.filename}")
if __name__ == "__main__":
parser = argparse.ArgumentParser(description='一个简单的命令行工具示例')
parser.add_argument('filename', type=str, help='要处理的文件名')
parser.add_argument('--verbose', action='store_true', help='显示详细信息')
args = parser.parse_args()
main(args)
# usage: test1.py [-h] [--verbose] filename
# test1.py: error: the following arguments are required: filename
# 应用十一:异常处理
def divide_numbers(dividend, divisor):
try:
result = dividend / divisor
print(f"结果是: {result}")
except ZeroDivisionError:
print("错误:除数不能为0!")
except Exception as e:
print(f"发生了一个未知错误: {e}")
# 测试函数
try:
divide_numbers(10, 0) # 这将触发ZeroDivisionError
divide_numbers(10, '2') # 这将触发TypeError,因为除数不是数字
divide_numbers(10, 2) # 这将正常工作
except Exception as e:
print(f"在测试函数中捕获到异常: {e}")
# 另一个示例,直接在try块中执行可能引发异常的代码
try:
# 尝试打开一个不存在的文件
with open('nonexistent_file.txt', 'r') as file:
content = file.read()
print(content)
except FileNotFoundError:
print("错误:文件不存在!")
except Exception as e:
print(f"发生了一个未知错误: {e}")
# 错误:除数不能为0!
# 发生了一个未知错误: unsupported operand type(s) for /: 'int' and 'str'
# 结果是: 5.0
# 错误:文件不存在!1-2、VBA:
略,待后补。2、推荐阅读:
2-1、Python-VBA函数之旅-open()函数
Python算法之旅:Algorithm
Python函数之旅:Functions







![[UDS][OTA] 自定义 IntelHEX (IHEX) format read/write library in C](https://img-blog.csdnimg.cn/direct/d5db2a16c7b24cd2838761ea8a4740a8.png)
