OpenCV(Open Source Computer Vision Library)是一个开源的计算机视觉库,它提供了很多函数,这些函数非常高效地实现了计算机视觉算法。
官网:https://opencv.org/
Github: https://github.com/opencv/opencv
Gitcode: https://gitcode.net/opencv/opencv
OpenCV 的应用领域非常广泛,包括图像拼接、图像降噪、产品质检、人机交互、人脸识别、动作识别、动作跟踪、无人驾驶等。
OpenCV 4.5.4版本开始,DNN模块集成了高性能的人脸检测算法(使用模型YuNet,由OpenCV China团队贡献)和人脸识别算法(使用模型SFace,由北京邮电大学邓伟洪教授课题组贡献)。
1. 人脸检测
1.1 接口定义
OpenCV基于深度学习的人脸检测FaceDetectorYN类定义如下
/** @brief DNN-based face detector
model download link: https://github.com/opencv/opencv_zoo/tree/master/models/face_detection_yunet
*/
class CV_EXPORTS_W FaceDetectorYN
{
public:
virtual ~FaceDetectorYN() {}
/** @brief Set the size for the network input, which overwrites the input size of creating model. Call this method when the size of input image does not match the input size when creating model
*
* @param input_size the size of the input image
*/
CV_WRAP virtual void setInputSize(const Size& input_size) = 0;
CV_WRAP virtual Size getInputSize() = 0;
/** @brief Set the score threshold to filter out bounding boxes of score less than the given value
*
* @param score_threshold threshold for filtering out bounding boxes
*/
CV_WRAP virtual void setScoreThreshold(float score_threshold) = 0;
CV_WRAP virtual float getScoreThreshold() = 0;
/** @brief Set the Non-maximum-suppression threshold to suppress bounding boxes that have IoU greater than the given value
*
* @param nms_threshold threshold for NMS operation
*/
CV_WRAP virtual void setNMSThreshold(float nms_threshold) = 0;
CV_WRAP virtual float getNMSThreshold() = 0;
/** @brief Set the number of bounding boxes preserved before NMS
*
* @param top_k the number of bounding boxes to preserve from top rank based on score
*/
CV_WRAP virtual void setTopK(int top_k) = 0;
CV_WRAP virtual int getTopK() = 0;
/** @brief Detects faces in the input image. Following is an example output.
* 
* @param image an image to detect
* @param faces detection results stored in a 2D cv::Mat of shape [num_faces, 15]
* - 0-1: x, y of bbox top left corner
* - 2-3: width, height of bbox
* - 4-5: x, y of right eye (blue point in the example image)
* - 6-7: x, y of left eye (red point in the example image)
* - 8-9: x, y of nose tip (green point in the example image)
* - 10-11: x, y of right corner of mouth (pink point in the example image)
* - 12-13: x, y of left corner of mouth (yellow point in the example image)
* - 14: face score
*/
CV_WRAP virtual int detect(InputArray image, OutputArray faces) = 0;
/** @brief Creates an instance of face detector class with given parameters
*
* @param model the path to the requested model
* @param config the path to the config file for compability, which is not requested for ONNX models
* @param input_size the size of the input image
* @param score_threshold the threshold to filter out bounding boxes of score smaller than the given value
* @param nms_threshold the threshold to suppress bounding boxes of IoU bigger than the given value
* @param top_k keep top K bboxes before NMS
* @param backend_id the id of backend
* @param target_id the id of target device
*/
CV_WRAP static Ptr<FaceDetectorYN> create(const String& model,
const String& config,
const Size& input_size,
float score_threshold = 0.9f,
float nms_threshold = 0.3f,
int top_k = 5000,
int backend_id = 0,
int target_id = 0);
/** @overload
*
* @param framework Name of origin framework
* @param bufferModel A buffer with a content of binary file with weights
* @param bufferConfig A buffer with a content of text file contains network configuration
* @param input_size the size of the input image
* @param score_threshold the threshold to filter out bounding boxes of score smaller than the given value
* @param nms_threshold the threshold to suppress bounding boxes of IoU bigger than the given value
* @param top_k keep top K bboxes before NMS
* @param backend_id the id of backend
* @param target_id the id of target device
*/
CV_WRAP static Ptr<FaceDetectorYN> create(const String& framework,
const std::vector<uchar>& bufferModel,
const std::vector<uchar>& bufferConfig,
const Size& input_size,
float score_threshold = 0.9f,
float nms_threshold = 0.3f,
int top_k = 5000,
int backend_id = 0,
int target_id = 0);
};1.2 性能指标
人脸检测模型YuNet在WIDER Face数据集的验证集中达到了0.8871(Easy AP),0.8710(Medium AP),0.7681(Hard AP);
1.3 C++调用示例代码
// 第一步:导入相关头文件
#include <opencv2/imgproc.hpp>
#include <opencv2/objdetect.hpp>
using namespace cv;
int main() {
        // 模型下载地址:https://github.com/opencv/opencv_zoo/tree/main/models/face_detection_yunet
        String modelPath = "face_detection_yunet_2023mar.onnx";
        // 第二步:读取图像
        Mat img = imread("face.jpg");
        // 第三步:初始化FaceDetectorYN
        Ptr<FaceDetectorYN> faceDetector = FaceDetectorYN::create(modelPath, "", img.size());
        // 第四步:检测人脸并将结果保存到一个Mat中
        Mat faces;
        faceDetector->detect(img, faces);
        // faces是一个nx15的二维Mat,每一行分别是:
        // [x1, y1, w, h, x_re, y_re, x_le, y_le, x_nt, y_nt, x_rcm, y_rcm, x_lcm, y_lcm, score]
        // 其中,x1, y1是人脸框左上角坐标,w和h分别是人脸框的宽和高;
        //      {x, y}_{re, le, nt, rcm, lcm}分别是人脸右眼瞳孔、左眼瞳孔、鼻尖、右嘴角和左嘴角的坐标;
        //       score是该人脸的得分。

        // ...

        return 0;
}
2. 人脸识别
2.1 接口定义
OpenCV基于深度学习的人脸识别FaceRecognizerSF类定义如下
/** @brief DNN-based face recognizer

model download link: https://github.com/opencv/opencv_zoo/tree/master/models/face_recognition_sface
 */
class CV_EXPORTS_W FaceRecognizerSF
{
public:
    virtual ~FaceRecognizerSF() {}

    /** @brief Definition of distance used for calculating the distance between two face features
     */
    enum DisType { FR_COSINE=0, FR_NORM_L2=1 };

    /** @brief Aligning image to put face on the standard position
     *  @param src_img input image
     *  @param face_box the detection result used for indicate face in input image
     *  @param aligned_img output aligned image
     */
    CV_WRAP virtual void alignCrop(InputArray src_img, InputArray face_box, OutputArray aligned_img) const = 0;

    /** @brief Extracting face feature from aligned image
     *  @param aligned_img input aligned image
     *  @param face_feature output face feature
     */
    CV_WRAP virtual void feature(InputArray aligned_img, OutputArray face_feature) = 0;

    /** @brief Calculating the distance between two face features
     *  @param face_feature1 the first input feature
     *  @param face_feature2 the second input feature of the same size and the same type as face_feature1
     *  @param dis_type defining the similarity with optional values "FR_OSINE" or "FR_NORM_L2"
     */
    CV_WRAP virtual double match(InputArray face_feature1, InputArray face_feature2, int dis_type = FaceRecognizerSF::FR_COSINE) const = 0;

    /** @brief Creates an instance of this class with given parameters
     *  @param model the path of the onnx model used for face recognition
     *  @param config the path to the config file for compability, which is not requested for ONNX models
     *  @param backend_id the id of backend
     *  @param target_id the id of target device
     */
    CV_WRAP static Ptr<FaceRecognizerSF> create(const String& model, const String& config, int backend_id = 0, int target_id = 0);
};
2.2 性能指标
人脸识别模型SFace在LFW数据集上达到了99.40%的准确率。
2.3 C++调用示例代码
2.3.1 人脸对齐
将检测到的人脸输入人脸识别模型前,通常需要先进行人脸对齐。人脸对齐利用检测部分提取到的关键点,与给定关键点之间计算变换矩阵,使用仿射变换对人脸进行变换,以减轻人脸尺度、姿态等对人脸特征提取的性能的影响。
// 模型下载地址:https://github.com/opencv/opencv_zoo/tree/master/models/face_recognition_sface
String recog_model_path= "face_recognition_sface_2021dec.onnx";
// 初始化FaceRecognizerSF
Ptr<FaceRecognizerSF> faceRecognizer = FaceRecognizerSF::create(recog_model_path, "");

// 在人脸检测部分的基础上, 对齐检测到的首个人脸(faces.row(0)), 保存至aligned_face。
Mat aligned_face;
faceRecognizer->alignCrop(image, faces.row(0), aligned_face);
2.3.2 人脸特征提取
人脸识别模型以尺寸为3*112*112的人脸图像对齐作为输入,输出维度为128维的人脸特征。
// 在上文的基础上, 获取对齐人脸的特征feature。
Mat feature;
faceRecognizer->feature(aligned_face, feature);
2.3.3 人脸特征比对
对于不同人脸图像的人脸特征,经过人脸特征比对求出特征之间的距离,以确定不同人脸图像是否属于同一身份。当使用consine距离时,值越大,则人脸越相似身份越接近;当使用normL2距离时,值越小,则人脸越相似身份越接近。
// 在上文的基础上, 比对两张人脸的特征feature1,feature2以确认身份。
// 使用consine距离作为指标
const double cosine_similarity_threshold = 0.363;
double cos_score = faceRecognizer->match(feature1, feature2, FaceRecognizerSF::DisType::FR_COSINE);
if (cos_score >= cosine_similarity_threshold)
{
        // the same identity
}
else
{
        // different identities
}

// 使用normL2距离作为指标
const double l2_similarity_threshold = 1.128;
double L2_score = faceRecognizer->match(feature1, feature2, FaceRecognizerSF::DisType::FR_NORM_L2);
if (L2_score <= l2_similarity_threshold)
{
        // the same identity
}
else
{
        // different identities
}
3. 演示Demo
3.1 开发环境
- OpenCV 4.9.0
- Visual Studio 2015
- Windows 10 Pro x64
3.2 功能介绍
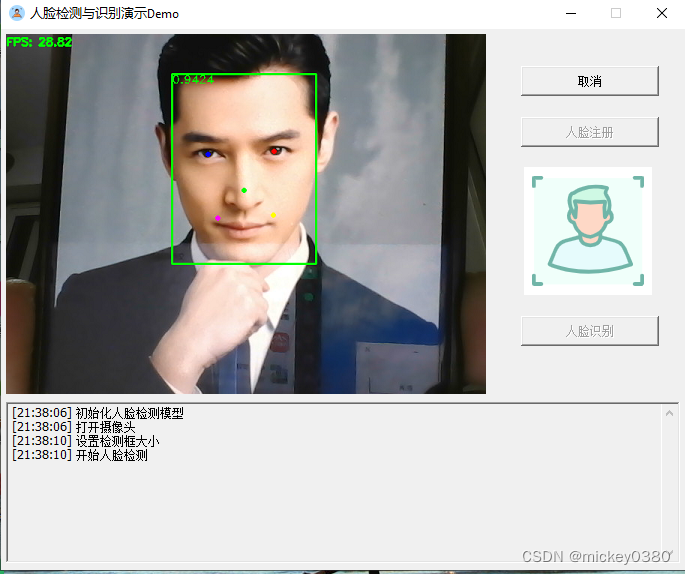
演示程序主界面如下图所示,具有人脸检测、人脸注册和人脸识别等功能。
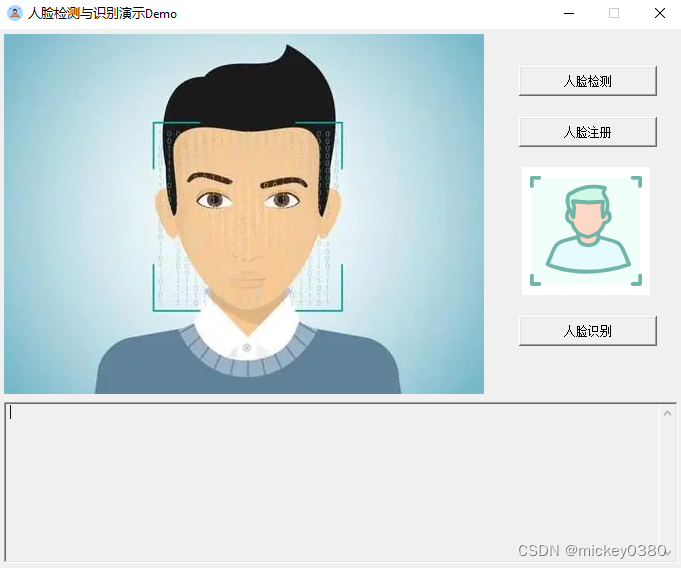
人脸检测:启动摄像头,进行实时人脸检测演示,结果显示在左侧(包括FPS,人脸框、五官坐标、人脸得分)。
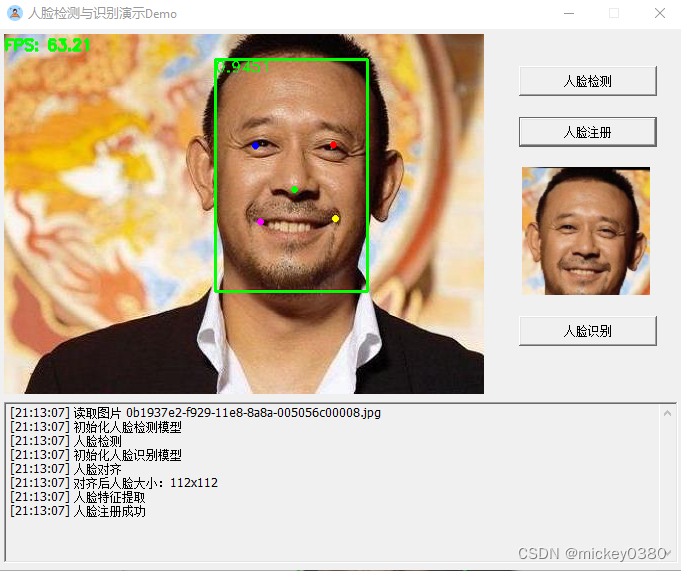
人脸注册:读取一张人脸图片,进行人脸检测、特征提取;左侧显示人脸检测结果,右侧显示对齐后人脸图,并保存人脸特征。
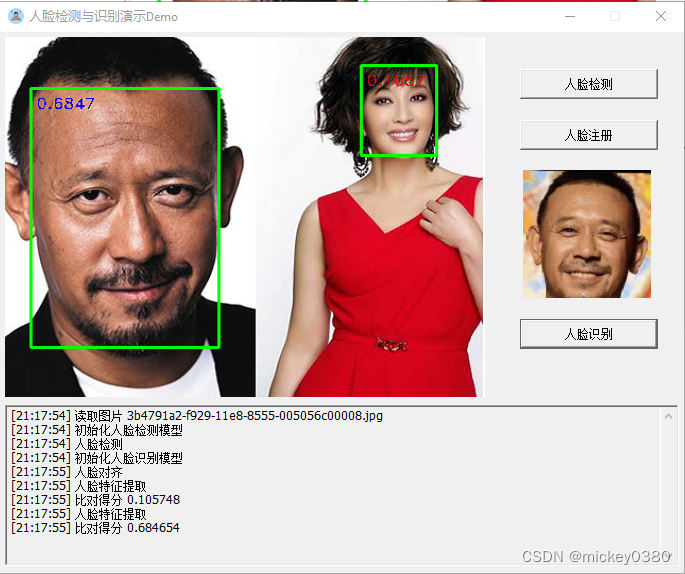
人脸识别:读取一张人脸图片,进行人脸检测、特征提取,并与已存储的注册人脸特性进行比对;结果显示在左侧(其中:蓝色得分认为是同一人,红色得分认为是不同人)。
3.3 下载地址
开发环境:
- Windows 10 pro x64
- Visual Studio 2015
- OpenCV4.9.0
下载地址: OpenCV人脸识别C++代码实现Demo

