vue +antvX6 根据节点与线,动态设置节点坐标生成流程图

news2024/12/24 9:09:45

需求

vue2 + antvX6完成流程图,但只有节点与线,没有节点的坐标,需要根据节点的顺序显示流程图。
需求:

1.根据数据动态生成对应的节点与线;
2.节点不能重叠;
3.节点与线可拖拽;
4.因为线存在重叠可能,所有鼠标移入时线必须高亮显示(红色),鼠标移出复原;
5.要求有对齐线;
6.线不能与节点重叠(先不能穿过节点)。

效果

图片
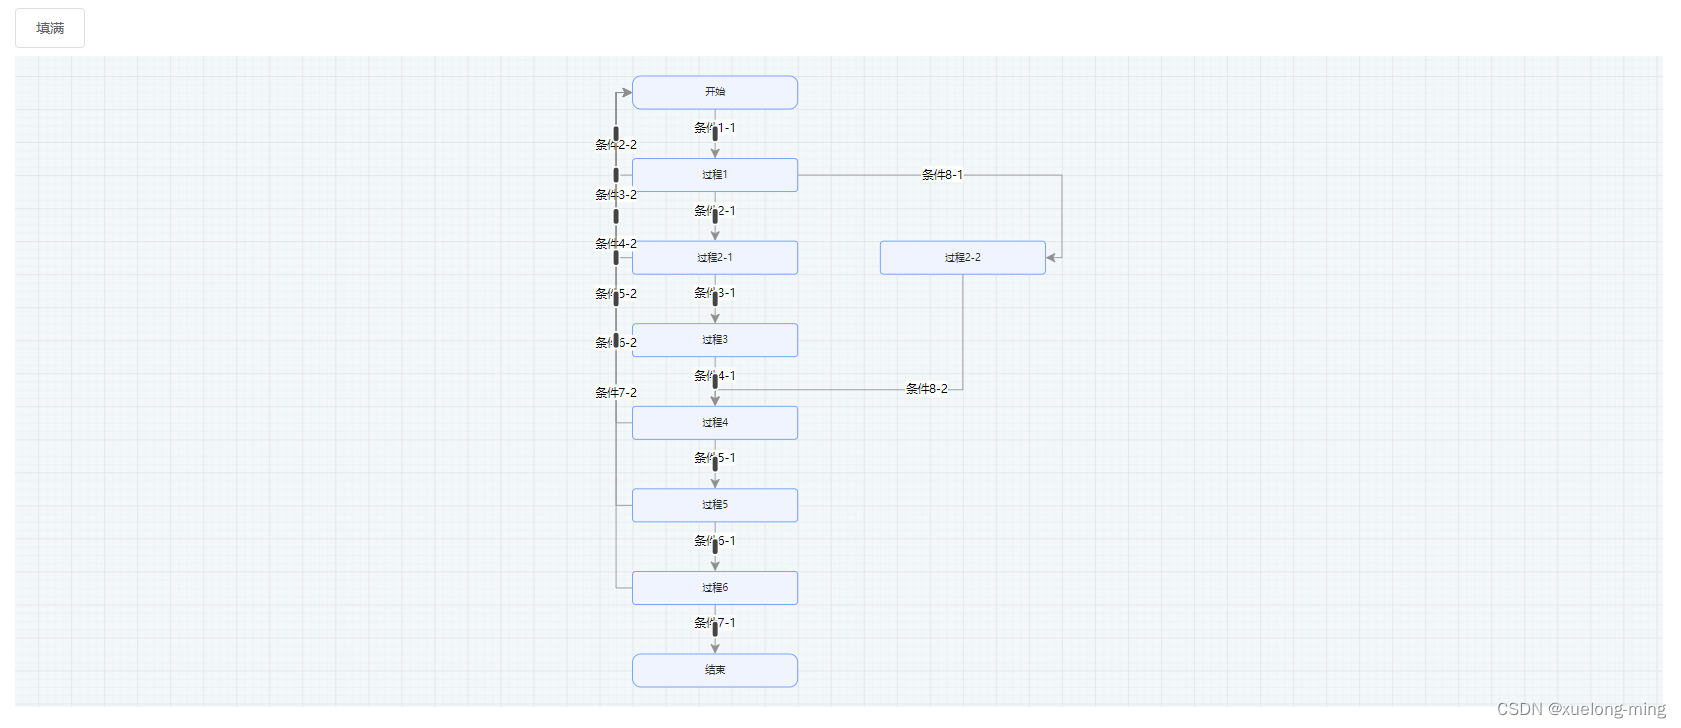
在这里插入图片描述
动图
在这里插入图片描述

参数

{
	"line_data": [ // 线数据
        {
            "name": "条件1-1", // 线名称
            "source_state_id": 6, // 源节点
            "destination_state_id": 5, // 目标节点
            "attribute_type_id": 1 // 成功或失败状态
        },
        {
            "name": "条件2-1",
            "source_state_id": 9,
            "destination_state_id": 6,
            "attribute_type_id": 1
        },
        {
            "name": "条件2-2",
            "source_state_id": 5,
            "destination_state_id": 6,
            "attribute_type_id": 2
        },
        {
            "name": "条件3-1",
            "source_state_id": 10,
            "destination_state_id": 9,
            "attribute_type_id": 1
        },
        {
            "name": "条件3-2",
            "source_state_id": 5,
            "destination_state_id": 9,
            "attribute_type_id": 2
        },
        {
            "name": "条件4-1",
            "source_state_id": 11,
            "destination_state_id": 10,
            "attribute_type_id": 1
        },
        {
            "name": "条件4-2",
            "source_state_id": 5,
            "destination_state_id": 10,
            "attribute_type_id": 2
        },
        {
            "name": "条件5-1",
            "source_state_id": 12,
            "destination_state_id": 11,
            "attribute_type_id": 1
        },
        {
            "name": "条件5-2",
            "source_state_id": 5,
            "destination_state_id": 11,
            "attribute_type_id": 2
        },
        {
            "name": "条件6-1",
            "source_state_id": 13,
            "destination_state_id": 12,
            "attribute_type_id": 1
        },
        {
            "name": "条件6-2",
            "source_state_id": 5,
            "destination_state_id": 12,
            "attribute_type_id": 2
        },
        {
            "name": "条件7-1",
            "source_state_id": 18,
            "destination_state_id": 13,
            "attribute_type_id": 1
        },
        {
            "name": "条件7-2",
            "source_state_id": 5,
            "destination_state_id": 13,
            "attribute_type_id": 2
        },
        {
            "name": "条件8-1",
            "source_state_id": 19,
            "destination_state_id": 6,
            "attribute_type_id": 3
        },
        {
            "name": "条件8-2",
            "source_state_id": 11,
            "destination_state_id": 19,
            "attribute_type_id": 1
        }
    ],
    "node_data": [ // 节点数据
        {
            "id": 1, // 节点id
            "name": "开始", // 节点名称
            "type_id": 1, // 节点状态
            "order_id": 1 // 节点顺序
        },
        {
            "id": 2,
            "name": "过程1",
            "type_id": 0,
            "order_id": 2
        },
        {
            "id": 3,
            "name": "过程2-1",
            "type_id": 0,
            "order_id": 3
        },
        {
            "id": 4,
            "name": "过程2-2",
            "type_id": 0,
            "order_id": 3
        },
        {
            "id": 5,
            "name": "过程3",
            "type_id": 0,
            "order_id": 4
        },
        {
            "id": 6,
            "name": "过程4",
            "type_id": 0,
            "order_id": 5
        },
        {
            "id": 7,
            "name": "过程5",
            "type_id": 0,
            "order_id": 6
        },
        {
            "id": 8,
            "name": "过程6",
            "type_id": 0,
            "order_id": 7
        },
        {
            "id": 9,
            "name": "结束",
            "type_id": 2,
            "order_id": 8
        }
    ]
}

代码

安装插件

1.antvX6
npm install @antv/x6 --save
2.对齐线
npm install @antv/x6-plugin-snapline --save

html代码

<template>
  <div class="info-box">
    <div class="top-box"
         id="top-width">
      <el-button type=""
                 @click="zoomToFit">填满</el-button>
    </div>
    <div class="content-box">
      <div class="container-box">
        <div id="container"></div>
      </div>
    </div>
  </div>
</template>

js代码

<script>
import API from '../api' // 接口
import { Graph } from '@antv/x6' // 引入antvX6
import { Snapline } from '@antv/x6-plugin-snapline' // 引入对齐线
Graph.registerNode( // 设置节点基础样式
  'custom-rect',
  {
    inherit: 'rect',
    width: 200,
    height: 40,
    attrs: {
      body: {
        strokeWidth: 1,
        stroke: '#5F95FF',
        fill: '#EFF4FF'
      },
      text: {
        fontSize: 12,
        fill: '#262626'
      }
    },
    text: {
      fontSize: 12,
      fill: '#262626'
    }
  },
  true
)
export default {
  data() {
    return {
      loading: false,
      graph: null, // 画布实例对象
      data: {
        nodes: [],
        edges: []
      }
    }
  },
  mounted() {
  	// 先初始化画布
    this.initGraph()
  },
  beforeDestroy() {
    // 画布的销毁以及回收
    this.graph.dispose()
    this.graph = null
  },
  methods: {
    // 初始化流程图画布
    initGraph() {
      const container = document.getElementById('container')
      this.graph = new Graph({
        container: container, // 画布容器
        width: container.offsetWidth, // 画布宽
        height: container.offsetHeight, // 画布高
        autoResize: true,
        background: { // 背景
          color: '#F2F7FA'
        },
        panning: {
          enabled: true // 支持滚动放大缩小
        },
        mousewheel: {
          enabled: true,
          modifiers: 'Ctrl', // 按住ctrl按键滚动鼠标滚轮缩放
          factor: 1.1,
          maxScale: 10, // 最大放大
          minScale: 0.05 // 最小缩小
        },
        grid: {
          visible: true, // 渲染网格背景
          type: 'doubleMesh',
          args: [
            {
              color: '#eee', // 主网格线颜色
              thickness: 1 // 主网格线宽度
            },
            {
              color: '#ddd', // 次网格线颜色
              thickness: 1, // 次网格线宽度
              factor: 4 // 主次网格线间隔
            }
          ]
        }
      })
      this.graph.use( // 启用对齐线
        new Snapline({
          enabled: true
        })
      )
      // 鼠标移入线
      this.graph.on('edge:mouseenter', ({ e, edge, view }) => {
        edge.attr({
          line: {
            stroke: 'red',
            strokeWidth: 3
          }
        })
      })
      // 鼠标移出线
      this.graph.on('edge:mouseleave', ({ edge }) => {
        edge.attr({
          line: {
            stroke: '#8f8f8f',
            strokeWidth: 1
          }
        })
      })
    },
    // 获取数据
    init() {
      this.loading = true
      API.getData().then(res => {
        if (res.code === 200) {
          this.setGraphData(res)
        } else {
          this.$message.error(res.msg)
        }
      }).finally(() => {
        this.loading = false
      })
    },
    // 设置画布数据
    setGraphData(data) {
      // const X = document.getElementById('top-width').offsetWidth / 2 - 100 // 居中
      const X = 200
      this.data = {
        nodes: [],
        edges: []
      }
      const obj = {}
      // 转为对象数组 节点有可能顺序相同,顺序相同的配列在同一行
      data.node_data.map(item => {
        if (obj[item.order_id]) {
          obj[item.order_id].push(item)
        } else {
          obj[item.order_id] = []
          obj[item.order_id].push(item)
        }
      })
      // 遍历对象数组  通过遍历数组,将节点数据转为流程图中需要的数据类型
      Object.keys(obj).forEach((key, objIndex) => {
        obj[key].map((item, index) => {
          const node = {
            id: item.id, // 节点id
            shape: 'custom-rect', // 这是上边定义的节点类型
            label: item.name, // 节点名称
            x: X + 300 * index, // 节点x轴坐标 因为存在顺序相同的节点,需要排在同一行,但是y不一样
            y: 40 + 100 * objIndex, // 节点y轴坐标 顺序不同的节点,y轴坐标不同
            attrs: {
              body: { // 这里是区分普通节点与开始结束节点的, 具体看效果图
                rx: item.type_id === 0 ? 4 : 10,
                ry: item.type_id === 0 ? 4 : 10
              }
            }
          }
          this.data.nodes.push(node)
        })
      })
      // 遍历线的数据 通过遍历数组,将线数据转为流程图中需要的数据类型
      data.line_data.map((item, index) => {
        const obj = {
          id: item.id, // 线id
          shape: 'edge', // 类型为线
          source: item.destination_state_id, // 源节点
          target: item.source_state_id, // 目标节点
          labels: [ // 线名称样式
            {
              attrs: {
                label: {
                  text: item.name // 线名称
                }
              },
              position: 0.4 // 名称在线的相对位置(0-1)一般为0.5
            }
          ],
          router: { // 线的路由
            name: 'manhattan', // 智能路由 移动节点时,线自动避免与节点接触
            args: { // 这里根据线的状态来判断线是从源节点的哪里开始,到目标节点的哪里结束
            // 值为1 线从源节点下方开始,到目标节点上方结束 // 值为2 线从源节点左方开始,到目标节点左方结束 // 值其他 线从源节点右方开始,到目标节点右方结束
              startDirections: item.attribute_type_id === 1 ? ['bottom'] : item.attribute_type_id === 2 ? ['left'] : ['right'],
              endDirections: item.attribute_type_id === 1 ? ['top'] : item.attribute_type_id === 2 ? ['left'] : ['right']
            }
          },
          tools: [{
            name: 'segments',
            args: {
              snapRadius: 20,
              attrs: {
                fill: '#444'
              }
            }
          }],
          attrs: { // 线样式
            line: {
              stroke: '#8f8f8f',
              strokeWidth: 1
            }
          }
        }
        this.data.edges.push(obj)
      })
      this.graph.fromJSON(this.data) // 渲染数据 将添加的节点与线画出来
    },
    zoomToFit() {
      this.graph.zoomToFit({
        padding: 20,
        preserveAspectRatio: true,
        maxScale: 1
      })
    }
  }
}
</script>

css代码

<style lang="scss" scoped>
.info-box {
  position: relative;
  width: 100%;
  height: 100%;
  padding: 1rem;
  box-sizing: border-box;

  .top-box {
    width: 100%;
    height: 3rem;
  }
  .content-box {
    width: 100%;
    height: calc(100% - 3rem);
    .container-box {
      width: 100%;
      height: 100%;
    }
  }
}
</style>

本文来自互联网用户投稿,该文观点仅代表作者本人,不代表本站立场。本站仅提供信息存储空间服务,不拥有所有权,不承担相关法律责任。如若转载,请注明出处:http://www.coloradmin.cn/o/1633405.html

如若内容造成侵权/违法违规/事实不符,请联系多彩编程网进行投诉反馈,一经查实,立即删除!

相关文章

渗透之sql注入联合查询的注入

sql注入产生的原因&#xff1a; 由于程序过滤不严谨&#xff0c;导致用户有一些异常输入&#xff0c;最终触发数据库的查询。所以会出现sql注入这个问题。有些恶意的人就会利用这些信息导致数据库泄露。 注意&#xff1a;一般我们存在注入点我们会查询管理员的账号和密码&#…

【C 数据结构】深度优先搜索、广度优先搜索

文章目录 【 1. DFS 深度优先搜索 】1.1 基本原理1.2 C 实现 【 2. BFS 广度优先搜索 】2.1 基本原理2.2 C 实现 【 3. 深度优先生成树、广度优先生成树 】【 4. 深度优先生成森林、广度优先生成森林 】4.1 深度优先生成森林4.2 广度优先生成森林 对存储的图中的顶点进行遍历搜…

P6技巧-关于汇总项目Summarize的使用

前言 不知你在使用P6项目时是否察觉到这么一个有趣的现象&#xff0c;在打开一个项目&#xff08;展开详细任务&#xff09;时&#xff0c;在项目页签下可以看到该项目能反馈此时项目的总体进展及完成时间等内容&#xff0c;而当项目关闭时&#xff0c;其前面所展示的进展信息…

2.1.5 EtherChannel 简介

1、EtherChannel 简介 EtherChannel &#xff08;以太网通道&#xff09;是由 Cisco 公司开发的、应用于交换机之间的多链路捆绑技术。它的基本原理是将两台设备间多条以太网链路捆绑在一起组成一条逻辑链路&#xff0c;形成一个端口通道&#xff08;PortChannel&#xff09;&a…

selenium 4.x入门篇(环境搭建、八大元素定位)

背景 Web自动化测现状 1. 属于 E2E 测试 2. 过去通过点点点 3. 好的测试&#xff0c;还需要记录、调试网页的细节 一、selenium4.x环境搭建 一键搭建 pip3 install webdriver-helper 安装后自动的完成&#xff1a; 1. 查看浏览器的版本号 2. 查询操作系统的类型…

生活服务推出品牌实惠团购,覆盖五一假期“吃喝玩乐”多场景

4月26日&#xff0c;抖音生活服务平台上线“跟着大牌过五一”活动会场&#xff0c;携手22家连锁品牌商家&#xff0c;于“五一”前推出优价团购和时令新品&#xff0c;覆盖“吃喝玩乐”多重购物需求&#xff0c;助力假期消费。同时&#xff0c;伴随各地涌现的文旅热潮&#xff…

VUE的生命周期图和各函数

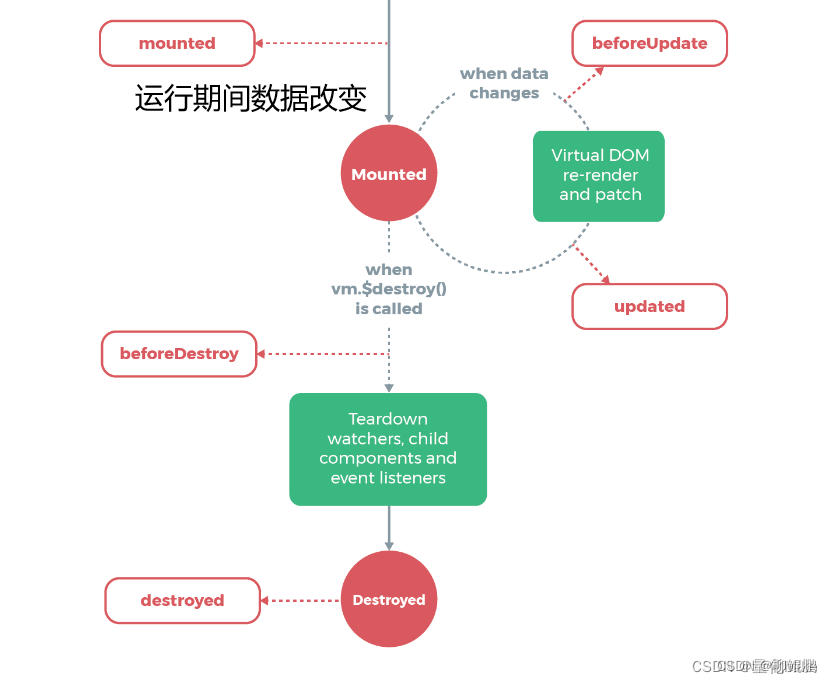
函数 beforeCreate(){ }, created(){ }, beforeMount(){ }, mounted(){ }, beforeUpdate(){ }, updated(){ }, beforeDestroy(){ }, destroyed(){ } 创建时生命周期图 运行时生命周期图

Linux vi\vim编辑器

vi/vim编辑器 一、vi\vim 编辑器的三种工作模式1.命令模式&#xff08;Command mode&#xff09;2.输入模式&#xff08;Insert mode&#xff09;3.底线命令模式&#xff08;Last line mode&#xff09; 二、参考 vi\vim 是 visual interface 的简称&#xff0c;是 Linux 中最经…

docker 虚拟化与docker的概念

一、云计算的三种服务模式 laas、pass、saas 1.1 IaaS: Infrastructure-as-a-Service&#xff08;基础设施即服务&#xff09; 第一层叫做IaaS&#xff0c;有时候也叫做Hardware-as-a-Service&#xff0c;几年前如果你想在办公室或者公司的网站上运行一些企业应用&#xff0c…

Linux网络-文件传输协议之FTP服务(附带命令及截图)

目录 一.FTP简介 二.FTP的数据模式 1.主动模式 2.被动模式 3.两种模式比较 三.安装配置vsftpd 1.安装vsftpd 1.1.安装前关闭防火墙 1.2.安装vsftpd 1.3.查看 1.4.备份 2.配置 3.重启后生效 四.相关实验 1.以win为例 1.1.设置并测试测试连通性 1.2.在终端里创建…

【人工智能基础】聚类实验分析

实验环境&#xff1a;anaconda、jupyter notebook、spyder 实现用到的类库&#xff1a;numpy、matplotlib、scikit-learn k均值聚类&#xff08;K-MEANS&#xff09; k均值聚类的原理&#xff1a; 选定k个聚类中心把数据集中距离聚类中心i最近的点都归属到一个簇根据每个簇中…

【Linux开发 第十二篇】搭建JavaEE环境

搭建开发环境 搭建javaEE环境 搭建javaEE环境 在Linux下开发JavaEE需要安装软件包&#xff1a; 安装jdk 安装步骤&#xff1a; 在opt目录下创建jdk目录通过xftp上床到jdk目录中进入到jdk目录中&#xff0c;解压jdk压缩包在/usr/local下创建java目录将解压完成的jdk文件移动…

Docker的介绍及应用

1.什么是Docker 我们在部署大型项目的时候&#xff0c;肯定会遇到这种问题&#xff0c;大学项目组件较多&#xff0c;运行环境复杂&#xff0c;部署时会碰到一些问题&#xff1a;例如node、redis、mysql等这些应用都有自己的依赖和函数库。这种复杂的依赖关系很容易出现兼容问…

笔试刷题-Day11

提示&#xff1a;文章写完后&#xff0c;目录可以自动生成&#xff0c;如何生成可参考右边的帮助文档 一、游游的水果大礼包 题目链接&#xff1a;https://ac.nowcoder.com/acm/problem/255193 类型&#xff1a;求一个表达式的最值&#xff08;并不是贪心,因为该题条件太少&…

毕业设计注意事项(嘉庚学院2024届更新中)

1.开题 根据学院发的开题报告模板完成&#xff0c;其中大纲部分可参考资料。 2.毕设以及实习 2.1 毕设 根据资料中的毕设评价标准&#xff0c;对照工作量 2.2 实习材料提交 2.2.1 校外实习 实习前&#xff1a;根据学院要求&#xff0c;填写好实习承诺书&#xff0c;实习单位…

贝叶斯统计实战:Python引领的现代数据分析之旅

贝叶斯统计这个名字取自长老会牧师兼业余数学家托马斯贝叶斯(Thomas Bayes&#xff0c;1702—1761)&#xff0c;他最先推导出了贝叶斯定理&#xff0c;该定理于其逝世后的1763年发表。但真正开发贝叶斯方法的第一人是Pierre-Simon Laplace(1749—1827)&#xff0c;因此将其称为…

清华同方电脑c盘满了怎么清理?别慌,学会这几个实用技巧

随着日常使用电脑&#xff0c;C盘&#xff08;通常是系统盘&#xff09;往往会积累大量的文件、程序和系统缓存&#xff0c;导致磁盘空间逐渐减少。当C盘空间不足时&#xff0c;电脑的性能可能会受到影响&#xff0c;甚至导致一些程序无法正常运行。对于清华同方电脑的用户来说…

2000.1-2023.8中国经济政策不确定性指数数据(日度、月度)

2000.1-2023.8中国经济政策不确定性指数数据&#xff08;日度、月度&#xff09; 1、时间&#xff1a;日度&#xff1a;2001.1.1-2022.06.17&#xff0c;月度2000.1-2023.8 2、指标&#xff1a;CNEPU&#xff08;经济政策不确定性指数&#xff09; 3、来源&#xff1a;China…

[BJDCTF 2020]base??(古典密码)

题目&#xff1a; 从题目我们看出dict是一个python的字典&#xff0c;但与原始的base64的表不同&#xff0c;所以我们想到通过替换原始的表&#xff0c;来对密文解密。 my_dict{0: J, 1: K, 2: L, 3: M, 4: N, 5: O, 6: x, 7: y, 8: U, 9: V, 10: z, 11: A, 12: B, 13: C, 14:…

2024五一杯ABC题资料合集+代码+参考论文!!!

一.赛题思路 (赛题出来以后第一时间在群内分享) 二.比赛日期和时间 比赛开始时间:2024年5月1日(周三)10;00 比赛结束时间:2024年5月4日(周六&#xff09;12:00 三.将在明天分享的资料合集如下 4.我们这边会分享22年的题目完整全部的过程 5.数学建模的29个通用模型及MATLAB…