成果展示:

1.前期准备
(1)在配置文件中添加权限及启动页面顺序
①展开工程,打开app下方的AndroidManifest.xml,添加权限,如下:
<uses-permission android:name="android.permission.CAMERA"/>
<uses-permission android:name="android.permission.WRITE_EXTERNAL_STORAGE"/>

② 依旧在AndroidManifest.xml文件中添加启动页面顺序的功能代码
<?xml version="1.0" encoding="utf-8"?>
<manifest xmlns:android="http://schemas.android.com/apk/res/android"
package="com.example.ts_menu"> //这里注意修改成自己创建的包名
<uses-permission android:name="android.permission.CAMERA" />
<uses-permission android:name="android.permission.WRITE_EXTERNAL_STORAGE" />
<uses-permission android:name="android.permission.READ_EXTERNAL_STORAGE"/>
<application
android:allowBackup="true"
android:icon="@mipmap/ic_launcher"
android:label="@string/app_name"
android:roundIcon="@mipmap/ic_launcher_round"
android:supportsRtl="true"
android:theme="@style/AppTheme">
<activity android:name=".AddInfoActivity"></activity>
<activity android:name=".LoginActivity">
<intent-filter>
<action android:name="android.intent.action.MAIN" />
<category android:name="android.intent.category.LAUNCHER" />
</intent-filter>
</activity>
<activity android:name=".MainActivity">
</activity>
</application>
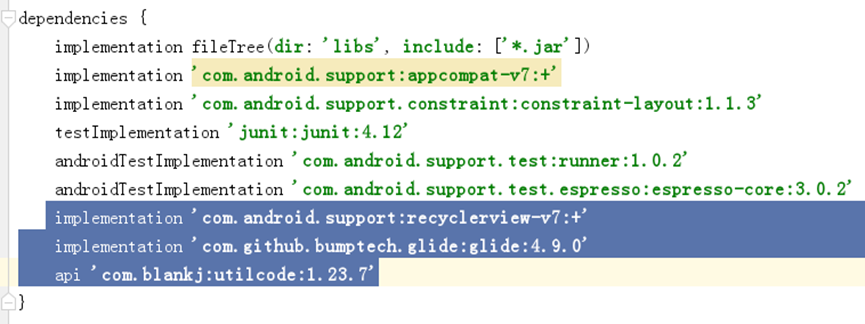
</manifest>(2)添加依赖
展开工程,打开app下方的build.gradle ,添加依赖,如下:依赖添加好之后,要记着同步,在页面右上角的位置单击:Sync Now 即可。
implementation 'com.android.support:recyclerview-v7:+'
implementation 'com.github.bumptech.glide:glide:4.9.0'
api 'com.blankj:utilcode:1.23.7'
(3)素材
一共5张图片,粘贴到工程的drawable文件夹下来,其中bgone.png,bgthree.jpg两个图片是登录界面和信息添加界面的背景,buttonbg.png,savebg.png图片是添加备忘录按钮和保存按钮的背景,另外一张背景图片是sunshine.jpg是一张默认显示的照片。选择你自己喜欢的图片添加进去吧!
2.所需的布局文件

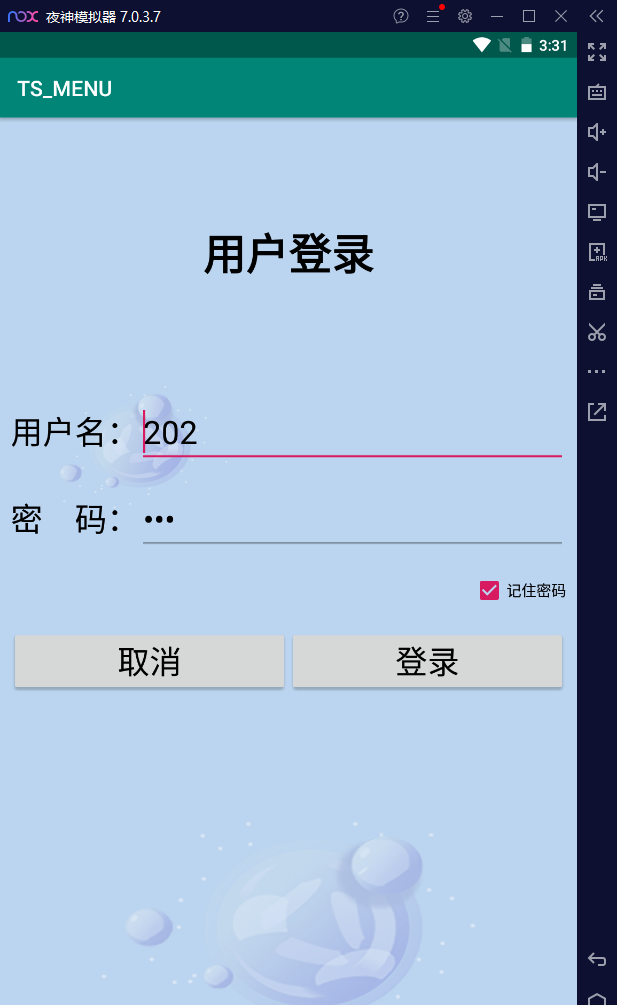
2.1 activity_login.xml
登录布局界面的实现
<?xml version="1.0" encoding="utf-8"?>
<LinearLayout xmlns:android="http://schemas.android.com/apk/res/android"
    xmlns:app="http://schemas.android.com/apk/res-auto"
    xmlns:tools="http://schemas.android.com/tools"
    android:layout_width="match_parent"
    android:layout_height="match_parent"
    android:orientation="vertical"
    android:background="@drawable/bgone"
    tools:context=".LoginActivity">
    <TextView
        android:layout_width="match_parent"
        android:layout_height="wrap_content"
        android:text="用户登录"
        android:textStyle="bold"
        android:textColor="#000000"
        android:textSize="40sp"
        android:layout_margin="100dp"
        android:gravity="center"/>

    <LinearLayout
        android:layout_width="match_parent"
        android:layout_height="wrap_content"
        android:orientation="horizontal"
        android:layout_margin="10dp">

        <TextView
            android:layout_width="wrap_content"
            android:layout_height="wrap_content"
            android:text="用户名:"
            android:textColor="#000000"
            android:textSize="30sp"        />
        <EditText
            android:id="@+id/editText_inputname"
            android:layout_width="match_parent"
            android:layout_height="wrap_content"
            android:hint="请输入用户名"
            android:textColor="#000000"
            android:textSize="30sp"        />
    </LinearLayout>

    <LinearLayout
        android:layout_width="match_parent"
        android:layout_height="wrap_content"
        android:orientation="horizontal"
        android:layout_margin="10dp">

        <TextView
            android:layout_width="wrap_content"
            android:layout_height="wrap_content"
            android:text="密    码:"
            android:textColor="#000000"
            android:textSize="30sp"        />
        <EditText
            android:id="@+id/editText_inputpwd"
            android:layout_width="match_parent"
            android:layout_height="wrap_content"
            android:hint="请输入密码"
            android:textColor="#000000"
            android:inputType="textPassword"
            android:textSize="30sp"        />
    </LinearLayout>

    <CheckBox
        android:id="@+id/checkBox_reme"
        android:layout_width="wrap_content"
        android:layout_height="wrap_content"
        android:text="记住密码"
        android:layout_gravity="right"
        android:layout_margin="10dp"/>


    <LinearLayout
        android:layout_width="match_parent"
        android:layout_height="wrap_content"
        android:orientation="horizontal"
        android:layout_margin="10dp">

        <Button
            android:layout_width="wrap_content"
            android:layout_height="wrap_content"
            android:text="取消"
            android:textColor="#000000"
            android:textSize="30sp"
            android:layout_weight="1"/>
        <Button
            android:id="@+id/button_login"
            android:layout_width="wrap_content"
            android:layout_height="wrap_content"
            android:text="登录"
            android:textColor="#000000"
            android:textSize="30sp"
            android:layout_weight="1"/>
    </LinearLayout>
</LinearLayout>
2.2 activity_main.xml文件代码:
添加备忘录界面
<?xml version="1.0" encoding="utf-8"?>
<LinearLayout xmlns:android="http://schemas.android.com/apk/res/android"
xmlns:app="http://schemas.android.com/apk/res-auto"
xmlns:tools="http://schemas.android.com/tools"
android:layout_width="match_parent"
android:layout_height="match_parent"
android:orientation="vertical"
tools:context=".MainActivity">
<TextView
android:layout_width="wrap_content"
android:layout_height="wrap_content"
android:text="愿这小小的备忘录,记下我生活中的点点滴滴"
android:textStyle="bold"
android:textColor="#000000"
android:layout_gravity="center"
android:layout_margin="10dp" />
<Button
android:id="@+id/button_add"
android:layout_width="wrap_content"
android:layout_height="wrap_content"
android:text="添加备忘录"
android:textStyle="bold"
android:textColor="#000000"
android:layout_gravity="right"
android:background="@drawable/buttonbg"
android:layout_margin="10dp" />
<android.support.v7.widget.RecyclerView
android:id="@+id/recy_view"
android:layout_width="match_parent"
android:layout_height="wrap_content"/>
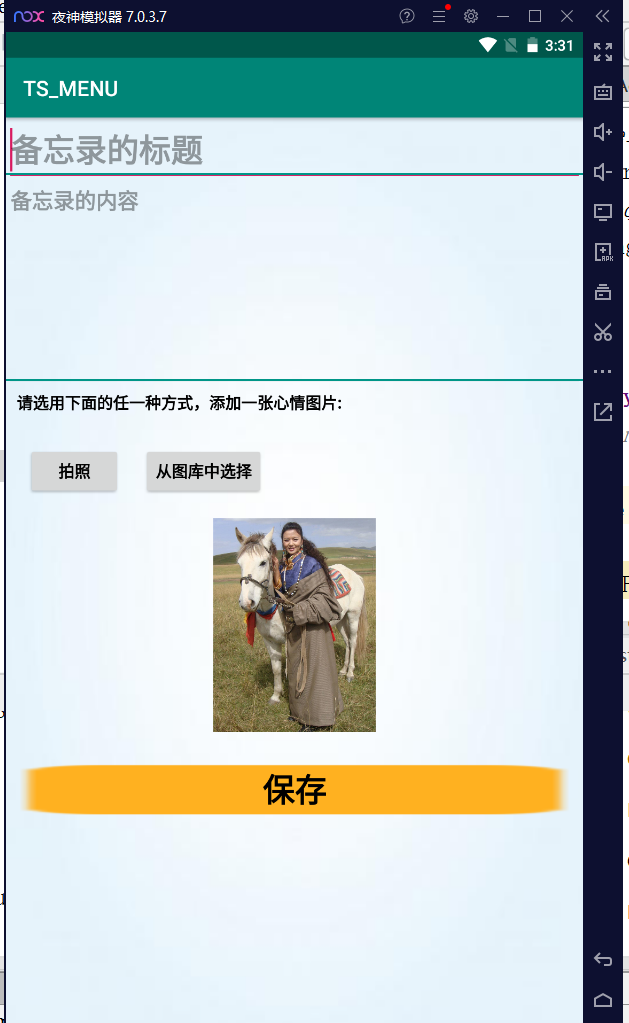
</LinearLayout>2.3 activity_add_info.xml文件代码:
备忘录信息添加布局界面
<?xml version="1.0" encoding="utf-8"?>
<LinearLayout xmlns:android="http://schemas.android.com/apk/res/android"
    xmlns:app="http://schemas.android.com/apk/res-auto"
    xmlns:tools="http://schemas.android.com/tools"
    android:layout_width="match_parent"
    android:layout_height="match_parent"
    android:orientation="vertical"
    android:background="@drawable/bgthree"
    tools:context=".AddInfoActivity">
    <EditText
        android:id="@+id/editText_title"
        android:layout_width="match_parent"
        android:layout_height="wrap_content"
        android:hint="备忘录的标题"
        android:textStyle="bold"
        android:textColor="#000000"
        android:textSize="30sp"/>
    <View
        android:layout_width="match_parent"
        android:layout_height="2dp"
        android:background="#009688"
        android:layout_marginTop="-10dp"/>
    <EditText
        android:id="@+id/editText_content"
        android:layout_width="match_parent"
        android:layout_height="200dp"
        android:hint="备忘录的内容"
        android:textStyle="bold"
        android:textColor="#000000"
        android:textSize="20sp"
        android:gravity="top"/>
    <View
        android:layout_width="match_parent"
        android:layout_height="2dp"
        android:background="#009688"
        android:layout_marginTop="-10dp"/>
    <TextView
        android:layout_width="match_parent"
        android:layout_height="wrap_content"
        android:text="请选用下面的任一种方式,添加一张心情图片:"
        android:textStyle="bold"
        android:textColor="#000000"
        android:textSize="15sp"
        android:gravity="top"
        android:layout_margin="10dp"/>
    <LinearLayout
        android:layout_width="match_parent"
        android:layout_height="wrap_content"
        android:orientation="horizontal"
        android:layout_margin="10dp">
        <Button
            android:id="@+id/button_camera"
            android:layout_width="wrap_content"
            android:layout_height="wrap_content"
            android:text="拍照"
            android:textStyle="bold"
            android:textColor="#000000"
            android:textSize="15sp"
            android:layout_margin="10dp"/>
        <Button
            android:id="@+id/button_photo"
            android:layout_width="wrap_content"
            android:layout_height="wrap_content"
            android:text="从图库中选择"
            android:textStyle="bold"
            android:textColor="#000000"
            android:textSize="15sp"
            android:layout_margin="10dp"/>
    </LinearLayout>
    <ImageView
        android:id="@+id/imageView_preview"
        android:layout_width="wrap_content"
        android:layout_height="200dp"
        android:src="@drawable/sunshine"
        android:layout_marginBottom="20dp"
        android:layout_gravity="center"/>

    <Button
        android:id="@+id/button_save"
        android:layout_width="match_parent"
        android:layout_height="wrap_content"
        android:text="保存"
        android:textStyle="bold"
        android:textColor="#000000"
        android:textSize="30sp"
        android:background="@drawable/savebg"
        android:layout_margin="10dp"/>
</LinearLayout>
2.4 recy_item.xml文件代码:
主界面--子布局界面
<?xml version="1.0" encoding="utf-8"?>
<LinearLayout xmlns:android="http://schemas.android.com/apk/res/android"
android:orientation="horizontal"
android:layout_width="match_parent"
android:layout_height="wrap_content"
android:background="#7AECCC"
android:id="@+id/item_layout"
android:layout_margin="5dp" >
<LinearLayout
android:layout_width="wrap_content"
android:layout_height="wrap_content"
android:orientation="vertical"
android:layout_gravity="center"
android:layout_weight="1"
android:layout_margin="5dp"
>
<TextView
android:id="@+id/item_title"
android:layout_width="match_parent"
android:layout_height="wrap_content"
android:text="标题"
android:textSize="20sp"
android:textStyle="bold"
android:textColor="#000000"/>
<TextView
android:id="@+id/item_content"
android:layout_width="wrap_content"
android:layout_height="wrap_content"
android:text="内容"
android:textColor="#000000"/>
</LinearLayout>
<LinearLayout
android:layout_width="wrap_content"
android:layout_height="wrap_content"
android:orientation="vertical"
android:layout_margin="5dp">
<ImageView
android:id="@+id/item_image"
android:layout_width="100dp"
android:layout_height="100dp"
android:src="@mipmap/ic_launcher_round"/>
<TextView
android:id="@+id/item_time"
android:layout_width="wrap_content"
android:layout_height="wrap_content"
android:text="时间"
android:textColor="#000000"
android:layout_gravity="center"/>
</LinearLayout>
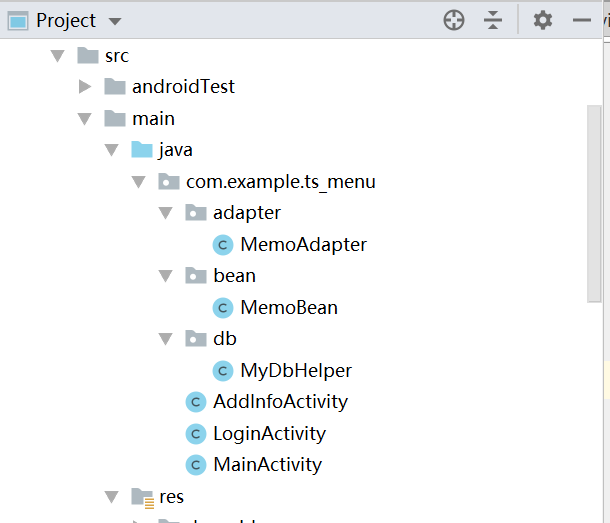
</LinearLayout>3.所需的java类文件
以下是所需要添加的package,及java类文件。
package所需要添加的文件有adapter、bean、db三个package包。
java类文件除了开始的主文件MainActivity,还需添加MemoAdapter、MemoBean、MydbHelper、AddInfoActivity、LoginActivity5个java类文件。
3.1 MemoAdapter文件代码:
备忘录的自定义适配器功能代码
package com.example.ts_menu.adapter;
import android.app.AlertDialog;
import android.content.Context;
import android.content.DialogInterface;
import android.database.sqlite.SQLiteDatabase;
import android.graphics.Color;
import android.graphics.drawable.GradientDrawable;
import android.os.Build;

import android.view.LayoutInflater;
import android.view.View;
import android.view.ViewGroup;
import android.widget.ImageView;
import android.widget.LinearLayout;
import android.widget.TextView;

import androidx.annotation.NonNull;
import androidx.annotation.RequiresApi;
import androidx.recyclerview.widget.RecyclerView;

import com.bumptech.glide.Glide;
import com.example.ts_menu.R;
import com.example.ts_menu.bean.MemoBean;
import com.example.ts_menu.db.MyDbHelper;


import java.util.List;
import java.util.Random;
//1 类文件后面添加泛型
//2 鼠标定位类文件行红色波浪线处,Alt+Enter键:添加未实现的方法
//3 鼠标定位类文件行ViewHolder处,Alt+Enter键:添加内部类
//4 鼠标定位界面最下方内部类ViewHolder处,添加extends  RecyclerView.ViewHolder
//5 鼠标定位界面最下方内部类ViewHolder红色波浪线处,Alt+Enter键:添加构造方法
//6 定义两个对象:上下文环境和数组
//7 定义两个对象下方的空白处:Alt+Insert键,添加适配器的构造方法

public class MemoAdapter extends RecyclerView.Adapter<MemoAdapter.ViewHolder>  {
    private Context mcontext;
    private List<MemoBean> arr1;
    private MyDbHelper mhelper1;
    private SQLiteDatabase db;

    public MemoAdapter(Context mcontext, List<MemoBean> arr1) {
        this.mcontext = mcontext;
        this.arr1 = arr1;
    }

    //负责加载item布局
    @NonNull
    @Override
    public MemoAdapter.ViewHolder onCreateViewHolder(@NonNull ViewGroup parent, int i) {
        View view= LayoutInflater.from(mcontext).inflate(R.layout.recy_item,parent,false);
        ViewHolder mholder=new ViewHolder(view);
        return mholder;
    }


    //负责加载item的数据
    @RequiresApi(api = Build.VERSION_CODES.JELLY_BEAN)
    @Override
    public void onBindViewHolder(@NonNull MemoAdapter.ViewHolder mholder, final int i) {
        final MemoBean memoBean=arr1.get(i);
        mholder.item_title.setText(memoBean.getTitle());
        mholder.item_content.setText(memoBean.getContent());
        mholder.item_time.setText(memoBean.getTime());
        Glide.with(mcontext).load(memoBean.getImgpath()).into(mholder.item_img);

        // 完善:设置RecyclerView中每一个子项的颜色和形状
        Random random = new Random();
        int color = Color.argb(255, random.nextInt(256), random.nextInt(256), random.nextInt(256));
        GradientDrawable gradientDrawable = new GradientDrawable();
        gradientDrawable.setShape(GradientDrawable.RECTANGLE);//形状
        gradientDrawable.setCornerRadius(10f);//设置圆角Radius
        gradientDrawable.setColor(color);//颜色
        mholder.item_layout.setBackground(gradientDrawable);//设置为background

        //完善:单击其中的一个子项,弹出删除功能
        mholder.item_layout.setOnClickListener(new View.OnClickListener() {
            @Override
            public void onClick(View view) {
                //弹出对话框,删除
                AlertDialog.Builder dialog=new AlertDialog.Builder(mcontext);
                dialog.setMessage("确定删除吗?");
                dialog.setPositiveButton("确定", new DialogInterface.OnClickListener() {
                    @Override
                    public void onClick(DialogInterface dialogInterface, int abc) {
                        //从数据库当中删除掉
                        mhelper1= new MyDbHelper(mcontext);
                        db=mhelper1.getWritableDatabase();
                        db.delete("tb_memory","title=?",new String[]{arr1.get(i).getTitle()});
                        arr1.remove(i);
                        notifyItemRemoved(i);
                        dialogInterface.dismiss();

                    }
                });
                dialog.setNegativeButton("取消",null);
                dialog.setCancelable(false);
                dialog.create();
                dialog.show();

            }
        });

    }

    //recyView一共有多少个子项
    @Override
    public int getItemCount() {
        return arr1.size();
    }

    public class ViewHolder  extends  RecyclerView.ViewHolder{
        TextView item_title,item_content,item_time;
        ImageView item_img;
        LinearLayout item_layout;
        public ViewHolder(@NonNull View itemView) {
            super(itemView);
            item_title=itemView.findViewById(R.id.item_title);
            item_content=itemView.findViewById(R.id.item_content);
            item_img=itemView.findViewById(R.id.item_image);
            item_time=itemView.findViewById(R.id.item_time);
            item_layout=itemView.findViewById(R.id.item_layout);

        }
    }
}
3.2 MemoBean文件代码:
一个javabean文件,为了存储备忘录的信息
package com.example.ts_menu.bean;

public class MemoBean {
        private  String title;
        private String content;
        private String imgpath;
        private String time;

        public MemoBean(String title, String content, String imgpath, String time) {
            this.title = title;
            this.content = content;
            this.imgpath = imgpath;
            this.time = time;
        }

        public String getTitle() {
            return title;
        }

        public void setTitle(String title) {
            this.title = title;
        }

        public String getContent() {
            return content;
        }

        public void setContent(String content) {
            this.content = content;
        }

        public String getImgpath() {
            return imgpath;
        }

        public void setImgpath(String imgpath) {
            this.imgpath = imgpath;
        }

        public String getTime() {
            return time;
        }

        public void setTime(String time) {
            this.time = time;
        }
    }
3.3 MydbHelper文件代码:
数据库文件
package com.example.ts_menu.db;

import android.content.Context;
import android.database.sqlite.SQLiteDatabase;
import android.database.sqlite.SQLiteOpenHelper;

public class MyDbHelper extends SQLiteOpenHelper {
    private  static String DBNAME="zsmemo.db";
    private  static int VERSION=1;
    //构造方法
    public MyDbHelper( Context context) {
        super(context, DBNAME, null, VERSION);
    }
    // 创建数据库
    @Override
    public void onCreate(SQLiteDatabase db) {
        //创建数据表
        db.execSQL("create table tb_memory(_id Integer primary key,title String (200),content String (2000),imgpath String (200),mtime String (50))");
    }
    //升级数据库
    @Override
    public void onUpgrade(SQLiteDatabase sqLiteDatabase, int i, int i1) {
    }
}
3.4 AddInfoActivity文件代码:
拍照功能直接闪退:
if(Build.VERSION.SDK_INT>=Build.VERSION_CODES.N)
{
    StrictMode.VmPolicy.Builder builder=new StrictMode.VmPolicy.Builder();
    StrictMode.setVmPolicy(builder.build());
}
使用上述代码防止闪退。
在拍照功能时应该将保存路径代码改为tmp_path=Environment.getExternalStoragePublicDirectory(Environment.DIRECTORY_DCIM).getAbsolutePath()+"/image"+randtime+".jpg";
有效防止拍照后确定不了问题。
package com.example.ts_menu;
import android.content.ContentValues;
import android.content.Intent;
import android.database.sqlite.SQLiteDatabase;
import android.net.Uri;
import android.os.Environment;
import android.provider.MediaStore;

import android.os.Bundle;
import android.text.format.Time;
import android.view.View;
import android.widget.Button;
import android.widget.EditText;
import android.widget.ImageView;
import android.widget.Toast;

import androidx.annotation.Nullable;
import androidx.appcompat.app.AppCompatActivity;

import com.blankj.utilcode.util.UriUtils;
import com.bumptech.glide.Glide;
import com.example.ts_menu.db.MyDbHelper;
import com.example.ts_menu.db.MyDbHelper;

import java.io.File;
import java.io.IOException;

public class AddInfoActivity extends AppCompatActivity {
    //定义对象
    EditText edit_title,edit_content;
    Button btn_camera,btn_photo,btn_save;
    ImageView img_preview;
    String tmp_path,disp_path;
    MyDbHelper mhelper;
    SQLiteDatabase db;

    @Override
    protected void onCreate(Bundle savedInstanceState) {
        super.onCreate(savedInstanceState);
        setContentView(R.layout.activity_add_info);
        //1 绑定控件
        initView();

        //2 单击按钮、拍照、从图库中选择照片
        btnOnClick();

        //3 接受拍好照片、接受从图库当中选择的照片 ------方法:系统回调

        //4 把信息保存到数据库中
        btnSave();
    }


    //1 绑定控件-----代码
    private void initView() {
        edit_title=findViewById(R.id.editText_title);
        edit_content=findViewById(R.id.editText_content);
        btn_camera=findViewById(R.id.button_camera);
        btn_photo=findViewById(R.id.button_photo);
        img_preview=findViewById(R.id.imageView_preview);
        btn_save=findViewById(R.id.button_save);
        mhelper=new MyDbHelper(AddInfoActivity.this);
        db= mhelper.getWritableDatabase();
    }


    //2 单击按钮、拍照----------代码
    private void btnOnClick() {
        btn_camera.setOnClickListener(new View.OnClickListener() {
            @Override
            public void onClick(View view) {
                //拍照
                Time time=new Time();
                time.setToNow();
                String randtime=time.year+(time.month+1)+time.monthDay+time.hour+time.minute+time.second+"";
               // tmp_path= Environment.getExternalStorageDirectory()+"/image"+ randtime+".jpg";
                  tmp_path=Environment.getExternalStoragePublicDirectory(Environment.DIRECTORY_DCIM).getAbsolutePath()+"/image"+randtime+".jpg";
                File imgfile=new File(tmp_path);
                try {
                    imgfile.createNewFile();
                } catch (IOException e) {
                    e.printStackTrace();
                }
                Intent intent=new Intent("android.media.action.IMAGE_CAPTURE");
                intent.putExtra(MediaStore.EXTRA_OUTPUT, Uri.fromFile(imgfile) );
                startActivityForResult(intent,11);

            }
        });
        btn_photo.setOnClickListener(new View.OnClickListener() {
            @Override
            public void onClick(View view) {
                //选择照片
                Intent intent=new Intent("android.intent.action.GET_CONTENT");
                intent.setType("image/*");
                startActivityForResult(intent,22);
            }
        });
    }


    //3 接受拍好照片、接受从图库当中选择的照片 ------方法:系统回调

    @Override
    protected void onActivityResult(int requestCode, int resultCode, @Nullable Intent data) {
        switch (requestCode){
            case 11:
                if(resultCode==RESULT_OK){
                    disp_path=tmp_path;
                    Glide.with(AddInfoActivity.this).load(disp_path).into(img_preview);
                }
                break;
            case 22:
                Uri imageuri=data.getData();
                if (imageuri==null)
                {
                    return;
                }
                disp_path=UriUtils.uri2File(imageuri).getPath();
                Glide.with(AddInfoActivity.this).load(disp_path).into(img_preview);
                break;
            default:
                break;
        }
    }

    //4 把信息保存到数据库中-------------代码
    private void btnSave() {
        btn_save.setOnClickListener(new View.OnClickListener() {
            @Override
            public void onClick(View view) {
                //保存信息到数据库代码
                Time time=new Time();
                time.setToNow();
                ContentValues contentValues=new ContentValues();//一行
                contentValues.put("title",edit_title.getText().toString());//1行——1列
                contentValues.put("content",edit_content.getText().toString());//1行——3列
                contentValues.put("imgpath",disp_path);
                contentValues.put("mtime",time.year+"/"+(time.month+1)+"/"+time.monthDay);
                db.insert("tb_memory",null,contentValues);
                Toast.makeText(AddInfoActivity.this,"保存成功",Toast.LENGTH_SHORT).show();

                //跳转到主界面
                Intent intent=new Intent(AddInfoActivity.this,MainActivity.class);
                startActivity(intent);
                finish();
            }
        });
    }

}
3.5 LoginActivity文件代码:
package com.example.ts_menu;
import android.content.Intent;
import android.content.SharedPreferences;
//import android.support.v7.app.AppCompatActivity;
import android.os.Bundle;
import android.view.View;
import android.widget.Button;
import android.widget.CheckBox;
import android.widget.EditText;

import androidx.appcompat.app.AppCompatActivity;

public class LoginActivity extends AppCompatActivity {
    //定义对象
    private EditText edit_inputname,edit_inputpwd;
    private CheckBox check_reme;
    private Button btn_login;
    @Override
    protected void onCreate(Bundle savedInstanceState) {
        super.onCreate(savedInstanceState);
        setContentView(R.layout.activity_login);
        //1 绑定控件
        initView();
        //2 单击登录按钮,将用户名和密码保存起来
        btnloginonClick();
        //3 下次启动,直接显示用户名和密码
        displayinfo();
    }


    //1 绑定控件--------代码
    private void initView() {
        edit_inputname=findViewById(R.id.editText_inputname);
        edit_inputpwd=findViewById(R.id.editText_inputpwd);
        check_reme=findViewById(R.id.checkBox_reme);
        btn_login=findViewById(R.id.button_login);
    }

    //2 单击登录按钮,将用户名和密码保存起来----代码
    private void btnloginonClick() {
        btn_login.setOnClickListener(new View.OnClickListener() {
            @Override
            public void onClick(View view) {
                //保存用户名和密码
                SharedPreferences.Editor editor=getSharedPreferences("myinfo",0).edit();
                editor.putString("name",edit_inputname.getText().toString());
                editor.putString("pwd",edit_inputpwd.getText().toString());
                editor.putBoolean("st",check_reme.isChecked());
                editor.commit();

                //跳转到第二页
                Intent intent=new Intent(LoginActivity.this,MainActivity.class);
                startActivity(intent);
            }
        });
    }

    //3 下次启动,直接显示用户名和密码-----代码
    private void displayinfo() {
        String strname=getSharedPreferences("myinfo",0).getString("name","");
        String strpwd=getSharedPreferences("myinfo",0).getString("pwd","");
        Boolean status=getSharedPreferences("myinfo",0).getBoolean("st",false);
        if(status==true){
            edit_inputname.setText(strname);
            edit_inputpwd.setText(strpwd);
            check_reme.setChecked(true);
        }else{
            edit_inputname.setText("");
            edit_inputpwd.setText("");
            check_reme.setChecked(false);
        }
    }

}
3.6 MainActivity文件代码:
package com.example.ts_menu;
import android.content.Intent;
import android.database.Cursor;
import android.database.sqlite.SQLiteDatabase;

import android.os.Bundle;


import android.view.View;
import android.widget.Adapter;
import android.widget.Button;

import androidx.appcompat.app.AppCompatActivity;
import androidx.recyclerview.widget.RecyclerView;
import androidx.recyclerview.widget.StaggeredGridLayoutManager;

import com.example.ts_menu.adapter.MemoAdapter;
import com.example.ts_menu.bean.MemoBean;
import com.example.ts_menu.db.MyDbHelper;

import java.util.ArrayList;
import java.util.List;

public class MainActivity extends AppCompatActivity {
    //定义对象
    private Button btn_add;
    private RecyclerView recy_view;
    private MyDbHelper mhelper;
    SQLiteDatabase db;
    @Override
    protected void onCreate(Bundle savedInstanceState) {
        super.onCreate(savedInstanceState);
        setContentView(R.layout.activity_main);
        //1 绑定控件
        initView();

        //2 对单击添加单击事件
        btnonclicknext();

        //3完善:从数据库获取数据,显示到RecyclerView控件里面
        recyDisplay();

    }


    //1 绑定控件-----------代码
    private void initView() {
        btn_add=findViewById(R.id.button_add);
        recy_view=findViewById(R.id.recy_view);
        mhelper=new MyDbHelper(MainActivity.this);
        db=mhelper.getWritableDatabase();
    }

    //2 对单击添加单击事件-----代码
    private void btnonclicknext() {
        btn_add.setOnClickListener(new View.OnClickListener() {
            @Override
            public void onClick(View view) {
                //单击后跳转到一下页
                Intent intent=new Intent(MainActivity.this,AddInfoActivity.class);
                startActivity(intent);
                finish();
            }
        });
    }

    //3完善:从数据库获取数据,显示到RecyclerView控件里面---------------代码
    private void recyDisplay() {
        //3.1准备数据-----------标题、内容、图片、时间(类)
        List<MemoBean> arr=new ArrayList();
        //从数据库里面取数据了
        Cursor  cursor=db.rawQuery("select * from tb_memory",null);
        while(cursor.moveToNext()){
            String mytitle=cursor.getString(cursor.getColumnIndex("title"));
            String mycontent=cursor.getString(cursor.getColumnIndex("content"));
            String myimgpath=cursor.getString(cursor.getColumnIndex("imgpath"));
            String mymtime=cursor.getString(cursor.getColumnIndex("mtime"));
            MemoBean memoBean=new MemoBean(mytitle,mycontent,myimgpath,mymtime);
            arr.add(memoBean);
        }
        cursor.close();


        //3.2 子布局 recy_item

        //3.3 数据------桥(适配器MemoAdapter)----------------子布局
        MemoAdapter adapter=new MemoAdapter(MainActivity.this,arr);
        //3.4 确定显示的方式
        StaggeredGridLayoutManager st=new StaggeredGridLayoutManager(2,StaggeredGridLayoutManager.VERTICAL);
        recy_view.setLayoutManager(st);

        //3.5 让数据显示出来
        recy_view.setAdapter(adapter);
    }

}
注意:activity文件中相关的名称报错,得换成自己所创建工程的名字。