若该文为原创文章,转载请注明原文出处。
前面提及目标跟踪使用的方法有很多,更多的是Deepsort方法。
本篇博客记录YOLOv8的实例分割+deepsort视觉跟踪算法。结合YOLOv8的目标检测分割和deepsort的特征跟踪,该算法在复杂环境下确保了目标的准确与稳定跟踪。在计算机视觉中,这种跟踪技术在安全监控、无人驾驶等领域有着广泛应用。
源码地址:GitHub - MuhammadMoinFaisal/YOLOv8_Segmentation_DeepSORT_Object_Tracking: YOLOv8 Segmentation with DeepSORT Object Tracking (ID + Trails)
感谢Muhammad Moin
一、环境搭建教程
使用的是Anaconda3,环境自行安装,可以参考前面的文章搭建。
1、创建虚拟环境
conda create -n YOLOv8-Seg-Deepsort python=3.8
2、激活
conda activate YOLOv8-Seg-Deepsort二、下载代码
代码可以使用源码,也可以使用我的,我把YOLOv8_Segmentation_DeepSORT_Object_Tracking和YOLOv8-DeepSORT-Object-Tracking整合在一起了。
下载地址:
Yinyifeng18/YOLOv8_Segmentation_DeepSORT_Object_Tracking (github.com)
git clone https://github.com/Yinyifeng18/YOLOv8_Segmentation_DeepSORT_Object_Tracking.git三、、安装依赖项
pip install -e ".[dev]"如果使用的是源码,会出现下面错误:
AttributeError: module 'numpy' has no attribute 'float'
Set the environment variable HYDRA_FULL_ERROR=1 for a complete stack trace.
出错错误的原因是所用的代码是依赖于旧版本的Numpy。您可以将你的Numpy版本降级到1.23.5。
pip install numpy==1.23.5
四、测试
1、转到检测或分割目录下
cd YOLOv8_Segmentation_DeepSORT_Object_Tracking\ultralytics\yolo\v8\detect
或
cd YOLOv8_Segmentation_DeepSORT_Object_Tracking\ultralytics\yolo\v8\segment2、测试
python predict.py model=yolov8l.pt source="test3.mp4" show=True或
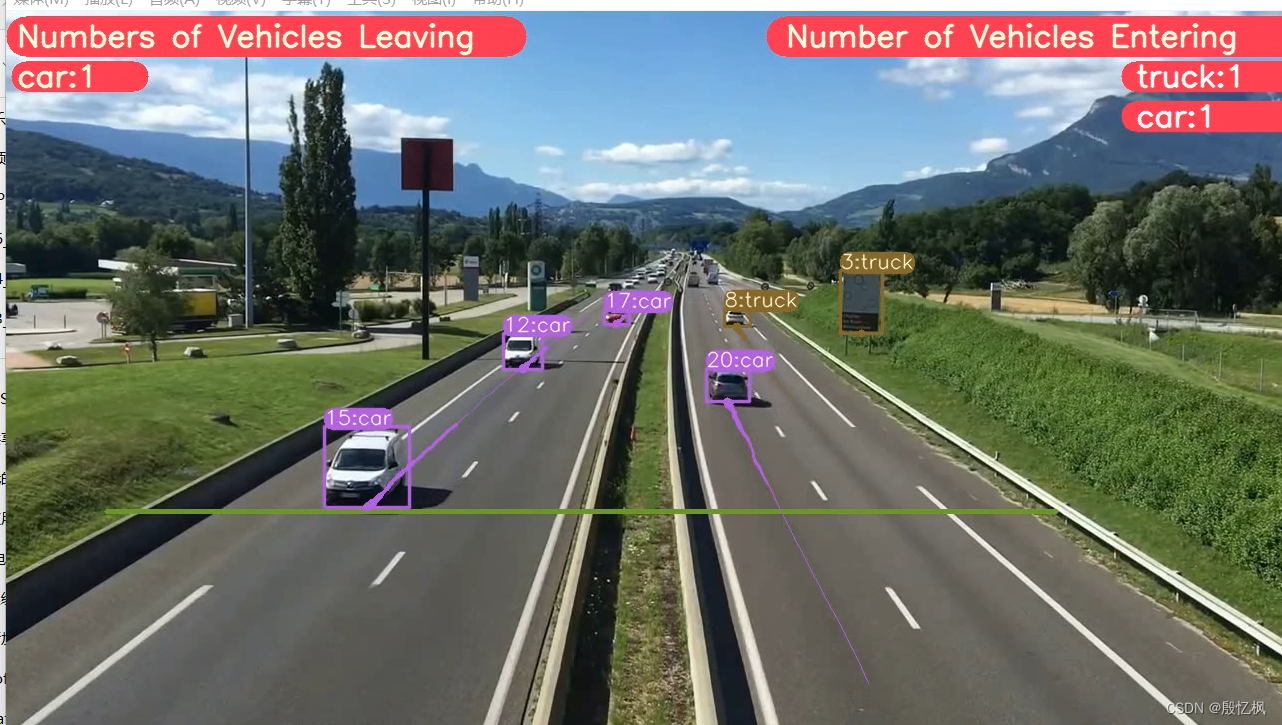
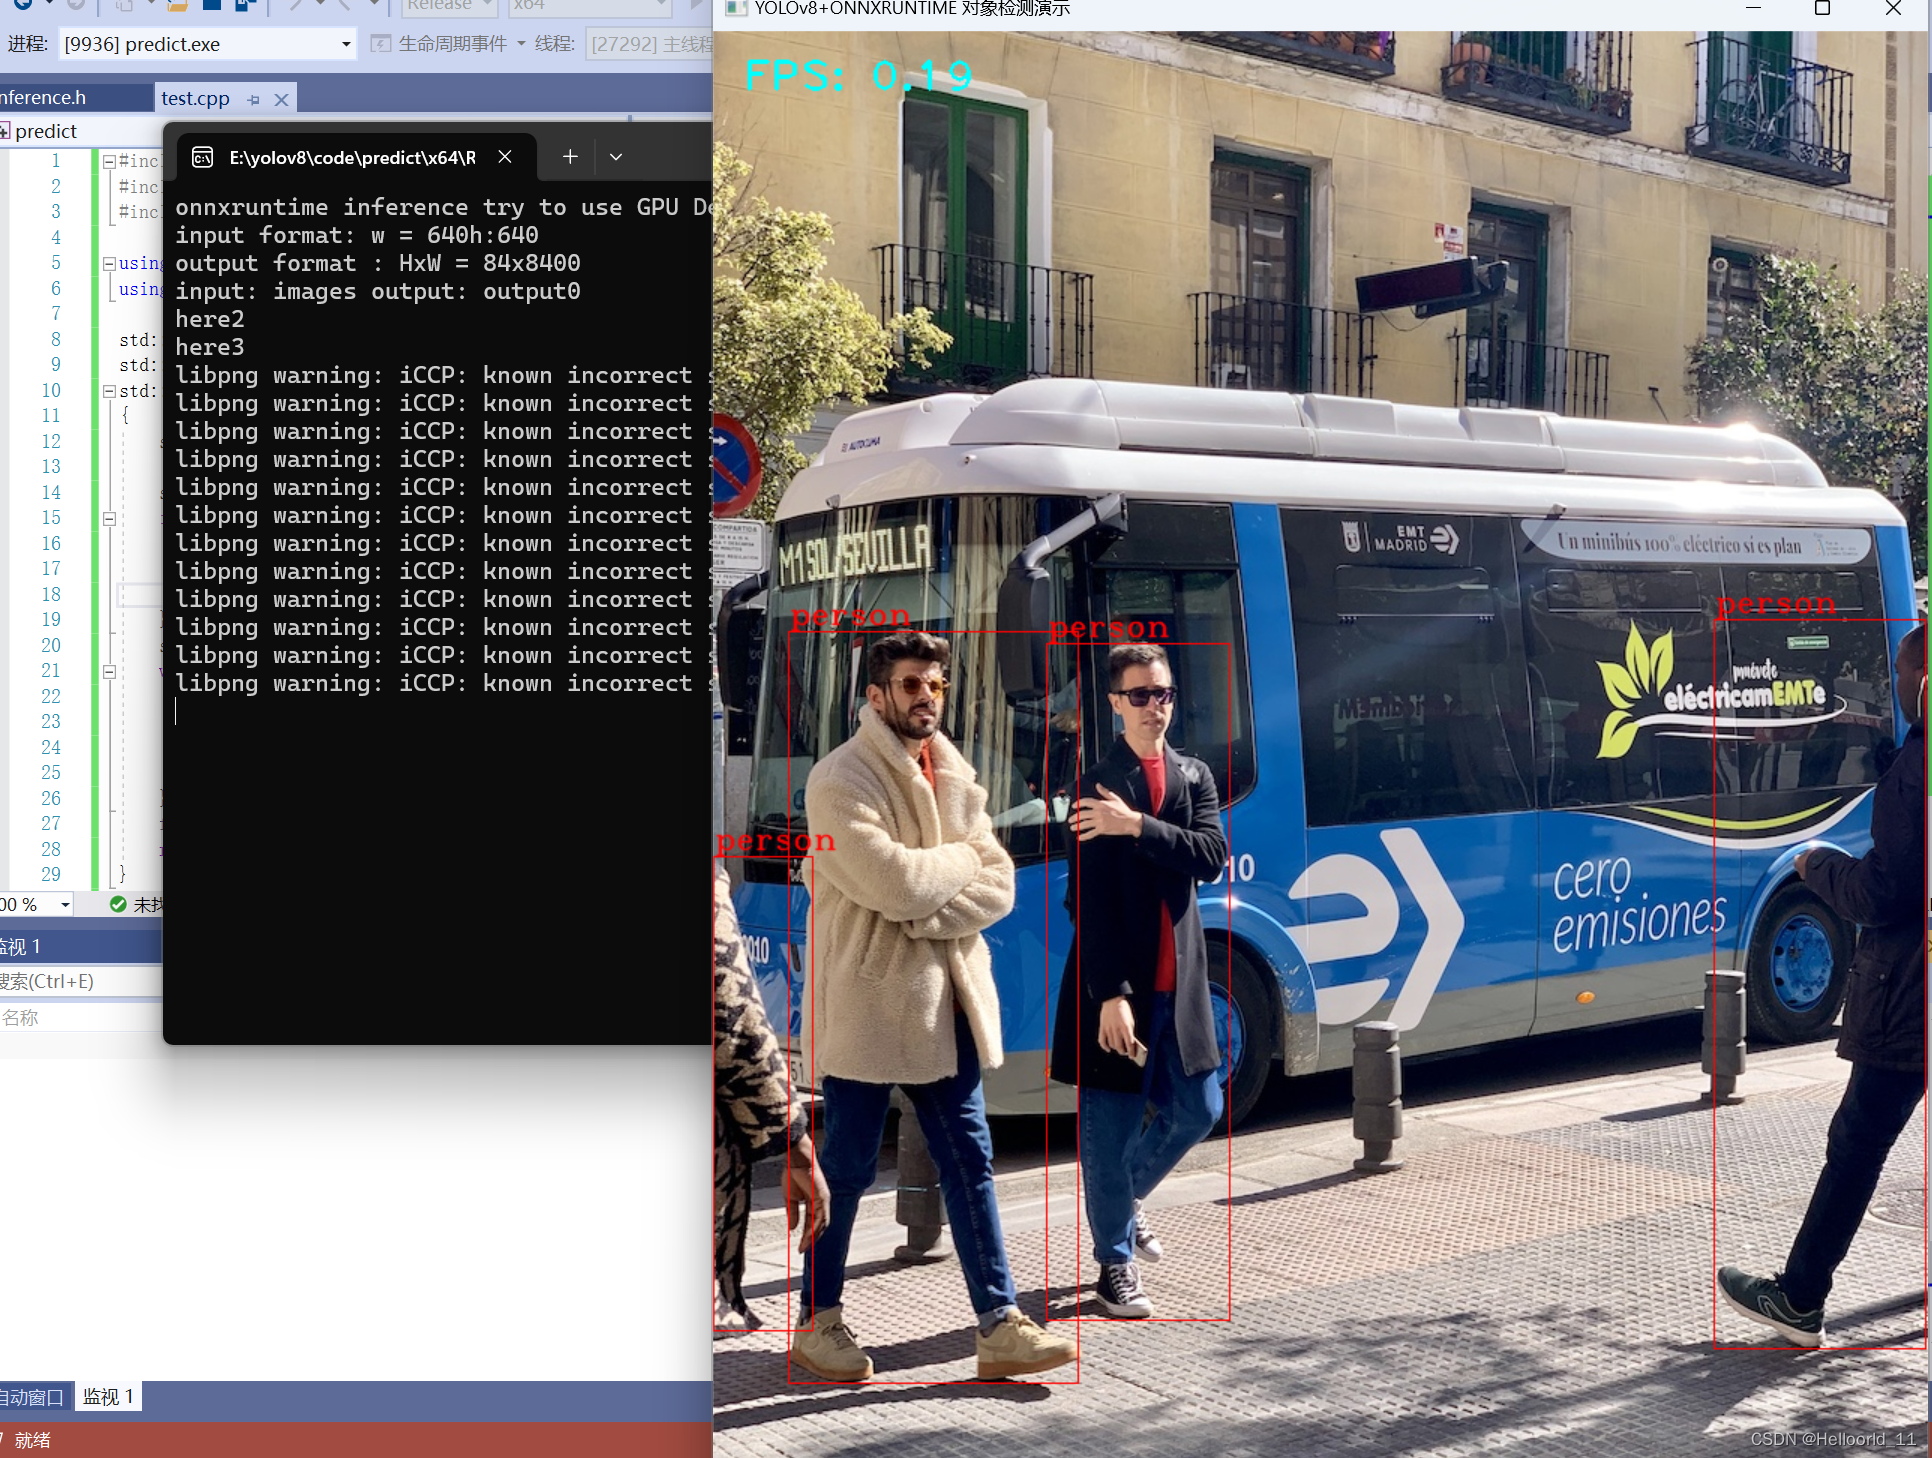
python predict.py model=yolov8x-seg.pt source="test3.mp4" show=True使用是实例分割测试,运行结果。
如果想保存视频,直接参数save=True

五、代码説明
DeepSort需要DeepSORT 文件,下载地址是:
https://drive.google.com/drive/folders/1kna8eWGrSfzaR6DtNJ8_GchGgPMv3VC8?usp=sharing-
下载DeepSORT Zip文件后,将其解压缩到子文件夹中,然后将deep_sort_pytorch文件夹放入ultralytics/yolo/v8/segment文件夹中
-
目录结果如下

这里直接附predict.py代码
# Ultralytics YOLO 🚀, GPL-3.0 license

import hydra
import torch

from ultralytics.yolo.utils import DEFAULT_CONFIG, ROOT, ops
from ultralytics.yolo.utils.checks import check_imgsz
from ultralytics.yolo.utils.plotting import colors, save_one_box

from ultralytics.yolo.v8.detect.predict import DetectionPredictor
from numpy import random


import cv2
from deep_sort_pytorch.utils.parser import get_config
from deep_sort_pytorch.deep_sort import DeepSort
#Deque is basically a double ended queue in python, we prefer deque over list when we need to perform insertion or pop up operations
#at the same time
from collections import deque
import numpy as np
palette = (2 ** 11 - 1, 2 ** 15 - 1, 2 ** 20 - 1)
data_deque = {}

deepsort = None

object_counter = {}

object_counter1 = {}

line = [(100, 500), (1050, 500)]
def init_tracker():
    global deepsort
    cfg_deep = get_config()
    cfg_deep.merge_from_file("deep_sort_pytorch/configs/deep_sort.yaml")

    deepsort= DeepSort(cfg_deep.DEEPSORT.REID_CKPT,
                            max_dist=cfg_deep.DEEPSORT.MAX_DIST, min_confidence=cfg_deep.DEEPSORT.MIN_CONFIDENCE,
                            nms_max_overlap=cfg_deep.DEEPSORT.NMS_MAX_OVERLAP, max_iou_distance=cfg_deep.DEEPSORT.MAX_IOU_DISTANCE,
                            max_age=cfg_deep.DEEPSORT.MAX_AGE, n_init=cfg_deep.DEEPSORT.N_INIT, nn_budget=cfg_deep.DEEPSORT.NN_BUDGET,
                            use_cuda=True)
##########################################################################################
def xyxy_to_xywh(*xyxy):
    """" Calculates the relative bounding box from absolute pixel values. """
    bbox_left = min([xyxy[0].item(), xyxy[2].item()])
    bbox_top = min([xyxy[1].item(), xyxy[3].item()])
    bbox_w = abs(xyxy[0].item() - xyxy[2].item())
    bbox_h = abs(xyxy[1].item() - xyxy[3].item())
    x_c = (bbox_left + bbox_w / 2)
    y_c = (bbox_top + bbox_h / 2)
    w = bbox_w
    h = bbox_h
    return x_c, y_c, w, h

def xyxy_to_tlwh(bbox_xyxy):
    tlwh_bboxs = []
    for i, box in enumerate(bbox_xyxy):
        x1, y1, x2, y2 = [int(i) for i in box]
        top = x1
        left = y1
        w = int(x2 - x1)
        h = int(y2 - y1)
        tlwh_obj = [top, left, w, h]
        tlwh_bboxs.append(tlwh_obj)
    return tlwh_bboxs

def compute_color_for_labels(label):
    """
    Simple function that adds fixed color depending on the class
    """
    if label == 0: #person
        color = (85,45,255)
    elif label == 2: # Car
        color = (222,82,175)
    elif label == 3:  # Motobike
        color = (0, 204, 255)
    elif label == 5:  # Bus
        color = (0, 149, 255)
    else:
        color = [int((p * (label ** 2 - label + 1)) % 255) for p in palette]
    return tuple(color)

def draw_border(img, pt1, pt2, color, thickness, r, d):
    x1,y1 = pt1
    x2,y2 = pt2
    # Top left
    cv2.line(img, (x1 + r, y1), (x1 + r + d, y1), color, thickness)
    cv2.line(img, (x1, y1 + r), (x1, y1 + r + d), color, thickness)
    cv2.ellipse(img, (x1 + r, y1 + r), (r, r), 180, 0, 90, color, thickness)
    # Top right
    cv2.line(img, (x2 - r, y1), (x2 - r - d, y1), color, thickness)
    cv2.line(img, (x2, y1 + r), (x2, y1 + r + d), color, thickness)
    cv2.ellipse(img, (x2 - r, y1 + r), (r, r), 270, 0, 90, color, thickness)
    # Bottom left
    cv2.line(img, (x1 + r, y2), (x1 + r + d, y2), color, thickness)
    cv2.line(img, (x1, y2 - r), (x1, y2 - r - d), color, thickness)
    cv2.ellipse(img, (x1 + r, y2 - r), (r, r), 90, 0, 90, color, thickness)
    # Bottom right
    cv2.line(img, (x2 - r, y2), (x2 - r - d, y2), color, thickness)
    cv2.line(img, (x2, y2 - r), (x2, y2 - r - d), color, thickness)
    cv2.ellipse(img, (x2 - r, y2 - r), (r, r), 0, 0, 90, color, thickness)

    cv2.rectangle(img, (x1 + r, y1), (x2 - r, y2), color, -1, cv2.LINE_AA)
    cv2.rectangle(img, (x1, y1 + r), (x2, y2 - r - d), color, -1, cv2.LINE_AA)

    cv2.circle(img, (x1 +r, y1+r), 2, color, 12)
    cv2.circle(img, (x2 -r, y1+r), 2, color, 12)
    cv2.circle(img, (x1 +r, y2-r), 2, color, 12)
    cv2.circle(img, (x2 -r, y2-r), 2, color, 12)

    return img

def UI_box(x, img, color=None, label=None, line_thickness=None):
    # Plots one bounding box on image img
    tl = line_thickness or round(0.002 * (img.shape[0] + img.shape[1]) / 2) + 1  # line/font thickness
    color = color or [random.randint(0, 255) for _ in range(3)]
    c1, c2 = (int(x[0]), int(x[1])), (int(x[2]), int(x[3]))
    cv2.rectangle(img, c1, c2, color, thickness=tl, lineType=cv2.LINE_AA)
    if label:
        tf = max(tl - 1, 1)  # font thickness
        t_size = cv2.getTextSize(label, 0, fontScale=tl / 3, thickness=tf)[0]

        img = draw_border(img, (c1[0], c1[1] - t_size[1] -3), (c1[0] + t_size[0], c1[1]+3), color, 1, 8, 2)

        cv2.putText(img, label, (c1[0], c1[1] - 2), 0, tl / 3, [225, 255, 255], thickness=tf, lineType=cv2.LINE_AA)


def intersect(A,B,C,D):
    return ccw(A,C,D) != ccw(B,C,D) and ccw(A,B,C) != ccw(A,B,D)

def ccw(A,B,C):
    return (C[1]-A[1]) * (B[0]-A[0]) > (B[1]-A[1]) * (C[0]-A[0])


def get_direction(point1, point2):
    direction_str = ""

    # calculate y axis direction
    if point1[1] > point2[1]:
        direction_str += "South"
    elif point1[1] < point2[1]:
        direction_str += "North"
    else:
        direction_str += ""

    # calculate x axis direction
    if point1[0] > point2[0]:
        direction_str += "East"
    elif point1[0] < point2[0]:
        direction_str += "West"
    else:
        direction_str += ""

    return direction_str
def draw_boxes(img, bbox, names,object_id, identities=None, offset=(0, 0)):
    cv2.line(img, line[0], line[1], (46,162,112), 3)

    height, width, _ = img.shape
    # remove tracked point from buffer if object is lost
    for key in list(data_deque):
      if key not in identities:
        data_deque.pop(key)

    for i, box in enumerate(bbox):
        x1, y1, x2, y2 = [int(i) for i in box]
        x1 += offset[0]
        x2 += offset[0]
        y1 += offset[1]
        y2 += offset[1]

        # code to find center of bottom edge
        center = (int((x2+x1)/ 2), int((y2+y2)/2))

        # get ID of object
        id = int(identities[i]) if identities is not None else 0

        # create new buffer for new object
        if id not in data_deque:
          data_deque[id] = deque(maxlen= 64)
        color = compute_color_for_labels(object_id[i])
        obj_name = names[object_id[i]]
        label = '{}{:d}'.format("", id) + ":"+ '%s' % (obj_name)

        # add center to buffer
        data_deque[id].appendleft(center)
        if len(data_deque[id]) >= 2:
          direction = get_direction(data_deque[id][0], data_deque[id][1])
          if intersect(data_deque[id][0], data_deque[id][1], line[0], line[1]):
              cv2.line(img, line[0], line[1], (255, 255, 255), 3)
              if "South" in direction:
                if obj_name not in object_counter:
                    object_counter[obj_name] = 1
                else:
                    object_counter[obj_name] += 1
              if "North" in direction:
                if obj_name not in object_counter1:
                    object_counter1[obj_name] = 1
                else:
                    object_counter1[obj_name] += 1
        UI_box(box, img, label=label, color=color, line_thickness=2)
        # draw trail
        for i in range(1, len(data_deque[id])):
            # check if on buffer value is none
            if data_deque[id][i - 1] is None or data_deque[id][i] is None:
                continue
            # generate dynamic thickness of trails
            thickness = int(np.sqrt(64 / float(i + i)) * 1.5)
            # draw trails
            cv2.line(img, data_deque[id][i - 1], data_deque[id][i], color, thickness)

    #4. Display Count in top right corner
        for idx, (key, value) in enumerate(object_counter1.items()):
            cnt_str = str(key) + ":" +str(value)
            cv2.line(img, (width - 500,25), (width,25), [85,45,255], 40)
            cv2.putText(img, f'Number of Vehicles Entering', (width - 500, 35), 0, 1, [225, 255, 255], thickness=2, lineType=cv2.LINE_AA)
            cv2.line(img, (width - 150, 65 + (idx*40)), (width, 65 + (idx*40)), [85, 45, 255], 30)
            cv2.putText(img, cnt_str, (width - 150, 75 + (idx*40)), 0, 1, [255, 255, 255], thickness = 2, lineType = cv2.LINE_AA)

        for idx, (key, value) in enumerate(object_counter.items()):
            cnt_str1 = str(key) + ":" +str(value)
            cv2.line(img, (20,25), (500,25), [85,45,255], 40)
            cv2.putText(img, f'Numbers of Vehicles Leaving', (11, 35), 0, 1, [225, 255, 255], thickness=2, lineType=cv2.LINE_AA)
            cv2.line(img, (20,65+ (idx*40)), (127,65+ (idx*40)), [85,45,255], 30)
            cv2.putText(img, cnt_str1, (11, 75+ (idx*40)), 0, 1, [225, 255, 255], thickness=2, lineType=cv2.LINE_AA)


    return img


class SegmentationPredictor(DetectionPredictor):

    def postprocess(self, preds, img, orig_img):
        masks = []
        # TODO: filter by classes
        p = ops.non_max_suppression(preds[0],
                                    self.args.conf,
                                    self.args.iou,
                                    agnostic=self.args.agnostic_nms,
                                    max_det=self.args.max_det,
                                    nm=32)
        proto = preds[1][-1]
        for i, pred in enumerate(p):
            shape = orig_img[i].shape if self.webcam else orig_img.shape
            if not len(pred):
                continue
            if self.args.retina_masks:
                pred[:, :4] = ops.scale_boxes(img.shape[2:], pred[:, :4], shape).round()
                masks.append(ops.process_mask_native(proto[i], pred[:, 6:], pred[:, :4], shape[:2]))  # HWC
            else:
                masks.append(ops.process_mask(proto[i], pred[:, 6:], pred[:, :4], img.shape[2:], upsample=True))  # HWC
                pred[:, :4] = ops.scale_boxes(img.shape[2:], pred[:, :4], shape).round()

        return (p, masks)

    def write_results(self, idx, preds, batch):
        p, im, im0 = batch
        log_string = ""
        if len(im.shape) == 3:
            im = im[None]  # expand for batch dim
        self.seen += 1
        if self.webcam:  # batch_size >= 1
            log_string += f'{idx}: '
            frame = self.dataset.count
        else:
            frame = getattr(self.dataset, 'frame', 0)

        self.data_path = p
        self.txt_path = str(self.save_dir / 'labels' / p.stem) + ('' if self.dataset.mode == 'image' else f'_{frame}')
        log_string += '%gx%g ' % im.shape[2:]  # print string
        self.annotator = self.get_annotator(im0)

        preds, masks = preds
        det = preds[idx]
        if len(det) == 0:
            return log_string
        # Segments
        mask = masks[idx]
        if self.args.save_txt:
            segments = [
                ops.scale_segments(im0.shape if self.args.retina_masks else im.shape[2:], x, im0.shape, normalize=True)
                for x in reversed(ops.masks2segments(mask))]

        # Print results
        for c in det[:, 5].unique():
            n = (det[:, 5] == c).sum()  # detections per class
            log_string += f"{n} {self.model.names[int(c)]}{'s' * (n > 1)}, "  # add to string

        # Mask plotting
        self.annotator.masks(
            mask,
            colors=[colors(x, True) for x in det[:, 5]],
            im_gpu=torch.as_tensor(im0, dtype=torch.float16).to(self.device).permute(2, 0, 1).flip(0).contiguous() /
            255 if self.args.retina_masks else im[idx])

        det = reversed(det[:, :6])
        self.all_outputs.append([det, mask])
        xywh_bboxs = []
        confs = []
        oids = []
        outputs = []
        # Write results
        for j, (*xyxy, conf, cls) in enumerate(reversed(det[:, :6])):
            x_c, y_c, bbox_w, bbox_h = xyxy_to_xywh(*xyxy)
            xywh_obj = [x_c, y_c, bbox_w, bbox_h]
            xywh_bboxs.append(xywh_obj)
            confs.append([conf.item()])
            oids.append(int(cls))
        xywhs = torch.Tensor(xywh_bboxs)
        confss = torch.Tensor(confs)

        outputs = deepsort.update(xywhs, confss, oids, im0)
        if len(outputs) > 0:
            bbox_xyxy = outputs[:, :4]
            identities = outputs[:, -2]
            object_id = outputs[:, -1]

            draw_boxes(im0, bbox_xyxy, self.model.names, object_id,identities)
        return log_string


@hydra.main(version_base=None, config_path=str(DEFAULT_CONFIG.parent), config_name=DEFAULT_CONFIG.name)
def predict(cfg):
    init_tracker()
    cfg.model = cfg.model or "yolov8n-seg.pt"
    cfg.imgsz = check_imgsz(cfg.imgsz, min_dim=2)  # check image size
    cfg.source = cfg.source if cfg.source is not None else ROOT / "assets"

    predictor = SegmentationPredictor(cfg)
    predictor()


if __name__ == "__main__":
    predict()
这里给的是对象分割和 DeepSORT 跟踪(ID + 轨迹)和车辆计数
没有分割在detect目录下,自行测试。
测试结果
如有侵权,或需要完整代码,请及时联系博主。


![正点原子[第二期]Linux之ARM(MX6U)裸机篇学习笔记-6.5](https://img-blog.csdnimg.cn/direct/af3bbc40a90646d1809e9eff2cc45597.png)