一、新增表单
<!DOCTYPE html>
<html lang="en">
<head>
    <meta charset="UTF-8">
    <meta name="viewport" content="width=device-width, initial-scale=1.0">
    <title>Document</title>
</head>
<body>
    <!--
        placeholder="请输入内容" 当输入内容是自动消失
        required="required" 检查表单input是否为空,当空时给你一个提示
        autofocus="autofocus" 自动获取焦点
        type="email" 必须为邮箱格式
        type="date"  自动提示日期
        type="color" 自动提示颜色
        type="number"必须输入数字
        type="range" 自动代替滚条
     -->
    <from action="">
        搜索内容:<input type="text" placeholder="请输入内容" required="required" autofocus="autofocus"/><br />
        请输入邮箱:<input type="email"/><br />
        请输入日期:<input type="date"/><br />
        请输入颜色:<input type="color"/><br />
        请输入电话:<input type="number"/><br />
        滚动条效果:<input type="range"/><br />
        <input type="submit" value="提交">
    </from>
</body>
</html>
效果
二、图标字体
我们的图标字体本意就是文字,只是他会以图片的形式来展示而已总结:对文字的操作,字号,颜色 字体 都是可以使用在图标字体上面的很早很早就有这个图标字体的技术,当苹果手机出来之后推荐大家使用各种高光,渐变阴影来设计---现在的设计走向扁平化设计,简约,所以图标字体又火了,因为图标字体是单色
优势:兼容性非常好,兼容各种浏览器,包含古老的IE6等低版本浏览器最大的好处:免费的--大家公认的最爱
iconfont-阿里巴巴矢量图标库
建立一个fonts的文件夹,把字体库(.eot,.woff,.ttf,.svg)拷贝进来
一般写法

如果要换font-family的名字,注意的是标签选择器里的名字也要跟随着改变
伪类写法
<!DOCTYPE html>
<html lang="en">
<head>
<meta charset="UTF-8">
<meta name="viewport" content="width=device-width, initial-scale=1.0">
<title>Document</title>
<style>
@font-face {font-family: 'libiao';
src: url('fonts/iconfont.eot'); /* IE9*/
src: url('fonts/iconfont.eot?#iefix') format('embedded-opentype'), /* IE6-IE8 */
url('fonts/iconfont.woff') format('woff'), /* chrome、firefox */
url('fonts/iconfont.ttf') format('truetype'), /* chrome、firefox、opera、Safari, Android, iOS 4.2+*/
url('fonts/iconfont.svg#iconfont') format('svg'); /* iOS 4.1- */
}
div{
font-family: 'libiao';/*改名上下都要改*/
font-size: 100px;
color: red;
}
p{
font-family: 'libiao';/*改名上下都要改*/
font-size: 100px;
color: red;
}
/*伪类写法*/
p:before{
content: "\e602";
}
</style>
</head>
<body>
<div></div>
<p></p>
</body>
</html>注意上面在p后面接伪类写法,下面的<p></p>就不用其他操作
在线图标字体
这里给大家一个图标字体的在线链接
http://at.alicdn.com/t/font_760782_hmtvl7u64w9.css
打开后会有图标字体
<!DOCTYPE html>
<html lang="en">
<head>
    <meta charset="UTF-8">
    <meta name="viewport" content="width=device-width, initial-scale=1.0">
    <title>Document</title>
    <link rel="stylesheet" href="http://at.alicdn.com/t/font_760782_hmtvl7u64w9.css">
    <style>
        .icon-sousuo{
            font-size: 60px;
            color: red;
        }
        .icon-weixin{
            font-size: 50px;
            color: skyblue;
        }
        .icon-caidan{
            font-size: 55px;
            color: #000;
        }
    </style>
</head>
<body>
    <i class="iconfont icon-sousuo"></i>
    <i class="iconfont icon-weixin"></i>
    <i class="iconfont icon-caidan"></i>
</body>
</html>
用<link rel="stylesheet" href="http://at.alicdn.com/t/font_760782_hmtvl7u64w9.css">来连接在线图标网站,再<i></i>中链接相关字体
三、图片下面空白缝隙问题
<!DOCTYPE html>
<html lang="en">
<head>
    <meta charset="UTF-8">
    <meta name="viewport" content="width=device-width, initial-scale=1.0">
    <title>Document</title>
    <style>
        div{
            border: 1px solid #000;

        }
    </style>
</head>
<body>
    <div>
        <a href="#"><img src="images/1.jpg" alt=""></a>
    </div>
</body>
</html>
给图片加一个边框但不给高与宽时,会在下面产生空白
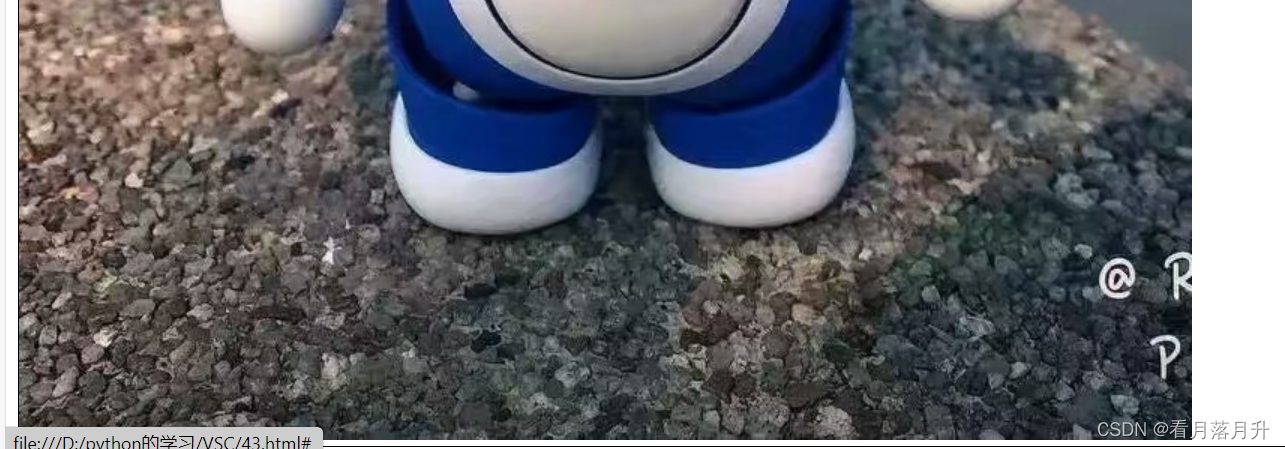 1.但给高宽度度后,就不会产生

2.给img一个display:blick;
<!DOCTYPE html>
<html lang="en">
<head>
    <meta charset="UTF-8">
    <meta name="viewport" content="width=device-width, initial-scale=1.0">
    <title>Document</title>
    <style>
        div{
            border: 1px solid #000;
            /*width: 782px;
            height: 1349px;*/
        }
        img{
            display: block;
        }
    </style>
</head>
<body>
    <div>
        <a href="#"><img src="images/1.jpg" alt=""></a>
    </div>
</body>
</html>
四、旋转transform
<!DOCTYPE html>
<html lang="en">
<head>
    <meta charset="UTF-8">
    <meta name="viewport" content="width=device-width, initial-scale=1.0">
    <title>Document</title>
    <style>
        div:first-child{
            width: 100px;
            height: 100px;
            background-color: hotpink;
            transform: translate(100px,100px);
            /*右下为正*/
        }
        div:nth-child(2){
            width: 100px;
            height: 100px;
            background-color: hotpink;
            margin: 150px;
            transform: rotate(45deg);
            /*顺位正,单位deg*/
        }
        div:nth-child(3){
            width: 100px;
            height: 100px;
            background-color: hotpink;
            margin: 150px;
            transform:scale(1.5,1.5);
            /*水平和垂直位置的缩放*/
        }
    </style>
</head>
<body>
    <div>水平和垂直移动100px</div>
    <div>旋转45deg</div>
    <div>水平垂直盒子放大1.5倍</div>
</body>
</html>
五、斜切效果
<!DOCTYPE html>
<html lang="en">
<head>
    <meta charset="UTF-8">
    <meta name="viewport" content="width=device-width, initial-scale=1.0">
    <title>Document</title>
    <style>
        div{
            width: 300px;
            height: 300px;
            background-color: hotpink;
        }
        div:hover{
            transform: skew(0deg,18deg);
        }
    </style>
</head>
<body>
    <!--
        我们的skew(0deg,18deg);
        正数往左推
    -->
    <div></div>
</body>
</html>
产生的效果如下
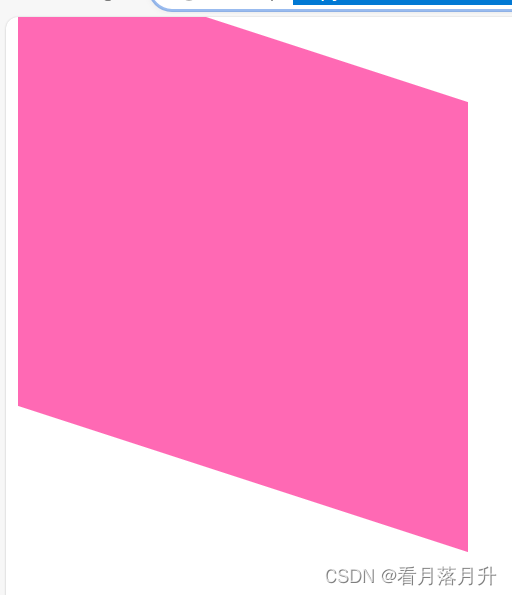
注意正数左高右低,即往左推
六、体验过渡效果
<!DOCTYPE html>
<html lang="en">
<head>
    <meta charset="UTF-8">
    <meta name="viewport" content="width=device-width, initial-scale=1.0">
    <title>Document</title>
    <style>
        div{
            width: 100px;
            height: 100px;
            background-color: red;
            transition: all 1s ease-in 0s;
        }
        div:hover{
            width: 200px;
            height: 200px;
            background-color: skyblue;
        }
    </style>
</head>
<body>
    <!--
        语法格式:transition: 属性名称 持续时间 运动方式 开始时间:
        总结:我们的过渡 transition 从一种形态渐渐的过渡到另外一种形态

        属性名称:
        就是你要对谁做过渡效果,可以是宽度可以是高度,还可以是2D转换,如果要变所有----all
        (就代表所有都变很大 属性都变化推荐使用all)

        持续时间:
        过渡时间是多久,单位是s秒,可以是小数,就是这个过渡需要多长时间

        运动方式:
        过渡以什么方式来改变
        linear ----- 匀速
        ease ----- 渐渐的慢下来
        ease-in ----- 加速(由慢到快)
        ease-out ----- 减速(由快到慢)
        ease-in-out ----- 先加速后减速

        开始时间:
        就是这个过渡什么时候开始,立即开始就写0s,如果是等1秒就写1s
        *******过渡在本身上(写在自己身上)-----谁做过渡就写在谁身上(不要写在hover身上)
        -->
        <div></div>
</body>
</html>
用旋转实现变大和旋转的过渡
<!DOCTYPE html>
<html lang="en">
<head>
    <meta charset="UTF-8">
    <meta name="viewport" content="width=device-width, initial-scale=1.0">
    <title>Document</title>
    <style>
        div{
            width: 600px;
            height: 669px;
            overflow: hidden;/*加上后盒子定好,只会在里面操作*/
        }
        img{
            transition: all 1s ease-in 0s;
        }
        img:hover{
            transform: scale(1.3) rotate(180deg);
        }
    </style>
</head>
<body>
    <div>
        <img src="images/3.jpg" alt="">
    </div>
</body>
</html>
七、设置中心点
我们默认的中心点 最中心 center center
语法格式 transform-origin:水平,垂直;
水平位置:left center right
垂直位置: top center bottom
我们可以通过transform-origin:水平,垂直;来设置我们的中心点
<!DOCTYPE html>
<html lang="en">
<head>
    <meta charset="UTF-8">
    <meta name="viewport" content="width=device-width, initial-scale=1.0">
    <title>Document</title>
    <style>
        img{
            margin: 200px;
            transition: all 0.6s;
            transform-origin: center bottom;
        }
        img:hover{
            transform:rotate(180deg);

        }
    </style>
</head>
<body>
    <!--
        我们默认的中心点 最中心 center center
        语法格式 transform-origin:水平,垂直;
        水平位置:left center right
        垂直位置: top center bottom
        我们可以通过transform-origin:水平,垂直;来设置我们的中心点
    -->
    <img src="images/1.jpg" alt="">
</body>
</html>