前言
需要搭建springcloud项目,eureka是其中的一个模块,依赖主要继承父依赖
学习视频:b站狂神说
便于理解,我修改了本地域名=》这里!!!
127.0.0.1 eureka7001.com
127.0.0.1 eureka7002.com
127.0.0.1 eureka7003.com
Eureka入门案例
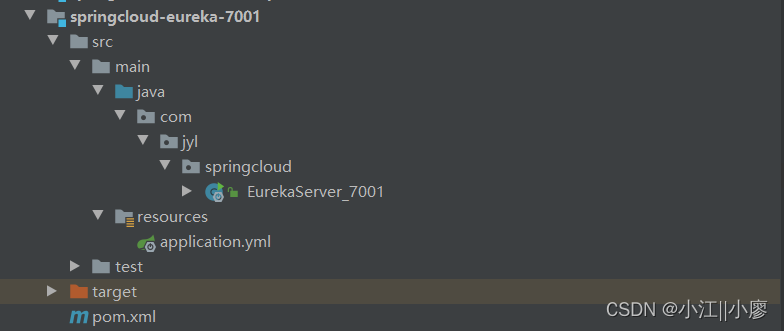
springcloud-eureka-7001模块
1、导入eureka依赖
        <!-- https://mvnrepository.com/artifact/org.springframework.cloud/spring-cloud-starter-eureka-server -->
        <dependency>
            <groupId>org.springframework.cloud</groupId>
            <artifactId>spring-cloud-starter-eureka-server</artifactId>
            <version>1.4.6.RELEASE</version>
        </dependency>
        <!--        热部署-->
        <dependency>
            <groupId>org.springframework.boot</groupId>
            <artifactId>spring-boot-devtools</artifactId>
        </dependency>
2、配置application.yml
server:
  port: 7001
# eureka 配置
eureka:
  instance:
    hostname: localhost # Eureka 服务端实例名称
  client:
    register-with-eureka: false  # 表示是否向服务器Eureka注册中心注册自己 这里本身激素服务器 false
    fetch-registry: false # 如果为false 则表示自己为注册中心
    service-url:  #       替换源码 默认this.serviceUrl.put("defaultZone", "http://localhost:8761/eureka/");
      # 单机
      defaultZone: http://${eureka.instance.hostname}:${server.port}/eureka/
3、创建启动类并添加启动注解
@SpringBootApplication
@EnableEurekaServer // 开启EurekaServer 服务端启动类 可以接收别人注册
public class EurekaServer_7001 {
    // 启动访问http://localhost:7001/
    public static void main(String[] args) {
        SpringApplication.run(EurekaServer_7001.class,args);
    }
}
4、启动Eureka服务&浏览器访问
http://localhost:7001/
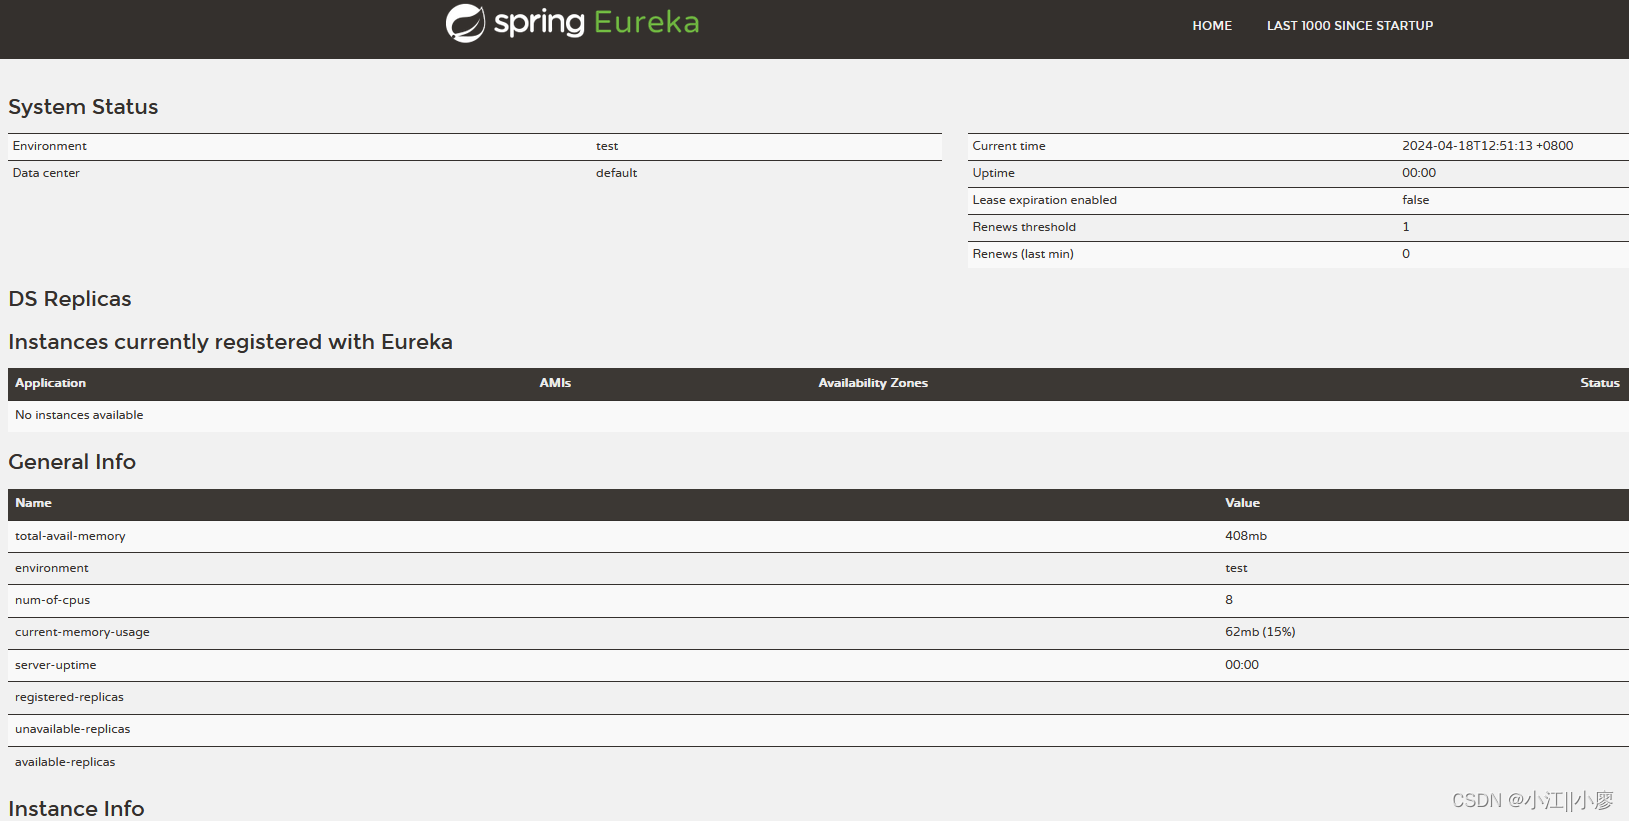 目前还没有任何服务注册到Eureka 所以显示是
No instances available
springcloud-provider-dept-8001 模块
这是一个普通的springcloud项目,需要注册到Eureka中
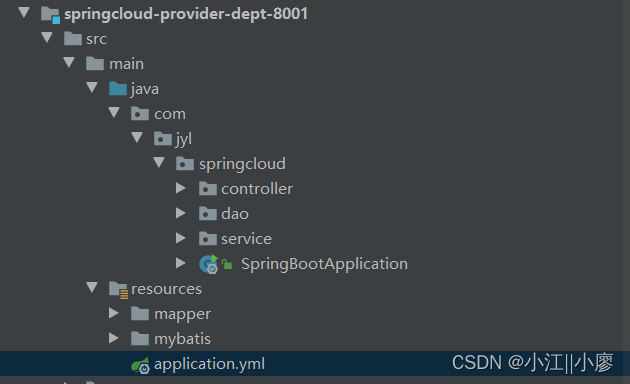
1、导入eureka依赖
<!-- https://mvnrepository.com/artifact/org.springframework.cloud/spring-cloud-starter-eureka -->
<dependency>
    <groupId>org.springframework.cloud</groupId>
    <artifactId>spring-cloud-starter-eureka</artifactId>
    <version>1.4.6.RELEASE</version>
</dependency>
2、配置application.yml
eureka:
  client:
    service-url:  #       替换源码 默认this.serviceUrl.put("defaultZone", "http://localhost:8761/eureka/");
      defaultZone: http://localhost:7001/eureka/
  instance:
    instance-id: springcloud-provider-dept8001  # 修改eureka 上	Status默认描述信息
3、在启动类上添加EurekaClient启动注解
@EnableEurekaClient // 自动在服务启动后自动注册到Eureka中
4、启动springcloud-provider-dept-8001
1.需要先启动Eureka服务
2.访问http://localhost:7001/
 在Instances currently registered with Eureka中Application对于的是配置文件中
spring.application.name: springcloud-provider-dept的值,Status对应的是eureka.instance.instance-id的值。
解决点击Status出现错误页面的问题
实际是http://localhost:8001/actuator/info地址,需要配置信息

解决出现错误页面的问题,下面使用actuator来解决。
1、导入启动actuator依赖
<!--        解决 eureka Status  actuator/info 完善监控信息-->
 <dependency>
     <groupId>org.springframework.boot</groupId>
     <artifactId>spring-boot-starter-actuator</artifactId>
 </dependency>
2、在springcloud-provider-dept-8001项目中添加配置
# 导入 actuator
info:
  app.name: jiangyl-springcloud
  company.name: jiang.yl.com
3、点击Status的UP (1) - springcloud-provider-dept8001
再次启动springcloud-provider-dept-8001
也就是访问http://localhost:8001/actuator/info

如何获取到该服务信息
可以在提供者模块的Controller控制层自动注入DiscoveryClient类来实现
    // 还需要在启动类中添加 @EnableDiscoveryClient  服务发现  用于团队协助
    @GetMapping("/dept/discovery")
    //注册进来的微服务  , 获取一些信息
    public Object discovery(){
        // 获取微服务列表的清单
        List<String> services = client.getServices();
        System.out.println("discovery->services = " + services);
        // Eureka 中Application iD
        List<ServiceInstance> instances = client.getInstances("SPRINGCLOUD-PROVIDER-DEPT");
        for (ServiceInstance instance : instances) {
            System.out.println(
                    instance.getHost()+"\t"+
                    instance.getUri()+"\t"+
                    instance.getPort()+"\t"+
                    instance.getServiceId());
        }
        return this.client;
    }
重新启动该服务,控制台输出内容:
discovery->services = [springcloud-provider-dept]
localhost	http://localhost	:8001	8001	SPRINGCLOUD-PROVIDER-DEPT
访问接口。
访问浏览器地址http://localhost:8001/dept/discovery

Eureka自我保护机制
如果已经注册到Eureka的服务,突然关闭服务了,默认等待90秒后刷新http://localhost:7001/浏览器会发现出现了下面的英文:
EMERGENCY! EUREKA MAY BE INCORRECTLY CLAIMING INSTANCES ARE UP WHEN THEY'RE NOT. RENEWALS ARE LESSER THAN THRESHOLD AND HENCE THE INSTANCES ARE NOT BEING EXPIRED JUST TO BE SAFE.
翻译:紧急!Eureka可能错误地声称实例正在运行,但实际上它们并未运行。由于续订数量低于阈值,因此为了安全起见,这些实例并未过期。

自我保护机制:好死不如赖活着
一句话总结:某时刻某一个微服务不可以用了,eureka不会立刻清理,依旧会对该微服务的信息进行保存!
- EurekaServer默认会在90秒内未收到微服务心跳时注销该实例。在网络分区故障时,健康的服务被错误注销。Eureka通过自我保护机制来避免这种情况,当短时间内丢失过多客户端时,EurekaServer会进入保护模式,不再注销服务,直到网络恢复。
- 在自我保护模式中,EurekaServer会保护服务注册表中的信息,不再注销任何服务实例。当它收到的心跳数重新恢复到阈值以上时,该EurekaServer节点就会自动退出自我保护模式。它的设计哲学就是宁可保留错误的服务注册信息,也不盲目注销任何可能健康的服务实例。
- 综上,自我保护模式是一种应对网络异常的安全保护措施。它的架构哲学是宁可同时保留所有微服务(健康的微服务和不健康的微服务都会保留),也不盲目注销任何健康的微服务。使用自我保护模式,可以让Eureka集群更加的健壮和稳定
- 在SpringCloud中,可以使用
eureka.server.enable-se1f-preservation = false禁用自我保护模式【不推荐关闭自我保护机制】
Eureka可以很好的应对因网络故障导致部分节点失去联系的情况,而不会像zookeeper那样使整个注册服务瘫痪
eureka集群环境配置
为了演示的更接近真实集群环境,首先将C:\Windows\System32\drivers\etc\hosts文件添加一下配置:
# 模拟有3台主机,
127.0.0.1 eureka7001.com
127.0.0.1 eureka7002.com
127.0.0.1 eureka7003.com
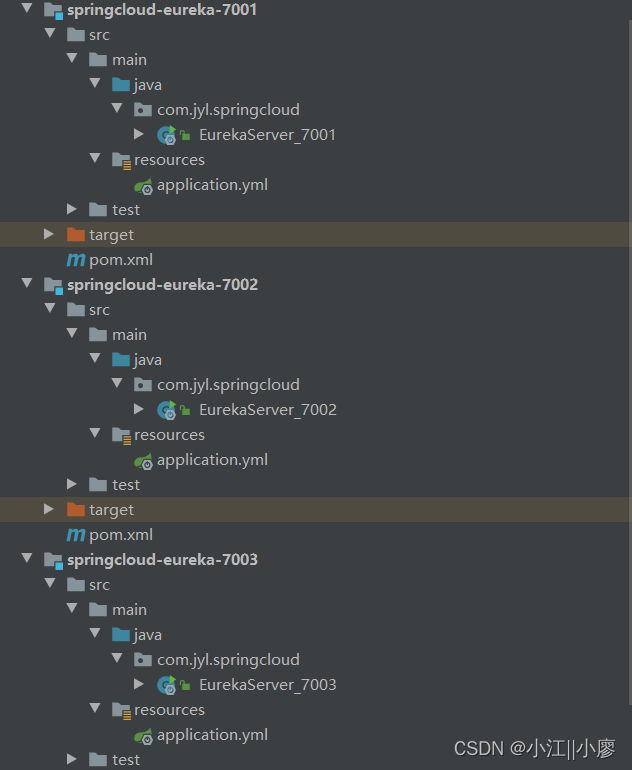
1、复制eureka服务项目
复制文章前面提到的springcloud-eureka-7001项目:
2、修改对应全局配置文件
只是需要修改对应的配置文件即可:
springcloud-eureka-7001模块中的application.yml修改之后
hostname: eueka7001.com 本机域名
defaultZone: http://eureka7002.com:7002/eureka/,http://eureka7003.com:7003/eureka/需要关联的主机
server:
  port: 7001
# eureka 配置
eureka:
  instance:
    hostname: eureka7001.com # Eureka 服务端实例名称 电脑1hostname
  client:
    register-with-eureka: false  # 表示是否向服务器Eureka注册中心注册自己 这里本身激素服务器 false
    fetch-registry: false # 如果为false 则表示自己为注册中心
    service-url:  #       替换源码 默认this.serviceUrl.put("defaultZone", "http://localhost:8761/eureka/");
      # 单机
      #      defaultZone: http://localhost:7001/eureka/
      #集群
      # 连接其它主机电脑,域名:端口
      defaultZone: http://eureka7002.com:7002/eureka/,http://eureka7003.com:7003/eureka/
springcloud-eureka-7002模块中的application.yml
server:
  port: 7002


# eureka 配置
eureka:
  instance:
    hostname: eureka7002.com # Eureka 服务端实例名称 电脑2hostname
  client:
    register-with-eureka: false  # 表示是否向服务器Eureka注册中心注册自己 这里本身激素服务器 false
    fetch-registry: false # 如果为false 则表示自己为注册中心
    service-url:  #       替换源码 默认this.serviceUrl.put("defaultZone", "http://localhost:8761/eureka/");
      # 连接其它主机电脑,域名:端口
      # 单机
      #      defaultZone: http://localhost:7001/eureka/
      #集群
      defaultZone: http://eureka7001.com:7001/eureka/,http://eureka7003.com:7003/eureka/
springcloud-eureka-7003模块中的application.yml
server:
  port: 7003

# eureka 配置
eureka:
  instance:
    hostname: eureka7003.com # Eureka 服务端实例名称 电脑3hostname
  client:
    register-with-eureka: false  # 表示是否向服务器Eureka注册中心注册自己 这里本身激素服务器 false
    fetch-registry: false # 如果为false 则表示自己为注册中心
    service-url:  #       替换源码 默认this.serviceUrl.put("defaultZone", "http://localhost:8761/eureka/");
      defaultZone: http://eureka7001.com:7001/eureka/,http://eureka7002.com:7002/eureka/
3、依次启动项目

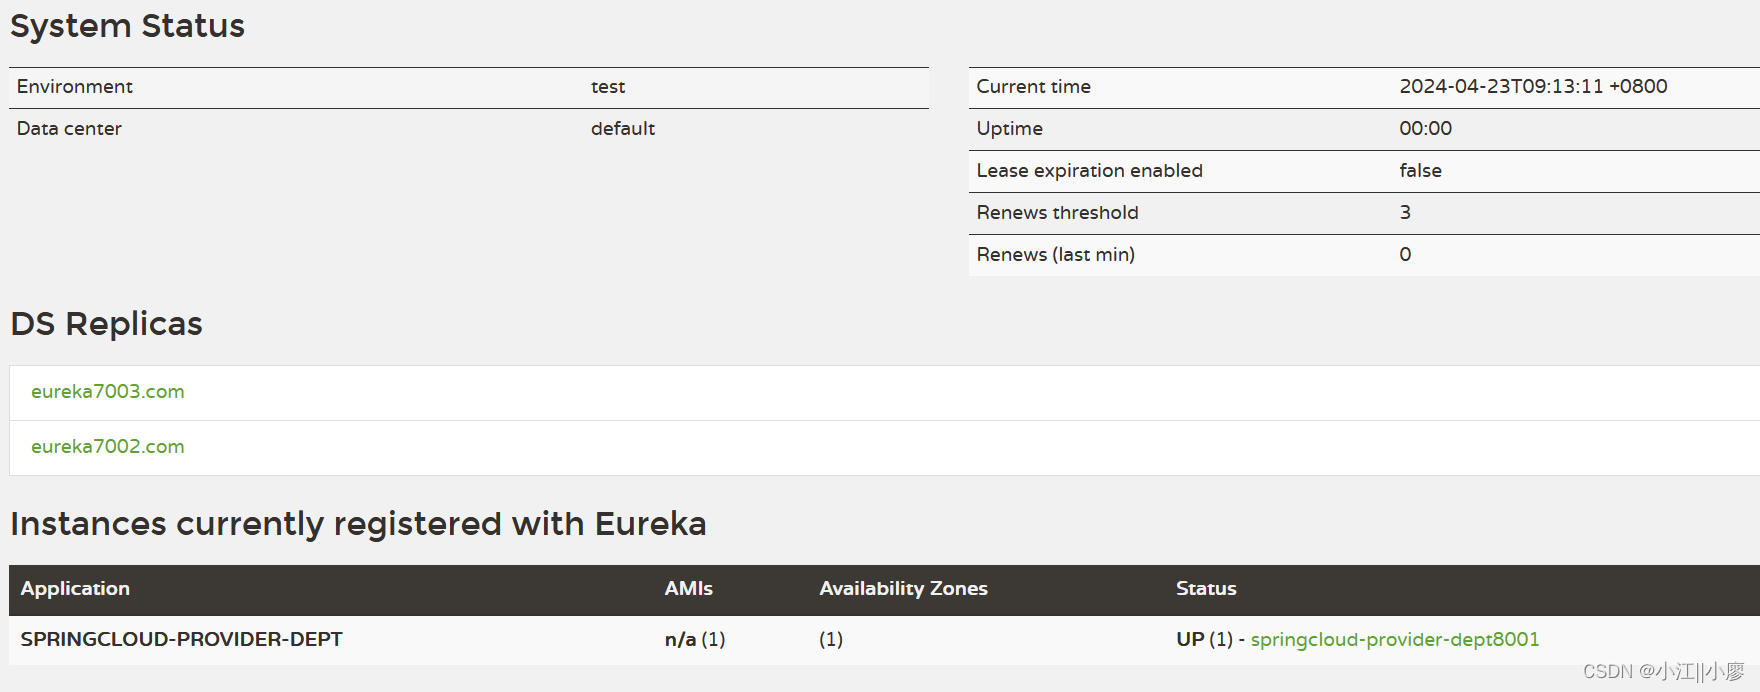
访问对应的域名:端口号,如:http://eureka7001.com:7001/,结果如下:
 DS Replicas:注册中心中用于数据同步的相邻备份节点
提供者连接集群eureka
只需要修改本文章上述提到的springcloud-provider-dept-8001项目中的application.yml文件defaultZone:的值
server:
  port: 8001

eureka:
  client:
    service-url:  #       替换源码 默认this.serviceUrl.put("defaultZone", "http://localhost:8761/eureka/");
      # 端口号 7001 7002 7003  ,实际工作中是3台不同的电脑域名或IP
      defaultZone: http://eureka7001.com:7001/eureka/,http://eureka7002.com:7002/eureka/,http://eureka7002.com:7003/eureka/
  instance:
    instance-id: springcloud-provider-dept8001  # 修改eureka 上	Status默认描述信息
先启动eureka集群,再启动提供者
访问三台eureka主机中的任意一个,都可以看到提供者信息,如:http://eureka7001.com:7001/
[每日鸡汤1/1]:学习不是一场短跑,而是一场马拉松。保持耐心和毅力,你会看到不一样的风景。




![[iOS]CocoaPods安装和使用](https://img-blog.csdnimg.cn/direct/cc42417e4af84707b6741df16c17fe91.png)

