Antd Desgin 穿梭框
- 普通用法
- 高级用法-表格穿梭框组件
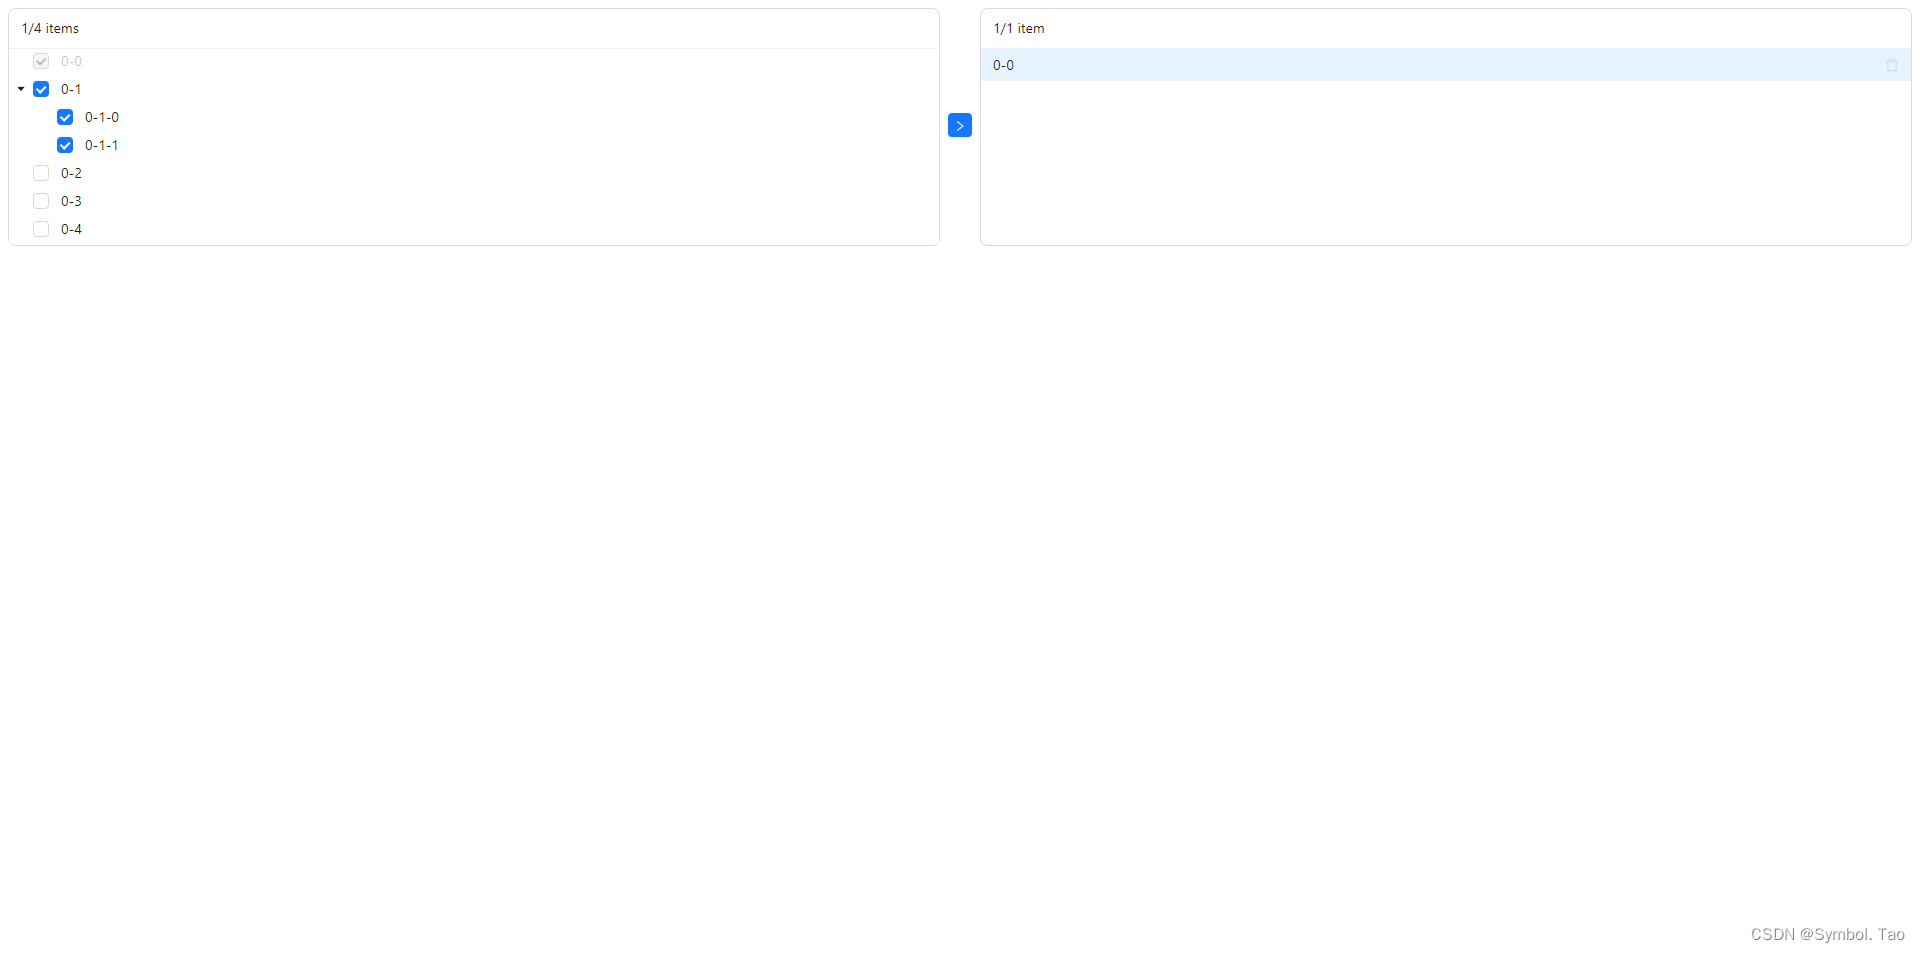
- 高级用法-树穿梭框组件
普通用法
/* eslint-disable no-unused-vars */
import React, { useEffect, useState } from 'react'
import { Space, Transfer } from 'antd'

// Antd的穿梭框组件Mock数据
const mockData = Array.from({
  length: 20
}).map((_, i) => ({
  key: i.toString(),
  title: `content${i + 1}`,
  description: `description of content${i + 1}`,
  disabled: i % 3 < 1 // 禁用某项
}))

// 筛选出ID数组
const initialTargetKeys = mockData.filter(item => Number(item.key) > 10).map(item => item.key)

const App = () => {
  // 设置目标键数组
  const [targetKeys, setTargetKeys] = useState(initialTargetKeys)
  // 设置选中的键数组
  const [selectedKeys, setSelectedKeys] = useState([])

  useEffect(() => {
    console.log('模拟数据', mockData)
  }, [])

  const onChange = (nextTargetKeys, direction, moveKeys) => {
    console.log('==========Start Change==========')
    console.log('targetKeys:', nextTargetKeys) // 下一次的目标键数组,即移动后的目标列表
    console.log('direction:', direction) // 移动的方向,可以是'left'或'right',表示从左侧列表移动到右侧列表或从右侧列表移动到左侧列表
    console.log('moveKeys:', moveKeys) // 移动的键数组,即移动的项
    console.log('==========End Change==========')
    setTargetKeys(nextTargetKeys)
  }

  const onSelectChange = (sourceSelectedKeys, targetSelectedKeys) => {
    console.log('==========Start SelectChange==========')
    console.log('sourceSelectedKeys:', sourceSelectedKeys) // 源列表中选中的键数组
    console.log('targetSelectedKeys:', targetSelectedKeys) // 目标列表中选中的键数组
    console.log('==========End SelectChange==========')
    setSelectedKeys([...sourceSelectedKeys, ...targetSelectedKeys])
  }

  const onScroll = (direction, e) => {
    console.log('==========Start Scroll==========')
    console.log('direction:', direction) // 滚动的方向,可以是'left'或'right',表示向左滚动或向右滚动
    console.log('target:', e.target) // 滚动事件对象,包含了滚动的相关信息,如滚动的目标等
    console.log('==========End Scroll==========')
  }

  console.log('==========Start Search==========')
  const handleSearch = (dir, value) => {
    // dir 表示搜索框所在的列表,可以是'left'或'right',表示在源列表或目标列表中搜索\
    // value 表示搜索框中的值
    console.log('search:', dir, value)
  }
  console.log('==========End Search==========')

  return (
    <div className="App">
      <Space>
        <Transfer
          dataSource={mockData} // 数据源,即需要在两个列表之间移动的数据列表
          titles={['Source', 'Target']} // 列表的标题,包括源列表和目标列表的标题
          targetKeys={targetKeys} // 目标列表中的键数组,表示当前已经选中的项的键数组
          selectedKeys={selectedKeys} // 当前选中的项的键数组,用于在两个列表之间移动项时的状态管理
          onChange={onChange} // 当目标列表中的键数组改变时触发的事件回调函数
          onSelectChange={onSelectChange} // 当源列表和目标列表中的选中项改变时触发的事件回调函数
          onScroll={onScroll} // 当滚动时触发的事件回调函数
          onSearch={handleSearch} // 当搜索框中的值改变时触发的事件回调函数
          render={item => item.title} // 定义如何渲染每个数据项,返回一个React元素
          oneWay // 是否只允许从左侧列表向右侧列表移动数据,默认为false
          showSearch // 是否显示搜索框,默认为false
          pagination // 是否显示分页,默认为false,一般在大数据量下使用
        />
        {/* 自定义状态 */}
        <Transfer status="error" />
        <Transfer status="warning" showSearch />
      </Space>
    </div>
  )
}

export default App

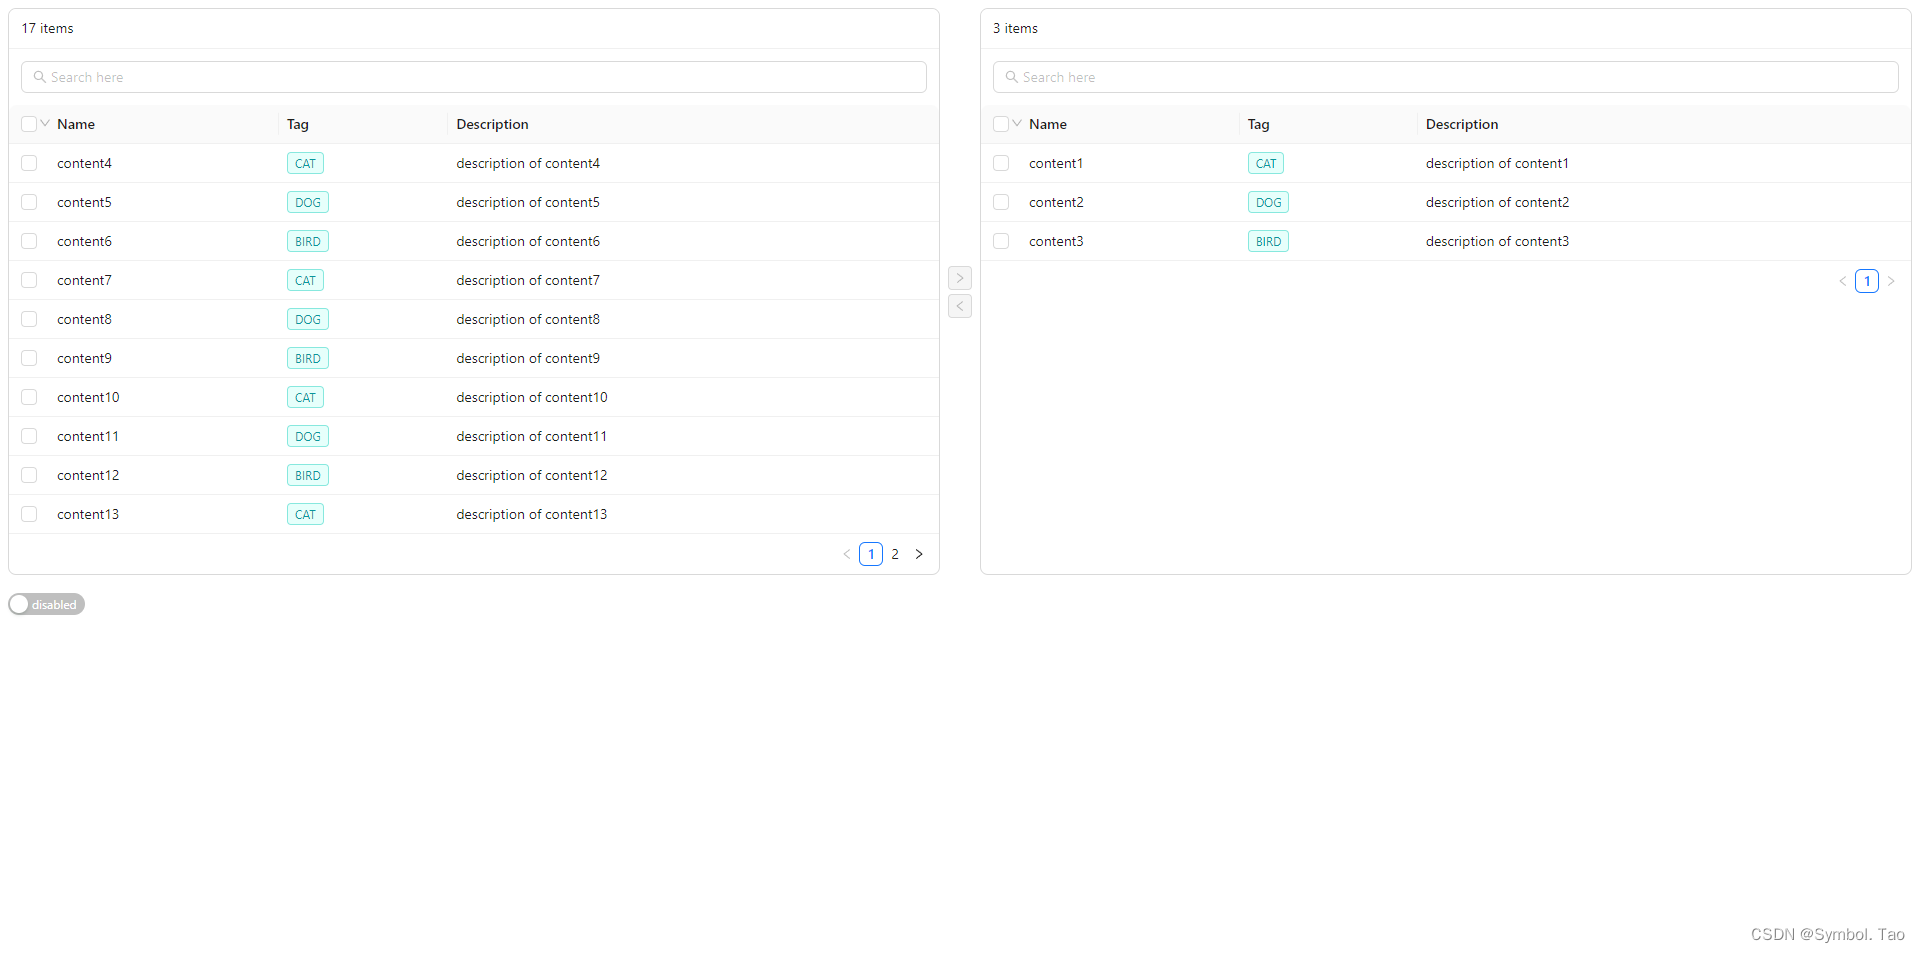
高级用法-表格穿梭框组件
/* eslint-disable react/prop-types */
/* eslint-disable no-unused-vars */
import React, { useState } from 'react'
import { Space, Switch, Table, Tag, Transfer } from 'antd'

// leftColumns 表示左侧表格的列,rightColumns表示右侧表格的列,restProps表示其他属性
const TableTransfer = ({ leftColumns, rightColumns, ...restProps }) => (
  // 渲染Transfer组件
  <Transfer {...restProps}>
    {({
      direction, // 数据传输方向(左或右)
      filteredItems, // 经过搜索过滤后的项
      onItemSelect, // 选中项时的回调函数
      onItemSelectAll, // 全选项时的回调函数
      selectedKeys: listSelectedKeys, // 已选中项的键数组
      disabled: listDisabled // 列表是否被禁用的标志
    }) => {
      const columns = direction === 'left' ? leftColumns : rightColumns // 根据传输方向选择表格列
      const rowSelection = {
        getCheckboxProps: () => ({
          disabled: listDisabled // 设置复选框是否禁用
        }),
        onChange(selectedRowKeys) {
          onItemSelectAll(selectedRowKeys, 'replace') // 全选/取消全选时的操作
        },
        selectedRowKeys: listSelectedKeys, // 已选中项的键数组
        selections: [Table.SELECTION_ALL, Table.SELECTION_INVERT, Table.SELECTION_NONE] // 表格行选择器
      }
      return (
        <Table
          rowSelection={rowSelection} // 表格行选择器配置
          columns={columns} // 表格列配置
          dataSource={filteredItems} // 数据源
          size="small" // 表格尺寸
          style={{
            pointerEvents: listDisabled ? 'none' : undefined // 根据列表是否禁用设置CSS样式
          }}
          onRow={({ key, disabled: itemDisabled }) => ({
            // 表格行的事件处理函数
            onClick: () => {
              if (itemDisabled || listDisabled) {
                // 如果项被禁用或列表被禁用,则不执行操作
                return
              }
              onItemSelect(key, !listSelectedKeys.includes(key)) // 选中/取消选中项时的操作
            }
          })}
        />
      )
    }}
  </Transfer>
)

const mockTags = ['cat', 'dog', 'bird'] // 模拟标签数据
const mockData = Array.from({
  // 生成模拟数据
  length: 20
}).map((_, i) => ({
  key: i.toString(), // 唯一键
  title: `content${i + 1}`, // 标题
  description: `description of content${i + 1}`, // 描述
  tag: mockTags[i % 3] // 标签
}))
// 表格列配置
const columns = [
  {
    dataIndex: 'title',
    title: 'Name'
  },
  {
    dataIndex: 'tag',
    title: 'Tag',
    render: tag => (
      <Tag
        style={{
          marginInlineEnd: 0
        }}
        color="cyan"
      >
        {tag.toUpperCase()}
      </Tag>
    )
  },
  {
    dataIndex: 'description',
    title: 'Description'
  }
]
const Default = () => {
  const [targetKeys, setTargetKeys] = useState([]) // 目标键数组的状态及其更新函数
  const [disabled, setDisabled] = useState(false) // 禁用状态及其更新函数
  const onChange = nextTargetKeys => {
    // 目标键数组变化时的处理函数
    setTargetKeys(nextTargetKeys) // 更新目标键数组
  }
  const toggleDisabled = checked => {
    // 切换禁用状态的处理函数
    setDisabled(checked) // 更新禁用状态
  }
  return (
    <>
      <TableTransfer // 表格数据传输组件
        dataSource={mockData} // 数据源
        targetKeys={targetKeys} // 目标键数组
        disabled={disabled} // 是否禁用
        showSearch // 是否显示搜索框
        showSelectAll={false} // 是否显示全选按钮
        onChange={onChange} // 目标键数组变化时的回调函数
        filterOption={(
          inputValue,
          item // 自定义搜索过滤函数
        ) => item.title.indexOf(inputValue) !== -1 || item.tag.indexOf(inputValue) !== -1}
        leftColumns={columns} // 左侧表格列配置
        rightColumns={columns} // 右侧表格列配置
      />
      <Space
        style={{
          marginTop: 16
        }}
      >
        {/* 开关组件,用于切换禁用状态 */}
        <Switch unCheckedChildren="disabled" checkedChildren="disabled" checked={disabled} onChange={toggleDisabled} />
      </Space>
    </>
  )
}
export default Default
高级用法-树穿梭框组件
未完善
TreeTransfer.jsx 树穿梭框组件
/* eslint-disable no-unused-vars */
/* eslint-disable react/prop-types */
import React, { useEffect, useState } from 'react'
import { Transfer, Tree } from 'antd'

const generateTree = (treeNodes = [], checkedKeys = [], parentKeys = []) =>
  treeNodes.map(({ children, ...props }) => {
    const updatedProps = {
      ...props,
      disabled: checkedKeys.includes(props.key),
      children: generateTree(children, checkedKeys, parentKeys.concat(props.key))
    }

    // 父节点如果被选中,则添加所有子节点到 checkedKeys
    if (checkedKeys.includes(props.key)) {
      updatedProps.children.forEach(child => {
        if (!checkedKeys.includes(child.key)) {
          checkedKeys.push(child.key)
        }
      })
    }

    return updatedProps
  })

const TreeTransfer = ({ dataSource, ...restProps }) => {
  const [selectedKeys, setSelectedKeys] = useState([])
  const [targetKeys, setTargetKeys] = useState([])

  useEffect(() => {
    console.log(selectedKeys, 'selectedKeys')
  }, [selectedKeys, setSelectedKeys])

  // 子节点全部选中时,让父节点也会被选中
  // key 表示当前节点,checkedKeys 是当前目标源keys数组,dataSource 是数据数组
  const updateParentKeys = (key, checkedKeys, dataSource) => {
    console.log(key, '当前节点', checkedKeys, '当前目标源keys数组', dataSource, '数据数组')
    // 对 checkedKeys 做浅拷贝,以避免直接修改原数组
    const updatedKeys = [...checkedKeys]
    // 查找包含指定子节点键 key 的父节点
    const parentNode = dataSource.find(item => item.children && item.children.some(child => child.key === key))
    if (parentNode) {
      // 如果找到了父节点
      // 检查父节点的所有子节点是否都在 updatedKeys 中
      const allChildrenChecked = parentNode.children.every(child => updatedKeys.includes(child.key))
      // 如果所有子节点都被选中且父节点未被选中,则将父节点添加到 updatedKeys 中
      if (allChildrenChecked && !updatedKeys.includes(parentNode.key)) {
        updatedKeys.push(parentNode.key)
      } else if (!allChildrenChecked && updatedKeys.includes(parentNode.key)) {
        // 如果存在未被选中的子节点且父节点被选中,则从 updatedKeys 中移除父节点
        updatedKeys.splice(updatedKeys.indexOf(parentNode.key), 1)
      }
      // 递归更新父节点的父节点,确保所有相关节点的选中状态都被正确更新
      return updateParentKeys(parentNode.key, updatedKeys, dataSource)
    }
    // 如果没有找到父节点,则直接返回 updatedKeys
    return updatedKeys
  }

  const handleCheck = (checkedKeys, { node: { key, children } }) => {
    let cKeys = [...selectedKeys] // 复制当前已选择的键数组
    // 如果点击的节点已经在已选择数组中,则从数组中移除
    if (cKeys.includes(key)) {
      cKeys = cKeys.filter(item => item !== key)
      if (children && children.length > 0) {
        const checkList = dataSource
          .filter(item => item.key === key)
          .map(item => {
            return [key, ...item.children.map(child => child.key)]
          })
          .flat()
        console.log(checkList, '取消选择的父节点')
        // 使用 Array.prototype.filter() 来移除整个节点数组
        cKeys = cKeys.filter(item => !checkList.includes(item))
      } else {
        // 如果点击的是子节点,则检查父节点是否需要从已选择数组中移除
        cKeys = updateParentKeys(key, cKeys, dataSource)
      }
    } else {
      // 将当前节点添加到已选择数组中
      cKeys.push(key)
      // 如果点击的是父节点,则同时将子节点也添加到已选择数组中
      if (children && children.length > 0) {
        children.forEach(child => {
          cKeys.push(child.key)
        })
      } else {
        // 如果点击的是子节点,则检查父节点是否需要添加到已选择数组中
        cKeys = updateParentKeys(key, cKeys, dataSource)
      }
    }

    setSelectedKeys(cKeys)
  }

  const onChange = (t, d, m) => {
    setTargetKeys(selectedKeys)
  }

  return (
    <Transfer
      {...restProps}
      targetKeys={targetKeys}
      selectedKeys={selectedKeys}
      dataSource={dataSource}
      onChange={onChange}
      render={item => item.title}
      showSelectAll={false}
      oneWay
    >
      {({ direction }) => {
        if (direction === 'left') {
          const checkedKeys = [...selectedKeys, ...targetKeys]
          return (
            <Tree
              blockNode
              checkable
              checkStrictly
              defaultExpandAll
              checkedKeys={checkedKeys}
              treeData={generateTree(dataSource, targetKeys)}
              onCheck={handleCheck}
              onSelect={handleCheck}
            />
          )
        }
      }}
    </Transfer>
  )
}

export default TreeTransfer
Index.jsx
/* eslint-disable no-unused-vars */
/* eslint-disable react/prop-types */
import React, { useState } from 'react'
import TreeTransfer from './dom';

const treeData = [
  {
    key: '0-0',
    title: '0-0'
  },
  {
    key: '0-1',
    title: '0-1',
    children: [
      {
        key: '0-1-0',
        title: '0-1-0'
      },
      {
        key: '0-1-1',
        title: '0-1-1'
      }
    ]
  },
  {
    key: '0-2',
    title: '0-2'
  },
  {
    key: '0-3',
    title: '0-3'
  },
  {
    key: '0-4',
    title: '0-4'
  }
]

const Index = () => {
  return <TreeTransfer dataSource={treeData} />
}
export default Index
