一:Spring IoC&DI
在前⾯的章节中, 我们学习了 Spring Boot 和 Spring MVC 的开发, 可以完成⼀些基本功能的开发了, 但是什么是 Spring 呢? Spring, Spring Boot 和 SpringMVC 又有什么关系呢? 咱们还是带着问题去学习.我们先看什么是Spring
1.1 Spring 是什么?
Spring 是⼀个开源框架, 他让我们的开发更加简单. 他支持广泛的应用场景, 有着活跃而庞大的社区, 这也是 Spring 能够长久不衰的原因,但是这个概念相对来说还是比较抽象,我们还是不太理解什么是 Spring
用⼀句更具体的话来概括 Spring,:包含了众多工具方法的 IoC 容器
那什么又是 IoC 容器?接下来我们⼀起来看
1.1.1 什么是容器
容器是用来容纳某种物品的装置。
生活中的水杯, 垃圾桶, 冰箱等等这些都是容器,我们想想,之前课程我们接触的容器有哪些?
- List/Map -> 数据存储容器
- Tomcat -> Web 容器
1.1.2 什么是 IoC?
IoC: Inversion of Control (控制反转),IoC 是 Spring 的核心思想, Spring 是⼀个 “控制反转” 的容器.
控制反转也就是获得对象的控制权发生了反转,当我们需要某个对象时, 传统开发模式中需要自己通过 new 创建对象,而现在不需要再自己进行创建对象了, 我们只需要把创建对象的任务交给 loc 容器,程序中依赖注入就可以了.
其实 IoC 我们在前面已经使用了, 我们在前面讲到,在类上面添加 @RestController 和
@Controller 注解, 就是把这个对象交给 Spring 管理, Spring 框架启动时就会加载该类. 把对象交给 Spring 管理, 就是 IoC 思想.
控制反转是⼀种思想, 在生活中也是处处体现:比如招聘, 企业的员工招聘,入职, 解雇等控制权, 由老板转交给给HR(人力资源)来处理
1.2 IoC 介绍
接下来我们通过案例来了解⼀下什么是 IoC,需求: 造⼀辆⻋
1.2.1 传统程序开发
我们的实现思路是这样的:
先设计轮子,然后根据轮子的大小设计底盘,接着根据底盘设计车身,最后根据车身设计好整个汽⻋。这⾥就出现了⼀个 “依赖” 关系:汽车依赖车身,车身依赖底盘,底盘依赖轮子.

最终程序的实现代码如下:
public class NewCarExample {
    public static void main(String[] args) {
        Car car = new Car();
        car.run();
    }
    /**
     * 汽⻋对象
     */
    static class Car {
        private Framework framework;
        public Car() {
            framework = new Framework();
            System.out.println("Car init....");
        }
        public void run(){
            System.out.println("Car run...");
        }
    }
    /**
     * ⻋⾝类
     */
    static class Framework {
        private Bottom bottom;
        public Framework() {
            bottom = new Bottom();
            System.out.println("Framework init...");
        }
    }
    /**
     * 底盘类
     */
    static class Bottom {
        private Tire tire;
        public Bottom() {
            this.tire = new Tire();
            System.out.println("Bottom init...");
        }
    }
    /**
     * 轮胎类
     */
    static class Tire {
        // 尺⼨
        private int size;
        public Tire(){
            this.size = 17;
            System.out.println("轮胎尺⼨:" + size);
        }
    }
}
这样的设计看起来没问题,但是可维护性却很低.
接下来需求有了变更: 随着对的车的需求量越来越大, 个性化需求也会越来越多,我们需要加工多种尺寸的轮胎.那这个时候就要对上面的程序进行修改了,修改后的代码如下所示:
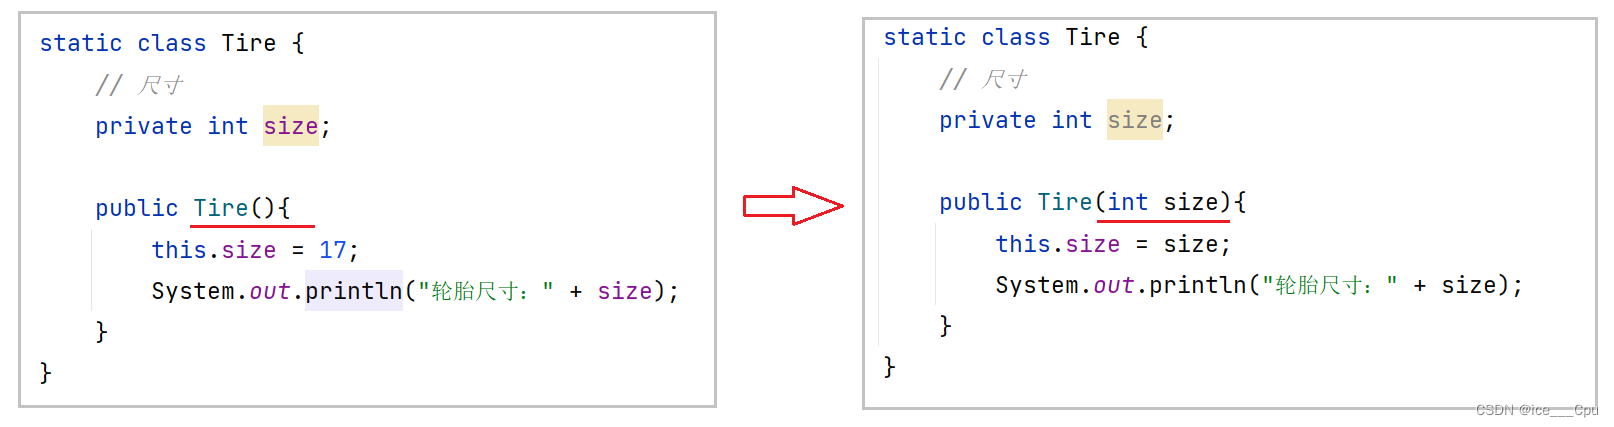
修改之后, 其他调用程序也会报错, 我们需要继续修改

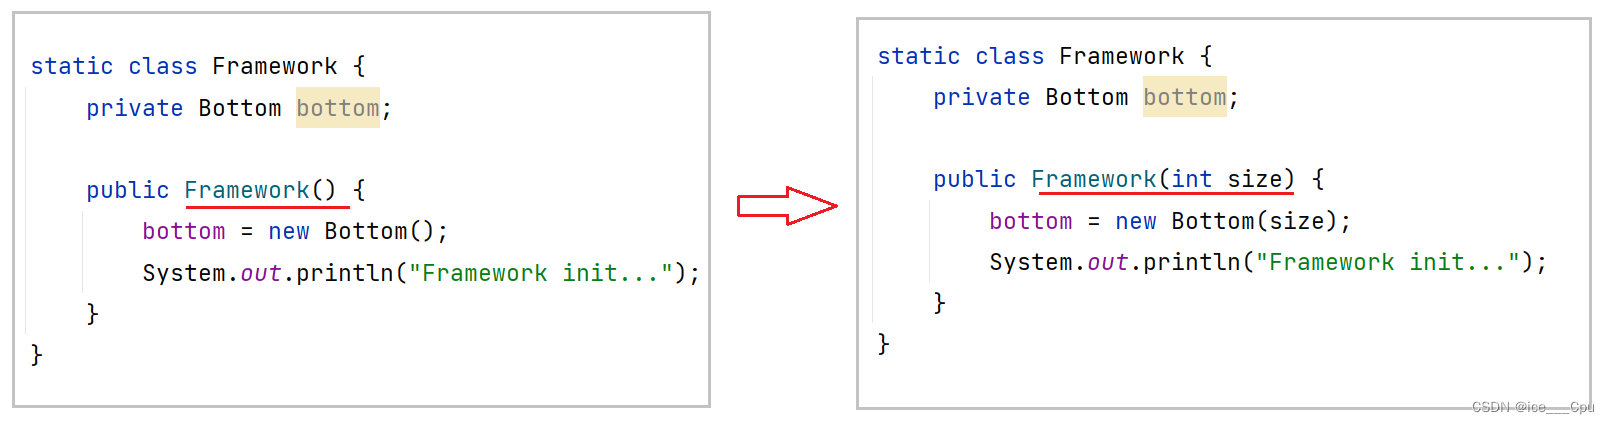
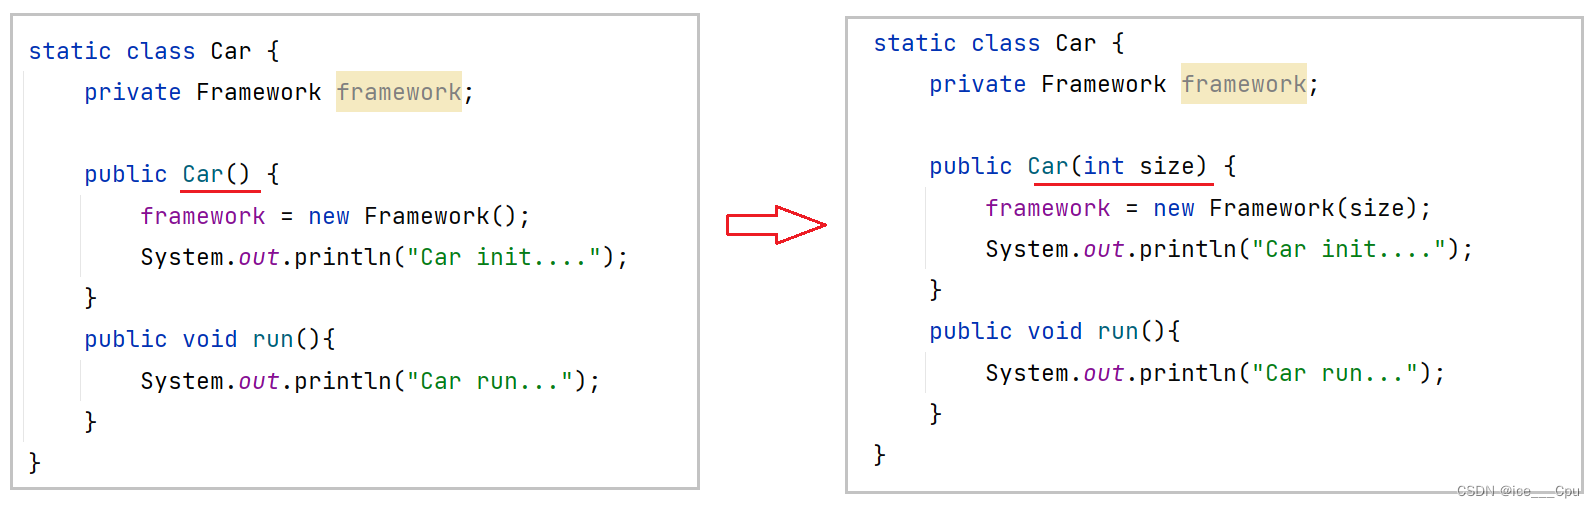
完整代码如下:
public class NewCarExample {
    public static void main(String[] args) {
        Car car = new Car(20);
        car.run();
    }
    /**
     * 汽⻋对象
     */
    static class Car {
        private Framework framework;
        public Car(int size) {
            framework = new Framework(size);
            System.out.println("Car init....");
        }
        public void run(){
            System.out.println("Car run...");
        }
    }
    /**
     * ⻋⾝类
     */
    static class Framework {
        private Bottom bottom;
        public Framework(int size) {
            bottom = new Bottom(size);
            System.out.println("Framework init...");
        }
    }
    /**
     * 底盘类
     */
    static class Bottom {
        private Tire tire;
        public Bottom(int size) {
            this.tire = new Tire(size);
            System.out.println("Bottom init...");
        }
    }
    /**
     * 轮胎类
     */
    static class Tire {
        // 尺⼨
        private int size;
        public Tire(int size){
            this.size = size;
            System.out.println("轮胎尺⼨:" + size);
        }
    }
}
从以上代码可以看出,以上程序的问题是:当最底层代码改动之后,整个调用链上的所有代码都需要修改,程序的耦合度非常高
1.2.2 解决方案
我们尝试换⼀种思路, 我们先设计汽车的大概样子,然后根据汽车的样子来设计车身,根据车身来设计底盘,最后根据底盘来设计轮子. 这时候,依赖关系就倒置过来了:轮子依赖底盘, 底盘依赖车身,车身依赖汽车

那么如何来实现呢:
此时,我们只需要将原来由自己创建的下级类,改为传递的方式(也就是注入的方式),因为我们不需要在当前类中创建下级类了,所以下级类即使发生变化(创建或减少参数),当前类本身也无需修改任何代码,这样就完成了程序的解耦
1.2.3 IoC 程序开发
基于以上思路,我们把调⽤汽车的程序示例改造⼀下,把创建子类的方式,改为注入传递的方式.
具体实现代码如下:.
public class IocCarExample {
public static void main(String[] args) {
Tire tire = new Tire(20);
Bottom bottom = new Bottom(tire);
Framework framework = new Framework(bottom);
Car car = new Car(framework);
car.run();
}
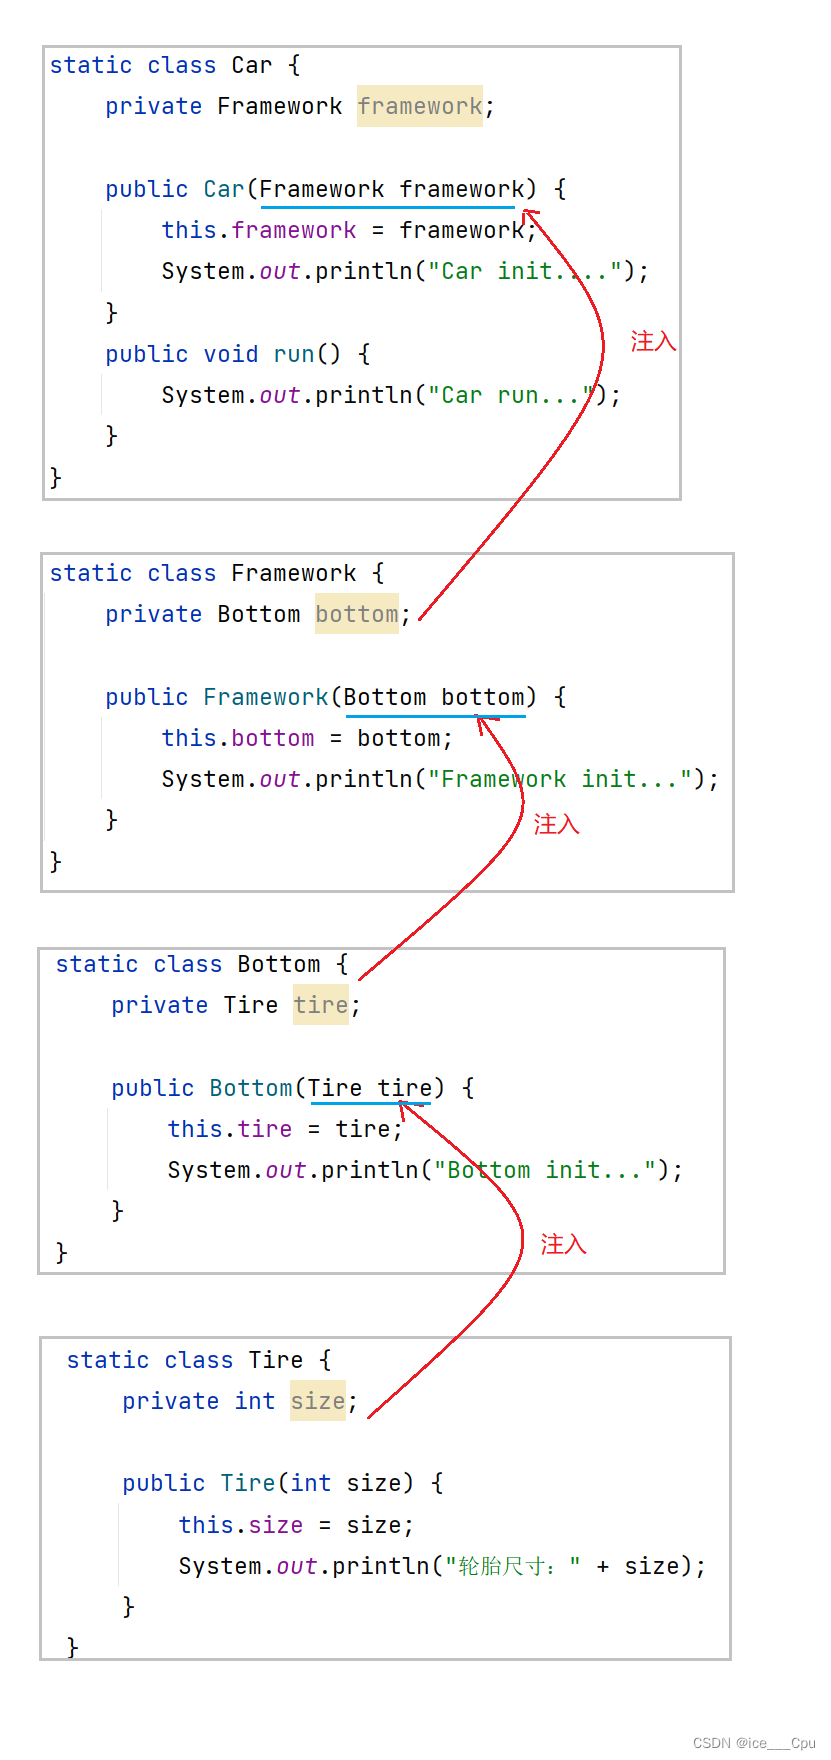
static class Car {
private Framework framework;
public Car(Framework framework) {
this.framework = framework;
System.out.println("Car init....");
}
public void run() {
System.out.println("Car run...");
}
}
static class Framework {
private Bottom bottom;
public Framework(Bottom bottom) {
this.bottom = bottom;
System.out.println("Framework init...");
}
}
static class Bottom {
private Tire tire;
public Bottom(Tire tire) {
this.tire = tire;
System.out.println("Bottom init...");
}
}
static class Tire {
private int size;
public Tire(int size) {
this.size = size;
System.out.println("轮胎尺⼨:" + size);
}
}
}
码经过以上调整,无论底层类如何变化,整个调⽤链是不用做任何改变的,这样就完成了代码之间的解耦,从而实现了更加灵活、通用的程序设计了。
1.2.4 IoC 优势
在传统的代码中对象创建顺序是:Car -> Framework -> Bottom -> Tire
改进之后解耦的代码的对象创建顺序是:Tire -> Bottom -> Framework -> Car
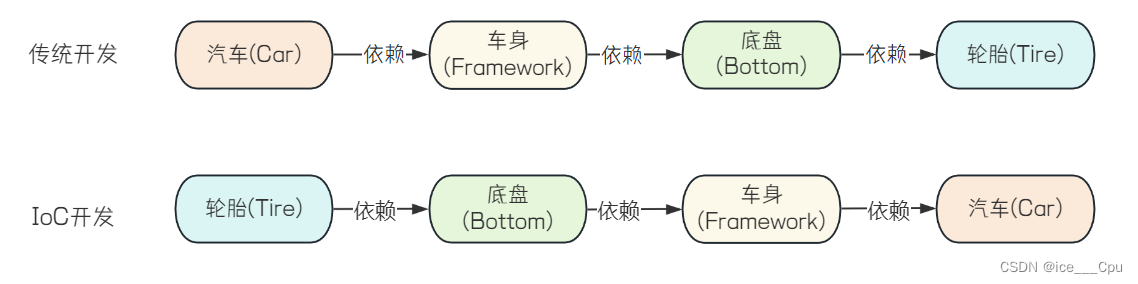
我们发现了⼀个规律,通用程序的实现代码,类的创建顺序是反的,传统代码是 Car 控制并创建了Framework,Framework 创建并创建了 Bottom,依次往下
而改进之后的控制权发生的反转,不再是使用方对象创建并控制依赖对象了,而是把依赖对象注入将当前对象中,依赖对象的控制权不再由当前类控制了.
这样的话, 即使依赖类发生任何改变,当前类都是不受影响的,这就是典型的控制反转,也就是 IoC 的实现思想,学到这里, 我们大概就知道了什么是控制反转了, 那什么是控制反转容器呢, 也就是IoC容器
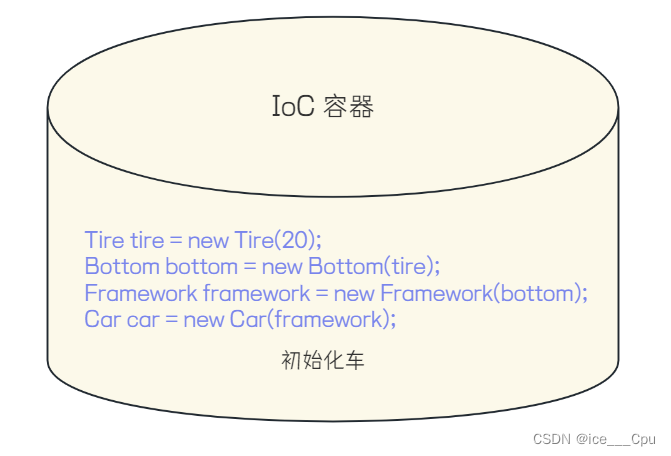
这部分代码, 就是 IoC 容器做的工作,Spring 就是⼀种 IoC 容器, 帮助我们来做了这些资源管理,从上面也可以看出来, IoC 容器具备以下优点:
- 第⼀,资源集中管理,实现资源的可配置和易管理。
IoC容器会帮我们管理⼀些资源(对象等), 我们需要使⽤时, 只需要从IoC容器中去取就可以了
- 第⼆,降低了使用资源双方的依赖程度,也就是我们说的耦合度。
所以我们在创建实例的时候不需要了解其中的细节,
1.3 DI 介绍
DI: Dependency Injection(依赖注⼊),容器在运行期间, 动态的为应用程序提供运行时所依赖的资源,称之为依赖注入,程序运行时需要某个资源,此时容器就为其提供这个资源.
从这点来看, 依赖注入(DI)和控制反转(IoC)是从不同的角度的描述的同⼀件事情,就是指通过引⼊ IoC 容器,利用依赖关系注入的方式,实现对象之间的解耦。
上述代码中, 是通过构造函数的方式, 把依赖对象注入到需要使用的对象中的
IoC 是⼀种思想,思想只是⼀种指导原则,最终还是要有可行的落地方案,而 DI 就属于具体的实现。所以也可以说 DI 是 IoC 的⼀种实现.
1.4 IoC & DI 使⽤
对 IoC 和 DI 有了初步的了解, 我们接下来具体学习 Spring IoC 和 DI 的代码实现.
既然 Spring 是⼀个 IoC(控制反转)容器,作为容器, 那么它就具备两个最基础的功能:
- 存
- 取
Spring 容器管理的主要是对象, 这些对象, 我们称之为 “Bean”. 我们把这些对象交由 Spring 管理, 由 Spring 来负责对象的创建和销毁. 我们程序只需要告诉 Spring , 哪些需要存, 以及如何从 Spring 中取出对象
目标:
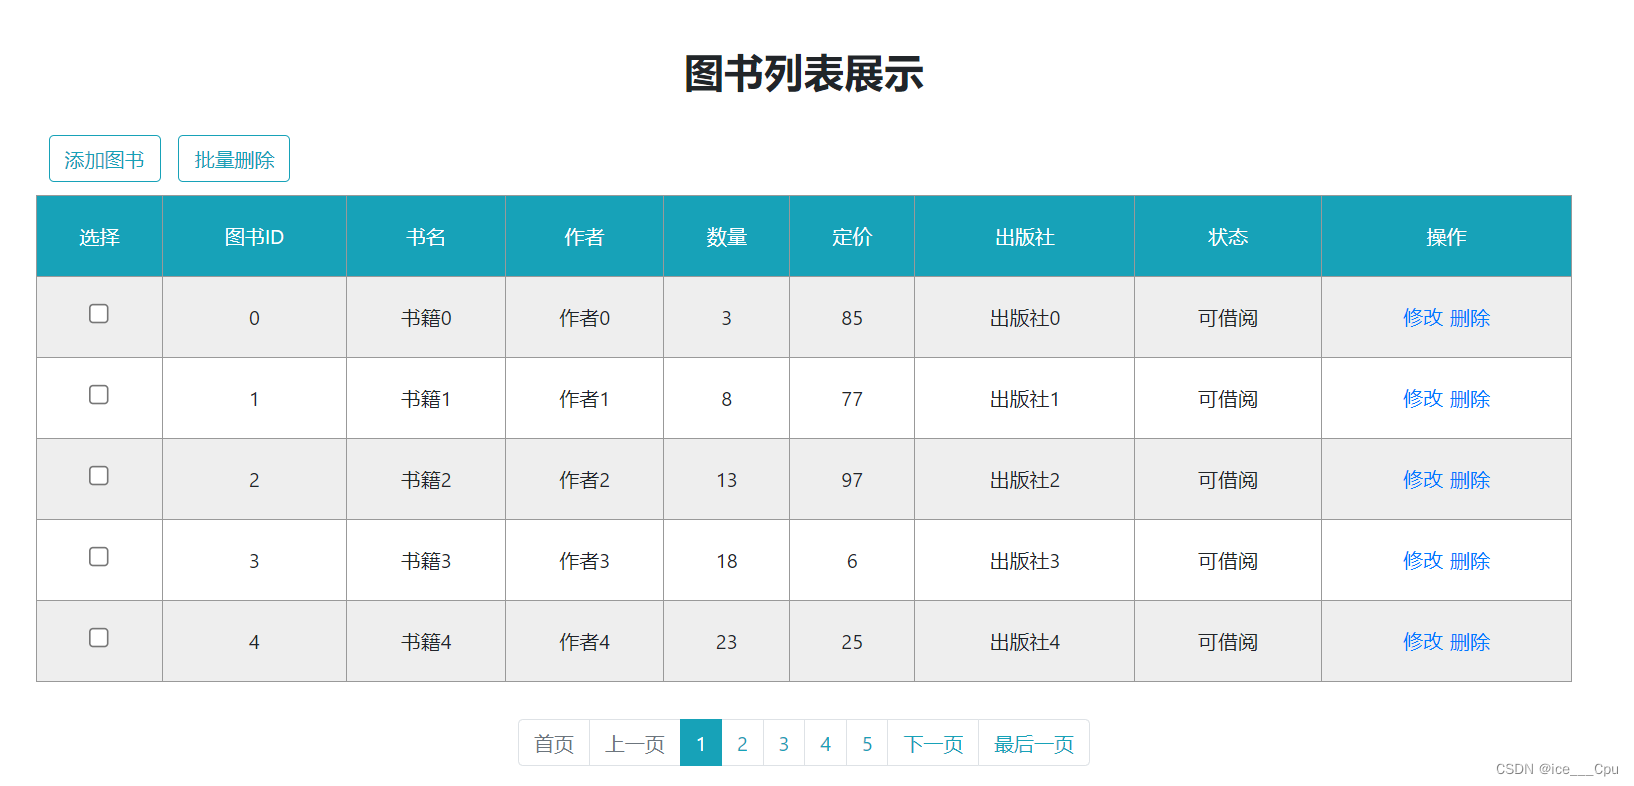
把 BookDao, BookService 交给 Spring 管理, 完成 Controller 层, Service 层, Dao 层的解耦
步骤:
- Service 层及 Dao 层的实现类,交给 Spring 管理: 使用注解: @Component
- 在Controller 层 和 Service 层 注入运行时依赖的对象: 使用注解 @Autowired
实现:
- 把 BookDao 交给 Spring 管理, 由 Spring 来管理对象
@Component
public class BookDao {
    /**
     * 数据Mock 获取图书信息
     *
     * @return
     */
    public List<BookInfo> mockData() {
        List<BookInfo> books = new ArrayList<>();
        for (int i = 0; i < 5; i++) {
            BookInfo book = new BookInfo();
            book.setId(i);
            book.setBookName("书籍" + i);
            book.setAuthor("作者" + i);
            book.setCount(i * 5 + 3);
            book.setPrice(new BigDecimal(new Random().nextInt(100)));
            book.setPublish("出版社" + i);
            book.setStatus(1);
            books.add(book);
        }
        return books;
    }
}
- 把BookService 交给 Spring 管理, 由 Spring 来管理对象
@Component
public class BookService {
    private BookDao bookDao = new BookDao();
    public List<BookInfo> getBookList() {
        List<BookInfo> books = bookDao.mockData();
        for (BookInfo book : books) {
            if (book.getStatus() == 1) {
                book.setStatusCN("可借阅");
            } else {
                book.setStatusCN("不可借阅");
            }
        }
        return books;
    }
}
- 删除创建 BookDao 的代码, 从 Spring 中获取对象
@Component
public class BookService {
    @Autowired
    private BookDao bookDao;
    public List<BookInfo> getBookList() {
        List<BookInfo> books = bookDao.mockData();
        for (BookInfo book : books) {
            if (book.getStatus() == 1) {
                book.setStatusCN("可借阅");
            } else {
                book.setStatusCN("不可借阅");
            }
        }
        return books;
    }
}
- 删除创建 BookService 的代码, 从 Spring 中获取对象
@RequestMapping("/book")
@RestController
public class BookController {
    @Autowired
    private BookService bookService;
    @RequestMapping("/getList")
    public List<BookInfo> getList(){
//获取数据
        List<BookInfo> books = bookService.getBookList();
        return books;
    }
}
- 重新运行程序, http://127.0.0.1:8080/book_list.html
1.5 IoC 详解
通过上面的案例, 我们已经知道了 Spring IoC 和 DI 的基本操作, 接下来我们来系统的学习 Spring IoC 和 DI 的操作.
前面我们提到 IoC 控制反转,就是将对象的控制权交给 Spring 的 IOC 容器,由 IOC 容器创建及管理对象。也就是 bean 的存储.
1.5.1 Bean的存储
在之前的入门案例中,要把某个对象交给IOC容器管理,需要在类上添加⼀个注解:
- @Component
⽽ Spring 框架为了更好的服务 web 应用程序, 提供了更丰富的注解.
共有两类注解类型可以实现:
- 类注解:@Controller、@Service、@Repository、@Component、@Configuration.
- 方法注解:@Bean.
接下来我们分别来看
1.5.1.1 @Controller(控制器存储)
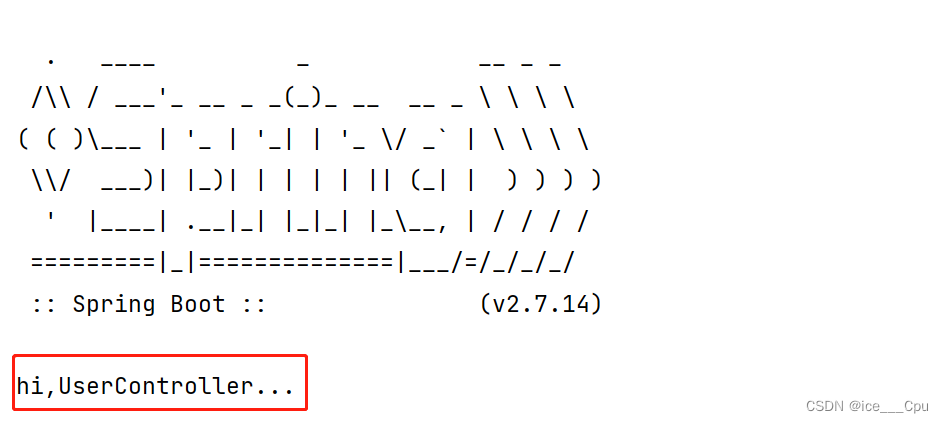
使用 @Controller 存储 bean 的代码如下所示:
@Controller // 将对象存储到 Spring 中
public class UserController {
    public void sayHi(){
        System.out.println("hi,UserController...");
    }
}
如何观察这个对象已经存在 Spring 容器当中了呢,接下来我们学习如何从 Spring 容器中获取对象
@SpringBootApplication
public class SpringIocDemoApplication {
    public static void main(String[] args) {
		//获取Spring上下⽂对象
        ApplicationContext context = SpringApplication.run(SpringIocDemoApplicatio
		//从Spring上下⽂中获取对象
        UserController userController = context.getBean(UserController.class);
		//使⽤对象
        userController.sayHi();
    }
}
ApplicationContext 翻译过来就是: Spring 上下文,因为对象都交给 Spring 管理了,所以获取对象要从 Spring 中获取,自然就得先得到 Spring 的上下文
观察运行结果, 发现成功从 Spring 中获取到 Controller 对象, 并执行 Controller 的 sayHi 方法
如果把 @Controller 删掉, 再观察运行结果

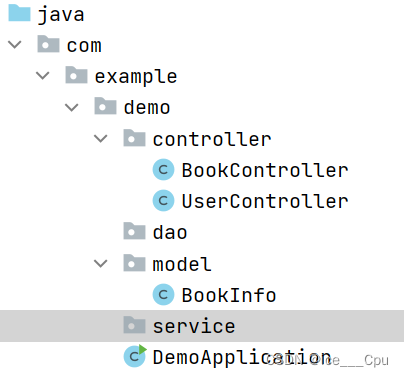
报错信息显示: 找不到类型是:com.example.demo.controller.UserController的 bean
1.5.1.2 获取 bean 对象的其他方式
上述代码是根据类型来查找对象, 如果 Spring 容器中, 同⼀个类型存在多个 bean 的话, 怎么来获取呢?
ApplicationContext 获取 bean 对象的功能, 是父类 BeanFactory 提供的
public interface BeanFactory {
    //以上省略...
	// 1. 根据bean名称获取bean
    Object getBean(String var1) throws BeansException;
    // 2. 根据bean名称和类型获取bean
    <T> T getBean(String var1, Class<T> var2) throws BeansException;
    // 3. 按bean名称和构造函数参数动态创建bean,只适⽤于具有原型(prototype)作⽤域的bean
    Object getBean(String var1, Object... var2) throws BeansException;
    // 4. 根据类型获取bean
    <T> T getBean(Class<T> var1) throws BeansException;
    // 5. 按bean类型和构造函数参数动态创建bean, 只适⽤于具有原型(prototype)作⽤域的bean
    <T> T getBean(Class<T> var1, Object... var2) throws BeansException;
//以下省略...
}
常⽤的是上述1,2,4种, 这三种⽅式,获取到的 bean 是⼀样的,其中1,2种都涉及到根据名称来获取对象. bean 的名称是什么呢
Spring bean 是 Spring 框架在运行时管理的对象, Spring 会给管理的对象起⼀个名字,根据Bean的名称(BeanId)就可以获取到对应的对象.
1.5.1.3 Bean 命名约定
程序开发人员不需要为 bean 指定名称(BeanId), 如果没有显式的提供名称(BeanId), Spring 容器将为该 bean 生成唯⼀的名称,命名约定 bean 名称以小写字母开头,然后使用驼峰式大小写.
比如:
- 类名: UserController, Bean的名称为: userController
- 类名: AccountManager, Bean的名称为: accountManager
- 类名: AccountService, Bean的名称为: accountService
也有⼀些特殊情况, 当有多个字符并且第⼀个和第⼆个字符都是大写时, 将保留原始的大小写,比如
- 类名: UController, Bean的名称为: UController
- 类名: AManager, Bean的名称为: AManager
根据这个命名规则, 我们来获取Bean.
@SpringBootApplication
public class SpringIocDemoApplication {
    public static void main(String[] args) {
		//获取Spring上下⽂对象
        ApplicationContext context = SpringApplication.run(SpringIocDemoApplicatio
		//从Spring上下⽂中获取对象
		//根据bean类型, 从Spring上下⽂中获取对象
        UserController userController1 = context.getBean(UserController.class);
		//根据bean名称, 从Spring上下⽂中获取对象
        UserController userController2 = (UserController) context.getBean("userController");
		//根据bean类型+名称, 从Spring上下⽂中获取对象
        UserController userController3 = context.getBean("userController", UserController.class);
        System.out.println(userController1);
        System.out.println(userController2);
        System.out.println(userController3);
    }
}
运行结果:
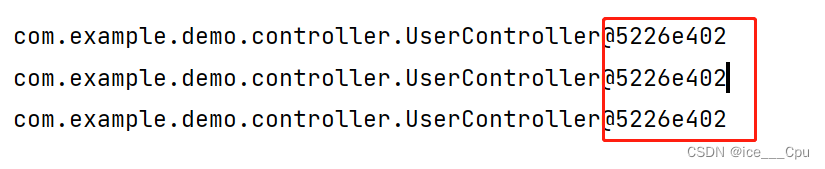
地址⼀样, 说明对象是⼀个
1.5.1.4 @Service(服务存储)
使⽤ @Service 存储 bean 的代码如下所⽰:
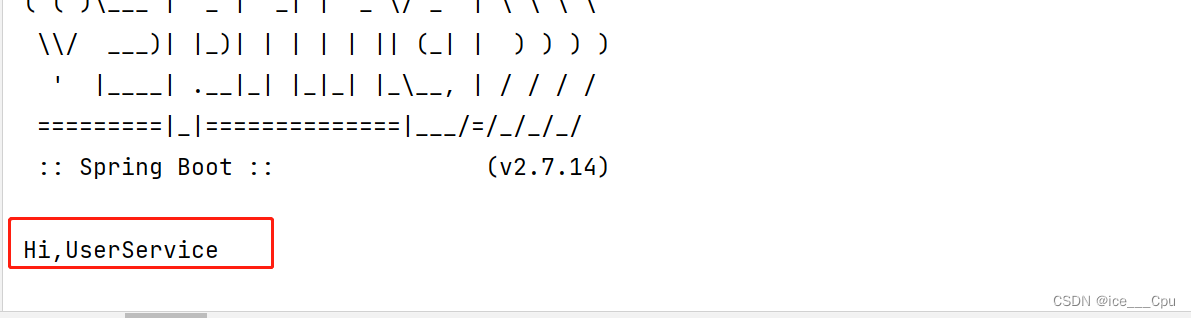
@Service
public class UserService {
    public void sayHi(String name) {
        System.out.println("Hi," + name);
    }
}
读取 bean 的代码:
@SpringBootApplication
public class SpringIocDemoApplication {
    public static void main(String[] args) {
		//获取Spring上下⽂对象
        ApplicationContext context = SpringApplication.run(SpringIocDemoApplication.class, args);
		//从Spring中获取UserService对象
        UserService userService = context.getBean(UserService.class);
		//使⽤对象
        userService.sayHi();
    }
}
观察运行结果, 发现成功从 Spring 中获取到 UserService 对象, 并执行 UserService 的sayHi 方法
1.5.1.5 @Repository(仓库存储)
使⽤ @Repository 存储 bean 的代码如下所⽰:
@Repository
public class UserRepository {
    public void sayHi() {
        System.out.println("Hi, UserRepository~");
    }
}
读取 bean 的代码:
@SpringBootApplication
public class SpringIocDemoApplication {
    public static void main(String[] args) {
		//获取Spring上下⽂对象
        ApplicationContext context = SpringApplication.run(SpringIocDemoApplication.class, args);
		//从Spring上下⽂中获取对象
        UserRepository userRepository = context.getBean(UserRepository.class);
		//使⽤对象
        userRepository.sayHi();
    }
}
观察运行结果, 发现成功从 Spring 中获取到 UserRepository 对象, 并执行 UserRepository 的 say 方法
1.5.1.6 @Component(组件存储)
使⽤ @Component 存储 bean 的代码如下所示:
@Component
public class UserComponent {
    public void sayHi() {
        System.out.println("Hi, UserComponent~");
    }
}
读取 bean 的代码:
@SpringBootApplication
public class SpringIocDemoApplication {
    public static void main(String[] args) {
		//获取Spring上下⽂对象
        ApplicationContext context = SpringApplication.run(SpringIocDemoApplication.class, args);
		//从Spring上下⽂中获取对象
        UserComponent userComponent = context.getBean(UserComponent.class);
		//使⽤对象
        userComponent.sayHi();
    }
}
观察运行结果, 发现成功从 Spring 中获取到 UserComponent 对象, 并执行 UserComponent 的 sayHi 方法
1.5.1.7 @Configuration(配置存储)
使⽤ @Configuration 存储 bean 的代码如下所⽰:
@Configuration
public class UserConfiguration {
    public void sayHi() {
        System.out.println("Hi,UserConfiguration~");
    }
}
读取 bean 的代码:
@SpringBootApplication
public class SpringIocDemoApplication {
    public static void main(String[] args) {
		//获取Spring上下⽂对象
        ApplicationContext context = SpringApplication.run(SpringIocDemoApplication.class, args);
		//从Spring上下⽂中获取对象
        UserConfiguration userConfiguration = context.getBean(UserConfiguration.cl
		//使⽤对象
                        userConfiguration.sayHi();
    }
}
观察运行结果, 发现成功从 Spring 中获取到 UserConfiguration 对象, 并执行 UserConfiguration 的 sayHi 方法
1.6 为什么要这么多类注解?
这个也是和咱们前面讲的应用分层是呼应的. 让程序员看到类注解之后,就能直接了解当前类的用途.
- @Controller:控制层, 接收请求, 对请求进行处理, 并进行响应.
- @Servie:业务逻辑层, 处理具体的业务逻辑.
- @Repository:数据访问层,也称为持久层. 负责数据访问操作
- @Configuration:配置层. 处理项目中的⼀些配置信息.
程序的应用分层,调用流程如下:
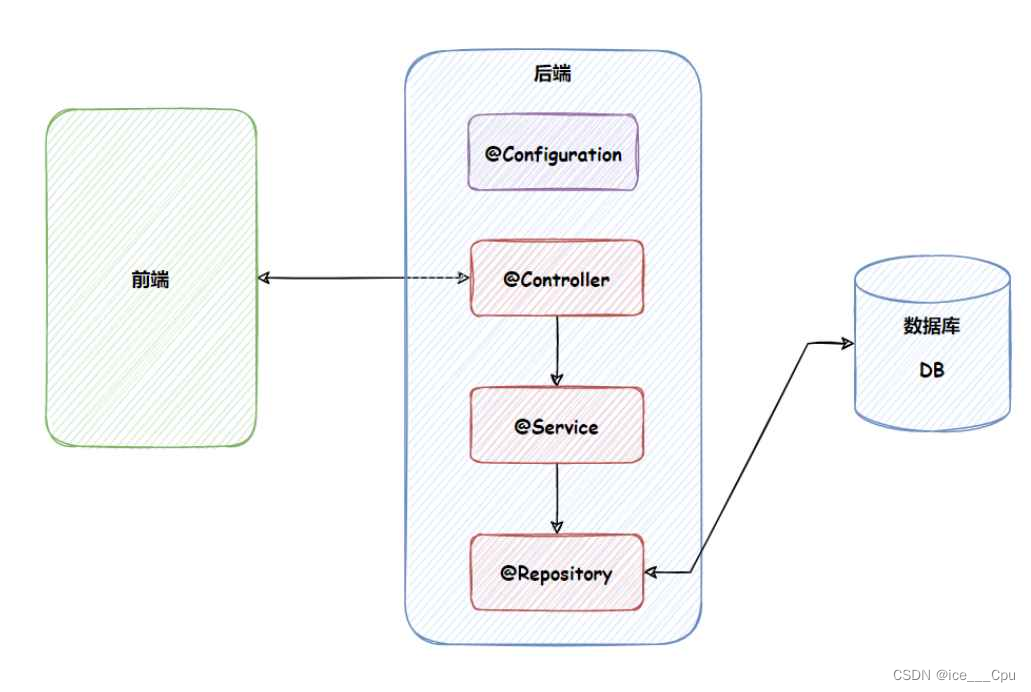
类注解之间的关系:查看 @Controller / @Service / @Repository / @Configuration 等注解的源码发现
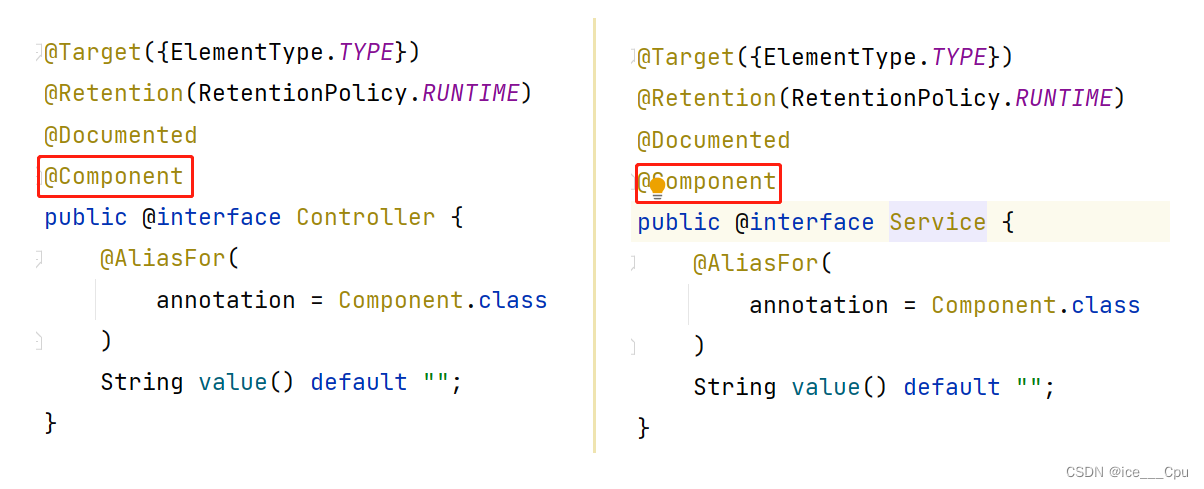
其实这些注解里面都有⼀个注解 @Component ,说明它们本身就是属于 @Component 的 “子类”
@Component 是⼀个元注解,也就是说可以注解其他类注解,如 @Controller , @Service ,@Repository 等. 这些注解被称为 @Component 的衍生注解.
@Controller , @Service 和 @Repository 用于更具体的用例(分别在控制层, 业务逻辑层, 持久化层), 在开发过程中, 如果你要在业务逻辑层使用 @Component 或 @Service,显然@Service是更好的选择


![[lesson58]类模板的概念和意义](https://img-blog.csdnimg.cn/direct/4b9d9730362a4e27b7d841b646e76381.png#pic_center)