项目链接:
yolov5_ros2
运行结果如下:实时显示识别结果

一、下载功能包并运行
1. 安装依赖
首先,确保您已经更新了系统并且安装了必要的依赖。以下是一些安装步骤,其中$ROS_DISTRO 是您的ROS2发行版(例如:foxy、galactic、我使用的是humble):
sudo apt update
sudo apt install python3-pip ros-$ROS_DISTRO-vision-msgs
pip3 install -i https://pypi.tuna.tsinghua.edu.cn/simple yolov5
2. 编译和运行
编译项目并设置环境变量:
colcon build
source install/setup.bash
下面两个命令是分别用于两种不同的摄像头设备的。
- 如果您使用的是 USB 摄像头,请运行以下命令:
sudo apt-get install ros-<ros2-distro>-usb-cam # 安装
ros2 run usb_cam usb_cam_node_exe
如下图,此时摄像头设备正在运行并且可以通过ROS话题发布图像到/image_raw 话题上
使用 ros2 topic list 命令来查看正在运行的话题列表

- 如果您使用的是计算机上已安装的默认摄像头设备,请运行以下命令
ros2 run image_tools cam2image --ros-args -p width:=640 -p height:=480 -p frequency:=30.0 -p device_id:=0最后的这里 device_id:=0 或者 device_id:=-1 都可以
如下图所示,此时的话题为/image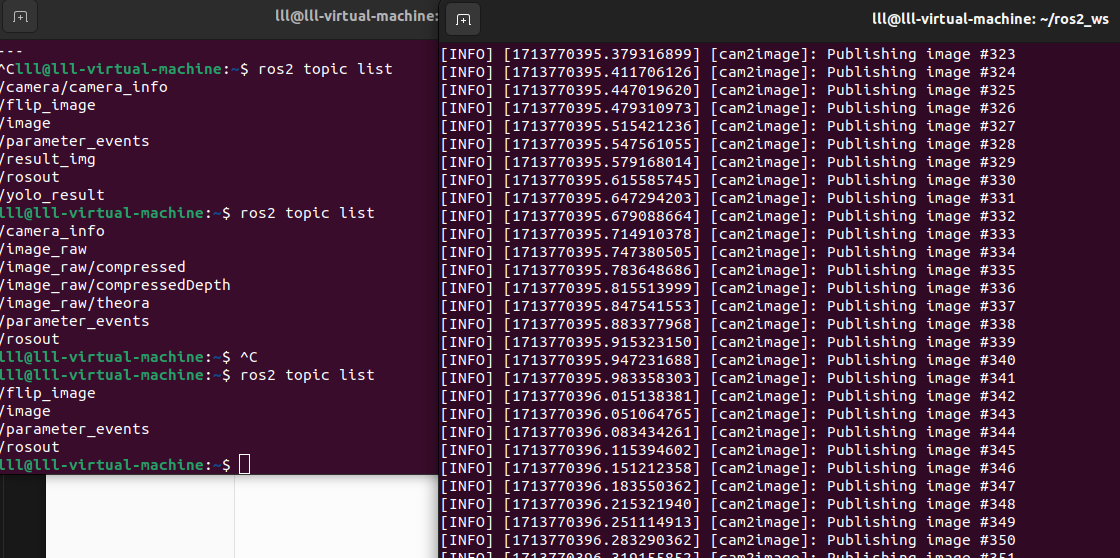
此时摄像头节点会发布图像消息到ROS的话题上。因此,您可以通过订阅下面的两个话题之一来接收摄像头发布的图像消息。
/image_raw /image
现在,您可以运行Yolo_ROS2节点。默认情况下,它将使用CPU来进行检测,您可以根据需要更改这些参数:
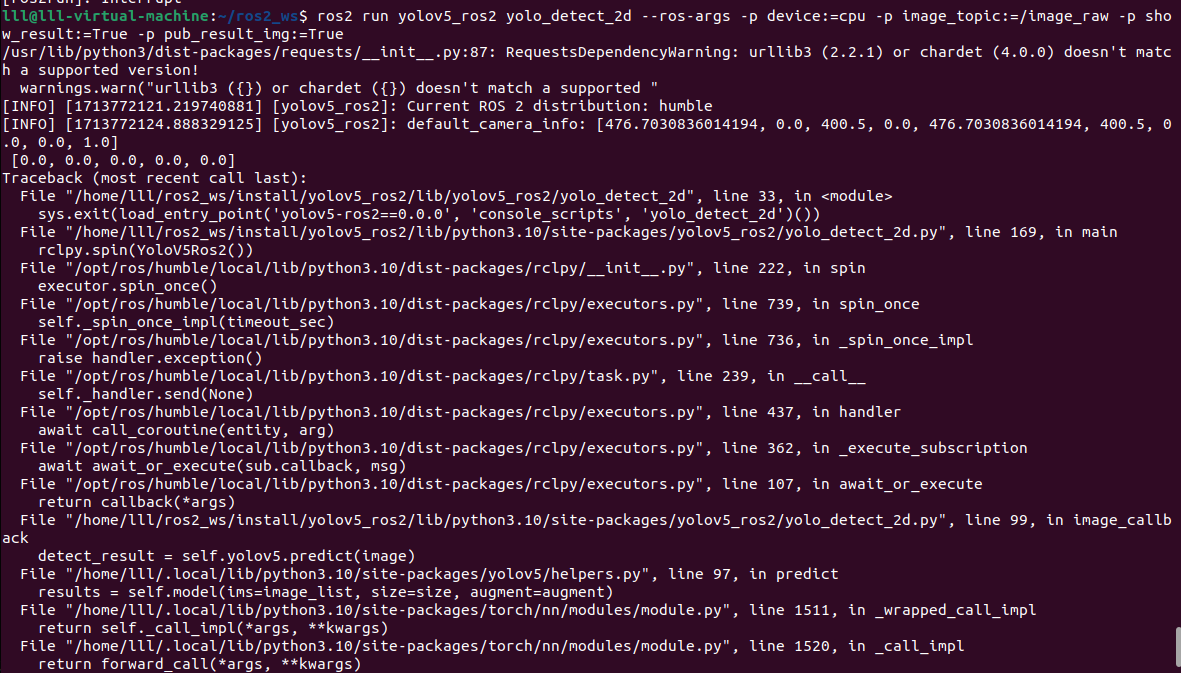
ros2 run yolov5_ros2 yolo_detect_2d --ros-args -p device:=cpu -p image_topic:=/image此时显示,只有命令行输出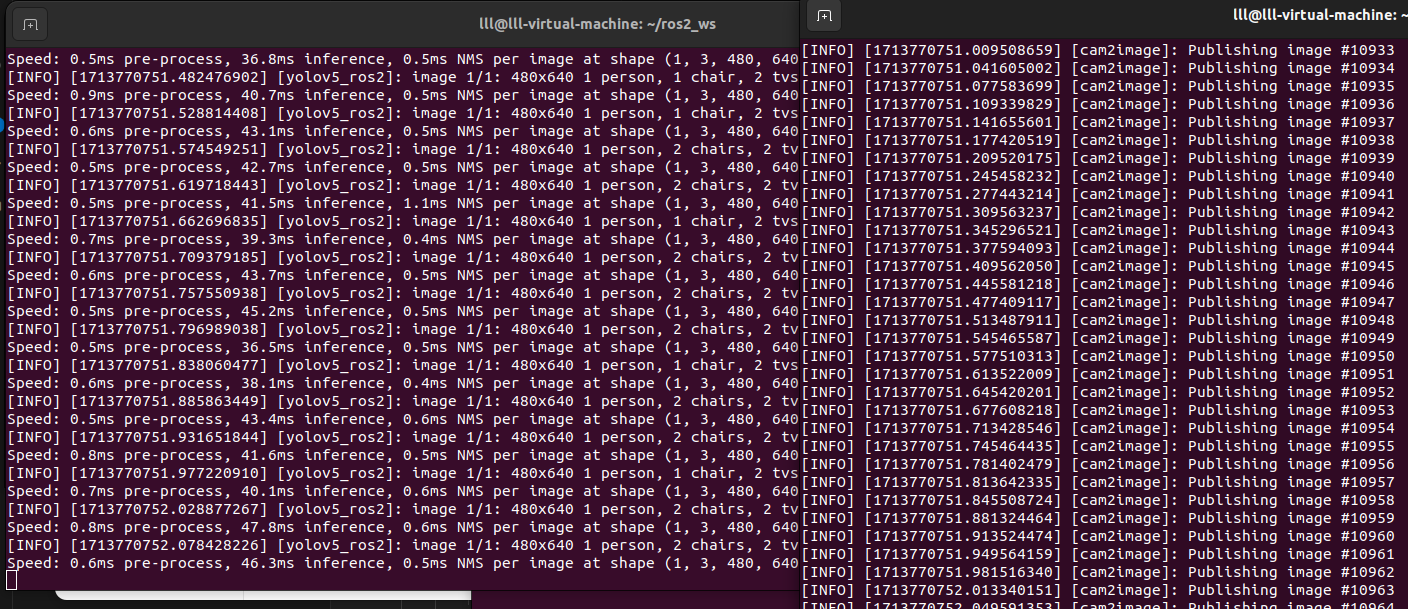
现在添加几个参数用来实时显示结果,输入下面的内容
ros2 run yolov5_ros2 yolo_detect_2d --ros-args -p device:=cpu -p image_topic:=/image -p show_result:=True -p pub_result_img:=True
显示
3. 订阅结果
Yolo_ROS2将检测结果发布到/yolo_result话题中,包括原始像素坐标以及归一化后的相机坐标系下的x和y坐标。您可以使用以下命令查看检测结果:
ros2 topic echo /yolo_result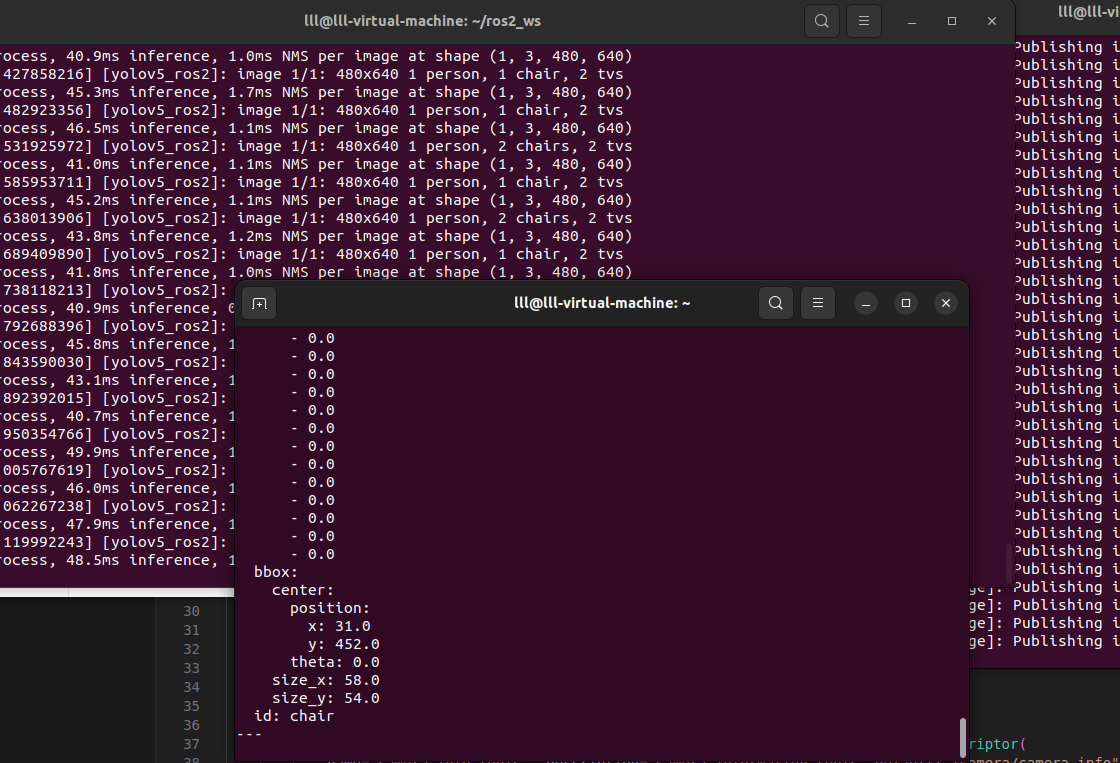
4. 更进一步使用
4.1 参数设置
在运行Yolo_ROS2节点时,您可以使用 -p name:=value 的方式来修改参数值。
4.1.1 图像话题
您可以通过指定以下参数来更改图像话题:
image_topic:=/image4.1.2 计算设备设置
如果您有CUDA支持的显卡,可以选择以下参数来配置计算设备:
device:=cpu4.1.3 是否实时显示结果
您可以使用以下参数来控制是否实时显示检测结果。设置为True将实时显示结果,设置为False则不会显示:
show_result:=False请注意,实时显示中的cv2.imshow可能会卡住。如果只需要验证结果,可以将此参数设置为False。
4.1.4 切换不同Yolov5模型
默认情况下,Yolo_ROS2使用yolov5s模型。您可以通过以下参数来更改模型:
model:=yolov5m4.1.5 是否发布结果图像
如果您希望Yolo_ROS2发布检测结果的图像,请使用以下参数:
pub_result_img:=True4.1.5 相机参数文件
功能包默认从 /camera/camera_info 话题获取相机参数,在获取成功前,相机参数文件路径可以通过参数进行设置,参数为:camera_info_file,通过该参数可以设置文件路径,注意需要使用绝对目录:
-p camera_info_file:=/home/lll/ros2_ws/src/yolov5_ros2/config/camera_info.yaml
5. 问题
运行
ros2 run usb_cam usb_cam_node_exe
和
ros2 run yolov5_ros2 yolo_detect_2d --ros-args -p device:=cpu -p image_topic:=/image_raw -p show_result:=True -p pub_result_img:=True
报错,这个错误的原因是您的模型期望输入的通道数为 3,但实际输入的图像通道数为 2。这可能是由于图像读取或预处理过程中的问题导致的。应该是我的摄像头是2d的
二、从头写一遍代码
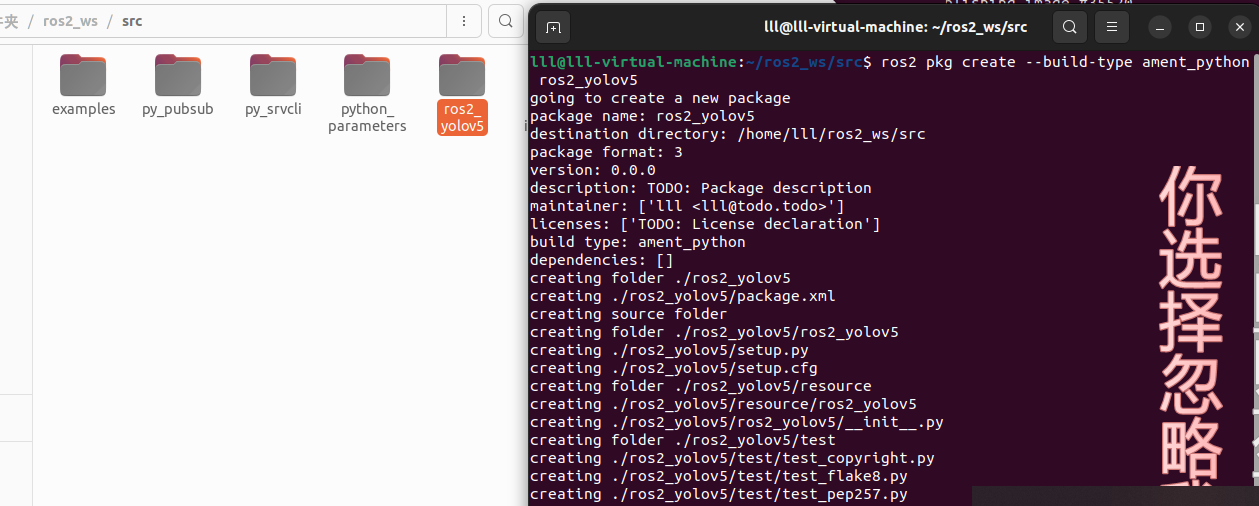
1.创建一个包
进入 ros2_ws/src 目录,并运行包创建命令:
ros2 pkg create --build-type ament_python ros2_yolov5你的终端将返回一条消息,验证已创建名为 ros2_yolov5 的软件包及其所有必要的文件和文件夹。

2.编写代码
进入 ros2_ws/src/ros2_yolov5/ros2_yolov5 目录。请记住,该目录是一个与嵌套的ROS 2软件包同名的 Python包。
创建一个名为yolov5_detect_2d.py的文件,复制下面的内容
from math import frexp
from traceback import print_tb
from torch import imag
from yolov5 import YOLOv5
import rclpy
from rclpy.node import Node
from ament_index_python.packages import get_package_share_directory
from rcl_interfaces.msg import ParameterDescriptor
from vision_msgs.msg import Detection2DArray, ObjectHypothesisWithPose, Detection2D
from sensor_msgs.msg import Image, CameraInfo
from cv_bridge import CvBridge
import cv2
import yaml
from yolov5_ros2.cv_tool import px2xy
import os

# Get the ROS distribution version and set the shared directory for YoloV5 configuration files.
ros_distribution = os.environ.get("ROS_DISTRO")
package_share_directory = get_package_share_directory('yolov5_ros2')

# Create a ROS 2 Node class YoloV5Ros2.
class YoloV5Ros2(Node):
    def __init__(self):
        super().__init__('yolov5_ros2')
        self.get_logger().info(f"Current ROS 2 distribution: {ros_distribution}")

        # Declare ROS parameters.
        self.declare_parameter("device", "cuda", ParameterDescriptor(
            name="device", description="Compute device selection, default: cpu, options: cuda:0"))

        self.declare_parameter("model", "yolov5s", ParameterDescriptor(
            name="model", description="Default model selection: yolov5s"))

        self.declare_parameter("image_topic", "/image_raw", ParameterDescriptor(
            name="image_topic", description="Image topic, default: /image_raw"))

        self.declare_parameter("camera_info_topic", "/camera/camera_info", ParameterDescriptor(
            name="camera_info_topic", description="Camera information topic, default: /camera/camera_info"))

        # Read parameters from the camera_info topic if available, otherwise, use the file-defined parameters.
        self.declare_parameter("camera_info_file", f"{package_share_directory}/config/camera_info.yaml", ParameterDescriptor(
            name="camera_info", description=f"Camera information file path, default: {package_share_directory}/config/camera_info.yaml"))

        # Default to displaying detection results.
        self.declare_parameter("show_result", False, ParameterDescriptor(
            name="show_result", description="Whether to display detection results, default: False"))

        # Default to publishing detection result images.
        self.declare_parameter("pub_result_img", False, ParameterDescriptor(
            name="pub_result_img", description="Whether to publish detection result images, default: False"))

        # 1. Load the model.
        model_path = package_share_directory + "/config/" + self.get_parameter('model').value + ".pt"
        device = self.get_parameter('device').value
        self.yolov5 = YOLOv5(model_path=model_path, device=device)

        # 2. Create publishers.
        self.yolo_result_pub = self.create_publisher(
            Detection2DArray, "yolo_result", 10)
        self.result_msg = Detection2DArray()

        self.result_img_pub = self.create_publisher(Image, "result_img", 10)

        # 3. Create an image subscriber (subscribe to depth information for 3D cameras, load camera info for 2D cameras).
        # 首先,从ROS 2参数服务器中获取图像话题的名称和相机信息话题的名称。
        # 然后,使用这些话题名称分别创建图像订阅器和相机信息订阅器。
        # 当接收到图像消息时,调用self.image_callback方法处理图像消息。
        # 当接收到相机信息消息时,调用self.camera_info_callback方法处理相机信息消息。
        image_topic = self.get_parameter('image_topic').value
        self.image_sub = self.create_subscription(
            Image, image_topic, self.image_callback, 10)

        camera_info_topic = self.get_parameter('camera_info_topic').value
        self.camera_info_sub = self.create_subscription(
            CameraInfo, camera_info_topic, self.camera_info_callback, 1)    # 从相机信息文件中读取相机参数。

        # Get camera information.
        with open(self.get_parameter('camera_info_file').value) as f:
            self.camera_info = yaml.full_load(f.read())
            self.get_logger().info(f"default_camera_info: {self.camera_info['k']} \n {self.camera_info['d']}")

        # 4. Image format conversion (using cv_bridge).
        self.bridge = CvBridge()    # 创建一个CvBridge实例,用于图像格式转换。

        self.show_result = self.get_parameter('show_result').value
        self.pub_result_img = self.get_parameter('pub_result_img').value

    def camera_info_callback(self, msg: CameraInfo):        # 相机信息被提取并存储在camera_info字典中。这个字典被用于存储相机的内参、畸变参数等信息
        """
        Get camera parameters through a callback function.
        """
        self.camera_info['k'] = msg.k       # 相机的内参矩阵,通常是一个 3x3 的矩阵,用来描述相机的焦距和光心位置
        self.camera_info['p'] = msg.p       # 投影矩阵,是相机内参矩阵和相机的畸变参数的组合,用于将相机坐标系中的点投影到图像平面上
        self.camera_info['d'] = msg.d       # 相机的畸变参数,用来描述相机的镜头畸变情况,包括径向畸变和切向畸变
        self.camera_info['r'] = msg.r       # 重投影矩阵,用于立体视觉中的相机标定
        self.camera_info['roi'] = msg.roi   # 感兴趣区域,表示图像中感兴趣的区域的位置和大小

        self.camera_info_sub.destroy()

    def image_callback(self, msg: Image):
        # 5. Detect and publish results.
        image = self.bridge.imgmsg_to_cv2(msg)      # 将 ROS 消息转换为 OpenCV 格式的图像
        detect_result = self.yolov5.predict(image)  # 使用 YOLOv5 模型对图像进行目标检测,得到检测结果 detect_result
        self.get_logger().info(str(detect_result))

        self.result_msg.detections.clear()      # 清空了 self.result_msg 对象中的检测结果,以确保每次处理新的图像时,都能够填充最新的检测结果。
        self.result_msg.header.frame_id = "camera"
        self.result_msg.header.stamp = self.get_clock().now().to_msg()

        # Parse the results.
        predictions = detect_result.pred[0]
        boxes = predictions[:, :4]  # x1, y1, x2, y2
        scores = predictions[:, 4]
        categories = predictions[:, 5]

        for index in range(len(categories)):
            name = detect_result.names[int(categories[index])]
            detection2d = Detection2D()
            detection2d.id = name
            x1, y1, x2, y2 = boxes[index]
            x1 = int(x1)
            y1 = int(y1)
            x2 = int(x2)
            y2 = int(y2)
            center_x = (x1+x2)/2.0
            center_y = (y1+y2)/2.0

            if ros_distribution=='galactic':
                detection2d.bbox.center.x = center_x
                detection2d.bbox.center.y = center_y
            else:
                detection2d.bbox.center.position.x = center_x
                detection2d.bbox.center.position.y = center_y

            detection2d.bbox.size_x = float(x2-x1)
            detection2d.bbox.size_y = float(y2-y1)

            obj_pose = ObjectHypothesisWithPose()
            obj_pose.hypothesis.class_id = name
            obj_pose.hypothesis.score = float(scores[index])

            # px2xy
            # px2xy 是一个函数,用于将像素坐标转换为世界坐标。在这里,将目标在图像中的中心像素
            # 坐标 (center_x, center_y) 作为参数传递给 px2xy 函数,同时传入相机的
            # 内参 self.camera_info["k"] 和畸变参数 self.camera_info["d"]。
            # world_x 和 world_y 分别是转换后的目标在相机坐标系中的世界坐标。
            world_x, world_y = px2xy(
                [center_x, center_y], self.camera_info["k"], self.camera_info["d"], 1)
            obj_pose.pose.pose.position.x = world_x     # 将转换后的世界坐标赋值给目标在 Detection2DArray 消息中的 results 字段中的 pose
            obj_pose.pose.pose.position.y = world_y
            detection2d.results.append(obj_pose)
            self.result_msg.detections.append(detection2d)      # 将结果填充到 Detection2DArray 消息中,包括物体类别、边界框位置、置信度以及物体在相机坐标系中的位置

            # Draw results.
            if self.show_result or self.pub_result_img:         #  绘制检测结果并显示
                cv2.rectangle(image, (x1, y1), (x2, y2), (0, 255, 0), 2)
                cv2.putText(image, f"{name}({world_x:.2f},{world_y:.2f})", (x1, y1),
                            cv2.FONT_HERSHEY_SIMPLEX, 0.5, (0, 255, 0), 1)
                cv2.waitKey(1)

        # Display results if needed.
        if self.show_result:
            cv2.imshow('result', image)
            cv2.waitKey(1)

        # Publish result images if needed.
        if self.pub_result_img:         # 发布检测结果图像
            result_img_msg = self.bridge.cv2_to_imgmsg(image, encoding="bgr8")
            result_img_msg.header = msg.header
            self.result_img_pub.publish(result_img_msg)

        if len(categories) > 0:     # 如果检测到物体,就发布 Detection2DArray 消息,其中包含了所有检测到的物体信息
            self.yolo_result_pub.publish(self.result_msg)

def main():
    rclpy.init()
    rclpy.spin(YoloV5Ros2())
    rclpy.shutdown()

if __name__ == "__main__":
    main()
创建一个名为cv_tool.py的文件,复制下面的的内容
# 导入所需的库
# Import the required libraries
import cv2  # OpenCV library for image processing
import numpy as np  # NumPy library for array and matrix operations

# 相机内参矩阵K,包括相机的焦距和主点坐标
# Camera intrinsic matrix K, including camera's focal length and principal point coordinates
K = [[602.7175003324863, 0, 351.305582038406],
     [0, 601.6330312976042, 240.0929104708551],
     [0, 0, 1]]

# 相机畸变参数D,用于校正图像畸变
# Camera distortion parameters D, used for correcting image distortion
D = [0.06712174262966401, -0.2636999208734844,
     0.006484443443073637, 0.01111161327049835, 0]

# 定义一个函数px2xy,用于将像素坐标转换为相机坐标系下的二维坐标
# Define a function px2xy to convert pixel coordinates to 2D coordinates in camera coordinate system
def px2xy(point, camera_k, camera_d, z=1.0):
    # 将相机内参矩阵K和相机畸变参数D转换为NumPy数组
    # Convert camera intrinsic matrix K and camera distortion parameters D to NumPy arrays
    MK = np.array(camera_k, dtype=float).reshape(3, 3)
    MD = np.array(camera_d, dtype=float)

    # 将输入的像素坐标点转换为NumPy数组
    # Convert the input pixel coordinate point to a NumPy array
    point = np.array(point, dtype=float)

    # 使用OpenCV的cv2.undistortPoints函数对输入点进行畸变矫正,并乘以深度值z
    # Use OpenCV's cv2.undistortPoints function to correct distortion of input points and multiply by depth value z
    pts_uv = cv2.undistortPoints(point, MK, MD) * z

    # 返回相机坐标系下的二维坐标
    # Return 2D coordinates in the camera coordinate system
    return pts_uv[0][0]

# 调用函数并打印结果(如果需要)
# Call the function and print the result (if needed)
# print(px2xy([0, 0], K, D, 1))
3. 参数配置
在package.xml中添加下面的内容
<depend>rclpy</depend>
<depend>vision_msgs</depend>
<depend>yolov5</depend>
<?xml version="1.0"?>
<?xml-model href="http://download.ros.org/schema/package_format3.xsd" schematypens="http://www.w3.org/2001/XMLSchema"?>
<package format="3">
  <name>ros2_yolov5</name>
  <version>0.0.0</version>
  <description>TODO: Package description</description>
  <maintainer email="lll@todo.todo">lll</maintainer>
  <license>TODO: License declaration</license>

  <depend>rclpy</depend>
  <depend>vision_msgs</depend>
  <depend>yolov5</depend>

  <test_depend>ament_copyright</test_depend>
  <test_depend>ament_flake8</test_depend>
  <test_depend>ament_pep257</test_depend>
  <test_depend>python3-pytest</test_depend>

  <export>
    <build_type>ament_python</build_type>
  </export>
</package>
在setup.py中添加
"yolo_detect_2d=ros2_yolov5.yolov5_detect_2d:main"如下:
    entry_points={
        'console_scripts': [
            "yolo_detect_2d=ros2_yolov5.yolov5_detect_2d:main"
        ],
4. 创建config文件夹
将yolov5s.pt模型文件放这里,可以随意换别的模型
5. 编译运行
colcon build --packages-select ros2_yolov5每打开一个终端都要source遍
source install/local_setup.bash然后再第一个终端输入
ros2 run image_tools cam2image --ros-args -p width:=640 -p height:=480 -p frequency:=30.0 -p device_id:=0
打开第二个终端输入
ros2 run ros2_yolov5 yolo_detect_2d --ros-args -p device:=cpu -p image_topic:=/image -p show_result:=True -p pub_result_img:=True
运行成功