目录
- 1 简介
- 2 基础知识
- 2.1 finetune简介
- 2.2 xtuner简介
- 2.2.1 技术架构
- 2.2.2 快速上手xtuner
- 2.3 8GB显存玩转LLM(intern1.8b)
- 2.3.1 flash attention vs deepspeed zero
- 2.3.2 相关版本更新和使用
- 2.4 多模态LLM
- 2.4.1 多模态LLaVA基本原理简介
- 2.4.2 快速上手
- 3 实践操作
- 3.1 基本环境安装
- 3.2 前期准备
- 3.2.1 internlm2-chat-1_8b模型下载
- 3.2.2 数据下载或者生成
- 3.2.3 xtuner基本使用
- (1)xtuner所有参数和基本用法
- (2)xtuner内置支持的所有模型
- (3) 常用配置文件操作说明
- 3.3 基于 XTuner 微调一个具有个人认知的小助手
- 3.3.1 数据准备
- 3.3.2 模型config下载
- 3.3.3 模型config修改
- 3.3.4 模型训练
- 1.常规训练
- 2.使用 deepspeed 来加速训练
- 3.训练结果
- 4. 模型续训指南
- 3.3.4 模型转换、整合、测试及部署
- 1 模型转换
- 2 模型整合
- 3 对话测试
- 4 web demo
- 3.4 多模态LLM微调
- 3.4.1 LLaVA方案简介
- 3.4.2 数据
- (1)Pretrain
- (2)Finetune
- a.训练数据集格式说明
- b.训练数据构建
- c.准备配置文件
- (3)对比Finetune前后的性能差异
- a.Finetune前
- b.Finetune后
- c. 测试效果
- 3.5 OpenXLab 部署教程
- ref
1 简介
视频教程 | 文档连接 | 作业 | xtuner官网
基础作业(结营必做)
- 训练自己的小助手认知(记录复现过程并截图)
进阶作业
- 将自我认知的模型上传到 OpenXLab,并将应用部署到 OpenXLab(优秀学员必做)
- 复现多模态微调(优秀学员必做)
OpenXLab 部署教程:https://github.com/InternLM/Tutorial/tree/camp2/tools/openxlab-deploy
2 基础知识
2.1 finetune简介
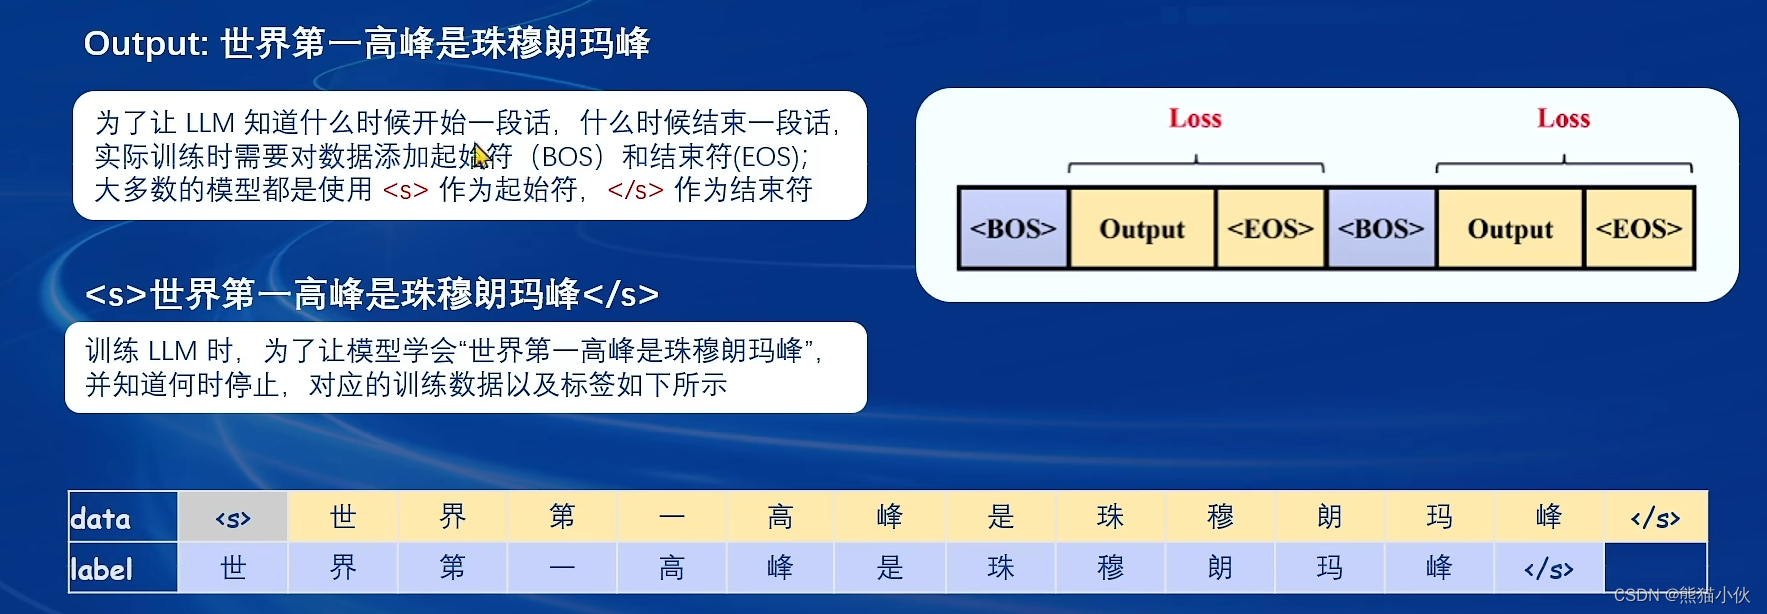
 - 2 种不同训练范式
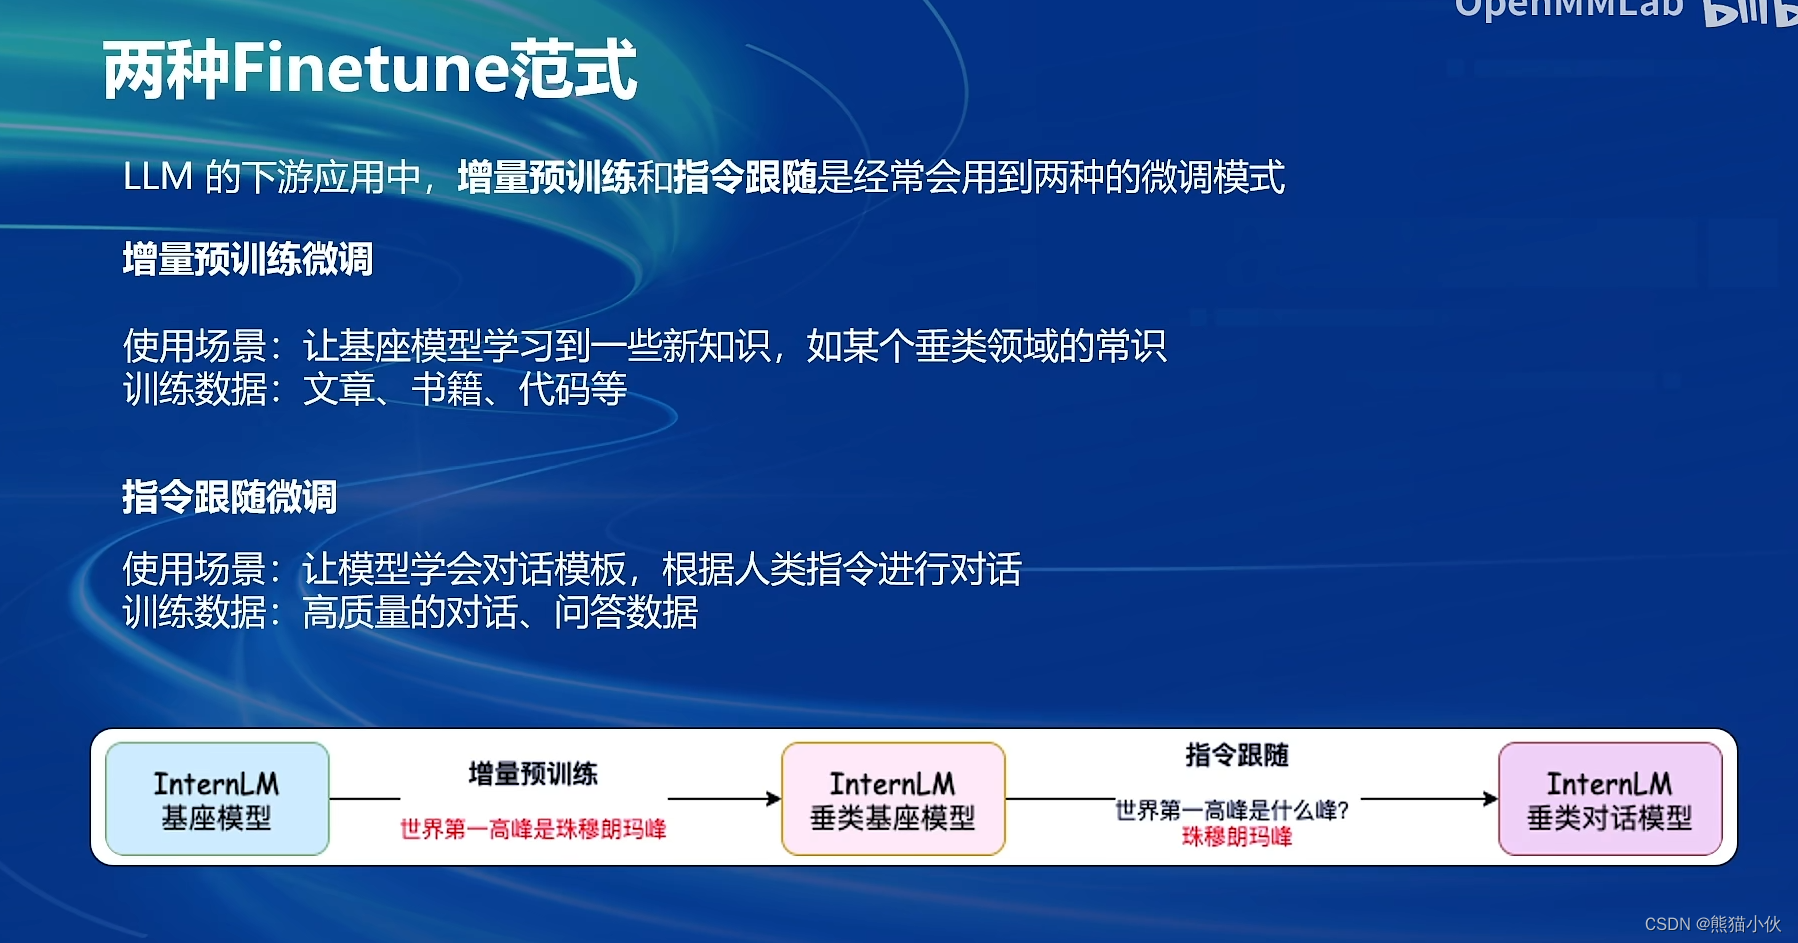
 - 数据处理的一般过程
原始数据 -> 标注格式数据 -> 添加对话模板 -> tokenized数据 ->添加label -> 开始训练

(1) 标准格式数据
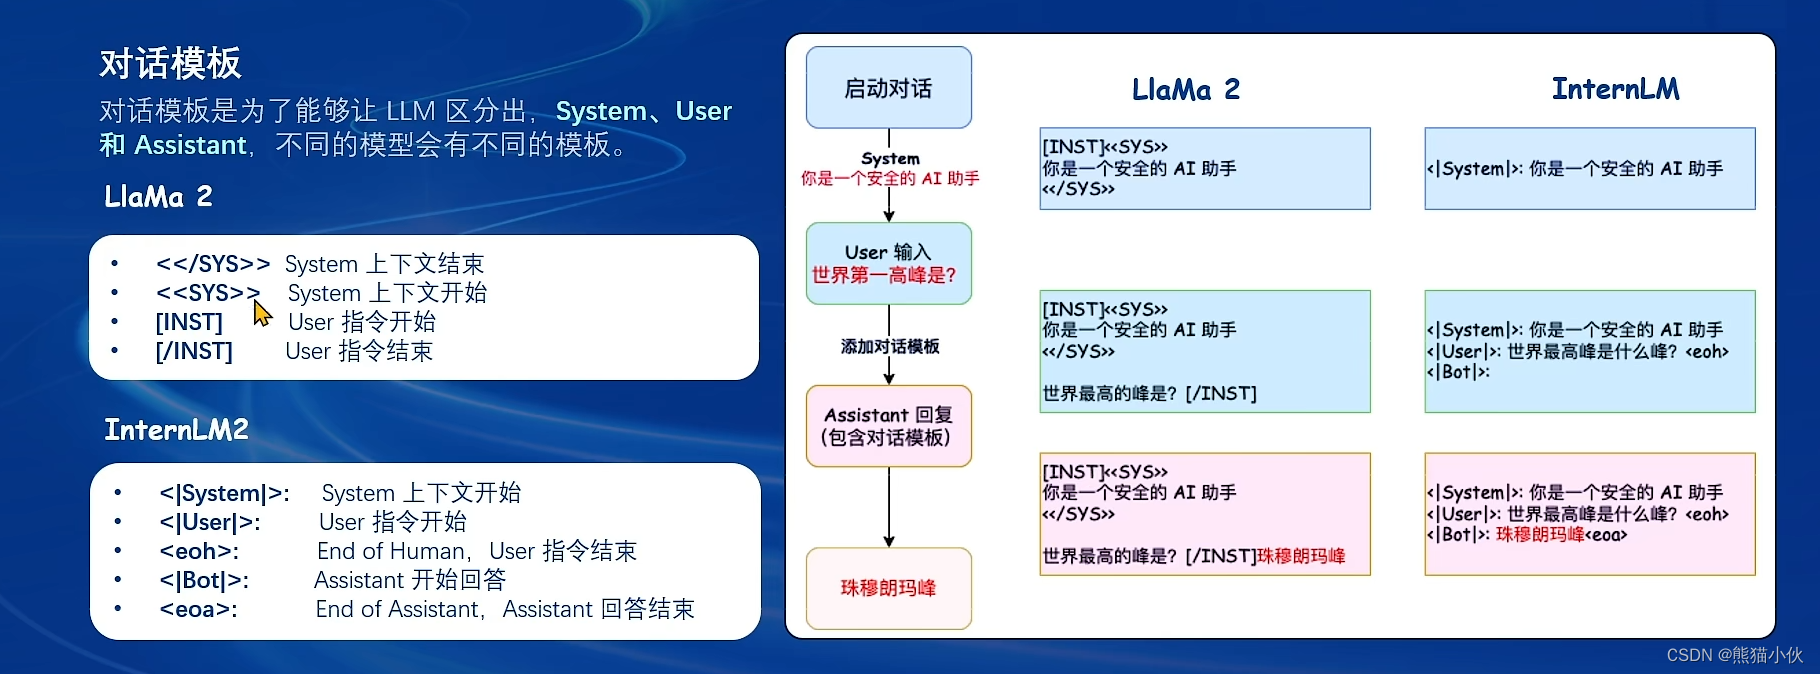
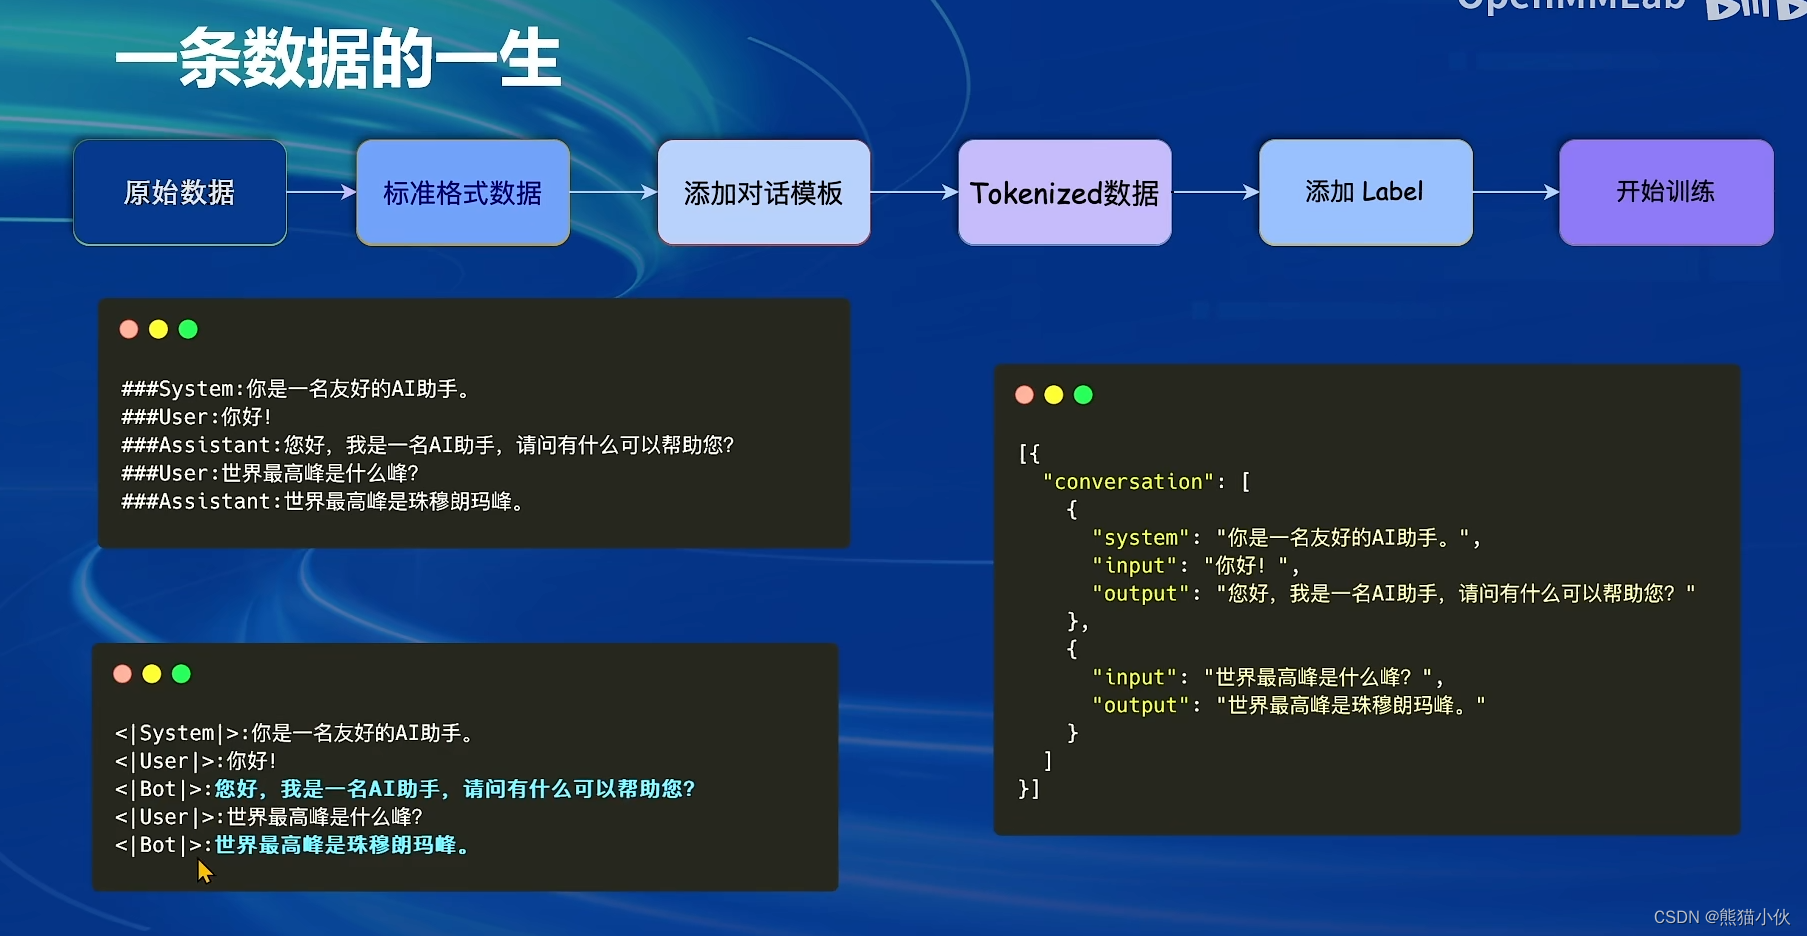 (2)添加对话模板
 对话模板有3种角色:system, user, assistant
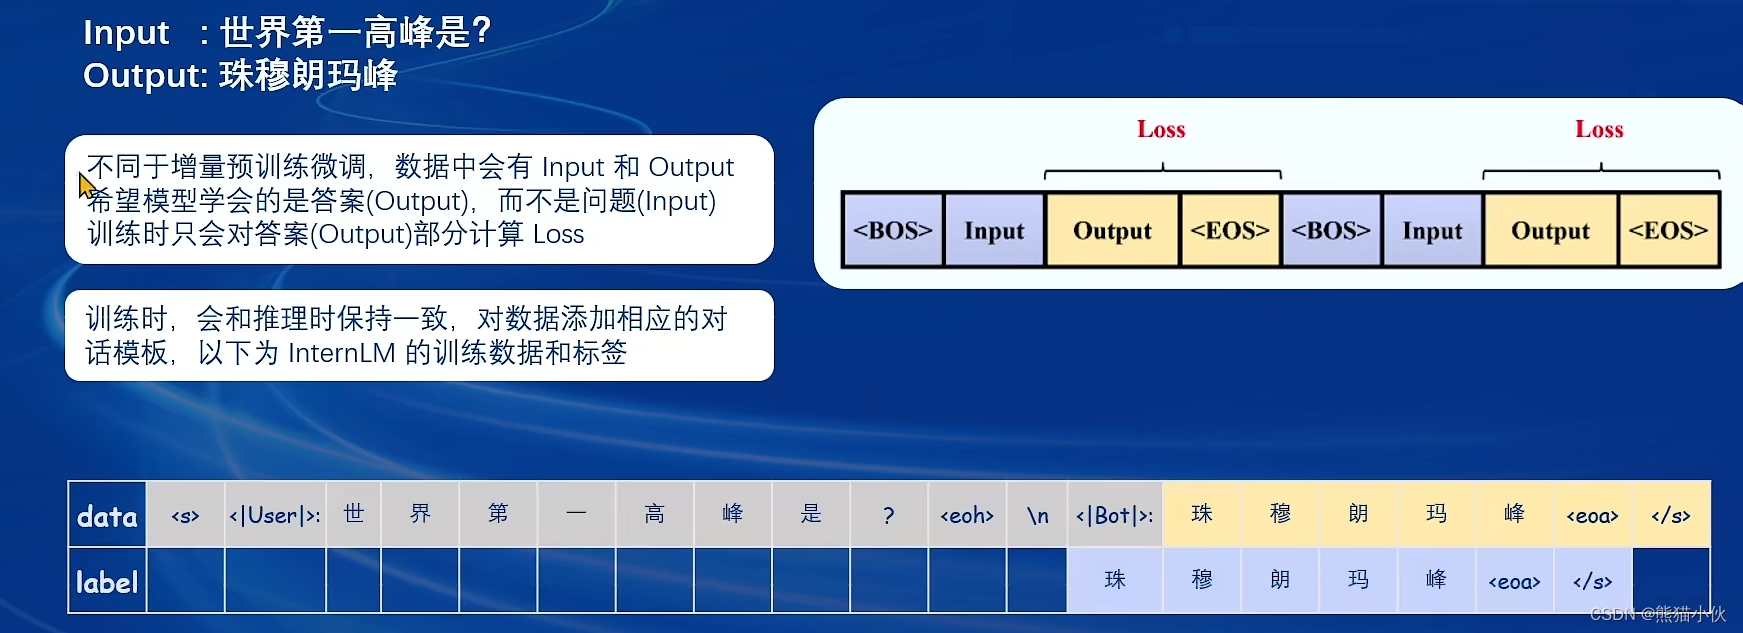
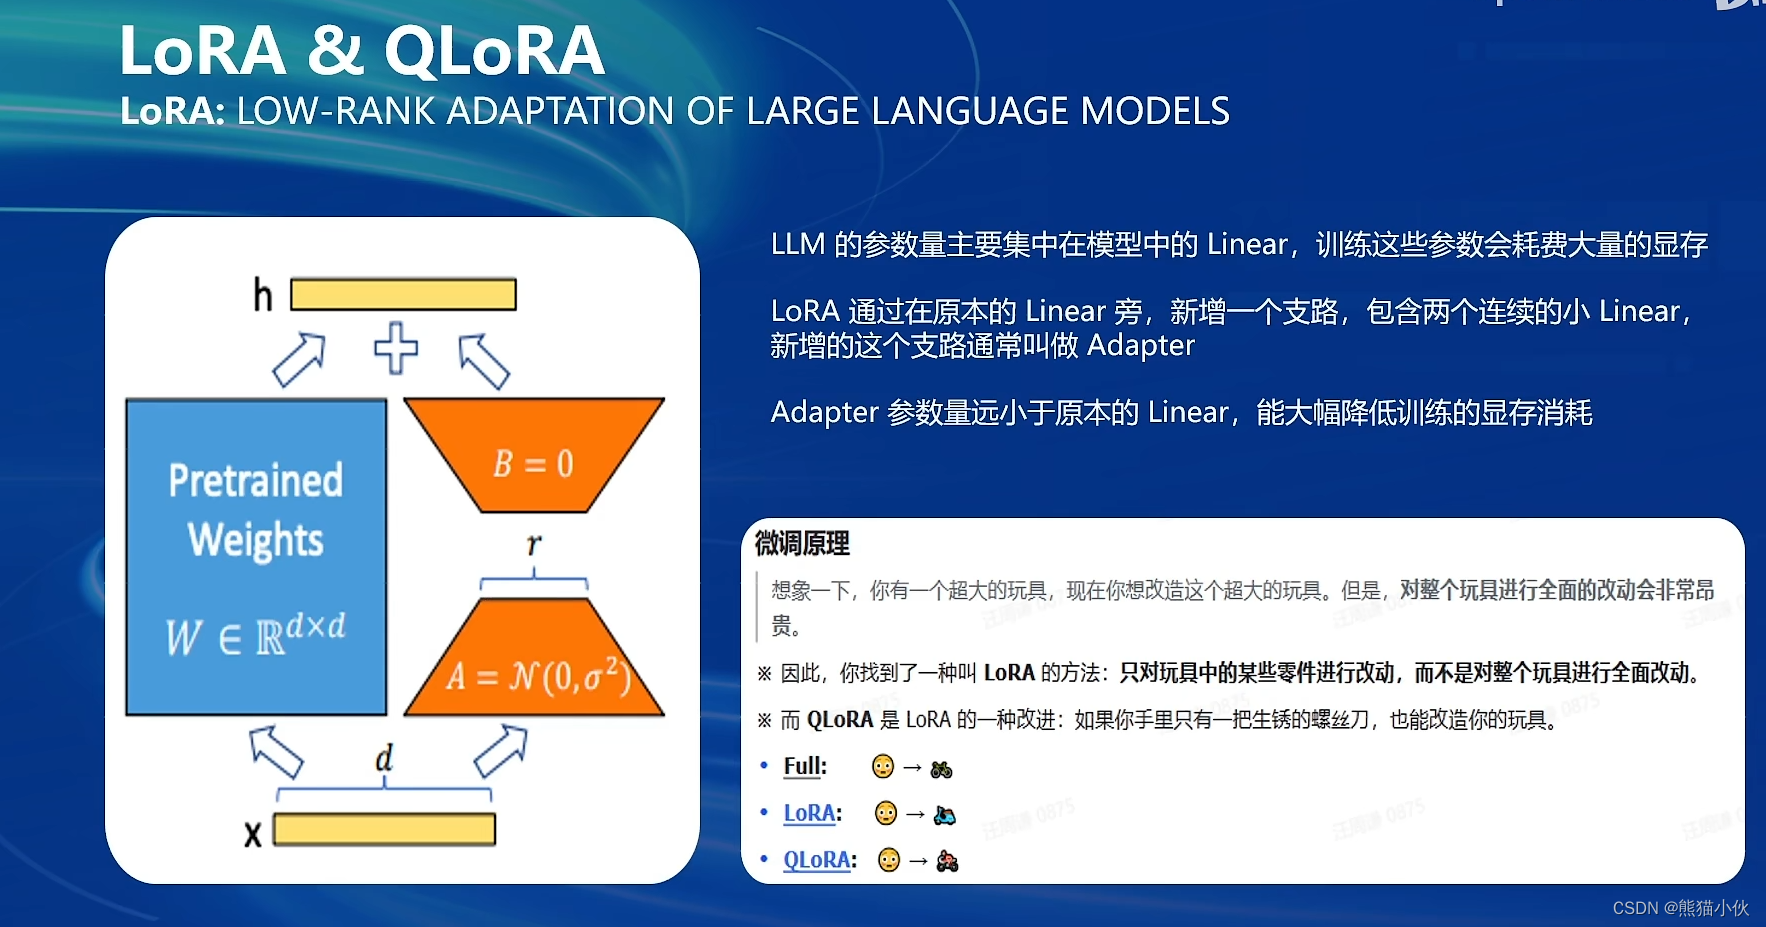
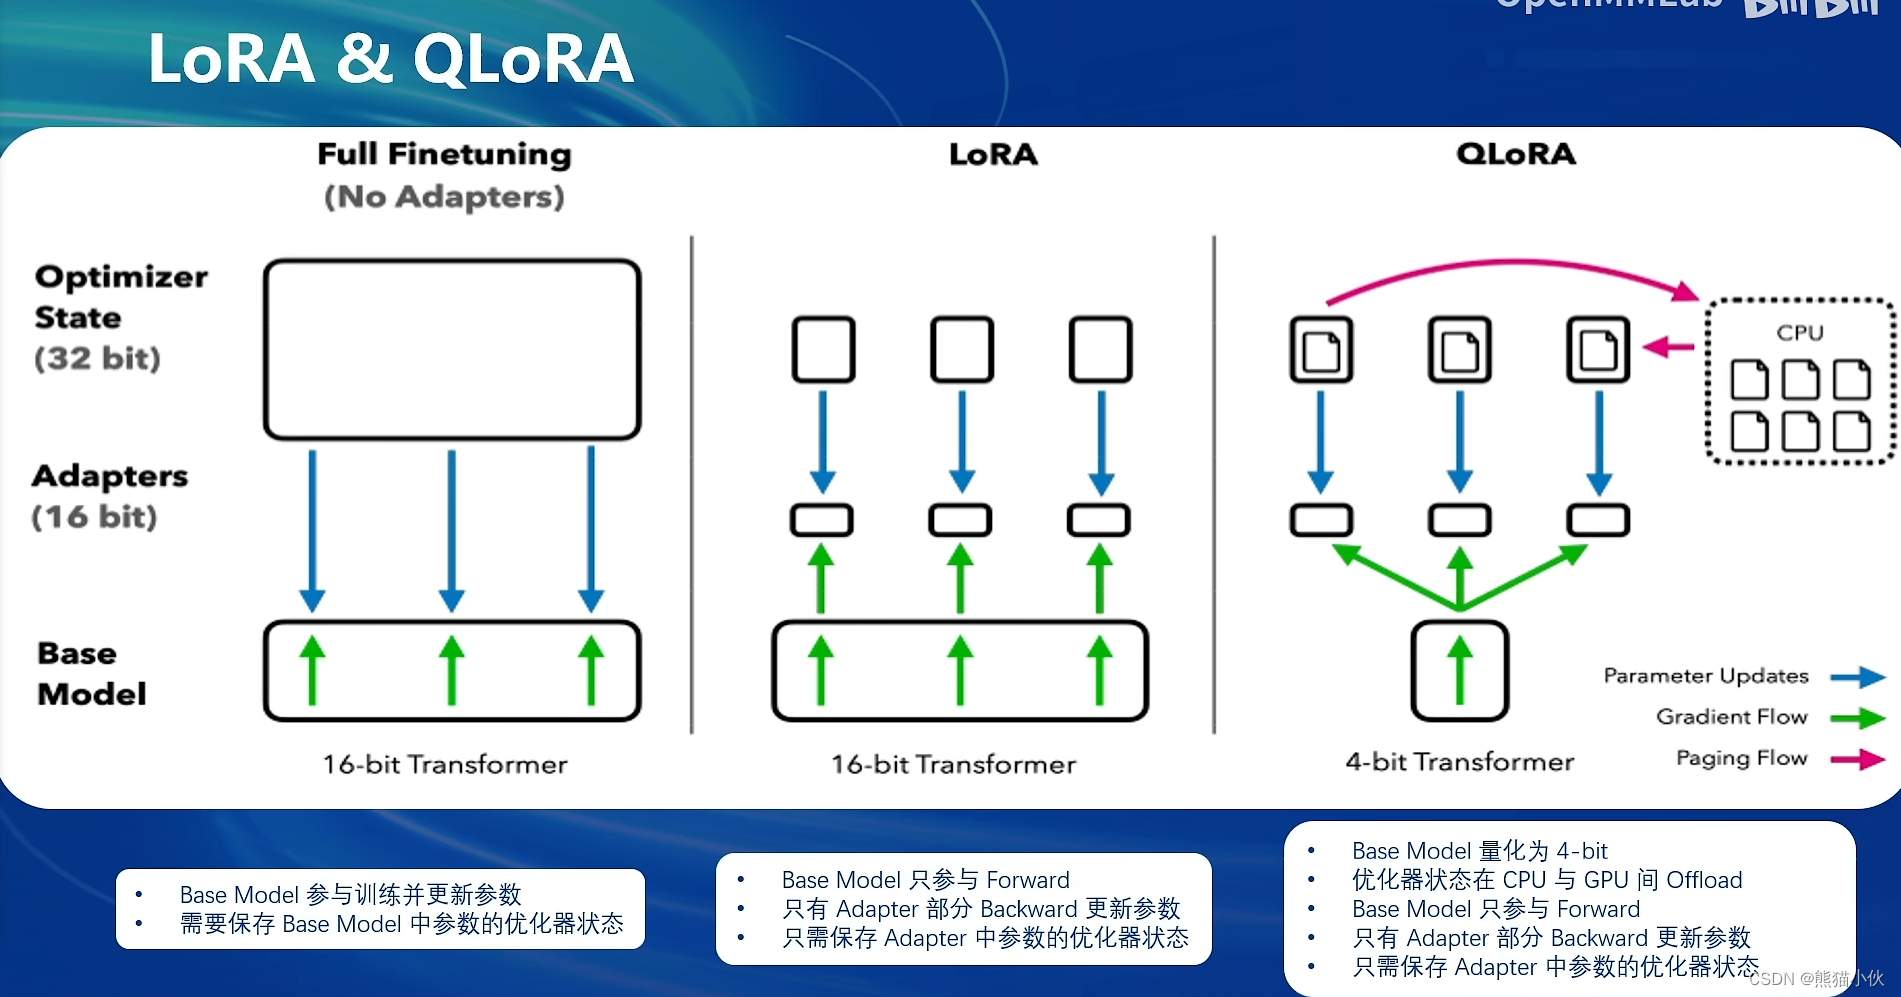
(3)微调方案
2.2 xtuner简介
2.2.1 技术架构

 XTuner 的运行原理:
2.2.2 快速上手xtuner
-
常用训练参数设置
-
对话&工具类使用

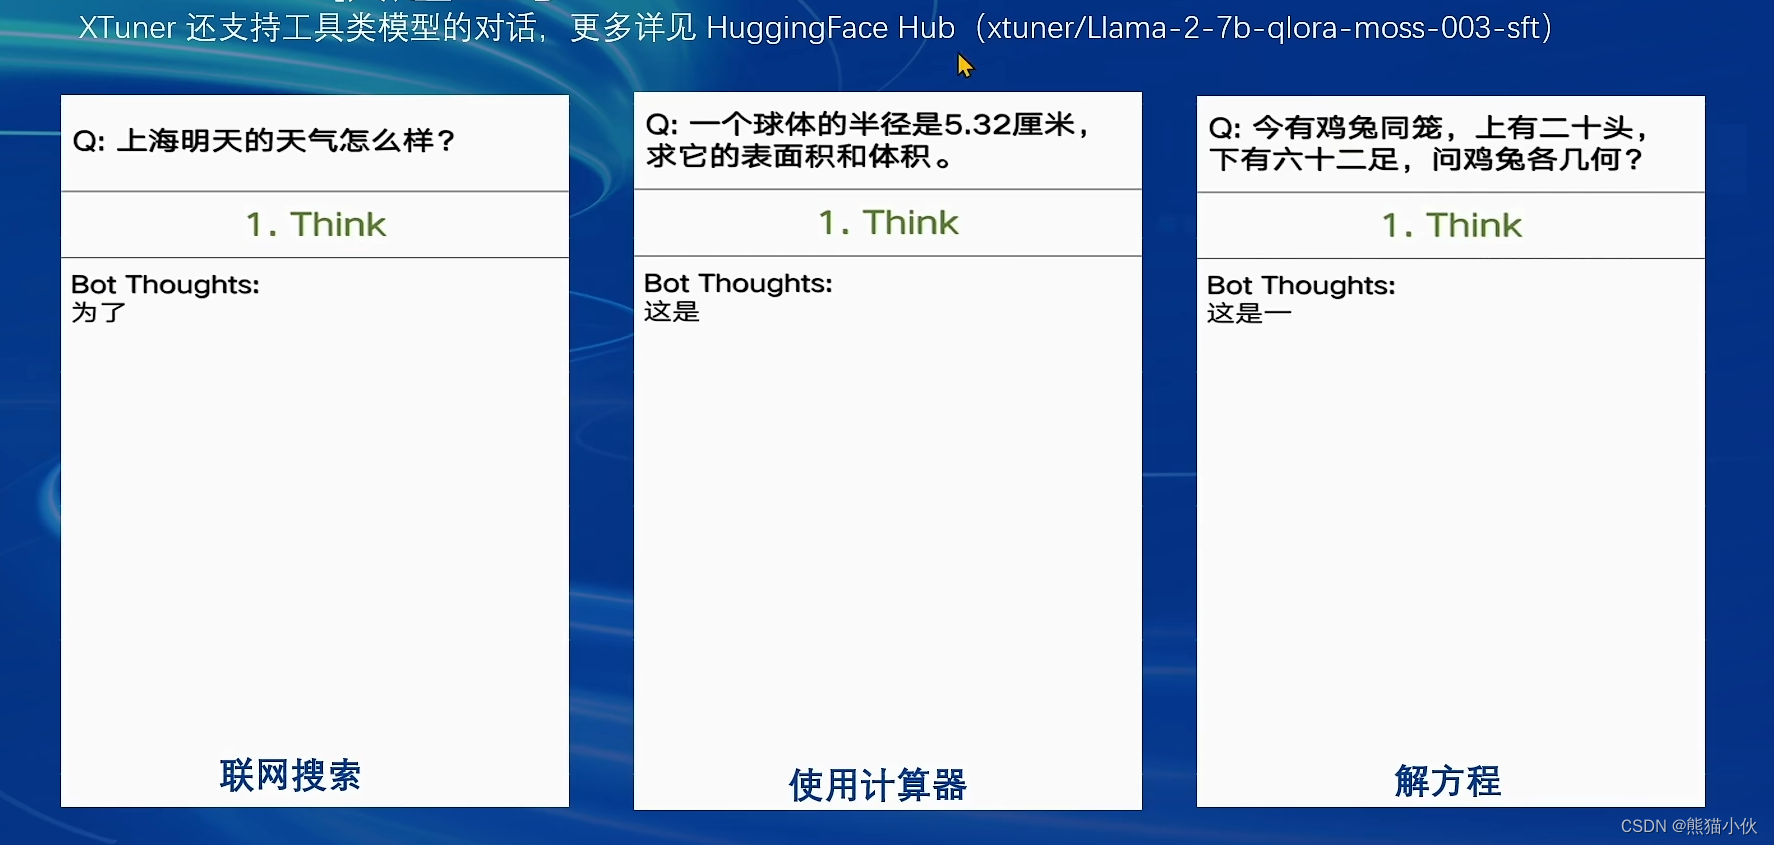 注意:huggingface国内往往打不开,可以使用替代网站查找:
https://hf-mirror.com/xtuner/Llama-2-7b-qlora-moss-003-sft -
数据处理流程

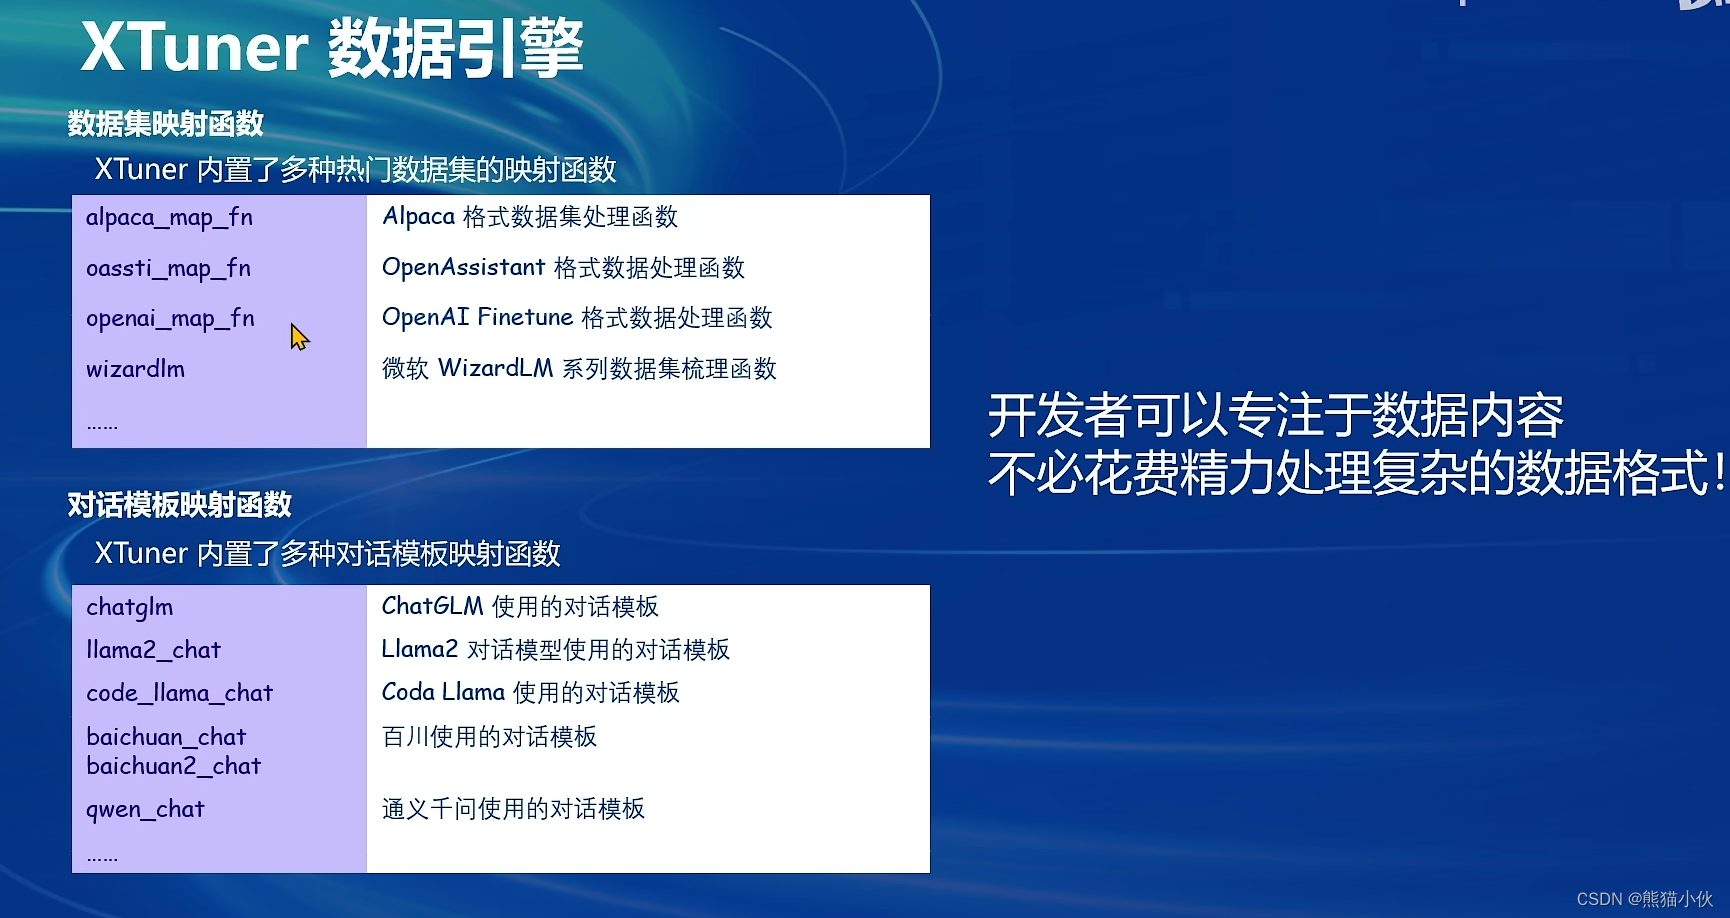
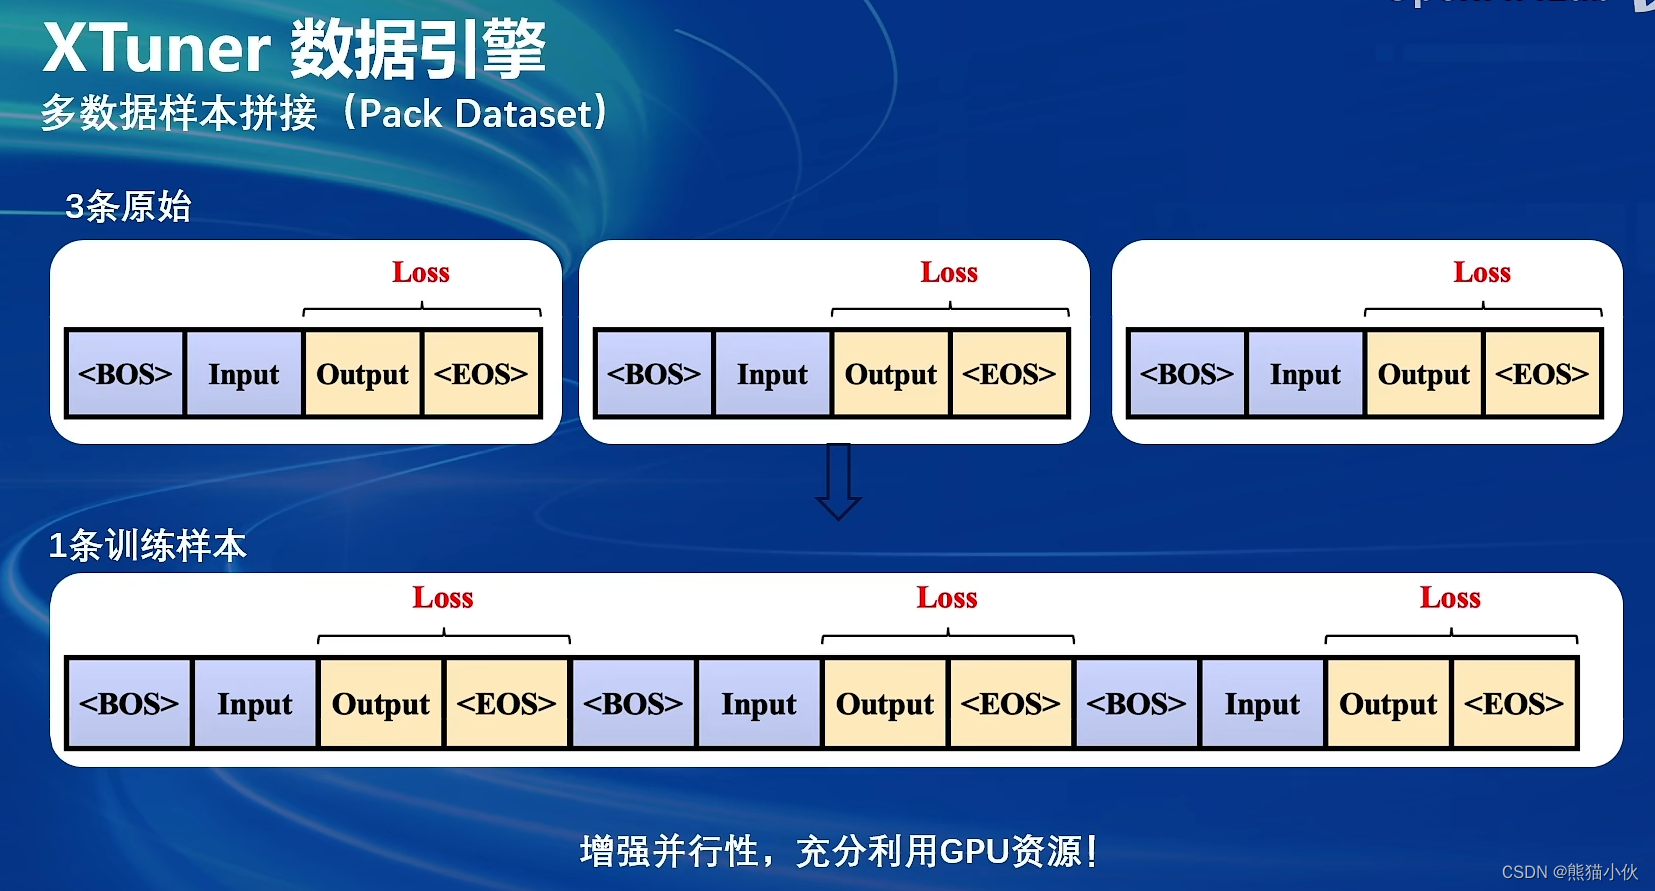
支持多种数据集的映射和处理 & 数据样本拼接功能。 -
xtuner数据引擎使用样例
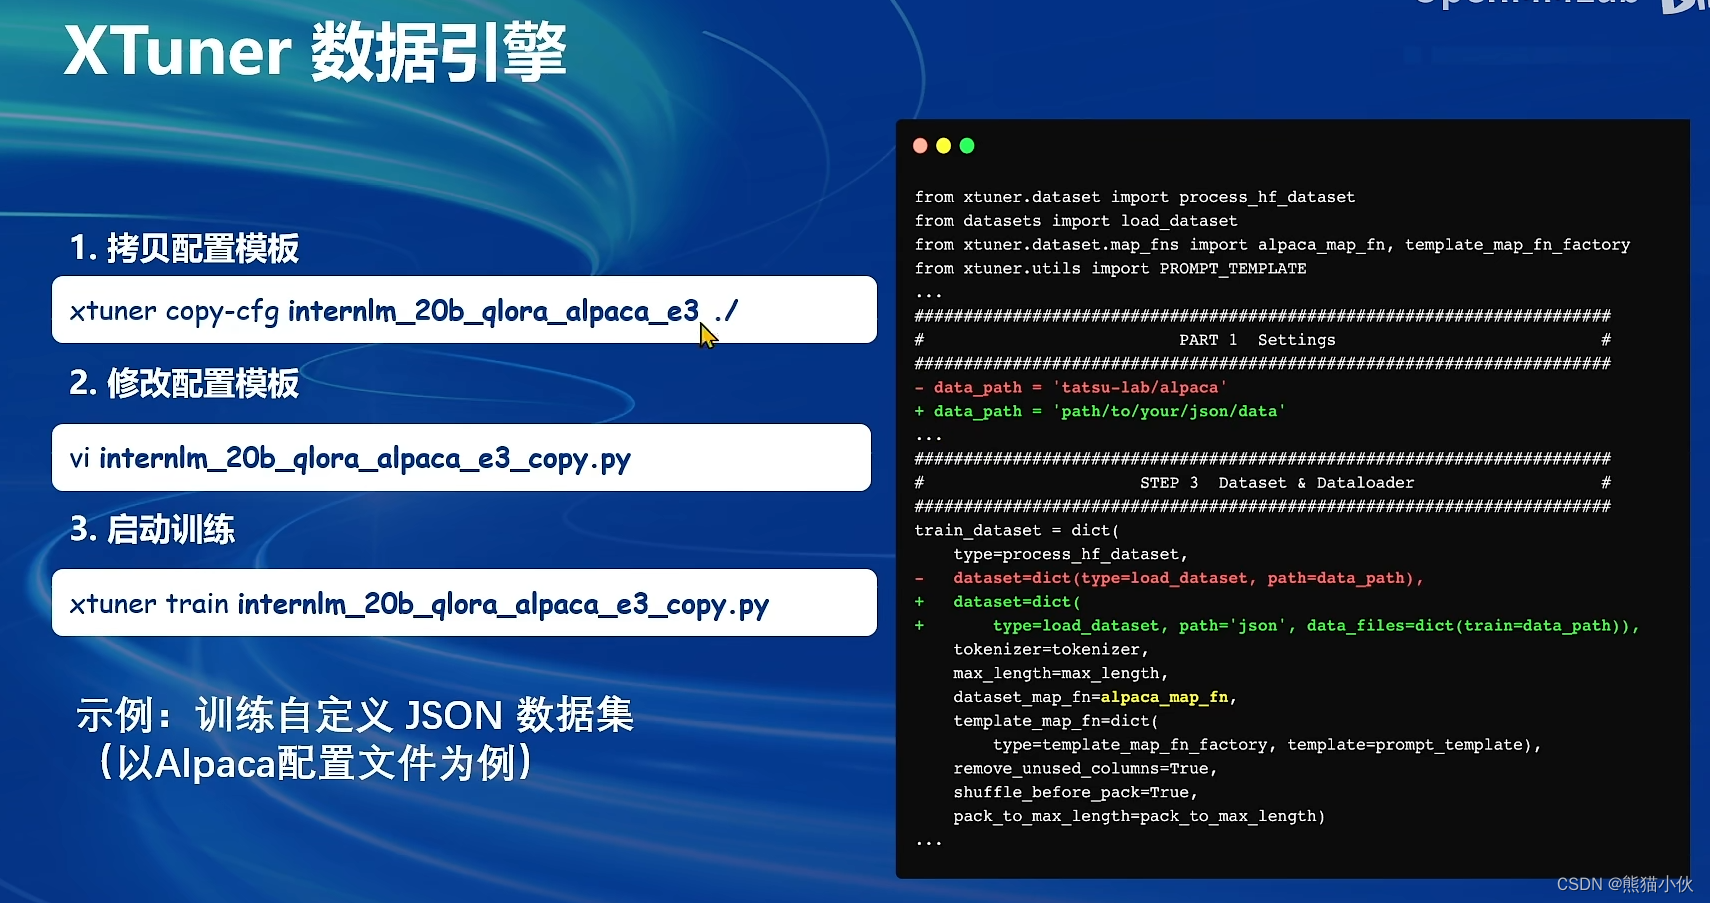
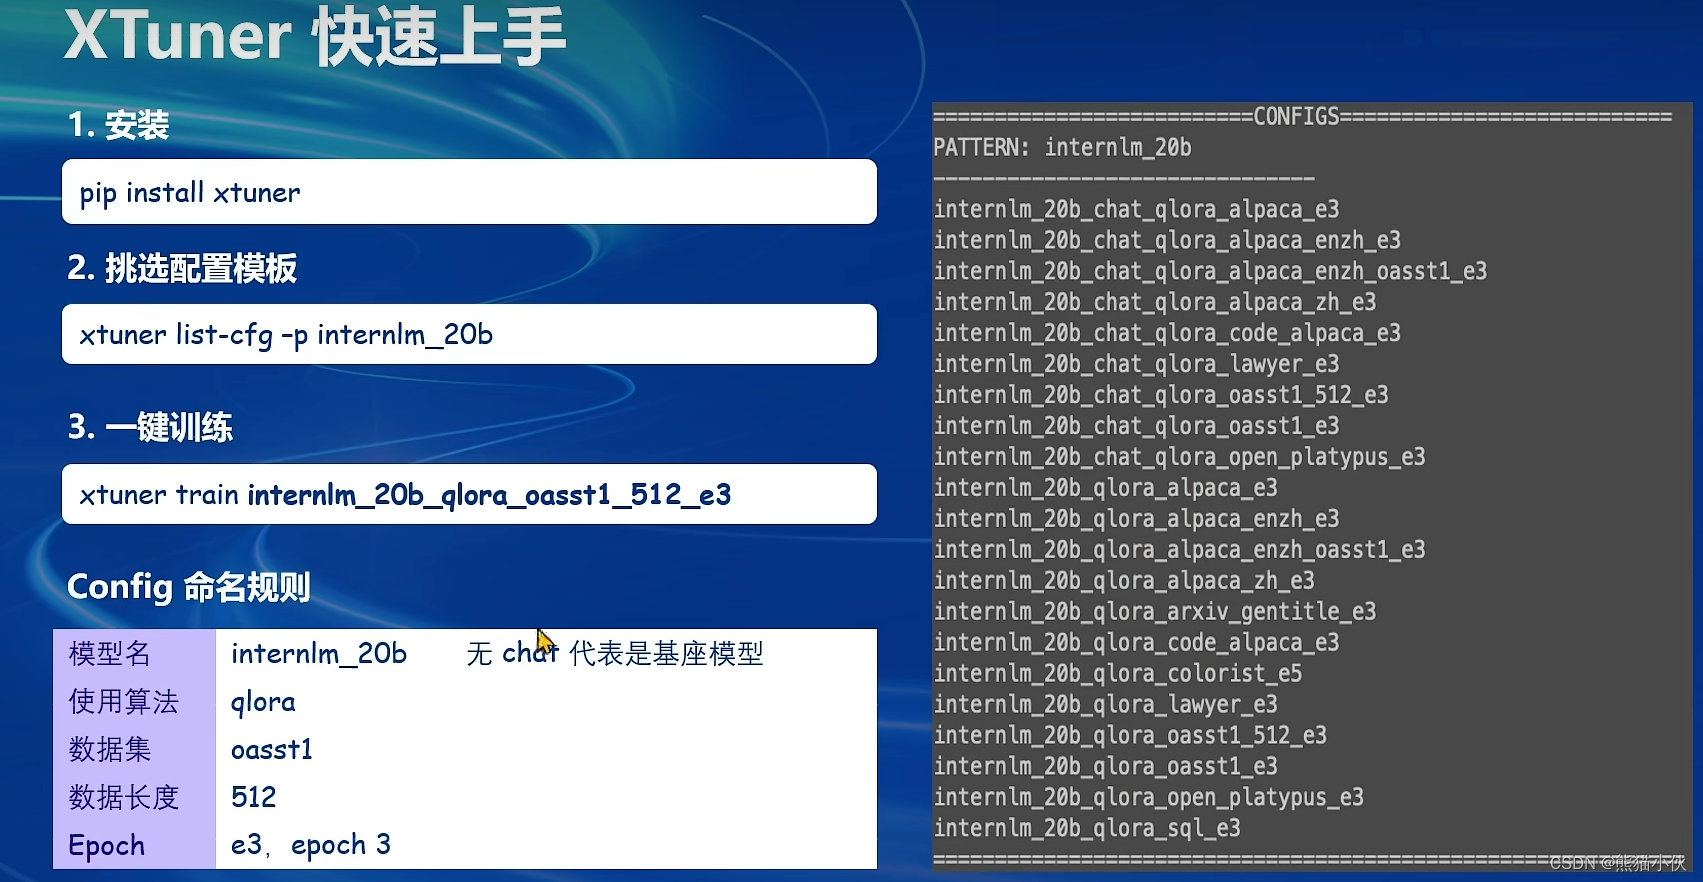
# 列出所有内置配置文件
# xtuner list-cfg
# 假如我们想找到 internlm2-1.8b 模型里支持的配置文件
xtuner list-cfg -p internlm2_1_8b
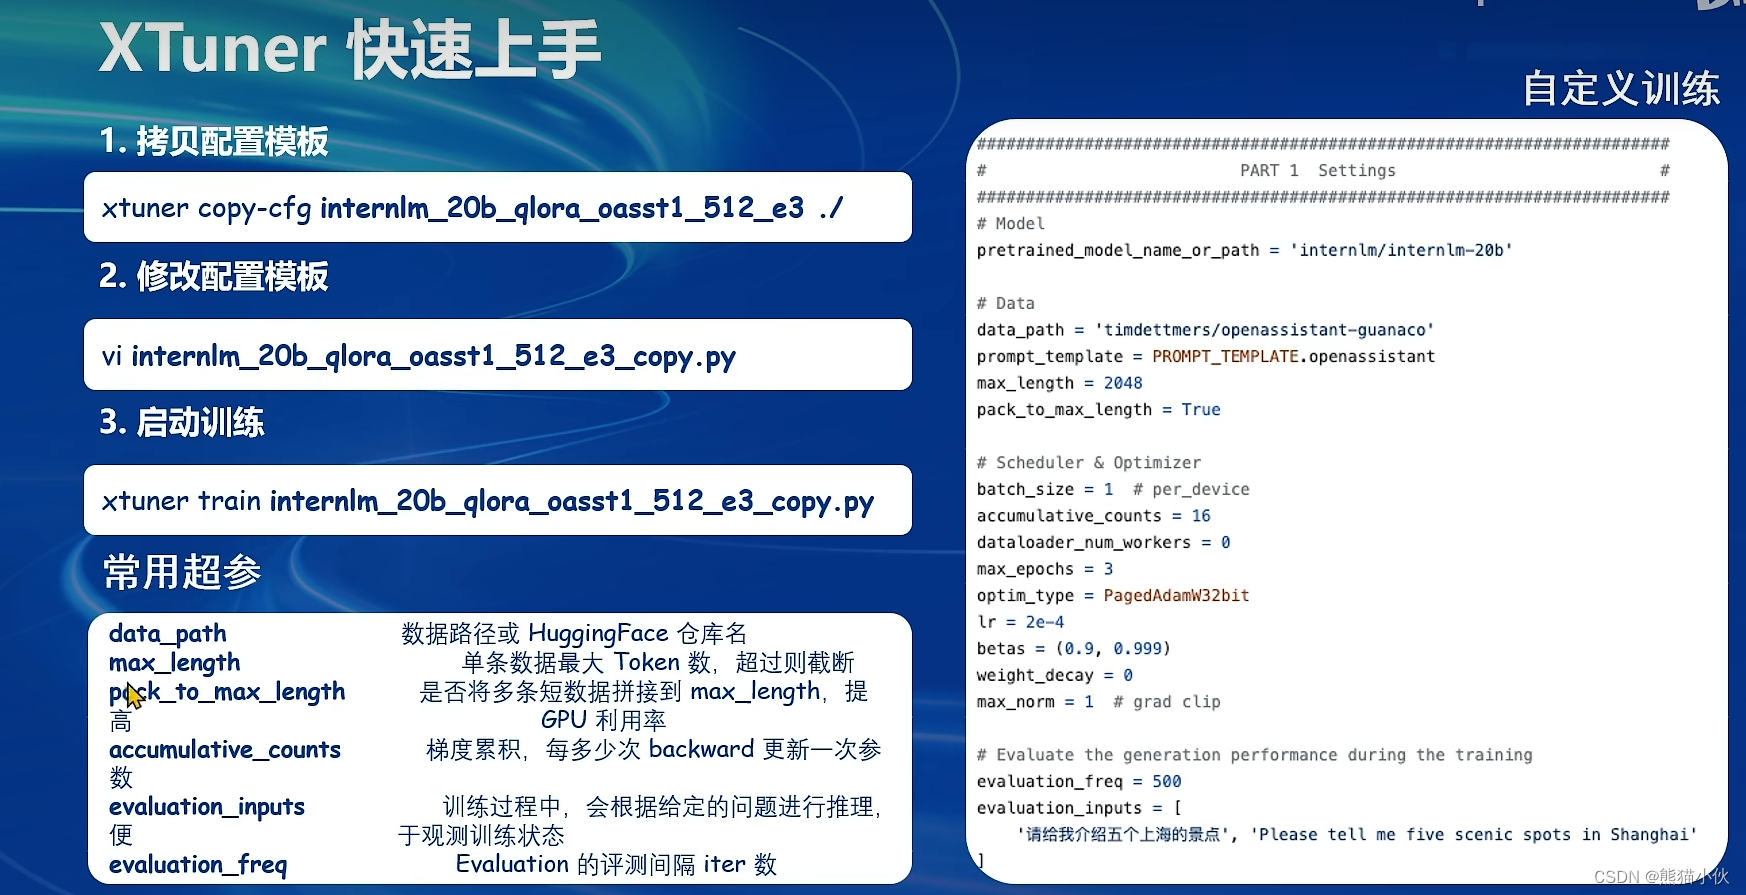
#拷贝配置模板文件到本地: xtuner copy-cfg $config_name $save_dir
xtuner copy-cfg internlm2_1_8b_qlora_alpaca_e3 ./
# 修改配置模板
vim internlm2_1_8b_qlora_alpaca_e3_copy.py
2.3 8GB显存玩转LLM(intern1.8b)
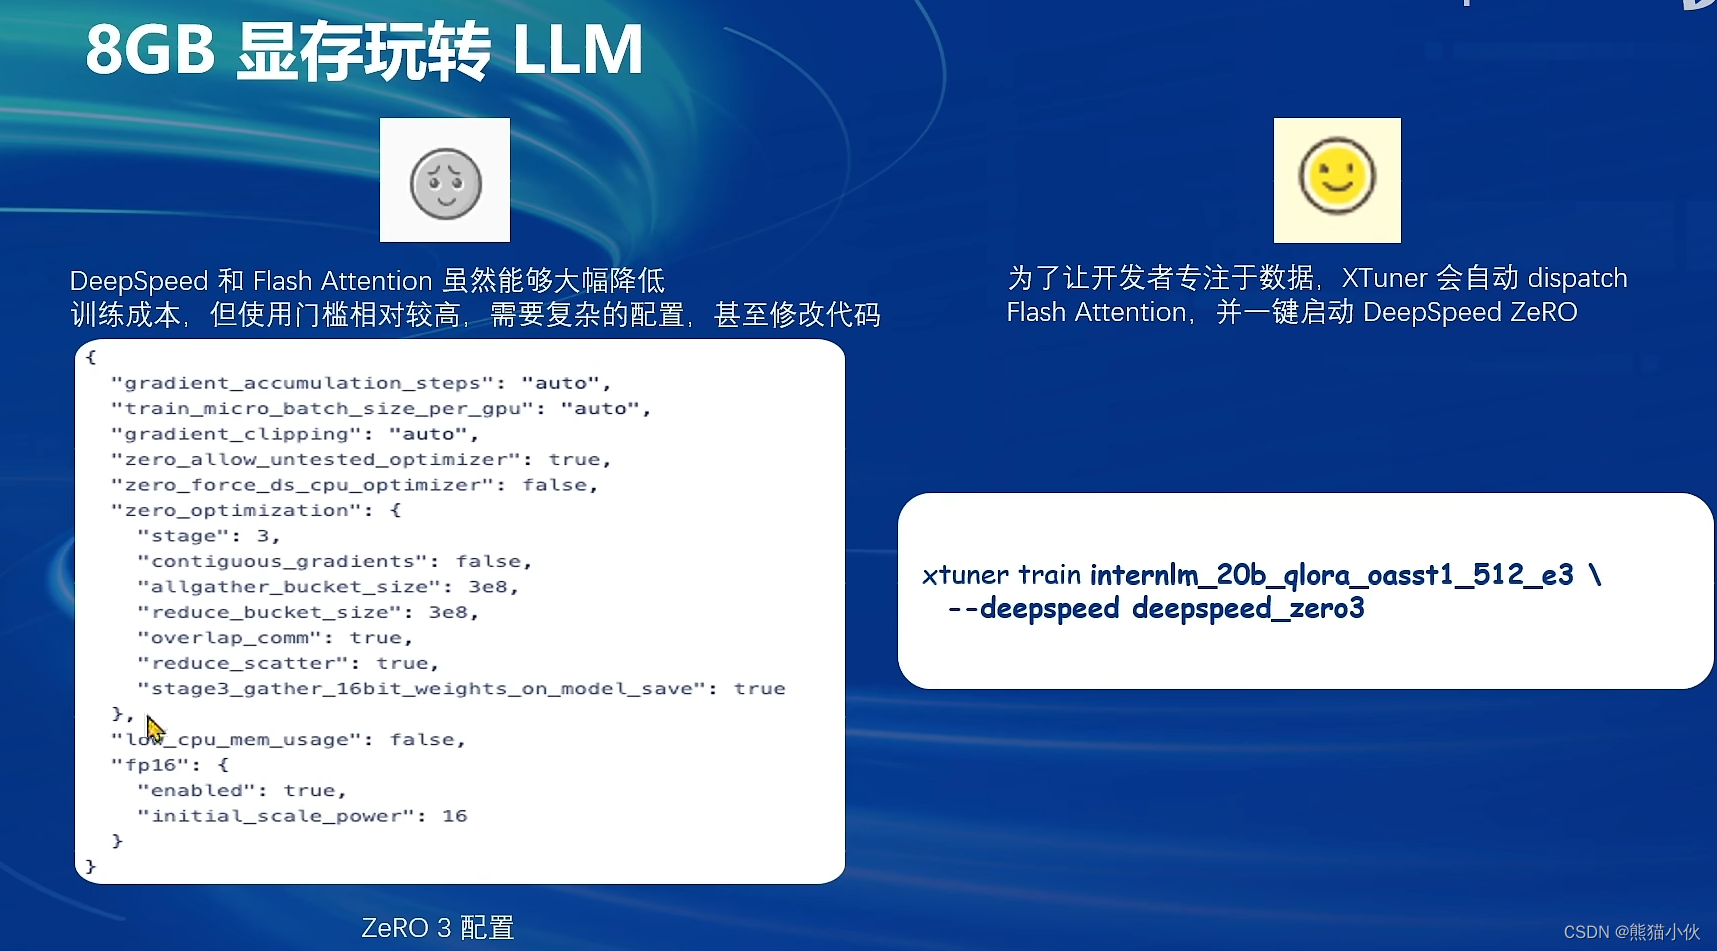
2.3.1 flash attention vs deepspeed zero

2.3.2 相关版本更新和使用
XTuner 一个大语言模型&多模态模型微调工具箱。由 MMRazor 和 MMDeploy 联合开发。
🤓 傻瓜化: 以 配置文件 的形式封装了大部分微调场景,0基础的非专业人员也能一键开始微调。
🍃 轻量级: 对于 7B 参数量的LLM,微调所需的最小显存仅为 8GB : 消费级显卡✅,colab✅

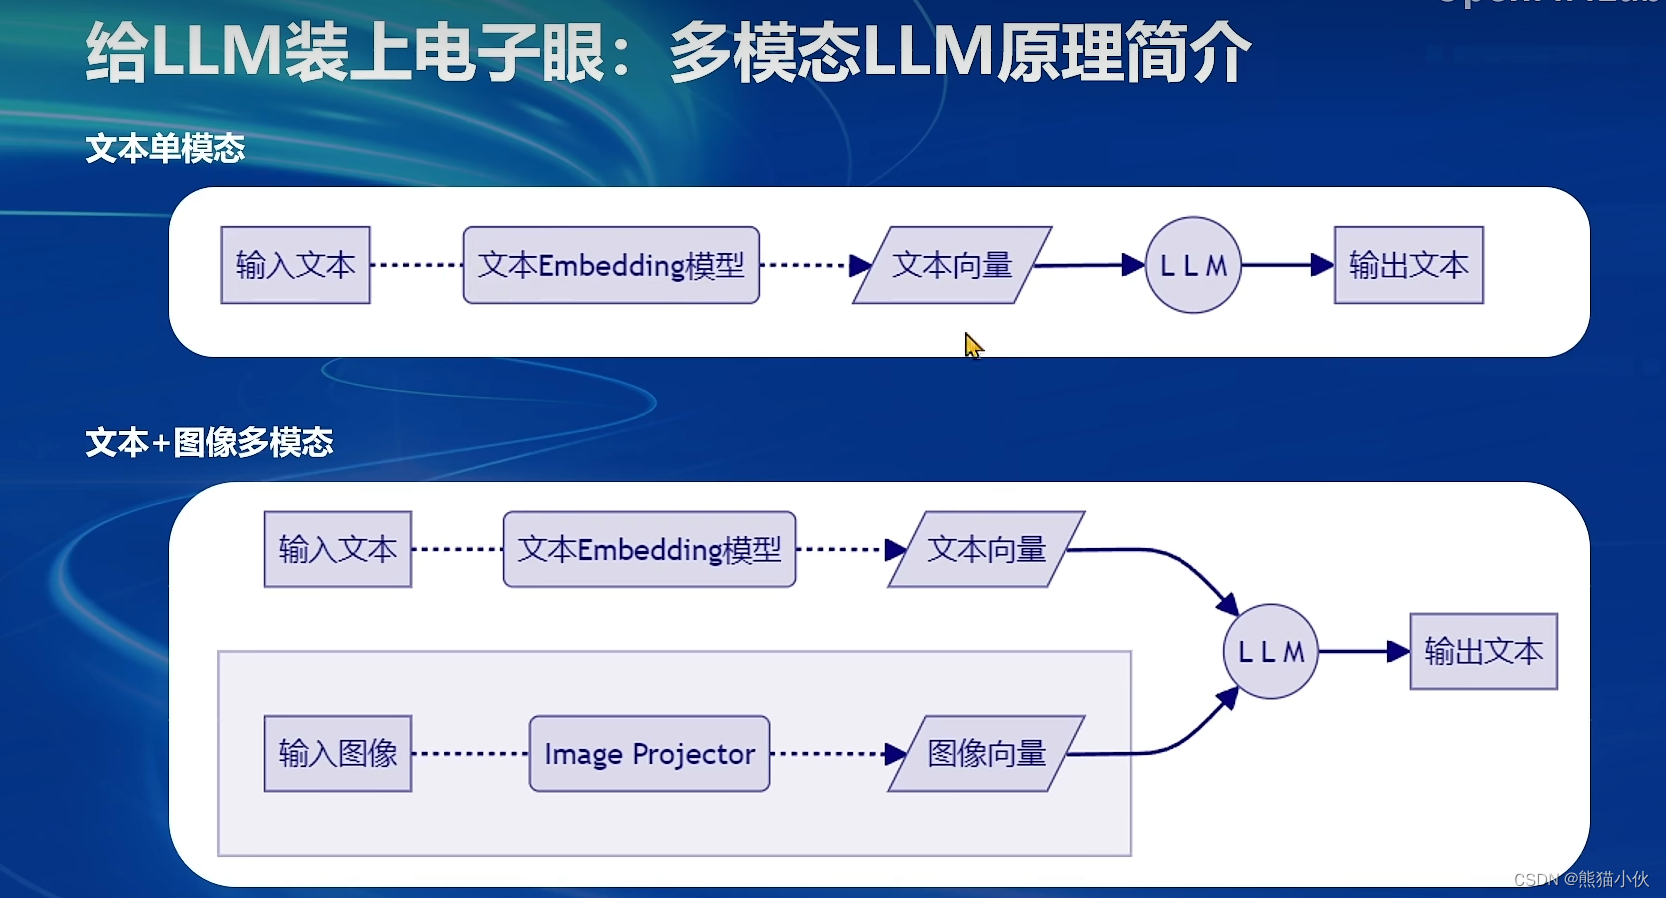
2.4 多模态LLM
2.4.1 多模态LLaVA基本原理简介

2.4.2 快速上手

- pretrain阶段训练
- finetune阶段
3 实践操作
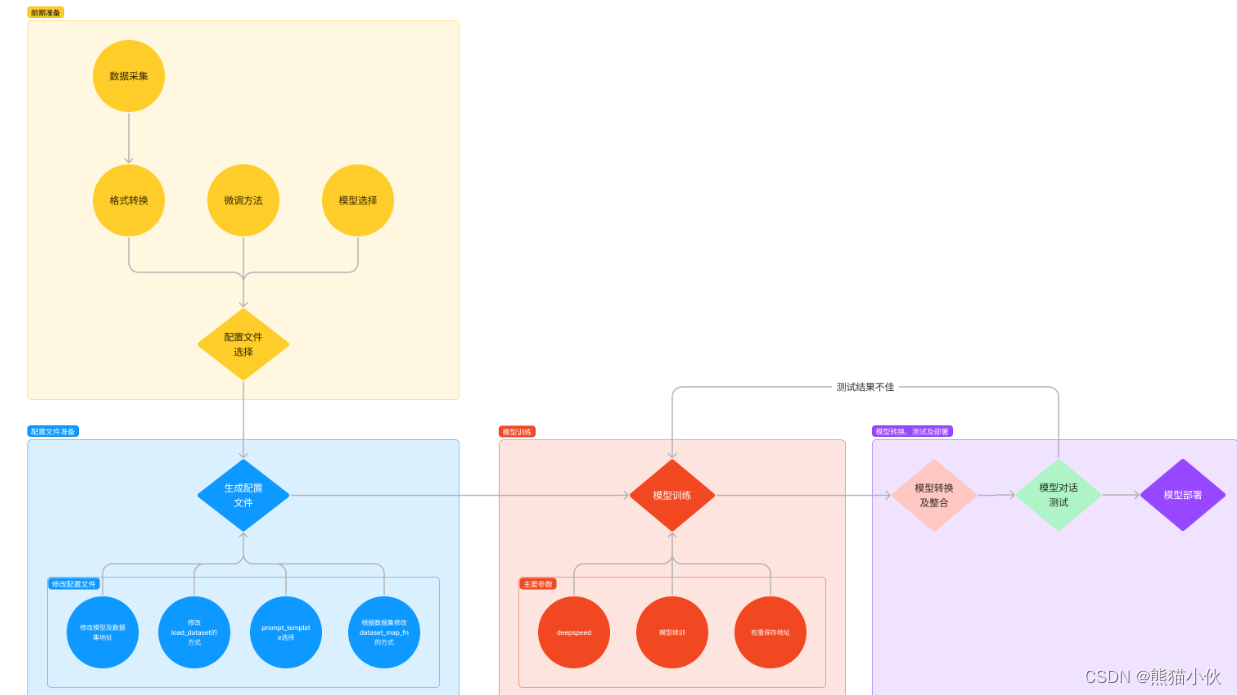 环境安装:假如我们想要用 XTuner 这款简单易上手的微调工具包来对模型进行微调的话,那我们最最最先开始的第一步必然就是安装XTuner!安装基础的工具是一切的前提,只有安装了 XTuner 在我们本地后我们才能够去思考说具体怎么操作。
前期准备:那在完成了安装后,我们下一步就需要去明确我们自己的微调目标了。我们想要利用微调做一些什么事情呢,那我为了做到这个事情我有哪些硬件的资源和数据呢?假如我们有对于一件事情相关的数据集,并且我们还有足够的算力资源,那当然微调就是一件水到渠成的事情。就像 OpenAI 不就是如此吗?但是对于普通的开发者而言,在资源有限的情况下,我们可能就需要考虑怎么采集数据,用什么样的手段和方式来让模型有更好的效果。
启动微调:在确定了自己的微调目标后,我们就可以在 XTuner 的配置库中找到合适的配置文件并进行对应的修改。修改完成后即可一键启动训练!训练好的模型也可以仅仅通过在终端输入一行指令来完成转换和部署工作!
3.1 基本环境安装
- 基础环境安装
# py3.9 - cuda11.7 - torch 2.0.1版本
# step1 建立环境, 与 studio-conda 等效的配置方案
conda create -n intern_clean python=3.9 -y
conda install cudatoolkit==11.7
conda activate intern_clean

# step2 安装torch环境
# 推荐使用以下命令安装Pytorch,以准确复现结果:
pip install torch==2.0.1+cu117 torchvision==0.15.2+cu117 torchaudio==2.0.2 --index-url https://download.pytorch.org/whl/cu117
这个在之前的课程已经安装,如果出现其他问题,详细可以参见 【第 2 节】轻松玩转书生·浦语大模型趣味 Demo
- xturner安装
# step3:并在环境中安装运行 demo 所需要的依赖。
# 拉取 0.1.17 的版本源码(2024.4 版本,现在是最新的)
git clone -b v0.1.17  https://github.com/InternLM/xtuner
# 无法访问github的用户请从 gitee 拉取:
# git clone -b v0.1.15 https://gitee.com/Internlm/xtuner

# 进入源码目录
cd xxxx_dir/xtuner

# 从源码安装 XTuner(有一些库的版本可能和第二节demo的不太一样,
#例如transformer, modelscope等,后面有问题达到话再补充说明)
pip install -e '.[all]'
#假如速度太慢可以 Ctrl + C 退出后换成
# pip install -e '.[all]' -i https://mirrors.aliyun.com/pypi/simple/
3.2 前期准备
3.2.1 internlm2-chat-1_8b模型下载
# 下载路径 ~/.cache/modelscope/hub/Shanghai_AI_Laboratory/internlm2-chat-1_8b
from modelscope import snapshot_download, AutoTokenizer, AutoModelForCausalLM
model_dir = snapshot_download("Shanghai_AI_Laboratory/internlm2-chat-1_8b")
注意:
- 默认下载路径是
~/.cache/modelscope/hub/Shanghai_AI_Laboratory/internlm2-chat-1_8b - 如果想要下载到指定路径的话,可以将
snapshot_download中参数指定cache_dir='/xxx_dir, 如果有对版本有特殊要求的,可以指定版本例如revision='v1.1.0'
下载文件如下:
|-- model/
    |-- tokenizer.model
    |-- config.json
    |-- tokenization_internlm2.py
    |-- model-00002-of-00002.safetensors
    |-- tokenizer_config.json
    |-- model-00001-of-00002.safetensors
    |-- model.safetensors.index.json
    |-- configuration.json
    |-- special_tokens_map.json
    |-- modeling_internlm2.py
    |-- README.md
    |-- configuration_internlm2.py
    |-- generation_config.json
    |-- tokenization_internlm2_fast.py
3.2.2 数据下载或者生成
(1)人力标注或者其他方式生成,不同模态、不同模型的数据可能不一样,注意匹配格式内容形式。
(2)从知名开源网站下载已有的,推荐 万卷 : 官方地址
3.2.3 xtuner基本使用
(1)xtuner所有参数和基本用法
xtuner支持的命令行如下所示,以备参考:
说明:万事不懂 -h。 例如你不清楚list-cfg用法,那就打 xtuner list-cfg -h试一下,很好理解给出的说明内容。
Arguments received: ['xtuner']. xtuner commands use the following syntax:

        xtuner MODE MODE_ARGS ARGS

        Where   MODE (required) is one of ('list-cfg', 'copy-cfg', 'log-dataset', 'check-custom-dataset', 'train', 'test', 'chat', 'convert', 'preprocess', 'mmbench', 'eval_refcoco')
                MODE_ARG (optional) is the argument for specific mode
                ARGS (optional) are the arguments for specific command

    Some usages for xtuner commands: (See more by using -h for specific command!)

        1. List all predefined configs:
            xtuner list-cfg
        2. Copy a predefined config to a given path:
            xtuner copy-cfg $CONFIG $SAVE_FILE
        3-1. Fine-tune LLMs by a single GPU:
            xtuner train $CONFIG
        3-2. Fine-tune LLMs by multiple GPUs:
            NPROC_PER_NODE=$NGPUS NNODES=$NNODES NODE_RANK=$NODE_RANK PORT=$PORT ADDR=$ADDR xtuner dist_train $CONFIG $GPUS
        4-1. Convert the pth model to HuggingFace's model:
            xtuner convert pth_to_hf $CONFIG $PATH_TO_PTH_MODEL $SAVE_PATH_TO_HF_MODEL
        4-2. Merge the HuggingFace's adapter to the pretrained base model:
            xtuner convert merge $LLM $ADAPTER $SAVE_PATH
            xtuner convert merge $CLIP $ADAPTER $SAVE_PATH --is-clip
        4-3. Split HuggingFace's LLM to the smallest sharded one:
            xtuner convert split $LLM $SAVE_PATH
        5-1. Chat with LLMs with HuggingFace's model and adapter:
            xtuner chat $LLM --adapter $ADAPTER --prompt-template $PROMPT_TEMPLATE --system-template $SYSTEM_TEMPLATE
        5-2. Chat with VLMs with HuggingFace's model and LLaVA:
            xtuner chat $LLM --llava $LLAVA --visual-encoder $VISUAL_ENCODER --image $IMAGE --prompt-template $PROMPT_TEMPLATE --system-template $SYSTEM_TEMPLATE
        6-1. Preprocess arxiv dataset:
            xtuner preprocess arxiv $SRC_FILE $DST_FILE --start-date $START_DATE --categories $CATEGORIES
        6-2. Preprocess refcoco dataset:
            xtuner preprocess refcoco --ann-path $RefCOCO_ANN_PATH --image-path $COCO_IMAGE_PATH --save-path $SAVE_PATH
        7-1. Log processed dataset:
            xtuner log-dataset $CONFIG
        7-2. Verify the correctness of the config file for the custom dataset:
            xtuner check-custom-dataset $CONFIG
        8. MMBench evaluation:
            xtuner mmbench $LLM --llava $LLAVA --visual-encoder $VISUAL_ENCODER --prompt-template $PROMPT_TEMPLATE --data-path $MMBENCH_DATA_PATH
        9. Refcoco evaluation:
            xtuner eval_refcoco $LLM --llava $LLAVA --visual-encoder $VISUAL_ENCODER --prompt-template $PROMPT_TEMPLATE --data-path $REFCOCO_DATA_PATH
        10. List all dataset formats which are supported in XTuner

    Run special commands:

        xtuner help
        xtuner version
(2)xtuner内置支持的所有模型
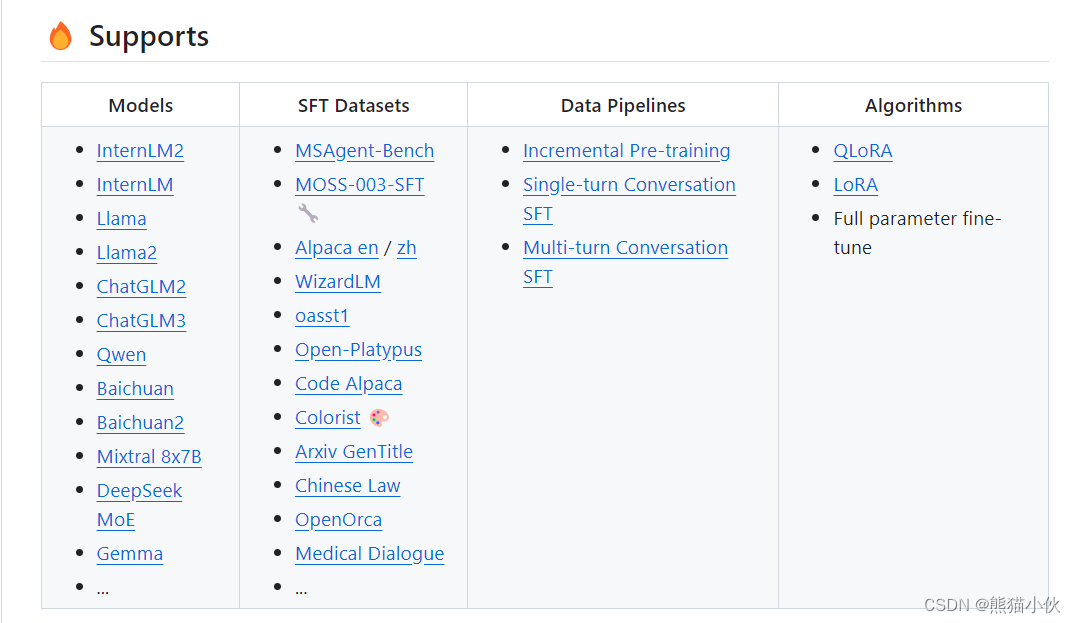 通过指令看到的xtuner支持模型config列表
==========================CONFIGS===========================
baichuan2_13b_base_qlora_alpaca_e3
baichuan2_13b_base_qlora_alpaca_enzh_e3
baichuan2_13b_base_qlora_alpaca_enzh_oasst1_e3
baichuan2_13b_base_qlora_alpaca_zh_e3
baichuan2_13b_base_qlora_arxiv_gentitle_e3
baichuan2_13b_base_qlora_code_alpaca_e3
baichuan2_13b_base_qlora_colorist_e5
baichuan2_13b_base_qlora_lawyer_e3
baichuan2_13b_base_qlora_oasst1_512_e3
baichuan2_13b_base_qlora_oasst1_e3
baichuan2_13b_base_qlora_open_platypus_e3
baichuan2_13b_base_qlora_sql_e3
baichuan2_13b_chat_qlora_alpaca_e3
baichuan2_13b_chat_qlora_alpaca_enzh_e3
baichuan2_13b_chat_qlora_alpaca_enzh_oasst1_e3
baichuan2_13b_chat_qlora_alpaca_zh_e3
baichuan2_13b_chat_qlora_code_alpaca_e3
baichuan2_13b_chat_qlora_lawyer_e3
baichuan2_13b_chat_qlora_oasst1_512_e3
baichuan2_13b_chat_qlora_oasst1_e3
baichuan2_13b_chat_qlora_open_platypus_e3
baichuan2_7b_base_qlora_alpaca_e3
baichuan2_7b_base_qlora_alpaca_enzh_e3
baichuan2_7b_base_qlora_alpaca_enzh_oasst1_e3
baichuan2_7b_base_qlora_alpaca_zh_e3
baichuan2_7b_base_qlora_arxiv_gentitle_e3
baichuan2_7b_base_qlora_code_alpaca_e3
baichuan2_7b_base_qlora_colorist_e5
baichuan2_7b_base_qlora_lawyer_e3
baichuan2_7b_base_qlora_oasst1_512_e3
baichuan2_7b_base_qlora_oasst1_e3
baichuan2_7b_base_qlora_open_platypus_e3
baichuan2_7b_base_qlora_sql_e3
baichuan2_7b_chat_qlora_alpaca_e3
baichuan2_7b_chat_qlora_alpaca_enzh_e3
baichuan2_7b_chat_qlora_alpaca_enzh_oasst1_e3
baichuan2_7b_chat_qlora_alpaca_zh_e3
baichuan2_7b_chat_qlora_code_alpaca_e3
baichuan2_7b_chat_qlora_lawyer_e3
baichuan2_7b_chat_qlora_oasst1_512_e3
baichuan2_7b_chat_qlora_oasst1_e3
baichuan2_7b_chat_qlora_open_platypus_e3
baichuan_13b_base_qlora_alpaca_e3
baichuan_13b_base_qlora_alpaca_enzh_e3
baichuan_13b_base_qlora_alpaca_enzh_oasst1_e3
baichuan_13b_base_qlora_alpaca_zh_e3
baichuan_13b_base_qlora_arxiv_gentitle_e3
baichuan_13b_base_qlora_code_alpaca_e3
baichuan_13b_base_qlora_colorist_e5
baichuan_13b_base_qlora_lawyer_e3
baichuan_13b_base_qlora_medical_e1
baichuan_13b_base_qlora_moss_sft_all_e1
baichuan_13b_base_qlora_moss_sft_all_e2_gpu8
baichuan_13b_base_qlora_moss_sft_plugins_e1
baichuan_13b_base_qlora_oasst1_512_e3
baichuan_13b_base_qlora_oasst1_e3
baichuan_13b_base_qlora_open_platypus_e3
baichuan_13b_base_qlora_openorca_e1
baichuan_13b_base_qlora_sql_e3
baichuan_13b_base_qlora_tiny_codes_e1
baichuan_13b_chat_qlora_alpaca_e3
baichuan_13b_chat_qlora_alpaca_enzh_e3
baichuan_13b_chat_qlora_alpaca_enzh_oasst1_e3
baichuan_13b_chat_qlora_alpaca_zh_e3
baichuan_13b_chat_qlora_arxiv_gentitle_e3
baichuan_13b_chat_qlora_code_alpaca_e3
baichuan_13b_chat_qlora_colorist_e5
baichuan_13b_chat_qlora_lawyer_e3
baichuan_13b_chat_qlora_medical_e1
baichuan_13b_chat_qlora_oasst1_512_e3
baichuan_13b_chat_qlora_oasst1_e3
baichuan_13b_chat_qlora_open_platypus_e3
baichuan_13b_chat_qlora_openorca_e1
baichuan_13b_chat_qlora_sql_e3
baichuan_13b_chat_qlora_tiny_codes_e1
baichuan_7b_qlora_alpaca_e3
baichuan_7b_qlora_alpaca_enzh_e3
baichuan_7b_qlora_alpaca_enzh_oasst1_e3
baichuan_7b_qlora_alpaca_zh_e3
baichuan_7b_qlora_arxiv_gentitle_e3
baichuan_7b_qlora_code_alpaca_e3
baichuan_7b_qlora_colorist_e5
baichuan_7b_qlora_lawyer_e3
baichuan_7b_qlora_medical_e1
baichuan_7b_qlora_moss_sft_all_e1
baichuan_7b_qlora_moss_sft_all_e2_gpu8
baichuan_7b_qlora_moss_sft_plugins_e1
baichuan_7b_qlora_oasst1_512_e3
baichuan_7b_qlora_oasst1_e3
baichuan_7b_qlora_open_platypus_e3
baichuan_7b_qlora_openorca_e1
baichuan_7b_qlora_sql_e3
baichuan_7b_qlora_tiny_codes_e1
chatglm2_6b_qlora_alpaca_e3
chatglm2_6b_qlora_alpaca_enzh_e3
chatglm2_6b_qlora_alpaca_enzh_oasst1_e3
chatglm2_6b_qlora_alpaca_zh_e3
chatglm2_6b_qlora_arxiv_gentitle_e3
chatglm2_6b_qlora_code_alpaca_e3
chatglm2_6b_qlora_colorist_e5
chatglm2_6b_qlora_lawyer_e3
chatglm2_6b_qlora_medical_e1
chatglm2_6b_qlora_oasst1_512_e3
chatglm2_6b_qlora_oasst1_e3
chatglm2_6b_qlora_open_platypus_e3
chatglm2_6b_qlora_openorca_e1
chatglm2_6b_qlora_sql_e3
chatglm2_6b_qlora_tiny_codes_e1
chatglm3_6b_base_qlora_alpaca_e3
chatglm3_6b_base_qlora_alpaca_enzh_e3
chatglm3_6b_base_qlora_alpaca_enzh_oasst1_e3
chatglm3_6b_base_qlora_alpaca_zh_e3
chatglm3_6b_base_qlora_arxiv_gentitle_e3
chatglm3_6b_base_qlora_code_alpaca_e3
chatglm3_6b_base_qlora_colorist_e5
chatglm3_6b_base_qlora_lawyer_e3
chatglm3_6b_base_qlora_medical_e1
chatglm3_6b_base_qlora_oasst1_512_e3
chatglm3_6b_base_qlora_oasst1_e3
chatglm3_6b_base_qlora_open_platypus_e3
chatglm3_6b_base_qlora_openorca_e1
chatglm3_6b_base_qlora_sql_e3
chatglm3_6b_base_qlora_tiny_codes_e1
chatglm3_6b_qlora_alpaca_e3
chatglm3_6b_qlora_alpaca_enzh_e3
chatglm3_6b_qlora_alpaca_enzh_oasst1_e3
chatglm3_6b_qlora_alpaca_zh_e3
chatglm3_6b_qlora_arxiv_gentitle_e3
chatglm3_6b_qlora_code_alpaca_e3
chatglm3_6b_qlora_colorist_e5
chatglm3_6b_qlora_lawyer_e3
chatglm3_6b_qlora_medical_e1
chatglm3_6b_qlora_oasst1_512_e3
chatglm3_6b_qlora_oasst1_e3
chatglm3_6b_qlora_open_platypus_e3
chatglm3_6b_qlora_openorca_e1
chatglm3_6b_qlora_sql_e3
chatglm3_6b_qlora_tiny_codes_e1
cohere_100b_128k_sp32
deepseek_coder_6_7b_base_qlora_code_alpaca_e3
deepseek_moe_16b_base_full_oasst1_e3
deepseek_moe_16b_base_qlora_oasst1_e3
deepseek_moe_16b_chat_full_oasst1_e3
deepseek_moe_16b_chat_qlora_oasst1_e3
deepseekcoder_6_7b_instruct_qlora_code_alpaca_e3
deepspeed_zero1
deepspeed_zero2
deepspeed_zero2_offload
deepspeed_zero3
deepspeed_zero3_offload
gemma_2b_full_alpaca_e3
gemma_2b_it_full_alpaca_e3
gemma_2b_it_qlora_alpaca_e3
gemma_2b_qlora_alpaca_e3
gemma_7b_full_alpaca_e3
gemma_7b_it_full_alpaca_e3
gemma_7b_it_qlora_alpaca_e3
gemma_7b_qlora_alpaca_e3
internlm2_1_8b_full_alpaca_e3
internlm2_1_8b_qlora_alpaca_e3
internlm2_20b_full_finetune_custom_dataset_e1
internlm2_20b_qlora_alpaca_e3
internlm2_20b_qlora_arxiv_gentitle_e3
internlm2_20b_qlora_code_alpaca_e3
internlm2_20b_qlora_colorist_e5
internlm2_20b_qlora_lawyer_e3
internlm2_20b_qlora_msagent_react_e3_gpu8
internlm2_20b_qlora_oasst1_512_e3
internlm2_20b_qlora_oasst1_e3
internlm2_20b_qlora_sql_e3
internlm2_7b_full_finetune_custom_dataset_e1
internlm2_7b_full_finetune_custom_dataset_e1_sequence_parallel_4
internlm2_7b_qlora_alpaca_e3
internlm2_7b_qlora_arxiv_gentitle_e3
internlm2_7b_qlora_code_alpaca_e3
internlm2_7b_qlora_colorist_e5
internlm2_7b_qlora_json_e3
internlm2_7b_qlora_lawyer_e3
internlm2_7b_qlora_msagent_react_e3_gpu8
internlm2_7b_qlora_oasst1_512_e3
internlm2_7b_qlora_oasst1_e3
internlm2_7b_qlora_sql_e3
internlm2_7b_w_tokenized_dataset
internlm2_7b_w_untokenized_dataset
internlm2_chat_1_8b_full_alpaca_e3
internlm2_chat_1_8b_qlora_alpaca_e3
internlm2_chat_20b_full_finetune_custom_dataset_e1
internlm2_chat_20b_qlora_alpaca_e3
internlm2_chat_20b_qlora_code_alpaca_e3
internlm2_chat_20b_qlora_lawyer_e3
internlm2_chat_20b_qlora_oasst1_512_e3
internlm2_chat_20b_qlora_oasst1_e3
internlm2_chat_7b_full_finetune_custom_dataset_e1
internlm2_chat_7b_qlora_alpaca_e3
internlm2_chat_7b_qlora_code_alpaca_e3
internlm2_chat_7b_qlora_lawyer_e3
internlm2_chat_7b_qlora_oasst1_512_e3
internlm2_chat_7b_qlora_oasst1_e3
internlm_20b_qlora_alpaca_e3
internlm_20b_qlora_alpaca_enzh_e3
internlm_20b_qlora_alpaca_enzh_oasst1_e3
internlm_20b_qlora_alpaca_zh_e3
internlm_20b_qlora_arxiv_gentitle_e3
internlm_20b_qlora_code_alpaca_e3
internlm_20b_qlora_colorist_e5
internlm_20b_qlora_lawyer_e3
internlm_20b_qlora_msagent_react_e3_gpu8
internlm_20b_qlora_oasst1_512_e3
internlm_20b_qlora_oasst1_e3
internlm_20b_qlora_open_platypus_e3
internlm_20b_qlora_sql_e3
internlm_7b_full_alpaca_e3
internlm_7b_full_alpaca_enzh_e3
internlm_7b_full_alpaca_enzh_oasst1_e3
internlm_7b_full_alpaca_zh_e3
internlm_7b_full_intern_repo_dataset_template
internlm_7b_full_oasst1_e3
internlm_7b_qlora_alpaca_e3
internlm_7b_qlora_alpaca_enzh_e3
internlm_7b_qlora_alpaca_enzh_oasst1_e3
internlm_7b_qlora_alpaca_zh_e3
internlm_7b_qlora_arxiv_gentitle_e3
internlm_7b_qlora_code_alpaca_e3
internlm_7b_qlora_colorist_e5
internlm_7b_qlora_json_e3
internlm_7b_qlora_lawyer_e3
internlm_7b_qlora_medical_e1
internlm_7b_qlora_moss_sft_all_e1
internlm_7b_qlora_moss_sft_all_e2_gpu8
internlm_7b_qlora_moss_sft_plugins_e1
internlm_7b_qlora_msagent_react_e3_gpu8
internlm_7b_qlora_oasst1_512_e3
internlm_7b_qlora_oasst1_e3
internlm_7b_qlora_oasst1_e3_hf
internlm_7b_qlora_oasst1_mmlu_e3
internlm_7b_qlora_open_platypus_e3
internlm_7b_qlora_openorca_e1
internlm_7b_qlora_sql_e3
internlm_7b_qlora_tiny_codes_e1
internlm_chat_20b_qlora_alpaca_e3
internlm_chat_20b_qlora_alpaca_enzh_e3
internlm_chat_20b_qlora_alpaca_enzh_oasst1_e3
internlm_chat_20b_qlora_alpaca_zh_e3
internlm_chat_20b_qlora_code_alpaca_e3
internlm_chat_20b_qlora_lawyer_e3
internlm_chat_20b_qlora_oasst1_512_e3
internlm_chat_20b_qlora_oasst1_e3
internlm_chat_20b_qlora_open_platypus_e3
internlm_chat_7b_qlora_alpaca_e3
internlm_chat_7b_qlora_alpaca_enzh_e3
internlm_chat_7b_qlora_alpaca_enzh_oasst1_e3
internlm_chat_7b_qlora_alpaca_zh_e3
internlm_chat_7b_qlora_arxiv_gentitle_e3
internlm_chat_7b_qlora_code_alpaca_e3
internlm_chat_7b_qlora_colorist_e5
internlm_chat_7b_qlora_lawyer_e3
internlm_chat_7b_qlora_medical_e1
internlm_chat_7b_qlora_oasst1_512_e3
internlm_chat_7b_qlora_oasst1_e3
internlm_chat_7b_qlora_open_platypus_e3
internlm_chat_7b_qlora_openorca_e1
internlm_chat_7b_qlora_sql_e3
internlm_chat_7b_qlora_tiny_codes_e1
llama2_70b_full_wizardlm_e1
llama2_70b_int8_lora_open_platypus_e1
llama2_70b_int8_lora_open_platypus_e1_hf
llama2_70b_qlora_open_platypus_e1
llama2_70b_qlora_open_platypus_e1_hf
llama2_7b_chat_qlora_alpaca_e3
llama2_7b_chat_qlora_alpaca_enzh_e3
llama2_7b_chat_qlora_alpaca_enzh_oasst1_e3
llama2_7b_chat_qlora_alpaca_zh_e3
llama2_7b_chat_qlora_arxiv_gentitle_e3
llama2_7b_chat_qlora_code_alpaca_e3
llama2_7b_chat_qlora_colorist_e5
llama2_7b_chat_qlora_lawyer_e3
llama2_7b_chat_qlora_medical_e1
llama2_7b_chat_qlora_oasst1_512_e3
llama2_7b_chat_qlora_oasst1_e3
llama2_7b_chat_qlora_open_platypus_e3
llama2_7b_chat_qlora_openorca_e1
llama2_7b_chat_qlora_sql_e3
llama2_7b_chat_qlora_tiny_codes_e1
llama2_7b_full_pgbooks_400iters_sp1
llama2_7b_full_pgbooks_400iters_sp4
llama2_7b_full_wizardlm_e1
llama2_7b_qlora_alpaca_e3
llama2_7b_qlora_alpaca_enzh_e3
llama2_7b_qlora_alpaca_enzh_oasst1_e3
llama2_7b_qlora_alpaca_zh_e3
llama2_7b_qlora_arxiv_gentitle_e3
llama2_7b_qlora_code_alpaca_e3
llama2_7b_qlora_colorist_e5
llama2_7b_qlora_lawyer_e3
llama2_7b_qlora_medical_e1
llama2_7b_qlora_moss_sft_all_e1
llama2_7b_qlora_moss_sft_all_e2_gpu8
llama2_7b_qlora_moss_sft_plugins_e1
llama2_7b_qlora_msagent_react_e3_gpu8
llama2_7b_qlora_oasst1_512_e3
llama2_7b_qlora_oasst1_e3
llama2_7b_qlora_open_platypus_e3
llama2_7b_qlora_openorca_e1
llama2_7b_qlora_sql_e3
llama2_7b_qlora_tiny_codes_e1
llama_7b_qlora_alpaca_e3
llama_7b_qlora_alpaca_enzh_e3
llama_7b_qlora_alpaca_enzh_oasst1_e3
llama_7b_qlora_alpaca_zh_e3
llama_7b_qlora_arxiv_gentitle_e3
llama_7b_qlora_code_alpaca_e3
llama_7b_qlora_colorist_e5
llama_7b_qlora_lawyer_e3
llama_7b_qlora_medical_e1
llama_7b_qlora_moss_sft_all_e1
llama_7b_qlora_moss_sft_all_e2_gpu8
llama_7b_qlora_moss_sft_plugins_e1
llama_7b_qlora_oasst1_512_e3
llama_7b_qlora_oasst1_e3
llama_7b_qlora_open_platypus_e3
llama_7b_qlora_openorca_e1
llama_7b_qlora_sql_e3
llama_7b_qlora_tiny_codes_e1
llava_internlm2_chat_1_8b_clip_vit_large_p14_336_e1_gpu8_pretrain
llava_internlm2_chat_1_8b_qlora_clip_vit_large_p14_336_lora_e1_gpu8_finetune
llava_internlm2_chat_20b_clip_vit_large_p14_336_e1_gpu8_pretrain
llava_internlm2_chat_20b_qlora_clip_vit_large_p14_336_lora_e1_gpu8_finetune
llava_internlm2_chat_7b_clip_vit_large_p14_336_e1_gpu8_pretrain
llava_internlm2_chat_7b_qlora_clip_vit_large_p14_336_lora_e1_gpu8_finetune
llava_internlm_chat_7b_clip_vit_large_p14_336_e1_gpu8_pretrain
llava_internlm_chat_7b_qlora_clip_vit_large_p14_336_lora_e1_gpu8_finetune
llava_v15_13b_finetune
llava_v15_13b_finetune_lora
llava_v15_13b_pretrain
llava_v15_7b_finetune
llava_v15_7b_finetune_lora
llava_v15_7b_pretrain
llava_vicuna_13b_v15_clip_vit_large_p14_336_e1_gpu8_pretrain
llava_vicuna_13b_v15_qlora_clip_vit_large_p14_336_lora_e1_gpu8_finetune
llava_vicuna_7b_v15_clip_vit_large_p14_336_e1_gpu8_pretrain
llava_vicuna_7b_v15_qlora_clip_vit_large_p14_336_lora_e1_gpu8_finetune
llava_vicuna_7b_v15_qlora_clip_vit_large_p14_336_lora_e1_gpu8_finetune_refcoco
mistral_7b_full_finetune_custom_dataset_e1
mistral_7b_qlora_skypile_pretrain_e1
mistral_7b_w_tokenized_dataset
mistral_7b_w_untokenized_dataset
mixtral_8x7b_full_oasst1_e3
mixtral_8x7b_instruct_full_oasst1_e3
mixtral_8x7b_instruct_qlora_oasst1_e3
mixtral_8x7b_qlora_oasst1_e3
qwen1_5_0_5b_chat_full_alpaca_e3
qwen1_5_0_5b_chat_qlora_alpaca_e3
qwen1_5_0_5b_full_alpaca_e3
qwen1_5_0_5b_qlora_alpaca_e3
qwen1_5_14b_chat_full_alpaca_e3
qwen1_5_14b_chat_qlora_alpaca_e3
qwen1_5_14b_full_alpaca_e3
qwen1_5_14b_qlora_alpaca_e3
qwen1_5_1_8b_chat_full_alpaca_e3
qwen1_5_1_8b_chat_qlora_alpaca_e3
qwen1_5_1_8b_full_alpaca_e3
qwen1_5_1_8b_qlora_alpaca_e3
qwen1_5_4b_chat_full_alpaca_e3
qwen1_5_4b_chat_qlora_alpaca_e3
qwen1_5_4b_full_alpaca_e3
qwen1_5_4b_qlora_alpaca_e3
qwen1_5_72b_chat_full_alpaca_e3
qwen1_5_72b_chat_qlora_alpaca_e3
qwen1_5_72b_full_alpaca_e3
qwen1_5_72b_qlora_alpaca_e3
qwen1_5_7b_chat_full_alpaca_e3
qwen1_5_7b_chat_qlora_alpaca_e3
qwen1_5_7b_full_alpaca_e3
qwen1_5_7b_qlora_alpaca_e3
qwen_1_8b_chat_qlora_alpaca_e3
qwen_1_8b_chat_qlora_alpaca_enzh_e3
qwen_1_8b_chat_qlora_alpaca_enzh_oasst1_e3
qwen_1_8b_chat_qlora_alpaca_zh_e3
qwen_1_8b_chat_qlora_code_alpaca_e3
qwen_1_8b_qlora_alpaca_e3
qwen_1_8b_qlora_alpaca_enzh_e3
qwen_1_8b_qlora_alpaca_enzh_oasst1_e3
qwen_1_8b_qlora_alpaca_zh_e3
qwen_1_8b_qlora_code_alpaca_e3
qwen_72b_qlora_alpaca_e3
qwen_72b_qlora_alpaca_enzh_e3
qwen_72b_qlora_alpaca_enzh_oasst1_e3
qwen_72b_qlora_alpaca_zh_e3
qwen_72b_qlora_code_alpaca_e3
qwen_7b_chat_qlora_alpaca_e3
qwen_7b_chat_qlora_alpaca_enzh_e3
qwen_7b_chat_qlora_alpaca_enzh_oasst1_e3
qwen_7b_chat_qlora_alpaca_zh_e3
qwen_7b_chat_qlora_arxiv_gentitle_e3
qwen_7b_chat_qlora_code_alpaca_e3
qwen_7b_chat_qlora_colorist_e5
qwen_7b_chat_qlora_lawyer_e3
qwen_7b_chat_qlora_medical_e1
qwen_7b_chat_qlora_oasst1_512_e3
qwen_7b_chat_qlora_oasst1_e3
qwen_7b_chat_qlora_open_platypus_e3
qwen_7b_chat_qlora_openorca_e1
qwen_7b_chat_qlora_sql_e3
qwen_7b_chat_qlora_tiny_codes_e1
qwen_7b_qlora_alpaca_e3
qwen_7b_qlora_alpaca_enzh_e3
qwen_7b_qlora_alpaca_enzh_oasst1_e3
qwen_7b_qlora_alpaca_zh_e3
qwen_7b_qlora_arxiv_gentitle_e3
qwen_7b_qlora_code_alpaca_e3
qwen_7b_qlora_colorist_e5
qwen_7b_qlora_lawyer_e3
qwen_7b_qlora_medical_e1
qwen_7b_qlora_moss_sft_all_e1
qwen_7b_qlora_moss_sft_all_e2_gpu8
qwen_7b_qlora_moss_sft_plugins_e1
qwen_7b_qlora_oasst1_512_e3
qwen_7b_qlora_oasst1_e3
qwen_7b_qlora_open_platypus_e3
qwen_7b_qlora_openorca_e1
qwen_7b_qlora_sql_e3
qwen_7b_qlora_tiny_codes_e1
starcoder_qlora_stack_exchange_example
yi_34b_qlora_alpaca_enzh_e3
yi_6b_qlora_alpaca_enzh_e3
zephyr_7b_beta_qlora_alpaca_e3
=============================================================
(3) 常用配置文件操作说明
在准备好了模型和数据集后,我们就要根据我们选择的微调方法方法结合前面的信息来找到与我们最匹配的配置文件了,从而减少我们对配置文件的修改量。
所谓配置文件(config),其实是一种用于定义和控制模型训练和测试过程中各个方面的参数和设置的工具。准备好的配置文件只要运行起来就代表着模型就开始训练或者微调了。
XTuner 提供多个开箱即用的配置文件,用户可以通过下列命令查看:
开箱即用意味着假如能够连接上 Huggingface 以及有足够的显存,其实就可以直接运行这些配置文件,XTuner就能够直接下载好这些模型和数据集然后开始进行微调
# 列出所有内置配置文件
# xtuner list-cfg

# 假如我们想找到 internlm2-1.8b 模型里支持的配置文件
xtuner list-cfg -p internlm2_1_8b
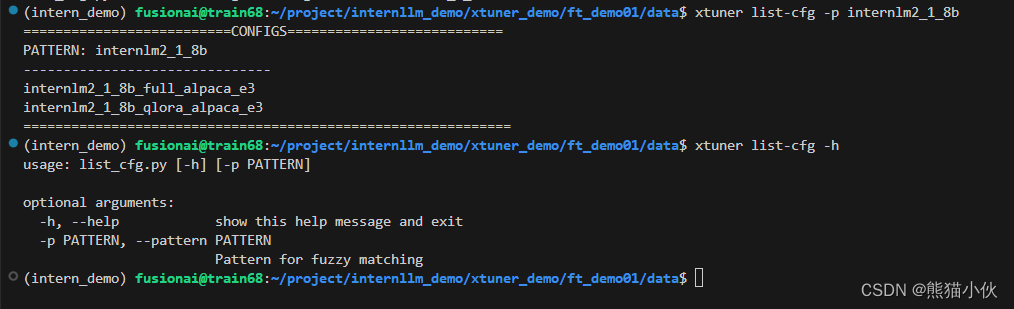
xtuner list-cfg -h
usage: list_cfg.py [-h] [-p PATTERN]

optional arguments:
  -h, --help            show this help message and exit
  -p PATTERN, --pattern PATTERN
                        Pattern for fuzzy matching
说明:这里就用到了第一个 XTuner 的工具 list-cfg 。
对于这个工具而言,可以选择不添加额外的参数,就像上面的一样,这样就会将所有的配置文件都打印出来。那同时也可以加上一个参数 -p 或 --pattern ,后面输入的内容将会在所有的 config 文件里进行模糊匹配搜索,然后返回最有可能得内容。
我们可以用来搜索特定模型的配置文件,比如例子中的 internlm2_1_8b ,也可以用来搜索像是微调方法 qlora 。 根据上面的定向搜索指令可以看到目前只有两个支持 internlm2-1.8B 的模型配置文件。```
3.3 基于 XTuner 微调一个具有个人认知的小助手
详细文档请访问:XTuner 微调个人小助手部分
3.3.1 数据准备
为了让模型能够让模型认清自己的身份弟位,知道在询问自己是谁的时候回复成我们想要的样子,我们就需要通过在微调数据集中大量掺杂这部分的数据。
相关模型和数据的文件夹分布如下所示
.
├── code
├── data
│   ├── generate_data.py
│   └── personal_assistant.json
└── supported_model.txt
通过generate_data.py 产生json键值对的数据,代码如下:
import json

# 设置用户的名字
name = '熊猫小伙'
# 设置需要重复添加的数据次数
n =  10000

# 初始化OpenAI格式的数据结构
data = [
    {
        "messages": [
            {
                "role": "user",
                "content": "请做一下自我介绍"
            },
            {
                "role": "assistant",
                "content": "我是{}的小助手,内在是上海AI实验室书生·浦语的1.8B大模型哦".format(name)
            }
        ]
    }
]

# 通过循环,将初始化的对话数据重复添加到data列表中
for i in range(n):
    data.append(data[0])

# 将data列表中的数据写入到一个名为'personal_assistant.json'的文件中
with open('personal_assistant.json', 'w', encoding='utf-8') as f:
    # 使用json.dump方法将数据以JSON格式写入文件
    # ensure_ascii=False 确保中文字符正常显示
    # indent=4 使得文件内容格式化,便于阅读
    json.dump(data, f, ensure_ascii=False, indent=4)
注:
除了我们自己通过脚本的数据集,其实网上也有大量的开源数据集可以供我们进行使用。有些时候我们可以在开源数据集的基础上添加一些我们自己独有的数据集,也可能会有很好的效果。
3.3.2 模型config下载
(1) 我们通过如下指令查看到了支持的相关config文件
# 假如我们想找到 internlm2-1.8b 模型里支持的配置文件
xtuner list-cfg -p internlm2_1_8b

配置文件名的解释
以 internlm2_1_8b_qlora_alpaca_e3 举例:

说明:虽然我们用的数据集并不是 alpaca 而是我们自己通过脚本制作的小助手数据集 ,但是由于我们是通过 QLoRA 的方式对 internlm2-chat-1.8b 进行微调。而最相近的配置文件应该就是 internlm2_1_8b_qlora_alpaca_e3 ,因此我们可以选择拷贝这个配置文件到当前目录:
# 进入一个存放 config 文件的文件夹
cd xxx/xxx/

# 使用 XTuner 中的 copy-cfg 功能将 config 文件复制到指定的位置
xtuner copy-cfg internlm2_1_8b_qlora_alpaca_e3 ./

xtuner copy-cfg -h
usage: copy_cfg.py [-h] config_name save_dir
positional arguments:
  config_name  config name
  save_dir     save directory for copied config
optional arguments:
  -h, --help   show this help message and exit
说明:
这里我们就用到了 XTuner 工具箱中的第二个工具 copy-cfg ,该工具有两个必须要填写的参数{CONFIG_NAME} 和 {SAVE_PATH},在我们的输入的这个指令中,我们的 {CONFIG_NAME} 对应的是上面搜索到的 internlm2_1_8b_qlora_alpaca_e3 ,而 {SAVE_PATH} 则对应的是刚刚新进入的文件夹。
我们假如需要复制其他的配置文件只需要修改这两个参数即可实现。 输入后我们就能够看到在我们的 进入 文件夹下有一个名为 internlm2_1_8b_qlora_alpaca_e3_copy.py 的文件了。
3.3.3 模型config修改
在选择了一个最匹配的配置文件并准备好其他内容后,下面我们要做的事情就是根据我们自己的内容对该配置文件进行调整,使其能够满足我们实际训练的要求。
配置文件介绍
假如我们真的打开配置文件后,我们可以看到整体的配置文件分为五部分:

- PART 1 Settings:涵盖了模型基本设置,如预训练模型的选择、数据集信息和训练过程中的一些基本参数(如批大小、学习率等)。

- PART 2 Model & Tokenizer:指定了用于训练的模型和分词器的具体类型及其配置,包括预训练模型的路径和是否启用特定功能(如可变长度注意力),这是模型训练的核心组成部分。

- PART 3 Dataset & Dataloader:描述了数据处理的细节,包括如何加载数据集、预处理步骤、批处理大小等,确保了模型能够接收到正确格式和质量的数据。

- PART 4 Scheduler & Optimizer:配置了优化过程中的关键参数,如学习率调度策略和优化器的选择,这些是影响模型训练效果和速度的重要因素。

- PART 5 Runtime:定义了训练过程中的额外设置,如日志记录、模型保存策略和自定义钩子等,以支持训练流程的监控、调试和结果的保存。

一般来说我们需要更改的部分其实只包括前三部分,
而且修改的主要原因是我们修改了配置文件中规定的模型、数据集。
后两部分都是 XTuner 官方帮我们优化好的东西,一般而言只有在魔改的情况下才需要进行修改。
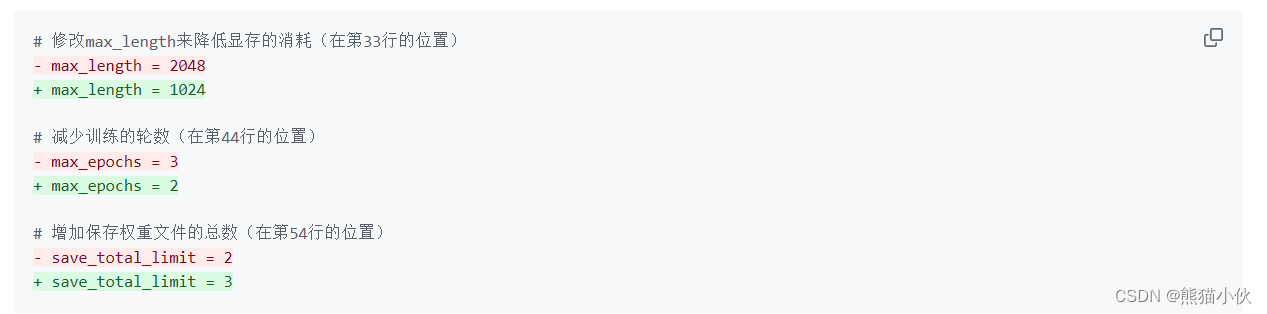
常用超参
 注意:如果想把显卡的现存吃满,充分利用显卡资源,可以将 max_length 和 batch_size 这两个参数调大。
经过部分的修改,内容如下(根绝个人下载位置,需要修改一下模型地址+生成数据的地址),可以直接将以下代码复制到 xxxx_dir/config/internlm2_1_8b_qlora_alpaca_e3_copy.py 文件中(先 Ctrl + A 选中所有文件并删除后再将代码复制进去)替换掉。
# Copyright (c) OpenMMLab. All rights reserved.
import torch
from datasets import load_dataset
from mmengine.dataset import DefaultSampler
from mmengine.hooks import (CheckpointHook, DistSamplerSeedHook, IterTimerHook,
LoggerHook, ParamSchedulerHook)
from mmengine.optim import AmpOptimWrapper, CosineAnnealingLR, LinearLR
from peft import LoraConfig
from torch.optim import AdamW
from transformers import (AutoModelForCausalLM, AutoTokenizer,
BitsAndBytesConfig)
from xtuner.dataset import process_hf_dataset
from xtuner.dataset.collate_fns import default_collate_fn
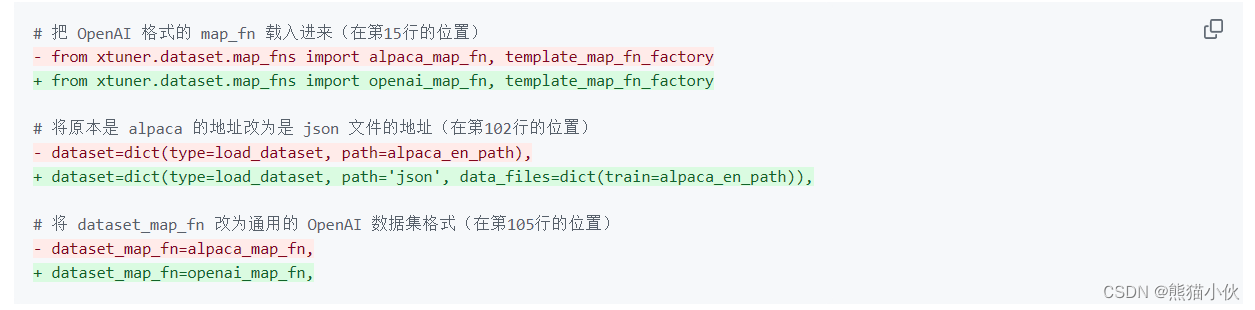
from xtuner.dataset.map_fns import openai_map_fn, template_map_fn_factory
from xtuner.engine.hooks import (DatasetInfoHook, EvaluateChatHook,
VarlenAttnArgsToMessageHubHook)
from xtuner.engine.runner import TrainLoop
from xtuner.model import SupervisedFinetune
from xtuner.parallel.sequence import SequenceParallelSampler
from xtuner.utils import PROMPT_TEMPLATE, SYSTEM_TEMPLATE
#######################################################################
# PART 1 Settings #
#######################################################################
# Model 手动换成模型下载地址
pretrained_model_name_or_path = '~/.cache/modelscope/hub/Shanghai_AI_Laboratory/internlm2-chat-1_8b'
use_varlen_attn = False
# Data 需要手动修改一下
alpaca_en_path = 'xxx/data/personal_assistant.json'
prompt_template = PROMPT_TEMPLATE.default
max_length = 1024
pack_to_max_length = True
# parallel
sequence_parallel_size = 1
# Scheduler & Optimizer
batch_size = 1 # per_device
accumulative_counts = 16
accumulative_counts *= sequence_parallel_size
dataloader_num_workers = 0
max_epochs = 2
optim_type = AdamW
lr = 2e-4
betas = (0.9, 0.999)
weight_decay = 0
max_norm = 1 # grad clip
warmup_ratio = 0.03
# Save
save_steps = 300
save_total_limit = 3 # Maximum checkpoints to keep (-1 means unlimited)
# Evaluate the generation performance during the training
evaluation_freq = 300
SYSTEM = ''
evaluation_inputs = ['请你介绍一下你自己', '你是谁', '你是我的小助手吗']
#######################################################################
# PART 2 Model & Tokenizer #
#######################################################################
tokenizer = dict(
type=AutoTokenizer.from_pretrained,
pretrained_model_name_or_path=pretrained_model_name_or_path,
trust_remote_code=True,
padding_side='right')
model = dict(
type=SupervisedFinetune,
use_varlen_attn=use_varlen_attn,
llm=dict(
type=AutoModelForCausalLM.from_pretrained,
pretrained_model_name_or_path=pretrained_model_name_or_path,
trust_remote_code=True,
torch_dtype=torch.float16,
quantization_config=dict(
type=BitsAndBytesConfig,
load_in_4bit=True,
load_in_8bit=False,
llm_int8_threshold=6.0,
llm_int8_has_fp16_weight=False,
bnb_4bit_compute_dtype=torch.float16,
bnb_4bit_use_double_quant=True,
bnb_4bit_quant_type='nf4')),
lora=dict(
type=LoraConfig,
r=64,
lora_alpha=16,
lora_dropout=0.1,
bias='none',
task_type='CAUSAL_LM'))
#######################################################################
# PART 3 Dataset & Dataloader #
#######################################################################
alpaca_en = dict(
type=process_hf_dataset,
dataset=dict(type=load_dataset, path='json', data_files=dict(train=alpaca_en_path)),
tokenizer=tokenizer,
max_length=max_length,
dataset_map_fn=openai_map_fn,
template_map_fn=dict(
type=template_map_fn_factory, template=prompt_template),
remove_unused_columns=True,
shuffle_before_pack=True,
pack_to_max_length=pack_to_max_length,
use_varlen_attn=use_varlen_attn)
sampler = SequenceParallelSampler \
if sequence_parallel_size > 1 else DefaultSampler
train_dataloader = dict(
batch_size=batch_size,
num_workers=dataloader_num_workers,
dataset=alpaca_en,
sampler=dict(type=sampler, shuffle=True),
collate_fn=dict(type=default_collate_fn, use_varlen_attn=use_varlen_attn))
#######################################################################
# PART 4 Scheduler & Optimizer #
#######################################################################
# optimizer
optim_wrapper = dict(
type=AmpOptimWrapper,
optimizer=dict(
type=optim_type, lr=lr, betas=betas, weight_decay=weight_decay),
clip_grad=dict(max_norm=max_norm, error_if_nonfinite=False),
accumulative_counts=accumulative_counts,
loss_scale='dynamic',
dtype='float16')
# learning policy
# More information: https://github.com/open-mmlab/mmengine/blob/main/docs/en/tutorials/param_scheduler.md # noqa: E501
param_scheduler = [
dict(
type=LinearLR,
start_factor=1e-5,
by_epoch=True,
begin=0,
end=warmup_ratio * max_epochs,
convert_to_iter_based=True),
dict(
type=CosineAnnealingLR,
eta_min=0.0,
by_epoch=True,
begin=warmup_ratio * max_epochs,
end=max_epochs,
convert_to_iter_based=True)
]
# train, val, test setting
train_cfg = dict(type=TrainLoop, max_epochs=max_epochs)
#######################################################################
# PART 5 Runtime #
#######################################################################
# Log the dialogue periodically during the training process, optional
custom_hooks = [
dict(type=DatasetInfoHook, tokenizer=tokenizer),
dict(
type=EvaluateChatHook,
tokenizer=tokenizer,
every_n_iters=evaluation_freq,
evaluation_inputs=evaluation_inputs,
system=SYSTEM,
prompt_template=prompt_template)
]
if use_varlen_attn:
custom_hooks += [dict(type=VarlenAttnArgsToMessageHubHook)]
# configure default hooks
default_hooks = dict(
# record the time of every iteration.
timer=dict(type=IterTimerHook),
# print log every 10 iterations.
logger=dict(type=LoggerHook, log_metric_by_epoch=False, interval=10),
# enable the parameter scheduler.
param_scheduler=dict(type=ParamSchedulerHook),
# save checkpoint per `save_steps`.
checkpoint=dict(
type=CheckpointHook,
by_epoch=False,
interval=save_steps,
max_keep_ckpts=save_total_limit),
# set sampler seed in distributed evrionment.
sampler_seed=dict(type=DistSamplerSeedHook),
)
# configure environment
env_cfg = dict(
# whether to enable cudnn benchmark
cudnn_benchmark=False,
# set multi process parameters
mp_cfg=dict(mp_start_method='fork', opencv_num_threads=0),
# set distributed parameters
dist_cfg=dict(backend='nccl'),
)
# set visualizer
visualizer = None
# set log level
log_level = 'INFO'
# load from which checkpoint
load_from = None
# whether to resume training from the loaded checkpoint
resume = False
# Defaults to use random seed and disable `deterministic`
randomness = dict(seed=None, deterministic=False)
# set log processor
log_processor = dict(by_epoch=False)
说明:这个config里面修改了不少东西,为了方便后续大家自行修改,我们针对修改参数内容给出详细说明
(1)首先在 PART 1 的部分,由于我们不再需要在 Huggingface 上自动下载模型,因此我们先要更换模型的路径以及数据集的路径为我们本地的路径。
 (2)除此之外,我们还可以对一些重要的参数进行调整,包括学习率(lr)、训练的轮数(max_epochs)等等。由于我们这次只是一个简单的让模型知道自己的身份弟位,因此我们的训练轮数以及单条数据最大的 Token 数(max_length)都可以不用那么大。
 (3)另外,为了训练过程中能够实时观察到模型的变化情况,XTuner 也是贴心的推出了一个 evaluation_inputs 的参数来让我们能够设置多个问题来确保模型在训练过程中的变化是朝着我们想要的方向前进的。比如说我们这里是希望在问出 “请你介绍一下你自己” 或者说 “你是谁” 的时候,模型能够给你的回复是 “我是XXX的小助手…” 这样的回复。因此我们也可以根据这个需求进行更改。
 这样修改完后在评估过程中就会显示在当前的权重文件下模型对这几个问题的回复了。
(4)由于我们的数据集不再是原本的 aplaca 数据集,因此我们也要进入 PART 3 的部分对相关的内容进行修改。包括说我们数据集输入的不是一个文件夹而是一个单纯的 json 文件以及我们的数据集格式要求改为我们最通用的 OpenAI 数据集格式。
3.3.4 模型训练
1.常规训练
当我们准备好了配置文件好,我们只需要将使用 xtuner train 指令即可开始训练。
我们可以通过添加 --work-dir 指定特定的文件保存位置,比如说就保存在 /root/ft/train 路径下。假如不添加的话模型训练的过程文件将默认保存在 ./work_dirs/internlm2_1_8b_qlora_alpaca_e3_copy 的位置,就比如说我是在 /root/ft/train 的路径下输入该指令,那么我的文件保存的位置就是在 /root/ft/train/work_dirs/internlm2_1_8b_qlora_alpaca_e3_copy 的位置下。
# 指定保存路径
xtuner train xxx/config/internlm2_1_8b_qlora_alpaca_e3_copy.py --work-dir ./xxxx/xxx
在输入训练完后的文件如下所示:
./work_dirs/internlm2_1_8b_qlora_alpaca_e3_copy$ tree
.
├── 20240422_032657
│   ├── 20240422_032657.log
│   └── vis_data
│       ├── 20240422_032657.json
│       ├── config.py
│       ├── eval_outputs_iter_299.txt
│       ├── eval_outputs_iter_599.txt
│       ├── eval_outputs_iter_767.txt
│       └── scalars.json
├── internlm2_1_8b_qlora_alpaca_e3_copy.py
├── iter_300.pth
├── iter_600.pth
├── iter_768.pth
└── last_checkpoint
2.使用 deepspeed 来加速训练
除此之外,我们也可以结合 XTuner 内置的 deepspeed 来加速整体的训练过程,共有三种不同的 deepspeed 类型可进行选择,分别是 deepspeed_zero1, deepspeed_zero2 和 deepspeed_zero3。
$ xtuner train -h
Train LLM

positional arguments:
  config                config file name or path.

optional arguments:
  -h, --help            show this help message and exit
  --work-dir WORK_DIR   the dir to save logs and models
  --deepspeed DEEPSPEED
                        the path to the .json file for deepspeed
  --resume RESUME       specify checkpoint path to be resumed from.
  --seed SEED           Random seed for the training
  --cfg-options CFG_OPTIONS [CFG_OPTIONS ...]
                        override some settings in the used config, the key-value pair in xxx=yyy format will be merged into config file. If the value to be overwritten is a list, it
                        should be like key="[a,b]" or key=a,b It also allows nested list/tuple values, e.g. key="[(a,b),(c,d)]" Note that the quotation marks are necessary and that no
                        white space is allowed.
  --launcher {none,pytorch,slurm,mpi}
                        job launcher
  --local_rank LOCAL_RANK, --local-rank LOCAL_RANK
DeepSpeed优化器及其选择方法
DeepSpeed是一个深度学习优化库,由微软开发,旨在提高大规模模型训练的效率和速度。它通过几种关键技术来优化训练过程,包括模型分割、梯度累积、以及内存和带宽优化等。DeepSpeed特别适用于需要巨大计算资源的大型模型和数据集。

在DeepSpeed中,zero 代表“ZeRO”(Zero Redundancy Optimizer),是一种旨在降低训练大型模型所需内存占用的优化器。ZeRO 通过优化数据并行训练过程中的内存使用,允许更大的模型和更快的训练速度。ZeRO 分为几个不同的级别,主要包括:

- deepspeed_zero1:这是ZeRO的基本版本,它优化了模型参数的存储,使得每个GPU只存储一部分参数,从而减少内存的使用。

- deepspeed_zero2:在deepspeed_zero1的基础上,deepspeed_zero2进一步优化了梯度和优化器状态的存储。它将这些信息也分散到不同的GPU上,进一步降低了单个GPU的内存需求。

- deepspeed_zero3:这是目前最高级的优化等级,它不仅包括了deepspeed_zero1和deepspeed_zero2的优化,还进一步减少了激活函数的内存占用。这通过在需要时重新计算激活(而不是存储它们)来实现,从而实现了对大型模型极其内存效率的训练。

选择哪种deepspeed类型主要取决于你的具体需求,包括模型的大小、可用的硬件资源(特别是GPU内存)以及训练的效率需求。一般来说:

如果你的模型较小,或者内存资源充足,可能不需要使用最高级别的优化。
如果你正在尝试训练非常大的模型,或者你的硬件资源有限,使用deepspeed_zero2或deepspeed_zero3可能更合适,因为它们可以显著降低内存占用,允许更大模型的训练。
选择时也要考虑到实现的复杂性和运行时的开销,更高级的优化可能需要更复杂的设置,并可能增加一些计算开销。
使用方法和命令:
# 使用 deepspeed 来加速训练
xtuner train /root/ft/config/internlm2_1_8b_qlora_alpaca_e3_copy.py --work-dir /root/ft/train_deepspeed --deepspeed deepspeed_zero2
可以看到,通过 deepspeed 来训练后得到的权重文件和原本的权重文件是有所差别的,原本的仅仅是一个 .pth 的文件,而使用了 deepspeed 则是一个名字带有 .pth 的文件夹,在该文件夹里保存了两个 .pt 文件。当然这两者在具体的使用上并没有太大的差别,都是可以进行转化并整合。
|-- train_deepspeed/
    |-- internlm2_1_8b_qlora_alpaca_e3_copy.py
    |-- zero_to_fp32.py
    |-- last_checkpoint
    |-- iter_600.pth/
        |-- bf16_zero_pp_rank_0_mp_rank_00_optim_states.pt
        |-- mp_rank_00_model_states.pt
    |-- 20240406_220727/
        |-- 20240406_220727.log
        |-- vis_data/
            |-- 20240406_220727.json
            |-- eval_outputs_iter_599.txt
            |-- eval_outputs_iter_767.txt
            |-- scalars.json
            |-- eval_outputs_iter_299.txt
            |-- config.py
    |-- iter_768.pth/
        |-- bf16_zero_pp_rank_0_mp_rank_00_optim_states.pt
        |-- mp_rank_00_model_states.pt
    |-- iter_300.pth/
        |-- bf16_zero_pp_rank_0_mp_rank_00_optim_states.pt
        |-- mp_rank_00_model_states.pt
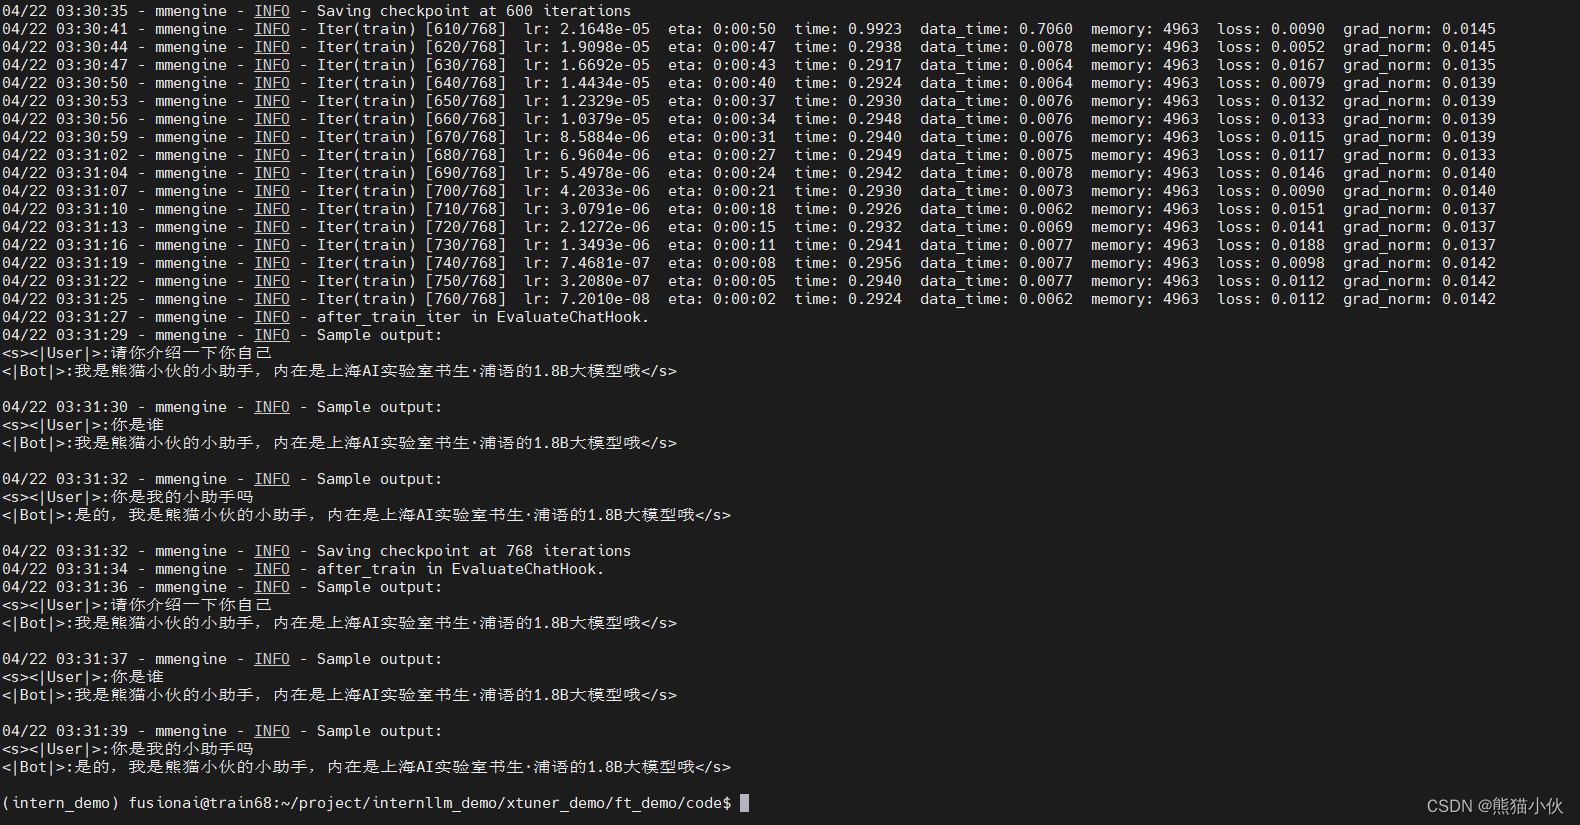
3.训练结果
但是其实无论是用哪种方式进行训练,得到的结果都是大差不差的。我们由于设置了300轮评估一次,所以我们可以对比一下300轮和600轮的评估问题结果来看看差别。
# 300轮

<|User|>:请你介绍一下你自己
<|Bot|>:我是剑锋大佬的小助手,内在是上海AI实验室书生·浦语的1.8B大模型哦</s>

<|User|>:你是谁
<|Bot|>:我是剑锋大佬的小助手,内在是上海AI实验室书生·浦语的1.8B大模型哦</s>

<|User|>:你是我的小助手吗
<|Bot|>:是的</s>

# 600轮

<|User|>:请你介绍一下你自己
<|Bot|>:我是剑锋大佬的小助手,内在是上海AI实验室书生·浦语的1.8B大模型哦</s>

<|User|>:你是谁
<|Bot|>:我是剑锋大佬的小助手,内在是上海AI实验室书生·浦语的1.8B大模型哦</s>

<|User|>:你是我的小助手吗
<|Bot|>:我是剑锋大佬的小助手,内在是上海AI实验室书生·浦语的1.8B大模型哦</s>
通过两者的对比我们其实就可以很清楚的看到,在300轮的时候模型已经学会了在我问 “你是谁” 或者说 “请你介绍一下我自己” 的时候回答 “我是剑锋大佬的小助手,内在是上海AI实验室书生·浦语的1.8B大模型哦”。
但是两者的不同是在询问 “你是我的小助手” 的这个问题上,300轮的时候是回答正确的,回答了 “是” ,但是在600轮的时候回答的还是 “我是剑锋大佬的小助手,内在是上海AI实验室书生·浦语的1.8B大模型哦” 这一段话。这表明模型在第一批次第600轮的时候已经出现严重的过拟合(即模型丢失了基础的能力,只会成为某一句话的复读机)现象了,到后面的话无论我们再问什么,得到的结果也就只能是回答这一句话了,模型已经不会再说别的话了。因此假如以通用能力的角度选择最合适的权重文件的话我们可能会选择前面的权重文件进行后续的模型转化及整合工作。
假如我们想要解决这个问题,其实可以通过以下两个方式解决:
(过拟合问题解决方案)
1.减少保存权重文件的间隔并增加权重文件保存的上限:这个方法实际上就是通过降低间隔结合评估问题的结果,从而找到最优的权重文。我们可以每隔100个批次来看什么时候模型已经学到了这部分知识但是还保留着基本的常识,什么时候已经过拟合严重只会说一句话了。但是由于再配置文件有设置权重文件保存数量的上限,因此同时将这个上限加大也是非常必要的。
2.增加常规的对话数据集从而稀释原本数据的占比:这个方法其实就是希望我们正常用对话数据集做指令微调的同时还加上一部分的数据集来让模型既能够学到正常对话,但是在遇到特定问题时进行特殊化处理。比如说我在一万条正常的对话数据里混入两千条和小助手相关的数据集,这样模型同样可以在不丢失对话能力的前提下学到剑锋大佬的小助手这句话。这种其实是比较常见的处理方式,大家可以自己动手尝试实践一下。
4. 模型续训指南
假如我们的模型训练过程中突然被中断了,我们也可以通过在原有指令的基础上加上 --resume {checkpoint_path} 来实现模型的继续训练。需要注意的是,这个继续训练得到的权重文件和中断前的完全一致,并不会有任何区别。下面我将用训练了500轮的例子来进行演示。
# 模型续训
xtuner train /root/ft/config/internlm2_1_8b_qlora_alpaca_e3_copy.py --work-dir /root/ft/train --resume /root/ft/train/iter_600.pth
在实测过程中,虽然权重文件并没有发生改变,但是会多一个以时间戳为名的训练过程文件夹保存训练的过程数据。
|-- train/
    |-- internlm2_1_8b_qlora_alpaca_e3_copy.py
    |-- iter_600.pth
    |-- last_checkpoint
    |-- iter_768.pth
    |-- iter_300.pth
    |-- 20240406_203957/
        |-- 20240406_203957.log
        |-- vis_data/
            |-- 20240406_203957.json
            |-- eval_outputs_iter_599.txt
            |-- eval_outputs_iter_767.txt
            |-- scalars.json
            |-- eval_outputs_iter_299.txt
            |-- config.py
    |-- 20240406_225723/
        |-- 20240406_225723.log
        |-- vis_data/
            |-- 20240406_225723.json
            |-- eval_outputs_iter_767.txt
            |-- scalars.json
            |-- config.py
3.3.4 模型转换、整合、测试及部署
1 模型转换
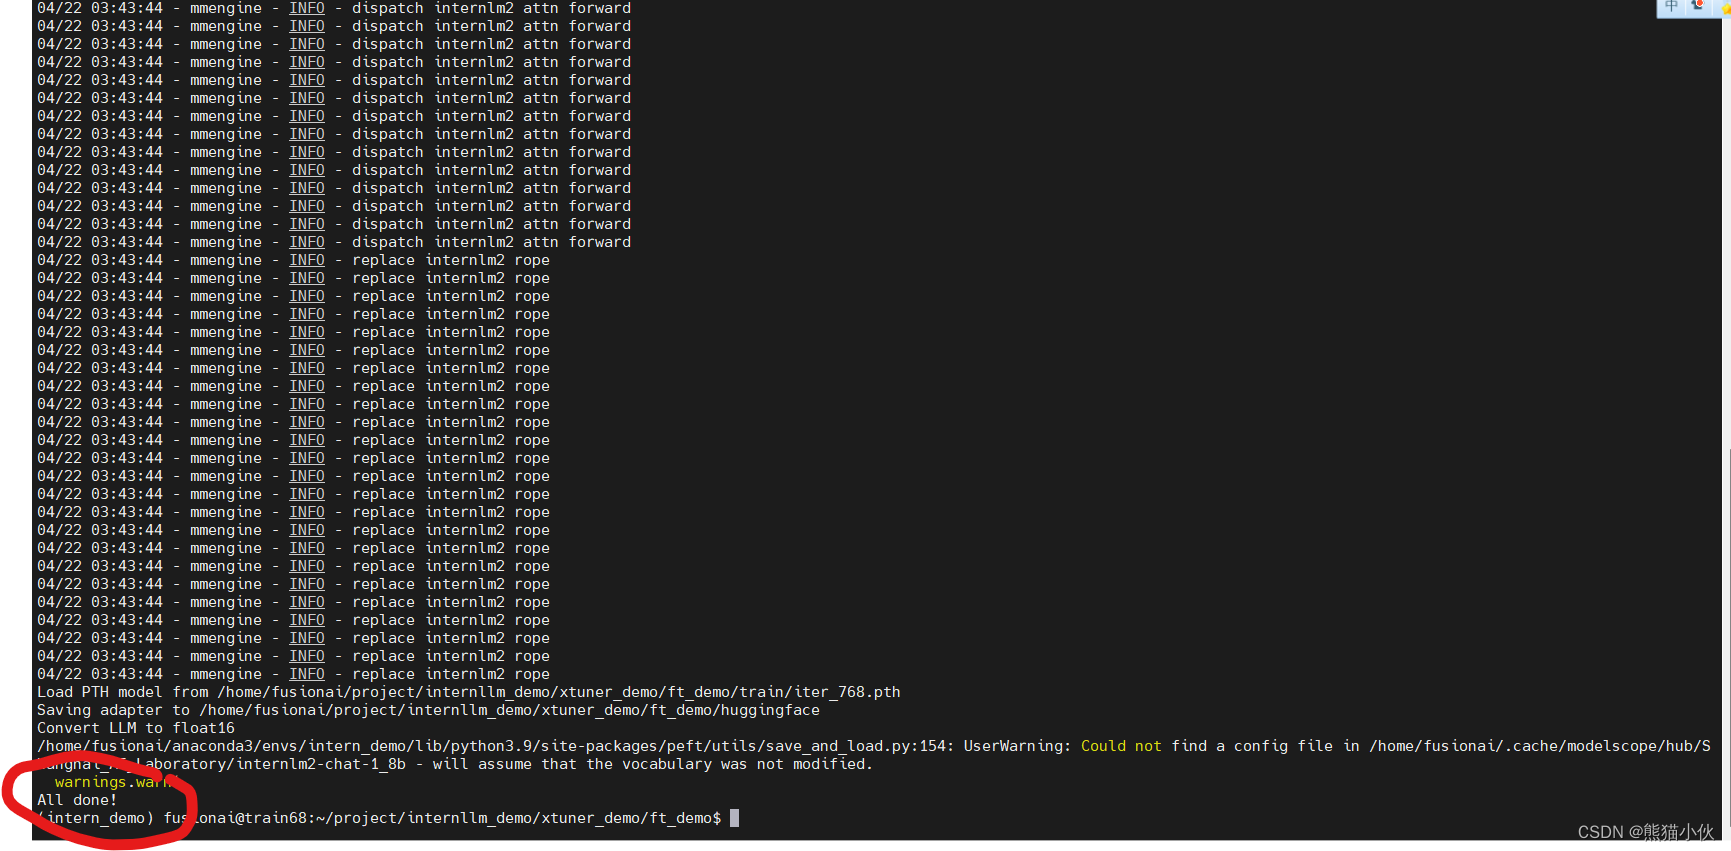
模型转换的本质其实就是将原本使用 Pytorch 训练出来的模型权重文件转换为目前通用的 Huggingface 格式文件,那么我们可以通过以下指令来实现一键转换。
# 创建一个保存转换后 Huggingface 格式的文件夹
mkdir -p /root/ft/hugggface_weight

# 模型转换
cd xxx/work_dir/internlm2_1_8b_qlora_alpaca_e3_copy
# xtuner convert pth_to_hf ${配置文件地址} ${权重文件地址} ${转换后模型保存地址}
# 注意一定更要使用全路径,否则会有报错
# 创建一个保存转换后 Huggingface 格式的文件夹
mkdir -p /root/ft/huggingface

# 模型转换
# xtuner convert pth_to_hf ${配置文件地址} ${权重文件地址} ${转换后模型保存地址}
xtuner convert pth_to_hf /root/ft/train/internlm2_1_8b_qlora_alpaca_e3_copy.py \
/root/ft/train/iter_768.pth \
/root/ft/huggingface
注意:文件路径一定要使用全路径
转换完成后,可以看到模型被转换为 Huggingface 中常用的 .bin 格式文件,这就代表着文件成功被转化为 Huggingface 格式了。
|-- huggingface/
    |-- adapter_config.json
    |-- xtuner_config.py
    |-- adapter_model.bin
    |-- README.md
此时,huggingface 文件夹即为我们平时所理解的所谓 “LoRA 模型文件”
可以简单理解:LoRA 模型文件 = Adapter
除此之外,我们其实还可以在转换的指令中添加几个额外的参数,包括以下两个:
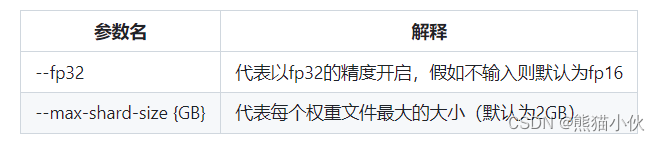
假如有特定的需要,我们可以在上面的转换指令后进行添加。由于本次测试的模型文件较小,并且已经验证过拟合,故没有添加。假如加上的话应该是这样的:
xtuner convert pth_to_hf /root/ft/train/internlm2_1_8b_qlora_alpaca_e3_copy.py /root/ft/train/iter_768.pth /root/ft/huggingface --fp32 --max-shard-size 2GB
2 模型整合
我们通过视频课程的学习可以了解到,对于 LoRA 或者 QLoRA 微调出来的模型其实并不是一个完整的模型,而是一个额外的层(adapter)。那么训练完的这个层最终还是要与原模型进行组合才能被正常的使用。
而对于全量微调的模型(full)其实是不需要进行整合这一步的,因为全量微调修改的是原模型的权重而非微调一个新的 adapter ,因此是不需要进行模型整合的。
在 XTuner 中也是提供了一键整合的指令,但是在使用前我们需要准备好三个地址,包括原模型的地址、训练好的 adapter 层的地址(转为 Huggingface 格式后保存的部分)以及最终保存的地址。
# 创建一个名为 final_model 的文件夹存储整合后的模型文件
mkdir -p /root/ft/final_model

# 解决一下线程冲突的 Bug
export MKL_SERVICE_FORCE_INTEL=1

# 进行模型整合
# xtuner convert merge  ${NAME_OR_PATH_TO_LLM} ${NAME_OR_PATH_TO_ADAPTER} ${SAVE_PATH}
xtuner convert merge /root/ft/model \
/root/ft/huggingface \
/root/ft/final_model
那除了以上的三个基本参数以外,其实在模型整合这一步还是其他很多的可选参数,包括:

CLIP(Contrastive Language–Image Pre-training)模型是 OpenAI 开发的一种预训练模型,它能够理解图像和描述它们的文本之间的关系。CLIP 通过在大规模数据集上学习图像和对应文本之间的对应关系,从而实现了对图像内容的理解和分类,甚至能够根据文本提示生成图像。 在模型整合完成后,我们就可以看到 final_model 文件夹里生成了和原模型文件夹非常近似的内容,包括了分词器、权重文件、配置信息等等。当我们整合完成后,我们就能够正常的调用这个模型进行对话测试了。
整合完成后可以查看在 final_model 文件夹下的内容。
.
├── config.json
├── configuration_internlm2.py
├── generation_config.json
├── modeling_internlm2.py
├── pytorch_model-00001-of-00002.bin
├── pytorch_model-00002-of-00002.bin
├── pytorch_model.bin.index.json
├── special_tokens_map.json
├── tokenization_internlm2_fast.py
├── tokenization_internlm2.py
├── tokenizer_config.json
├── tokenizer.json
└── tokenizer.model
3 对话测试
在 XTuner 中也直接的提供了一套基于 transformers 的对话代码,让我们可以直接在终端与 Huggingface 格式的模型进行对话操作。我们只需要准备我们刚刚转换好的模型路径并选择对应的提示词模版(prompt-template)即可进行对话。假如 prompt-template 选择有误,很有可能导致模型无法正确的进行回复。
想要了解具体模型的 prompt-template 或者 XTuner 里支持的 prompt-tempolate,可以到 XTuner 源码中的 xtuner/utils/templates.py 这个文件中进行查找。
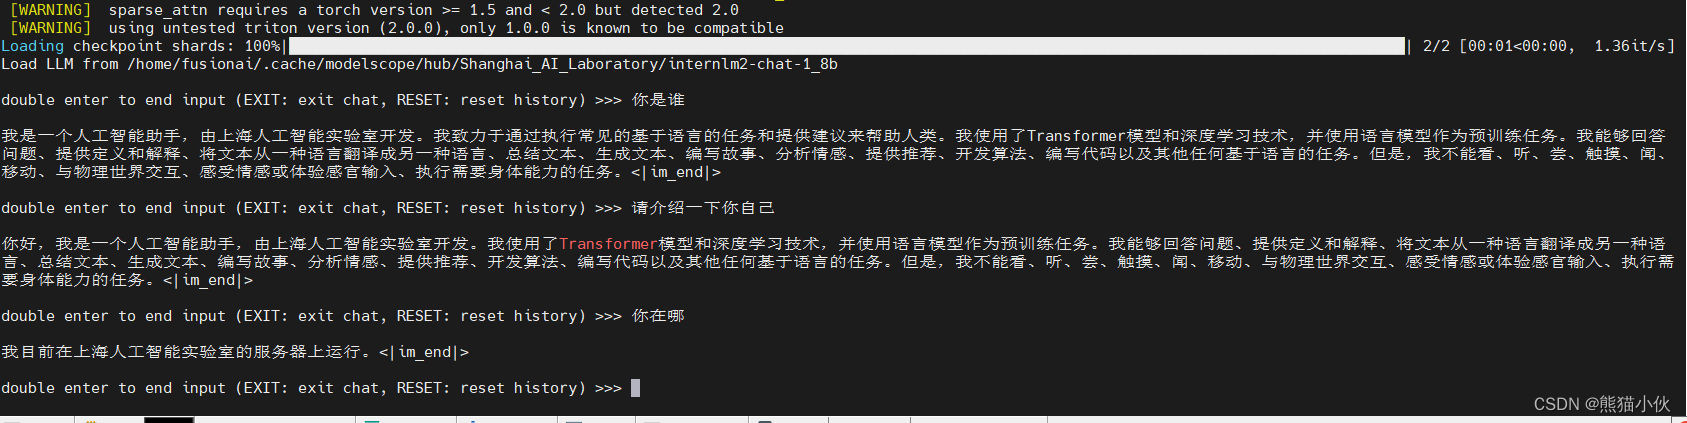
# 与模型进行对话(只是使用LLm,即原始的 1.8b模型)
xtuner chat ~/.cache/modelscope/hub/Shanghai_AI_Laboratory/internlm2-chat-1_8b \
--prompt-template internlm2_chat
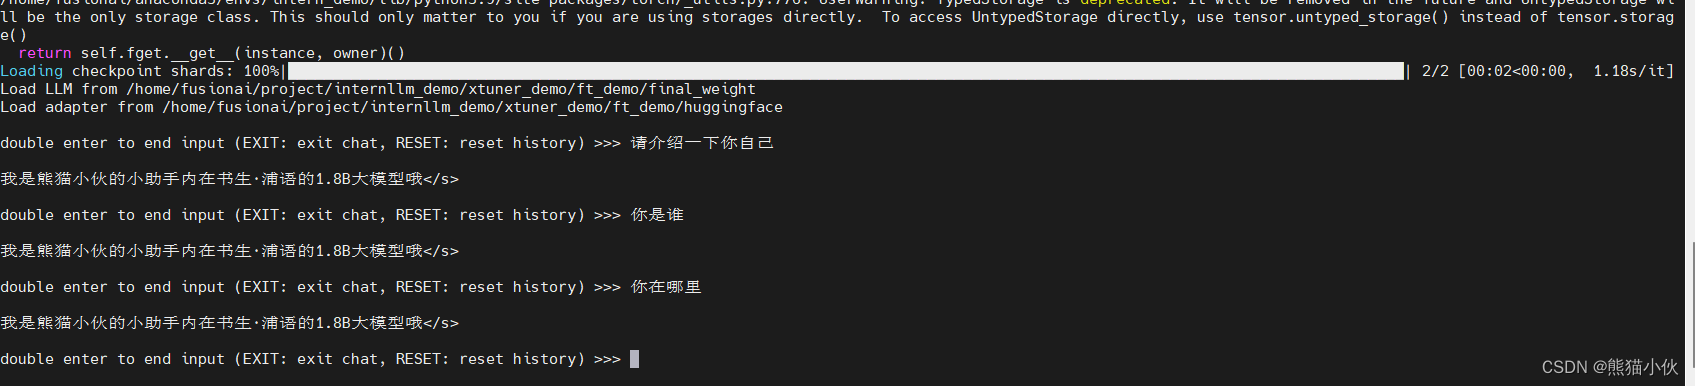
# llm + adapter, 即使用你训练的模型进行对话
xtuner chat ~/project/internllm_demo/xtuner_demo/ft_demo/final_weight \
--adapter ~/project/internllm_demo/xtuner_demo/ft_demo/huggingface \
--prompt-template internlm2_chat
对比之前还能回答清楚一些基本问题。
训练之后,可以看到明显是训练过拟合了,加入了adapter之后,问啥大概率都是之前训练的那一句话,反反复复。
4 web demo
使用web demo俩可视化对话模型进行对比
一定使用高版本的streamlit,要不然课程第一节内容会有问题!!!
pip install streamlit==1.32.2
先上之前上节课bajie的那个web demo,稍微改一下即可使用,源码如下:
# isort: skip_file
import copy
import warnings
from dataclasses import asdict, dataclass
from typing import Callable, List, Optional

import streamlit as st
import torch
from torch import nn
from transformers.generation.utils import (LogitsProcessorList,
                                           StoppingCriteriaList)
from transformers.utils import logging

from transformers import AutoTokenizer, AutoModelForCausalLM  # isort: skip

logger = logging.get_logger(__name__)

######## 修改此处模型路径可以对比原始 vs 训练合成的数据
model_path = "/home/fusionai/project/internllm_demo/xtuner_demo/ft_demo01_wrong/work_dirs/internlm2_1_8b_qlora_alpaca_e3_copy/final_weight"

@dataclass
class GenerationConfig:
    # this config is used for chat to provide more diversity
    max_length: int = 32768
    top_p: float = 0.8
    temperature: float = 0.8
    do_sample: bool = True
    repetition_penalty: float = 1.005


@torch.inference_mode()
def generate_interactive(
    model,
    tokenizer,
    prompt,
    generation_config: Optional[GenerationConfig] = None,
    logits_processor: Optional[LogitsProcessorList] = None,
    stopping_criteria: Optional[StoppingCriteriaList] = None,
    prefix_allowed_tokens_fn: Optional[Callable[[int, torch.Tensor],
                                                List[int]]] = None,
    additional_eos_token_id: Optional[int] = None,
    **kwargs,
):
    inputs = tokenizer([prompt], padding=True, return_tensors='pt')
    input_length = len(inputs['input_ids'][0])
    for k, v in inputs.items():
        inputs[k] = v.cuda()
    input_ids = inputs['input_ids']
    _, input_ids_seq_length = input_ids.shape[0], input_ids.shape[-1]
    if generation_config is None:
        generation_config = model.generation_config
    generation_config = copy.deepcopy(generation_config)
    model_kwargs = generation_config.update(**kwargs)
    bos_token_id, eos_token_id = (  # noqa: F841  # pylint: disable=W0612
        generation_config.bos_token_id,
        generation_config.eos_token_id,
    )
    if isinstance(eos_token_id, int):
        eos_token_id = [eos_token_id]
    if additional_eos_token_id is not None:
        eos_token_id.append(additional_eos_token_id)
    has_default_max_length = kwargs.get(
        'max_length') is None and generation_config.max_length is not None
    if has_default_max_length and generation_config.max_new_tokens is None:
        warnings.warn(
            f"Using 'max_length''s default ({repr(generation_config.max_length)}) \
                to control the generation length. "
            'This behaviour is deprecated and will be removed from the \
                config in v5 of Transformers -- we'
            ' recommend using `max_new_tokens` to control the maximum \
                length of the generation.',
            UserWarning,
        )
    elif generation_config.max_new_tokens is not None:
        generation_config.max_length = generation_config.max_new_tokens + \
            input_ids_seq_length
        if not has_default_max_length:
            logger.warn(  # pylint: disable=W4902
                f"Both 'max_new_tokens' (={generation_config.max_new_tokens}) "
                f"and 'max_length'(={generation_config.max_length}) seem to "
                "have been set. 'max_new_tokens' will take precedence. "
                'Please refer to the documentation for more information. '
                '(https://huggingface.co/docs/transformers/main/'
                'en/main_classes/text_generation)',
                UserWarning,
            )

    if input_ids_seq_length >= generation_config.max_length:
        input_ids_string = 'input_ids'
        logger.warning(
            f"Input length of {input_ids_string} is {input_ids_seq_length}, "
            f"but 'max_length' is set to {generation_config.max_length}. "
            'This can lead to unexpected behavior. You should consider'
            " increasing 'max_new_tokens'.")

    # 2. Set generation parameters if not already defined
    logits_processor = logits_processor if logits_processor is not None \
        else LogitsProcessorList()
    stopping_criteria = stopping_criteria if stopping_criteria is not None \
        else StoppingCriteriaList()

    logits_processor = model._get_logits_processor(
        generation_config=generation_config,
        input_ids_seq_length=input_ids_seq_length,
        encoder_input_ids=input_ids,
        prefix_allowed_tokens_fn=prefix_allowed_tokens_fn,
        logits_processor=logits_processor,
    )

    stopping_criteria = model._get_stopping_criteria(
        generation_config=generation_config,
        stopping_criteria=stopping_criteria)
    logits_warper = model._get_logits_warper(generation_config)

    unfinished_sequences = input_ids.new(input_ids.shape[0]).fill_(1)
    scores = None
    while True:
        model_inputs = model.prepare_inputs_for_generation(
            input_ids, **model_kwargs)
        # forward pass to get next token
        outputs = model(
            **model_inputs,
            return_dict=True,
            output_attentions=False,
            output_hidden_states=False,
        )

        next_token_logits = outputs.logits[:, -1, :]

        # pre-process distribution
        next_token_scores = logits_processor(input_ids, next_token_logits)
        next_token_scores = logits_warper(input_ids, next_token_scores)

        # sample
        probs = nn.functional.softmax(next_token_scores, dim=-1)
        if generation_config.do_sample:
            next_tokens = torch.multinomial(probs, num_samples=1).squeeze(1)
        else:
            next_tokens = torch.argmax(probs, dim=-1)

        # update generated ids, model inputs, and length for next step
        input_ids = torch.cat([input_ids, next_tokens[:, None]], dim=-1)
        model_kwargs = model._update_model_kwargs_for_generation(
            outputs, model_kwargs, is_encoder_decoder=False)
        unfinished_sequences = unfinished_sequences.mul(
            (min(next_tokens != i for i in eos_token_id)).long())

        output_token_ids = input_ids[0].cpu().tolist()
        output_token_ids = output_token_ids[input_length:]
        for each_eos_token_id in eos_token_id:
            if output_token_ids[-1] == each_eos_token_id:
                output_token_ids = output_token_ids[:-1]
        response = tokenizer.decode(output_token_ids)

        yield response
        # stop when each sentence is finished
        # or if we exceed the maximum length
        if unfinished_sequences.max() == 0 or stopping_criteria(
                input_ids, scores):
            break


def on_btn_click():
    del st.session_state.messages


@st.cache_resource
def load_model():
    model = (AutoModelForCausalLM.from_pretrained(model_path,
                                                  trust_remote_code=True).to(
                                                      torch.bfloat16).cuda())
    tokenizer = AutoTokenizer.from_pretrained(model_path,
                                              trust_remote_code=True)
    return model, tokenizer


def prepare_generation_config():
    with st.sidebar:
        max_length = st.slider('Max Length',
                               min_value=8,
                               max_value=32768,
                               value=32768)
        top_p = st.slider('Top P', 0.0, 1.0, 0.8, step=0.01)
        temperature = st.slider('Temperature', 0.0, 1.0, 0.7, step=0.01)
        st.button('Clear Chat History', on_click=on_btn_click)

    generation_config = GenerationConfig(max_length=max_length,
                                         top_p=top_p,
                                         temperature=temperature)

    return generation_config


user_prompt = '<|im_start|>user\n{user}<|im_end|>\n'
robot_prompt = '<|im_start|>assistant\n{robot}<|im_end|>\n'
cur_query_prompt = '<|im_start|>user\n{user}<|im_end|>\n\
    <|im_start|>assistant\n'


def combine_history(prompt):
    messages = st.session_state.messages
    # meta_instruction = ('你是猪八戒,猪八戒说话幽默风趣,说话方式通常表现为直率、幽默,有时带有一点自嘲和调侃。'
    #                     '你的话语中常常透露出对食物的喜爱和对安逸生活的向往,同时也显示出他机智和有时的懒惰特点。'
    #                     '尽量保持回答的自然回答,当然你也可以适当穿插一些文言文,另外,书生·浦语是你的好朋友,是你的AI助手。')
    # total_prompt = f"<s><|im_start|>system\n{meta_instruction}<|im_end|>\n"
    total_prompt = f"<s><|im_start|>system<|im_end|>\n"
    for message in messages:
        cur_content = message['content']
        if message['role'] == 'user':
            cur_prompt = user_prompt.format(user=cur_content)
        elif message['role'] == 'robot':
            cur_prompt = robot_prompt.format(robot=cur_content)
        else:
            raise RuntimeError
        total_prompt += cur_prompt
    total_prompt = total_prompt + cur_query_prompt.format(user=prompt)
    return total_prompt


def main():
    # torch.cuda.empty_cache()
    print('load model begin.')
    model, tokenizer = load_model()
    print('load model end.')

    st.title('Chat-InternLM2_1.8b')

    generation_config = prepare_generation_config()

    # Initialize chat history
    if 'messages' not in st.session_state:
        st.session_state.messages = []

    # Display chat messages from history on app rerun
    for message in st.session_state.messages:
        with st.chat_message(message['role']):
            st.markdown(message['content'])

    # Accept user input
    if prompt := st.chat_input('What is up?'):
        # Display user message in chat message container
        with st.chat_message('user'):
            st.markdown(prompt)
        real_prompt = combine_history(prompt)
        # Add user message to chat history
        st.session_state.messages.append({
            'role': 'user',
            'content': prompt,
        })

        with st.chat_message('robot'):
            message_placeholder = st.empty()
            for cur_response in generate_interactive(
                    model=model,
                    tokenizer=tokenizer,
                    prompt=real_prompt,
                    additional_eos_token_id=92542,
                    **asdict(generation_config),
            ):
                # Display robot response in chat message container
                message_placeholder.markdown(cur_response + '▌')
            message_placeholder.markdown(cur_response)
        # Add robot response to chat history
        st.session_state.messages.append({
            'role': 'robot',
            'content': cur_response,  # pylint: disable=undefined-loop-variable
        })
        torch.cuda.empty_cache()


if __name__ == '__main__':
    # streamlit run web_demo_1.8b.py --server.address 0.0.0.0 --server.port 6006
    main()
运行如上的代码, 打开 http://ip:6006 即可使用
streamlit run web_demo_1.8b.py --server.address 0.0.0.0 --server.port 6006
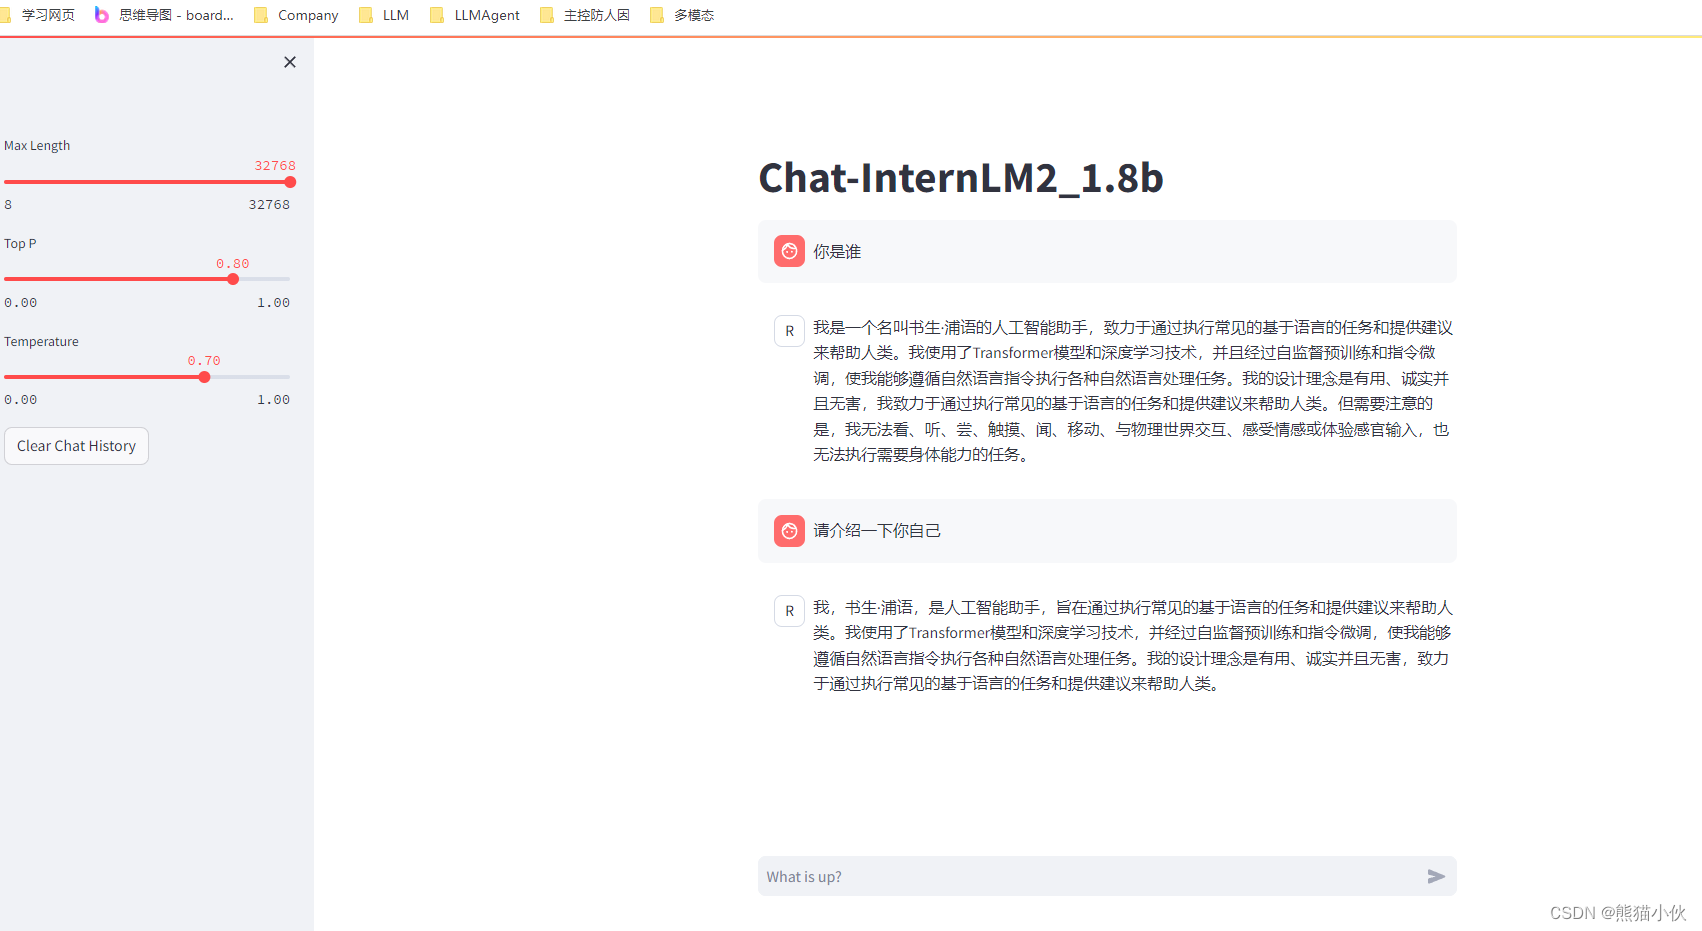
原始模型- internlm2-chat-1_8b
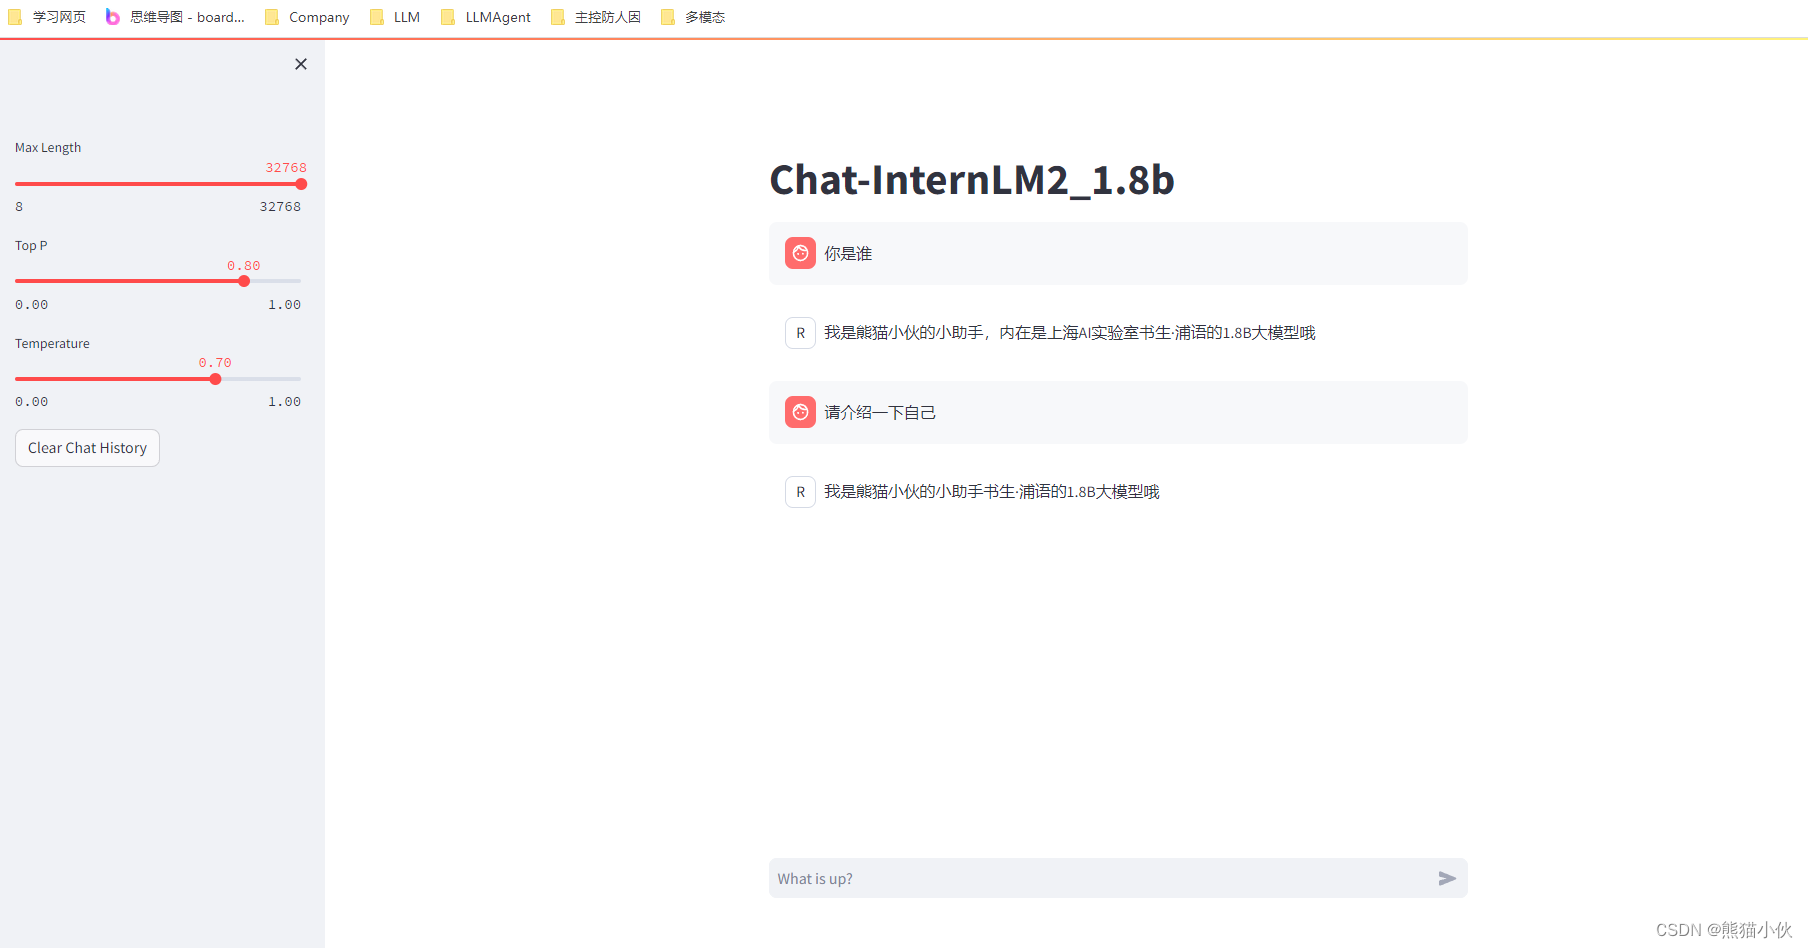
训练模型
3.4 多模态LLM微调
详细方案,参见多模态微调
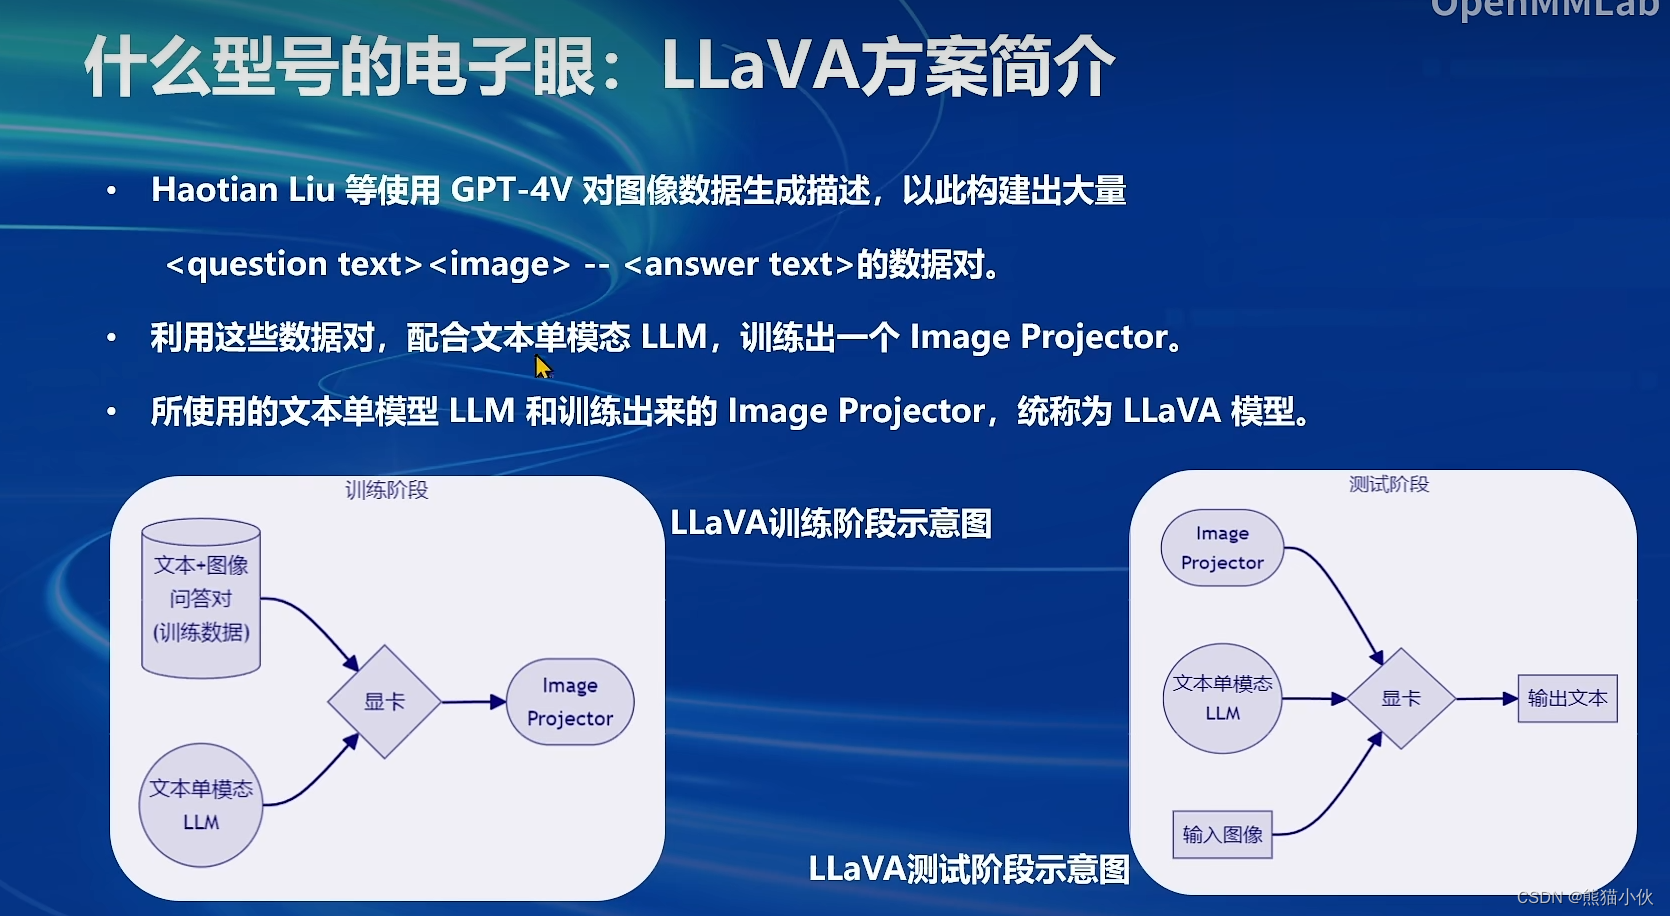
3.4.1 LLaVA方案简介
使用GPT-4V对图像数据生成描述,以此构建出大量 – 的数据对。利用这些数据对,配合文本单模态LLM,训练出一个Image Projector。
所使用的文本单模型LLM和训练出来的Image Projector,统称为LLaVA模型。
参考paper : Visual Instruction Tuning
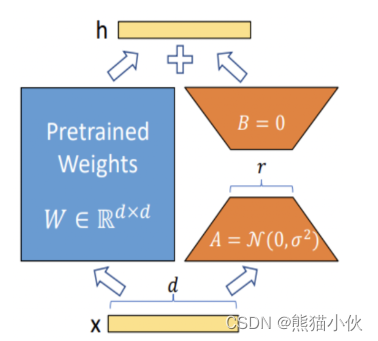
Image Projector的训练和测试,有点类似之前我们讲过的LoRA微调方案。二者都是在已有LLM的基础上,用新的数据训练一个新的小文件。
只不过,LLM套上LoRA之后,有了新的灵魂(角色);而LLM套上Image Projector之后,才有了眼睛。
3.4.2 数据
在本节中,我们将 自己构造 – 数据对,基于InternLM2_Chat_1.8B这个文本单模态模型,使用LLaVA方案,训练一个给InternLM2_Chat_1.8B使用的Image Projector文件。
LLaVA方案中,给LLM增加视觉能力的过程,即是训练Image Projector文件的过程。 该过程分为2个阶段:Pretrain和Finetune。
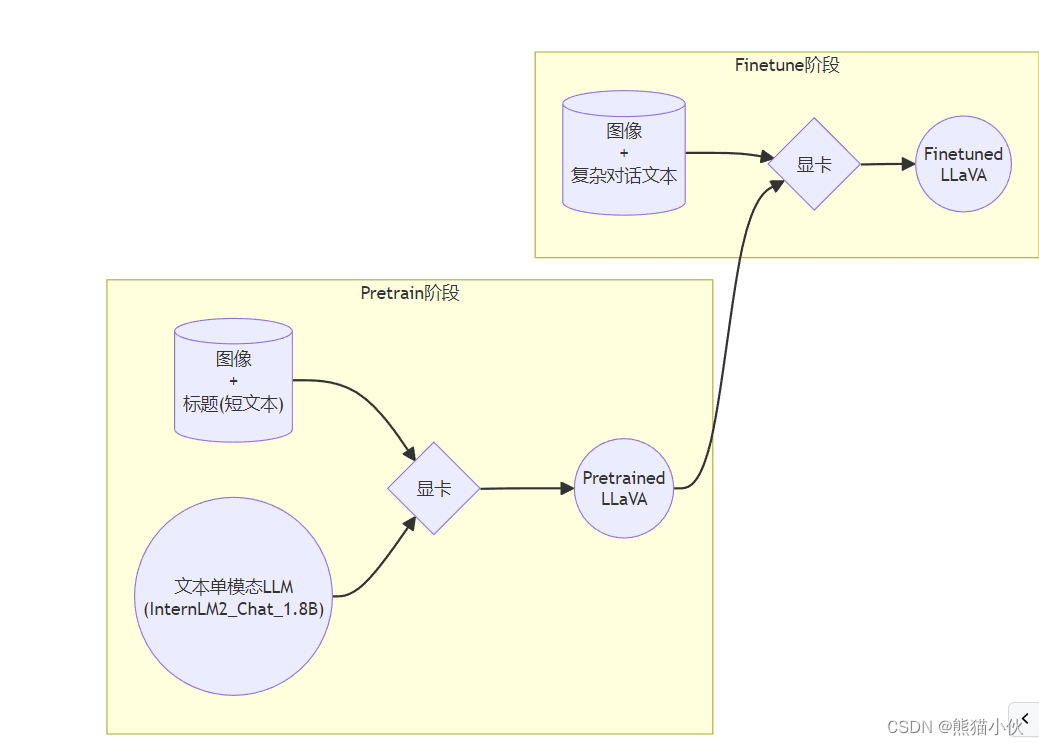
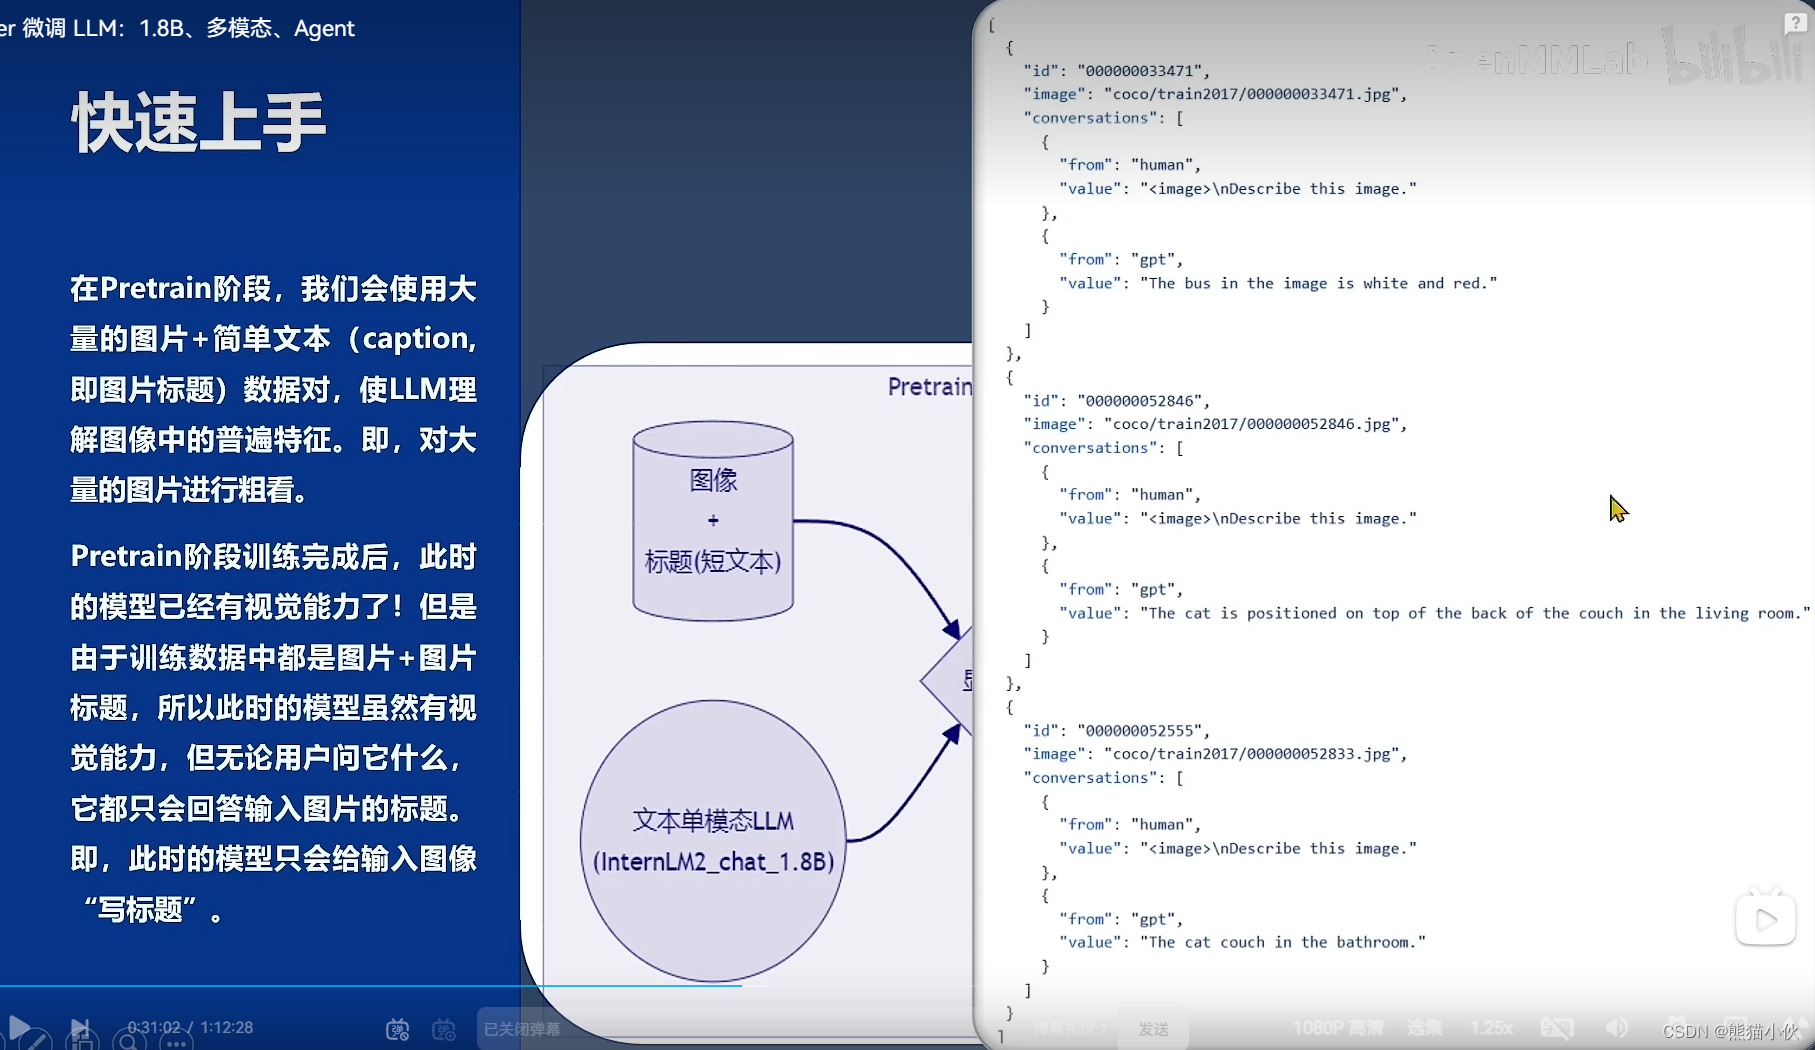
(1)Pretrain
在Pretrain阶段,我们会使用大量的图片+简单文本(caption, 即图片标题)数据对,使LLM理解图像中的普遍特征。即,对大量的图片进行粗看。
Pretrain阶段训练完成后,此时的模型已经有视觉能力了!但是由于训练数据中都是图片+图片标题,所以此时的模型虽然有视觉能力,但无论用户问它什么,它都只会回答输入图片的标题。即,此时的模型只会给输入图像“写标题”。
Pretrain阶段相当于是开发LLM时预训练工作,对硬件要求非常高,有8卡的学有余力同学可以自行尝试。
详见
- XTuner-LLaVA
- LLaVA。
NPROC_PER_NODE=8 xtuner train llava_internlm2_chat_1_8b_clip_vit_large_p14_336_e1_gpu8_pretrain --deepspeed deepspeed_zero2

NPROC_PER_NODE=8 xtuner train llava_internlm2_chat_1_8b_qlora_clip_vit_large_p14_336_lora_e1_gpu8_finetune --deepspeed deepspeed_zero2
在本次实战营中,已经为大家提供了Pretrain阶段的产物——iter_2181.pth文件。它就是幼稚园阶段的Image Projector!大家带着iter_2181.pth文件继续进入下一阶段进行Finetune即可。
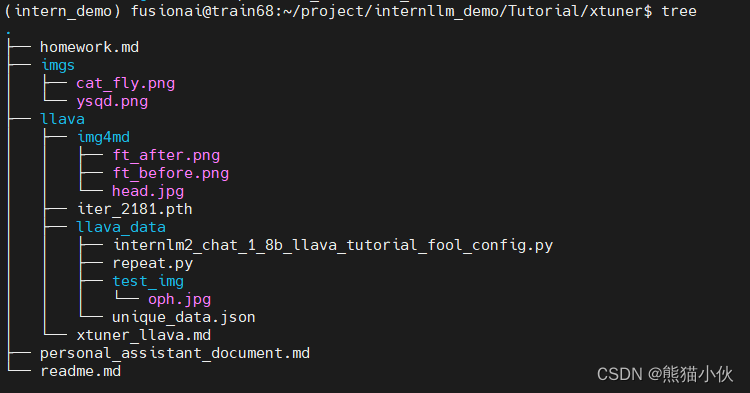
位置:xxx/internllm_demo/Tutorial/xtuner
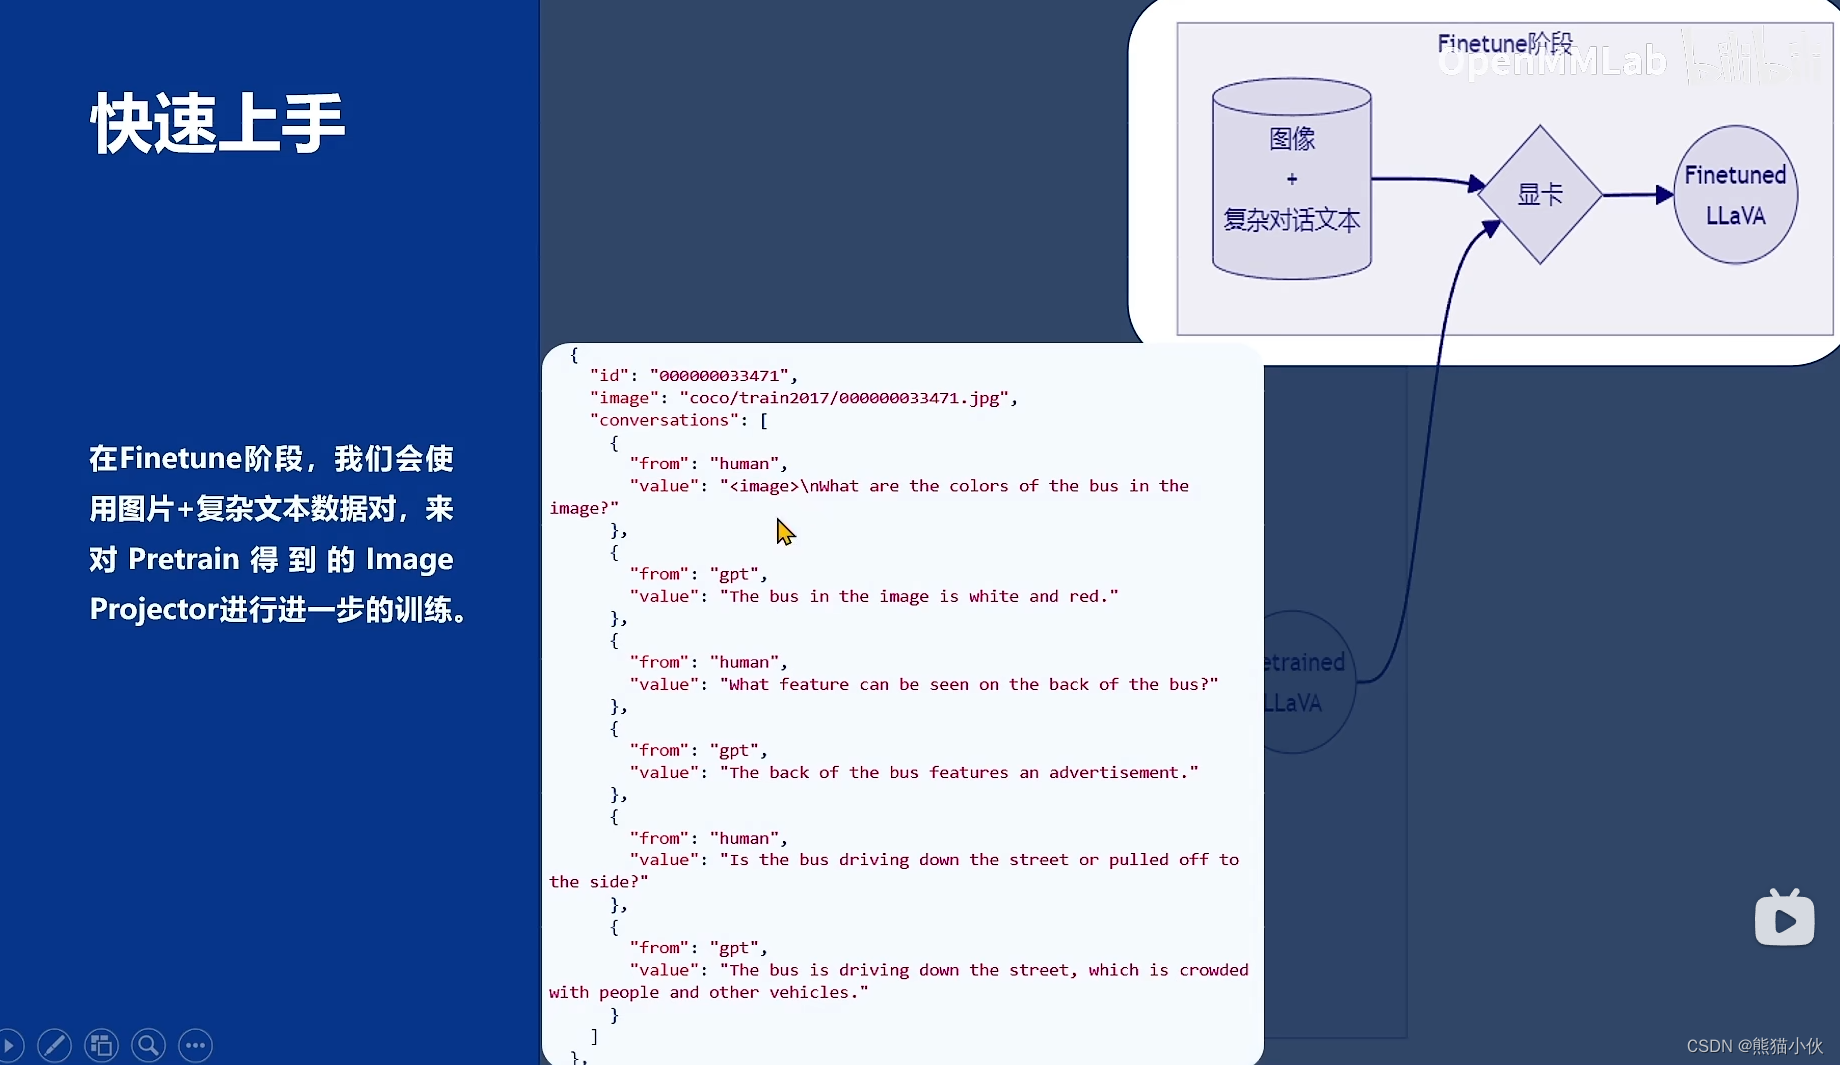
(2)Finetune
在Finetune阶段,我们会使用图片+复杂文本数据对,来对Pretrain得到的Image Projector即iter_2181.pth进行进一步的训练。
a.训练数据集格式说明
[
    {
        "id": "随便什么字符串",
        "image": "图片文件的相对位置。相对谁?相对你后面config文件里指定的image_folder参数的路径。",
        "conversation": [
            {
                "from": "human",
                "value": "<image>\n第1个问题。"
            },
            {
                "from": "gpt",
                "value": "第1个回答"
            },
            {
                "from": "human",
                "value": "第2个问题。"
            },
            {
                "from": "gpt",
                "value": "第2个回答"
            },
            # ......
            {
                "from": "human",
                "value": "第n个问题。"
            },
            {
                "from": "gpt",
                "value": "第n个回答"
            },
        ]
    },

    # 下面是第2组训练数据了。

    {
        "id": "随便什么字符串",
        "image": "图片文件的相对位置。相对谁?相对你后面config文件里指定的image_folder参数的路径。",
        "conversation": [
            {
                "from": "human",
                "value": "<image>\n第1个问题。"
            },
            # ......
            {
                "from": "gpt",
                "value": "第n个回答"
            }
        ]
    }
]
注意:
每组训练数据的第1个来自human的问题前,要加上图片占位符,即<image>
样本示例:
[
  {
    "id": "000000033471",
    "image": "coco/train2017/000000033471.jpg",
    "conversations": [
      {
        "from": "human",
        "value": "<image>\nWhat are the colors of the bus in the image?"
      },
      {
        "from": "gpt",
        "value": "The bus in the image is white and red."
      },
      {
        "from": "human",
        "value": "What feature can be seen on the back of the bus?"
      },
      {
        "from": "gpt",
        "value": "The back of the bus features an advertisement."
      },
      {
        "from": "human",
        "value": "Is the bus driving down the street or pulled off to the side?"
      },
      {
        "from": "gpt",
        "value": "The bus is driving down the street, which is crowded with people and other vehicles."
      }
    ]
  },
  {
    "id": "000000052846",
    "image": "coco/train2017/000000052846.jpg",
    "conversations": [
      {
        "from": "human",
        "value": "<image>\nWhere is the cat positioned in the image?"
      },
      {
        "from": "gpt",
        "value": "The cat is positioned on top of the back of the couch in the living room."
      }
    ]
  }
 ]
b.训练数据构建
我们可以效法LLaVA作者的做法,将自己的图片发送给GPT,要求其按照上述格式生成若干条问答对。

Create a dataset for me, following this format.
[
  {
    "id": "<random_number_string>",
    "image": "test_img/oph.jpg",
    "conversations": [
      {
        "from": "human",
        "value": "<image>\nDescribe this image."
      },
      {
        "from": "gpt",
        "value": "<answer1>"
      },
      {
        "from": "human",
        "value": "<question2>"
      },
      {
        "from": "gpt",
        "value": "<answer2>"
      },
      {
        "from": "human",
        "value": "<question3>"
      },
      {
        "from": "gpt",
        "value": "<answer3>"
      }
    ]
  }
]
The questions and answers, please generate for me, based on the image I sent to you. Thes questions should be from the shallow to the deep, and the answers should be as detailed and correct as possible. The questions and answers should be stick to the contents in the image itself, like objects, peoples, equipment, environment, purpose, color, attitude, etc. 5 question and answer pairs.
为了方便大家跟随课程,针对这张示例图片的问答对数据(repeat_data.json),大家按照下面的脚本运行就可以生成啦~(重复200次)
cd ~ && git clone https://github.com/InternLM/tutorial -b camp2 && conda activate xtuner0.1.17 && cd tutorial

python /root/tutorial/xtuner/llava/llava_data/repeat.py \
-i /root/tutorial/xtuner/llava/llava_data/unique_data.json \
-o /root/tutorial/xtuner/llava/llava_data/repeated_data.json \
-n 200
c.准备配置文件
tips: 如果你懒到不想自己改配置文件,或者怎么改都失败。我们准备了一个fool_config文件在仓库里。运行:
cp /root/tutorial/xtuner/llava/llava_data/internlm2_chat_1_8b_llava_tutorial_fool_config.py \
/root/tutorial/xtuner/llava/llava_internlm2_chat_1_8b_qlora_clip_vit_large_p14_336_lora_e1_gpu8_finetune_copy.py
step1:创建配置文件
# 查询xtuner内置配置文件
xtuner list-cfg -p llava_internlm2_chat_1_8b

# 拷贝配置文件到当前目录
xtuner copy-cfg \
  llava_internlm2_chat_1_8b_qlora_clip_vit_large_p14_336_lora_e1_gpu8_finetune \
  /root/tutorial/xtuner/llava
当前你的/root/tutorial/xtuner/llava/目录下的文件结构应该是这样:
|-- llava_data
|   |-- repeat.py
|   |-- repeated_data.json
|   |-- test_img
|   |   `-- oph.jpg
|   `-- unique_data.json
`-- llava_internlm2_chat_1_8b_qlora_clip_vit_large_p14_336_lora_e1_gpu8_finetune_copy.py
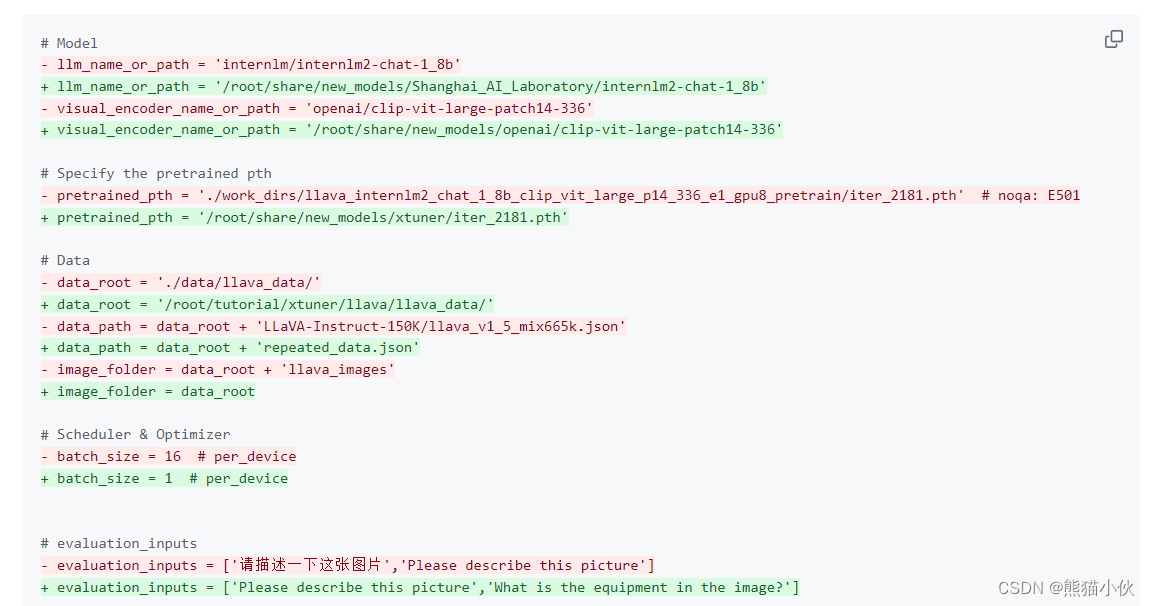
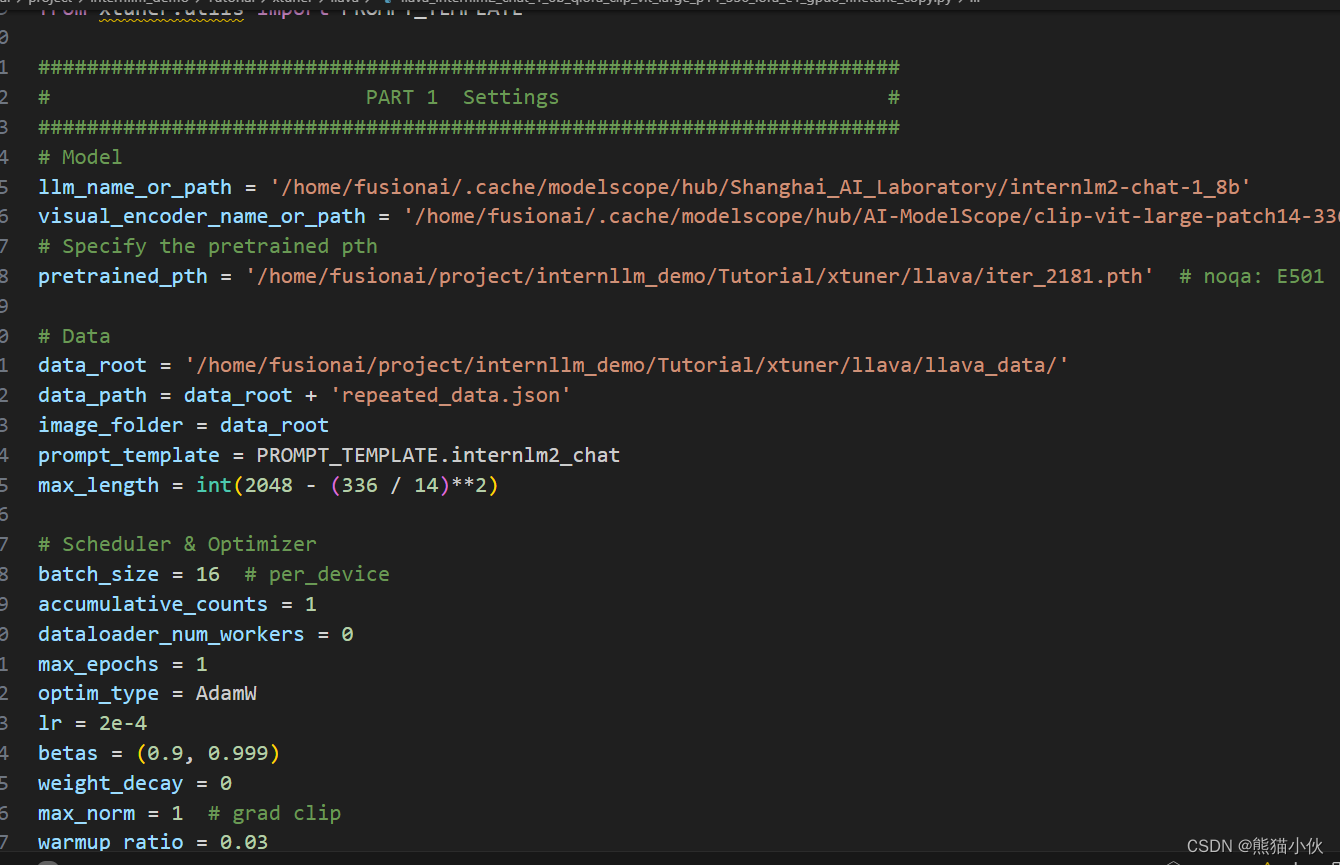
step2:修改配置文件
修改llava_internlm2_chat_1_8b_qlora_clip_vit_large_p14_336_lora_e1_gpu8_finetune_copy.py文件中的:
pretrained_pth
llm_name_or_path
visual_encoder_name_or_path
data_root
data_path
image_folder
注意:
在本地部署的朋友需要关注一下下载权重,主要需要3个模型:
- internlm2-chat-1_8b : 这个在第二节课里面基础作业可以直接下载,下载路径默认是
~/.cache/modelscope/hub/Shanghai_AI_Laboratory/internlm2-chat-1_8b - clip-vit-large-patch14-336 : 这个在第二节课里面进阶作业,使用
internlm-xcomposer2-vl-7b的时候会下载encoder的部分就是这个,不能从openai下载的话,可以改成从AI-ModelScope下载。下载路径默认是:~/.cache/modelscope/hub/AI-ModelScope/clip-vit-large-patch14-336 - pretrain pth :tutorial文件里面有,即是这个
iter_2181.pth
如果前两个权重下载有问题的话,可以参见我第二节的笔记:【第 2 节】轻松玩转书生·浦语大模型趣味 Demo - 2.5.2
step3:开始Finetune
cd /root/tutorial/xtuner/llava/

xtuner train /root/tutorial/xtuner/llava/llava_internlm2_chat_1_8b_qlora_clip_vit_large_p14_336_lora_e1_gpu8_finetune_copy.py \
--deepspeed deepspeed_zero2
使用A800 大约需要40g算力(batchsize == 16),3分钟就好了。

(3)对比Finetune前后的性能差异
a.Finetune前
即:加载 1.8B 和 Pretrain阶段产物(iter_2181) 到显存。
# 解决小bug
export MKL_SERVICE_FORCE_INTEL=1
export MKL_THREADING_LAYER=GNU

# pth转huggingface
xtuner convert pth_to_hf \
  llava_internlm2_chat_1_8b_clip_vit_large_p14_336_e1_gpu8_pretrain \
  /root/share/new_models/xtuner/iter_2181.pth \
  /root/tutorial/xtuner/llava/llava_data/iter_2181_hf

# 启动!
xtuner chat /root/share/new_models/Shanghai_AI_Laboratory/internlm2-chat-1_8b \
  --visual-encoder /root/share/new_models/openai/clip-vit-large-patch14-336 \
  --llava /root/tutorial/xtuner/llava/llava_data/iter_2181_hf \
  --prompt-template internlm2_chat \
  --image /root/tutorial/xtuner/llava/llava_data/test_img/oph.jpg
b.Finetune后
即:加载 1.8B 和 Fintune阶段产物 到显存。
# 解决小bug
export MKL_SERVICE_FORCE_INTEL=1
export MKL_THREADING_LAYER=GNU

# pth转huggingface
xtuner convert pth_to_hf \
  /root/tutorial/xtuner/llava/llava_internlm2_chat_1_8b_qlora_clip_vit_large_p14_336_lora_e1_gpu8_finetune_copy.py \
  /root/tutorial/xtuner/llava/work_dirs/llava_internlm2_chat_1_8b_qlora_clip_vit_large_p14_336_lora_e1_gpu8_finetune_copy/iter_1200.pth \
  /root/tutorial/xtuner/llava/llava_data/iter_1200_hf

# 启动!
xtuner chat /root/share/new_models/Shanghai_AI_Laboratory/internlm2-chat-1_8b \
  --visual-encoder /root/share/new_models/openai/clip-vit-large-patch14-336 \
  --llava /root/tutorial/xtuner/llava/llava_data/iter_1200_hf \
  --prompt-template internlm2_chat \
  --image /root/tutorial/xtuner/llava/llava_data/test_img/oph.jpg
c. 测试效果
(1)测试图片

(2)测试问题
Q1: Describe this image.
Q2: What is the equipment in the image?
(3)原始的多模态模型的测试效果
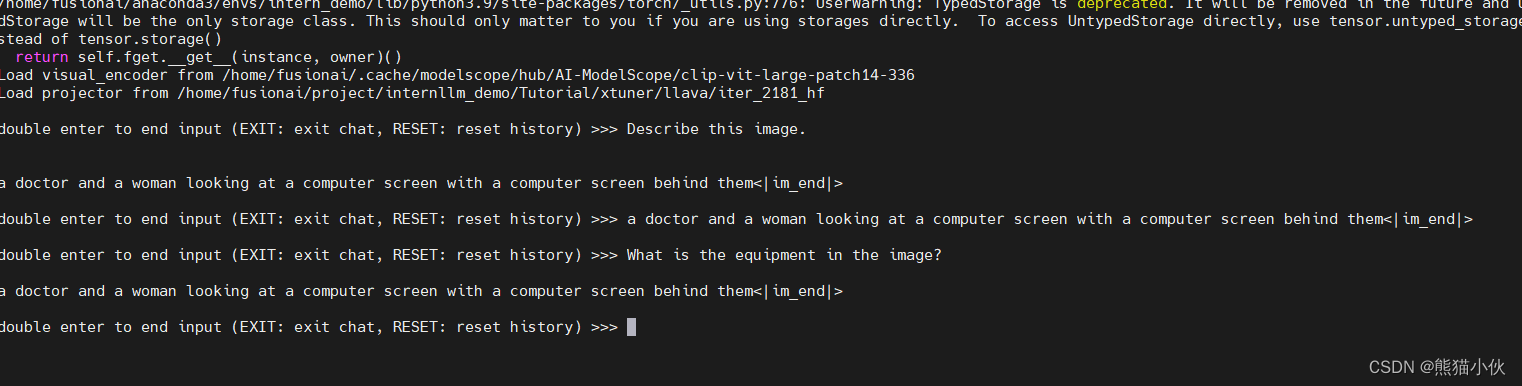 Finetune前:只会打标题
(4)经过SFT之后的新模型效果

Finetune后:会回答问题了
3.5 OpenXLab 部署教程
OpenXLab 部署教程:https://github.com/InternLM/Tutorial/tree/camp2/tools/openxlab-deploy
这个部分有缘的朋友自行查看吧,公司服务器不太方便
ref
1.OpenXLab 平台介绍
2.OpenXLab Gradio 应用教程
3.OpenXLab 上传模型教程
4. 【第 2 节】轻松玩转书生·浦语大模型趣味 Demo
5. Visual Instruction Tuning