jwt是做验证的必经之路,至于原理,就不在叙述了,可以参考官网
jwt官网介绍
JSON Web Tokens - jwt.io
原理介绍
JSON Web Token 入门教程 - 阮一峰的网络日志
看完之后,结合这个图,就明白了。

本案例使用vs2022,.net6api做后端,以及vue3做前端来完成功能。
1.创建一个可执行的.net6api后端

2.安装jwt,要注意版本

3. 在appsettings.json中添加JWT加密需要的私钥AuthenticationDemo
{
  "Logging": {
    "LogLevel": {
      "Default": "Information",
      "Microsoft.AspNetCore": "Warning"
    }
  },
  "AllowedHosts": "*",
  "AuthenticationDemo": { //这些键值对都可以自定义
    "SecretKeyDemo": "aaaaaaaaaadddddddddddddffffffffffffwwwwwwww", //私钥
    "IssuerDemo": "guli2130", //发布者
    "AudienceDemo": "audience" //接收者
  }

}
4.新建一个GetToken类,再建立一个LoginToken方法
using Microsoft.AspNetCore.Http;
using Microsoft.AspNetCore.Mvc;
using Microsoft.IdentityModel.Tokens;
using System.IdentityModel.Tokens.Jwt;
using System.Security.Claims;
using System.Text;

namespace net6ApiJWT.Controllers
{
    [Route("api/[controller]/[action]")]
    [ApiController]
    public class GetToken : ControllerBase
    {
        public readonly IConfiguration configuration;
        public GetToken(IConfiguration configuration)         //注入配置,用来获取appsettings.json的配置
        {
            this.configuration = configuration;
        }
        [HttpGet]
        public ActionResult<string> LoginToken()
        {

            //1.验证用户账号密码是否正确,暂时忽略,因为我们是模拟登录

            //2.生成JWT
            //Header,选择签名算法
            var signingAlogorithm = SecurityAlgorithms.HmacSha256;
            //Payload,存放用户信息,下面我们放了一个用户id
            var claims = new[]
            {
                new Claim(JwtRegisteredClaimNames.Sub,"userId")
            };
            //Signature
            //取出私钥并以utf8编码字节输出
            var secretByte = Encoding.UTF8.GetBytes(configuration["AuthenticationDemo:SecretKeyDemo"]);
            //使用非对称算法对私钥进行加密
            var signingKey = new SymmetricSecurityKey(secretByte);
            //使用HmacSha256来验证加密后的私钥生成数字签名
            var signingCredentials = new SigningCredentials(signingKey, signingAlogorithm);
            //生成Token
            var Token = new JwtSecurityToken(
                    issuer: configuration["AuthenticationDemo:IssuerDemo"],        //发布者
                    audience: configuration["AuthenticationDemo:AudienceDemo"],    //接收者
                    claims: claims,                                         //存放的用户信息
                    notBefore: DateTime.UtcNow,                             //发布时间
                    expires: DateTime.UtcNow.AddDays(1),                      //有效期设置为1天
                    signingCredentials                                      //数字签名
                );
            //生成字符串token
            var TokenStr = new JwtSecurityTokenHandler().WriteToken(Token);

            return Ok(TokenStr);
        }
    }
}
5.运行api,可以看到生成的token

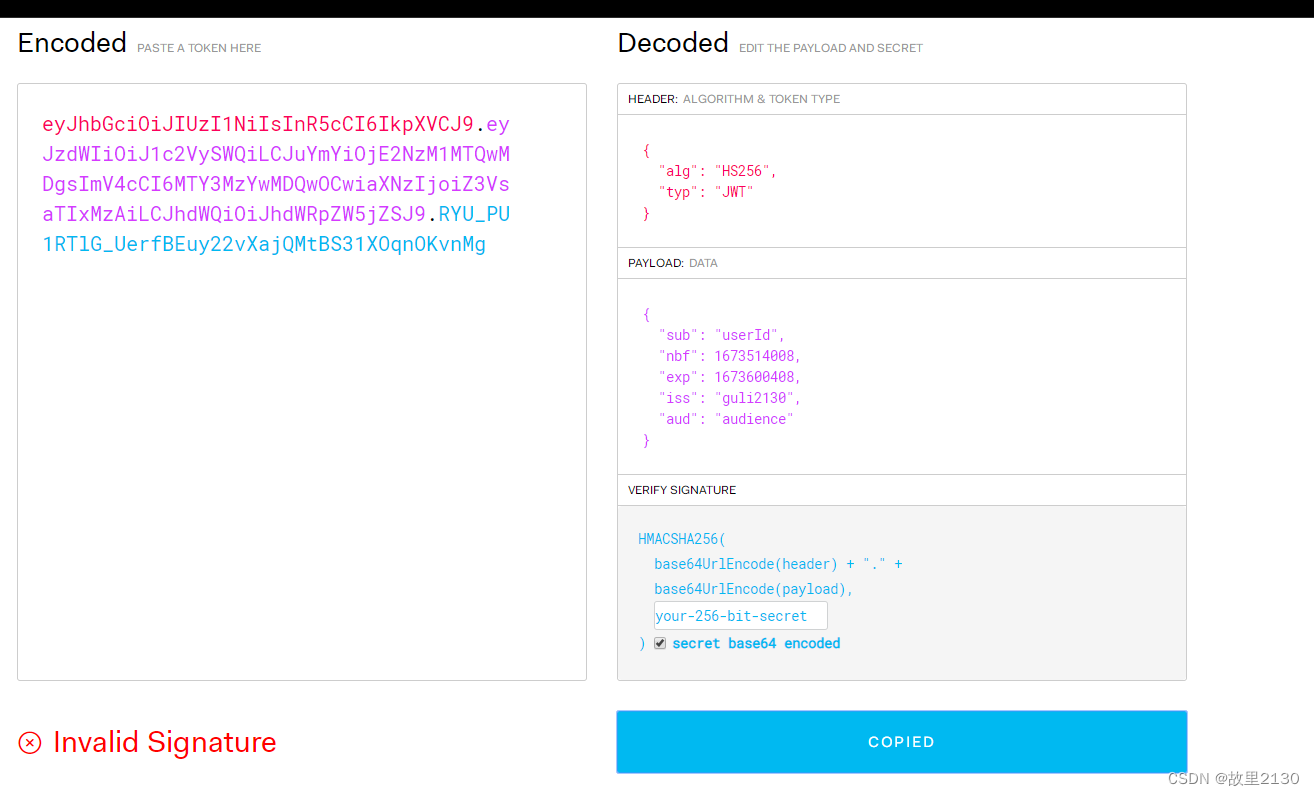
当我们把字符串复制到JWT官网,就可以是明文的,所以千万不要写账号和密码,如果要写,就再加密一层。
6.在Program.cs中注入JWT身份认证服务
里面有注释,加有跨域的问题,可以分开看。
using Microsoft.AspNetCore.Authentication.JwtBearer;
using Microsoft.IdentityModel.Tokens;
using System.Text;

var builder = WebApplication.CreateBuilder(args);

// Add services to the container.

builder.Services.AddControllers();
// Learn more about configuring Swagger/OpenAPI at https://aka.ms/aspnetcore/swashbuckle
builder.Services.AddEndpointsApiExplorer();
builder.Services.AddSwaggerGen();
builder.Services.AddAuthentication(JwtBearerDefaults.AuthenticationScheme)
    .AddJwtBearer(options =>
    {
        //取出私钥
        var secretByte = Encoding.UTF8.GetBytes(builder.Configuration["AuthenticationDemo:SecretKeyDemo"]);
        options.TokenValidationParameters = new TokenValidationParameters()
        {
            //验证发布者
            ValidateIssuer = true,
            ValidIssuer = builder.Configuration["AuthenticationDemo:IssuerDemo"],
            //验证接收者
            ValidateAudience = true,
            ValidAudience = builder.Configuration["AuthenticationDemo:AudienceDemo"],
            //验证是否过期
            ValidateLifetime = true,
            //验证私钥
            IssuerSigningKey = new SymmetricSecurityKey(secretByte)
        };
    });

//配置跨域服务
builder.Services.AddCors(options =>
{
    options.AddPolicy("cors", p =>
    {
        p.AllowAnyOrigin()
        .AllowAnyMethod()
        .AllowAnyHeader();

    });
});

var app = builder.Build();

// Configure the HTTP request pipeline.

app.UseSwagger();
app.UseSwaggerUI();

app.UseCors("cors");      //跨域
app.UseHttpsRedirection();

app.UseAuthentication();        //添加jwt验证  这2句千万不能忘记了,顺序不能颠倒。
//代码从上到下执行,中间可以加判断, 权限设置问题
app.UseAuthorization();

app.MapControllers();

app.Run();
至此,获取Token的任务就完成了。
7.关键时刻,此时建立一个User类,再建立一个Login方法增加,并且增加[Authorize]。
如果在路由上面加[Authorize],那么应用于整个类的方法。
如果在HttpGet上面加[Authorize],那么应用这个方法。
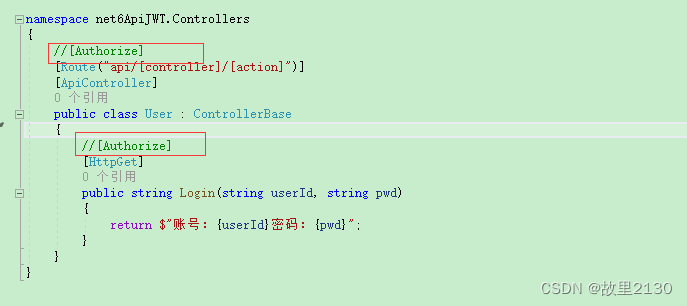
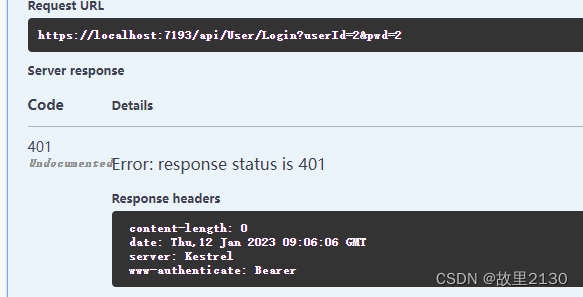
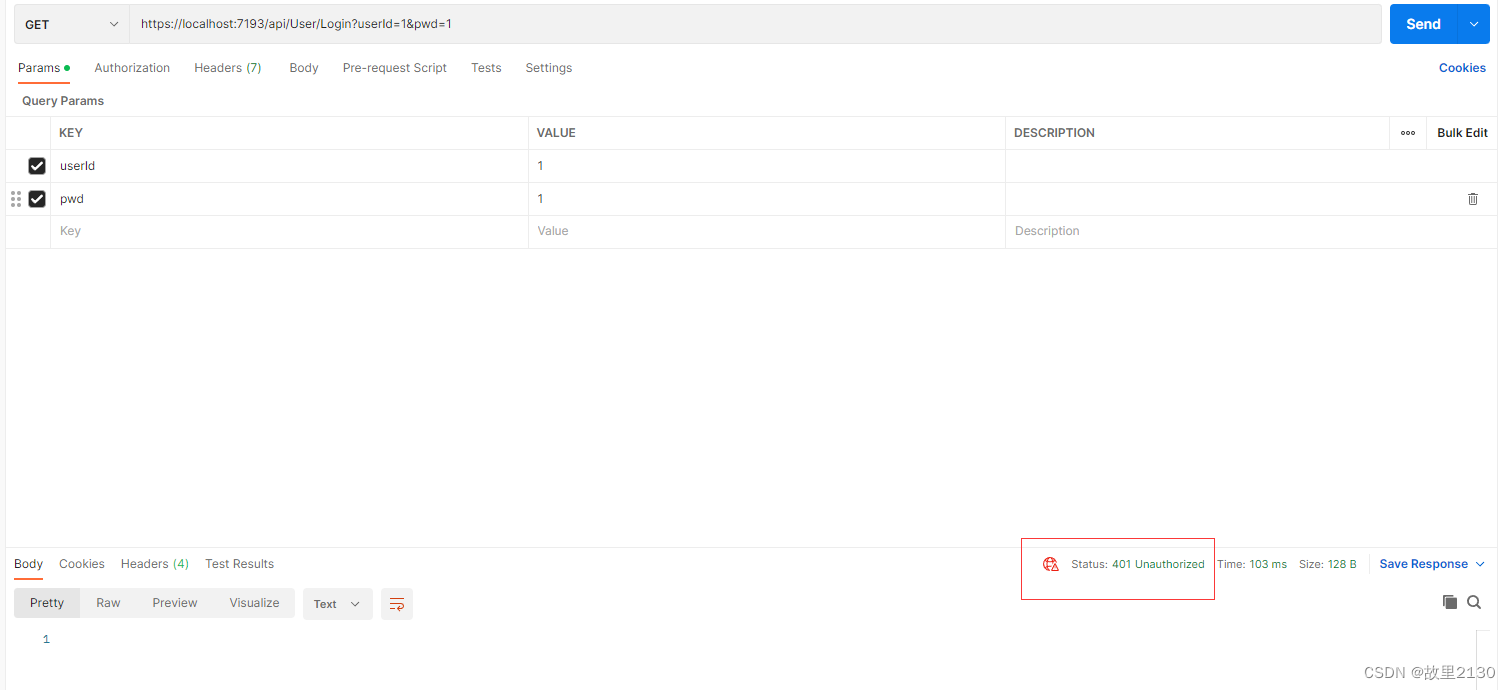
无论增加哪里, 都不能访问Login了,都是401。
不加[Authorize],就是200
8.此时,使用Postman进行测试
依然是401
9.现在执行LoginToken方法,获取Token的值

10.把Token的值放在Authorization中
点击执行,就可以看到数据了。
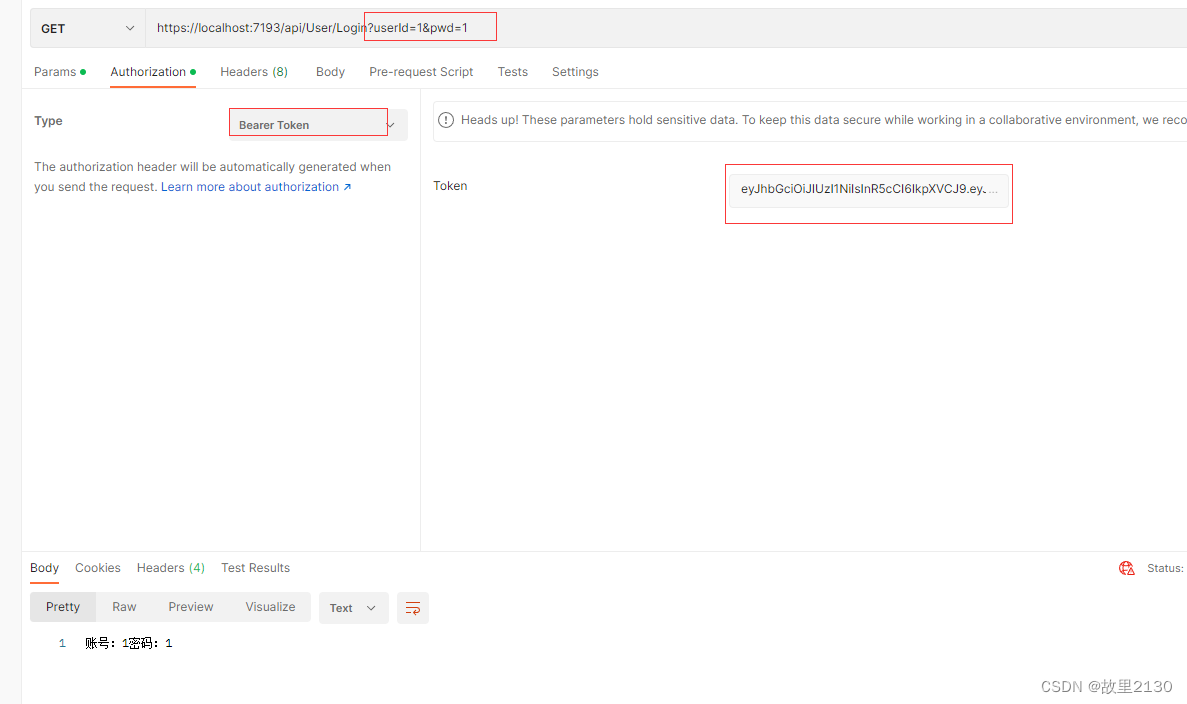
也可以把Token的值放在Headers中,增加Authorization,还需要加bearer,后面加空格 。二选一即可。

11. 给api的方法增加权限
首先在Claim这里,赋值给登录用户一个admin的用户权限

然后在具体的方法上面,增加角色,也就是只有admin才能访问这个方法,其他用户不能访问,就是200,其他用户访问就是401,当然这是在postman里面操作的。

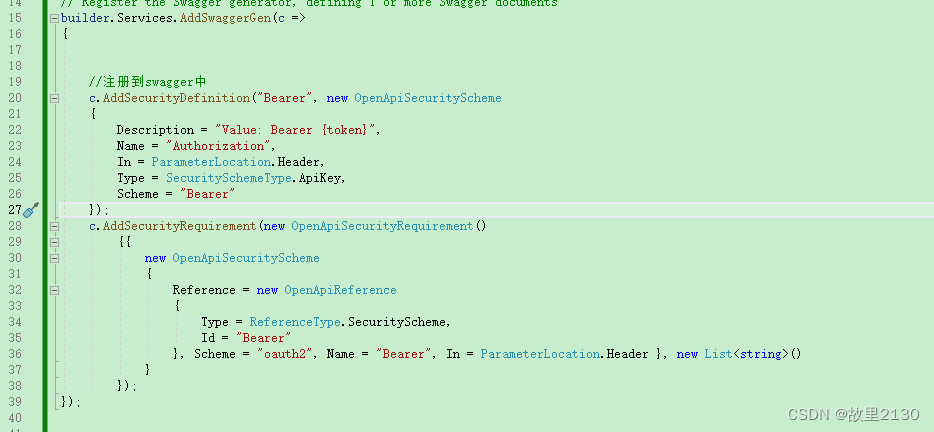
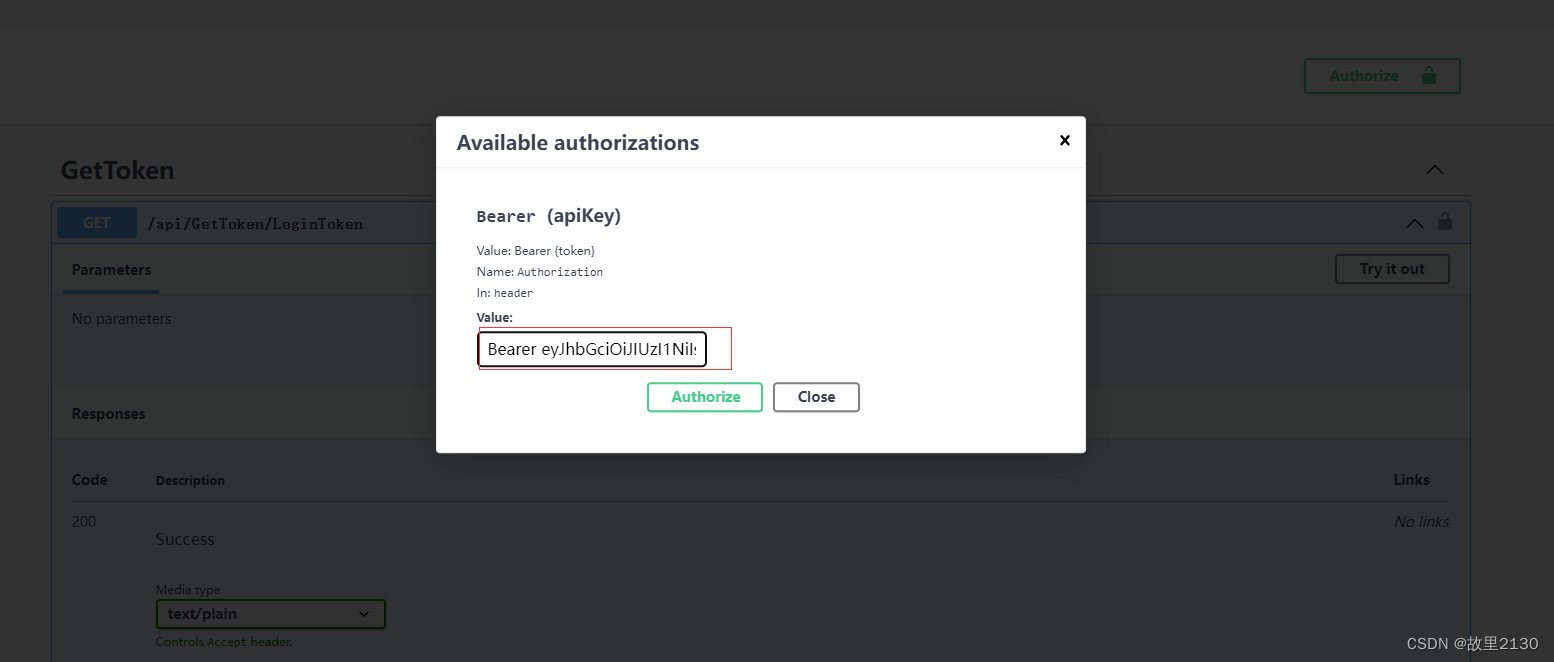
12.其实不用postman, 在AddSwaggerGen方法中,可以配置输入token的小锁子
using Microsoft.AspNetCore.Authentication.JwtBearer;
using Microsoft.IdentityModel.Tokens;
using Microsoft.OpenApi.Models;
using System.Text;

var builder = WebApplication.CreateBuilder(args);

// Add services to the container.

builder.Services.AddControllers();
// Learn more about configuring Swagger/OpenAPI at https://aka.ms/aspnetcore/swashbuckle
builder.Services.AddEndpointsApiExplorer();
//builder.Services.AddSwaggerGen();
// Register the Swagger generator, defining 1 or more Swagger documents
builder.Services.AddSwaggerGen(c =>
{


    //注册到swagger中
    c.AddSecurityDefinition("Bearer", new OpenApiSecurityScheme
    {
        Description = "Value: Bearer {token}",
        Name = "Authorization",
        In = ParameterLocation.Header,
        Type = SecuritySchemeType.ApiKey,
        Scheme = "Bearer"
    });
    c.AddSecurityRequirement(new OpenApiSecurityRequirement()
        {{
            new OpenApiSecurityScheme
            {
                Reference = new OpenApiReference
                {
                    Type = ReferenceType.SecurityScheme,
                    Id = "Bearer"
                }, Scheme = "oauth2", Name = "Bearer", In = ParameterLocation.Header }, new List<string>()
            }
        });
});


builder.Services.AddAuthentication(JwtBearerDefaults.AuthenticationScheme)
    .AddJwtBearer(options =>
    {
        //取出私钥
        var secretByte = Encoding.UTF8.GetBytes(builder.Configuration["AuthenticationDemo:SecretKeyDemo"]);
        options.TokenValidationParameters = new TokenValidationParameters()
        {
            //验证发布者
            ValidateIssuer = true,
            ValidIssuer = builder.Configuration["AuthenticationDemo:IssuerDemo"],
            //验证接收者
            ValidateAudience = true,
            ValidAudience = builder.Configuration["AuthenticationDemo:AudienceDemo"],
            //ValidateIssuerSigningKey= true,//是否验证SigningKey
            //验证是否过期
            ValidateLifetime = true,
            //验证私钥
            IssuerSigningKey = new SymmetricSecurityKey(secretByte)


        };
    });

//配置跨域服务
builder.Services.AddCors(options =>
{
    options.AddPolicy("cors", p =>
    {
        p.AllowAnyOrigin()
        .AllowAnyMethod()
        .AllowAnyHeader();

    });
});

var app = builder.Build();

// Configure the HTTP request pipeline.

app.UseSwagger();
app.UseSwaggerUI();

app.UseCors("cors");      //跨域
app.UseHttpsRedirection();

app.UseAuthentication();        //添加jwt验证  这2句千万不能忘记了,顺序不能颠倒。
//代码从上到下执行,中间可以加判断, 权限设置问题
app.UseAuthorization();

app.MapControllers();

app.Run();
13.然后启动后,就出现了,小锁子
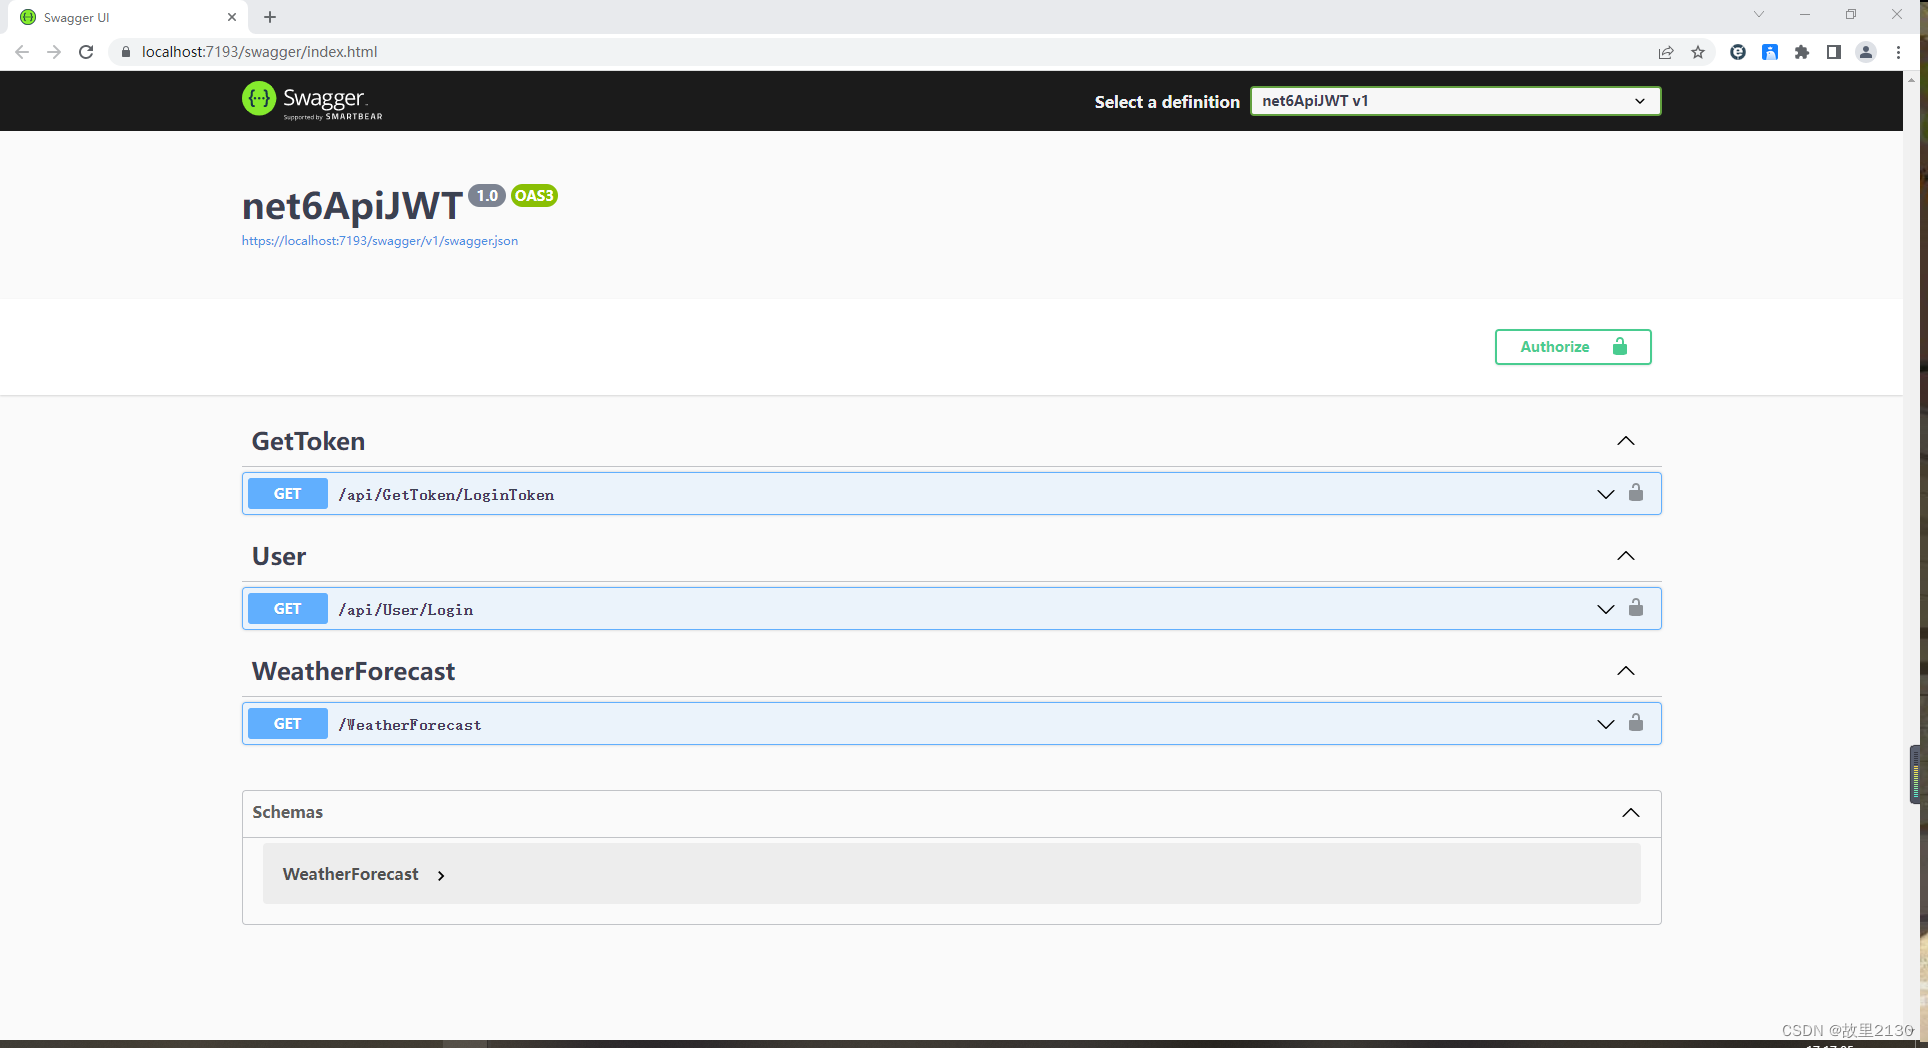
14.此时,先点击LoginToken获取Token
再把Token输入里面去,注意加上Bearer和后面的空格,再执行Login方法就成功了。
此时,我们就可以脱离postman了。
15.后端已经全部完成了,现在做前端
前端使用vue3,只说配置即可,具体创建项目不说了,我之前也写了。
我们在axios中配置headers的Authorization。实际项目肯定不能直接写死

import axios from 'axios'
import {
	ElLoading
} from 'element-plus'


//export将service传出去
export const service = axios.create({
	baseURL: 'https://localhost:7193/api',
	headers:{
		'Authorization':'Bearer eyJhbGciOiJIUzI1NiIsInR5cCI6IkpXVCJ9.eyJzdWIiOiJ1c2VySWQiLCJodHRwOi8vc2NoZW1hcy5taWNyb3NvZnQuY29tL3dzLzIwMDgvMDYvaWRlbnRpdHkvY2xhaW1zL3JvbGUiOiJhZG1pbiIsIm5iZiI6MTY3MzYwMDY2MiwiZXhwIjoxNjczNjg3MDYyLCJpc3MiOiJndWxpMjEzMCIsImF1ZCI6ImF1ZGllbmNlIn0.2_EQjQzi8ZmaPoTR4hdBrePiijkk9J25nZS0KIBx6OA'
	}
})
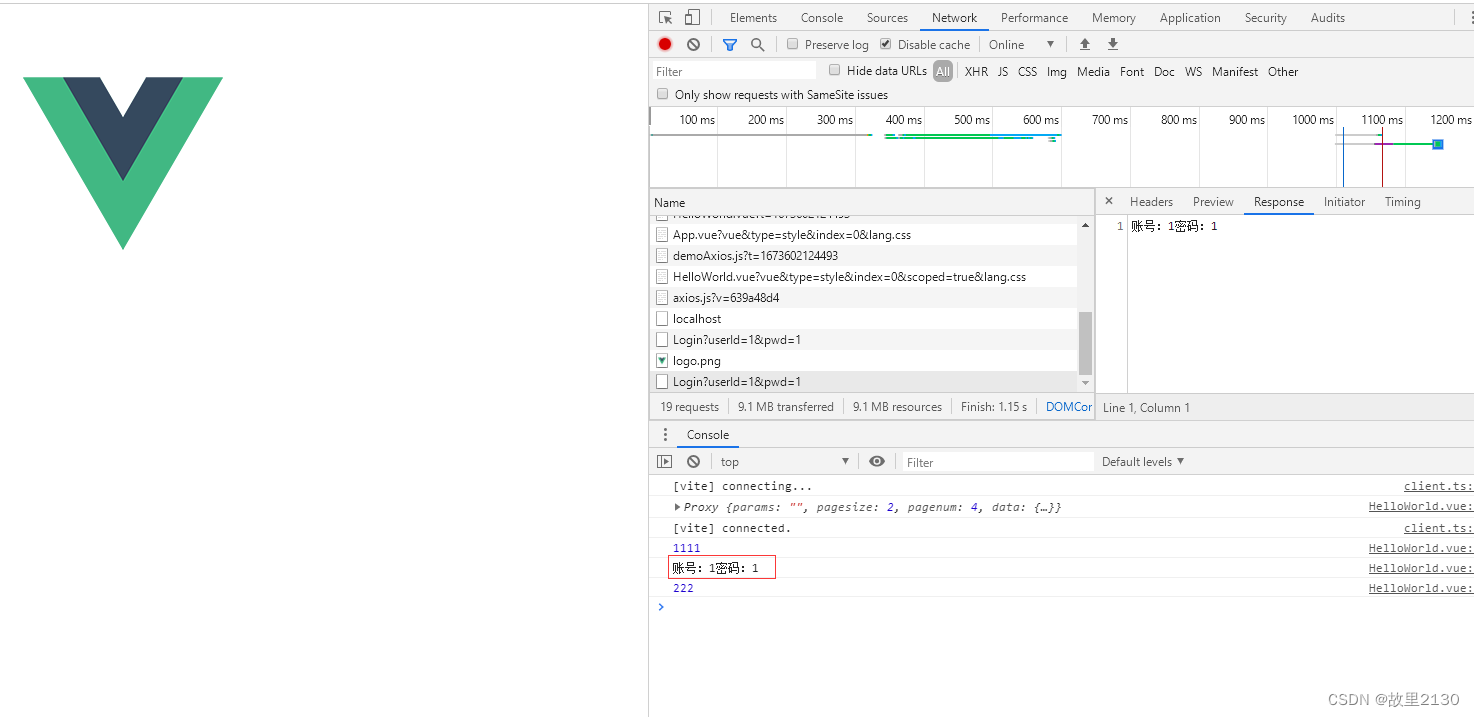
16.在界面调用
await service.get(`https://localhost:7193/api/User/Login?userId=1&pwd=1`).then(res => {
			if (res.status == 200) {
				console.log(1111)
				console.log(res.data)
				console.log(222)
			}
		})
17.效果
源码:
https://download.csdn.net/download/u012563853/87383701
参考:
这个是简单的认证。
.NET Core登录api时使用Basic认证_故里2130的博客-CSDN博客


![Android 设备自动重启分析[低内存]——MTK平台 debuglogger](https://img-blog.csdnimg.cn/2b3cf088fd9240c1b4706a432864d5db.png)


