环境搭建+抛出问题
1.环境搭建
1.创建maven项目

2.导入依赖
<project xmlns="http://maven.apache.org/POM/4.0.0" xmlns:xsi="http://www.w3.org/2001/XMLSchema-instance"
  xsi:schemaLocation="http://maven.apache.org/POM/4.0.0 http://maven.apache.org/maven-v4_0_0.xsd">
  <modelVersion>4.0.0</modelVersion>
  <groupId>org.example</groupId>
  <artifactId>sun-spring</artifactId>
  <packaging>war</packaging>
  <version>1.0-SNAPSHOT</version>
  <name>sun-spring Maven Webapp</name>
  <url>http://maven.apache.org</url>
  <dependencies>
    <dependency>
      <groupId>junit</groupId>
      <artifactId>junit</artifactId>
      <version>3.8.1</version>
      <scope>test</scope>
    </dependency>
  <!--配置spring的基本包-->
    <dependency>
      <groupId>org.springframework</groupId>
      <artifactId>spring-context</artifactId>
      <version>5.3.8</version>
    </dependency>
  <!--加入spring开发切面编程需要的包-->
    <dependency>
      <groupId>org.springframework</groupId>
      <artifactId>spring-aspects</artifactId>
      <version>5.3.8</version>
    </dependency>
  </dependencies>
  <build>
    <finalName>sun-spring</finalName>
  </build>
</project>
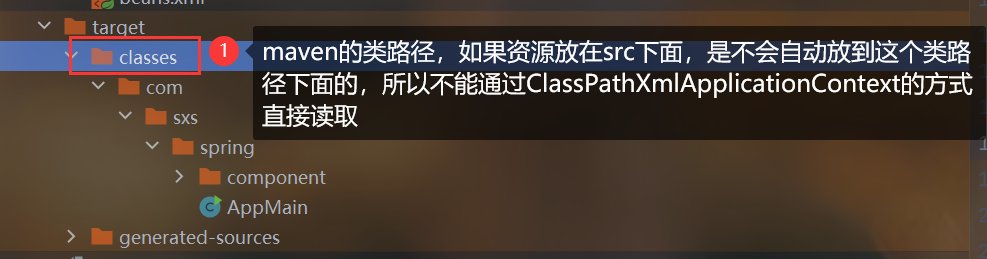
3.maven的资源路径问题
类路径

4.IOC演示
1.文件目录
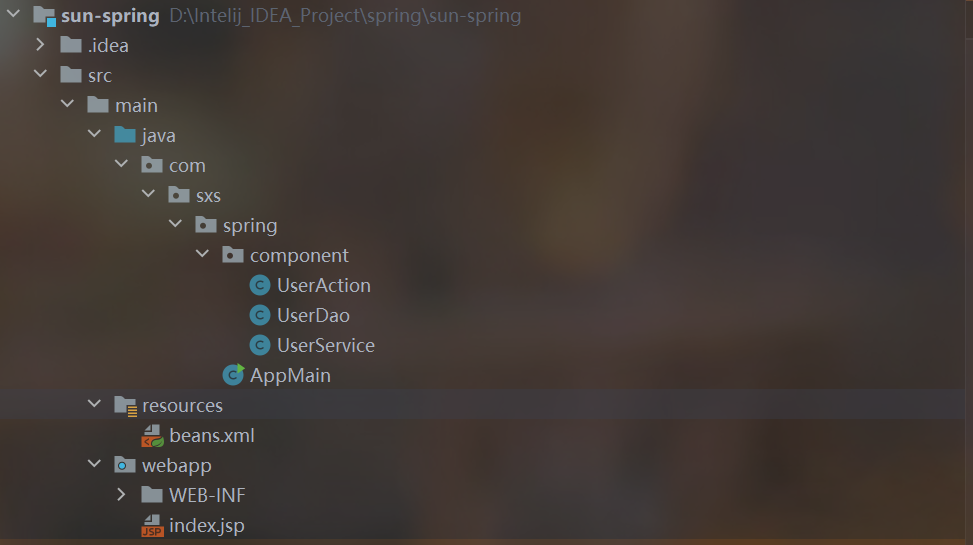
2.UserAction.java
package com.sxs.spring.component;

import org.springframework.stereotype.Component;

/**
 * 这是一个Controller
 *
 * @author 孙显圣
 * @version 1.0
 */
@Component
public class UserAction {
}
3.UserDao.java
package com.sxs.spring.component;

import org.springframework.stereotype.Component;

/**
 * 这是一个dao
 *
 * @author 孙显圣
 * @version 1.0
 */
@Component
public class UserDao {
    public void hi() {
        System.out.println("UserDao-hi()");
    }
}
4.UserService.java
package com.sxs.spring.component;
import org.springframework.beans.factory.annotation.Autowired;
import org.springframework.stereotype.Component;
/**
* 这是一个Service
*
* @author 孙显圣
* @version 1.0
*/
@Component
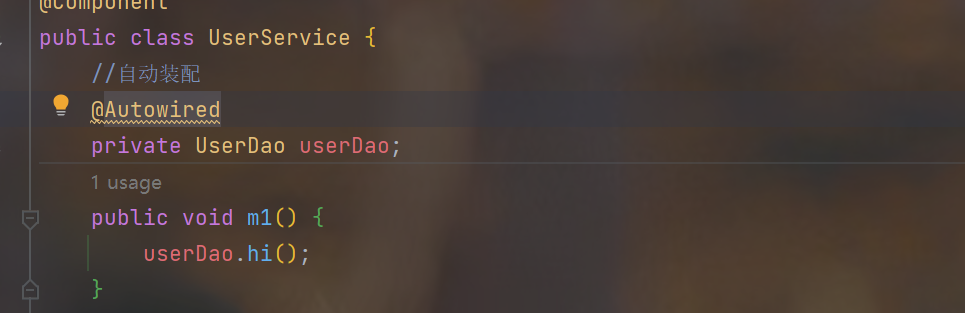
public class UserService {
//自动装配
@Autowired
private UserDao userDao;
public void m1() {
userDao.hi();
}
}
5.AppMain.java
package com.sxs.spring;

import com.sxs.spring.component.UserAction;
import com.sxs.spring.component.UserDao;
import com.sxs.spring.component.UserService;
import org.springframework.context.ApplicationContext;
import org.springframework.context.support.ClassPathXmlApplicationContext;

/**
 * @author 孙显圣
 * @version 1.0
 */
public class AppMain {
    public static void main(String[] args) {
        ApplicationContext ioc = new ClassPathXmlApplicationContext("beans.xml");
        UserAction action1 = ioc.getBean(UserAction.class);
        UserAction action2 = ioc.getBean(UserAction.class);
        System.out.println("action1=" + action1);
        System.out.println("action2=" + action2);
        UserService service = ioc.getBean(UserService.class);
        System.out.println("service=" + service);
        service.m1();
        UserDao userDao = ioc.getBean(UserDao.class);
        System.out.println("userDao=" + userDao);
    }
}
6.beans.xml
<?xml version="1.0" encoding="UTF-8"?>
<beans xmlns="http://www.springframework.org/schema/beans"
       xmlns:xsi="http://www.w3.org/2001/XMLSchema-instance"
       xmlns:context="http://www.springframework.org/schema/context"
       xsi:schemaLocation="http://www.springframework.org/schema/beans http://www.springframework.org/schema/beans/spring-beans.xsd http://www.springframework.org/schema/context https://www.springframework.org/schema/context/spring-context.xsd">
    <!--配置自动扫描-->
    <context:component-scan base-package="com.sxs.spring.component"/>
</beans>
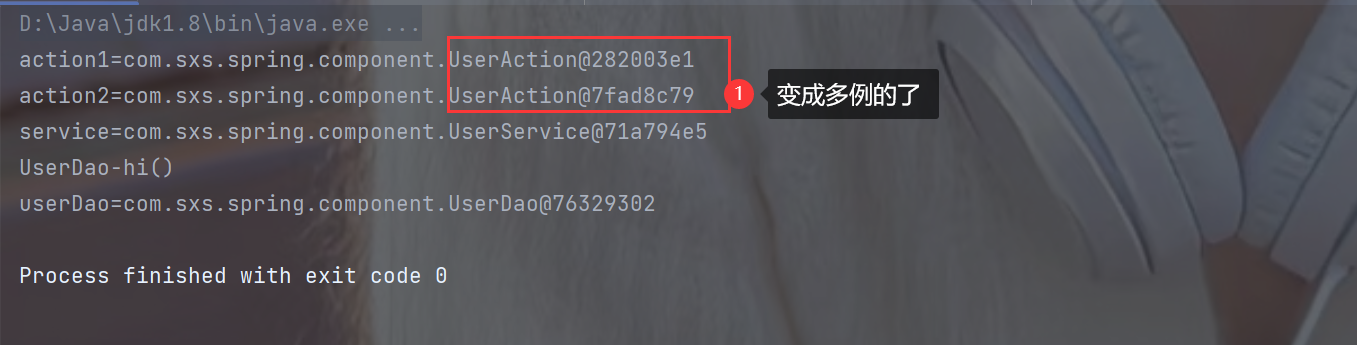
7.结果

2.抛出问题
1.prototype怎么实现的?

2.Autowired怎么实现的?
3.后置处理器是怎么实现的?
1.使用xml配置后置处理器
<!--配置后置处理器,就是反射创建了一个bean对象,也可以使用component注解创建-->
<bean class="com.sxs.spring.process.MyBeanPostProcessor" id="beanPostProcessor"/>
2.使用注解配置后置处理器
1.配置自动扫描
<!--如果使用注解来配置后置处理器,别忘了在这里配置自动扫描!!!-->
<context:component-scan base-package="com.sxs.spring.process"/>
2.MyBeanPostProcessor.java
package com.sxs.spring.process;

import org.springframework.beans.BeansException;
import org.springframework.beans.factory.config.BeanPostProcessor;
import org.springframework.stereotype.Component;

/**
 * @author 孙显圣
 * @version 1.0
 */
//反射创建后置处理器的bean对象
@Component
public class MyBeanPostProcessor implements BeanPostProcessor {
    /**
     * 在bean的init初始化方法之前执行
     * @param bean
     * @param beanName
     * @return
     * @throws BeansException
     */
    public Object postProcessBeforeInitialization(Object bean, String beanName) throws BeansException {
        System.out.println("postProcessBeforeInitialization被调用 " + beanName + "bean=" + bean.getClass());
        return bean;
    }

    /**
     * 在bean的init初始化方法之后执行
     * @param bean
     * @param beanName
     * @return
     * @throws BeansException
     */
    public Object postProcessAfterInitialization(Object bean, String beanName) throws BeansException {
        System.out.println("postProcessAfterInitialization被调用 " + beanName + "bean=" + bean.getClass());
        //注意:这里如果返回的是空,则还是使用的原来的bean
        return bean;
    }
}
4.Spring AOP是怎么实现的?
1.文件目录

2.SmartAnimalable.java
package com.sxs.spring.aop;

/**
 * @author 孙显圣
 * @version 1.0
 */
public interface SmartAnimalable {
    float getSum(float i, float j);
    float getSub(float i, float j);
}
3.SmartDog.java
package com.sxs.spring.aop;

import org.springframework.stereotype.Component;

/**
 * @author 孙显圣
 * @version 1.0
 */
@Component
public class SmartDog implements SmartAnimalable{
    public float getSum(float i, float j) {
        float res = i + j;
        System.out.println("SmartDog-getSum=" + res);
        return res;
    }

    public float getSub(float i, float j) {
        float res = i - j;
        System.out.println("SmartDog-getSub=" + res);
        return res;
    }
}
4.SmartAnimalAspect.java
package com.sxs.spring.aop;
import org.aspectj.lang.JoinPoint;
import org.aspectj.lang.Signature;
import org.aspectj.lang.annotation.*;
import org.springframework.stereotype.Component;
import java.util.Arrays;
/**
* @author 孙显圣
* @version 1.0
*/
@Component
@Aspect
public class SmartAnimalAspect {
@Pointcut(value = "execution(public float SmartDog.*(float, float)))")
public void myPointCut() {
}
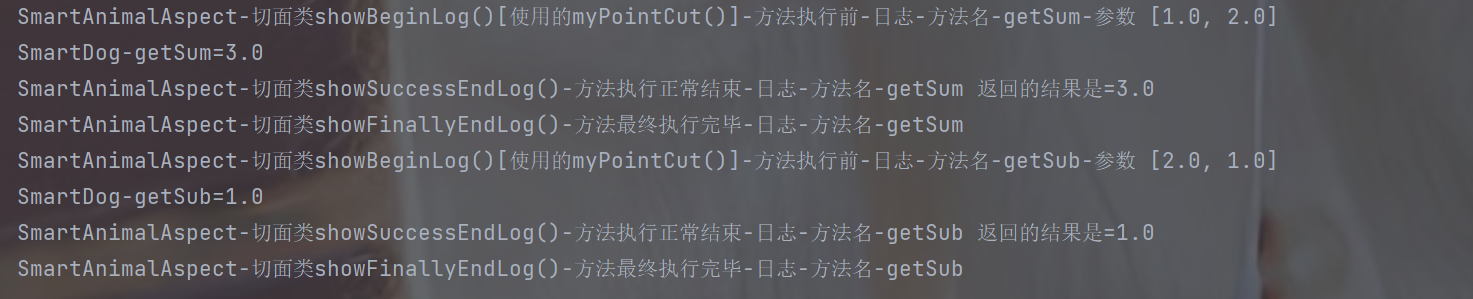
@Before(value = "myPointCut()")
public void showBeginLog(JoinPoint joinPoint) {
Signature signature = joinPoint.getSignature();
System.out.println("SmartAnimalAspect-切面类showBeginLog()[使用的myPointCut()]-方法执行前-日志-方法名-" + signature.getName() + "-参数 "
+ Arrays.asList(joinPoint.getArgs()));
}
@AfterReturning(value = "myPointCut()", returning = "res")
public void showSuccessEndLog(JoinPoint joinPoint, Object res) {
Signature signature = joinPoint.getSignature();
System.out.println("SmartAnimalAspect-切面类showSuccessEndLog()-方法执行正常结束-日志-方法名-" + signature.getName() + " 返回的结果是=" + res);
}
@AfterThrowing(value = "myPointCut()", throwing = "throwable")
public void showExceptionLog(JoinPoint joinPoint, Throwable throwable) {
Signature signature = joinPoint.getSignature();
System.out.println("SmartAnimalAspect-切面类showExceptionLog()-方法执行异常-日志-方法名-" + signature.getName() + " 异常信息=" + throwable);
}
@After(value = "myPointCut()")
public void showFinallyEndLog(JoinPoint joinPoint) {
Signature signature = joinPoint.getSignature();
System.out.println("SmartAnimalAspect-切面类showFinallyEndLog()-方法最终执行完毕-日志-方法名-" + signature.getName());
}
}
5.beans.xml
    <!--扫描aop-->
    <context:component-scan base-package="com.sxs.spring.aop"/>
    <!--启动aop注解-->
    <aop:aspectj-autoproxy/>
3.AOP与后置处理器的关系
1.介绍

2.补充说明
这个SmartDog在init之后变成了代理对象,原因是这个类的方法被切面切入了,所以会通过后置处理器返回代理对象

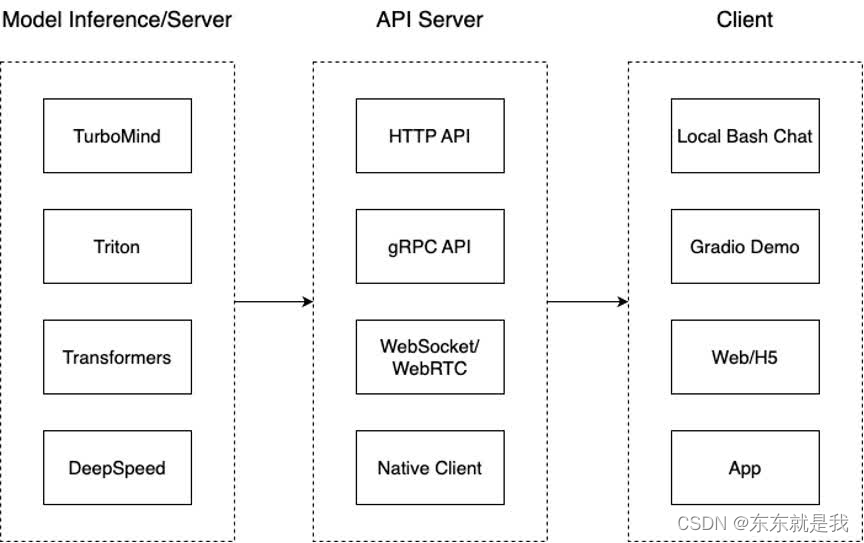
1.Spring整体架构分析 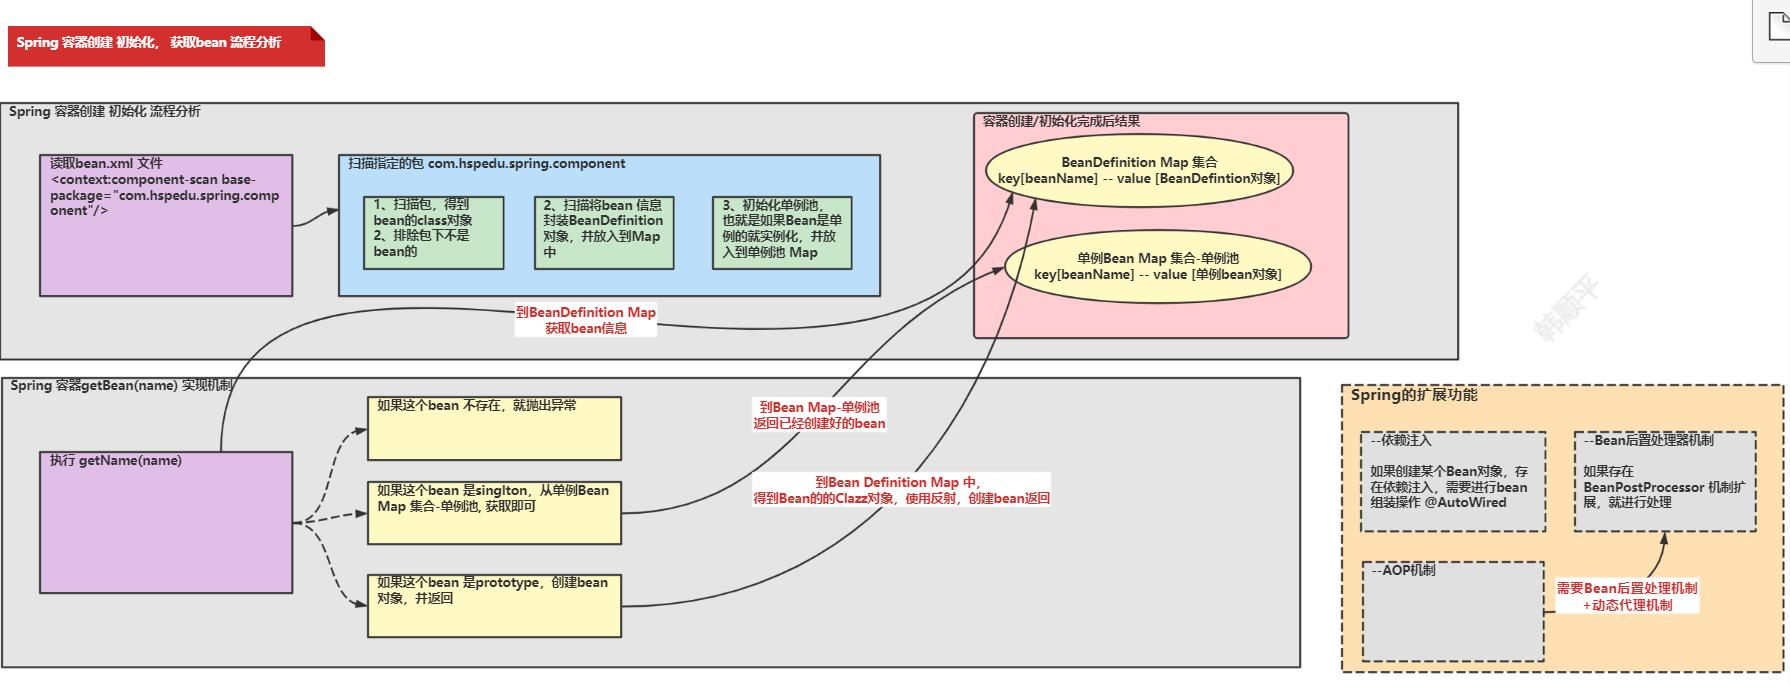
2. 阶段1框架图
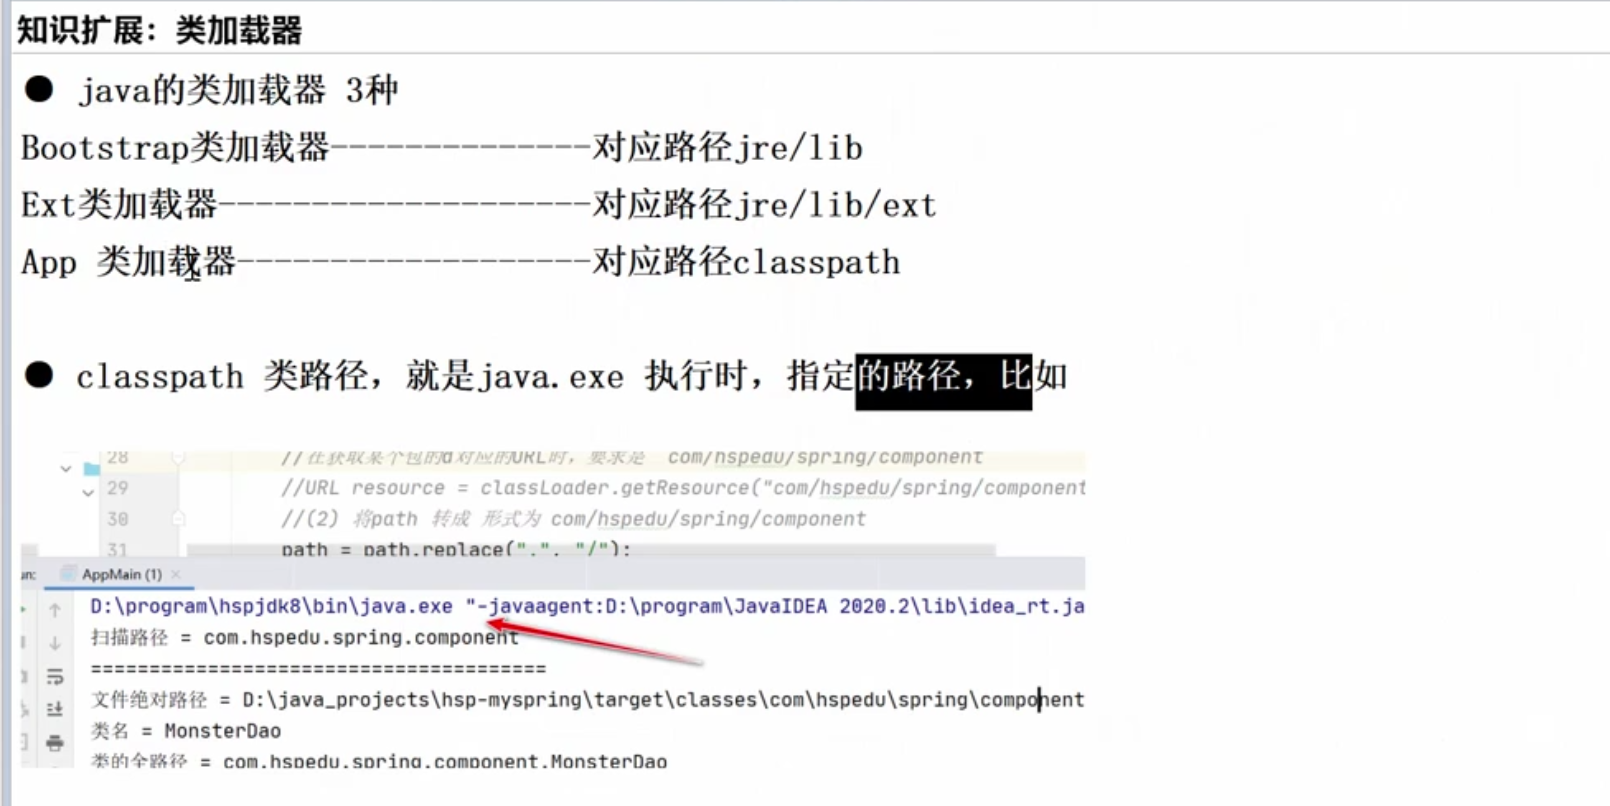
3.二说类加载器

4.代码实现
1.环境搭建
1.创建新模块

2.将新模块放在与当前模块并行的位置(location里自己看)
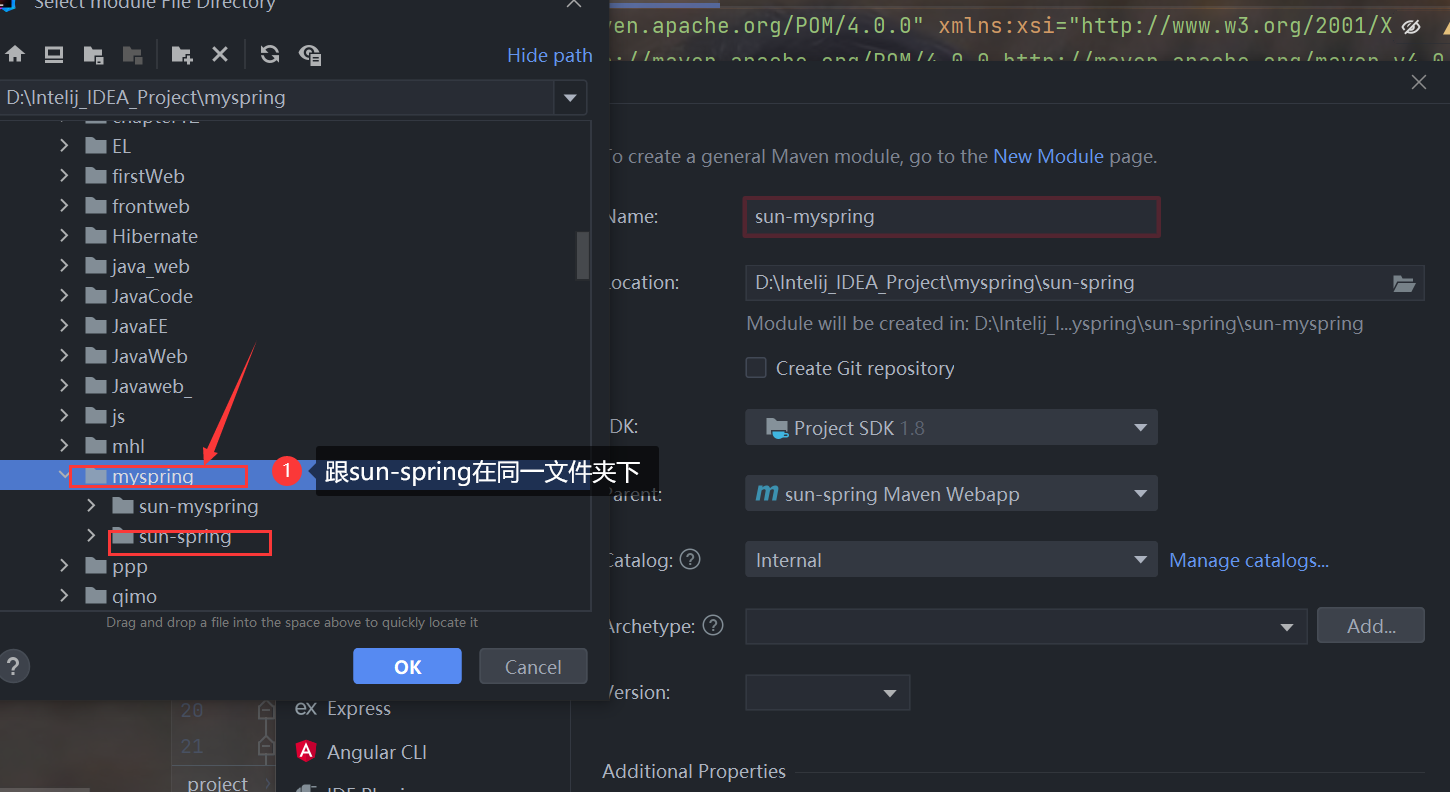
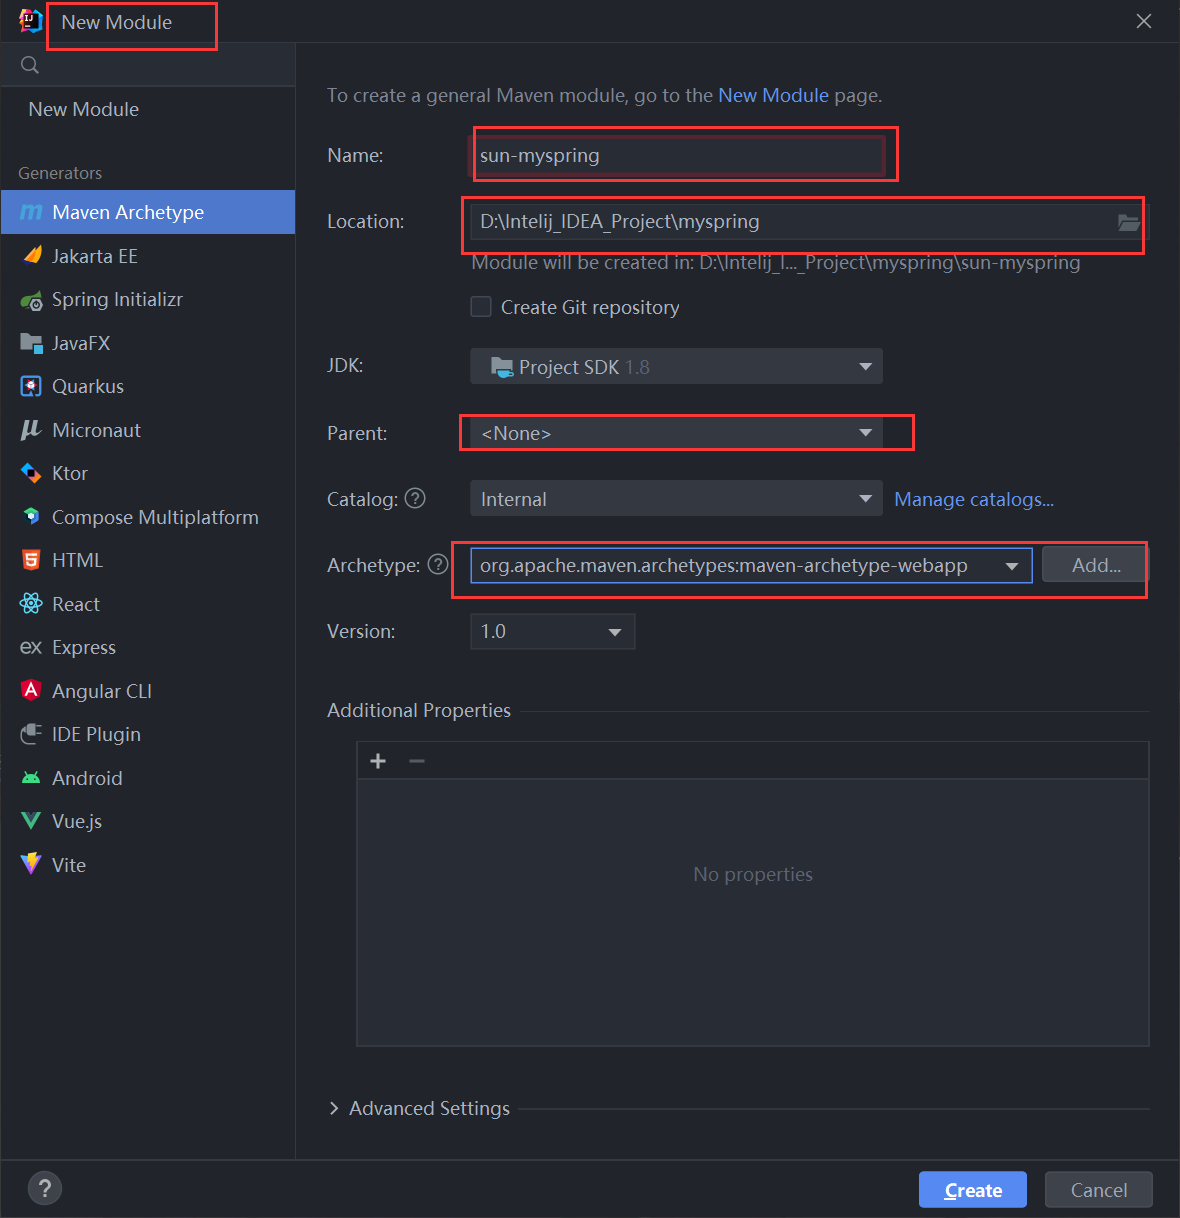
3.成功创建!

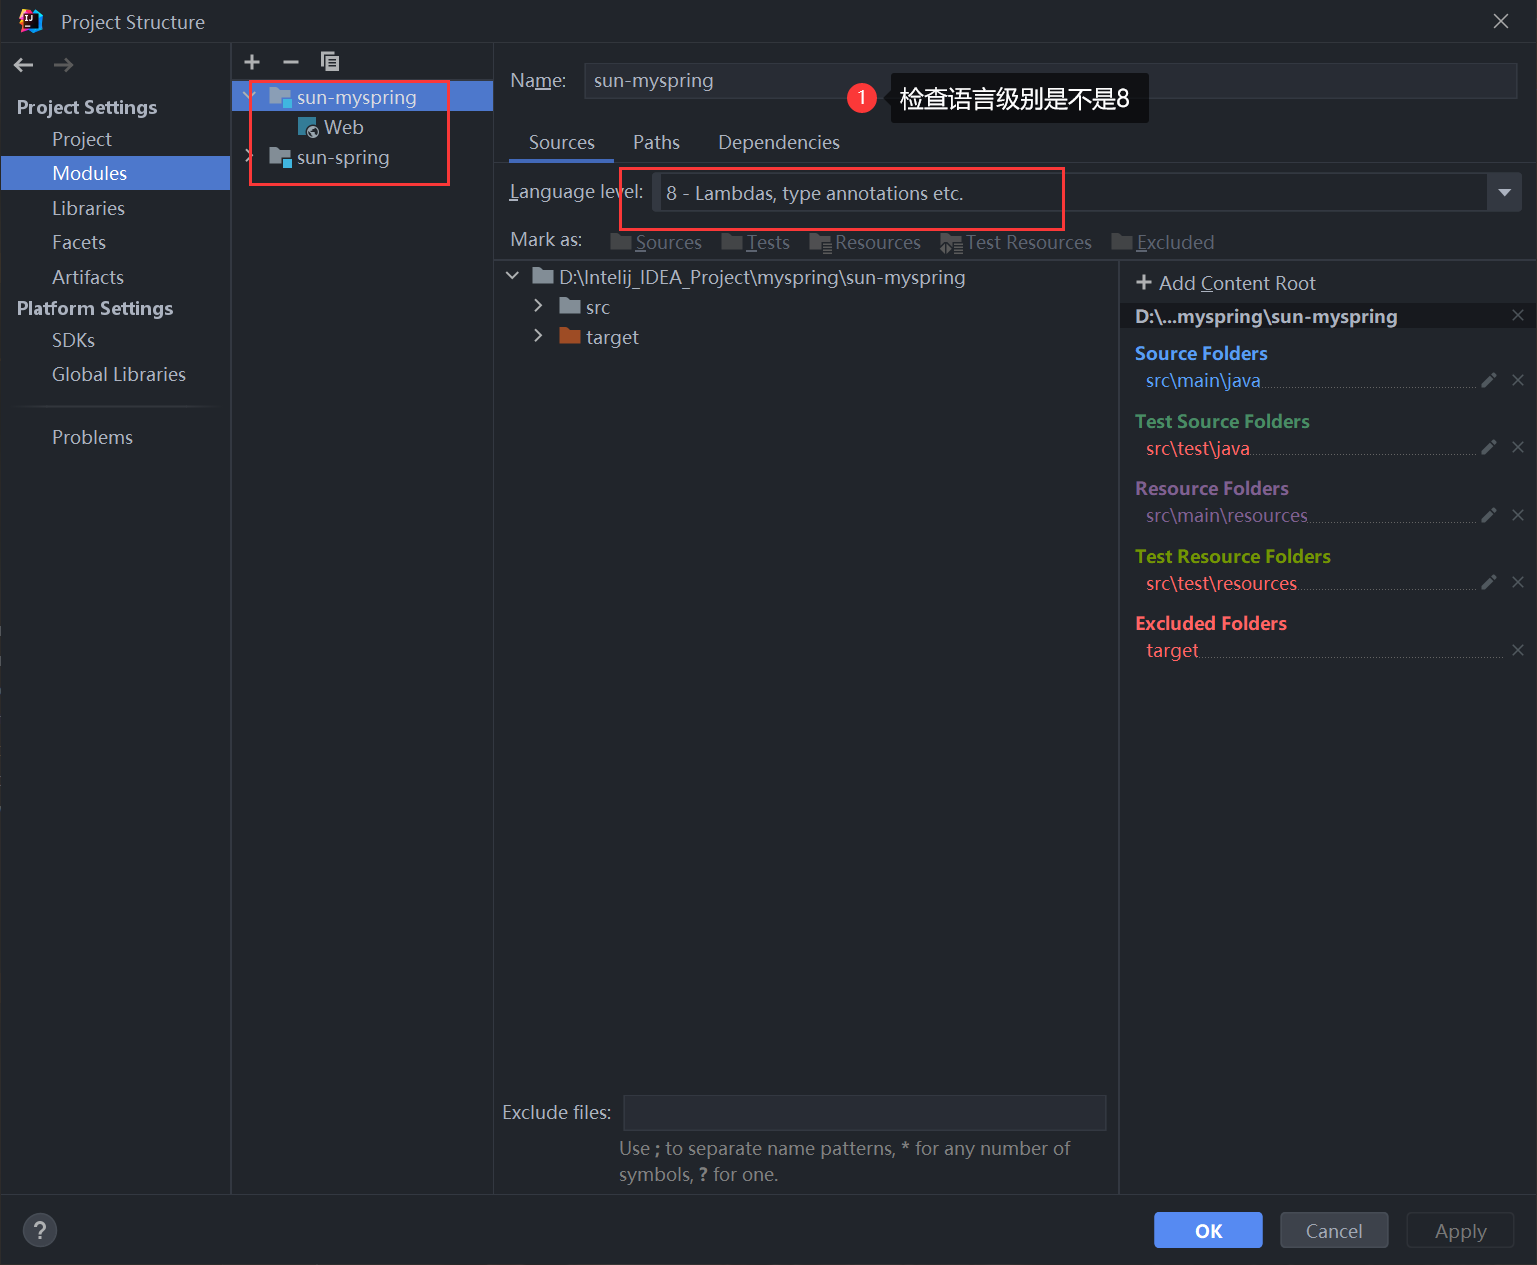
4.修改语言级别

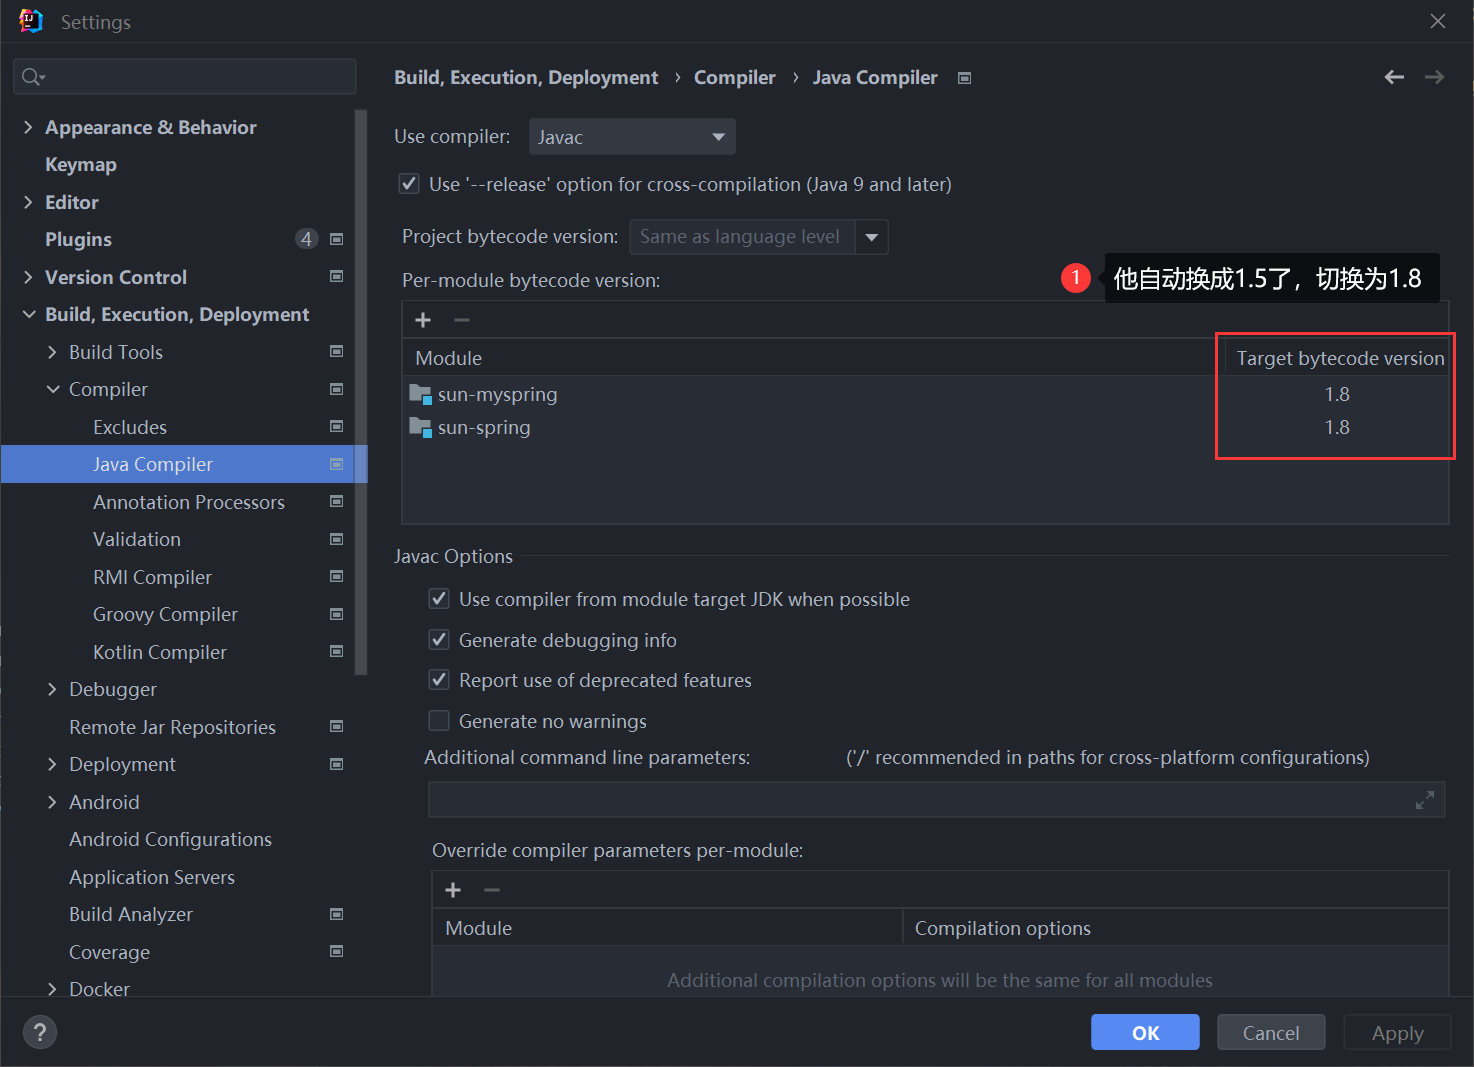
5.解决启动错误
这个错误是版本问题

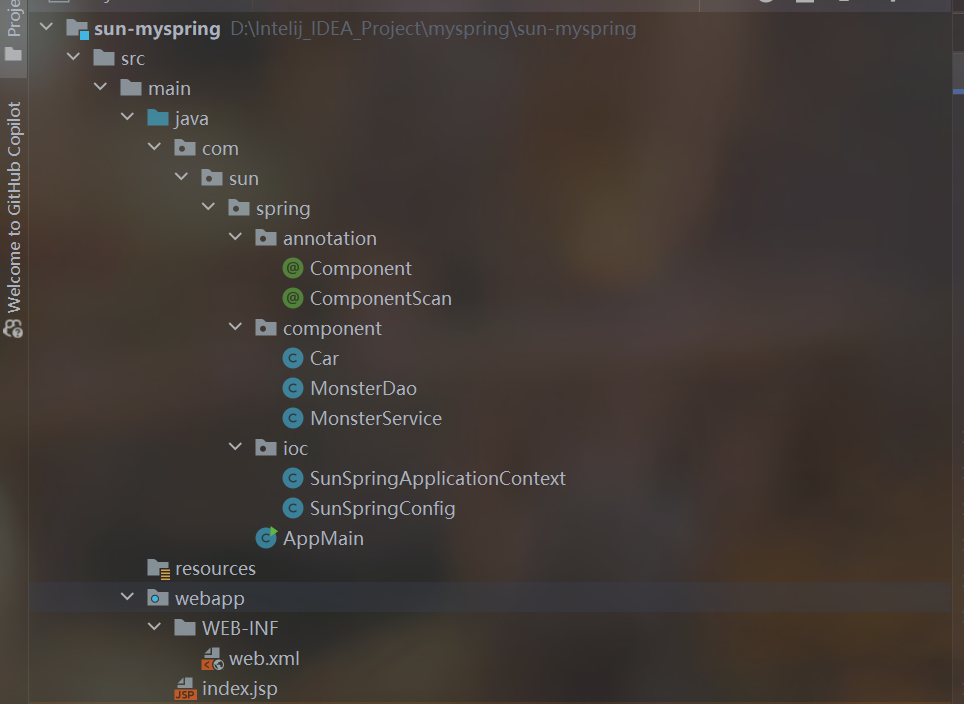
2.文件目录
3.自定义扫描注解,指定要扫描的包ComponentScan.java
package com.sun.spring.annotation;

import java.lang.annotation.ElementType;
import java.lang.annotation.Retention;
import java.lang.annotation.RetentionPolicy;
import java.lang.annotation.Target;

/**
 * 容器扫描的注解:通过value可以指定要扫描的包
 */
@Target(ElementType.TYPE)
@Retention(RetentionPolicy.RUNTIME)
public @interface ComponentScan {
    String value() default "";
}
4.自定义Component注解,Component.java
package com.sun.spring.annotation;

import java.lang.annotation.ElementType;
import java.lang.annotation.Retention;
import java.lang.annotation.RetentionPolicy;
import java.lang.annotation.Target;

/**
 * 组件注解:指定要自动创建bean对象的类,还可以自定义value作为创建bean对象的id
 *
 * @author 孙显圣
 * @version 1.0
 */
@Target(ElementType.TYPE)
@Retention(RetentionPolicy.RUNTIME)
public @interface Component {
    String value() default "";
}
5.三个测试组件
1.Car.java
package com.sun.spring.component;

/**
 * @author 孙显圣
 * @version 1.0
 */
//没有加Component注解
public class Car {
}
2.MonsterDao.java
package com.sun.spring.component;

import com.sun.spring.annotation.Component;

/**
 * @author 孙显圣
 * @version 1.0
 */
@Component(value = "monsterDao")
public class MonsterDao {
}
3.MonsterService.java
package com.sun.spring.component;

import com.sun.spring.annotation.Component;

/**
 * @author 孙显圣
 * @version 1.0
 */

//自定义注解,自动反射创建bean对象,如果指定了value则id为value否则为首字母小写
@Component(value = "monsterService")
public class MonsterService {
}
6.自定义spring容器SunSpringApplicationContext.java
package com.sun.spring.ioc;
import com.sun.spring.annotation.Component;
import com.sun.spring.annotation.ComponentScan;
import java.io.File;
import java.net.URL;
/**
* 类似于Spring原生的ioc容器
*
* @author 孙显圣
* @version 1.0
*/
public class SunSpringApplicationContext {
//传进来一个配置类的Class对象
private Class configClass;
//构造器,接收配置类的class对象
public SunSpringApplicationContext(Class configClass) throws ClassNotFoundException, InstantiationException, IllegalAccessException {
this.configClass = configClass;
//一、获取要扫描的包
//1.首先反射获取类的注解信息
ComponentScan componentScan = (ComponentScan) this.configClass.getDeclaredAnnotation(ComponentScan.class);
//2.通过注解来获取要扫描的包的路径
String path = componentScan.value();
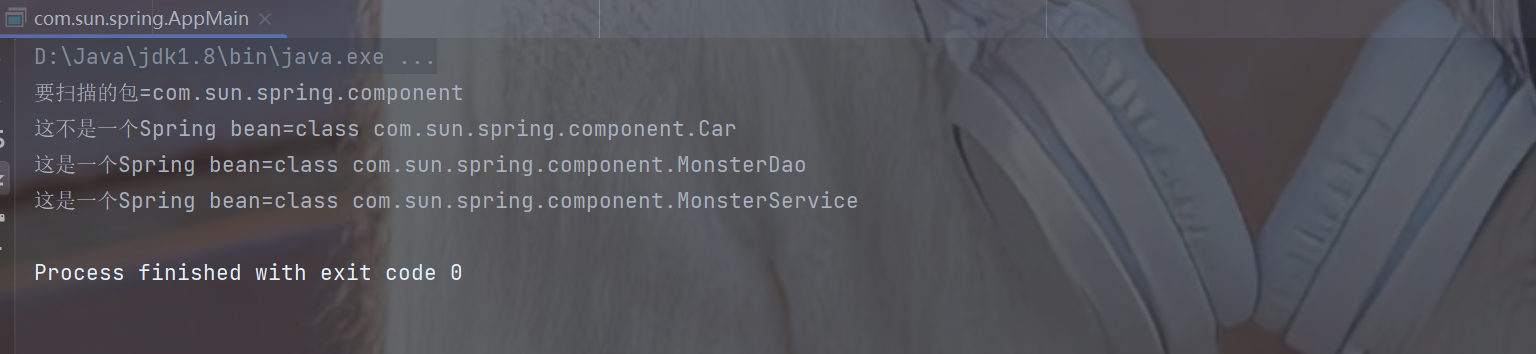
System.out.println("要扫描的包=" + path);
//二、得到要扫描包的.class文件对象,从而得到全路径进行反射
//1.获取类加载器
ClassLoader classLoader = SunSpringApplicationContext.class.getClassLoader();
//2.获取要扫描包的真实路径,默认刚开始在根目录下
path = path.replace(".", "/");
URL resource = classLoader.getResource(path);
//3.由该路径创建一个文件对象,可使用resource.getFile()将URL类型转化为String类型
File file = new File(resource.getFile());
//4.遍历该文件夹下的所有.class文件对象
if (file.isDirectory()) {
File[] files = file.listFiles();
for (File f : files) {
//反射注入容器
//1.获取所有文件的绝对路径
String absolutePath = f.getAbsolutePath();
//只处理class文件
if (absolutePath.endsWith(".class")) {
//2.分割出类名
String className = absolutePath.substring(absolutePath.lastIndexOf("\\") + 1, absolutePath.indexOf("."));
//3.得到全路径
String fullPath = path.replace("/", ".") + "." + className;
//4.判断是否需要注入容器,查看有没有自定义的注解Component
Class<?> aClass = classLoader.loadClass(fullPath);
//如果该类使用了注解Component则说明是一个spring bean
if (aClass.isAnnotationPresent(Component.class)) {
System.out.println("这是一个Spring bean=" + aClass);
} else {
System.out.println("这不是一个Spring bean=" + aClass);
}
}
}
}
}
//返回容器中的对象
public Object getBean(String name) {
return null;
}
}
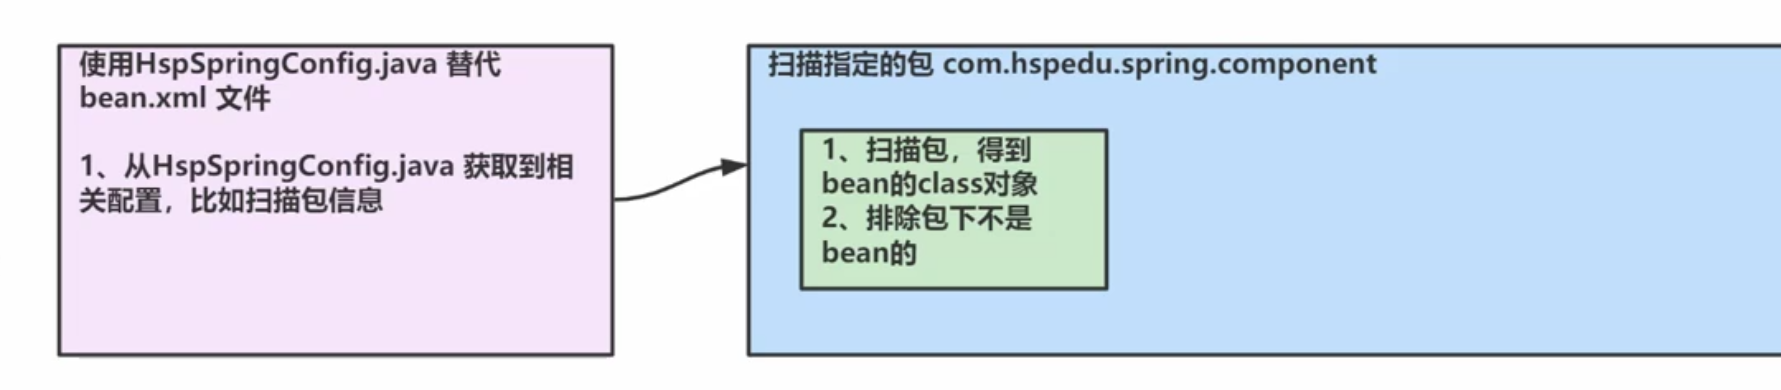
7.自定义配置类(跟自定义扫描注解一起使用,相当于原来的配置文件)SunSpringConfig.java
package com.sun.spring.ioc;

import com.sun.spring.annotation.ComponentScan;

/**
 * 相当于原来的xml配置文件
 * @author 孙显圣
 * @version 1.0
 */
@ComponentScan(value = "com.sun.spring.component") //自定义注解:指定要扫描的包
public class SunSpringConfig {

}
8.启动类AppMain.java
package com.sun.spring;

import com.sun.spring.ioc.SunSpringApplicationContext;
import com.sun.spring.ioc.SunSpringConfig;

/**
 * @author 孙显圣
 * @version 1.0
 */
public class AppMain {
    public static void main(String[] args) throws ClassNotFoundException, InstantiationException, IllegalAccessException {
        //
        SunSpringApplicationContext ioc = new SunSpringApplicationContext(SunSpringConfig.class);

    }
}
9.执行结果
5.当前阶段完成的任务
- 自定义扫描注解和自定义配置类充当配置文件,value存储需要扫描的包
- 自定义Component注解,用于指定需要自动创建bean对象的类
- 自定义Spring容器,当容器启动时,创建容器对象传入容器的配置类的Class对象,容器通过构造方法,获取配置类的注解信息,得到要扫描的包的全路径,然后进行一些操作得到这个包下面的所有类的全路径