什么是沙盒实例?
沙盒实例仅适用于出于测试目的在本地计算机上部署和运行,可以与 InnoDB Cluster 、 InnoDB ClusterSet 和 InnoDB ReplicaSet 一起工作。
如何使用部署沙盒的 API 函数?
-
语法
-
dba.deploySandboxInstance(port[, options])
解释
-
- port:新实例将侦听连接的端口,必须参数。
- options:包含影响新部署实例的选项的字典,可选参数。
支持以下选项:
sandboxDir:将部署新实例的路径。allowRootFrom:配置root用户可以从哪个主机连接。默认为root@%。ignoreSslError:在沙盒实例上配置安全连接。当ignoreSslError为true(这是默认值)时,如果无法提供 SSL 支持并且部署服务器实例时没有 SSL 支持,则在操作期间不会发出错误。当ignoreSslError设置为false时,沙盒实例将部署 SSL 支持,如果无法配置 SSL 支持,将发出错误。mysqldOptions:在沙盒实例上配置其他选项。默认为空字符串,并接受指定选项和值的字符串列表。例如mysqldOptions: ["lower_case_table_names=1", "report_host="10.1.2.3"]}。指定的选项将写入沙盒实例的选项文件。portX:配置用于 X 协议 连接的端口。默认值通过将端口值乘以 10 来计算。该值是介于 1024 和 65535 之间的整数。password:新实例上的 MySQLroot用户的密码。
牛刀小试:部署一个沙盒实例
执行 mysqlsh 打开 MySQL Shell 交互模式:
[root@natnet-source ~]$ mysqlsh
MySQL Shell 8.0.31

Copyright (c) 2016, 2022, Oracle and/or its affiliates.
Oracle is a registered trademark of Oracle Corporation and/or its affiliates.
Other names may be trademarks of their respective owners.

Type '\help' or '\?' for help; '\quit' to exit.
执行dba.deploySandboxInstance(3310)在本地部署一个使用端口 3310 的 MySQL 实例。
 MySQL  JS > dba.deploySandboxInstance(3310)
A new MySQL sandbox instance will be created on this host in
/root/mysql-sandboxes/3310

Warning: Sandbox instances are only suitable for deploying and
running on your local machine for testing purposes and are not
accessible from external networks.

Please enter a MySQL root password for the new instance: ***********

Deploying new MySQL instance...

Instance localhost:3310 successfully deployed and started.
Use shell.connect('root@localhost:3310') to connect to the instance.

 MySQL  JS >
部署一个 InnoDB Cluster
1. 先创建三个新实例
此处,我复用了上面创建的 MySQL 沙盒实例 3310 。
然后,重复部署使用端口 3310 的 MySQL 实例的操作,再部署两个分别使用端口 3320 和 3330 的 MySQL 实例。
 MySQL  JS > dba.deploySandboxInstance(3320);
A new MySQL sandbox instance will be created on this host in
/root/mysql-sandboxes/3320

Warning: Sandbox instances are only suitable for deploying and
running on your local machine for testing purposes and are not
accessible from external networks.

Please enter a MySQL root password for the new instance: ***********

Deploying new MySQL instance...

Instance localhost:3320 successfully deployed and started.
Use shell.connect('root@localhost:3320') to connect to the instance.

 MySQL  JS > dba.deploySandboxInstance(3330);
A new MySQL sandbox instance will be created on this host in
/root/mysql-sandboxes/3330

Warning: Sandbox instances are only suitable for deploying and
running on your local machine for testing purposes and are not
accessible from external networks.

Please enter a MySQL root password for the new instance: ***********

Deploying new MySQL instance...

Instance localhost:3330 successfully deployed and started.
Use shell.connect('root@localhost:3330') to connect to the instance.
2. 创建集群(InnoDB Cluster)实例
2.1 连接到 MySQL 沙盒实例 3310 ,以它作为将要创建的集群的主实例。
mysql-js> shell.connect('root@localhost:3310')

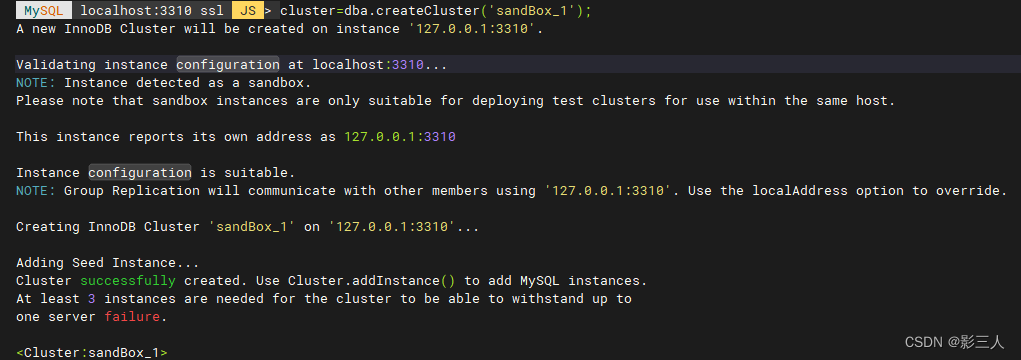
2.2 创建集群实例
创建集群实例 sandBox_1 ,并赋值给变量cluster:
MySQL localhost:3310 ssl JS > cluster=dba.createCluster('sandBox_1');
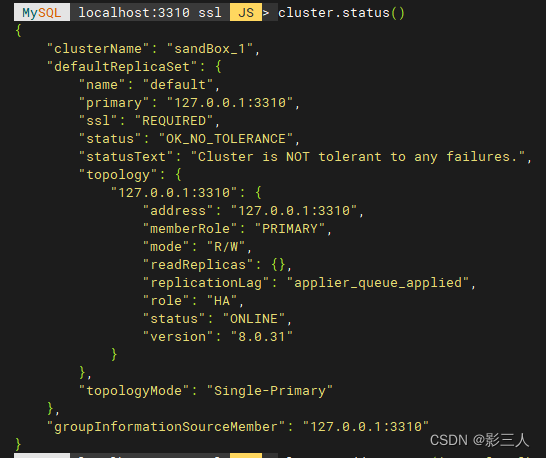
3. 查看集群状态
MySQL localhost:3310 ssl JS > cluster.status()
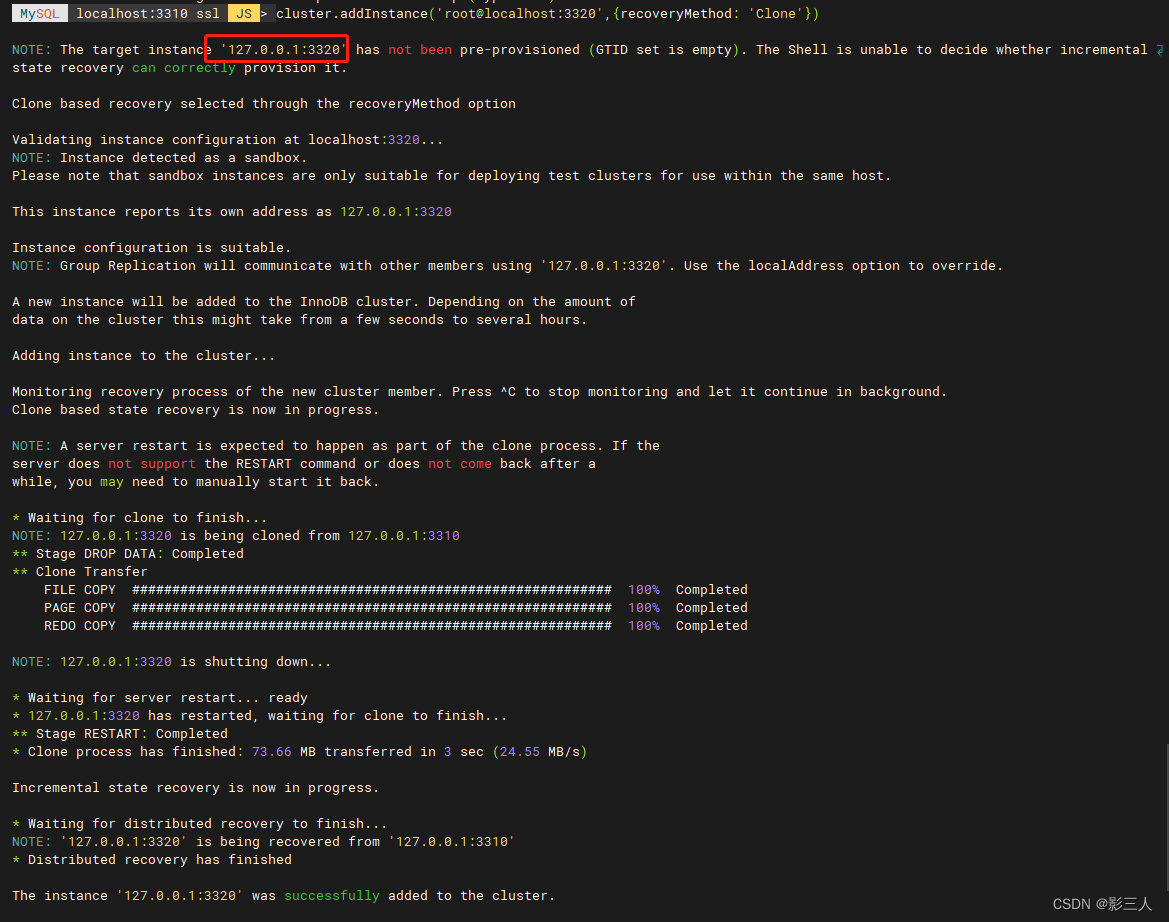
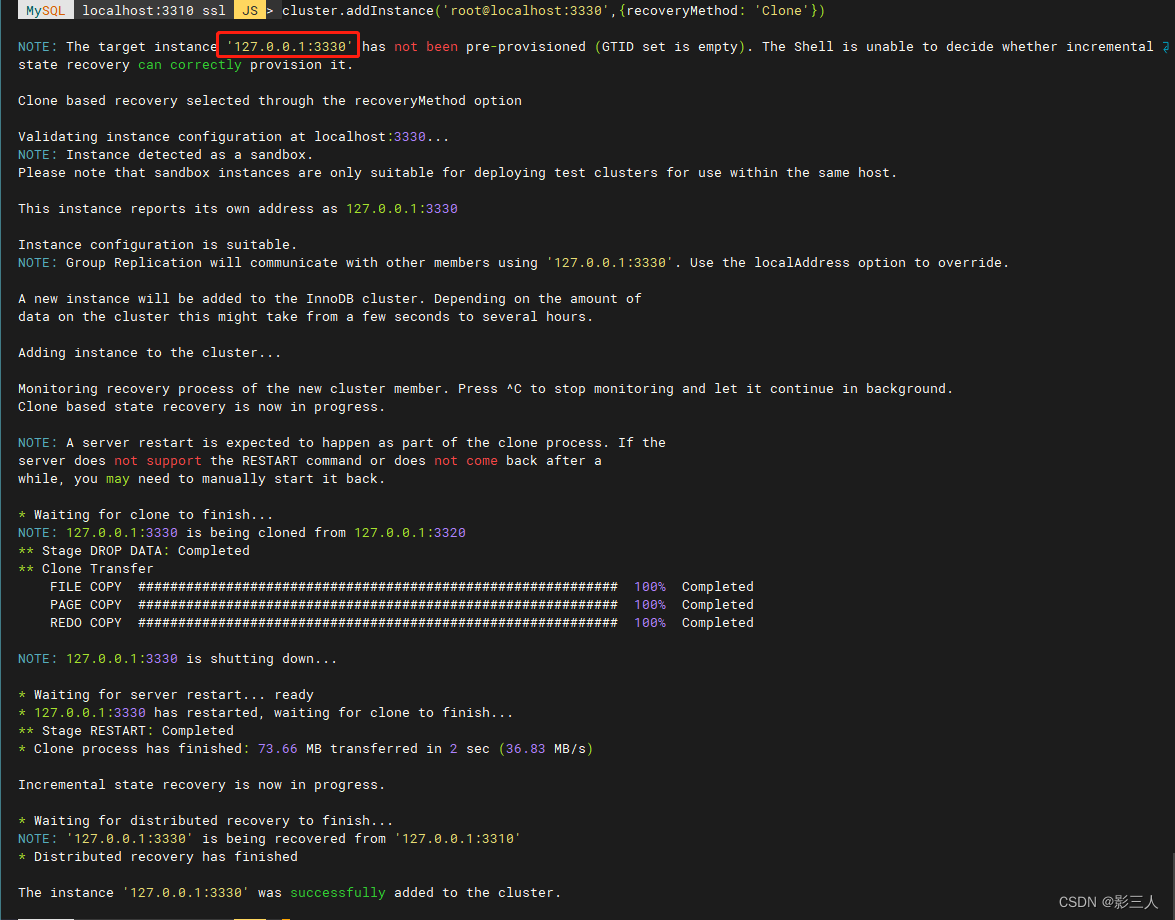
4. 向集群中加入其他两个实例
此处采用克隆的恢复方式将其他两个实例加入到集群实例 sandBox_1 内。
 MySQL  localhost:3310 ssl  JS > cluster.addInstance('root@localhost:3320',{recoveryMethod: 'Clone'})
 MySQL  localhost:3310 ssl  JS > cluster.addInstance('root@localhost:3330',{recoveryMethod: 'Clone'})
5. 再次查看集群状态
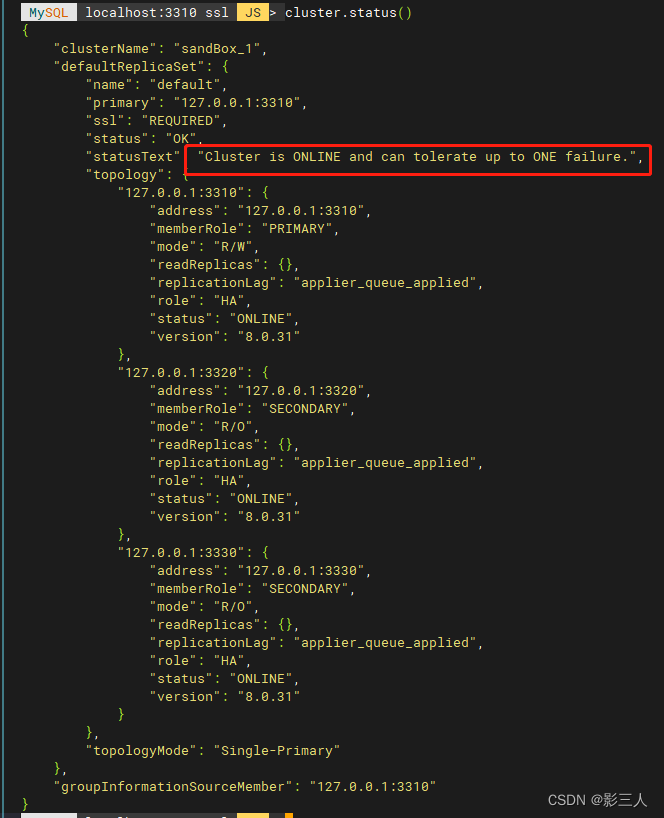
MySQL localhost:3310 ssl JS > cluster.status()
显示状态如下即表示使用沙盒实例创建 InnoDB Cluster 成功!
引导 MySQL Router
指定/lib/mysqlrouter为 MySQL Router 的存储目录。
[root@natnet-source mysqlrouter]$ mysqlrouter --bootstrap root@localhost:3310 -d /lib/mysqlrouter --user=mysqlrouter --force
[root@natnet-source mysqlrouter]$ /lib/mysqlrouter/start.sh
PID 15524 written to '/usr/lib/mysqlrouter/mysqlrouter.pid'
stopping to log to the console. Continuing to log to filelog

[root@natnet-source mysqlrouter]$ ps -ef|grep mysqlrouter
root     15522     1  0 17:10 pts/2    00:00:00 sudo ROUTER_PID=/usr/lib/mysqlrouter/mysqlrouter.pid /usr/bin/mysqlrouter -c /usr/lib/mysqlrouter/mysqlrouter.conf --user=mysqlrouter
mysqlro+ 15524 15522  5 17:10 pts/2    00:00:00 /usr/bin/mysqlrouter -c /usr/lib/mysqlrouter/mysqlrouter.conf --user=mysqlrouter
root     15550 14468  0 17:10 pts/2    00:00:00 grep --color=auto mysqlrouter
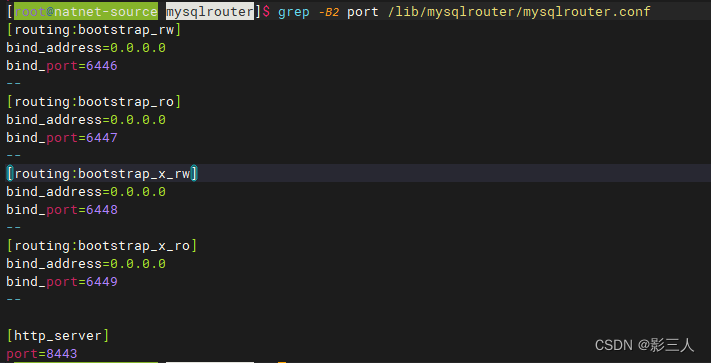
查看 MySQL Router
[root@natnet-source mysqlrouter]$ grep -B2 port /lib/mysqlrouter/mysqlrouter.conf
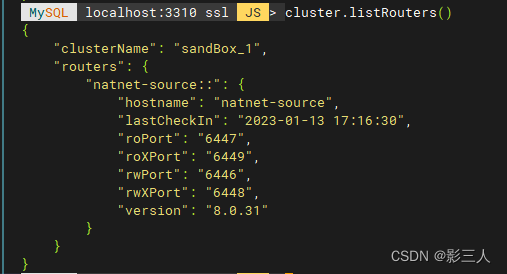
cluster.listRouters()
测试 MySQL Router 配置
测试路由器的各个端口( 6446 ~ 6449 )。
[root@natnet-source ~]$ mysqlsh --sql root@localhost:6446 -e 'select @@port;'
@@port
3310
[root@natnet-source ~]$ mysqlsh --sql root@localhost:6447 -e 'select @@port;'
@@port
3330
[root@natnet-source ~]$ mysqlsh --sql root@localhost:6447 -e 'select @@port;'
@@port
3330
[root@natnet-source ~]$ mysqlsh --sql root@localhost:6448 -e 'select @@port;'
@@port
3310
[root@natnet-source ~]$ mysqlsh --sql root@localhost:6449 -e 'select @@port;'
@@port
3320
[root@natnet-source ~]$ mysqlsh --sql root@localhost:6449 -e 'select @@port;'
@@port
3330
这里不知道为什么在使用 Classic MySQL 协议 的 6447 时总是连接到 3330 实例,按理说应该时轮询的,默认使用的是round-robin-with-fallback 。而使用 MySQL X 协议 的只读端口 6649 就可以轮询。
然后使用dba.killSandboxInstance()函数来关闭 MySQL Server 实例,模拟实例宕机故障,测试高可用性、容错能力和自动路由切换功能。
 MySQL  localhost:3310 ssl  JS > dba.killSandboxInstance(3310)

Killing MySQL instance...

Instance localhost:3310 successfully killed.

 MySQL  localhost:3310 ssl  JS > shell.connect('root@localhost:3320')
Creating a session to 'root@localhost:3320'
Fetching schema names for auto-completion... Press ^C to stop.
Closing old connection...
Your MySQL connection id is 760
Server version: 8.0.31 MySQL Community Server - GPL
No default schema selected; type \use <schema> to set one.
<ClassicSession:root@localhost:3320>
 MySQL  localhost:3320 ssl  JS > cluster=dba.getCluster()
<Cluster:sandBox_1>
 MySQL  localhost:3320 ssl  JS > cluster.status()
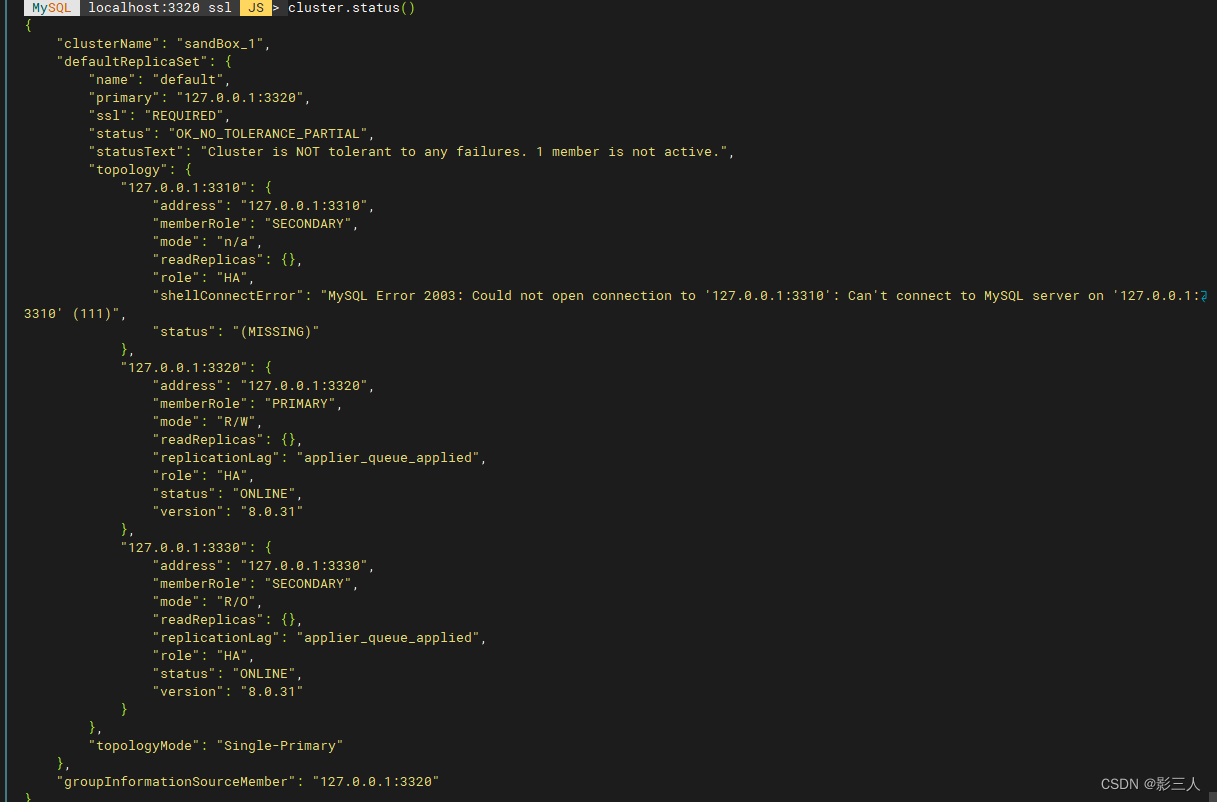
可见,3320 实例成了新的主实例。
执行 SQL 查看 6646 端口会路由到哪个实例。
[root@natnet-source mysqlrouter]$ mysqlsh --sql root@localhost:6446 -e 'select @@port;'
@@port
3320
可见,路由进行了自动切换到新主。
其他
使用沙盒实例部署 InnoDB ClusterSet 、InnoDB ReplicaSet 请参阅我之前写的生产环境部署 InnoDB ClusterSet 、InnoDB ReplicaSet 文章,并结合本文,即可成功部署。相信聪明的你,一定能玩明白!
更多有关 MySQL Shell 沙盒实例的信息,请参阅 6.8 AdminAPI MySQL 沙盒 。


![LeetCode[295]数据流的中位数](https://img-blog.csdnimg.cn/img_convert/def2872e75a34ee9a738fabbf5603e7d.png)


