NIO学习

news2024/11/27 12:44:00

文章目录

  • 前言
  • 一、主要模块
  • 二、使用步骤
    • 1.服务器端
    • 2.客户端
  • 三、NIO零拷贝(推荐)
  • 四、NIO另一种copy
  • 总结


前言

NIO是JDK1.4版本带来的功能,区别于以往的BIO编程,同步非阻塞极大的节省资源开销,避免了线程切换和上下文切换带来的资源浪费。


一、主要模块

  1. Selector:选择器,为事件驱动,做中央调度使用,一个选择器可以注册多个channel;
  2. Channel:通道,信息流通;支持读取和写入数据,一个通道可以有多个Buffer;
  3. Buffer:缓存区,存放数据,支持读取和写入的切换;

二、使用步骤

1.服务器端

代码如下(示例):

package nio;
 
import java.io.IOException;
import java.net.InetSocketAddress;
import java.nio.ByteBuffer;
import java.nio.channels.SelectionKey;
import java.nio.channels.Selector;
import java.nio.channels.ServerSocketChannel;
import java.nio.channels.SocketChannel;
import java.time.LocalDateTime;
import java.time.format.DateTimeFormatter;
import java.util.Iterator;
import java.util.Set;
 
/**
 * Create by zjg on 2022/9/11
 */
public class NIOServer {
    public static void main(String[] args) {
        try {
            ServerSocketChannel serverSocketChannel = ServerSocketChannel.open();
            serverSocketChannel.configureBlocking(false);
            serverSocketChannel.bind(new InetSocketAddress(6666));
            Selector selector =Selector.open();
            serverSocketChannel.register(selector, SelectionKey.OP_ACCEPT);
            while(true){
                if(selector.select(10000)==0){
                    System.out.println("没有接收到监听事件");
                    continue;
                }
                Set<SelectionKey> selectionKeys = selector.selectedKeys();
                Iterator<SelectionKey> iterator = selectionKeys.iterator();
                while (iterator.hasNext()){
                    SelectionKey selectionKey = iterator.next();
                    if(selectionKey.isAcceptable()){
                        System.out.println("获取到新的连接");
                        SocketChannel socketChannel = serverSocketChannel.accept();
                        socketChannel.configureBlocking(false);
                        socketChannel.register(selector,SelectionKey.OP_READ,ByteBuffer.allocate(1024));
                    }
                    if(selectionKey.isReadable()){
                        SocketChannel socketChannel = (SocketChannel)selectionKey.channel();
                        ByteBuffer byteBuffer = (ByteBuffer) selectionKey.attachment();
                        int read = socketChannel.read(byteBuffer);
                        if(read==-1){
                            selectionKey.cancel();
                        }else{
                            String req=new String(byteBuffer.array()).trim();
                            System.out.println("nio客户端说:"+req);
                            String res= "服务器响应["+LocalDateTime.now().format(DateTimeFormatter.ISO_DATE)+" "+LocalDateTime.now().format(DateTimeFormatter.ISO_TIME)+"]:"+req;
                            System.out.println(res);
                            socketChannel.write(ByteBuffer.wrap(res.getBytes()));
                        }
                    }
                    iterator.remove();
                }
            }
        } catch (IOException e) {
            e.printStackTrace();
        }
    }
}

在这里插入图片描述

2.客户端

代码如下(示例):

package nio;
 
import java.io.IOException;
import java.net.InetSocketAddress;
import java.nio.ByteBuffer;
import java.nio.channels.SocketChannel;
 
/**
 * Create by zjg on 2022/9/11
 */
public class NIOClient {
    public static void main(String[] args) {
        try {
            SocketChannel socketChannel = SocketChannel.open();
            socketChannel.configureBlocking(false);
            InetSocketAddress inetSocketAddress = new InetSocketAddress("127.0.0.1", 6666);
            if(!socketChannel.connect(inetSocketAddress)){
                while (!socketChannel.finishConnect()){
                    System.out.println("等待连接完成!");
                }
            }
            String message="向往自由!";
            ByteBuffer byteBuffer = ByteBuffer.wrap(message.getBytes());
            socketChannel.write(byteBuffer);
            System.out.println("请求完成!");
            ByteBuffer allocate = ByteBuffer.allocate(1024);
            while (true){
                int read = socketChannel.read(allocate);
                if(read==0){
                    continue;
                }
                System.out.println("---"+new String(allocate.array()).trim());
                socketChannel.close();
                break;
            }
        } catch (IOException e) {
            e.printStackTrace();
        }
    }
}

在这里插入图片描述

三、NIO零拷贝(推荐)

package nio;
 
import java.io.File;
import java.io.FileInputStream;
import java.io.FileNotFoundException;
import java.io.FileOutputStream;
import java.io.IOException;
import java.nio.channels.FileChannel;
 
/**
 * Create by zjg on 2022/9/11
 */
public class NIOZeroCopy {
    public static void main(String[] args) {
        FileChannel src = null;
        FileChannel dest = null;
        try {
            src=new FileInputStream("2.txt").getChannel();
            dest=new FileOutputStream("3.txt").getChannel();
            long start = System.currentTimeMillis();
            src.transferTo(0,src.size(),dest);
            long end = System.currentTimeMillis();
            System.out.println("copy完成,共"+src.size()+"byte,用时"+(end-start)+"毫秒");
        } catch (FileNotFoundException e) {
            e.printStackTrace();
        } catch (IOException e) {
            e.printStackTrace();
        }finally {
            if(src!=null){
                try {
                    src.close();
                } catch (IOException e) {
                    e.printStackTrace();
                }
            }
            if(dest!=null){
                try {
                    dest.close();
                } catch (IOException e) {
                    e.printStackTrace();
                }
            }
        }
    }
}
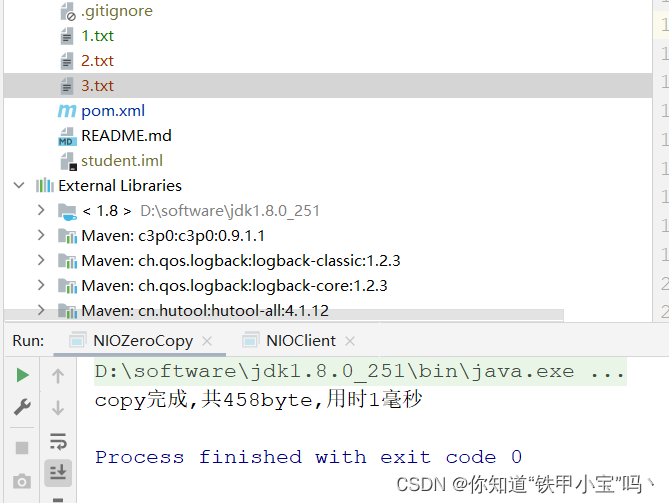
在这里插入图片描述

四、NIO另一种copy

package nio;
 
import java.io.File;
import java.io.IOException;
import java.nio.file.Files;
 
/**
 * Create by zjg on 2022/9/18
 */
public class NIOTest {
    public static void main(String[] args) {
        File source=new File("2.txt");
        File target=new File("4.txt");
        try {
            long start = System.currentTimeMillis();
            Files.copy(source.toPath(),target.toPath());
            long end = System.currentTimeMillis();
            System.out.println("copy完成,共"+source.length()+"byte,用时"+(end-start)+"毫秒");
        } catch (IOException e) {
            e.printStackTrace();
        }
    }
}

在这里插入图片描述
效率稍微慢点,用起来简单。


总结

回到顶部
刚开始写,请大佬指点。
本文来自互联网用户投稿,该文观点仅代表作者本人,不代表本站立场。本站仅提供信息存储空间服务,不拥有所有权,不承担相关法律责任。如若转载,请注明出处:http://www.coloradmin.cn/o/1599684.html

如若内容造成侵权/违法违规/事实不符,请联系多彩编程网进行投诉反馈,一经查实,立即删除!

相关文章

C++设计模式|创建型 2.工厂模式

1.简单工厂思想 简单工厂模式不属于23种设计模式之⼀&#xff0c;更多的是⼀种编程习惯。它的核心思想是将产品的创建过程封装在⼀个⼯⼚类中&#xff0c;把创建对象的流程集中在这个⼯⼚类⾥⾯。卡码网将其结构描述为下图所示的情况&#xff1a; 简单⼯⼚模式包括三个主要⻆⾊…

【STL详解 —— priority_queue的使用与模拟实现】

STL详解 —— priority_queue的使用与模拟实现 priority_queue的使用priority_queue的介绍priority_queue的定义方式priority_queue各个接口的使用 priority_queue的模拟实现仿函数priority_queue的模拟实现 priority_queue的使用 priority_queue的介绍 std::priority_queue 是…

基于Echarts的超市销售可视化分析系统(数据+程序+论文

本论文旨在研究Python技术和ECharts可视化技术在超市销售数据分析系统中的应用。本系统通过对超市销售数据进行分析和可视化展示&#xff0c;帮助决策层更好地了解销售情况和趋势&#xff0c;进而做出更有针对性的决策。本系统主要包括数据处理、数据可视化和系统测试三个模块。…

专项1:理论横向误差计算

1.前言 车辆实际位置与轨迹要求的位置的误差大小是反映自动驾驶控制精度的关键性指标&#xff0c;也是作为控制系统的输入量。在对车辆的控制算法进行研究时候&#xff0c;首先需要厘清控制系统的输入。控制系统的输入的关键性环节就是笛卡尔坐标系和frent坐标系之间的转换。 …

【进阶篇】四、字节码增强框架:ASM、ByteBuddy

文章目录 1、ASM2、ASM字节码增强3、ASM入门案例4、ASM Java Agent实现增强类的方法5、Byte Buddy6、Byte Buddy案例 相比自己的代码里用Spring AOP添加某些功能&#xff0c;字节码增强更适配无侵入式的Java Agent场景。比如下面写个Java Agent打印 任意Java程序中方法执行的…

电商技术揭秘九:搜索引擎中的SEO数据分析与效果评估

相关系列文章 电商技术揭秘一&#xff1a;电商架构设计与核心技术 电商技术揭秘二&#xff1a;电商平台推荐系统的实现与优化 电商技术揭秘三&#xff1a;电商平台的支付与结算系统 电商技术揭秘四&#xff1a;电商平台的物流管理系统 电商技术揭秘五&#xff1a;电商平台的个性…

DC-3渗透测试复现

DC-3渗透测试复现 目的&#xff1a; 获取最高权限以及5个flag 过程&#xff1a; 信息打点-sql注入-反弹shell- pkexec提权&#xff08;CVE-2021-4034&#xff09; 环境&#xff1a; 攻击机&#xff1a;kali(192.168.85.136) 靶机&#xff1a;DC_3(192.168.85.133) 复现…

记录一下hive跑spark的insert,update语句报类找不到的问题

我hive能正常启动&#xff0c;建表没问题&#xff0c;我建了一个student表&#xff0c;没问题&#xff0c;但执行了下面一条insert语句后报如下错误&#xff1a; hive (default)> insert into table student values(1,abc); Query ID atguigu_20240417184003_f9d459d7-199…

「每日跟读」英语常用句型公式 第13篇

「每日跟读」英语常用句型公式 第13篇 1. How was __? __怎么样&#xff1f; How was the concert last night? &#xff08;昨晚的音乐会怎么样&#xff1f;&#xff09; How was your trip to the museum? &#xff08;你去博物馆的旅行怎么样&#xff1f;&#xff09…

Rust腐蚀服务器修改背景和logo图片操作方法

Rust腐蚀服务器修改背景和logo图片操作方法 大家好我是艾西一个做服务器租用的网络架构师。在我们自己搭建的rust服务器游戏设定以及玩法都是完全按照自己的想法设定的&#xff0c;如果你是一个社区服那么对于进游戏的主页以及Logo肯定会有自己的想法。这个东西可以理解为做一…

嵌入式4-16

tftpd #include <myhead.h> #define SER_IP "192.168.125.243" //服务器IP地址 #define SER_PORT 69 //服务器端口号 #define CLI_IP "192.168.125.244" //客户端IP地址 #define CLI_PORT 8889 //客户端端…

MSQL DML数据操作语言

&#x1f339;作者主页&#xff1a;青花锁 &#x1f339;简介&#xff1a;Java领域优质创作者&#x1f3c6;、Java微服务架构公号作者&#x1f604; &#x1f339;简历模板、学习资料、面试题库、技术互助 &#x1f339;文末获取联系方式 &#x1f4dd; 往期热门专栏回顾 专栏…

【MogDB】在ORACLE和MogDB中查看存储过程出参游标数据的方式

一、前言 使用ORACLE作为数据库的应用软件中&#xff0c;偶尔会遇到使用游标作为出参的存储过程&#xff0c;这种存储过程迁移到MogDB并不需要进行改造&#xff0c;但是在开发这样的存储过程时&#xff0c;开发人员偶尔会想要在数据库中测试执行一下&#xff0c;看看游标中的数…

Fiddler安装与使用的深度解析

在现今的互联网开发领域&#xff0c;无论是前端开发、后端开发&#xff0c;还是移动应用开发&#xff0c;对HTTP协议的深入理解和应用都至关重要。而在这个过程中&#xff0c;一个强大的HTTP调试代理工具就显得尤为关键。Fiddler&#xff0c;作为一款功能强大的网络调试工具&am…

数据库练习(二)

建表 create table employee(empno int primary key auto_increment , ename char(10) , job char(6) , mgr int , hiredate date , sal float(10,2),comm float(10,2),deptno int ); insert into employee(empno…

【简单介绍下单片机】

&#x1f308;个人主页: 程序员不想敲代码啊 &#x1f3c6;CSDN优质创作者&#xff0c;CSDN实力新星&#xff0c;CSDN博客专家 &#x1f44d;点赞⭐评论⭐收藏 &#x1f91d;希望本文对您有所裨益&#xff0c;如有不足之处&#xff0c;欢迎在评论区提出指正&#xff0c;让我们共…

元类的执行

class MetaB(type):def __new__(cls, name, bases, attrs):print(f"使用元类 {cls.__name__} 创建{name}类 ")return super().__new__(cls, name, bases, attrs)class A(metaclassMetaB):passclass C(A):pass元类MetaB的__new__方法应该只会在创建类A时被调用一次, 因…

集成电路测试学习

集成电路&#xff08;Integrated Circuit&#xff0c;IC&#xff09;整个设计流程包括&#xff1a;电路设计、晶圆制造、晶圆测试、IC封装、封装后测试。 IC测试目的&#xff1a;一、确认芯片是否满足产品手册上定义的规范&#xff1b;二、通过测试测量&#xff0c;确认芯片可以…

Python爬虫:requests模块的基本使用

学习目标&#xff1a; 了解 requests模块的介绍掌握 requests的基本使用掌握 response常见的属性掌握 requests.text和content的区别掌握 解决网页的解码问题掌握 requests模块发送带headers的请求掌握 requests模块发送带参数的get请求 1 为什么要重点学习requests模块&…

Unity架构师进阶:红点系统的架构与设计

面试的时候经常被问道如何来设计一个红点系统,本文将详细地介绍如何设计一个红点系统&#xff0c;有哪些接口&#xff0c;并完整地给出实现。 红点系统的需求分析 首先我们来分析一下红点系统的设计需求: 红点系统严格意义上来说不属于框架&#xff0c;而是游戏逻辑&#xff0…