基本概念

Compose 名称由来
众所周知,继承在功能拓展上表现的很脆弱,容易类、函数爆炸,通过代理和包装进行组合会更健壮。
Compose 意为组合,使用上也是把 Compose 函数以 模拟函数调用层级关系的方式 组合到一起,最终映射为 ViewTree。
声明示UI与命名式UI
命名式UI:
需要手动更新。
<?xml version="1.0" encoding="utf-8"?>
<LinearLayout xmlns:android="http://schemas.android.com/apk/res/android"
  android:layout_width="match_parent"
  android:layout_height="match_parent">

  <TextView
    android:text="Hello"
    android:layout_width="wrap_content"
    android:layout_height="wrap_content"/>

  <ImageView
    android:src="..."
    android:layout_width="wrap_content"
    android:layout_height="wrap_content"/>

</LinearLayout>
声明式UI:
只需要把界面设置出来,不需要手动更新。(随着数据自动更新)
Column() {
    Text(text = "Hello")
    Image(bitmap = ...)
}
声明式UI如何实现自动订阅
  var text by mutableStateOf("hello")

  //与ui绑定
  Text(text = text)

  //赋值,ui会收到订阅
  LaunchedEffect(Unit) {
      text = "good"
  }
Compose和databind的区别
databinding只能更新界面元素中的值,而compose可以更新任何内容,包括结构。
    //文案是否可以被显示
    var ifShow by mutableStateOf(false)

    var text by mutableStateOf("hello")
    if (ifShow) {
      Text(text = text)
    }
比如这里if(showImage) ,如果为false,则Text从视图结构里被移除,跟原本的setVisible是有区别的。
关于层级嵌套
Android布局嵌套层级太深,会导致性能损耗,因为重复测量。
(比如父view是Linelayout,宽度为wrap_content,会取子view的最大宽度为宽度。如果有一个子View为match_parent,就会先以0为强制宽度测量一次这个子view,再测量其他子view的最大宽度,再以最大宽度测量这个match_parent的子view得出最终尺寸。在有多重嵌套的场景下,测量次数会指数级攀升,测量次数 = O^2n,O为层级数,因此每增加一层,布局时间翻一倍)

Compose规避了这个问题,因为在Compose中,子项只能测量一次,测量两次就会引发运行时异常。
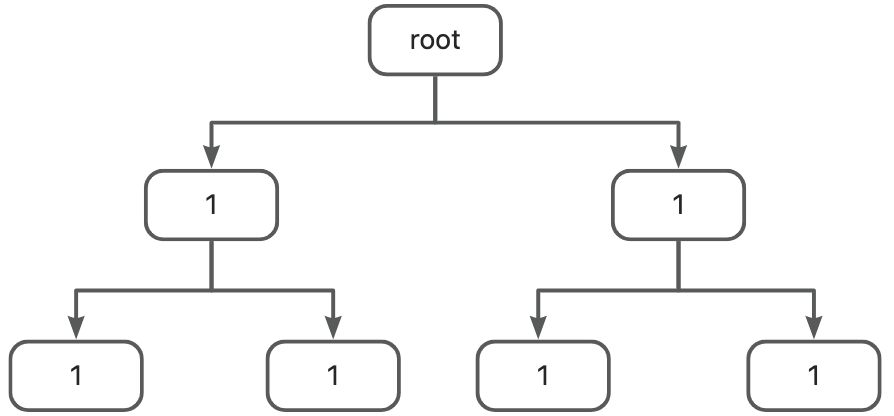
Intrinsic Measurement 固有尺寸测量。
Compose允许父组件在测量前,先粗略测量子组件的最大最小大小尺寸,再统一进行测量。测量次数 = O^n。
因此在Compose中,N级嵌套布局,和同一层级嵌套布局,性能是一样的。
实现简单APP主页
实现一个列表
实现一个竖向列表,item为头像+昵称
首先需要定义好数据源:
//数据源
data class User(val name: String, val job: String)
object UserData {
  val messages = listOf(
    User("小王", "厨师"),
    User("大明", "司机"),
    User("小李 ", "外卖员"),
  )
}
然后实现每一列的布局ui:
//ui item
@Composable
private fun UserItem(user: User) {
  //Row 是以行排布的元素组件,列是Column
  Row(
    modifier = Modifier.padding(all = 8.dp),
    verticalAlignment = Alignment.CenterVertically
  ) {
    //头像
    Image(
      painter = painterResource(id = R.mipmap.mine),
      contentDescription = null,
      modifier = Modifier
        .size(30.dp)
        .clip(CircleShape)
    )
    Spacer(Modifier.padding(horizontal = 8.dp))
    Column() {
      //名字
      Text(
        text = user.name
      )
      //间隔
      Spacer(Modifier.padding(vertical = 8.dp))
      //职业
      Text(
        text = user.job,
      )
    }
  }
}
最后,需要将布局Item组成一个Conversation列表,加入到Activity的布局中:
//Activity
class ComposeListActivity : ComponentActivity() {
  override fun onCreate(savedInstanceState: Bundle?) {
    super.onCreate(savedInstanceState)
    setContent {
      Conversation(userList = messages)
    }
  }
}

//实现一个列表
@Composable
fun Conversation(userList: List<User>) {
  LazyColumn {
    items(userList) { it ->
      UserItem(user = it)
    }
  }
}
实现底部导航栏
首先新建一个Activity,在setContent中声明底部导航栏(结构为一个Row+三个Icon)
class ComposeHomeActivity : ComponentActivity() {
  override fun onCreate(savedInstanceState: Bundle?) {
    super.onCreate(savedInstanceState)
    setContent {
      NavBar()
    }
  }

  @Composable
    fun NavBar() {
      Row {
        Icon(painter = painterResource(id = R.mipmap.home), contentDescription = null)
        Icon(painter = painterResource(id = R.mipmap.project), contentDescription = null)
        Icon(painter = painterResource(id = R.mipmap.mine), contentDescription = null)
      }
    }
}
此时运行的效果是这样的:

略显丑陋,接下来给它们补充一些间距,布局,以及颜色:
@Composable
fun CustomApp() {
  Row(
    Modifier
      .height(84.dp)
      .padding(16.dp),
    verticalAlignment = Alignment.CenterVertically
  ) {
    NavItem(iconRes = R.mipmap.home, desc = "主页", Color.Blue)
    NavItem(iconRes = R.mipmap.project, desc = "项目", Color.Gray)
    NavItem(iconRes = R.mipmap.mine, desc = "我的", Color.Gray)
  }
}

// 避免给每个Icon重复设置,将Icon抽成独立的自定义参数组件
@Composable
fun RowScope.NavItem(@DrawableRes iconRes: Int, desc: String, tint: Color) {
  Icon(
    painter = painterResource(id = iconRes), contentDescription = desc,
    Modifier
      .size(24.dp)
      .weight(1f),  //宽度比重,必须要在RowScope下才能设置。
    tint = tint
  )
}
运行:

可以看到效果好了很多。那么如何实现不同页面之间的切换呢?
首先定义好三个不同的页面:
@Composable
  fun ProjectScreen(modifier: Modifier = Modifier) {
    Box(modifier.fillMaxSize()) {
      Text(text = "Favorites Screen", modifier = Modifier.align(Alignment.Center))
    }
  }

  @Composable
  fun UserScreen(modifier: Modifier = Modifier) {
    Box(modifier.fillMaxSize()) {
      Text(text = "Settings Screen", modifier = Modifier.align(Alignment.Center))
    }
  }


  @Composable
  fun HomeScreen(userList: List<User>) {
      //这里是前面实现的列表页面
    LazyColumn {
      items(userList) { it ->
        UserItem(user = it)
      }
    }
  }
然后,在底部栏按钮外部,增加Scaffold组件
Scaffold:一个组合元素,可以轻松地在同一个位置添加AppBar、BottomAppBar等。
- 增加页面数据类Screen,用来标识三个页面。
- 增加currentScreen变量,维护当前页面状态。
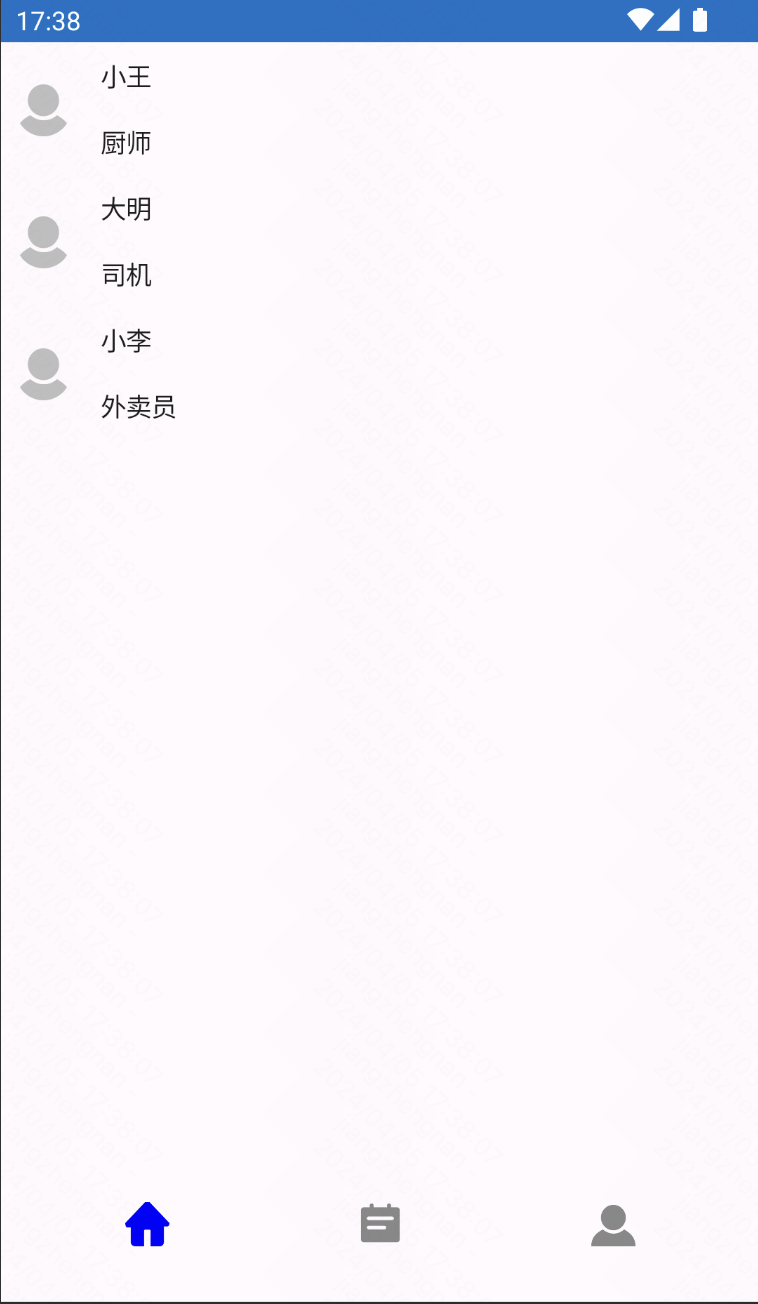
- 给每一个NavItem设置点击监听事件,在每一个item点击时设置currentScreen的变化。
- Scaffold收到currentScreen变化通知,切换不同的页面。
  sealed class Screen {
    object Home : Screen()
    object Project : Screen()
    object User : Screen()
  }

@Composable
  fun CustomApp() {
      //维护当前页面状态
    var currentScreen by remember { mutableStateOf<Screen>(Screen.Home) }

    Scaffold(
      bottomBar = {
        Row(
          Modifier
            .height(84.dp)
            .padding(16.dp),
          verticalAlignment = Alignment.CenterVertically
        ) {
          NavItem(iconRes = R.mipmap.home, desc = "主页", Color.Blue) {
            currentScreen = Screen.Home
          }
          NavItem(iconRes = R.mipmap.project, desc = "项目", Color.Gray) {
            currentScreen = Screen.Project
          }
          NavItem(iconRes = R.mipmap.mine, desc = "我的", Color.Gray) {
            currentScreen = Screen.User
          }
        }
      }
    ) { innerPadding ->
      when (currentScreen) {
        Screen.Home -> HomeScreen(UserData.messages)
        Screen.Project -> ProjectScreen(Modifier.padding(innerPadding))
        Screen.User -> UserScreen(Modifier.padding(innerPadding))
      }
    }
  }

  // 避免给每个Icon重复设置,将Icon抽成独立的自定义参数组件
  @Composable
  fun RowScope.NavItem(
    @DrawableRes iconRes: Int,
    desc: String,
    tint: Color,
    click: () -> Unit,
  ) {
    Icon(
      painter = painterResource(id = iconRes), contentDescription = desc,
      Modifier
        .size(24.dp)
        .weight(1f)
        .clickable {
          click.invoke()
        },  //宽度比重,必须要在RowScope下才能设置。
      tint = tint,

      )
  }
实现效果:

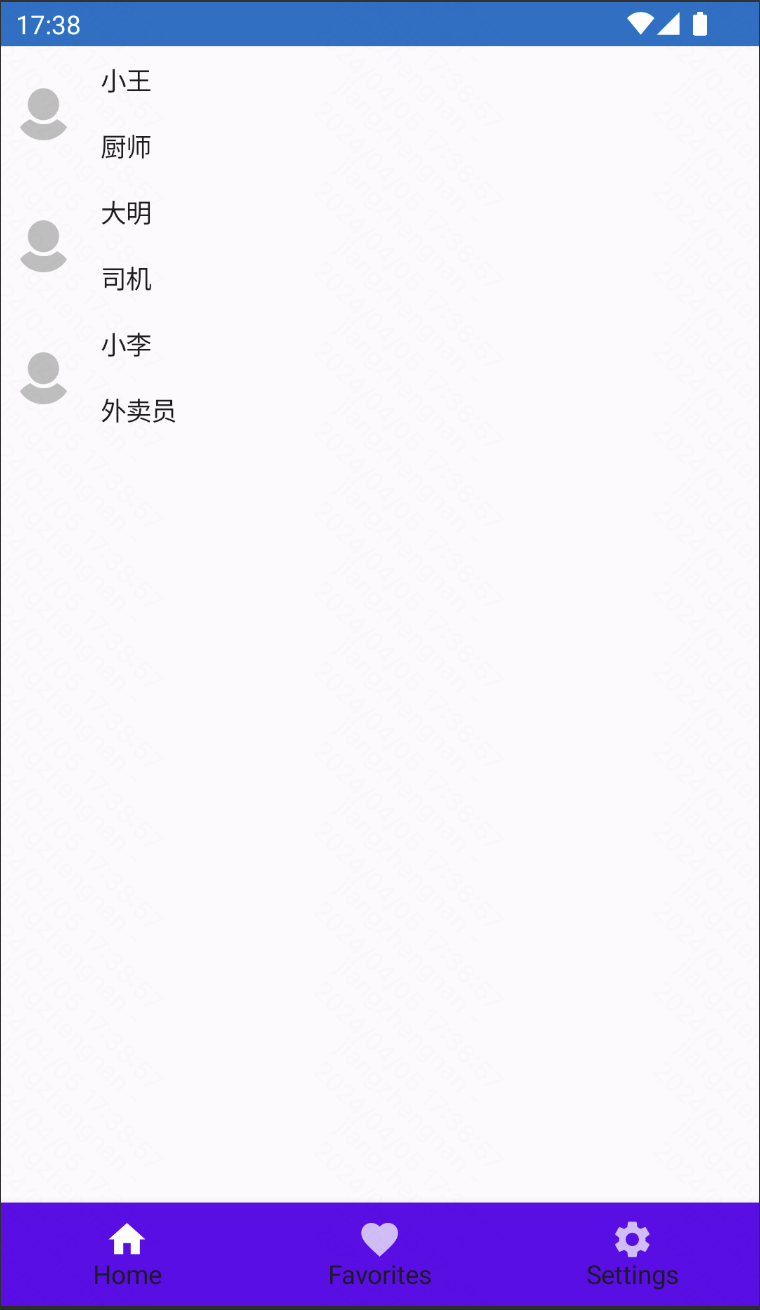
底部栏BottomNavigation
比起自己实现导航栏+左右滑动页面,最好采用系统api来实现,效果和稳定性更优。这里可以先引入Navigation的库:
//Navigation
implementation "androidx.navigation:navigation-compose:2.8.0-alpha06"
结合Jetpack Compose的一些常用元素:
BottomNavigation:用于创建底部导航栏。
BottomNavigationItem:底部导航栏的一个单独项。
@Composable
  fun MyApp() {
    var currentScreen by remember { mutableStateOf<Screen>(Screen.Home) }

    Scaffold(
      bottomBar = {
        BottomNavigation {
          BottomNavigationItem(
            icon = { Icon(Icons.Filled.Home, contentDescription = "Home") },
            label = { Text("Home") },
            selected = currentScreen == Screen.Home,
            onClick = { currentScreen = Screen.Home }
          )
          BottomNavigationItem(
            icon = { Icon(Icons.Filled.Favorite, contentDescription = "Favorites") },
            label = { Text("Favorites") },
            selected = currentScreen == Screen.Project,
            onClick = { currentScreen = Screen.Project }
          )
          BottomNavigationItem(
            icon = { Icon(Icons.Filled.Settings, contentDescription = "Settings") },
            label = { Text("Settings") },
            selected = currentScreen == Screen.User,
            onClick = { currentScreen = Screen.User }
          )
        }
      }
    ) { innerPadding ->
      when (currentScreen) {
        Screen.Home -> HomeScreen(Modifier.padding(innerPadding))
        Screen.Project -> ProjectScreen(Modifier.padding(innerPadding))
        Screen.User -> UserScreen(Modifier.padding(innerPadding))
      }
    }
  }
实现效果:
Android原生自定义View在Compose中使用
在第二个页面ProjectScreen中,尝试加入之前写好的自定义View:
@Composable
  fun ProjectScreen(modifier: Modifier = Modifier) {
    AndroidView(
      modifier = Modifier.size(150.dp),
      factory = { context ->
        // Creates view
        CircularAnimProgressView(context)
      },
      update = { view ->
        // 视图已膨胀或此块中读取的状态已更新
        // 如有必要,在此处添加逻辑
        // 由于selectedItem在此处阅读,AndroidView将重新组合
        // 每当状态发生变化时
        // 撰写示例->查看通信
      }
    )
  }
可以通过AndroidView组件实现,在factory中返回通过原生方式实现的自定义View即可实现。
并且在状态更新时,会回调update事件,可以在这里对View进行一些刷新操作。
运行效果:

与MVI结合使用
带来的优化
举个栗子:
用MVI实现一个计数器,通常需要定义一个状态类来存储计数器的状态:
状态类CounterState
事件类CounterEvent:来表示计数器的事件。
数据类CounterViewModel:用于处理计数器应用程序的业务逻辑。
//状态
data class CounterState(val count: Int)

//事件
sealed class CounterEvent {
    object IncrementCounter : CounterEvent()
}

//ViewModel
class CounterViewModel : ViewModel() {
    private val _state = MutableLiveData(CounterState(0))
    val state: LiveData<CounterState> = _state

    fun handleEvent(event: CounterEvent) {
        when (event) {
            is CounterEvent.IncrementCounter -> incrementCounter()
        }
    }

    private fun incrementCounter() {
        val currentCount = _state.value?.count ?: 0
        _state.value = CounterState(currentCount + 1)
    }
}

// UI databind部分
//1.在xml中定义 btn 和 text...
val button = findViewById(R.id.btn)
val text = findViewById(R.id.text)
// 2.显示绑定
 viewmodel.state.observe(this) {count->
      btn.text = "Click Count: $count"
    }
 //3.点击监听
 button.setOnclickListener {
     viewmodel.handleEvent(...)
 }
UI部分如果使用Compose实现,代码会比较简洁,因为在UI初始化的时候就建立了绑定。
@Composable
fun Counter() {
    Button(onClick = { viewmodel.handleEvent(...) }) //点击
    Text(text = "Click Count: " + viewmodel.state.value.count) //显示
}
这样做的优点是,保证了框架的唯一性
由于每个view是在一开始的时候就被数据源赋值的,无法被多处调用随意修改,所以保证了框架不会被随意打乱。更好的保证了代码的低耦合等特点。
MVI结合Compose
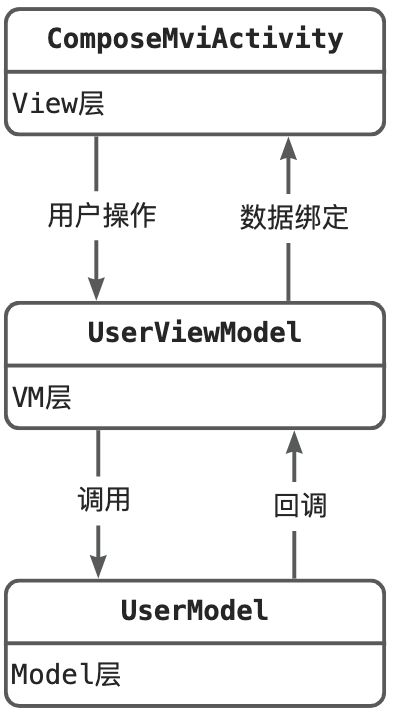
举个栗子,用MVI+Compose实现一个登录功能,整体结构如下:
class ComposeMviActivity : ComponentActivity() {
  private lateinit var userViewModel: UserViewModel

  override fun onCreate(savedInstanceState: Bundle?) {
    super.onCreate(savedInstanceState)

    userViewModel =
      ViewModelProvider(this, UserViewModelFactory(application)).get(UserViewModel::class.java)

    setContent {
      val userState = userViewModel.state.value

      val username = remember { mutableStateOf(TextFieldValue("")) }
      val password = remember { mutableStateOf(TextFieldValue("")) }


      Column(
        modifier = Modifier.padding(16.dp)
      ) {
        Text(text = "Welcome")

        TextField(
          value = username.value,
          onValueChange = { username.value = it }
        )

        TextField(
          value = password.value,
          onValueChange = { password.value = it },
          visualTransformation = if (password.value.text.isNotEmpty()) PasswordVisualTransformation() else VisualTransformation.None,
          keyboardOptions = KeyboardOptions(keyboardType = KeyboardType.Password),
        )

        Button(
          onClick = {
            userViewModel.onIntent(
              UserIntent.Login(
                username.value.text,
                password.value.text
              )
            )
          },
          modifier = Modifier.padding(top = 8.dp)
        ) {
          Text(text = "Login")
        }

        Button(
          onClick = { userViewModel.onIntent(UserIntent.Logout) },
          modifier = Modifier.padding(top = 8.dp)
        ) {
          Text(text = "Logout")
        }

        if (userState.success) {
          Text(text = "登录成功")
        } else {
          Text(text = "未登录:" + userState.error)
        }
      }
    }
  }

}

class UserViewModelFactory(private val application: Application) :
  ViewModelProvider.AndroidViewModelFactory(application) {
  override fun <T : ViewModel> create(modelClass: Class<T>): T {
    //val sharedPreferences = PreferenceManager.getDefaultSharedPreferences(application)
    val userModel = UserModel()
    return UserViewModel(userModel) as T
  }
}
sealed class UserIntent {
data class Login(val username: String, val password: String) : UserIntent()
object Logout: UserIntent()
}
data class UserViewState(val success: Boolean = false, val error: String = "")class UserModel() {
fun login(username: String, password: String): Boolean {
return "123" == username && "456" == password
}
fun logout() {
//清空本地账号密码
}
}class UserViewModel(private val userModel: UserModel): ViewModel() {
private val _state = mutableStateOf(UserViewState())
val state: State<UserViewState> = _state
fun onIntent(intent: UserIntent) {
when(intent) {
is UserIntent.Login -> {
val isSuccessful = userModel.login(intent.username, intent.password)
if (isSuccessful) {
_state.value = UserViewState(success = true)
} else {
_state.value = UserViewState(error = "Invalid username or password")
}
}
is UserIntent.Logout -> {
userModel.logout()
_state.value = UserViewState(success = true)
}
}
}
}总结
首先掌握Compose的重要性不言而喻,SwiftUI也好,Flutter也好,声明式UI一统移动端是大势所趋。
写之前笔者对Compose的了解基本为0,作为Android开发,之前也只是写过一点flutter的demo,但是从开始学习到完成本文一共花了大约不到1天,由此可见Compose的入手门槛其实并不高,只要花时间看一看写一写,是比较容易快速上手的。
但是深入理解依然是需要花功夫和心血的,整理了一些后续的学习方向:
● Compose实现自定义View
● Compose动画
● Compose绘制原理(https://kstack.corp.kuaishou.com/article/6353)
● Compose事件分发
● Compose滑动嵌套
● Compose Widget Lifecycle
● Compose UI 交互刷新流程
会在以后的工作和学习过程中,持续补充,希望感兴趣的同学可以一起加入进来,共同进步。
最后~感谢读到这里,再会!
参考资料:
Jetpack Compose | Android Developers——Compose官方教程
写在开头 | 你好 Compose——jetpack compose中文教程
